The interior decoration of the frame bath with their own hands. Warming up the external surfaces of the walls of the frame bath. Mounting roof frame bath
Ways to reduce the cost of building the bath are relevant to many people. If she stands on cottage plot And only in summer, it makes no sense to build a capital construction - a summer bath from the boards will quite cope with its functions.
If it is well insulated, it will be possible to operate at any time of the year. It will cost it cheaper than the structure from a bar, logs, bricks and other expensive materials.
And not only at the expense of the lower value of the materials themselves, but also through work. In addition, such a bath can be built independently, having only one helper and the necessary tools.
Advantages and disadvantages of frame baths
Any material and, accordingly, the building erected from it is certain advantages and cons. Boards and timber, from which frame baths are mainly and built, this is a natural material that has such disadvantages, as an exposure to rotting, strain, cracking, bugs, etc.
But, unlike bathing from a log or bar, frame structures are not sitting on, which is their enormous dignity: you do not need to wait a few months to work in finishing and commissioning.
Another big plus - under the possessing small weight of the bath from the boards you can not do ribbon foundation, fairly column. This also turns out to save well, and as a result, the price of the bath turns below.
How to build a bath from boards
When building buildings frame technology Not only boards can be used, but also materials such as plywood or osp (oriented chipboard). The basic principles of construction depend on their choice.
But besides the trim, you will need materials for steam, hydro and thermal insulation. How to choose them?
Choosing materials
- For a frame, you can take a well-drying bar Go Board with a cross section of at least 50x100 mm.
- For external sheaving - boards of coniferous rocks (pine, larch).
- For internal sheaving - Low thermal conductivity wood (linden, ox).
- Steamproofing during heating should not be distinguished by harmful substances and odor, therefore, the traditional only reference can be used. Stop your choice on modern vapor insulation films.
Council. The most effective foil films.
They not only do not miss steam under the trim, but also reflect the warm air.
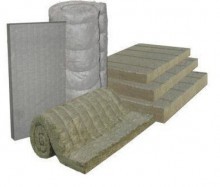
- Thermal insulation is the main material that ensures the safety of heat in the hut Ban, but not interfering with air exchange in it. It is recommended to use moisture-proof insulation - stone (basalt) cotton wool. In contrast to many other materials, it does not burn and does not release harmful substances when heated.
Basalt wool can be both in rolls and in sheets
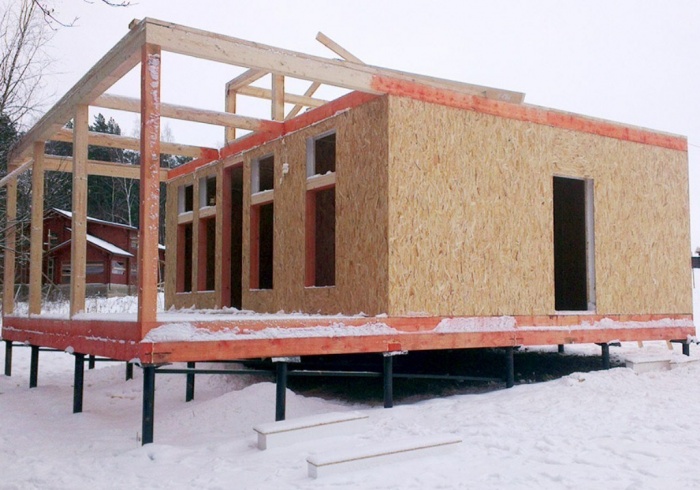
If you decide to find out how to build a bath with your own hands from the boards, then keep in mind that the difference from construction from other materials is only in the design of the walls. Although, as mentioned above, the foundation can also be lightweight - column.
Sugal strapping
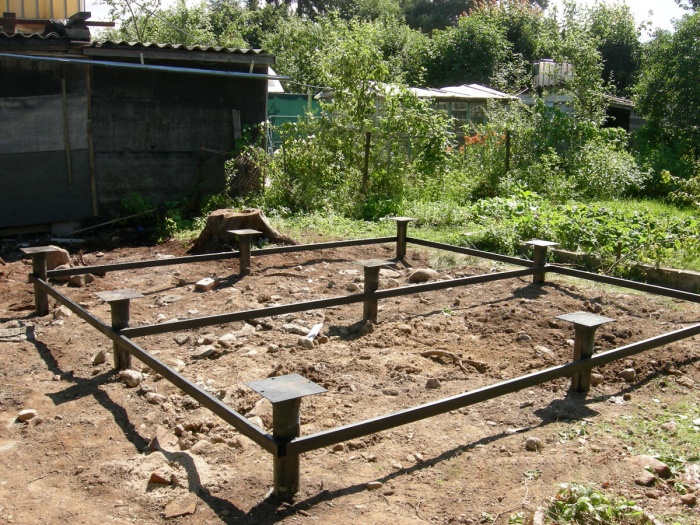
Installation of the baths start with a device of a rigid basecloth - base for the frame. For her, the rear of 15x15 cm is used or laid on the edge in 2-3 rows of a cross section of 50x100 (150) mm. They are necessarily impregnated with antiseptic solutions before stacking.
Council. If you use boards, not a bar, it will be easier for you to connect them in the corners and make the grooves in the strapping to install vertical frame racks.
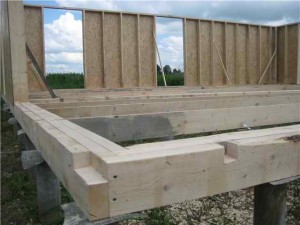
The photo shows the connection to the ends of the Christmas tree and the dumps. When working with a bar for the device of these elements, more labor costs, experience and special tools (jigsaw, chainsaw) will be required.
After assembling the strapping, it is placed on the supporting columns of the foundation with gaskets from the rubberoid or roofing and align horizontally. If necessary, the level is removed using wooden linings or the required number of pool layers. The corners of the strapping should be relying on the poles, so do not make mistakes in size during its manufacture.
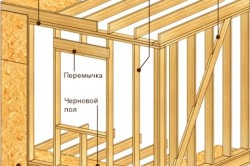
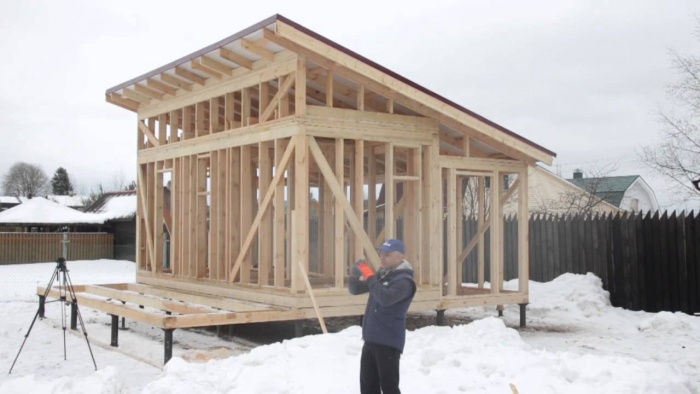
Racks and upper strands
After mounting and fastening the bottom strapping and the device in it, the grooves are installed. The step between their axes is usually done 60 cm, subsequently to these cells will be conveniently laid, having the same size in width.
Need to decide in advance with the location and size of window and door openingsIn order to install them framing and corner racks first, then it is easier to calculate the position of the intermediate.
Note. Vertical racks must be put in places of adjoining to the main walls of the inner partitions.
To the already mounted racks do not fall while the rest is set, they are additionally attached to the bottom strapping by temporary dosens, at the same time uniform verticality.
In the upper end, the racks are bonded between themselves with an upper strapping, which is performed from the plated glossy board-fifty.
Despite the seeming simplicity, the works described should be done very carefully to bring straight corners, save the vertical and horizontal level of the corresponding structural elements.
Warming and sheathing
Instructions for the construction of frame baths require the execution of the following sequence when a device of a warming cake:
- First, the outside framework is performed by boards. To give the structure stiffness, it is done in the horizontal direction. But the boards over time dry and the gaps may appear between them, so they should not be attached to the jack, and it is recommended to put it under the trim.
- The next step is the installation of the insulation. It stacked between vertical racks and does not require additional fastening, as the distance between them is purity slightly smaller than the width of the insulation, so it is tightly kept in cells.
- Installation of vaporizolation is made on top of the insulation, close to it. For fastening, thin rails and construction staplers with brackets are used. The canvas are joined by the shoulder and be sure to be sick with a special tape. It is necessary to take all the random cuts, since the vapor barrier layer should be solid.
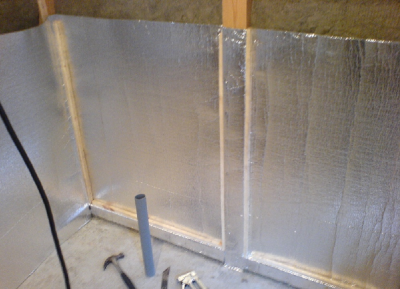
Attention!
The vapor barrier film should take 10-15 cm below the wall of the wall with the floor, so that the condensate is glad by it, not falling on the wooden elements.
- The inner covering is performed vertically of wooden lining. Between it and the layer of vapor barrier should remain a ventilation gap.
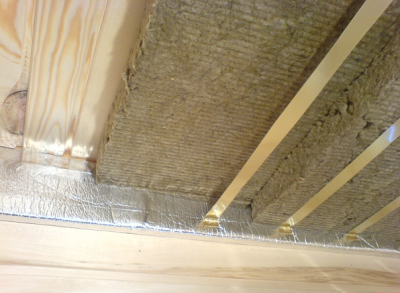
The ceiling is also satisfied, but to reduce heat losses, the insulation is placed on it in two layers.
Conclusion
As part of this article, you learned only about the design of the walls of a bath built from the board. If you need full information describing all stages of construction, watch the video in this article.
- What should be taken into account during construction frame bath do it yourself
- How to build a skeleton bath with your own hands
- Bookmark Fundament
- Walling
- Arrangement of roofing
- External and interior structures
The classic sauna is the usual wooden logwhose quality is checked for years. But now such a structure is considered rather expensive pleasure. Today, thanks to new technologies in the field of building materials manufacturing, private developers have been proposed a great option - the construction of a frame bath with their own hands. Consumers such innovation was perceived positively and now the baths of this type enjoys particularly popular.
For a frame bath, you should choose well-dried boards with low thermal conductivity and non-defamatory deformation.
What should be taken into account when building a frame bath with their own hands
The construction of the frame bath is impossible without installing the thermal insulation system, which provides normal conditions for sealing and normal air exchange indoors. Best work on insulation structures to carry out fiberglass or mineral WatBecause these materials have appropriate characteristics and perfectly cope with the responsibilities assigned to them.
One of the essential flaws in the construction of a frame bath with their own hands is the appearance of condensation. During atmospheric precipitation in the form of rains and snowfalls, a certain percentage of moisture penetrates the slots and accumulates inside the frame. To prevent this unpleasant phenomenon during construction, you should take care of vaporizolation. In this case, the parchment or vapor barrier films will be used optimally, which must be put between the insulation layer and the inner covering. In this case, the runneroid is extremely recommended because it exudes an unpleasant sharp smell when heated.
The construction of such a structure, as a bath, implies the mandatory availability of well-dried boards. To do this, it is desirable to choose a material that has low thermal conductivity and is practically not deformed. Such properties have wooden boards from Osin, Linden and larch. Finished lips of lining should be of the highest grade and without various defects.
All the conditions listed above must be taken into account in the construction of the structure so that the bath can last for a long time and maintain all the quality characteristics. Therefore, to achieve some success in this case, experts are recommended to draw up a carefully thought out plan for construction.
Frame bath and its advantages:
- minimum construction deadlines;
- the bath can be built at any time of the year;
- efficiency in the construction of the construction and operation of the structure in the future;
- good masking of all communication networks and electrical equipment;
- lack of shrinkage of the structure;
- a large number of options for both external and interior decorations.
Back to the category
How to build a skeleton bath with your own hands
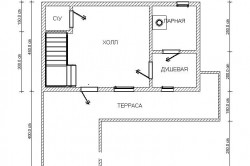
First of all, you should decide on the place where the frame bath will be built, and the size of the building itself. The minimum is considered the area for the bath 2.5x 2.5 m², it makes no sense to make a smaller structure. Otherwise, the room will be closely, and the simultaneous placement of two and more people will deliver some discomfort. When determining the sizes of the pre-banker and washing, it is also necessary to take into account the placement of the shop and shower.
After the place of future structures and dimensions will be determined, it is necessary to analyze the composition of the soil and make the construction scheme. It is recommended to immediately designate the location of the furnace, chimney, ventilation systems and choose the material to cover the walls and roofs. After all, a properly developed construction plan is half of the success.
Back to the category
Bookmark Fundament
It is known that frame baths as building structures have a small weight, therefore, it is allowed to perform a foundation on a more simplified scheme for erection.
In this case, the most advantageous option is the laying of a column foundation on asbestos-cement pipes, filled with concrete solution.
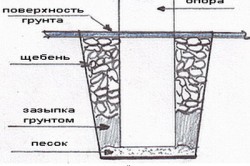
- To do this, it is necessary for a benzobur to try the required number of wells with a depth of at least 1.5 m and a diameter of 200 mm.
- Asbestos-cement pipes must be cut in half, insert into the wells, fall asleep with sand and good tamper.
- Prepare a concrete solution and pour them the installed pipes.
- With the help of the level and roulette, make marking of future walls.
- Now you can proceed to the strapping, there will be boards with a cross section of 50x100 mm, which before starting work it is necessary to handle the antiseptic.
- The boards are put along the outer contour of the outer face, fasten them through the hammer and nails.
- The basecloth is connected using wooden supports.
- Horizontal installation can be monitored using a construction level. When detecting deviations, it is possible to align the laying by means of a pool folded in several layers.
- Intermediate racks are installed with installation heat insulating material, external and internal conveying of the structure.
- In advance along the perimeter of the structure, it is necessary to insert and pour metal plates with concrete solution, which will give extraction and lags additional strength.
- Upon completion of work, all wooden components should be treated with an antiseptic so that the blockage and lags are not corrupted by moisture and various pests.
Back to the category
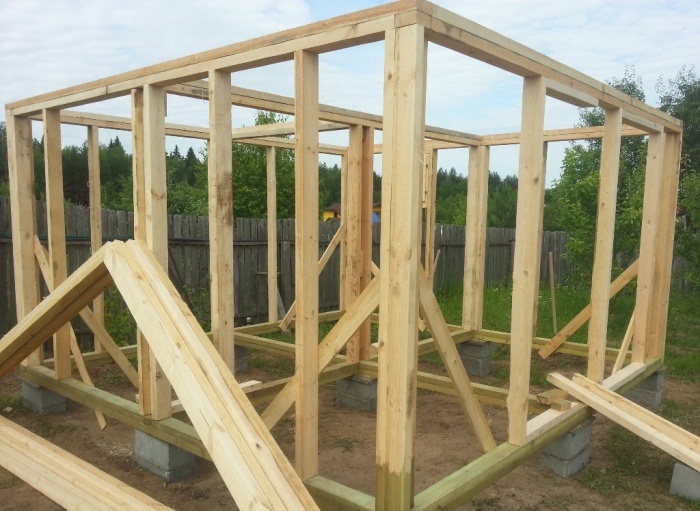
Walling
When the walls are erected, a special value between the axes should be paid. If, with the arrangement of the opening, the pitch with other walls is not envisaged, this indicator should be 0.6 m. Otherwise, the gap need to be increased to 0.4 m. The distance between the racks depends on the size of the door and window openings.
- In places of joining the frame to the jumper or wall, you must install additional racks. After installing all items, check the frame on its correspondence to rectangular shape.
- The assembly starts from the corner, first collect the wall that will be connected to the strapping. The wall is checked for verticality and strengthen the temporary pink.
- The following frames are then installed at right angles. The straps are well fixed by boards that are nailed.
- Internal and external trim are proceed only after the end of all installation works associated with the installation of the frame.
Back to the category
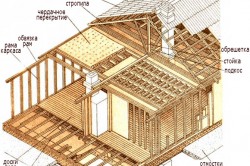
Arrangement of roofing
For the convenience of working, all the rafter components are more expedient to collect on Earth. Then each component of the roof must be lifted to the roof and position right above each particular counter. To facilitate mounting workIt is recommended to wall thick boards on the beams and use them as temporary overlaps.
To create ventilation between rafters and counterbruits, lay a layer of vapor barrier film. The roofing case is attached to rafters. To coat the roof uses slate, ondulin or metal profile.
When the rafters and roofs are fully mounted, the sheets of the required form are fixed to the front part.
The question is how to stop the frame bath yourself, today it is quite often found. Let's say right, this is not the simplest, although this technology is considered the most simple of all offered. The construction of the construction of the construction is a frame of wooden Brusovwhich is trimmed outside and from the inside with flat sawn timber. There is necessarily insulation of walls, gender and ceiling, as a result, a full-fledged building is obtained with the necessary standards of residence.
Stages of the frame of a frame bath
First of all, it is necessary to determine the sizes of the frame bath and with the place of its construction. As for construction with their own hands, the smaller the structure is the easier and more economical to erect it. Therefore, you can choose a typical project with sizes of 3x3 m or 4x4 m.
As for the location of the frame bath, then perfect option - Near the reservoir. If there is no such, then anywhere in the country site. Although there are some rules that determine the fire safety of objects. It is important here to take into account the moment that the smoke from the chimney of the frame bath is not heading towards the main house: its own or neighbor.
Foundation Bath Bookmark
Now to the selection of the foundation of the frame bath. The easiest option that can be built with your own hands, columnar. But it can be poured only on dense soils. If the site is located in the area where the soil is movable, or the frame bath is built on the heated soils, it is better than the screw piles not to find. It is not possible to make them possible, so it is better to order them. For which it will have to determine the level of groundwater and the level of soil freezing. Which of them is closest to the surface of the soil, one is taken as the basis of drilling wells, and accordingly, as the basis of the length of piles. The last indicator should be half the meter.
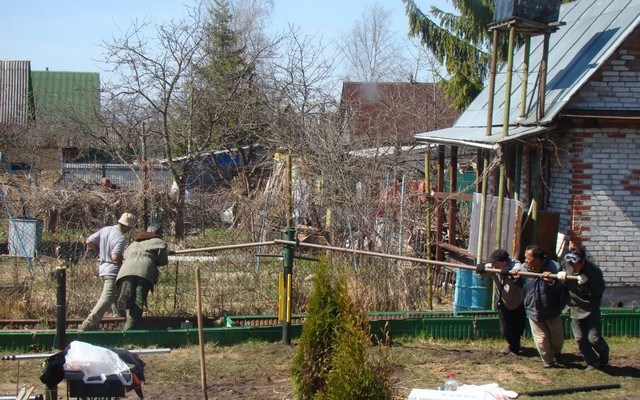
For a small frame bath on screw piles Eight piles will need: four in the corners of the construction, four between them. They are screwed with levers, as shown in the photo above. The main requirement is to reach the alleged level. After that, all piles are cut under one size over the soil with the help of a grinder. This is done like this:
- The height of the trimming on one pile installed in the corner of the building is established.
- A robust thread or fishing line is tied on the markup.
- It is assumed all piles, and the stretch should be located on all sides exactly horizontally, which can be provided using the usual construction level.
- On each pile, a mark is made, on which the trimming is made.
- Now, for each column sticking out of the ground, it is necessary to weld the metal plate with a thickness of 5 mm with dimensions of 20x20 cm. In the plates, it is recommended to drill holes under the fasteners in advance.
Attention! Not all developers make the following operation, considering it optional. It is necessary for the future frame structure Make a sandy benchmark with a thickness of 20 cm (this indicator after the ram). Thus, the pile foundation will be like lying on a sandy pillow.
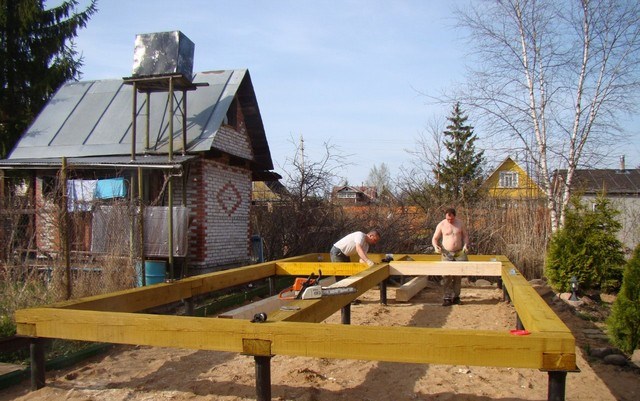
Construction of the base of the frame of the bathhouse
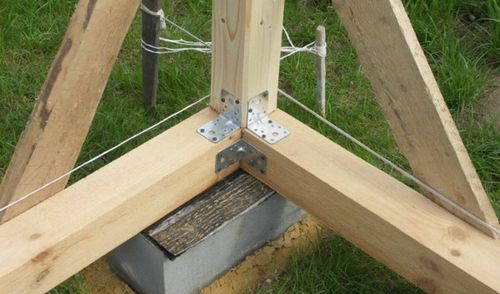
As the base of the frame bath will be a bunch of wooden brusons with a cross section of 200x200 mm. This will be enough to withstand the skeleton design, and even with the attic.
Bruses are stacked on the piles plates and are attached to each other in a quarter. The mounting to the pile is made on the anchor, and between themselves are still strengthened with metal corners. Only so you can achieve the increased strength of the entire frame design. Look in the photo below, where everything is shown how the elements of the base bathtub standing on the screw piles should be attached.
Attention! After installation, all wooden products are impregnated with antiseptic solution. It is better to do this in two layers, between the application of which should pass at least 24 hours.
Installation and fastening of the wall of the walls of the bath
Before moving to the mounting of the walls of the walls of the bath, you need to choose the material for their plating. Because it is from their size that the distance between the vertical elements of the design will depend. For example, let it be an unconventional casing material - OSP slabs. Them standard size: 250x120 cm. So, the distance between the risers (their middle) should be 120 cm, so that the edge of each leaf lay exactly in the middle of the rack, and there was no need to produce their trimming.
Each vertical pillar exhibited by removable should be fixed to the base of the building with two bodies, as shown in the photo above. Be sure to make their way between the struts of the struts based on the base, the horizontal at the height of one meter from the struts are made in the same way. The thickness of the board for the slightest and strut - 50 mm. Brues of the same section are stacked on top of the installed supports as the racks themselves. This is the top strapping of the frame bath. Please note that the strapping attachment to the racks should be carried out by consulting the edge of the rack into the body of the strapping elements. Cleaning should be made to a depth of 50% of the thickness of the strapping element.
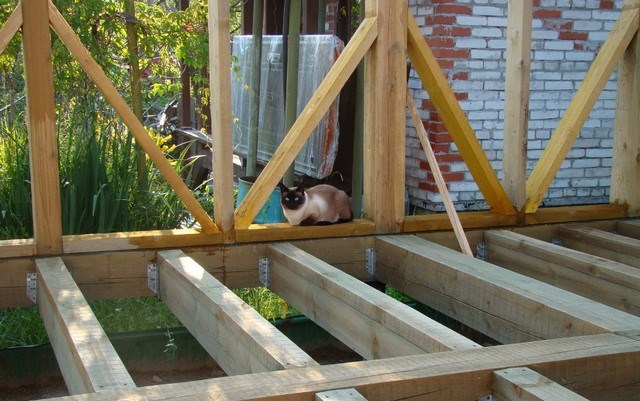
Now you can put and fasten the lags under the floor of the frame bath. To do this, you can use the board with a thickness of 50 mm and a width of 150 mm. Fasten them to the strapping need metal corners from two sides of the board. Bath framework is practically complete, you can process all the elements of the antiseptic.
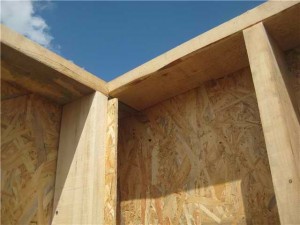
How to enjoy the walls of the frame bath sheets of OSP
A built bath frame, no matter how hard you try to fix it, will still shake. Therefore, before the roof is roof, it is necessary to carry out the walls of the walls outside. To do this, the first sheet is placed from any angle of the frame building and is attached to vertical stands with self-draws. Thus, all the angles from all sides are trimmed. After that, intermediate elements are installed and mounted (first solid sheets, then edged).
Mounting roof frame bath
Before moving to the mounting roof of a frame bath with hands (meaning it in mind), you must choose its shape. The easiest option is a single roof. And if there is no need to comply with the requirements of the beauty ratio of the building with landscape design and with the design of the main house, then this optimal option Roof construction. Her and consider further.
From the facade side of the building, it is necessary to install racks from the board with a thickness of 5 mm in the upper strapping of the frame bath every 80-100 mm. The height of the support varies from 40 to 60 cm. They are fixed to the strapping by bumps and metal corners. There is also a horizontal reference board or a bar on them, the attachment is the same.
Now you need to prepare rafters. You can make them from boards or brusons. The length of the rafter feet is determined by the measurement distance from the support bar to the element of the upper strapping, located on the other side. The number of rafters is determined by the distance between them: 80-100 mm. They are stacked at the place and are attached to metal corners and self-drawing. Often for fastening use and knitted wire. It remains only to install a clash from the boards with a thickness of 32 mm and a width of 100 mm and lay roofing material. The facade of the roof of the frame bath is trimmed by the same OSP sheets as the entire frame design of the bath.
Warming and Inner Saving Frame Bath
The frame bath is practically ready, it remains only to strip it from the inside sheets of OSP and lay thermal insulation. But before it is recommended to do floors in the bath. It should also be warm. How to do it?
- On the bottom of the foundation of the bath is made of waterproofing material. This rolled film, which is stacked by the braziness of the stacked bands.
- Then on top of it, boards or sheet material (plywood, OSP) are installed on the lags.
- Further, the entire process is translated into the frame of the frame bath. Stacked between lags insulation (mineral wool, polystyrene slabs).
- A vapor insulation membrane makes itself on top of the lags.
- Pointed boards are stacked, which are attached to the lags by self-drawing.

Now you can carry out insulation of the walls. Everything is almost the same here as with outdoor base. After conducting all protective and thermal insulation activities, you can move to the trim inland walls OSP sheets.
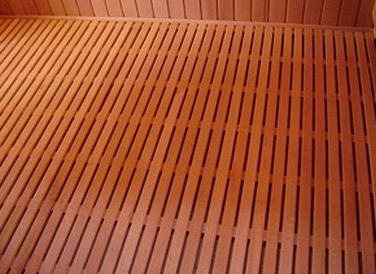
As for the floor in wash bath, then you will have to choose from two options:
- Make a concrete floor, for which it will have to produce a large amount of concrete work, associated with the construction structure under the washing department. That is, to make a subtype of rubble, tanning the washing compartment under the bathing of the formwork. Then make insulation, falling asleep with a layer of clay. And after pouring a screed with a slope toward the sewer plum. Let's just say, a large amount of work. But the floor made in this way is a guarantee of high quality.
- Make the flowing floors in the bath. Not very the best wayBut the cheapest. Just on lags without insulation and protection boards are stacked with a gap of 3-5 mm. It is through the gaps that the water will go down to the ground. A large drawback of this design is the penetration of the cold through the floors inside the frame bath.
And the last stage is the installation of windows and doors. After that, finish is made: external and internal. Do not forget to install a stove with a stone, furniture and other bath accessories.
Conclusion on the topic
As you can see, build a bath seems to be easy, but how much the nuances should be taken into account. This is especially true of the construction of the carcass. And the roof is just not built. Therefore, it is very important to break the whole process in advance to the stages, correctly pick up the necessary construction Materialsnot mistaken in their quantity in order not to make unnecessary expenses.
The skeleton bath is one of the most economical solutions, according to its operational characteristics, almost nothing is inferior to more expensive analogues from a natural bar.
Frame Bath - Project and Construction
For most areas of our country, it is enough to have a thickness of the walls of the frame bath 10 cm. Warming frameless walls You can do both mineral wool and expanded polystyrene. A layer of mineral wool thickness of only 13 cm on thermal conductivity replaces the thickness of the walls from a bar of 50 cm. We remind those who are afraid that the skeleton bath is too cold. Now count the difference in the price of materials. To this difference should be added even the costs of the additional insulation of the barbed bath all the same mineral wool.
For the regions of the Far North with very cold winters there are two ways to improve the indicators of the bathing of the bath.
Later on polystyrene foam slabs, a thin screed is made using a reinforcing mesh and the finish painting coating is applied. The structure looks very beautiful, it costs rather cheaply, and in the heat saving indicators a lot of buildings familiar to us from the bar are much strung.
We made up step-by-step instructions The insulation of a frame bath for cold climatic zones, developers independently make an optimal option for themselves.
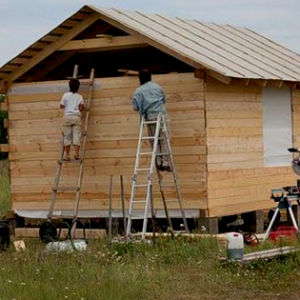
A few words must be said about the features of such types of buildings. This method was first used in Finland, then experience was adopted in America and there are more than 60% of all buildings on this technology. Light buildings (much reduced losses for the construction of the foundation), warm, comfortable and cheap. The construction time of buildings from scratch and before the end of the finishing work with the right organization is no more than two weeks.
Frame bath - Photo
Important moment. While creating a frame, you need to know what kind of material will be insulation. The fact is that international standards establish the width of the extruded glass gambled or polystyrene foam 60 cm, but some domestic producers for inexplicably reasons for several centimeters reduce it. This must be taken into account during the calculation of the distances between the vertical supports of the frame, otherwise insulation will be carried out with great difficulties and an essential amount of unproductive waste of expensive insulation.
We have a little dealt with the theoretical part, you can move to practical steps to insulate the frame bath.
Algorithm for insulation frame bath
Source conditions. Insulation material - extruded mineral wool thickness of 10 cm, internal covering - natural lining. The outer walls are trimmed with OSP plates and are insulated with polystyrene plates. For regions with a temperate climate, the external walls can be sewed with clap, additional insulation is not required. Works start from the walls.
Wall insulation
Step 1. Calculate the required amount of mineral wool. Do it easy - summarize the area external walls and ceilings. You do not need to do a discount on the width and the number of vertical racks, due to this you will have a sufficient stock for unforeseen losses.
Very important. Warming work should be done only in dry weather. You can meet the recommendations at the beginning to cut the frame of the windproof material, and then calmly warm the building regardless of weather. Do not take into account such tips. First, windproof materials will never protect Mineral Wat from moisture penetration during rain. Secondly, the number of places with a loose fit of the insulation to the frame is significantly increased. The fact is that you have the opportunity to check the density of the fit of mats only from the inside, and the external is not available, it is closed by material.
In order to make sure that personally, try to insert one sheet of mineral wool in the frame of the frame. From the reverse side, the sharp corners of the wool are deformed and will not be on the laid place, the thickness of the insulating layer in these places will significantly decrease. In these places, cold street air will be penetrated, and steam is condensed. Each sheet needs to be corrected all over the perimeter, use for this kitchen knife or canvas hacksaws for metal. It must be achieved that the ends of the sheet of mineral wool canvas and all over the perimeter come into contact with the elements wooden carcass And among themselves.
Important. Isolation works much more efficiently if instead of one plate with a thickness of 100 mm set two to 50 mm. It will provide an opportunity to overlap the joints between the individual plates and it is better to control the density of the fit to the frame elements of their ends. According to the cost, nothing is lost, and the quality improves noticeably. In addition, condensate is necessarily formed on each cold bridge, which very negatively affects the operation time of the wooden elements. Two layers of thinner mineral plates solve this problem.
Step 2. Mineral wool start laying from the floor to the ceiling. Under its own weight, it is additionally compacted and reduces the number of probable slots.
Council of professionals. Cut the extruded mineral wool is much easier than an ordinary manual hacksaw. Before this, the maximum scold the grinder of the teeth and take them a little wider.
Some builders for such purposes apply a mounting knife, but we do not advise. First, his blade is very thin and thick sheets difficult to cut smoothly. The blade from the first time does not cut through the entire mineral wool, you have to spend several times in the same place. And precisely to get the second time in the made incision is almost impossible. Secondly, the blade of the knife is quickly tupping about the glass, the tip does not cut, but pulls and tear the material. Works are much more complicated, the quality deteriorates.
Install the thermal insulation throughout the perimeter of the walls of the frame bath. There are cases when after insulation, doubts arise in sufficient efficiency, and the external warming is not obtained for various reasons. Do not be discouraged, there is a very simple way out.
To vertical frame racks, it is 5 cm thick, the distance between the rails is 60 cm. We select more accurate values \u200b\u200bdepending on the linear dimensions of mineral wool mats. Between the priestly rails, you can put another layer of insulation. Do not worry that the internal size of the premises will decrease, these several centimeters no one will not even notice.
Step 3. Now you can proceed to the installation of ventilation and engineering networks (water supply and electricity), if you have. Before you start such work, you must have a diagram of the location of the ventilation products, gaskets electrical cables and plumbing or sewer pipe. Works should be made taking into account the requirements of PUE and construction regulatory acts.
Important. Do not lower the mineral wool right to the floor, put it on a wooden rail. Such a technique will exclude the risks of wetting insulation, and the wet extruded wool will eventually be the cause of premature damage wooden structures.
Photo - laying insulation in two layers
Step 4. Install from the inside vaporizolation.
Very important moment, all work should be performed exactly according to the instructions. The fact is that even a slight increase in the relative humidity of mineral wool sharply reduces its heating saving characteristics. In addition, a long-term contact of vertical racks with a wet wool is extremely undesirable.
For vaporizolation, various materials can be applied: cheap polyethylene filmrather expensive nonwoven membranes or aluminum foil.
The protective barrier is fastened by the stapler, the nesting of the material is at least 5 centimeters. It should be very careful to seal joints, use the ordinary tape or a special self-adhesive foil for this purpose. Keep in mind that any minor gaps in obligatory eventually will let yourself know. Do not hurry with work. All technological operations do the most carefully.
Step 5. Speak racks with a thickness of about two centimeters and fix the lining to them. Check the width and length of the room, if the dimensions are normal, then you can cut the entire lining at once. If there are problems, then each board must be customized separately. Break down on the bottom up, use small carnations to 2 cm long cloves for fixing. It is possible to drive the nails in the groove or to the facial surface. The first way looks more beautiful, but harder is done. Soberly rate your abilities and with their account, select a method for fixing the trim.
On this internal work Under the insulation of the frame bath is finished, you can proceed to external.
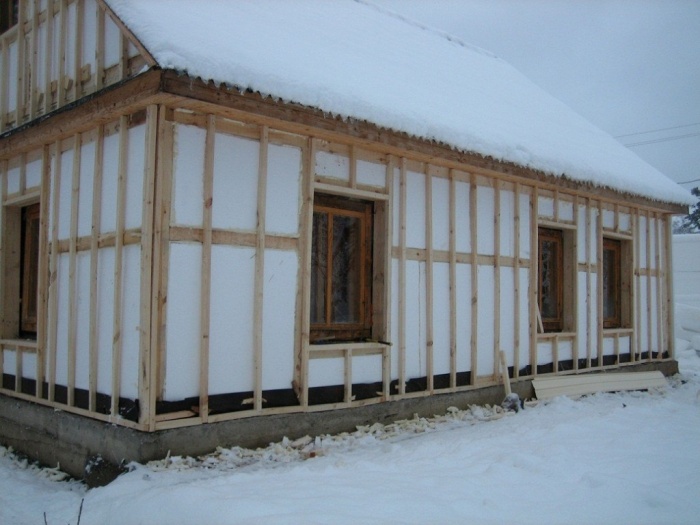
Warming of the external surfaces of the walls of a frame bath
We have already mentioned that these works should be performed only in areas with a very cold climate. Initial data. The external surfaces of the walls of the frame bath are covered with moisture-resistant plates of OSP or glued plywood. Insulation material - polystyrene foam, thickness of sheets 5 ÷ 10 cm.
Step 1. Calculate the required amount of materials and hardware. The polystyrene foam can be fixed with special dowels with increased diameters of the caps or perch on polymer glue.
On one square meter Square wall need 6 pcs. Dowels. The amount of glue depends on how smooth surfaces of the walls and how it will be applied: continuous or only around the edges and the center. To say exactly how it is better not possible, learn the instructions for the glue and use the manufacturer's recommendations. Only after the start of the work you can find out the actual amount of glue consumption taking into account all factors. For the finishing finish of the plates, you will need a reinforcing mesh and finishing plaster.
Step 2. Check the condition of the surfaces and correct the problem areas if necessary. OSP plates must be completely dry. From the outside, it is not necessary to protect them from moisture, the defense will serve as a polystyrene foam, he does not miss moisture or steam.
Practical advice. Do not attempt to make the walls of the walls perfectly even, the spreading up to 0.5 cm is easily corrected during the installation of polystyrene foam plates.
Step 3. Works start with the bottom of the building, very carefully check the position of the first row. Polystyrene plates are better to glue, modern materials have excellent adhesion. In addition, working with glue is easier and faster, it allows you to level the surface. If the walls have quite large irregularities, then glue to the layer of increased thickness. In order to save material, you can glue only the corners and the center of the sheet.
Check the position of polystyrene foam plates with a long level rack. At the same time, you must control the position of at least two sheets of polystyrene foam.
Practical advice. If you have little experience in the production of such work, we strongly advise you to repel horizontal lines on the walls at a distance equal to the width of the sheets. Use the rope with blue, this time will take only a few hours, and the benefits will be very noticeable. The lines make it possible to constantly monitor the position of each row of insulation.
Step 4. By such an algorithm will warm all the walls of the bath. Thoroughly process the places of door and window openings.
Now you need to give time to dry the glue, depending on the specific brand it will be necessary from 24 to 48 hours. Glue drop - you can start gluing the reinforcing grid and decorative plastering.
Watching on the grid
Step 1. Carefully with the help of glue, close all the joints between the individual sheets of the insulation, fill large ledges in height.
Step 2. Prepare the solution according to the instructions, work can be performed by a large spatula or ironing. Initially, the grid is pre-fixed in several places, and then the glue is superimposed over the entire surface. Carefully watch it nowhere to save and not peeled from the surface of polystyrene foam plates.
Step 3. Shuffle the external surface of the insulation. You don't need a thick layer of solution, the main thing is to hide the reinforcing grid. The plaster must close the reinforcing grid for 1 ÷ 2 mm.
A layer of plaster is applied on top of the reinforcing layer. But before this, the reinforcing layer should dry well within a few days. Stucco Cooking for further painting, or cladding various materials. It is necessary to stucify at temperatures above +5 degrees, you need to avoid hot days, windy and rainy weather. And choose good outdoor plaster, because it is it that the main protective layer of atmospheric precipitation
On this work on the warming of the walls of the frame bath is finished, you can start working with the ceilings.
Sheets can be put on the draft ceiling (optimal from our point of view) or fix from falling out by any metal slats, and to attach a finishing lining to navigate special rails 20 × 50 mm.
Step 1. Pribe a rough ceiling to ceiling beams. For this, you can take the unedged boards of the second-third grade with a thickness of about 20 mm. Do not forget to remove the bark. Under the crust, the pests will always appear over time, which will begin to damage not only the black ceiling boards, but also all wooden frames of the frame bath. The distance between the boards is 20 ÷ 25 cm, for fixing you can use ordinary nails or wood screws.
Step 2. Stay in the free niches of the draft ceiling of the heaters, carefully align them all over the perimeter. Initially, it is followed by the attic to put the entire insulation, then from the inside to correct their position. In the joints between the sheets, insert the knife or canvas of the hacksaw and, moving their back / rear, achieve the perfect fit of the insulation on all parties.
Step 3. Take care of vapor insulation. To do this, you can use aluminum foil, modern membrane materials or an ordinary polyethylene film. All these materials are well coped with the tasks set, although the price difference can be very significant.
Practical advice. The main attention is paid to the sealing of the joints of insulating materials. The backstage in these places at least five centimeters, joints should be sickling with a scotch or special foil.
When working with foil, be very careful - she quickly rushes. And any hole significantly reduces vapor barrier with all negative consequences. Parosolation is fixed by the stapler, do not allow large savings of the material. The distance between the finishing clamping of the ceiling and insulating material should be at least one centimeter.
Step 4. Speak to the ceiling beams of racks with a thickness of about two centimeters, the lining will be attached to them.
Video - heat insulation frame bath
Video - Warming Bath
Step 5. Check the position of the waterproofing and insulation, if everything is normal, then start finish finish Ceiling. During the trim, additional works may occur if the chimney is released through the roof. How to finish a chimney pipe?
Principle of protection of a warmed ceiling from the heat
The work complex will depend on the material of the manufacture and type of chimney. Consider the four most common types of chimney pipe.
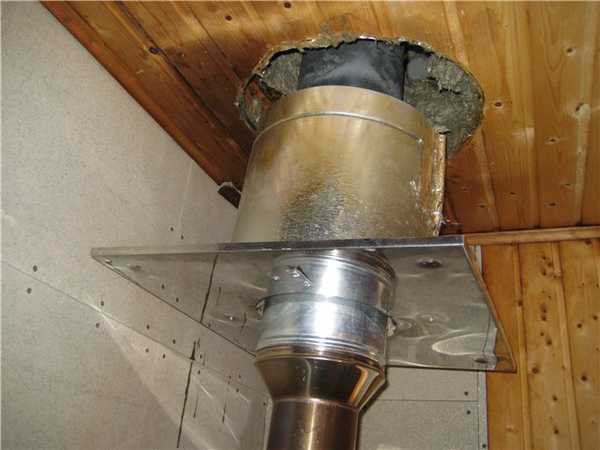
Metal chimney installation guide. Elements of chimney and ceiling and passing node
During the description of the operational advantages of the frame bath, there are few people mention and its shortcomings, and they have each building. One of them is relatively low carrier frame characteristics. This feature has a noticeable impact on the choice of insulation. We strongly do not advise too much to load the designs of the bath and apply materials with large specific weights during insulation.
Do not use traditional folk heaters based on straw or sawdust. During the preparation, they are stirred with clay operated in water and become very heavy. In addition, availability large number Water can cause the wetting of wooden ceiling overlap designs, and this will very negatively affect all the operational performance of the bath.
Frame walls do not make any obstacles to the penetration of rodents. And they very much like polystyrene foam, all over a year - two are capable of turning solid sheets in Dulku. Keep this in mind during the choice of material, do not use polystyrene foam for insulation of the internal niche frame.
Pay great attention to the quality of hydro and vapor barrier. Frame baths do not have unloaded vertical stubborn racks, each of them bears load and keeps other important design or architectural elements of the structure. Violation of strength due to prolonged exposure to moisture of just one rack can cause critical disorders of the sustainability of the entire bath. Complete and expensive repairs will be required. It is much better to prevent such a situation at the stage of insulation of the premises, than then to engage in complex repair work.
Any work on the insulation of premises is to increase the comfort of the adoption of bath procedures. But you will never be able to achieve the desired result, if you are engaged only to insulate the frame bath, and the device and selection of the stove, the ventilation of the room important moments Do not pay attention.
The facade of the baths covered with natural materials looks aesthetic and gives the structure of individuality.
The bath from a rounded log or glued bar looks attractive, and does not need an additional finish of the facade. But what to do if construction was a skeletal way or from slag blocks? It is necessary to complete the finish and give the bath aesthetic appearance. Materials for finishing on the market a lot, but it is difficult to make a choice. How to seize the bath from the outside, what materials are their features, pros and cons Consider with our readers.
What material for the exterior finish is better to use?
The exterior decoration of the bath is usually done with. So, like a bath of small sizes, it is more profitable to save the inner space and pave the insulation outside. The easiest I. proper option - This is a ventilated facade. So moisture will not accumulate on the walls and the bath will last longer.
For ventilated facade baths use materials:
- Siding (vinyl, metallic).
- Vantka (plastic, wooden).
- Simulation of timber.
- Block house.
Everyone has its pros and cons. Consider them in more detail.
Siding for finishing the facade bath
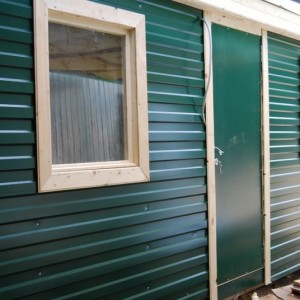 Metal siding does not burn and is considered one of best Materials For finishing a small bath.
 Siding is a panel with a width of 20 cm and a length of 120 cm. According to the material from which is made divided into: vinyl, iron.
Coloring in panels over 15, most popular of which are pistachio, and cream, chocolate. Foreign and domestic companies are manufactured. Imported is considered more durable, but the price is higher. The price of the material of the domestic producer from 120 p. Before finishing the bath, you must calculate the required number of panels. The material is fastened horizontally from the bottom upwards, retreating from the base of the bathhouse by 10-20 cm on the tree crate or metal profiles. Self-tapping screws are used as fasteners, which are screwed into a special fastener.
The main advantages of siding:
- Protects the facade of the bath from snow, rain and wind.
- Well tolerate temperature differences.
- Does not fade over time.
- Resistance to mechanical and chemical influences.
- Made from non-toxic material.
- Passes oxygen.
- Does not rot and not afraid of rodents.
- Not hygroscopic.
- High fire resistance.
- Easy installation.
But the material has consists that provoke negative reviews on numerous forums:
- The price on the panel is low, but connectives: external and internal cornerThe joining cost is expensive.
- When finishing, the surface of the walls should be perfectly even or the crate must be aligned in the level. If there are minor skews, the panels will go to bed uneven and the facade looks untidy.
- If the panel is incorrect, the panel can be deformed.
- Although the panels are not toxic, but it is not worth talking about ecologically.
- The metal siding dark color is strongly heated in the sun.
Selecting this material for finishing the facade of the bath is easy to perform work with your own hands. Special experience and skills when attaching panels are not needed. The only one needs to start the installation from below and consolidate the first panel as soon as possible, the further type of skin will depend on it.
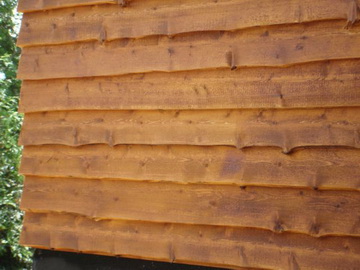
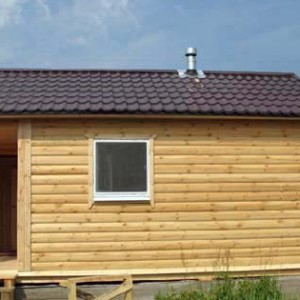
Simulation of a bar for finishing the facade of a bath
 You can perform the trim bath to simulate a bar with your own hands without having experience.
 Simulation of the bar completely copies the appearance of the laying of the timber. The material costs from 210 rubles, but is considered one of the best for the plating the bath outside and inside. If there is no possibility to build an expensive solidly wooden bath, you can smear and strip structure, such as frame, imitation. Externally distinguished the bath can only specialists.
Brusade imitation is a more modern wooden lining, width from 10 cm. exterior decoration It is better to take a width of more than 15 cm and a thickness of at least 1 cm. Less visually reduce the height of the wall and will look like ordinary lining. From the technical side, a special hollow, which removes the tension in the tree and the material will serve for a long time.
Produce a timber imitation from different species Woods. For external finishes it is better to use coniferous breedsSo the material will be less rot.
The main pluses of imitation of timber include:
- Easy installation.
- High resistance to mechanical and chemical influences.
- Beautiful appearance.
- Large size of size, both in length and width, thick.
- Additional thermal insulation.
- For proper care will last for more than 20 years.
But, even with such modern material There are cons talking about numerous forums:
- It is necessary to constantly process water-repellent and antiseptic compositions.
- Wooden material is well lit.
- It is afraid of mold and insects.
- If you purchase a poor-quality, with a bad drying, the material is deformed.
Before buying, you need to calculate the amount of material, so you can avoid extra costs. Singing the bath from the outside is designed horizontally, up spike. So the mount will be less susceptible to penetration of moisture in the castle. The decoration is made on the aligned wall, with the help of a tree or metal crate. Wooden crate before mounting must be covered with antiseptics. The material is processed before installation, you can do this at the end of the work, but then the lock and the inner side will not be processed. Before the finishing coating, the imitation is grinning the smallest nozzle. You can go easier and acquire already ready-made painted material. The price is from 270 p.
Block-house package
 Baths The sheltered block houses look no worse from the processed log, and the price of them is 3-4 times lower.
 Block House came to us from Finland and Canada. This is another kind of imitation of a bar, but with a rounded outer side. The bath sheathed with the material is similar to the construction of a rounded log.
So how to dry the rounded log is difficult, cracks appear on the walls. They have to be additionally caught, and this is the costs and loss of appearance. You can solve the problem with a block house. The panels are treated and dried in the cells at the enterprise. Standard humidity block house no higher than 12%.
Pros block house:
- Environmentally friendly, as it is made of wood.
- Beautiful appearance of the facade.
- It is economically profitable, since the bath from the rounded log is expensive.
- Easy installation.
- Convenient size.
About minuses block house feedback. The most popular are associated with the wrong installation. If you do not perform a ventilated facade and do not leave the clearance under the material can accumulate condensate.
Cold on the crate in 70 cm increments upwards. Additionally, polished and covered with protective paints. Bashed simply by self-drawing through. For this, a slight recess on the diameter is wider than hats self-pressing. They screw the screws and on top of it closed with plugs or lubricates with widths and grinds.
Lining for facade bath
The wall tread for trimming the bath is applied plastic outside. This is the most economical finish option, on this its advantages, perhaps end. It is the lining from 37 p., But its width is 50-60 mm. Color solutions More than 20, but not everyone can be used to create aesthetically attractive facade.
By cons of the material include:
- Do not breathe.
- Not eco-friendly.
- Easy breaks and snacks.
- Flowers over time.
- Lights with toxic couples.
You need to choose this material to cover the bath outside in extreme cases.
What does a bath that covers timed by imitation of a bar looks in detail on video:
Any of the listed materials is mounted using components. The angular compounds of the simulation of the bar and block house decorate with special overhead corners. They will give full realism of masonry with the residue.
When finishing the bath Outside, you should not forget about the front. If you leave them not covered, then the appearance has incompleteness.
Finish the front of the bath
The front of the front is performed depending on its design, the material that was used to finish the facade. It is also important from which the FRONTON itself is made:
- Wooden fronton can be seen by any material, but it is pre-performing waterproofing using a membrane material.
- For frontones made of concrete, the surface is pre-aligned and the lamp is mounted. On the crate fasten the trim.
 The trim of the front of the bath will give the facade of the finished look and will additionally protect the design from moisture.
 In order not to violate the unity of the ensemble of the bobbies, the baths with a decree or siding are trimmed by the same material. For brick and concrete structures, stucco can be used in the form of various embossed elements. It is well suited for the finishing of the bodies of the baths Iron sheets, but due to the high cost this option can be found infrequently. The easiest and most inexpensive method of trimming the fronton is a siding panels.
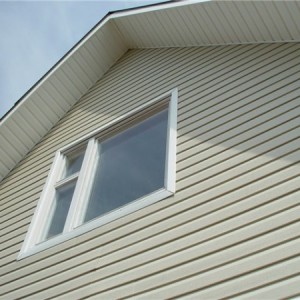
In the photo on the right you can see the front of the roof of the bath with an attic separated by plastic clapboard. It combines perfectly with siding, which was used to cover the facade. If you take the lining of the contrast color, then you can give a unique design design.
Fixed material to the fronton in several ways:
- With aluminum racks that are attached to the front.
- On the wooden frontton siding or imitation of the timber can be sewed directly to the surface.
- With wooden rails that are pre-fixed to the frontoth.
When trimming the bhatus frontones, it is necessary to use the level and secure the planks on the same plane. If this does not comply with the integrity of the design will be broken.
After the bath is trim, it is necessary to take care of additional protection. The roof is set to the drain system, sewage is performed. wastewater. It's all easy to do with your own hands.
When choosing a material for plating a bath outside, it is necessary to take into account its financial capabilities, the material is covered with neighboring structures, design features. It is necessary to acquire in well-known retail chains, so less likely to face fakes. And you can fulfill the finish with your own hands, the main thing is a bit diligence and the desire to serve for many years.