How to make smooth corners of the room. How to correct the inner corners in the apartment
Good day, dear readers. This time we will deal with how you can stack the walls to make me together with a straight angle. Unfortunately, it is rarely talking about it, and in vain.
You ask: "Why is it necessary?". And the fact that the furniture and baths are most often made rectangular, and if you neglect with simple calculations during the plaster, you can get out of stuffed gaps between the bathroom or a table and walls. Do we need it? That's right, so this lesson I urge you to study and treat this topic seriously, especially since now they are just building some kind of ... But, not at home.
In my practice there was a case, by the way, quite recently, when one wall of the room was for fifteen centimeters shorter than the opposite! I do not know what the builders took when they were erected in that apartment interior partitions: mushrooms, LSD or something else, but I hope that they have already cured ...
Of course, if you have such angles at home, the plaster will not help here, you need to dry glassboard. But in most cases, nevertheless, builders build walls in a lightly intoxication, so you can still fix it.
The analysis of this topic, I propose to carry out the example of the standard at the current time of the bathroom. Budget accommodation, although I always pierces laughter when this word is used for seven digits. Yes, just my salary of the year for three. So, we have such a silent picture as in the photo. Batyushki, instead of plastering, we have a masonry mix! Never, never buy it, especially if you are going to stucked yourself! It is not intended for this, just to the customer, as always, everything is visible)) "We take it cheaper, not even want to read the inscriptions on bags." But if you want to bend the back of the day Four, or even five, constantly collect the ladder of the solution and wash them with yourself, but save forty bucks, then please.
Okay, distracted, just just) is given a task - to shock the bathroom, of course, under the lighthouses, making two corners strictly straight. No problem.
Again distracted, I apologize. Finally, I will describe the essence of the technology of plastering walls at 90 degrees. It lies in the fact that on the first wall of self-tapping screws under the beacons we set up in the usual way, and on the adjacent one in the coal. You are surely, you may have imagined the usual building Uguns at 30 cm. No, no, we need a good thing, we will produce the square from the rules. After all, the essence of its use is reduced to the fact that it should be almost from the wall to the wall. And how do we make such a square and how to check it? For this, an easy and brilliant thing is already invented - an Egyptian triangle. This is such a triangle, the sides of which correspond to each other as 3: 4: 5, which means that direct corner automatically. So, we just need to draw such a triangle on the floor, and then align two rules on its parties and make them up with each other. The rules must be combined with straight faces, that is, those that without messengers. Thus, the bottom of the bottom will look down, and the top is up.
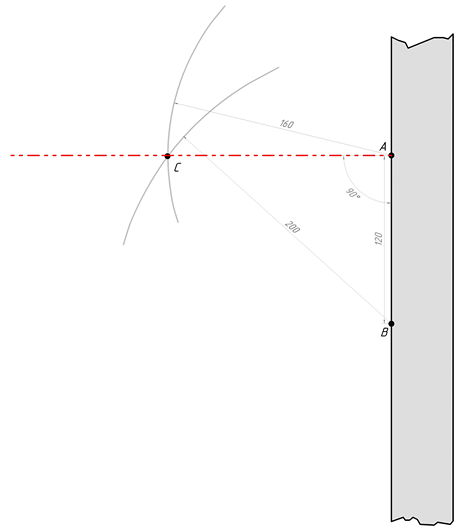 Now I will explain all this on the example. Bathroom sizes We have 220 × 175. So, we take two two-meter rules, one whole, we cut about 30 cm. We sweep the floor in the future place of markup. By the way, it is most convenient to do it in the middle of the room, but from the wall. We note on the floor at the wall, the starting point A and lay down (again along the wall) from it any size, multiple three; In our case, it is convenient to take 120 cm. It will be Point V. Now we need to make an improvised circulation from, for example, a marker and cord, but such a cord that he would not stretch. You can use roulette. From the point and set off the distance, multiple of four, that is, 160 cm, and blacksmith small arc. And from the point in laying 200 cm and also black arc. The place of intersection of the arc will be the point C, and the AU line will be perpendicular to av. It remains to lay our rules on these two lines and bore a few self-draws:
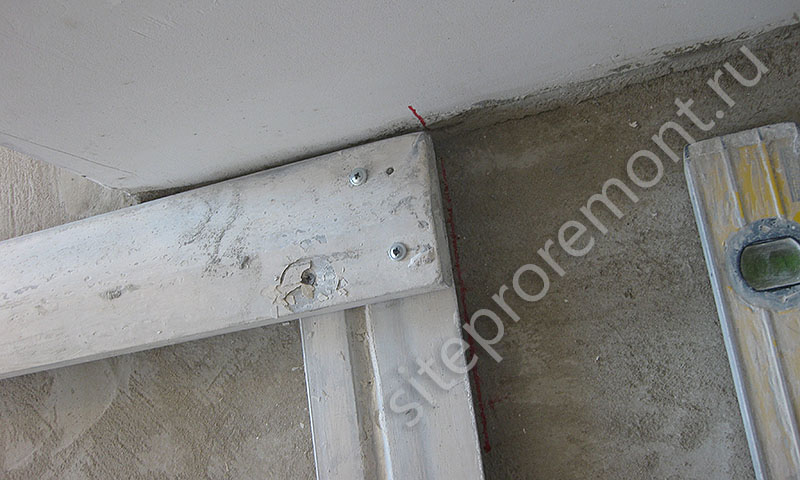
The rules took the most descendant, not to spoil the same. Just in case, check the angle:

All is well, the megalon is ready to use. In the meantime, we need to post lighthouses and put the self-tapping screws on the starting wall. We use a laser for this. First, we note the place to install beacons. It is still important to make it so that all self-tapping screws from the floor are in the same level, because we will have to put the square at once. The top is also desirable to do at one level. They, actually, will not exhibit on the carbon and simply on the vertical level, the right angle must be transferred automatically. But it would be nice to check it later.
I exhibit all the screws of the supporting wall - form the base plane. We will need to set the top and bottom screws from the base wall of the upper and lower screws. After that, it's time to take our titanic square. In fact, it is necessary for us to reach an angle of 90 degrees only to set the near bottom self-sufficiency. It is better to screw it into a dowel to the maximum (considering the clearance at least 6 mm for the lighthouse). We apply the carbon to the two lower bases of the base and the distant on the adjacent wall, look at how we do with your neighbors. If the rule does not reach it - unscrew so that it would take. If the rule rested into it, but does not reach the long-scale self-pressing - unscrew the far. It may happen so that you will have to screw it out several times / unscrew and apply the square. Nothing terrible, small labor. So, all, four lower screws form a straight angle. 
 Top exhibiting already in terms of level. With a laser, I do it like this: I direct the vertical beam on the bottom Hat and I look at the shadow from her, after which I achieve the same shadow from the top self-drawing.
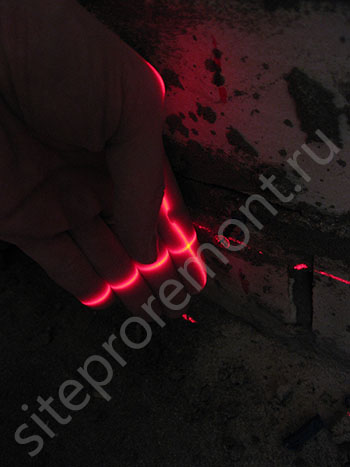
This method is suitable if one wall accounts for two lighthouse. If they are more, the beam will need to be directed parallel to the wall, that is, it will not fall on the hats. In this case, a screwdriver takes, it is set to the least discovering from the wall sulfur. In a place where the beam will fall on a screwdriver, a mark is set, which needs to be focused on the exhibition of other self-tales. 
Notice, my screwdriver is painted in red, and it is not just like that. Just, oddly enough, the red beam is much better visible on a red background than any friend.
So, we have done one straight corner, now exactly repeat the same steps with the next wall. Only here it will be necessary to turn the carbon, because the aspect ratio of the room will change. The lower screws were put up, then the top and controlled the layer so that the beacons were held everywhere: 
On how to exhibit lighthouses, you have already read in the article "Stucco walls". The only thing I still check them after installing a laser level for complete confidence: 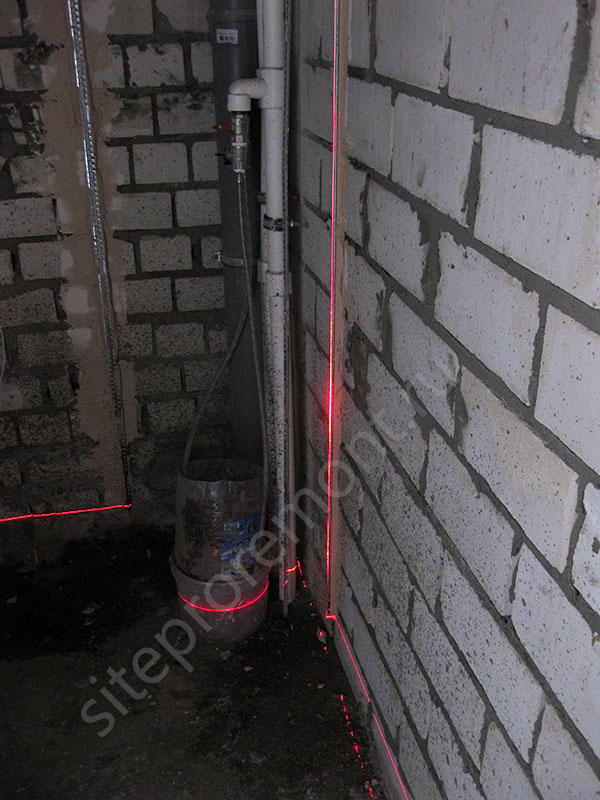
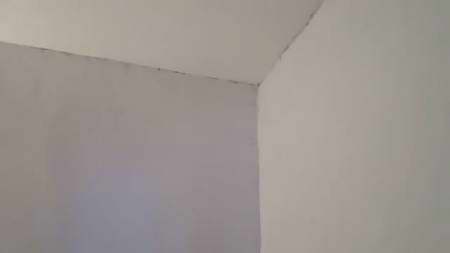
If desired, after the lighthouses are grabbed, you can check their as a coal again. So far, I always coincided, I think, and you have no problems. Everything can be processed directly to the plaster. We have in this bathroom here's what: 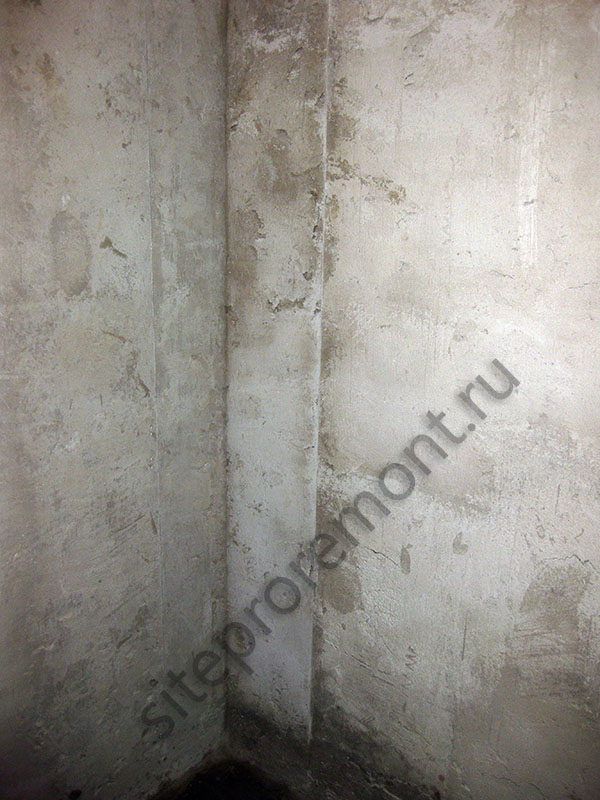
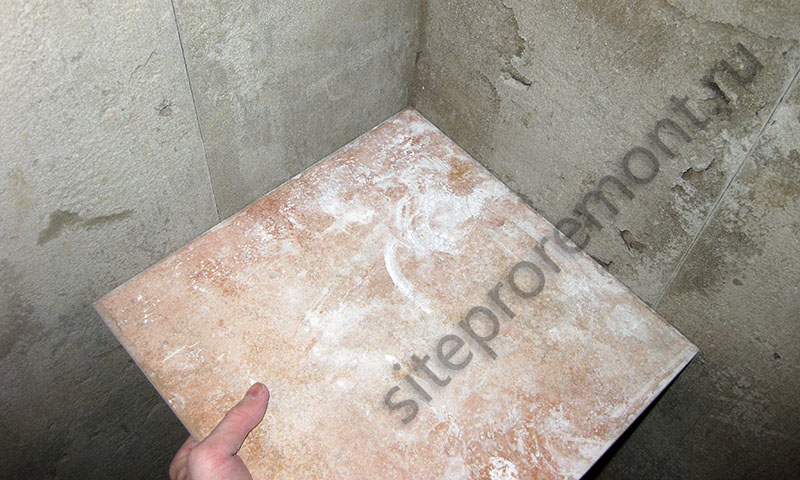
If the walls are prepared for the tile, then you do not need to rub the surface, as you do not need and remove beacons. It should also be remembered that the layer of plaster under the tile must be at least 1 cm.
Here, in principle, all the tricks of plaster straight corners. Now we can safely put furniture or bath in them, there will be no gaps. I will be flattered if you subscribe to updates. In this case, you will always receive the announcements of new articles in a timely manner. Good luck in repair with your own hands!
Theme-your odnogunnone :-)
2013-04-18 00:41:09
krasava, novel. Keep uploading lessons, I read at your leisure)))
2013-04-18 16:27:18
Hach)) I ample that you say here)) I think I will write! Subscribe to blog updates, such an announcements of articles will come to the mail!
2013-05-23 12:15:28
It remains to find two "bundles" rules;) I plan to draw angle on the floor, and then put the plane on the laser 360 ...
2013-05-23 21:02:17
Your option is definitely easier) But for its application, you need a laser and a smooth floor, which most readers, in theory, does not. Therefore, I brought a more versatile method)
2013-05-24 15:37:56
Laser is available - Bosch 2-80 ... The floors will naturally be very smoothly (skidding the tile, prepare and fill in the nevilir) ... But while the floors are curves, even approximately you can see that now the angles 90 simply do not ...
2013-05-25 22:34:06
Mikhail, GLL 2-80 - the device is serious!) To set the lighthouses just perfect. Do you work professionally?
2013-06-05 10:06:12
No, of course;) Just the apartment completely repaired (for myself naturally) - San Knotes remained ... I study all the materials and do in the "best practices" - I am a perfectionist;) at the same time and the experience is immediately recruited ... And the device "rented" - indefinitely and free - as finishing work, I will figure it out ... True, I would like 3-80 - there are immediately plane and angle 90;)
2013-06-05 23:47:42
I like your approach! Good luck!
Usually they are mobbing and cheaper, I already hurt to look, what hacktur for myself the same people do. I'm thinking about to make a heading type "finishing shoals", you can write articles without end) But while I am still too early with this
2013-08-25 19:12:42
I have a 3D plane builder for them in an idea it's easier to do? Suppose it is already a little such rule for the room, it is enough to take 3w.eft-niv.ru/image/cache/data/raspor_shtativ-500x500.jpg the spacer station turn over the platform and will be 90 degrees already below 3w.gmc2.ru/image/ Cache / Data / AutoLevel / ada_6d_servoliner_planes_800x800-500x500.gif There to spread the plane and transfer them or am I wrong?
2013-08-25 20:38:41
It all depends on the model of the laser, some can immediately build a straight angle. I do not have such a glamorous rod, so I'm a hell on the floor of an Egyptian triangle, along the sides of which let the beam. The article was written for people who have no lasers (and such 99%). And so, of course, it is easier to do with them
2013-08-26 00:13:42
That she is immediately glamorous :) comfortable thingthan tripod, you can adjust all the height of the room
2013-09-02 18:25:37
And I do it easier, for the start of the laser I define the rehearsecturality of all 4-walls, for this we put the level to the center of one wall, shoot the beam in opposite two angle, it turns out two plumbings, on these plumbings stretch the threads on the wall, then put a level in front of the wall where We need 90 degrees, again shoot a ray in opposite angles, it turns out two more sheer lines. One of them is already marked from the previous wall, two walls are ready for 90, then also in a circle, only in a small room is more rational to start marking from the door.
2013-09-02 22:20:29
Honestly, I did not understand this technology)))
Alexander
2013-10-04 17:08:54
Thanks for the blog. He himself began repairing his apartment, a lot of inhessmal learned. I agree with Mikhail (I study all the materials and do in the "best practices" - I simply can not be perfectionist))))
2013-10-04 22:28:49
Glad you liked it. Mikhail has a serious approach)
2013-10-15 22:27:00
I did it before about the same, but for more than a year I apply 3w.bosch-professional.com/ru/ru/gtl-3-16943-ocs-p/ much more convenient, and when tiled works are irreplaceable.
2013-10-15 22:30:22
Well, do not buy the readers of the Lasers for the Chervonets for the sake of one or two angles))) Blog, nevertheless, is designed for nonprofessional)
2013-10-15 22:30:45
If the walls are not vertical, then the ray will give a vertical only if the device cost strictly perpendicular to the wall.
2014-02-06 15:06:59
Good afternoon, Roman! Is it possible to use a wooden bar instead of rules? Still, the rules do not want to spoil.
2014-02-06 19:04:21
Hello. If the timber is high, then you can
Konstantin
2014-03-18 15:18:11
Hello. I suppose it can be done easier (for the owner of laser levels). 1) plaster one of the walls; 2) Attach the cooler with the posted wall. You can anyone, but better than 50 cm. And they are diagnosed on the floor of the coal perpendicular line (marker or, now I will not write the correct name, the marker, only with white paint, i.e. he writes on any surface after stamping); 3) We take laser level. Turn on the vertical. Customize it so that the Laser line is exactly "walked" along the drawn line. You can not waste time and immediately set the screws on the perpendicular wall to the level.<<Ну не покупать же читателям лазеры по червонцу ради одного-двух углов))) У меня уровень "Ермак". Стоит 1.500-2.000 рублей. Вполне доступно и при первом, даже небольшом ремонте, окупит себя.
2014-03-18 21:46:30
Hello! This method is suitable only in the case of a smooth screed and has potentially worse accuracy. But yes, it is easier. Ermak, by the way, many praise, and I don't even see for sale.
Konstantin
2014-03-19 12:12:13
<<Такой метод годится только в случае ровной стяжки Можно его использовать везде, на любой поверхности. Пол и его ровность в данном случае никакой роли, кроме как на нем чертится линия, не играет, т.к. прямой угол мы делаем не к полу, а к отштукатуренной стене. Эта линия является вспомогательным элементом, который позволяет выставить направления луча ПЕРПЕНДИКУЛЯРНО оштукатуренной стене. Если бы можно было это сделать при помощи только одного лазерного уровня (т.е. выставить прямой угол), то не нужна была бы операция с выставлением угольника и начертанием линии. <<Ермак, кстати, многие хвалят, а я даже в продаже такие не вижу. Уровень как уровень. В пользовании около года. Погрешность точно не знаю, проверял только в сравнении с пузырьковым. Не то чтобы серьезным, но неприятным недостатком является рассеивание луча уже начиная от 3-х метров - луч становится 3-4 мм. Поэтому просто при разметке на больших расстояниях нужно находить середину луча. Покупал в крепежном магазине. Видел в Энкоре, если он есть в Ваш городе.
2014-03-19 23:41:52
Yes it's all that's all)) just if there are no screeds, it's hard to read normally and put a ray of line
Konstantin
2014-03-20 09:37:32
<<Просто если стяжки нет Берем любую ровную поверхность - доску, правило и т.д., что есть под рукой. Ложим, чертим на ней.
2014-03-28 22:24:55
Xs, I can not agree about the plaster. I am not plasterers (although I have a discharge and experience, etc. etc.), I'm tiled, without a small 9 years only I do tiled, and arguments can give tons against. I will say one thing in Snip is stupidly written that it is not permissible to the use of plaster and silicates.
2014-03-28 22:46:54
And I would listen to your arguments, bring, feel free to
2014-11-29 19:24:00
when he worked on a construction site, electrician, crossed with specials from Knauf, their words Rotabant have several colors, for wet rooms there should be gray, for dry white. There are a couple of colors, but it was a little time to talk.
2014-11-26 17:59:32
Do not tell the fairy tales)))
2014-11-25 21:48:00
Under the tile of plaster is awkward, there is a cement mixture.
2014-12-06 23:22:25
Roman Hello! I did not understand a little "if there are more of them, the beam will need to be directed parallel to the wall, that is, it will not fall on the hats. In this case, the screwdriver is taken, it is set to the least discovering from the wall. In the place where the beam will fall on the screwdriver There is a mark on which you need to navigate when exhibiting other screws. " The least discovered this is what? We also have the lower exhibits and we do not touch them and do not compare with others. And then I did not understand, why under the least discovered to put all the screws on the wall or do you mean the self-tapping screw of this lighthouse? After all, the lighthouse needs to be put on another label.
Kristina
2015-01-17 23:46:12
Roman, hello! I studied your site, everything is very accessible and understandable! The question is on the article - on the example in the photo Color Gray, and I have a white-beige - this is Knauf Rotband ...? Today I started the forces of 2 male relatives to repair in the bathroom. I bought everything on the article only Betonontkt another company - I hope it is not scary (I didn't find such as you wrote) Everything was written at the temple - when I saw that I bought this Rotband ...)) I urged me that everything would fall off to hell. In the store too. In general, for the day 5 men crap me up to the head. Even the official website of Knauf did not help (they are also fools there))))))) I need to make a rather thick layer, 3 cm (to rinse the wall to come to the bathroom and do not make a plastic "corner".) Is it possible to be such a thick layer under Tile? What is more 1cm know, and the maximum of which is under the tile doubt))))
Kristina
2015-01-17 23:45:55
Roman, hello! I studied your site, everything is very accessible and understandable! The question is on the article - on the example in the photo Color Gray, and I have a white-beige - this is Knauf Rotband ..? I started the forces of 2 robbing male repair in the bathroom. I bought everything on the article only Betonontkt another company - I hope it is not scary (I didn't find such as you wrote) Everything was written at the temple - when I saw that I bought this Rotband ...)) I urged me that everything would fall off to hell. In the store too. In general, for the day 5 men crap me up to the head. Even the official website of Knauf did not help (they are also fools there))))))) I need to make a rather thick layer, 3 cm (to build a wall to come to the bathroom and do not make a plastic "corner".) Is it possible to be such a thick layer under Tile? What is more 1cm know, and the maximum of which is under the tile doubt))))
The straight angle between the walls is needed quite often. For example, to competently install the bath, a kitchen sink or table. But most people simply do not take into account such a necessity, and then they regret when a centimeter slot arises between the bathroom and the wall. Also indirect angle is detected along the floor tiles when the sides of the sides are different. And there are situations even worse. Therefore, we assume to this material with all seriousness.
Builders, elevating modern houses, contrary to the opinion of the majority, do not care about the proximity of the corners in apartments to 90 degrees. They are important only the amount of work, and often they do not even give any measuring. Just trowel, yes halfurist. "Vajai, Rovshan!"
How to make a straight angle between the walls after such a hack? There are two options: either we are plastering for beacons, or align the walls with plasterboard. And if in the second case there should be no difficulties in the second case - just grind profiles on the coal, then with everything is more complicated. By the way, the option "Yes, I will not ride everything with a tile." Practice shows that all those who are trying to make a straight angle by smoothly increasing the layer of tiled glue, constantly kosyat. And the corner of their direct does not work, and the tile is crooked. If you have found the strength and courage to plaster on the beacons, you can easily make an ideal straight angle. To which to completely calmly put the tile "under the comb".
The first fundamental principle of plaster under a straight angle - first plastering one wall in the usual way.
Usually the longest. Whole. It is much easier and faster to build an angle already from the finished plane.
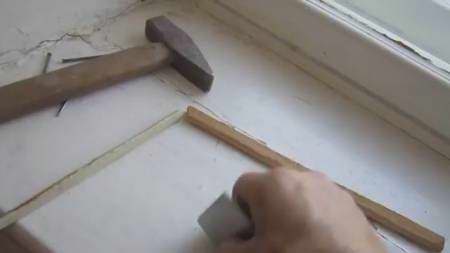
What's next? You will need two plaster rules. Preferably long over the wall. Often the baths are sizes in the area of \u200b\u200b175x175, so, in this case, take two "doubles" and a grinder or knuckling to shorten them.
Suppose that one wall you have already shuffled ideally. And adjacent has dimensions of 175x275 cm. In this case, two lighthouse will be needed. Place them. All as it should be, at a distance of 30 cm from the walls. But there is one important nuance here. A pair of lower screws should be strictly in the same level. Accordingly, the pair of the upper - too. A little later you will learn why. And it is recommended to repel on a plastered wall lying lying in the same level with a lower pair of self-tapping screws.
The holes are clogged on, dowels and self-tapping screws are drunk in them. Now what? With a simple half-meter carbon, you can not do anything, you will not do anything. The solution lies on the surface - you need a big ring. It is made from two rules. But how to make it so that they formed a strict angle of 90 degrees? Not on the small carbon, in this case, because there is no point. Everything is much easier.
There are Pythagore's theorem. Which uniquely sets the ratio of the sides of the rectangular triangle. Root from the sum of squares of cathets is equal to hypotenuse. Remember the geometry school course. It all means that if you can construct a triangle on the floor, the sides of which will be correlated in the same way, one of its corners will be absolutely exactly equal to 90 degrees. The easiest case is so-called. Egyptian triangle, whose parties relate as 3: 4: 5. Usually it is convenient to take in practice 120: 160: 200 cm.
 So, a pencil line is drawn on the floor. The marker is undesirable, accuracy is important here. Two points are put on it: one with the edge, the second - on the removal of 120 cm from the first. Then the segment of the lighthouse is taken, or you can use a tape measure. It will be necessary to postpone from the first point 160 cm, and from the second - 200 cm. It is more accurate to construct fragments of the circles of these radius. The intersection point of these figures and will be the third vertex of the triangle. It remains only to connect the vertices. All, you built a rectangular triangle with high accuracy.
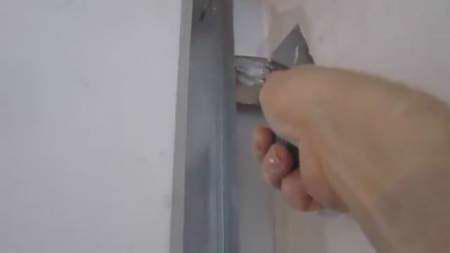
The next step is to put on the floor two rules exactly on the lines. Since they will be mowed outward floors, it will not be so easy. You will have to use the square. So, the rules are combined with lines: 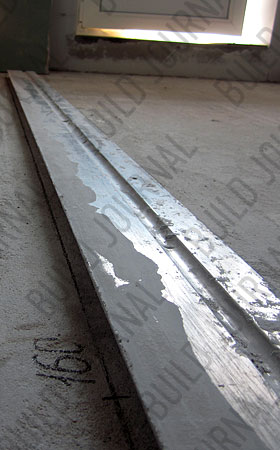
Now it is necessary to securely bore them with each other. This is usually done by self-pressing with pressshube or black metal screws. The main thing at the same time is to prevent the rules offset relative to the lines under the influence of vibration from the screwdriver or drill. It is enough to build the rules at two points:
But, in general, this is not enough. You need to apply an additional bar from the KNAUF protective corner, for example. Breeping it, as shown in the picture: 
Now you have a huge, hard, and most importantly, accurate square. You are returning to the room where you will have lighthouses. There is already scheduled the line for which you will apply the urban. Yes, you need to have it strictly in the horizontal plane, otherwise it turns out an error.
You have already previously needed to estimate the degree of deviation of the angle from 90 degrees, so you know which self-tapping screw from the bottom pair to take as a basis. Suppose that the angle was stupid, therefore unscrewed at a minimum (7-8 mm) of the nearly plastered wall screws. And the distant will already get out of the carbon. Apply it to the line on the already finished wall and to the left pair of the dump truck on the placed. See. Suppose the distant self-tapping screw does not reach the coce about 4 mm. Twink it about this distance and again evaluate the situation by the salt. Perhaps you have to apply it several times, but, in general, the process of installing a self-building will take you no more than a couple of minutes. If initially the angle was sharp - the first to expose the distant self-tapping screw. And the neighbor - by the carbon.
 The upper pair of self-sufficiency is uncomfortable to exhibit the same coal - he is hard, it is difficult to raise it, he constantly scorches with the hats. Therefore, it will be easier to set them simply vertically relative to the bottom pair. On a plunder or bubble level. In any case, if the first wall you are aligned ideally, it turns out perfectly straight angle and on top, and below, automatically.
If you need to put a straight corner and on the opposite wall - then there are no problems, do everything in the same way. This happens, for example, if the bath in dimensions arises in bulk to the walls. At the same time, the underrection of tiles on the floor will be ideally. It is recommended not to post all the lighthouses in advance, and then plastering. Much better, although longer, there will be alternate marking and plaster of each wall. But you will know exactly what has not mistaken anywhere.
 Now you know how to make a straight angle between the walls during the plaster. Having spent a couple of hours on markup, you will save more on laying tiles, and get professional quality will be much easier.
Jun 6, 2014 Admin.
Repairs are always a matter of time consuming, with high time and money costs. But there are many subtleties and tricks when conducting Repair work, knowledge of which will help get rid of extra and unnecessary costs.
Start any repair need from mandatory alignment of the corners and walls of the room. It is important to remember that the corners of the room can be internal and external, as well as horizontal and vertical (relative to the floor and ceiling). After preliminary inspection of the room and evaluating future work volumes, alignment It occurs in such a sequence - first external angles, and then internal.
A famous fact is the angle under which the walls must intersect. It should be straight and range 90 degrees. But the premises can be different architecture, which does not provide for parallel placement of opposing walls in relation to each other, and therefore other types of catch can be in the building - sharp and stupid. When trying to align them will have to change the diagonal between them, which is strictly prohibited. In this case, when using construction tools, or other rectangular rectangles that have a correct rectangular shape, the line is echoed from each wall in such a way that in the future of all lines an angle of 90 degrees. And only after that you can check the length of diagonals, as well as perform the alignment procedure.
Aligning internal vertical angles According to its preparation for the process, it differs significantly from the previous one. Here it is already necessary to use a construction level, and preferably long. It must be remembered that the surface must be smooth. To align the walls are used construction lighthouses. But they can always be replaced by construction waste, for example, tile, which is glued to the wall in several places from the floor to the ceiling along the inner corner. All this is done using the adjusted level.
To the wall of the tile is attached with alabaster. And after that, the remaining space between the opportunities received by the beacons is filled with the necessary construction substances. The correct location of Mayakov It is the key to the right Wall alignment. Thus, you can align both walls that come into contact with each other.
But to align the external vertical angles, you need to remember the following features. Building boards need to attach from the outside of the wall, here they will perform the function of beacons, and now you need to fill empty space building materials.
August 8, 2014 ,Smooth angles are not only aesthetic necessity, but also the guarantee of the quality and long-term finish. "Curves" angles are even worse than unfairly processed walls: they distort the pattern on the wallpaper and deform them, contribute to the tile cracking and the bamboo dug. And this list can be continued to infinity. However, it is important to remember that in itself an uneven angle is rare. Very often, together with it, it is necessary to smooth and the surface of the walls.
Aligning the angle of the wall can be carried out in three different ways. Stop your choice on one of them should be taking into account the features of defects, irregularities and value of materials.
The first way is to align the corner of the wall by plaster for beacons. It is suitable for minor (no more than one centimeter) tubercles and recesses. With the help of the rule or smooth stick, we define the largest convexities - they must be stabbed or lost. Those bumps that cannot be removed and will serve us by beacons. They are better additionally noted by a pencil. We define the plumb and the level of extreme upper (it is celebrated on the ceiling) and lower (it, respectively, on the floor) point. Then, with the help of a mixture on places, we create final beacons - we will produce angle alignment on them. Let's get the time to frost well and dry. Now we take a short spatula and apply a solution that immediately distribute along the surface is long. Next, using the rule or angular spatula, align the angle itself. At the end of work, the plaster must give time to completely dry. And only after its final frosting, you can proceed to subsequent facing work.
The second way is to align the angle of the wall by a plastic or metal profile. To work, we will need a countercultuary - an aluminum "corner" with a grid on the sides, which serves to improve adhesion with the wall. Intropefully align the angle of putty do not have to, with this task, the profile will cope. But smoothing the gap between the grid and the wall plane may require additional effort. After preparing the main disadvantages, we apply to the angle of the layer of putty. It is necessary to capture the surface of the wall from one and the other side of the angle at least twenty centimeters so that it was possible to "plant" there without any problems. Then "Top" the contraglot in the solution, we remove the extensive spatula. Most likely, you will have to apply one or two additional layers of the mixture so that the profile does not "stick together." After the plaster is completely dry, it will be necessary to walk on the surface by sandpaper to finally disguise the transition between the edge of the grid and the wall.