The walls of the frame bath with your own hands. How to build a bathhouse from planks. Video - Thermal insulation of a frame bath
A person who is well versed in construction technologies will agree with the statement that the optimal structure for a bath is a frame.
Someone may argue that a home bathhouse must certainly be chopped and will lead as arguments folk traditions, beautiful appearance and high environmental friendliness.
We will not argue with these facts. Just note that the chopped bath will still have to be insulated, creating a second level of sheathing and finishing from scratch.
Thickness wooden walls 15-18 cm is clearly insufficient for keeping warm - the main factor of comfort in any bath.
Having calculated all the costs, we will see that the construction of a frame bath will be cheaper than using logs or bricks. The duration of the construction process usually does not exceed 4 weeks, and with intensive work, you can keep within 14 days.
Along the way, we will point out other significant advantages frame technology:
- Season independence;
- Minimum shrinkage deformations;
- Possibility of hidden laying of engineering communications;
- Variety of finishes.
All reviews of the owners of frame baths can be divided into two groups. Anyone who was not too lazy to delve into the intricacies of the process, did everything carefully and carefully, completely satisfied with the result. A bathhouse with a wooden frame keeps heat well and looks no worse than a log house.
Other owners, and there are an order of magnitude less of them, complain about poor thermal insulation, since they unreasonably saved on it during construction. Sometimes there are claims of rotting wood, which they forgot to process, or the builders did not properly antisept. A number of complaints are addressed to the wobbly frame, built of a thin board and not reinforced with struts.
In order to get a correct idea of how to build a frame bath with your own hands and not make mistakes, consider the main stages of the technology.
Foundation
The frame structure is not afraid of soil shrinkage, since their wood was built - a sufficiently strong and resilient material.
Low weight is another plus in favor of frame technology. Thanks to this, the foundation for the bath can be chosen the most inexpensive. Columnar or piled, slab or shallow tape - all of them are well suited for such a structure.
The main thing is that the upper cut of the base, on which the support bar will lie, is even and well waterproofed (coating with mastic, laying roofing material in 2 layers). It is better to choose the timber itself from hardwood (oak, hornbeam, larch) and also treat it with an antiseptic with high quality.
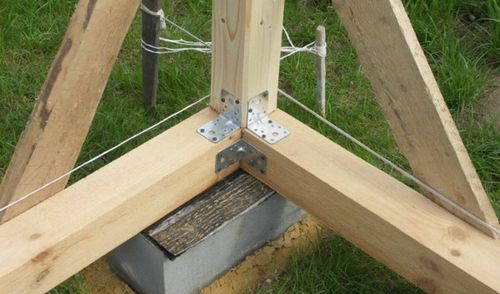
To connect the wooden belt with the foundation, you can use anchors made of reinforcing rods with a diameter of 14-16 mm with a hook at the end buried in concrete by 15-20 cm. At the other end of the anchors, a metric thread is cut for a nut.
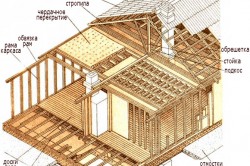
This is how the foundation looks schematically with a bar prepared for the installation of frame racks.
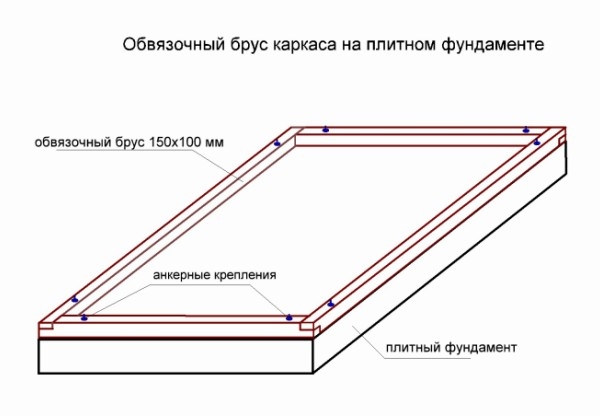
The corner joints of the timber are connected "in a paw" and placed on the anchor. After that, extreme vertical racks with a section of 10x15 cm are placed on them in level and fixed with jibs. The middle posts are aligned with the cord. Please note that the thickness of the racks should be equal to the thickness of the insulation that will be laid between them.
The pitch of the frame racks is chosen in the range from 60 to 80 cm. They are attached to the support bar with steel brackets. Do not forget about installing jibs (struts) - strong bars or boards with a section of 50x150 mm. They significantly increase the volumetric rigidity of the entire structure.

For a small building (3x4, 4x5 meters), frame technology allows the installation of struts only on corner posts. For a more spacious and tall structure, it is recommended to install them in each bay.
If your plans include a frame bath with an attic for relaxation and tea drinking, then be sure to make a detailed drawing (plan + nodes). This structure is more complex than the low gable roof version.
Floor beams in the presence of an attic should be thicker in order to withstand the weight of people and furniture without critical deflection. They should be supported on a solid strapping beam, and not on thin sheathing boards.
The fastening of the upper strapping bar to the uprights can be done with a tongue-and-groove connection. To fix the floor beams to the uprights, a perforated steel plate bent in the form of a corner is suitable.
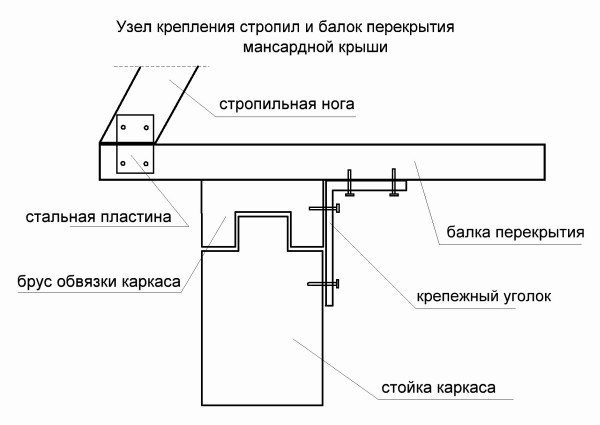
The rafter legs are conveniently attached to the beams through the mounting plates.
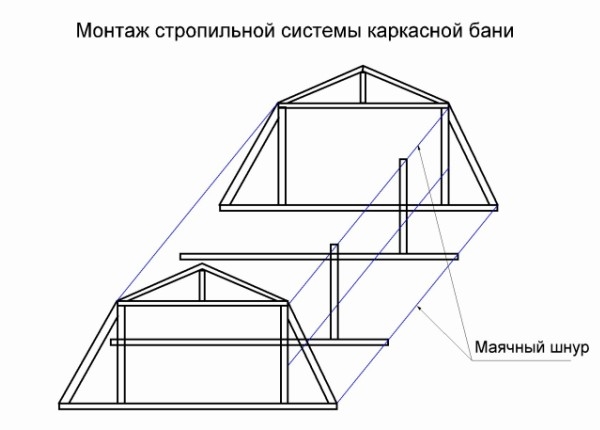
Installation rafter system mansard roof start with the installation of the two extreme farms. Having tied them with a ridge bar, a cord is pulled between them and the remaining structural elements are exposed along it.
Having installed the roof frame, you can start filling the battens. Its pitch is selected depending on the type of roofing. To install slate on a cold roof, it is enough to install three boards under each sheet (along the edges and in the middle).
If soft tiles are used, then you will have to make a continuous flooring from edged boards (25-30 mm) or lay an OSB board. Metal tiles are an intermediate option. A crate is placed under it in increments of 20-30 cm.
Sheathing and insulation of the frame
The best material for decorating a bath was and remains wood. Everyone chooses a specific type of cladding according to their taste. The interior of the bath can be finished with moisture-resistant plasterboard, tongue-and-groove board or clapboard.
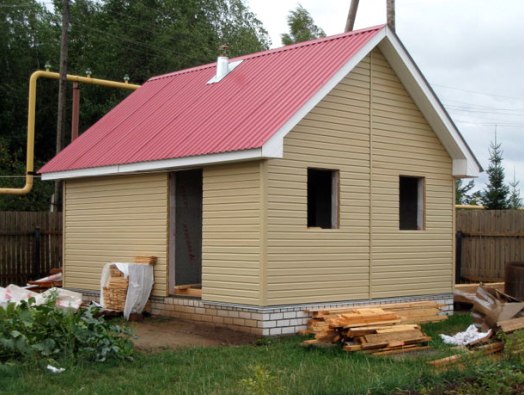
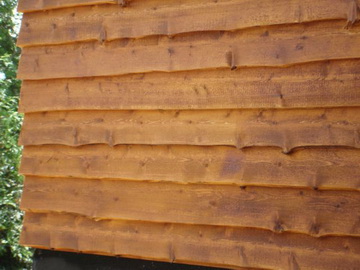
Outside can be used edged board, siding or blockhouse, which will give the structure the appearance of a log house.

It is not advisable to sheathe the walls of the bath from the inside with OSB. It does not allow water vapor to pass through and is problematic from an environmental point of view (phenol-formaldehyde resins). Use a regular edged board instead. It is not more expensive than particle board, breathes well and does not emit toxic compounds.
There are fewer options with insulation. We will not consider polyfoam. It is not only toxic when burning, but also completely blocks the path for diffusion of water vapor through walls. On contact with wood, it promotes accelerated decay of the latter.
Remains mineral and ecowool. The first requires moisture protection. Therefore, the walls from the inside in front of the cladding are upholstered with a vapor barrier, and a film hydro-wind barrier is placed outside.
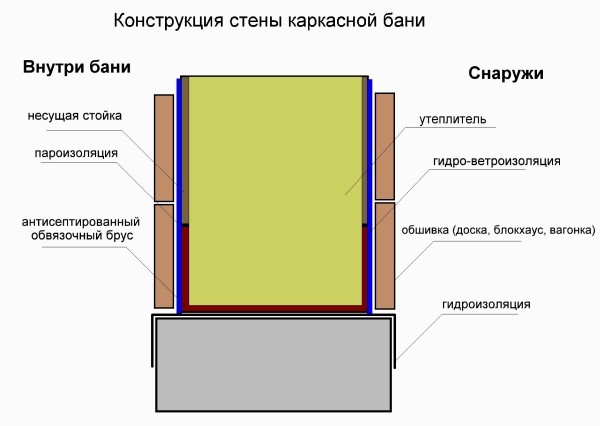
If the bath is insulated using ecowool, then a vapor barrier will not be needed. This type of insulation is a fluffed wood pulp. Unlike mineral wool, it does not get wet from water vapor.
Ecowool can be applied wet from the inside using a blow molding machine. After drying, it is covered with a layer of kraft paper, after which wood sheathing is stuffed onto the racks. With the dry method of warming, ecowool is poured layer-by-layer in the cavity between the outer and inner lining.
Thermal insulation and waterproofing of the steam room is a separate topic. Here you need to use a constructive proven over the years. It will prevent wood from rotting due to moisture and high temperatures.
Since the main walls of the frame have already been insulated, it remains to make the thermal insulation of the internal partition and the ceiling. The same insulation can be put here, and its surface facing the steam room must be protected from moisture with aluminum foil.
Having calculated the area of the ceiling and walls of the steam room, you can buy foil mineral wool or foamed polyethylene with a reflective aluminum layer.
Having protected the insulation with roll insulation, all its joints must be carefully glued with tape with a reflective layer of aluminum.
After that, it remains to fill the antiseptic lathing from the bar on the racks and fix the linden or alder lining on it - best material for decorating the walls of the steam room.

When designing the device of a frame bath, do not forget about the holes for ventilation of the washing and steam rooms. There you will need to put an electric hood, closed by a louvered grill. It will help remove moisture faster after bath procedures.
In the underground space of the washing compartment, it is necessary to provide for a simple sewerage system, providing the water with the possibility of free flow into the septic tank.
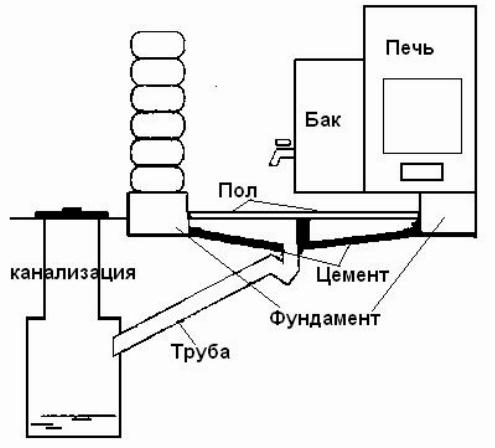
In the steam room, the floor is easiest to make of ceramic tiles, laying it on a layer of hard insulation, protected from above by waterproofing.
Estimated construction costs
The cost of 1 m2 of a turnkey frame bath is from 10 to 15 thousand rubles. This price includes all materials and work on the installation of a shallow strip foundation, frame, roof, wall insulation (mineral wool 15 cm), installation of woodwork and plumbing. The specified price range provides for the installation of electrics, installation of plumbing and fireplace stoves.
By undertaking the independent construction of this object, you will reduce its cost by almost a third. According to the data provided by home craftsmen, the cost of a frame bath with an area of 20 m2 is less than 160 thousand rubles (7-8 thousand rubles per 1 m2).
- What to consider when building a frame bath with your own hands
- How to build a frame bath with your own hands
- Laying the foundation
- Walling
- Roof arrangement
- External and internal finishing of the structure
The classic bath is an ordinary wooden blockhouse, the quality of which has been tested for years. But now such a structure is considered a rather expensive pleasure. Today, thanks to new technologies in the field of production building materials private developers were offered an excellent option - the construction of a frame bath with their own hands. This innovation was received positively by consumers, and now this type of bath is especially popular.
For a frame bath, you should choose well-dried boards that have low thermal conductivity and cannot be deformed.
What to consider when building a frame bath with your own hands
The construction of a frame bath is impossible without the installation of a thermal insulation system, thanks to which normal conditions for sealing and normal air exchange in the room are provided. It is best to carry out work on the insulation of the structure using fiberglass or mineral wool because these materials have the appropriate characteristics and do an excellent job with the responsibilities assigned to them.
One of the significant drawbacks in the construction of a frame bath with your own hands is the appearance of condensation. During atmospheric precipitation in the form of rains and snowfalls, a certain percentage of moisture penetrates through the cracks and accumulates inside the frame. To prevent this unpleasant phenomenon during construction, you should take care of vapor barrier. In this case, it will be optimal to use glassine or vapor barrier films, which must be placed between the insulation layer and the inner lining. At the same time, it is not recommended to use roofing material because it emits an unpleasant pungent odor when heated.
The construction of such a structure as a bathhouse requires the presence of well-dried boards. For this, it is desirable to choose a material that has low thermal conductivity and practically does not deform. Such properties are possessed by wooden boards made of aspen, linden and larch. Finished lining sheets must be of the highest grade and free from various defects.
All of the above conditions must be taken into account during the construction of the structure, so that the bathhouse can serve for a long time in the future and at the same time maintain all the quality characteristics. Therefore, in order to achieve some success in this matter, experts recommend drawing up a carefully thought-out construction plan.
Frame bath and its advantages:
- minimum construction time;
- a bathhouse can be built at any time of the year;
- cost-effectiveness in the construction of the structure and the operation of the structure in the future;
- good disguise of all communication networks and electrical equipment;
- no shrinkage of the structure;
- a large number of options for both external and internal decoration.
Back to the table of contents
How to build a frame bath with your own hands
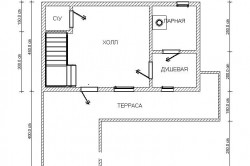
First of all, you need to decide on the place where the frame bath will be built, and the size of the building itself. The minimum area for a bath is 2.5x 2.5 m², it makes no sense to make this structure even smaller. Otherwise, the room will be cramped, and the simultaneous placement of two or more people will cause some discomfort. When determining the size of the dressing room and sink, you should also take into account the placement of the bench and shower.
After the place of the future structure and the dimensions are determined, it is necessary to analyze the composition of the soil and make a construction scheme. It is recommended to immediately indicate the location of the stove, chimney, ventilation system and choose a material for wall and roof cladding. After all, a correctly developed construction plan is half the success in the business started.
Back to the table of contents
Laying the foundation
It is known that frame baths as building structures are lightweight, therefore, for their construction, it is allowed to carry out the foundation according to a more simplified scheme.
In this case, the most profitable option is considered to be the laying of a columnar foundation on asbestos-cement pipes filled with concrete mortar.
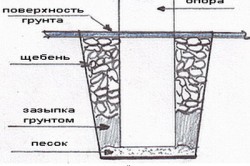
- To do this, it is necessary to drill the required number of wells with a depth of at least 1.5 m and a diameter of 200 mm with a gas drill.
- Asbestos-cement pipes must be cut in half, inserted into wells, covered with sand and compacted well.
- Prepare a concrete solution and pour it over the installed pipes.
- Use a level and tape measure to mark future walls.
- Now you can start strapping, here you will need boards with a section of 50x100 mm, which must be treated with an antiseptic before starting work.
- The boards are laid along the outer contour with the outer edge, fastened with a hammer and nails.
- The plinth trim is connected using wooden supports.
- Laying horizontality can be controlled using a building level. If deviations are found, the laying can be leveled by means of roofing tar, folded in several layers.
- Intermediate racks are installed taking into account the installation thermal insulation material, external and internal cladding of the structure.
- In advance, along the perimeter of the structure, it is necessary to dig in and pour metal plates with concrete solution, which will give the strapping and logs additional strength.
- At the end of the work, all wooden components should be treated with an antiseptic so that the strapping and logs are not damaged by moisture and various pests.
Back to the table of contents
Walling
When erecting walls, special attention should be paid to the distance between the axes. If, when arranging the opening, docking with other walls is not provided, this indicator should be equal to 0.6 m.Otherwise, the gap must be increased to 0.4 m. The distance between the posts depends on the size of the door and window openings.
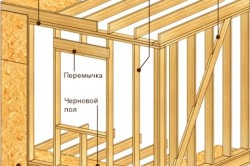
- In the places where the frame is connected to the lintel or wall, it is necessary to install additional stands. After installing all the elements, check the frame for its rectangular shape.
- The assembly starts from the corner, first, the wall is assembled, which will be connected to the harness. The wall is checked for verticality and reinforced with temporary struts.
- Then the following frames are installed at right angles. The straps are well fixed with boards that are nailed.
- The inner and outer cladding is started only after the completion of all installation work related to the installation of the frame.
Back to the table of contents
Roof arrangement
For the convenience of carrying out the work, it is more expedient to collect all the rafter components on the ground. Then each component of the roof must be lifted onto the roof and positioned directly above each specific rack. To relieve installation work, it is recommended to lay thick boards on the beams and use them as temporary overlaps.
To create ventilation between the rafters and the counterbeam, a layer of vapor barrier film should be overlapped. The roof lathing is attached to the rafters. Slate, ondulin or metal profiles are used to cover the roof.
When the rafters and the roof are fully assembled, OSB sheets of the required shape are attached to the front.
The construction of a frame bath, a house and other outbuildings does not end after the installation of a skeleton or a box, even the most reliable and strong one. The most costs and financial investments begin with orders and purchase of materials for finishing works.
The first thing that comes to mind is the price of finishing materials. An alternative to how to make the interior decoration of the bathhouse luxurious, stylish, modern and with minimal cost arises when the frame bath has already been erected and it is urgent to start finishing it.
There is an option when the interior of the bath can be finished in parallel with the construction of the frame. The saying "expensive, but cute, cheap, but rotten" is not always true, modern technologies allow you to choose decent materials from relatively cheap offers.
Outside allows you to express your design preferences and the manifestation of taste in surface cladding with a block house, siding, clapboard or just plaster. Regardless of who carries out the construction and insulation of the frame bath by specialists or by their own hands, the technology of the arrangement of the constituent elements should not change.
So:
- The inner cladding is made with horizontally arranged materials, which make it possible to further strengthen the structure.
- A frame made thoroughly for many years.
- The steam insulation of the bath is performed with aluminum foil or glassine. A great option is to use a vapor barrier film with a foil layer.
The foil is placed inside the room and will serve to reflect heat and heat the bath faster.
Attention: Vapor barrier with roofing felt or roofing felt provokes the release of specific odors when heated.
- Ceiling and wall insulation is used from traditional materials.
- Wind and waterproofing.
- External finishing cladding.
Of particular interest is the decoration inside the baths, because it refers to complex and time-consuming work. It is not enough to say that the standard set of a bath is limited to a listing of four rooms - a dressing room, a washing department and a steam room.
Everyone's financial capabilities and desires are different, someone will want to have a veranda or an attic, which also needs to be equipped and decorated.
So:
- Choose only environmentally friendly material for decoration, regardless of cost.
- Combine different styles interior decoration, and there is nothing to worry about if you move away from traditional Russian.
- The bathroom is provided with reliable waterproofing elements made of wood and it is worth considering the option of passing from the washing department to the recreation room, the location of the sanitary unit, so that the resting people and people visiting this room do not intersect and do not end up on each other's path.
- When designing the ceiling height, consider the size of the surface cladding panels.
- If you have doubts about your qualifications as a finisher, it is better to seek help from specialists.
- There should not be anything superfluous in the bath, only a minimum of necessary accessories.
Choices and properties of wood
Interior decoration baths begins with the choice of material, more precisely, with the choice of wood and a clear concept of what types of trees are used and where.
So:
- Both deciduous and coniferous species can be used. It protects the bath from the cold air in winter, from the wind.
Fuel, fire-fighting equipment can be stored in its premises. There are no high temperatures and humidity here. - The recreation room meets at least two tasks - it should not cause psychological and emotional stress, be functional in terms of the ecology of the room and be sustained in Russian traditions, like the interior decoration of the bath. Any kind of wood is taken, suitable for finishing work in calm and natural tones and shades.
It can be both coniferous and deciduous woods.
Attention: The surface is pre-sanded, treated with an antiseptic and coated with a special bath compound.
How to decorate a bathhouse inside, a video of the work performed by specialists in the washing department, presents the entire set of materials and basic techniques. Literally, two years ago, builders expressed the opinion that the best option consists in combining the steam room and washing compartments.
Today, most developers prefer to equip these premises separately. The washing room belongs to the area with high humidity and constant contact not just with moisture, but with water of various temperatures.
According to hygienic standards, it is recommended to clad all walls ceramic tiles not lower than 1.8 m, everything above is plastered, whitewashed or painted. The norms are not always respected, especially with the advent of new finishing materials.
The washing compartment is finished with clapboard, pre-treated with various compounds to prevent rotting and water-based varnishes. Someone applies plastic panels, and even polycarbonate (there are positive reviews).
An important requirement for the wash compartment is the presence of a drain or drainage of water. The steam room and the wash compartment must be separated Brick wall instead of a bar, especially if there is a stove.
The outer wall is also protected by a brick partition.
How to properly decorate the sauna inside, if only the steam room remains:
- The main rule is no conifers wood, although the exception may be Siberian or Canadian cedar. Hardwoods are preferred.

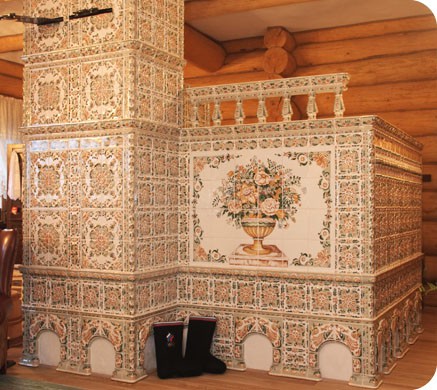
- Linden is especially worthy of a separate description. She smells amazing when heated, refers to an energy donor.
Linden cladding does not burn and does not darken over the years, and its decoration is quite decorative, photo above. - Than to decorate the bath inside except for linden, more accessible alder or aspen is used, the tree of which has the ability to absorb negative emotions, energy and "delay" diseases.
- The interior decoration of the bathhouse made of abasha (African oak) is distinguished by high moisture resistance, low resin content. Products made from it are lightweight, plastic, durable with creamy white or pale yellow wood, they do not have flaws, they do not deform and are very beautiful. The material from this tree can be attributed to a real find for decorating a steam room.
The main qualities and requirements for wood can be formulated in three words - low heat capacity, thermal conductivity.
Basic rules for clapboard cladding
Surely finishing the baths inside will not do without work with the clapboard (see). Great importance, has and right choice materials, methods of fastening and instructions for use.

The lining can be fastened with ordinary nails, but when heated, the hot metal can burn the skin of a person or, even worse, a child.
It is very important to know about the correct fastening of the panels:
- Before fastening, a set of works is performed.
- The interior decoration of the bath includes the laying of mineral insulation.
- Protect it with aluminum foil.
- Pay attention to the air gap between the foil layer and the clapboard.
- All panels are fastened in a secret way.
Attention: When finishing the ceiling, the peculiarity of the hot air rising up is taken into account and the wood for its finishing should be selected with a minimum resin content in order to exclude the possibility of burns.
Does the stove need finishing
The stove is an indispensable element of any bath, and when finishing it you will have to "dance" next to it. How to decorate a bathhouse inside and forget about the stove?
It's not even about the outwardly unpresentable and rude appearance. Dust and dirt, which is stuffed into the seams between the bricks, looks untidy, ugly, and not hygienic.
Three finishing methods
So:
- The attractive and stylish appearance of the stove is given by the cladding... It belongs to the most common finishing options in terms of its simplicity and low cost.
The tiles rest on the base of the stove rather than hanging from the brickwork. - Simple plastering, requiring annual greasing, whitewashing and ultimately resulting in redecorating... Manufacturers of mixtures provide consumers with ready-to-use dry plaster sets for ovens, but many prefer recipes that have already been known and worked out for years.
With a properly prepared solution, the life of the surface is quite long. The stove is plastered after complete drying of the masonry and completion of the stove settlement. - For round and rectangular stoves, masonry is used in ¼ part of the brick in steel cases. It has high strength due to the use of corrugated steel.
It remains only to state the fact that various materials are offered, including extra-class ones. Various inserts from expensive panels have been widely used, which give the premises not only a beautiful, but also an exquisite look.
Ways to reduce the cost of building a bath are relevant for many people. If she stands on summer cottage and be operated only in the summer, there is no point in erecting a capital structure - a summer bath made of boards will fully cope with its functions.
If it is well insulated, it can be operated at any time of the year. At the same time, it will cost less than a structure made of timber, logs, bricks and other expensive materials.
And not only due to the lower cost of the materials themselves, but also due to the work. In addition, such a bath can be built independently, with only one assistant and the necessary tools.
Advantages and disadvantages of frame baths
Any material and, accordingly, a building erected from it, has certain pros and cons. Planks and beams, from which frame baths are mainly built, is a natural material that has such disadvantages as susceptibility to decay, deformation, cracking, bugs, etc.
But, unlike log or timber baths, frame structures do not sit down, which is their great advantage: you do not need to wait several months to finish finishing and putting the bath into operation.
Another big plus is that under a light-weight bathhouse from boards you can not do strip foundation, columnar enough. It also turns out to be good to save money, and as a result, the price of the bath is lower.
How to build a bathhouse from planks
When erecting buildings using frame technology, not only boards can be used, but also materials such as plywood or OSB (oriented strand boards). The basic principles of construction depend on their choice..
But in addition to cladding, you will need materials for steam, hydro and thermal insulation. How to choose them?
Choice of materials
- For the frame, you can take a well-dried timber or boards with a section of at least 50x100 mm.
- For external cladding - boards of coniferous species (pine, larch).
- For interior cladding - wood with low thermal conductivity (linden, aspen).
- When heated, vapor barrier should not emit harmful substances and odors, therefore, traditional roofing felt and roofing material cannot be used. Opt for modern vapor barrier films.
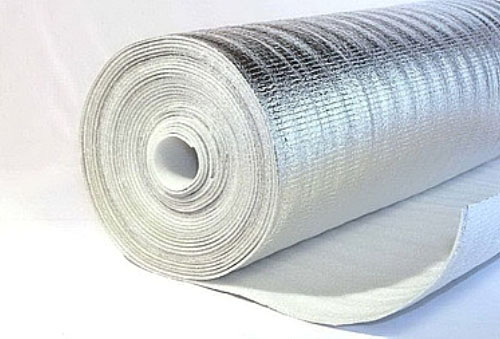
Advice. Foil films are most effective.
They not only prevent steam from passing under the skin, but also reflect warm air back.
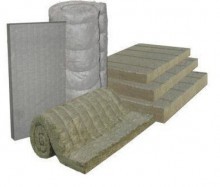
- Thermal insulation is the main material that ensures the preservation of heat in a heated bath, but does not interfere with air exchange in it. It is recommended to use a moisture-resistant insulation - stone (basalt) wool. Unlike many other materials, it does not burn and does not emit harmful substances when heated.
Basalt wool can be either in rolls or in sheets
If you decide to find out how to build a bathhouse with your own hands from boards, then keep in mind that the difference from construction from other materials lies only in the construction of the walls. Although, as mentioned above, the foundation can also be lightweight - columnar.
Basement piping
The installation of the bath begins with the device of a rigid basement strapping - the basis for the frame. For it, a beam of 15x15 cm is used or boards with a section of 50x100 (150) mm laid on the edge in 2-3 rows. Before laying them, they must be impregnated with antiseptic solutions.
Advice. If you use boards, and not a timber, it will be easier for you to connect them in the corners and make grooves in the strapping for installing the vertical frame racks.
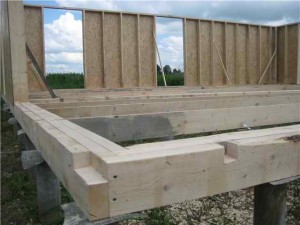
The photo shows a herringbone connection and sawed-out grooves. When working with a bar, the device of these elements will require more labor, experience and special tools (jigsaw, chainsaw).
After assembling the strapping, it is laid on the support posts of the foundation with gaskets made of roofing material or roofing felt and aligned horizontally. If necessary, the level is taken out with the help of wooden linings or the required number of layers of roofing tar. The corners of the strapping should rest on the posts, so do not be mistaken with the dimensions when making it.
Racks and top harness
After installation and fastening of the lower strapping and the device of the grooves in it, the racks are installed. The step between their axes is usually made 60 cm, subsequently it will be convenient to lay in these cells, having the same size in width.
It is necessary to determine in advance the location and size of the window and doorways, in order to first of all install the framing and corner posts, then it will be easier to calculate the position of the intermediate ones.
Note. Vertical racks must also be placed in the places where they are adjacent to the main walls of the internal partitions.
So that the already mounted racks do not fall while the others are being installed, they are additionally attached to the lower strapping with temporary jibs, while simultaneously adjusting the verticality.
Along the upper ends, the racks are fastened together with an upper strapping, which is made of a fifty-plank laid flat.
Despite the apparent simplicity, the described work should be done very carefully in order to deduce right angles, to maintain the vertical and horizontal level of the corresponding structural elements.
Insulation and sheathing
Instructions for the construction of frame baths require the following sequence to be performed when arranging a warming cake:
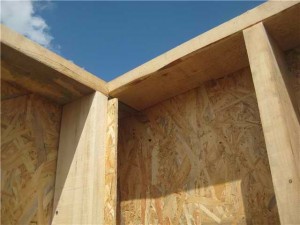
- First, the outer sheathing of the frame with boards is performed. To give the structure rigidity, it is done in a horizontal direction. But the boards dry out over time and gaps may appear between them, so they should not be fastened end-to-end, but it is recommended to lay them under the sheathing.
- The next stage is the installation of insulation. It fits between the vertical posts and does not require additional fastening, since the distance between them is clean, slightly less than the width of the insulation, so it is tightly held in the cells.
- The installation of the vapor barrier is carried out on top of the insulation, close to it. For fastening, thin slats and a construction stapler with staples are used. The canvases are overlapped and must be glued with a special tape. It is also necessary to glue all accidental gaps with it, since the vapor barrier layer must be continuous.
Attention!
The vapor barrier film should protrude 10-15 cm below the junction of the wall with the floor so that the condensate flows down it without falling on the wooden elements.
- The inner lining is made vertically from a wooden lining. There must be a ventilation gap between it and the vapor barrier.
The ceiling is arranged in the same way, but to reduce heat loss, the insulation is laid on it in two layers.
Conclusion
Within the framework of this article, you only learned about the construction of the walls of the bathhouse, built of boards. If you need complete information describing all stages of construction, watch the video in this article.
A frame bath is one of the most economical solutions, in terms of its performance characteristics it is almost in no way inferior to more expensive counterparts made from natural timber.
Frame bath - design and construction
For most regions of our country, it is enough to have a wall thickness of a frame bath of 10 cm. Insulation of frame walls can be done with both mineral wool and expanded polystyrene. A layer of mineral wool with a thickness of only 13 cm in terms of thermal conductivity replaces the thickness of the walls from a bar of 50 cm. We remind those who are afraid that the frame bath is too cold. Now estimate the difference in the cost of materials. To this difference should be added the cost of additional insulation of the cobbled bath with the same mineral wool.
For the regions of the Far North with very cold winters, there are two ways to improve the heat saving indicators of a bath.
Subsequently, a thin screed is made on the expanded polystyrene plates using a reinforcing mesh and a finishing paint coating is applied. The building looks very beautiful, it is quite cheap, and in terms of heat-saving indicators it is much ahead of any timber buildings we are used to.
We have compiled step by step instructions insulating a frame bath for cold climatic zones, developers must independently select the best option for themselves.
A few words must be said about the features of these types of buildings. This method was first used in Finland, then the experience was adopted in America and over 60% of all buildings are built there using this technology. The buildings are light (losses for the construction of the foundation are much reduced), warm, comfortable and cheap. The term of construction of buildings from scratch to the end of the finishing works with the correct organization is no more than two weeks.
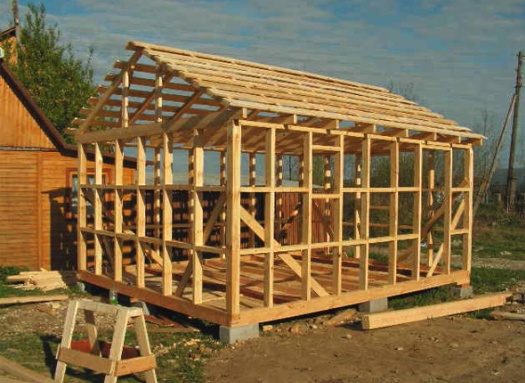
Frame bath - photo
An important point. Even during the creation of the frame, you need to know what kind of material the insulation will be made with. The fact is that international standards set the width of pressed glass wool or expanded polystyrene to 60 cm, but some domestic manufacturers, for inexplicable reasons, reduce it by several centimeters. This must be taken into account when calculating the distances between the vertical supports of the frame, otherwise the insulation will be performed with great difficulties and a significant amount of unproductive waste of expensive insulation.
With the theoretical part, we figured it out a little, you can proceed to the practical steps for insulating a frame bath.
Algorithm for warming a frame bath
Initial conditions. Insulation material - pressed mineral wool 10 cm thick, inner lining - natural lining. External walls are sheathed with OSB boards and insulated with expanded polystyrene boards. For regions with a temperate climate, external walls can be sheathed with clapboard; additional insulation is not required. Let's start with the walls.
Wall insulation
Step 1. Calculate the required amount of mineral wool. It's easy to do - add up the area external walls and ceilings. There is no need to discount the width and number of uprights, so you will have sufficient margin for unforeseen losses.
Very important. Insulation work should be done only in dry weather. You can find recommendations to first upholster the frame with windproof material, and then calmly insulate the building, regardless of the weather. Do not heed such advice. Firstly, windproof materials will never protect mineral wool from moisture penetration during rain. Secondly, the number of places with a loose fit of the insulation to the frame increases significantly. The fact is that you have the opportunity to check the tightness of the mats only from the inside, and the outside is inaccessible, it is covered with material.
In order to see this for yourself, try inserting one sheet of mineral wool into the niche of the frame. On the reverse side, the sharp corners of the cotton wool are deformed and will not fall into place, the thickness of the insulation layer in these places will be significantly reduced. In these places, cold outside air will definitely penetrate, and steam will condense. Each sheet needs to be corrected around the entire perimeter, use for this kitchen knife or a hacksaw blade for metal. It is necessary to ensure that the ends of the sheet of mineral wool, the canvas and along the entire perimeter, are in contact with the elements timber frame and among themselves.
Important. Insulation works much more efficiently if instead of one 100 mm thick slab, two 50 mm thick boards are installed. This will make it possible to overlap the joints between individual slabs and better control the tightness of their ends to the frame elements. Nothing is lost at cost, and the quality improves noticeably. In addition, condensation must form on each cold bridge, which has a very negative effect on the operating time of wooden elements. Two layers of thinner mineral slabs solve this problem as well.
Step 2. Start laying the mineral wool from the floor to the ceiling. Under its own weight, it is additionally compacted and reduces the number of possible cracks.
Council of professionals. Cutting pressed mineral wool is much easier with an ordinary hacksaw. Before that, sharpen the teeth with a grinder to the maximum and spread them a little wider.
Some builders use an assembly knife for such purposes, but we do not recommend it. Firstly, its blade is very thin and thick sheets are difficult to cut evenly. The blade does not cut through all the mineral wool the first time, it is necessary to carry it through the same place several times. And it is almost impossible to get exactly a second time into the cut made. Secondly, the blade of the knife quickly dulls against the glass, the tip does not cut, but pulls and tears the material. The work becomes much more complicated, the quality deteriorates.
Install thermal insulation around the entire perimeter of the walls of the frame bath. There are cases when, after insulation, doubts arise about sufficient efficiency, and external insulation cannot be produced for various reasons. Don't be discouraged, there is a very simple way out.
Nail horizontal slats 5 cm thick to the vertical racks of the frame, the distance between the slats is 60 cm. Choose more accurate values depending on the linear dimensions of the mineral wool mats. Another layer of insulation can be placed between the nailed slats. Do not worry that the internal dimensions of the premises will decrease, no one will even notice these few centimeters.
Step 3. Now you can start installing ventilation and utilities (water supply and electricity), if you have them. Before starting such work, you should have drawn a diagram of the location of ventilation ducts, gaskets electrical cables and plumbing or sewer pipes... Work should be carried out taking into account the requirements of the PUE and construction regulations.
Important. Do not put the rock wool close to the floor, place it on a wooden slat. Such a technique will eliminate the risks of the insulation getting wet, and wet pressed cotton wool over time will certainly cause premature damage. wooden structures.
Photo - laying insulation in two layers
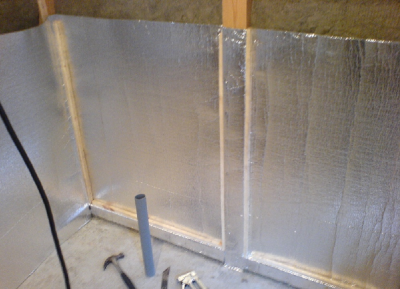
Step 4. Install a vapor barrier from the inside.
A very important point, all work should be done exactly according to the instructions. The fact is that even a slight increase in the relative humidity of mineral wool dramatically lowers its heat-saving characteristics. In addition, prolonged contact of the uprights with wet cotton wool is highly undesirable.
Various materials can be used for vapor barrier: cheap plastic wrap, rather expensive non-woven membranes or aluminum foil.
The protective barrier is attached with a stapler, the overlap of the material is at least 5 centimeters. Seal the joints very carefully, use ordinary tape or special self-adhesive foil for this purpose. Keep in mind that any minor gaps will necessarily make themselves felt over time. Don't rush to work. Perform all technological operations as carefully as possible.
Step 5. Nail the slats about two centimeters thick and fix the lining to them. Check the width and length of the premises, if the dimensions are normal, then you can cut off the entire lining at once. If there are problems, then each board needs to be customized separately. Fasten the lining from the bottom up; to fix it, use small nails up to 2 cm long. You can drive nails into the groove or into the front surface. The first method looks prettier, but it is more difficult to do. Soberly assess your abilities and, taking them into account, choose a method of fixing the skin.
On this internal work on the warming of the frame bath are completed, you can proceed to the external ones.
Thermal insulation of the outer surfaces of the walls of the frame bath
We have already mentioned that this work should only be carried out in areas with very cold climates. Initial data. The outer surfaces of the walls of the frame bath are sheathed with moisture-resistant OSB boards or plywood. Insulation material - expanded polystyrene, sheet thickness 5 ÷ 10 cm.
Step 1. Calculate the required amount of materials and hardware. Expanded polystyrene can be fixed with special dowels with increased diameters of the caps or placed on polymer glue.
For one square meter wall area you need 6 pcs. dowels. The amount of glue depends on how smooth the surfaces of the walls are and how it will be applied: solid or only along the edges and center. It is impossible to say exactly what is best, read the instructions for the glue and use the manufacturer's recommendations. Only after the start of work will you be able to find out the actual amount of glue consumption, taking into account all factors. For finishing the surface of the slabs, you will need a reinforcing mesh and finishing plaster.
Step 2. Check the condition of the surfaces and, if necessary, correct the problem areas. OSB boards must be completely dry. From the outside, there is no need to protect them from moisture, expanded polystyrene will serve as protection, it does not allow moisture or steam to pass through.
Practical advice. Do not try to make the wall cladding perfectly even, a gap of up to 0.5 cm is easily corrected during the installation of polystyrene foam plates.
Step 3. Start work from the bottom of the building, very carefully check the position of the first row. It is better to glue polystyrene boards, modern materials have excellent adhesion. In addition, it is easier and faster to work with glue, it allows you to level surfaces. If the walls have rather large irregularities, then apply the glue in a layer of increased thickness. In order to save material, only the corners and the center of the sheet can be glued.
Check the position of the expanded polystyrene boards with a long, even strip. At the same time, you must control the position of at least two sheets of polystyrene foam.
Practical advice. If you have little experience in the production of such works, then we strongly advise you to beat off horizontal lines on the walls at a distance equal to the width of the sheets. Use a rope with blue color, it will take only a few hours and the benefits will be quite noticeable. The lines make it possible to constantly monitor the position of each row of insulation.
Step 4. Using this algorithm, insulate all the walls of the bath. Treat door and window openings carefully.
Now you need to give time for the glue to dry, depending on the specific brand, it will take from 24 to 48 hours. The glue is dry - you can start gluing the reinforcing mesh and decorative plastering.
Plastering on a grid
Step 1. Carefully use glue to seal up all the joints between the individual sheets of insulation, trim large ledges in height.
Step 2. Prepare the solution according to the instructions, work can be done with a large spatula or trowel. First, the mesh is pre-fixed in several places, and then the glue is applied over the entire surface. Make sure that it does not sag anywhere and does not peel off from the surface of the expanded polystyrene plates.
Step 3. Plaster outer surface insulation. It is not necessary to apply a thick layer of mortar, the main thing is to hide the reinforcing mesh. The plaster should cover the reinforcing mesh by 1 ÷ 2 mm.
A layer of plaster is applied over the reinforcing layer. But before that, the reinforcing layer must dry well for several days. We prepare the plaster for further painting or cladding various materials... Plastering is necessary at temperatures above +5 degrees, you need to avoid hot days, windy and rainy weather. And choose a good external plaster, because it is she who is the main protective layer from atmospheric precipitation
This completes the work on insulating the walls of the frame bath, you can start working with the ceilings.
Sheets can be laid on the rough ceiling (the optimal option from our point of view) or fixed against falling out with any metal slats, and to fasten the finished lining, special 20 × 50 mm slats can be nailed.
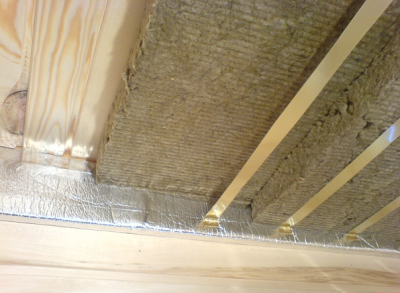
Step 1. Nail the rough ceiling to ceiling beams... To do this, you can take unedged boards of the second or third grade with a thickness of about 20 mm. Remember to remove the bark. Under the bark, wood pests will always appear over time, which will begin to damage not only the boards of the rough ceiling, but also all the wooden structures of the frame bath. The distance between the boards is 20 ÷ 25 cm, for fixing you can use ordinary nails or wood screws.
Step 2. Lay sheets of insulation in the free niches of the rough ceiling, carefully align them around the entire perimeter. First, you should put all the insulation from the side of the attic, then correct their position from the inside. Insert a knife or a hacksaw blade into the joints between the sheets and, moving them forward / backward, achieve a perfect fit of the insulation on all sides.
Step 3. Take care of the vapor barrier. For this, you can use aluminum foil, modern membrane materials or ordinary plastic wrap. All of these materials do a good job with the tasks at hand, although the price difference can be very significant.
Practical advice. Focus on sealing the joints of insulating materials. The overlap in these places is at least five centimeters, the joints should be glued with tape or special foil.
Be very careful when working with foil - it breaks quickly. And any hole significantly reduces the effectiveness of the vapor barrier with all the negative consequences. The vapor barrier is fixed with a stapler, do not allow large sagging of the material. The distance between the finishing lining of the ceiling sheathing and the insulating material must be at least one centimeter.
Step 4. Nail about two centimeters thick slats to the ceiling beams, the lining will be attached to them.
Video - Thermal insulation of a frame bath
Video - Insulation of a frame bath
Step 5. Check the position of the waterproofing and insulation, if everything is normal, then start finishing ceiling. During the sheathing, additional work may occur if the stove chimney exits through the roof. How to finish a chimney?
The principle of protecting the insulated ceiling from heat
The complex of works will depend on the material of manufacture and the type of chimney. Let's take a look at the four most common types of chimney.
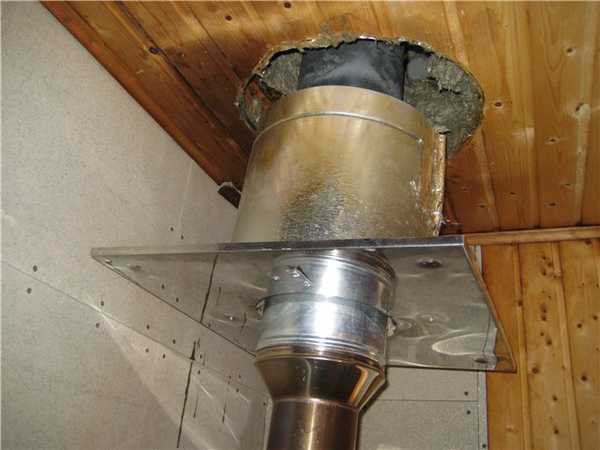
Installation manual for a metal chimney. Chimney and ceiling duct elements
During the description of the operational advantages of a frame bath, few people mention its disadvantages, and they are available in every building. One of them is the relatively low bearing characteristics of the frame. This feature has a significant impact on the choice of insulation. We strongly advise against overloading the bath structure and using materials with a high specific gravity during insulation.
Do not use traditional folk insulation based on straw or sawdust. During cooking, they are mixed with clay soaked in water and become very heavy. In addition, the presence of a large amount of water can cause the wooden structures of the ceiling to get wet, and this will have a very negative effect on all the performance indicators of the bath.
The frame walls do not constitute any obstacle to the entry of rodents. And they are very fond of expanded polystyrene, in just a year or two they are able to turn solid sheets into dust. Keep this in mind when choosing a material, do not use polystyrene foam to insulate the internal niches of the frame.
Pay great attention to the quality of waterproofing and vapor barrier. Frame baths do not have unloaded vertical thrust posts, each of them carries a load and holds other important structural or architectural elements of the structure. A breakdown in strength due to prolonged exposure to moisture in just one rack can cause critical disturbances in the stability of the entire bath. Complex and expensive repairs will be required. It is much better to prevent such a situation even at the stage of warming the premises than to engage in complex repair work later.
Any work on the insulation of premises is aimed at increasing the comfort of taking bath procedures. But you will never be able to achieve the desired result if you only deal with the insulation of the frame bath, and the device and the choice of the stove, the ventilation of the premises is different. important points do not pay attention.