How to make the floor in the garage do it yourself cheap? Overview of coatings and photo materials. Choose flooring in the garage: What material is better?
During the construction of the garage, some attention should be paid to the floor. If the surface is mowing, highlight a lot of dust, it will not be able to withstand loads - it will negatively affect the safety of the car. To do paul in the garage do it yourself You can in several ways, each of which has its advantages. A classic base is considered a concrete screed, but are in demand and other floor options: earth, bulk, wooden and even tiled.
The cheapest floor is earthen. It does not require financial costs, has a very simple device, but at the same time it has low strength and strongly absorbs moisture. Such a coating can be temporarily made if the construction budget is very limited. Also, this option is suitable for those who do not often use the garage, and most of the time is in the roadway.
The process of earth agriculture is very simple:
- with the markup of the site under the foundation remove the entire floral layer;
- after filling the base, the internal space is cleared and align;
- with the help of a tamper, the base is carefully compacted;
- when the roof is already mounted in the garage, a layer of fatty clay with a thickness of 10 cm is poured into the floor;
- carefully tamper the base.
You can do without clay, but it significantly increases the strength of the floor and provides good defense from moisture.
Concrete floor
Concrete screed is the most popular coating in private garages. Such a floor withstands very strong and uneven loads, not afraid of fire, resistant to various oils, solvents and gasoline, durable. Moisture concrete can pull, but the correct floor device completely eliminates such risks. Although the volume of work is large enough and will require a lot of time and physical effort, the process itself has a simple technology.
Stages of construction:
- manufacture of observation pit;
- floor laying;
- preparation of soil;
- floating with sand and rubble;
- laying waterproofing;
- reinforcement;
- filling the floor.
All work is performed after the completion of the construction of the garage, but before the start interior decoration premises.
Step 1. Preparation of pit
The observation pit is not a mandatory element of each garage; It needs only those who independently repair their car. It should be noted that the pit should not be done on the site, where the level of groundwater is 2.5 m. The place for it is usually chosen in the center of the room, retreating from entering a certain distance.
Having determined the location of the pit, digging the pit. His parameters:
- width 75-80 cm + 30 cm for waterproofing;
- depth - the growth of the garage owner + 30 cm;
- length - car length + 1.5 m.
On the ground, the boundaries of the pit and begin to dig. While working, you need to ensure that all the walls remained as vertical and even as possible. After the ground, the floor is sealing the floor, then the thin layer of clay is poured and the tram. Further, the bottom of the pits stood with the layer of rubberoid, the edges of which are short for the walls.
On top of the runneroid poured a concrete mixture to height from 7 to 10 cm. The top of the concrete is flattering and leave to dry. You do not need to cover the pit at the time of drying out the solution.
Step 2. Wall Laying
When concrete in the pit is quite hardening, you can upload walls. For these purposes, a red burned brick and blocks made of aerated concrete is best suited. Perform masonry immediately around the perimeter, separately laying each wall it is impossible. So, the first row is stacked by the level, leaving about 15-20 cm between the walls and bricks. The protruding solution is immediately removed by the trowel, so that when finishing the pit it was not to knock off the frozen concrete.
Laying of walls. Around the perimeter metal corner
All subsequent rows are laid out with the displacement of vertical seams, which contributes to the strengthening of the walls. So that the masonry remains vertical, every 2-3 rows check the level; It is not recommended to build more than 6 rows of bricks. The last row of bricks should be 6-7 cm below the threshold level. Subsequently on brick walls A metal corner will be laid, which should not perform above the floor surface.
Step 3. Waterproofing pit
After two or three days, the walls of the pits can be hydroizing from the outside. Using a dense roller on a long handle, a brick surface is covered with primer and leave to dry. Next, heaves bitumen mastic, and the same roller apply it to the walls of a dense layer. The frighting of the free space behind the walls of the pits is made after complete drying of the mastic. Screw the emptiness soil should be layered with a mandatory traam, otherwise under the concrete coating, the Earth will see and cracked.
Step 4. Place Marking
Marking makes a laser or water level, the usual construction is not suitable here. In the presence of laser level The whole process will take a few minutes, but the marking of the water level will require more time. For convenience, markup is made at a distance of 1 m from the draft floor, and then transfer to the zero mark. So, first from the threshold upstart 1 m and put a pencil label. Then one end of the level is pressed to the label, and the second to the adjacent wall, where the water level in the tube will show the location of the next label.
Thus, on each of the walls, 2-3 tags are left; After that, the upper beacons are measured down 102 cm and also put the label pencil. It remains only to beat off the laying line of the coated cord, and the zero level is determined.
Step 5. Preparation of the base
In the process of construction of the garage indoors, excess primer and construction trash remains. All this must be removed, after which it is additionally removed by a layer of land to a depth of 30 cm. Depth should be the same throughout the area, so all visible irregularities should be considered a shovel. With the help of tamping, the ground itself is carefully compacted, then the layer of sand and clay with a thickness of 3-5 cm is poured, shed water and again take over the tumble. The higher the density of the base, the stronger the floor will be.
Step 6. Arrangement of sand-gravel pillows
The thickness of the gravel layer is 10 cm. If the garage is large, pour a layer of the desired thickness without additional measurements will be difficult, so you can simplify the task. For this purpose, wooden peasants of the desired height are driven into the ground, placing them with smooth rows. Fall asleep gravel to this level, it is necessary to make it a good time, pull out the pegs and fill the emptiness in the same gravel.
In a small garage, you can do differently: in every corner and in the middle of the walls at the level of 10 cm it is necessary to put a bright label. This technique will help quickly fall asleep gravel, without spending time for measurements. Next layer - sand; It can be small or coarse-grained, even with an admixture of clay, but without garbage and large comkers. The sandy pillow for greater seal is spilled with water and tram. Completion check the foundation plane by a large building level or rule to avoid the formation of irregularities.
The crushed stone with a diameter of 40-50 mm is poured onto the sand, the thickness of this layer is about 5 cm. The surface is spilled, compacted, fall asleep with a small amount of sand and moisturize. Trambet once again, trying not to leave sharp protrusions. In conclusion, the base is poured by a skinny concrete, the thickness of the layer of which is 3 cm.
Skinny concrete is mixed in the following proportion:
- 1 part of cement;
- 3 parts of sifted sand;
- 6 pieces of fine rubble.
This solution has low strength, but it perfectly aligns the base under the screed. Concrete poured on crushed stone, roll over the entire area of \u200b\u200bthe rule and leave to dry.
| Component | Description |
|---|---|
| Cement | Cement is an astringent binder for fastening the remaining elements of concrete and a mixture of a homogeneous stone-shaped structure. For the manufacture of concrete solution, it is better to use cement M500 or M400 (Pozzolane or Slag) |
| Sand | The sand is a placeholder that provides a normal mixture hardening and closes the voids between large components of the mixture. For concrete used washed, sophisticated sand with a shallow, medium fraction, less often - large |
| Crusheden | A variety of crushed stone can be used in concrete - stone, slag, limestone, gravel, etc. For skinny concrete, stone, gravel and mixed type of aggregate, both small and large grains. |
| Water | He is a reagent for the reaction of cement hydration reaction, which leads to solidification of the solution. To optimally flow this reaction, it is important to comply with the correct proportion of reagents (cement and water), which is customary to be called a water-cement attitude or module in / c |
| Additives | Plasticizers, hydropobicators, antiseptics, seals, surfactants, air ducts, moderators or hardening accelerators, etc. |
Step 7. Floor Waterproofing
When concrete dry, it is treated with any primer mixture.
Special membranes, rolled materials, bitumen mastic and liquid rubber are used as waterproofing. Ruberoid, film, membrane spread on the floor, and the edges are started on the walls. The canvases are placed necessarily for 10 cm. Very often the runneroid is placed right on the hot mastic, then the web is tightly glued to the base and securely protects the floor from moisture.
Step 8. Reinforcement
For reinforcement, a metal mesh with cell sizes 10x10 or 15x15 cm are needed. It is boiled from the reinforcement with a cross section of 5 mm. The grid is placed so that between its edges and the walls there are about 5 cm. The same distance must be left over the perimeter of the observation pit. In addition, the grid should be slightly raised above the surface, so plastic or metal backups with a height of 2 cm are placed under the rod.
Step 9. Installation of lighthouses
In order for the floor to be perfectly smooth, you need to make a screed by lighthouses. Metal corners, profile, but the most convenient to use steel pipes of a small diameter, for example, 25 mm, can be such lighthouses. A little solution is mixed for fixing the guides, and the pipes themselves are abundantly lubricated with machine oil. Lighthouses should be located smooth horizontal rows, the distance between which is equal to 1.2-1.5 m. Along the walls on the floor, the grooves of the solution are pounce every 15 cm and put the first pipe on them. With the help of the level, it is horizontally exposed to horizontally and simultaneously flatter at the zero mark. When all guides are installed, you should check their horizontal again. For this, the level is put perpendicular to 2 or 3 lighthouse.
On the perimeter of the garage, it is necessary to leave small gaps between the screed and walls of 1-2 cm wide and fill them with a damper ribbon. This will help avoid damage to the coating during the shrinkage of the garage. Now it remains to boil the frame from the corners for the observation pit. The steel corner of 50x50 mm is cut into 4 parts of the pits and weld in the form of a rectangle. The finished frame is ground and dry, and then laid on the brick walls. If you wish, you can paint the corner with Surik - it will be an additional corrosion protection. Under the weight of the concrete solution, the frame may be slightly deformed; So that it does not happen, the corners should be strengthened by temporary struts from the bar.
Step 10. Pouring screed
First you need to calculate the approximate volume of the solution. To do this, the field area is multiplied by a screed height, which is 5 cm. For example, if the area is 35 sq. M., then the screed will require no less than 1.75 cubic meters of concrete mix. A solution is prepared in a ratio of 1: 3, and the cement is better to take the 400-500 brands, and the sand can be replaced by the screening.
The solution should be sufficiently thick and homogeneous, so it should be mixed very carefully. The finished mass is poured between the beacons so that the solution is covered, and then the metal rule is carried out along the pipes and tightened everything too much. The rule must be strongly pressing on both sides and can be done evenly, then the surface of the screed is simultaneously compacted and aligned.
1-2 days after pouring from the screed, you should carefully remove the guides. Since the pipes were lubricated with oil, this process will not require great effort. Grooves from lighthouses are filled with the same solution and leave the surface to dry. In order to avoid cracking, the floor is recommended to regularly moisturize; You can also float the surface with wet sawdust and periodically spray them with water. Days after 10-12 sawdust sweep, and the floor dries already in the open state. A complete drying of the concrete screed is usually required about 4 weeks.
Ceramic tile coating
This option is quite expensive because quality floor tiles it's expensive. But such a floor looks great, it is easily cleaned, it allocates very little dust. Tile must be purchased with a wear-resistance class not less than 5, and if there is no heating in the garage, then frost-resistant. Stacking is recommended no earlier than 2 years after the garage construction, otherwise the coating is deformed when shrinking.
To work, you will need:
- primer;
- tile glue;
- ceramic tile;
- toothed spatula;
- level;
- plastic crosses for seams;
- grout.
Step 1. Preparation of the foundation
Tile laid on a concrete basis. If the rough screed rate during operation was damaged, it is necessary to close all the irregularities of cement mortar, clean it from dust and coat with two layers of primer. High-quality screed is just simply projected.
Step 2. floor lining
The glue composition is bred according to the instructions and give 10 minutes. On the reverse side of the tile, part of the glue is applied, the rest on the floor with a toothed spatula. Apply the tile to the floor, flatter and gently pressed. Between adjacent fragments, plastic struts are inserted, which ensure the uniform of the seams. After leveling the tile check the floor to get the floor perfectly smooth. The glue should not fall on the front of the ceramics, all random splashes and smears immediately wipe on a rag.
Step 3. Grouting seams
After laying, you need to wait 3 days and sweep the seams. For this, a special composition based on cement is used. The seams are moisturized, and then the rubber narrow spatula is applied a working mixture. After filling the seam, the surplus is removed with a neat sharp movement. When the process is completed, they give a grout to grab for half an hour, after which the seams are closed with a damp sponge. You can enter the garage in the garage in 2 weeks when the glue is completely dry and the floor will acquire the necessary strength.
The bulk floor costs expensive, but the benefits of such a coating quite justify the cost. The battery life of at least 40 years, it has very high strength, easily cleaned, does not burn, has a perfectly smooth surface. Epoxy and polyurethane industrial mixtures are best suited for the garage. Installing installation can be independently, because the fill technology is very simple.
Step 1. Preparatory work
A draft base is purified from dust and close all cracks. Receptions of a depth of more than 3 cm are also filled with a solution and dried. After that, the floor twice is processed by primer.
Step 2. Pouring the mixture
The solution for the floor is prepared exactly according to the instructions, otherwise the quality of the coating will decrease. During operation, the temperature in the garage should not be less than 10 and above 25 degrees. If the room is large, the fill is produced in stages, dividing the area into several sections. Running a mixture with needle roller, carefully removing air bubbles. It will take about 20 days to dry out, after which the coating is ready to operate.
Floors from wood in garages are very rare. Despite the ease of installation, the low cost and environmental friendliness of the material, it does not use such a popularity. Even the tight wood does not withstand loads from the car more than 5 years. In addition, the wooden floor is easily flammable, and in the garage where gasoline, oil and solvent is stored, it is doubly dangerous.
Wooden floor in the garage photo
Video - Paul in the garage do it yourself
Which floors do better in the garage, the question that many motorists ask themselves. The main thing is not to make mistakes so that it is not necessary to break everything in just a year and redo.
The reasons for damage to the surface, very much. These include a large weight of the car, the harmful effects of aggressive fuel and lubricants (fuel), large temperature differences and humidity.
Which floor is best done in the garage is considered in this article.
In order to determine which one is better than the floor in the garage, you should get acquainted with the requirements for them so that they are durable and have high-quality coverage.
The floor in the garage must have:
- High degree of strength to mechanical effects.
- Resistance to the action of chemicals.
- Great fire safety.
- Good moisture resistance.
Before deciding, what better to make the floor in the garage should be answered by such questions:
- Is it possible to make the floor with your own hands?
- What floor is better in the garage to make it reliable and inexpensive?
- Which floor is better for the garage to increase its life?
Floor options in the garage
Paul from concrete
Most often for the floor, the owners of garages choose the traditional option -.
The advantages of such a coating are:
- Really not a high price.
- Durability.
- Withstand sufficiently severe operating conditions.
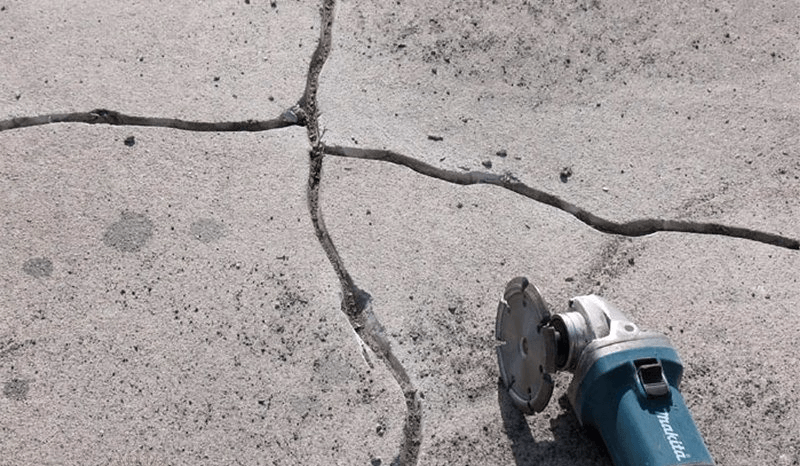
- Arriving during the period of operation on the concrete surface of the crack and potholes, due to frosty, and some mechanical damage, for example, when falling per floor, the hammer usually do not cause special discontent.
But, serious shortcomings of concrete floor serve:
- Its ability to larger dust is deposited on all surfaces in the garage, including the car.
- In concrete, all sorts of chemical pollutants can be absorbed quickly and easily, which forms implantable unpleasant divorces.
- Sometimes these stains can contribute to the appearance of unpleasant odor.
Tip: With all the variety of deficiencies, they can be completely leveled. To do this, the top layer should be covered with paints or sealants.
Concrete polished floor
Concrete floor covering in a special paint garage will make it:
- Convenient in operation.
- More durable.
- Press the coating aesthetic appearance.
- After staining, the surface will not be distinguished by dust, it will become less to succumb to mechanical damage.
This embodiment of concrete coating is most often applied. It is he who choose many car enthusiasts when answering a question, what floor in the garage is better to do?
This is explained:
- Sufficient cheap.
- Easily applying paint on the floor yourself, using any paint tool: brush, roller, sprayer.

Self Garage Floors
To enjoy ordinary concrete floor in the garage, it is best to use modern bulk mixtures, as shown in the photo.

Such formulations most often have two components that contain a polymer resin and hardener. Instructions for use indicates that they are applied to the floor in a liquid form, forming absolutely smooth, impact-resistant, with high resistance and frost resistance.
These advantages will fully manifest themselves only with a certain thickness of the coating on the basis, it must be at least five millimeters. Bulk floors are not only practicality, but beauty. Their aesthetic look is at a high level.
Tip: Such is perfectly smooth, with a gloss or matte coating, you can paint in different colors, apply a drawing on it.
Ceramic floor tile in the garage
To obtain durable floors in the garage, you can use the concrete base for facing ceramic tiles. To do this, only some types of ceramic tiles should be applied.
It can be:
- Porcelain stoneware consisting of an alloy of granite crumb and clay with some other fillers. Such material by appearance And some characteristics has the same properties with natural stone, which allows porcelain tiles to have high strength, great resistance to frost, resistant to the effects of aggressive chemical environments.
- Clinker tile or ceramics, which in the process of manufacture is subjected to long-term firing at high temperature, which gives the material with increased strength and frost resistance.
- Outdoor ceramic tiles, intended for external work, which has frost resistance, is also suitable for facing the floor of the garage.
Tip: For the floor in the garage, the tile should be selected with an anti-slip surface, which will save the car owner from random drops.

Use for floor in garage PVC plates

Such a modern outdoor material has the form of individual modules. For its manufacture, a durable, chemically resistant polyvinyl chloride is taken. High frost resistance allows the use of tiles in heated and in unheated premises, even on the street.
The PVC surface has such features:
- It is not susceptible to slip, on time the car washing with careless movement, you can not be afraid to fall.
- It absorbs vibration well.
- Perfectly withstands high loads.
- Well counteracts mechanical damage.
- Material is easy to mount. To do this, there is no need to use adhesive compositions: tiles have special locks that allow you to collect coating, like the designer. If necessary, they can be easily disassembled into components and decompose in another place.
Wooden garage floors

Tip: car enthusiasts that prefer all environmentally friendly, should be made in the garage floors from the tree.
Advantages of wooden floors:
- Absolute security: they are not sources of dust or excretion of harmful substances.
- Boards who come to disrepair can easily be repaired or replaced with new ones.
- The total cost of floors from the boards is low enough.
Tip: Choosing the floor for the garage, you should focus on your capabilities, but it is impossible to forget about the quality. From properly laid, high-quality outdoor coatingDepends on its durability and the safety of your car.
The disadvantages of wooden floors can be attributed:
- Little service life. After 4-5 years of operation, despite the perfect waterproofing and the correct care, the boarding rings begin to rot. But, spoiled boards easily change to new ones.
The listed coatings for the floor are not all that can be used in the garage. These are just the most popular solutions. For example, you can make an ordinary earth floor - the cheapest option, and the floor of natural stone is one of the most expensive.
During operation, the floor in the garage is daily exposed to serious tests. The duration of its service directly depends on how correctly the arrangement was performed. Insufficient attention to trifles can lead to rapid wear and worsening consumer characteristics of the floor covering. However, strictly observing the technology of work, you can make a reliable and durable floor in the garage with your own hands.
Selecting a Floor Fashion Fashion
Before starting the floor of the floor, ground research and assessment of terrain irregularities are carried out. If a high level of groundwater is detected, drainage works are performed. When the garage is located on the slope and availability of a large difference in height, the site is pre-aligned, the upper layer of the Earth is removed.
Then selected optimal method Outdoor coating equipment.
For sex in the garage can be used:
- wood flooring;
- monolithic reinforced concrete plate;
- concrete screed.
The wooden floor in the garage is rare, since it does not meet the requirements of fire safety and does not differ in high strength. However, it is quite warm, cozy and contributes to creating a special atmosphere in this room.
For its installation initially, a flat site is prepared. It is installed on the level of columns or brick supports. Their number depends on the size of the garage and the planned load on the floor. As an option, the foundation for the floor can be the foundation of the garage.
Lags from the bar are stacked on the support, the cross section of which should be at least 150 * 150 mm. Previously, they are soaked with liquid bitumen or water-repellent impregnation. Between them, waterproofing and insulation is laid. Then the boards of at least 50 mm thick, processed by the antiseptic, are then nailed. Lags are necessarily mounted across the garage, and the boards are fixed along the alleged line of movement of the machine.
| Outdoor boards thickness, mm | Gap between lags, mm |
|---|---|
| 20 | 300 |
| 24 | 400 |
| 30 | 500 |
| 35 | 600 |
| 40 | 700 |
| 45 | 800 |
| 50 | 1000 |
Plate Zhby
In places having a significant bias or high level of groundwater, it is advisable to put on the floor in the garage one-piece basis. This significantly reduces the time of work and simplifies the installation process itself.
Install the plate can only be based on the basis. To do this, the floor in the garage is saturated with gravel or rubble layer 20 cm, and then sand. All this is thoroughly trambed. The frame of metal profiles is stacked on a dense surface, which already drops the plate itself. It is unacceptable to put it directly to the ground, because due to the movement of the soil and during operation, the stove can crack.
It is impossible to use the hollow slab overlap for floor mounting in the garage, which is not heated in winter.
On top of the laid base poured a layer cement tie. or the finish bulk polymer floor. The result is a solid and reliable coating. The only drawback of the slab is that it is necessary to use the services of expensive construction equipment for its laying.
It is more reliable and easier to make a concrete floor in the garage. However, you must first consider the question of whether the pit is needed in the garage.
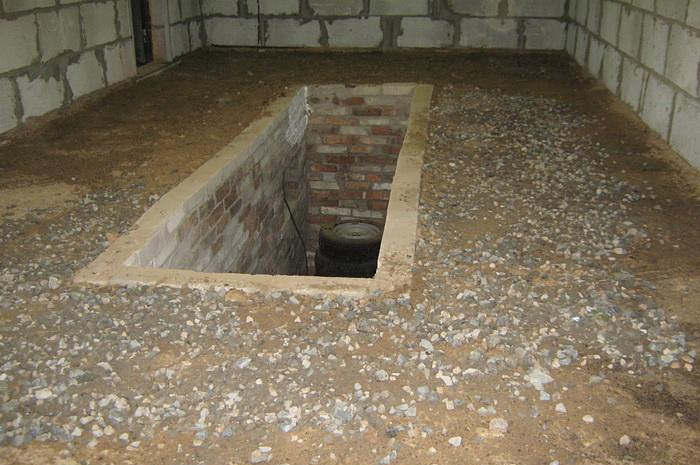
Looking Yama
For the convenience of repairing the car in the garage, the observation pit is equipped.
But it should be borne in mind that in the presence of a high level of groundwater, the device of underground structures in the garage can become extremely problematic.
For observation pit in the garage follows:
- drop the pit in the ground, having a 20 cm depth greater growth of the machine, 80-90 cm width and a length of about a meter (depending on the dimensions of the machine);
- fall asleep on the floor layer of gravel, sand and make over a thin layer of cement screed (5-10 cm);
- along the walls to make a formwork and pour cement or put on a solution of bricks;
- from above on the finished walls, put a welded frame of 60 mm of iron corner and fasten it with a cement solution.
As soon as the pit is ready, you can proceed to further work on the arrangement of the floor in the garage.
Concrete floor in the garage
Preparation of the foundation
Before starting work, the approximate height of the future floor is calculated. It should be a bit above the threshold. All excess earth from the garage is exported. Then it falls asleep to the surface:
- rubble shallow fraction with a layer from 30 cm to 85 cm (depending on the type of soil);
- safety small sand with a layer from 15 cm to 20 cm.
All this is thoroughly recalling, trambed, watering with water and again tamper. To do this, you can use special equipment or to do with shirts. As a result, a dense and even base should be obtained. The deviation of the plane of the prepared floor surface from the level should not be more than 5 mm per meter.
Spring sand
Waterproofing, insulation and reinforcement
On the rammed sand rolled out rubberoid, hydroizol, rupture or glazing. It is based on the extruded polystyrene foam thickness from 5 to 10 cm thick. This insulation will help avoid troubles associated with the friction of concrete in the winter season. A dense film or a waterproof membrane is spread to polystyrene foam. The film strips are stacked necessarily with the allen on top of each other at least 15 cm, and the joints between them are punctured by transparent scotch.
On the walls, the waterproofing material is fixed at a height greater than 5 cm's estimated level of finished floor.
At the next stage, the installation of the reinforced frame is performed. This uses fittings with a thickness of 8 to 12 mm. It is necessary to choose it depending on the intended load on the concrete slab. If the garage is big and there will be many heavy machines in it, then the iron bars should be as thick as possible.
Between themselves, iron rods are associated with wire. The use of welding is not allowed, since the frame design must have a certain mobility. The edges, corners and joints it is advisable to strengthen as reliably as possible. For transverse racks in the frame, fittings are 6 mm thick. As a result, a durable two-layer lattice should be obtained with a distance between the rods of 5-10 cm.
Under the lower reinforcing grid, stands are stacked with a height of 3-5 mm. The total height of the frame should be slightly smaller than the planned thickness of the concrete slab, which is chosen on the basis of the analysis of the soil and the climatic conditions of the region. On sandy soils, in the absence of low temperatures in the winter season, a plate thickness is allowed from 25 mm to 35 mm. On bunched soils in areas with traditionally low winter temperatures, the thickness of the concrete base should exceed 45 mm.
From the walls of the frame from the reinforcement is separated by a compensation gap. It is necessary to ensure a concrete slab of free space for gradual expansion and narrowing at different times of the year. In the absence of a distance between the floor and the walls of the garage, the entire design may occur. A damper tape, foam or soft insulation is used as a plugging material.
Installation of Mayakov
For the device of a smooth concrete plate, lighthouses are installed on top of the solution on the solution. They can be metallic, aluminum or wooden. They are installed so that the upper surfaces of all beacon guides are in the same plane. This is done using a laser or construction level, you can use for these purposes and the usual construction shoela. To do this, it is tensioned on the diagonals of the room and regulate in terms of the level.
First, the beacons are fixed along the walls, the following are set at a distance of the length of the rules of the concrete solution. Pulling concrete can be started only after complete hardening of the cement mixture on beacons.
Must under the installation of the guides provides for a slope of at least 2 cm in the direction of the garage gate. This will ensure a timely outflow from the finished floor of water and other liquids in the future.
As soon as the beacon profiles are securely fixed along the entire surface of the floor, you can proceed to the direct device of the concrete slab.
Video - Installation of beacons
Pouring concrete
To install the floor in the garage, we should use a solid frost-resistant concrete, which has a brand not lower than M300.
| Brand concrete | Mass composition, C: P: Sh, kg | Volume composition on 10 l cement p / sh, l | |
|---|---|---|---|
| 100 | 1: 4,6: 7,0 | 41/61 | 78 |
| 150 | 1: 3,5: 5,7 | 32/50 | 64 |
| 200 | 1: 2,8: 4,8 | 25/42 | 54 |
| 250 | 1: 2,1: 3,9 | 19/34 | 43 |
| 300 | 1: 1,9: 3,7 | 17/32 | 41 |
| 400 | 1: 1,2: 2,7 | 11/24 | 31 |
| 450 | 1: 1,1: 2,5 | 10/22 | 29 |
| Brand concrete | Mass composition C: P: Sh, kg | Volume composition for 10 liters of cement p / sh, l | The number of concrete from 10 l cement, l |
|---|---|---|---|
| 100 | 1: 5,8: 8,1 | 53/71 | 90 |
| 150 | 1: 4,5: 6,6 | 40/58 | 73 |
| 200 | 1: 3,5: 5,6 | 32/49 | 62 |
| 250 | 1: 2,6: 4,5 | 24/39 | 50 |
| 300 | 1: 2,4: 4,3 | 22/37 | 47 |
| 400 | 1: 1,6: 3,2 | 14/28 | 36 |
| 450 | 1: 1,4: 2,9 | 12/25 | 32 |
In areas with complex climatic conditions, adding to cement mix Special additives and plasticizers. An independent preparation of the solution will take a long time, and will not serve as a guarantee of the formation of durable coating.
Aligning screed over insulation
Concrete for filling the floor in the garage should have the most homogeneous consistency. Satisfy this requirement in handicraft conditions is almost impossible.
The optimal option is to order a mixer with concrete solution. This will make it possible to perform all the work at a time, which is also an indispensable factor in the successful implementation of installation work. Pulling the concrete mix into several methods is strictly prohibited. This will lead to the rapid destruction of the integrity of the coating.
During the fill, the mixture is distributed by the Rule of Lateacins, while the air is carefully expelled from it. To this end, the shovel or submersible vibrator for concrete is used. The main goal mounting work is the formation along the entire surface of the floor of the garage of a solid and even mass of a solution that does not have voids inside.
The day after the fill, the floor over the entire area is covered with a dense rag, which is wetted daily by water.
You can not allow direct sunlight on the floor of the garage until they achieve the desired level of strength.
The complete hardening of the concrete slab will occur only after 28 days. After that, it will be possible to start the final stage and finishing work.
Finish coating
Concrete itself is not a durable coating. It will inevitably destroy and cracks, gradually absorbs oil, gasoline and chemical compounds. Therefore, the finished concrete floor makes sense to be covered with a thin protective layer having a higher threshold of strength.
It can be:

The choice of material for decoration depends only on personal preferences and financial capabilities of the garage owner. The sequence of mounting most of these materials in the garage is no different from the actions during normal repairs in the apartment. Initially, the floor in the garage is diverse. Then the primer is applied to it. Then the selected material is glued according to the instructions.
In any case, the properly made concrete base will serve as a reliable support for any modern coating.
Video - what to fill the floor in the garage
Video - how to make a concrete floor in the garage
Dampness, temperature jumps and drops of humidity level, aggressive impact of spilled fuel and lubricants and other features of the garage room are able to deliver a lot of hassle. Therefore, during registration of a car in the garage to a list of first priorities, it is necessary to make the installation of flooring. Assess the specifics of the operation of the room and choose the desired material will help an exciting acquaintance with the species of technical flooring and their characteristics. And if you are going to make a garage floor with your own hands, it will not hurt at all in advance to the working tool and free time.
How to choose the floor in the garage?
In the garage, the car owner has to not only keep his four-wheeled assistant, but also to keep care. To do this, in the room there is a comfortable microclimate, to create which can be insulated with a garage structure and performing interior decoration. The garage arrangement should be started with flooring. Due to the specifics of the room, the garage floor must meet the following requirements:
- mechanical strength;
- constructive reliability;
- fire safety;
- moisture resistance;
- immunity to the effects of aggressive chemicals;
- durability.
Flooring for garage out of porcelain
The floor in the garage can be made from various materials. Any of them has its advantages and disadvantages that need to be taken into account not only when choosing a coating, but also during the operation of the room.
The most widespread use of the garage flooring options were obtained:
- excavation flooring;
Such gender is not able to ensure the protection of the room from the cold and dampness. In addition, the earthen flooring is unable to resist either humidity or intensive loads when setting the car into the garage and leaving it. But this is the easiest and most cheap way to arrange the floor - everything you need, it is to align and tackle the ground inside the garage perimeter.
Earth floor in the garage room
- gravel pillow;
Gravel and sand pillow is an improved type of open floor. Such a coating is not either either either convenience in operation, no longeons, but perfectly copes with high humidity and leaks of fuels. In addition, it will cost such a floor covering inexpensively, and laying it easy to produce it alone.

Laying garage floor gravel
- concrete;
Concrete floor is the most practical and durable option for the garage room. With competent fill and proper finishing, the screed will serve as decades without being subjected to wear and contamination. On the other hand, the fill of concrete is quite time consuming, and besides the very expensive task, which requires a certain qualifications.

Concrete screed on the floor in autogo
- wooden flooring;
Wooden floors in garage rooms are installed quite often, although the tree does not have such strength and durability like concrete. In addition, unlike the latter, it is a fire-hazardous material that is in addition of interest to pests. At the same time, the laying of the wooden flooring takes much less means, forces and time than the fill of the concrete screed, and when proper care During operation, such a floor calmly serves at least a decade, without delivering the garage owner no hassle.

Moody flooring in the garage room
- ceramic tile and stone.
Ceramic tile and stone possess high decorative qualities. They are perfectly protected from chemical contamination and are not inferior to concrete in wear resistance and mechanical strength. The term of the ceramic floor is 25-30 years, and stone - 35-40. The disadvantages of ceramic and stone coatings include the impressive cost, as well as the fact that in the process of laying and tile, and the stone requires considerable skill and patience.

Flooring in a garage from ceramic tiles
Please note: Improvements of the intracerall furnishings are reasonably gradually. For example, for the beginning of the earth flooring, it is possible to hydrate the thick layer of oily clay and over time to cover the gravel and sand pillow. If necessary, on such a floor, it will be easy to install a doom for plating it with wooden flooring or pour the reinforced concrete tie for subsequent styling with tiles.
Calculation and fill of concrete base with their own hands
The arrangement of the garage floor from concrete is carried out in several steps:
- Calculation of a concrete screed.
- Collect the tool and buying material.
- Preparatory work.
- Pouring concrete.
- Alignment and dusting of the floor surface.
It is useful to know: after finishing alignment and dedusting the concrete floor it is advisable to cover with special paint or sealant layer. This will protect the material from the contact with water and aggressive chemical components, as well as significantly slow down the mechanical destruction of the coating.
Car Garage with Painted Concrete Outdoor
Calculation of concrete screed
Reinforced concrete used in the construction of foundations and screeds has a multilayer structure. In the garage room, such an outdoor coating should be installed on the rammed and waterproofed earthy pillow.
The composition of the "cake" of the concrete tie includes:
- sand (gravel and sand) pillow;
- black concrete;
- parotherproofing;
- waterproofing gasket;
- reinforced screed.
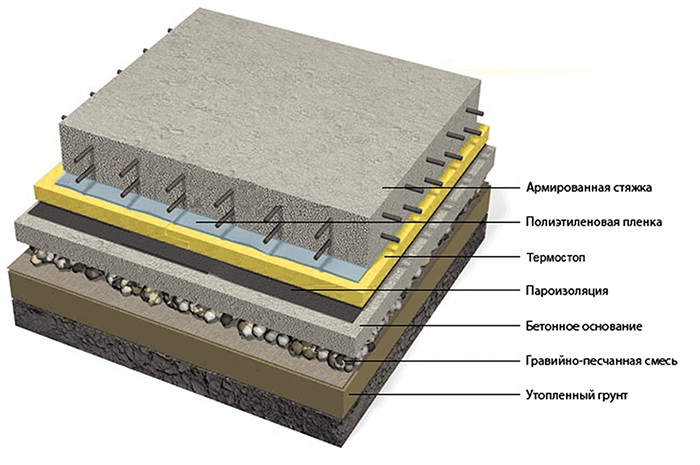
Concrete tie of the floor in the context
- take 20 cm height for a reinforced screed, crowded "pie";
- provide styling reinforced concrete on an insulating gasket with a thickness of about 5 cm;
- take a layer of black concrete at least 15 cm;
- allocate on the gravel-sand pillow stacked at the bottom of the pit, at least 10 cm;
Now you can calculate the thickness of the screed. It will be equal to:
H \u003d H Dog. + H black. Concrete + H Par. Gadrosezol + H Arm \u003d 10 + 15 + 5 + 20 \u003d 60 cm
If the zero mark is installed, it is necessary to reduce the level of earthlings to the desired depth project, i.e. Lower it on the thickness of the concrete screed under construction.

Rytyto Drinking under the reinforced concrete floor in the garage
Earth bottom of a pit and gravel-sand pillow under the draft concrete should be carefully tumped. To solve this problem, the vibrating plot is needed - a powerful tool that can ensure the highest quality of the seal of earth flooring and pillows. As a result, the risk of tie destruction is minimized due to the seasonal movement of the soil layers or sudden raising groundwater.

Sealing sand pillow vibrating
When preparing for basic work, it is necessary to check the marked laser levels from time to time.

Marking of "Cake" concrete with a laser level
For fixing the level exposed level, a construction marker and a paint cord are used. The marker needs to stagnately labels, denoting the boundaries of the layers of concrete, after which they connect them with a painted cord.

Marking of "Cake" concrete hydroelectric
Please note: when calculating a concrete screed, it is necessary to provide a small slope of the floor plane (up to 2 cm) towards sewage communications or drainage system. This will provide spontaneous removal of liquids from the floor surface.
Tools for laying concrete floor in the garage
To the pouring of the concrete screed in the garage room it is necessary to prepare thoroughly. You should collect all the tools that will be needed in the process of work, and stock building materials in sufficient to complete construction.
As for the list of instruments, it should be made:
- concrete mixer;
- vibrating plates;
- welding machine;
- disk saw with metal cutting discs;
- scrap, scooping and bayonet shovels, as well as metal vests or other capacity;
- a wheelbarrow for transporting sand, gravel and concrete mix;
- hydroelectory;
- laser level;
- malyary cord;
- rule;
- grinding machine on concrete;
- drill with a nozzle mixer;
- plastering blade, cielma and trowel;
- construction roulette;
- wooden mace for grouting concrete.
Calculation of building materials
Sand, cement and gravel - the main components of the concrete mix. The volume of the latter needed to fill the screed in the garage is calculated by multiplying the inner area of \u200b\u200bthe room to the height of the "cake" of concrete. It is necessary to take into account the coefficient shrinkage of the material, as well as the volume of insulating gasket and the reinforcing frame. Another 10% of the reserve is added to the resulting value, after which it is necessary to calculate the amount of sand and gravel required for the preparation of the solution using a table of proportions of concrete.

Preparation of concrete mix with concrete mixer
In practice, the cement of M400 or M500 brand is used for the fill of concrete floors in the technical premises. Reference references said that the average consumption of dry cement per unit volume of the concrete mix M150 or M200 is 400-410 kg / m. Cube. Knowing this figure, as well as the proportions of the solution given in the already familiar table, you can perform a quick and accurate calculation of any of the components of the concrete tie of the floor in the garage.
Please note: in garages located on the ground with a high level of groundwater, on steep slopes or areas where the risk of soil shifts or floods is present, it is irrational to pour a concrete screed. The floor in such premises can be performed by flooring with wooden boards along a pre-installed carriage frame.
Problem floor in the automotive garage
Preparation for work
To perform the fill of the concrete floor in the garage operational and, most importantly, without difficulties and mistakes, you should make calculations of building materials and thoroughly consider the actions algorithm. On the initial stage The construction of a first priority is to prepare a pit for laying an insulating pillow and pouring a rough concrete.
As part of the preparation of the garage premises to the fill of the concrete reinforced tie, the floor is required:

For the preparation of the main material - concrete mixture - need cement, sand and crushed stone. The list of accompanying materials must be made:

It is useful to know: to increase the hydro and thermal insulation qualities of the gravel-sand pillow can be using a fatty clay, the dense layer of which needs to be laid down the bottom of the pit, not forgetting about careful rambling. When laying, the mixture of sand and gravel is recommended to be made abundantly with water. This will ensure the sealing of the insulating pillow, which is positively affected by the quality of the thermo- and vaporizolation of the garage floor.
Pouring concrete and laying insulating interlayer
If the earthen flooring in the garage is rambling and laid with a pillow, you can begin the pouring of the rough concrete along the beacons. This task is solved as follows:

It is important to remember: the fill of the screed is performed in one occasion. It should be started from the highest point. Concrete is recomposed by the rule towards the distance from the far wall of the room. Upon completion of the fill and alignment of concrete, it is necessary for several hours to cover with polyethylene film. After grapping the solution in 0.5 hours from the moment of the fill, it is necessary to perform the surface of the surface with the wooden miner.
How to Dust, Align and Make Finish Processing
After filling the reinforced concrete screed, the front surface of the latter needs alignment. But before, it must be carefully examined on the subject of cracks, chips and other defects to assess the volume of the upcoming work.

Silvering new concrete tie
Alignment
The concrete floor surface can be aligned with one of the following ways:
- Puttailing.
- Grinding.
- Milling.
- Self-arguing fill.
Puttooth concrete is performed by a polymer-based composition with the addition of quartz sand. This method allows you to get rid of minor surface defects, whereas to eliminate irregularities to 5 mm depth to 5 mm need a mosaic-grinding machine. Unfortunately, with depths and wave transitions of a depth of 2-3 cm. This technique will not cope, the pharmaceutical defects are eliminated by milling.
The least time consuming, but at the same time the most expensive way to align the concrete floor in the garage is the fill with self-arguing composition. At the same time, if the thickness of the finish layer exceeds 15 mm, it is recommended to use a polymer-cement screed, whereas with the thickness of the alignment of no more than 8 mm can be caught by cheaper polymerized sand concrete.
In the presence of critical surface defects and significant height drops, it is necessary to perform an additional screed with a thickness of 1-8 cm, which not only lines, but also strengthens the top layer of reinforced concrete. This is done in several stages:
It is useful to know: the mixture for an aligning screed is prepared by small portions. In the process of filling, air bubbles, large lumps and random garbage are removed using metal robbles or a shaft with a needle nozzle.
Dusting concrete tie
For untreated concrete, intensive dust formation is characterized, since due to the accumulation on the surface of the frozen cement milk, the mechanical strength of the floor is significantly reduced.

Destruction of a raw concrete screed
If when pouring the screed in the automotive garage, do not perform dedusing, it will lead to:
- increase in the intensity and deepening of the erosion of concrete;
- constant pollution and dusting of the garage premises;
- manifestation of creak and crunch when moving along flooring;
- getting dust into moving and legged knots of equipment and equipment operating in the garage;
- reducing the comfort of stay in the garage room and the occurrence of risk to the health of the car owner.
Dusting the surface of the concrete screed involves the use of strengthening mineral or polymer impregnations. As for the first, the most common option is formulations based on sodium silicate or lithium polysilicate.

Application of dustless impregnation on the floor tie in the garage
When interacting with calcium compounds on the surface of concrete, they form a vitreous structure, which not only protects the screed from destruction, but provides additional strength. The disadvantages of mineral dusts include:
- the duration of the flow of chemical processes (from several weeks to several months);
- risk of reverse cloth - silicate reactions;
- the complexity of the composition of the composition;
- the need for careful flushing screed after absorbing.
The most practical, but also a very expensive means of mineral dedustivation is Lithium polysilicat. Its absorption takes place for 10-14 days, after which the screed does not need flushing and re-processing throughout the entire floor operation period.
To organic (polymeric) dusts include impregnation of the following types:
- acrylic (used for processing screeds with standard strength requirements);
- polyurethane (strengthen concrete, providing high water repellent properties and inertness of material to the effects of chemical reagents);
- epoxy (apply in rooms with restrictions on the use of composures with a sharp smell).
Dusting a concrete tie of the floor in the garage is performed in three stages:
When processing the screed, the discusing composition is applied with spill and is evenly distributed over the surface of the brush or oxygen.

Concrete screed after impregnation with a distinctive composition
It is useful to know: when using silicate impregnations, the process of absorption takes about 40-60 minutes. During this time, the remaining impregnation becomes viscous, so before re-applying it is necessary to dilute with water. After 20-30 minutes after the processing is completed, the impregnation must be removed using rubber cancer.
Finish treatment
In addition to the dust impregnation, the screed can be covered with water-repellent paint, pre-constructed. Coloring will exclude the contact of the floor with moisture and aggressive chemistry, as well as prevent mechanical damage and premature wear of concrete.

Staining concrete floor in the garage
With a high intensity of operational loads, the screed is advisable to protect against cracking and destruction by cutting deformation seams. The latter can perform feature:
- floor insulation from structural elements of the building in order to clean the vibrations and chemical interaction of materials;
- insulation of concrete monoliths laid at various times;
- removing voltage with uneven dried and concrete shrinkage.
It is useful to know: cutting seams are carried out after drying the screed with their subsequent strengthening and sealing.
Video: Pouring a concrete screed in the garage with your own hands
Self laying of wooden floor
Despite the disadvantages of the tree as a building material, it is widely used for laying outdoor coatings, including in garage premises. The floor, made of this material, well absorbs moisture in the air, due to which the metal components of the car receive additional protection against rust. In addition, the wooden coating is absolutely safe and much more comfortable for working in the garage than concrete. And, unlike the latter, wood does not create any dust, and if necessary, it allows you to perform operational repairs or replacement of the extensive or damaged elements of the garage floor.

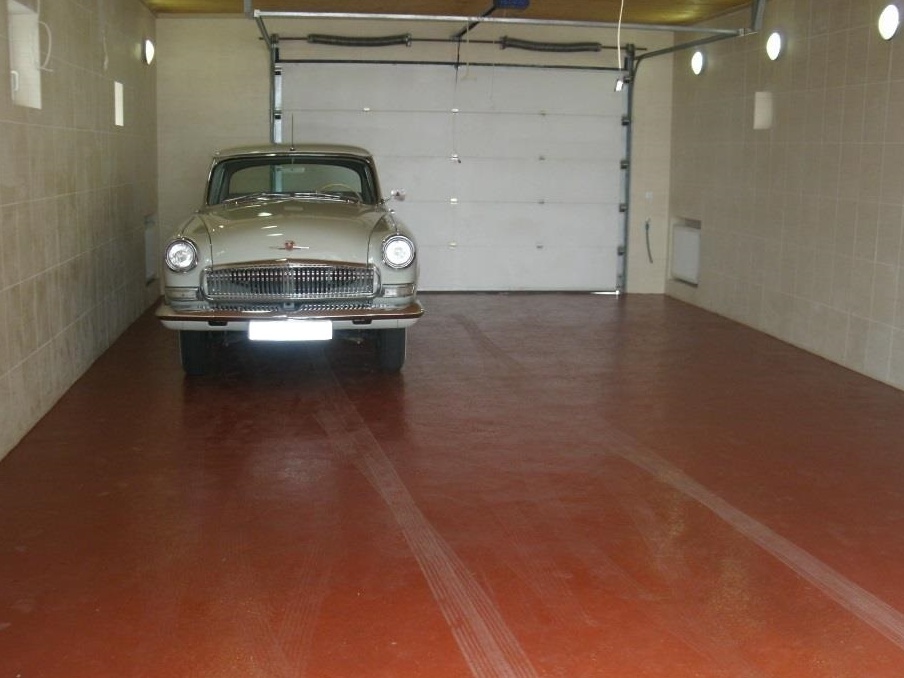
Automotive garage with pavement flooring
The choice of the laying of a wooden flooring depends on the type of base equipped in the room. If a rough concrete screed is filled in the garage, the floor covering is performed in thick (from 5 cm) edged board.

Wooden Floor Frame on a concrete substrate with waterproofing
The latter fit on the transverse lags of a small cross section (50 * 50 mm), based on the waterproofing pillow or the wall of the room. Fixation of wooden structural elements is performed by nails, self-draws or anchors. In the event that at the base of the garage there is an earthy mound, a clay or gravel-sand pillow, the design of the wooden floor will have to provide thick transverse lags (beams) with a support on the wall or the foundation of the room.

Logs of transverse lag on the walls of the garage
Another option of arrangement of the boarded flooring in the garage provides installation on an earthen or concrete base of the carriers of the columns to which the framework frame will be relying.

Wooden floor lag support for bearing columns
It is useful to know: before laying a wooden floor, an earthen base in the garage room can be pouring a draft concrete. However, this option is significantly expensive and very laborious, so in practice it is rarely applied. In most cases, a rammed sandy-gravel pillow is used as a substrate for wooden flooring.
What materials for the construction of a wooden floor to choose
If the garage is planned to lay out the flooring from the tree, the first thing that needs to be done is to choose the appropriate material. The most advantageous financial plan is the wood of coniferous rocks. Possessing a relatively low cost, it is well opposed to wear, represents little interest for pests and has high mechanical strength. In the same time conifer tree Next to cracking, and its batchness and resinity indicate certain difficulties in processing.

Timber for the arrangement of wooden floor in the garage
When choosing a tree for laying the floor in the garage, follow the following principles:
- Material must have optimal humidity. Too dry wood It will not cope with intense mechanical loads, and overly wet over time is deformed.
- Boards and carriers of lags with pronounced defects - cracks, knots, split or resin spots - should not be bought even with a discount. Such a material will deliver the trouble not only during processing, but also during the operation of the floor.
- The material is bought with a 15% margin.
- Plaques for floor sheat must have a length of at least 2 m.
- The board and the timber can be taken from one batch. This allows you to count on the same behavior of the wooden elements of the floor during operation.
- You should buy polished boards, which will significantly simplify the task of preparation of the tree to the installation and operation of the floor in the garage.
Wooden flooring can have a single or double design. The second option is advisable to apply if the floor insulation is necessary, but it can be done with a single milking flooring.
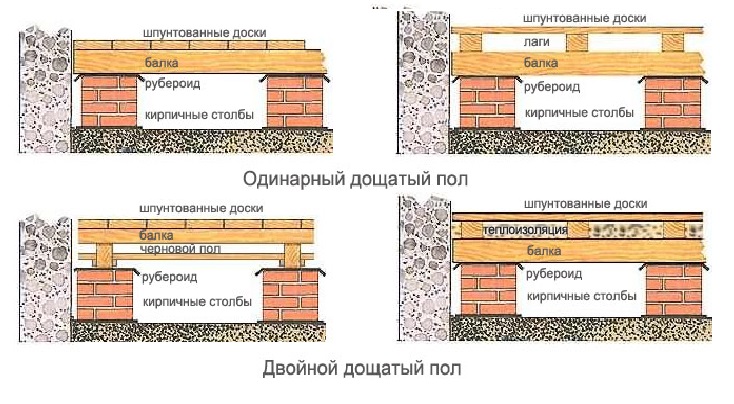
Single and Double Wooden Garage Hall
The optimal solution for arrangement of a wooden flooring in the garage - a spanted spruce or pine board with a thickness of 36 mm and a width of 20 cm or relatively cheap, but less reliable edged board 40-50 mm thick.
The covering is mounted on the mounting bar, the functions of which will perform the timing by a cross section 20 * 40 mm.
As carrying lags for the wooden floor, it is advisable to use dry beams with a cross section of 150 * 100 mm.

Carrier beams under the boardwalk
The distance between them under the above the thickness of the trim is recommended to be taken equal to 700 mm. Now, knowing the inner area of \u200b\u200bthe room, calculate the amount of materials for laying the wooden floor will be completely simple.
Please note: when laying a wooden floor on a ground-based lags, the height of the structure should be taken into account. Together with hydro and vaporizolation, as well as by the mounting plars, it will be about 20 cm. It also needs to be remembered that when the lag is supported on the wall or the foundation of the garage to the useful length of the bar from each end, at least 15 cm, which will be drilled in walls.
Tool and related materials
Before starting work on the arrangement of wooden floor in the garage, you should collect the tool required to perform related operations. The list must include:
- construction level or tubular hydroelectory;
- laser level;
- screwdriver;
- hacksaw on wood and electrolybiz;
- joiner hammer;
- joinery chisel;
- the electric drill with the function of the perforator and the set of rolled metal and concrete;
- screwdriver Set;
- nails;
- ax;
- measuring roulette and pencil (marker);
- brushes for protective and finishing wood;
- mounting stapler;
- construction knife.
In addition to the main materials, before starting construction you need to stock:
- by assembly (self-drawing, screws, bolts or anchors);
- emery;
- construction plaster;
- waterproofing gasket and vapor barrier;
- insulation (if necessary);
- means to protect the tree from pests, fire, dampness and rotting;
- paint and varnish materials for the finishing floor covering.
It is important to remember: if necessary, the arrangement of the draft concrete screed will need a tool for earthworks and preparation of concrete. The volume of the components of the latter is calculated on the basis of the actual base of the base of the floor and the required height of the concrete layer. Also, we should not forget about the murdration of the ground flooring and the gravel and sandstone. They must be performed before the start of the main construction.
Right mounting of the carcass
Getting Started, it is necessary to perform the impregnation of the tree with the flame and the antiseptic composition. The processed material is placed in the garage room. Here he will wait for its o'clock for several days until the moisture of wood stabilizes. But before it should be reduced to the level of ground flooring to the required project, carefully tumped it and hide with a sandy or gravel-sand pillow. In addition, in the space of the sample, it is necessary to provide a supply and exhaust ventilation holes. They are performed on longitudinal walls among opposite indoor angles, while the total exhaust ventilation is excreted by a separate channel, the output is located under the ceiling overlap.

Arrangement of natural ventilation in the garage room
The algorithm for laying a wooden floor on the lags on the ground-based basis will be as follows:

Please note: transverse lags are fitted perpendicular to the movement of the car, and the casing is parallel. Lighthouses, denoting levels of flooring, must be set before work. Rope labels are advisable to pull after the installation of the extreme crossing.
Pole cover
The finished carcass of the floor covering is covered with a vapor barrier gasket, which is attached to lags with the help of construction brackets.

Laying a vapor barrier film under the wood flooring of the garage floor
It is also necessary to think about the filling of emptiness under the trim. This is necessary for thermal insulation of the floor, as well as leveling temperature and humidity under the floor and in the garage room. Fill the sample space can be directly in the installation process, for which materials such as clay, sand, gravel sand mixture or mineral wool. With a lack of free time and funds, the event is allowed to schedule for the near future, but necessarily before changing the seasons.

Food insulation in the garage of mineral wool
Outdoor covering is performed in several steps:

It is useful to know: elements of the trim are preferably placed in a checker manner, so that the floor design will receive an additional margin of safety.
How to protect and process a wooden base
At the end of the installation work, it is necessary to once again handle the facial surface of the antiseptic boards and heal in the means of protection against pests and fire.

Processing the front surface of the wooden floor by protective composition
The casing must completely dry, after which it needs to be covered with several layers of varnish or paint. Finishing protects the facial surface of the floor from moisture, the effects of aggressive chemical reagents, condensate accumulation and mechanical wear.

Moody flooring of a garage floor after painting
Video: Independent laying of a garage floor from a tree
What and how to insulate the floor in the garage?
According to the requirements of SNiP, 21-02-99 "Parking of cars" in autogogene, it is recommended to maintain the temperature of +5 ° C and a stable level of humidity. It is possible to provide such conditions using high-quality ventilation (the influx of at least 180 mk. / Hour), as well as the insulation of the gate, walls, ceiling and floor, equipped in the garage room.

Metal garage, insulated from inside by foam
The main characteristics of the insulation and its types
Selection of insulation for flooring depends on the species, constructive features The latter and, of course, the local climate in which the garage is operated. In any case, thermal insulation must have such characteristics as:
- Non-hatching.
- Environmental Safety.
- Low thermal conductivity.
- Easy storage, processing and laying.
- Durability.
- Resistance to wear, exposure to moisture and temperature differences, as well as other aggressive exploration factors, including the development of malicious microorganisms.
Modern heat insulation materials differ in several categories:
- silicate (glass gamble and its varieties, perlite);
- mineral (Ceramzit, cement solutions with special additives, mineral wool);
- polymer (foam and its derivatives, polyurethane);
- wood-chip (plywood, chipboard, sawdust and materials based on them).
Please note: to take the right solution on the thermal insulation of the garage floor, it is necessary to carefully study and compare the characteristics of the insulation available on the market.
Properties of popular thermal insulation materials (ceramzite, foam, etc.)
In practice, such types of thermal insulation are most widely used as:
- ceramzit;
The main advantage of this material is low cost. It has a high mechanical strength and a small thermal conductivity coefficient, perfectly copes with humidity, temperature surges and influence of chemical reagents. At the same time, the ceramzite has a significant minus: the normal thickness of the insulation layer is at least 30 cm, which makes it inappropriate its use in the premises with low ceiling. Optimally use material for insulation of concrete floors.
- styrofoam;
A characteristic feature of this insulation is the versatility of application. The foam has a low thermal conductivity, no moisture is afraid and eliminates the possibility of the development of mold. With a relatively low price of the material, its use can significantly reduce the thickness of the thermal insulating gasket. Polyfoam is advisable to use for the insulation of concrete floor, but it is worth considering its disadvantages - small mechanical strength, fire hazard and inability to resist the effects of chemical reagents.

High density foam for insulation of walls and overlaps
- polystyrene bapton;
This material is a versatile insulation that can be used as a substrate and under concrete and under wooden floors. Its main advantages - high mechanical strength with a slight thickness of the thermal insulating layer, as well as enviable resistance to moisture and sharp changes temperature mode. Polystyrevbeton shows inertia to chemical reactions and is not of interest for fungal microorganisms. At the same time, it provides the perfectly smooth surface of the thermal laying and is able to serve for several decades. Almost the only drawback of this insulation is the impressive cost.
- glass gaming and mineral wool;
These are rolled materials belonging to the budget category of insulation. They are universal in use, but are used mainly for thermal insulation of wooden flooring. Glasswater and minvata have high thermal insulation characteristics and have excellent performance indicators. Meanwhile, they are able to deliver a lot of inconvenience when laying, and during operation, harmful components can be allocated to the atmosphere. As a result, as well as due to the inclination of the material to absorb moisture, the insulation of the gasket needs to arrange the ventilation gap and the reliable isolation from the internal space of the garage.

Glasswater for floor insulation
- equata;
This material refers to the class of loose insulation and can be used for thermal insulation of any kinds of floor coatings. For eco-plating, high thermal insulation indicators are characterized with a small strip thickness. Meanwhile, this insulation does not tolerate contact with moisture and weakly resist the effects of temperature differences, therefore requires additional waterproofing. Most often, the Ecurate is used to insulate the wooden flooring on a concrete base.

Terkesolation Equata for floors and floors
- foamizole;
This is a liquid thermal insulation material, which is a derivative of foam. Peniosol can be insulated with any floor covering, including concrete and wooden. It has a low thermal conductivity coefficient, no moisture, no temperature drops and passes the air well, which contributes to the formation of a comfortable microclimate indoor. The disadvantage of foamizol is a weak resistance to wear, flammability and a very high price.

Thermal insulating foamizole
- thermal insulating foil.
This material is supplied in rolls or solid plates, including with a layer of foam or mineral wool. Its main feature is the ability to reflect warm on one side of the thermal insulation laying and prevent his leak on the other. The foil insulation is impenetrable for moisture, is indifferent to sharp temperature drops and does not contribute to the development of fungal colonies. The main minus of this material is high cost. But it is equally convenient for thermal insulation both concrete and wooden flooring.

Folgized Mineral Wool Heater
When choosing a heater for the floor in the garage room, the focus should be focused on four criteria: the thermal conductivity indicator, the thickness of the thermal insulation layer, the durability of the material service and its cost. The ratio of these characteristics should be optimal for a particular garage room and comply with the budget of its owner.
Independent warming of concrete floor
The insulation of concrete floor coverings in the garage can be performed in several stages that meet the stages of the construction of the latter:

Consider the algorithm of the warming of concrete floor at the stage of preparation for the fill of the reinforced floor screed. In this case optimal option Thermal insulation will be a foam of a thickness of 10 cm and a density of 30 kg / m. Insulation is performed in the following order:

It is useful to know: to improve the quality of thermal insulation when laying foam sheets, seams are closed between them mounting foam. When laying an army and its fixation with glue, it is necessary to control the horizontal level of the substrate surface. Finally, increase the strength of the finishing screed, filled through the selected node, can be added to the solution of extradited polystylane granules.
Warm the wooden floor do it yourself
Thermal insulation of wooden floor covering on initial stage Its construction is not a challenge. It is performed in the standard order: after laying a sandy pillow, a layer of waterproofing is installed, followed by transverse lags, then the insulation and vapor barrier is fit and, finally, the floor cover is made. In the event that it is necessary to thermally insulate the finished wooden floor, it will have to be partially or more likely to fully disassemble.

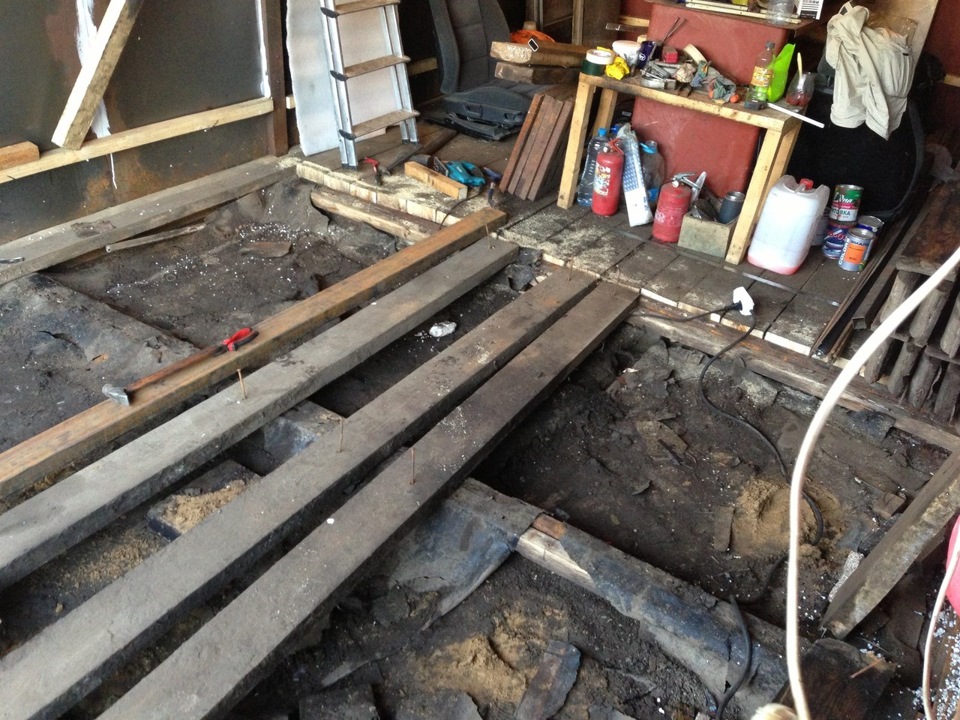
Demoloration of the feet for subsequent thermal insulation
The mineral wool supplied in the form of plates or flexible mats is most often used as a material for insulation of the boarding floor covering. Mineral wool supplied in the form of plates or flexible mats. In a complex with such thermal insulation, high-quality waterproofing should be used, as well as a vapor barrier gasket. Otherwise, the insulation will actively absorb moisture, which will lead to the rotting of wooden floor elements.
The method of insulation of the boarding outdoor coating of the Ministry of Internal Affairs is as follows:

It is useful to know: Mineral Wool is three species - slag, basalt (stone) and glass. Their cost varies significantly and largely depends on the type of material (roll, stove or flexible mat). For wood insulation, matte material on basalt or slag-based is perfect. The upper plane of the Minvati is marked, which is important to remember when laying.
Competent arrangement of flooring in the garage will create optimal conditions For storing cars and everyday care. The choice of materials for the construction of the floor and its design depends on the operating conditions of the room, as well as the dimensions and weight of the vehicle. Subject to the requirements for training, laying, hydro and vaporizolation, as well as finish finish Outdoor coverage, the latter will last the longest time, without delivering the garage owner any trouble.
This floor is made of wood
The floor in the garage must be resistant to mechanical damage and chemical compositionunresponsible to fires and high humidity. How to achieve this? How to cover the floor in your? All possible options have their pros and cons. Because of which the dispute between the car owners does not stop. What is better in the garage? We will try to answer these questions in this article.
Floor options
Today floors in the garage can be made different ways. The following types are most popular:
- earthen;
- concrete;
Consider the advantages and disadvantages of each and phased performance.
Easier simple: earth floor
Advantages of earthcoat:
- almost complete lack of cash investments;
- maximum simplicity of arrangement.
Disadvantages:
- low wear strength;
- high humidity (the soil is intended to absorb depth moisture).
How to make the floor in this way?
- cut a completely vegetable layer (if any).
- align the base.
- through the trimming is good to compact.
Tip! Increase the strength of such sex and ensure the protection against moisture will help the fatty clay. The recommended thickness of the clay layer is more than ten centimeters.
Classic - from concrete

Base concreting in the garage is the first stage of work in almost any form of coating. Also concrete is an independent coating, quite popular among car owners.
Advantages:
- high strength and resistance to mechanical damage;
- low cost of materials.
Disadvantages:
- dust formation during operation;
- chemicals and dirt are injured in concrete coating, creating nasty smell in the garage;
- labor and "dirty" process of filling concrete.
The device of the concrete floor in the garage depends on the luck of the car owners. If lucky, then a solid reinforced concrete plate is already available as a base. Work on such an outdoor coating is one pleasure. No harves. Bowed concrete - and that's it.
If not very lucky, the base will be the ground. And to pour the floor with the concrete in the garage on the ground, you need to perform several laborious processes:
- Align and catch the base.
- Make a waterproofing layer. For this, liquid clay wrapping the base.
- Perform on the walls marking of the future floor height, pull the rope guide.
- Fill gravel. The recommended layer thickness is about 80 cm (with adverse conditions), about 45 cm (under favorable conditions).
Tip! To indicate the height of the gravel layer, you can set along the walls of wooden columns with a step of 1 m.

Gravel tumble, removing sharp and too large stones. Fall over about 10 cm of sand. And also to take it. Thus, each layer of filtering "pillows" must be thoroughly pressing. The main condition of the quality of the work is also the level of surface horizontally (permissible deviation - +/- 2 cm).
Waterproofing of the floor in the garage is performed by polyethylene film or modern membranes. Polyethylene strips are eliminated by the entire surface, laying their flashes. Joints to work out a polyvinyl chloride ribbon. "Will start" a film on the walls (just above the level of the finish future coating). Thoroughly smooth out.
Strengthen concrete coating with a reinforced grid. Material with cells 10 × 10 cm and a rod diameter of 0.5 cm. Grid cover the entire area.
Set long wooden rails (1-2 m), the width of which corresponds to the height of the draft coating (10 cm), with a step of 1 m. The finished solution is pouring the strips to the gaps between the slats, so as to hide the lighthouses. Wooden rules remove an excess solution, right / left progressive movements to the mixture.
Tip! The concrete screed of the floor in the garage should not "fit" close to the walls and pipes: the construction can give a shrinkage and damage the floor covering. Bulking the floor, along the walls and near the pipes you need to leave the gaps. In the resulting gaps put pieces of elastic insulation.
Bay "Chernovaya" concrete, cover it with a film and leave for a month. Periodically moisturize.
If floor insulation is planned in the garage, the next layer is the heat insulator. Possible material options: mineral wool, foam, foaminess, astrok, rubberoid and others. It is more convenient and faster to work with rolled heat insulators. For hydro and vaporizolation, the insulation is covered with a film from above.
Flooring of the floor in the garage is performed similarly to the "Chernovaya": cover the surface metal mesh, put lighthouses, pour concrete, align and catch. Slide the surface with steel ironing.
If the insulation layer is not, then first the draft coating is coated with cement "milk" (cement, plasticizer and water), then the "finishing" concrete is poured.
Note! The finish tie should be done with a slight bias towards exiting the garage. This is necessary for water drain.
To increase the service life, and also save the room from dirt and dust, the upper layer should be strengthened. You can use special impregnations or paints. How to paint the floor? Special polyurethane, acrylic or epoxy enamels.
Caring for ecology: wooden floor
Wooden coating for the floor in the garage has its advantages:
- environmental friendliness;
- high efficiency;
- ease of installation;
And minuses: DISTRIBUTY (the average life is 5 years). Stages of work:
- Make a rough concrete floor (see above).
- Prepare lags: handle antiseptic, dry.
- Post the lighthouse lags in a step of 2 m. Fix you need every half meter by means of a dowel.
- Put intermediate lags with a step of 40 cm. Fixed similarly.
- In the intervals of the frame to lay hydro and vapor barrier material.
- Flight board boards as close as possible to each other with nails or self-drawing perpendicular to lagas.
Do not go to save lags immediately to the soil. Such a coating will fail within two seasons.
Autodoma with a luxury claim: ceramic tile
- waterproof;
- lack of excessive spraying;
- easy cleaning.
Cons: High cost of materials and works.
For flooring in the garage, we need a tile with a 5th grade of wear. And for unheated premises - frost-resistant varieties. Only strong building materials will provide high resistance to mechanical damage and abrasion.
In no case can not be laid ceramic tiles on the floor just built the garage. The expansion coefficient of this material is too low, so the tile will not stand the shrinkage of the building in the first two years.
So, we make the floor of the tile:
- Run a concrete tie.
- Progress the surface.
- Apply an adhesive composition to the gear of the gear, corresponding to the tile brand. Lubricate the edges of the tile itself. Stop material with rows, checking the level of horizontal. So that the seams turned out to be smooth, you need to use special plastic cross.
- A day later, three wrestling seams. You can operate the floor in 2 weeks.
Bulk floors in the garage
Modern leveling solutions may have a cement or polymer base.
Pluses of bulk floors:
- high wear resistance;
- ideal smoothness and evenness;
- the ability to experiment with color;
- ease of installation;
- easy cleaning.
Cons: High cost.
Polyurethane and epoxy industrial floors are more suitable for garages. Polymer coatings guaranteed more than 45 years.
How to fill the floor?

Bulk
Prepare a concrete base: to close cracks, potholes, clean from dirt, dust, polish. Apply a primer to the floor of the floor in two layers, each of which you need to dry. Prepare a solution, following the instructions specified by the manufacturer.
Pour the composition that is applied portion. Pull the solution to a specific area - to align the gear roller, thoroughly removing all air bubbles. Work on the pouring of the floor is recommended at a temperature of from 10 ° C to 25 ° C. The limit level of humidity in the garage is 60%.
Thus, each floor has its pros and cons. Choice - for the car owner. If the means allow, you can make a bulk sex - the most suitable for the garage technical characteristics. If the budget is considerably limited, then you can temporarily do with an earthen floor or make a wooden.