Everything you need to know about stretch ceilings. Stretch ceiling accessories - what do you need for installation? Construction materials and fasteners used during installation
A stretch ceiling saves you time, your money and even your living space - after all, when installing it, you lose a lower height than when choosing suspended structures.
The most important thing is not to confuse stretch ceilings with suspended ceilings. Suspended structures are a rigid frame in which various modules are installed - plates, panels, cassettes, and stretch ceilings are vinyl film fixed with a baguette. Both designs are suitable for rooms of any height, they completely hide various defects of the base ceiling, as well as electrical wiring, ventilation pipes, etc.
feel the difference
Have stretch ceilings there are undeniable advantages:
- Outwardly, they are most similar to a traditional plastered (or painted) ceiling when comparing vinyl with metal panels and even more so with mineral fiber slabs.
- If the entire surface of the suspended structure consists of separate segments, then the stretch ceilings have seams, but they are completely invisible. The number of seams directly depends on the width of the room, since the film is produced in a standard size (roll height 1.6–2.2 m).
- When installing a stretch ceiling, a lower height is lost - from 11 mm to 6 cm, while suspended ceiling systems “eat up” 4–15 cm.
- Other positive aspects include fire and water resistance. The canvas is not only not afraid of moisture, but also reliably protects the room from leaks: its square meter can withstand up to 100 liters of water. Well, after the water is removed and the base ceiling is dried, the film (of course, not without the help of specialists) takes on the same appearance as before the accident. Any other ceiling will undoubtedly require partial or even complete renovation.
- finally, the tension structure refers to materials that are produced to order, for a specific room, which excludes its purchase in a construction supermarket. On the one hand, this can be considered a disadvantage, since from the moment of payment to the start of installation, you have to wait 3–20 working days. On the other hand, an individual approach to manufacturing allows you to take into account all the features of the room (non-rectangular and even curvilinear configuration) even at the production stage and, as a result, eliminate the rather costly stage associated with fitting "to the figure". All that remains is that it is not too complicated installation, and by the hands of professionals.
- By the way, it is not necessary to remove furniture from the room either - it is enough to move it to the center of the room, and after 4–6 hours - this is the time it usually takes to install the stretch ceiling - to return it to its original place.
Cosmetic surgery
Draft is an annoying addition to an apartment in a newly built house. You can, of course, first make a quick repair, wait five to seven years, and then start a full-scale interior decoration. But there is another way out - to follow your own plan, simply to mount a stretch ceiling in all rooms. Of course, it will not be possible to get rid of cracks in the base ceilings and their joints with the walls in this way. However, all defects will be reliably hidden behind the vinyl film.Products and prices
Thermal expansion
A change in the geometric dimensions of a stretch ceiling with a significant increase in room temperature (say, in a hot summer) is quite common. After all, it is on this property of vinyl film that the technology of its installation is based. However, the ceiling increases in size slightly, so that its sagging will be completely invisible.Depending on the area of the room, the cost of a stretch ceiling varies within the range of 900–2100 rubles / m². How smaller room, the more expensive will be the square meter of the finished coating. In addition, its cost is influenced by the degree of gloss of the film (matte, satin, glossy) and its color (more than 150 shades). The most economical and at the same time the most popular is white matte or satin fabric. A little more expensive - about 20% - colored matte, satin or glossy film. Even more expensive (by 30–35%) is a square meter of ceiling with a suede, leather, metal or marble texture. And the most expensive are the so-called art canvases. Their square meter costs about 4,500-5,600 rubles.
Many companies that have in the list of services the production and installation of stretch ceilings offer directly on their website to calculate the approximate cost of the finished canvas of the required area and configuration. The online calculator, of course, gives some error, but in general it helps to navigate. At the same time, we recommend that you take into account that any additional work related to the production or installation of the ceiling will be calculated and paid separately. As an example of such technological operations, we will cite the manufacture of holes for built-in or pendant lights, pipe edging, passage of more than four curved surfaces and corners, vertical bends of the canvas, etc. Separately, the costs do not seem too high, but the total cost can turn out to be quite impressive. However, these amounts seem quite reasonable, given the problems we will be spared from over the next ten years. This is the guarantee given by all manufacturing firms without exception. At the same time, according to company representatives, the real service life of stretch ceilings is much longer. How much - time will tell, because a little more than 12 years have passed since the installation of the first stretch ceilings.
Respectful attitude
Taking care of the stretch ceiling is as easy as shelling pears, it is enough to regularly wipe it with a damp cloth or sponge. If desired, you can use a neutral detergent. The main thing is to avoid direct contact of the blade with piercing and cutting objects. And champagne corks are not capable of doing it any harm.The principle and rules of installation: what are the tension surfaces made of and what are they attached to?
The overall appearance of the interior of the room depends on the quality of the lining of the ceiling surface. Smooth, beautiful ceilings give the room a well-groomed look, and decorated with the use of colored or textured materials, multi-level, with lighting structures, create a special atmosphere of luxury and comfort at the same time.
Consider what is the technology of installing stretch ceilings, which are the best finishing option. We will analyze the nuances of the installation of various types of canvases, and find out how much it is possible to carry out these works on our own.
What is a stretch ceiling

Fixation principle
It is with this question that I would like to start our article, because surely many have seen this design already in its finished form, but not many know about all the intricacies of the process and about what it is made of.
In fact, a stretch ceiling is a sheet of durable vinyl or fabric stretched parallel to the floor slabs. Stretching of ceilings occurs, in the language of professionals, "hot". Thanks to this, a smooth and even surface is obtained without any differences.

It should be noted that today stretch ceilings are increasingly replacing complex ones, they are much lighter, cost much less and are easier to care for. In addition, they are much easier to mount, and in order not to be unfounded, we suggest looking at how the video ceilings are stretched.
As you can see, there is nothing complicated here, and a little below we will describe in detail this process with all its subtleties and nuances, but for now I would like to prioritize and find out what is the secret of the popularity of stretch ceilings.
pros

So:
- If we compare the final cost of tension and suspension structures. Then the price of a stretch ceiling, even with a print, will be much lower.
- Installation takes place in just a few hours, without having to destroy half of the room.
- The whole process is quite clean, and it is enough just to cover the furniture with a film from dust, while not taking it completely out of the room.
- The surface can be mounted at a minimum distance from the floor slab, the loss in height will be only 3-5 centimeters, which is especially important for houses with initially.

Material description
The cloth is made from polyester (polyester) yarns and impregnated with polyurethane to improve performance. The coating is supplied in rolls of 3-5.5 m.

This coating is environmentally friendly, fire resistant, sunlight and mechanical deformation.
The big advantages of woven ceilings are also:
- their seamless installation;
- the ability to operate at negative temperatures;
- vapor permeability;
- installation of the structure without the use of heating the canvas.
Some disadvantages in comparison with film materials can be considered a meager collection of colors and finishes, the absence of glossy models. Although the use of glossy canvases on apartment ceilings has a lot of negative reviews.
Types of fasteners for polyester ceilings
When installing fabric ceilings, wedge and clip methods are used:
- Wedge mount
The technology for installing a stretch ceiling by this method consists in fixing the fabric inside the U-shaped profile with a special wedge (glazing bead). The baguette (profile) is attached with self-tapping screws. A bead or wedge grips the material inside the profile and holds it under tension.
The insert, which acts as, snaps into the profile and closes the joint between the surfaces of the stretch ceiling and the wall.

The advantages of this design are the low profile height, and, accordingly, the saving in the height of the room, as well as the possibility of installation without taking perfectly accurate measurements.
However, the fasteners have enough disadvantages:
- the ceiling is almost impossible to dismantle without damaging the canvas, and install it back;
- the mount is not suitable for the installation of multi-level structures, it does not withstand a massive canvas poorly (in large rooms);
- over time, there is a possibility that the fasteners will loosen and the glazing beads fall out.
- Clip-on fastening
The profile, made of hard, high-strength plastic, securely fixes the fabric material between two planes.

After installing the fabric in the profile, its excess is cut off, so it is almost impossible to reuse the material for installation. The clip-on method of installation of canvases does not require the installation of additional masking skirting boards, since there is no technological gap.
The installation pitch of fasteners for fabric ceilings is usually chosen equal to 15-20 cm (depending on the recommendations of the ceiling manufacturer).
Film ceilings
Coverings of the most common when installing stretch ceilings.
Material description
European products are produced in rolls with a width of 1.2 to 2.8 m (currently there are Chinese manufacturers who have established the production of five-meter canvases). There are a great many types of textures and colors for such ceilings. These are matte and glossy, translucent and mirror models, marbled, suede, satin, etc.

Film ceilings are characterized by:
- Budget price (depends on the invoice of the material).
- Do-it-yourself installation.
- Resistant to moisture and fire.
- Antistatic.
- The ability to dismantle and re-install the curtain and profiles.
However, there are also disadvantages:
- The coating does not withstand mechanical damage poorly.
- During installation, and for several days after it, an unpleasant odor is present in the room where the installation of the film ceiling was carried out.
- The technology of installing stretch ceilings from a film implies the mandatory heating of the material (the temperature rises to 70 degrees). Firstly, the installer should be able to handle heating devices (guns), and secondly, interior items may suffer from high temperatures. This should be taken into account, and remove them from the room in advance.
Important! The recently introduced "Cool Stretch" technology allows the installation of film covers without the use of guns.
Depending on the size of the room and the width of the existing coating, the film canvases can be welded. The seam, although not very conspicuous, can be noticeable in certain lighting conditions.
Types of film coating fasteners
For the installation of film ceilings, two types of fastening are used:
- Shtapikovoe
This a budget option fastening the film covering is similar to that used when installing fabric ceilings.
A harpoon ̶ is attached to the entire perimeter of the canvas with a special hook, which is then inserted into the installed profile.

This method of fastening does not require much time, if it becomes necessary to replace the coating, the old material is dismantled, and a new canvas is installed in its place in the existing profiles.

Harpoon ceilings are more likely to sag in the center of the structure. Another disadvantage of such mounts is the higher price.
Fastening of film coatings is best done every 10-15 cm. In addition to the type of fastening, baguettes also differ in functionality.
Types of fasteners depending on the purpose
- Depending on the surface used for the installation of the baguette, the profiles are divided into wall and ceiling profiles. Versatile mounts are also available to suit both horizontal and vertical surfaces.

- Profiles for the installation of multi-level structures.
These elements allow for elevation changes. An example of such baguettes is shown in the photo:

- Dividing baguettes.
These angled, horizontal or vertical profiles are used to connect individual webs in one plane or to bend around various obstacles.

- Profiles for the device of curved structures.
To mount the ceiling to a curved surface, special baguettes with cuts that can be bent are used.

In addition to profiles, during installation, elements are used for mounting chandeliers and lamps, bypassing pipes, as well as decorative inserts.
Surface and fasteners for ceiling installation
When installing stretch coatings, special attention is paid to the strength of the surface to which it is planned to install the profiles. It must be prepared to withstand the tension created by the stretched web.
- Preferred materials for fastening profiles: metal, concrete or brick base.
- The technology of installation on a wooden base (depending on its condition) can provide for installation along the entire perimeter of additional elements that provide rigidity.
- To mount the tensile structure on fragile surfaces (foam or aerated concrete), first fasten around the perimeter wooden bar which takes on the main stress.
- When installing ceilings on a plasterboard surface, special fasteners are used.

- To mount a baguette to concrete or brick surfaces, use dowel-nails, to wood - self-tapping screws.
Installation of stretch ceilings
For installation, you will need the following inventory:
Stretch ceiling installation technology ( step-by-step instruction). Installation of coatings takes place after leveling the walls and completing all work, the performance of which is accompanied by the appearance of dirt and dust. , you can ̶ after.
In this case, everyone chooses for himself, as it is more convenient for him:
- Pieces of old coating are removed from the surface, which can fall over time and ruin the ceiling.
- The required dimensions are removed.
- A diagram of the installation of the coating is drawn up.
- The points of installation of lighting devices are marked (luminaires built into the tension cover should not have a power exceeding 40 W).
- Places of installation of hidden wiring near the installation work are applied.

- For convenience, the furniture is removed - as a last resort, it is moved to the center of the room.
- The lowest point of the base ceiling is determined, from it, taking into account the dimensions of the profile and lamps, as well as the possible installation of insulation, the necessary indent is made and the markings are applied along the perimeter. Ceiling moldings will be installed on the ceiling itself.
- The profiles for the corner joint are cut at an angle of 45 degrees. The ends are processed with a file, otherwise burrs can damage the canvas.
- A baguette is attached along the lines drawn. The attachment points should not be more than three centimeters from the joints and corners.

Installation of film coating
- The room temperature rises to 40-50 degrees.
- The canvas is stretched first along one diagonal, secured with clamps, then along the second.
- The film heats up to 70 degrees. The material becomes elastic and stretches perfectly.
Important! When installing stretch ceilings in small rooms, a construction hair dryer is sufficient for warming up.

- Using a spatula with rounded ends (this is necessary to prevent damage to the film), the canvas is installed in the baguette. At the first stage, the film is tucked into a baguette at intervals of 8-10 cm, then fixed along the entire profile. If wrinkles remain, they can be straightened by heating the surface.

- If the wedge mounting method was used, excess material is removed.
- Decorative plugs are installed if necessary.
- In places where lamps and lamps are installed, thermo rings are glued to the canvas. They are necessary to protect the material from the heat generated by the lighting fixtures. The film is cut inside the ring.

- The pipes are guided with glued plates.

Installation of fabric canvases
- The size of the fabric should be larger than the ceiling surface area.
- The canvas is hung with clips.
- The fastening of the fabric into the baguette begins from the center of the room. The cloth is tucked in in 50-70 cm increments. By pulling it at the corners, you should achieve an even distribution. At the corners, the material is fixed at the end of the process. In case of wrinkling, you can slightly warm up the fabric with a construction hairdryer and straighten it.
- The excess material formed after installation using the clip method should be cut off. In the case of using glazing beads, all excess canvas remains in the area invisible to the eye, and it should not be cut off.

- Decorative inserts are installed.
- Installation of lighting and bypassing pipes is carried out similarly to the film version.
The result obtained should inevitably allow you to experience a sense of pride in your work and give the interior of the room a stylish and attractive look.

I would like to note that the installation of stretch ceilings should be taken with full responsibility, since the structure must withstand loads up to 100 kg / sq. M.
As you can see, the technology of installing a stretch ceiling does not seem to be a completely impossible enterprise. If you have a tool, an idea of the stages of the work, and, most importantly, desire, everyone can cope with the finishing.
Installation of stretch ceilings is rightfully considered one of the most progressive and modern methods finishing of ceilings, firstly, because of the speed of installation of tension structures, and secondly, in terms of design. However, the seemingly simple system of PVC ceilings is actually very laborious and difficult for one-hand installation.
In this regard, most customers prefer to turn to the services of professionals who have sufficient experience and have specialized installation equipment and tools.
Do-it-yourself installation of a stretch ceiling with a strong desire, of course, is possible, but one way or another, a call of specialists is necessary: only they will be able to make a qualified taking measurements and manufacture, in accordance with them, the PVC cloth of the necessary parameters (see). Read on to learn more about what the technology of stretch ceilings is.
Construction materials and fasteners used during installation

To install stretch ceiling structures, you will need the following materials:
- PVC profile (baguette) designed for stretch ceilings;
- a canvas made of polyvinyl chloride film (PVC) - it is connected by soldering from the required number of pieces of material and is bordered around the perimeter with a harpoon;
- cover strip - a decorative element that will close the gap formed between the wall and the stretch ceiling;
- self-tapping screws and dowels - will be needed to fasten the profiles to the walls or ceiling base.
Profile for stretch ceiling systems
Manufacturers offer to purchase not only PVC molding, but also aluminum (see). The classification of the profile, depending on the method of fastening, is as follows:
- wall-mounted - the most popular type of baguette; it is fixed to the walls and resembles, according to the installation method, the fastening of the guide profile during construction false ceilings from drywall;
- ceiling - fixed to the ceiling and used in cases where it is not possible to install the profile on the walls;

- separation - a connecting baguette, used when it is required to arrange a ceiling in large rooms (60 m 2 or more); in this case, the likelihood of sagging the PVC sheet under its own weight is quite high, therefore, stretch ceilings are installed in the form of separate assembly groups.
Advice! As a rule, a profile for stretch ceilings is produced with a length of 2.50 m, but during installation it can be cut with a "grinder" into pieces of the required length.
Installation of a stretch ceiling involves the initial installation of a baguette to the walls or ceiling around the perimeter of the room, as well as further fastening and tensioning of the PVC film (see).
PVC cloth and harpoon system

The canvas is made, as already mentioned, from rolls of PVC film. Rolls of glossy film are produced in widths of 1.3, 1.5 and 1.8 m; matt width is 1.5, 2.0 and 2.7 m. The required number of segments of the same color are prepared, which are then connected by soldering.
The joints are thin and straight, after installation they are almost invisible. The pattern of the canvas is made in a smaller area relative to the ceiling by 5-15%, which is necessary to stretch the film and obtain a high-quality result - a perfectly flat ceiling (see).
The harpoon is a flexible but rigid PVC plate of a special shape, which is attached by welding along the perimeter of the canvas and serves to fix it in the baguette. The harpoon has a higher density than the canvas itself, and is quite easy to insert into the profiles. The device of stretch ceilings assumes a reliable fastening of the harpoon in the baguettes, it happens without any effort. This fastener is named so because of the similarity with the design of the famous fishing tool.

Experts call the harpoon fastening system one of the strongest and most reliable: it can handle not only the load generated by the weight of the stretch ceiling, but also additional influences. For example, it can withstand a significant amount of water if your apartment is flooded by neighbors upstairs.
Stretch ceiling installation
Installation of stretch ceilings is carried out in this order:
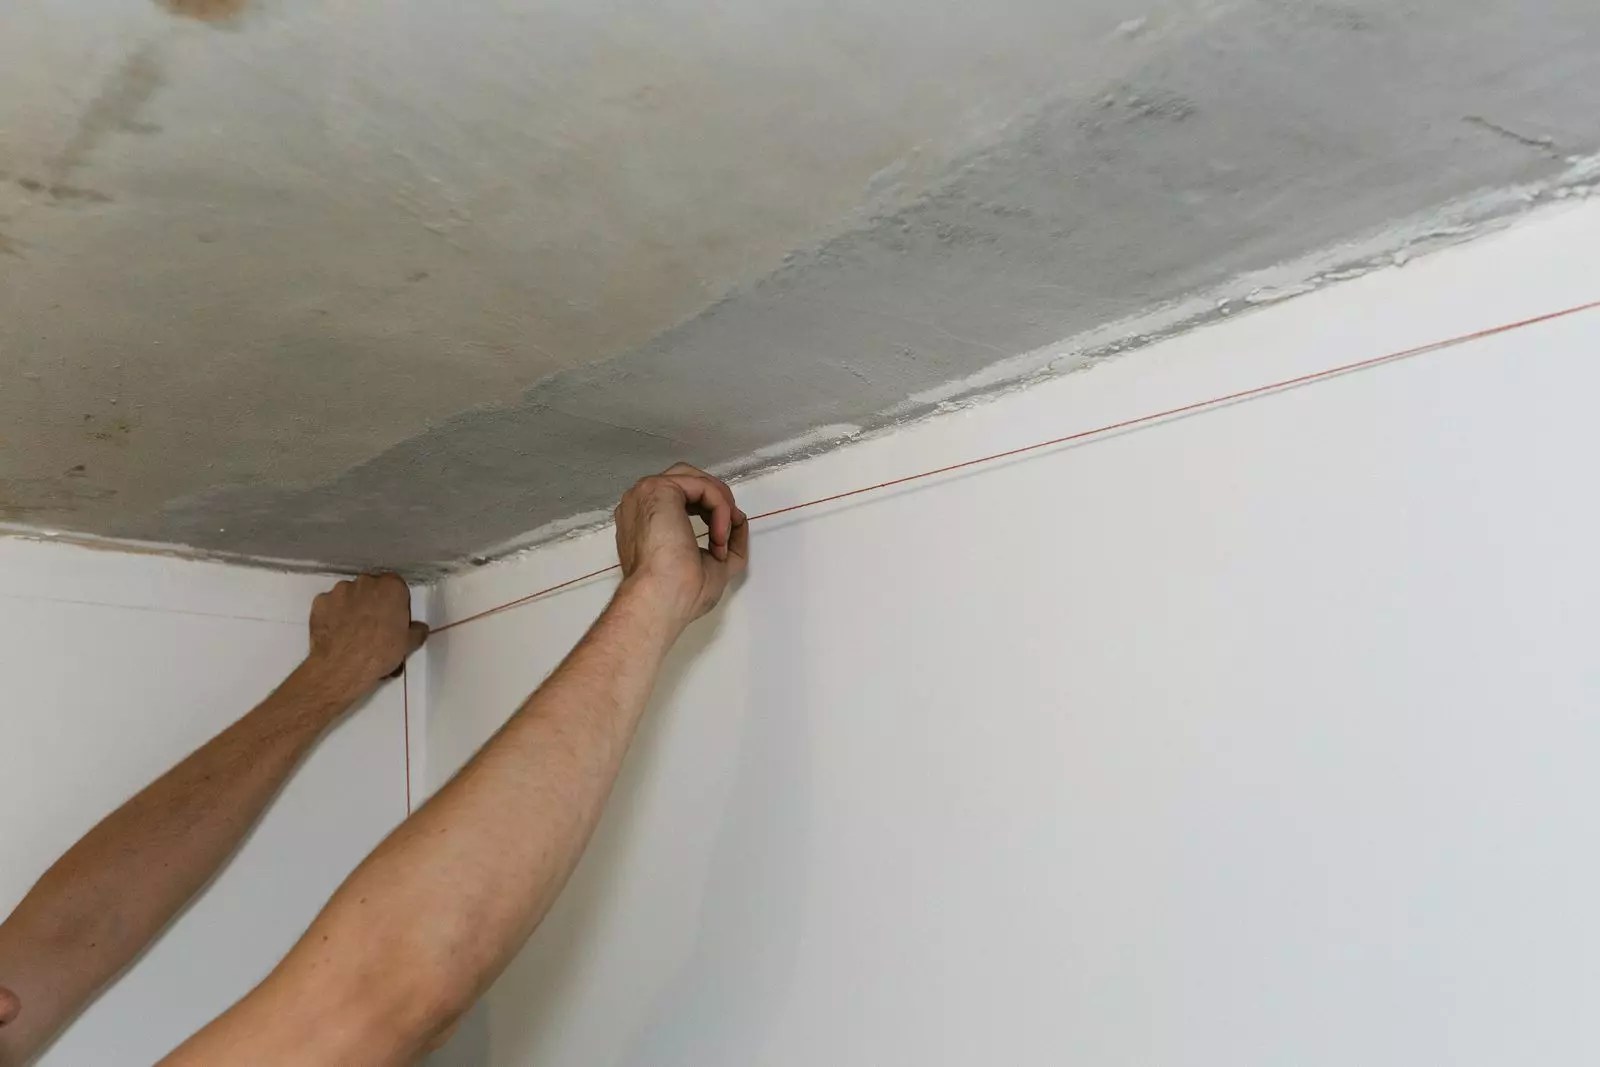
- Marking is applied to the walls - a horizontal line along which the profile will be attached.
Advice! The markings on the walls before the installation of the baguette should be applied using the building level. This will ensure perfect line alignment and a quality end result.

- By means of self-tapping screws, a baguette is installed according to the marking.
- The PVC sheet is suspended from the rough ceiling with hooks.
- The room where the installation is carried out is heated to a temperature of 50-60 0 С, for which a heat gun is used.
- After a certain time, the film acquires elasticity and softness, becomes easily stretchable. This means that it is the turn of attaching the canvas to the baguette. The PVC sheet is stretched, the harpoon system is inserted into the profile with a construction trowel. After the harpoon has cooled, it straightens inside the baguette, forming a strong connection.

- The room is cooled to room temperature, after which the film is compressed and stretched. During this process, the canvas is finally straightened, and the surface of the ceiling becomes smooth and beautiful.
- The final stage is the installation of a decorative strip. It "hides" the cracks between the baguette and the walls. The cover strip is fixed to the profile by means of specially provided teeth located on both fasteners. The decorative element is made from the same material as the harpoon and is purchased together with it.
Installation of stretch ceiling structures is presented in the video of the corresponding topic, presented on our portal.

This is how the installation of stretch ceilings looks like. Despite the complexity of self-installation, now you know its technology, and this will help you control and evaluate the work of invited specialists. Choose stretch ceilings for your home, and it will be an example of style and beauty not only for you, but also for your friends and acquaintances.
Stretch ceilings are a popular type of decoration both in private houses and in city apartments. If you follow the installation technique, you get an even and durable coating that does not require maintenance. To keep costs down, many people choose to do the installation themselves. Below we will hold a master class in which we will show you step by step how stretch ceilings are made. A detailed guide will help you understand all the nuances and stages of installation.
What stretch ceilings can be made by hand
There are two types of stretch ceilings:
- Film.
- Fabric.
The main difference is the material of the canvas. In the first case, a thin polyvinyl chloride film is used, in the second, a synthetic polyester fabric impregnated with polyurethane. Each material has both pros and cons.


The main advantages of PVC films:
- water resistance - when flooded, the stretch ceiling retains water, and after the liquid is drained, it returns to its previous form;
- many color variations - more than 250 shades of various textures are produced (glossy, matte, satin, textured, with patterns or photo printing);
- the possibility of wet cleaning - thanks to this, the ceiling is easy to care for and remove even the most stubborn dirt.


Advantages of fabric canvases:
- frost resistance - polyester can withstand negative temperatures down to -50ºC without losing its properties;
- large web width - 5.1 m against the maximum 3.2 m for foil, which allows you to make seamless ceilings in almost any room;
- durability - withstands an accidental blow or a flying off champagne cork;
- air permeability - thanks to microscopic holes in the structure of the material, the canvas does not interfere with air exchange in the room.


The disadvantages of film ceilings include low strength - PVC breaks from contact with sharp objects and does not tolerate negative temperatures. The main disadvantages of fabric canvases are the high cost and modest choice of colors - only about 20 shades of mostly pastel colors.
Installing a stretch ceiling with your own hands is possible for both options, but there is a difference in the installation technology. The PVC film is preheated so that the material becomes elastic and stretches. For this, a gas heat gun is used. After cooling, the film stretches and forms a flat surface. The polyester fabric does not require heating and has a ready-made appearance immediately after installation.
We have previously described in detail, in this article we will consider how to stretch a PVC canvas.
Principle of installation of stretch ceilings
The technology of the device is as follows: the structure is a canvas stretched over a frame made of aluminum or plastic profiles (baguettes), which are attached around the perimeter of the room. The PVC film is tucked into the frame and securely fixed. The tension creates an even ceiling surface.


Installation takes place in stages. The installation procedure is as follows:
- First, the room is measured. Then a sketch of the future ceiling is prepared with the locations of the lighting fixtures. Based on the drawing, the PVC film is cut.
- If necessary, the base is prepared for stretching the canvas.
- After that, the markings are made for fixing the frame and the profile is mounted.
- Next, the fixtures for the lamps are installed and the electrical wiring is laid in accordance with the installation diagram.
- Then the PVC film is heated with a heat gun, stretched and fixed in the baguette.
- After that, lighting devices are installed and connected.
- At the last stage, the mounting gaps are masked, which remain at the junction of the walls and the stretch ceiling.

 2 Preparation of the base


 9 Masking joints
Cutting of PVC films is done in production, therefore, it is better to entrust the measurement and preparation of the drawing to professionals.
The fact is that the canvas is cut exactly to the size of the room, taking into account the stretching of the material. It is important not to make a mistake in the calculations, since it will not be possible to correct the error during the installation process. The film will sag, folds will form, or simply will not stretch to the desired width. The rest of the steps are easy to complete on your own, the installation technology is simple, any home craftsman can handle it.
General installation rules
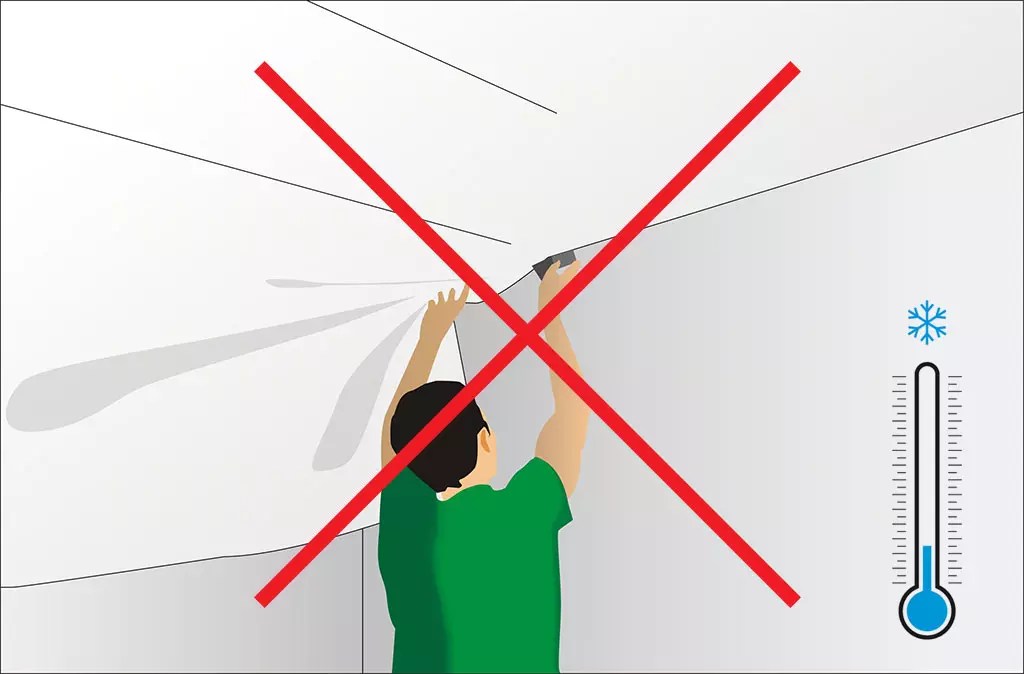
Film ceilings retain their properties only at positive temperatures, therefore they are installed exclusively in apartments or houses for permanent residence... PVC is equally well suited for utility rooms and living rooms... It is especially recommended in bathrooms, toilets and in the kitchen, as the film is not afraid of moisture, protects against leaks from above and is easy to clean compared to other types of materials.
It is recommended to install a stretch ceiling at the last stage of the renovation, when all finishing and construction work has already been completed. Wallpaper is an exception, since during the installation of baguettes, they are likely to get dirty, and it will be quite difficult to remove dirt, especially from embossed surfaces.

It is not required to level and prepare the rough floor before installing the stretch ceiling. But if the plaster is old and crumbling, you need to remove everything that may subsequently fall on the canvas, and then strengthen the surface.
Attention! In the process of stretching the PVC film, the room heats up to + 40ºC, and near the gun the temperature reaches + 70ºC. Therefore, furniture, paintings and other items that may be affected by heat are best taken out.
Stretch ceiling fastening technology
To fix the PVC film, special baguettes are used, which are mounted around the perimeter of the room at a short distance from the base overlap. There are different ones. They differ in material of manufacture, design, fastening system and installation method.
Fastening systems
For film ceilings, two methods of fixing the canvas are used:
- Harpoon... Recognized as the most reliable. For attachment to the edge of the PVC film, a folded plastic edge (harpoon) is welded after cutting. During installation, the edge is inserted into the baguette and clings to a special protrusion in the profile structure. The canvas is securely fixed and held according to the principle of a harpoon, for which the fastening received this name. The remaining gap is closed with a special masking tape. There is also a gapless profile, but perfectly flat walls are required for its installation.
- Shtapikovy(wedge). The film is measured with a margin. The canvas is tucked into the profile and fixed with a special plug in the form of a wedge or glazing bead. The excess film is then cut off, and the gap is closed with a decorative insert.


The technology of installing ceilings with harpoon mounts requires an accurate calculation of the dimensions of the canvas, otherwise the film will not be enough or the ceiling will sag. But the installation is quick and easy, since the tension is calculated during cutting, it is enough just to fill the harpoon into the baguette. In addition, this fastening system allows you to easily remove the cover and tighten it again. This is necessary, for example, to drain water after a flood or to repair the electrics behind the ceiling.

With a glazing bead, the cutting of the canvas is done approximately and mistakes are not so terrible. But adjusting the tension of the film manually is much more difficult and can only be done by experienced specialists. In addition, this method is non-separable. After dismantling the coating, you will have to purchase a new film.

Thus, for self-installation of a PVC stretch ceiling, it is better to choose a harpoon mounting system.
Profile types
Baguettes are made of plastic or aluminum. Metal is more expensive, but stronger and more durable. In rooms with an area of more than 20 square meters it is recommended to install aluminum. If the size of the room is smaller, plastic will do.
At the point of attachment, baguettes are divided into wall and ceiling. Which one to choose depends on the height of the structure and the condition of the rough ceiling. The minimum indentation from the ceilings is achieved by the ceiling profile (2-3 cm). But in such cases, it is impossible to mount recessed lighting or a hidden curtain rod. And the rough ceiling should be perfectly flat and strictly horizontal, which is extremely rare in practice.


When attached to walls, more height is lost in the room, but under the canvas you can hide embedded fixtures, power supplies or utilities. Also, the wall profile makes it easy to set the horizontal level, even with strong differences in the rough flow.
In practice, ceiling molding is rarely used and is used only when there is no alternative. For example, there is no access to the wall due to the sliding wardrobe or the material of the partitions does not allow the profile to be securely attached.
Preparation of tools and materials
To make a stretch ceiling with your own hands, you will need the following tools:
- ladder;
- laser or water level;
- roulette;
- pencil;
- chopping cord;
- perforator (it is convenient to use a tool with a built-in vacuum cleaner, but a regular one will do as well);
- drill;
- screwdriver or screwdriver;
- grinder or hacksaw for metal;
- file;
- construction or office knife;
- a special curved spatula for filling the canvas into a baguette;
- heat gun and propane tank.


Consumables will require:
- fasteners (if the walls are made of foam concrete or wood, use self-tapping screws 5x40, for concrete and brick - dowel-nails 5 × 50);
- aluminum or masking tape;
- protective rings and embedded platforms for lamps;
- plastic plates for bypassing pipes;
- special glue Cosmofen for mounting thermal rings and contours (the use of ordinary glue is not recommended, as it can damage the canvas);
- cable and terminal blocks for connecting spotlights.


A heat gun can be rented, baguettes and others are easiest to order in a specialized online store.
Cutting and harpooning of the blade is carried out in production. You won't be able to do this on your own; you will need to order it from a stretch ceiling installation company. The PVC film will be cut to size, the edge for the harpoon attachment will be welded and the finished canvas will be delivered.


It should be borne in mind that the width of the film does not exceed 3.2 m (depending on the manufacturer and texture). If the dimensions of the room are larger, parts of the canvas are connected by welding on a special high-frequency machine, the result is a barely noticeable seam. If desired, for an additional fee, you can order a centering of the seam so that the film patterns are located symmetrically.

Step-by-step installation instructions
Consider the process of installing a simple tension flow in one level with built-in spotlights and bypassing the pipe. As a frame, we will use aluminum wall moldings with harpoon mounts. The following is a detailed step-by-step instruction for installing a stretch ceiling made of PVC film. It is important to follow the installation sequence and proceed to the next step only when the previous one is completed.
Preparation of the base
The draft ceiling will be closed, so no alignment is required. But falling pieces of plaster or paint can damage the film. For this reason, all parts of the old coating that do not adhere well, including dirt and dust, are removed from the surface.
Then the floor is impregnated with an antiseptic primer. This action has two purposes:
- strengthening the base (so that nothing falls from it);
- mold prevention.


No plastering or painting is required.
Markup
First of all, you need to determine,. For recessed luminaires, a distance of at least 7 cm from the base is required. In other cases, the ceiling can only drop by 3-5 cm. But the smaller this distance, the more difficult it is to work with a puncher. Sometimes engineering communications (air ducts, pipes, etc.) are hidden behind the stretch fabric, then the film is pulled even lower.

Then you need to measure the height difference of the floor and find the lowest point. The selected distance is plotted from it. With the help of a laser level and a pencil, indents are transferred to the walls and marks are placed in the corners. Then a chopping line is applied and pulled to connect the marks. As a result, you will get a straight line along the entire perimeter of the room with the required indentation from the rough ceiling. The markings must be strictly horizontal.


Fastening baguettes
Before starting work, it is necessary to determine the location of the electrical wiring, usually it runs vertically of the switches to the ceiling. Installation of baguettes begins with any inner corner.

The order of work is as follows:
- The profile is applied to the wall in such a way that the lower edge falls on the marking line.
- The puncher drills holes in the wall with a pitch of 12-15 cm. The places where the electrical wiring is supposed to pass are skipped.
- Then plastic dowels are inserted.
- The baguette is pressed against the wall and fixed with 5 × 50 universal screws.


The joints should ideally match in level. The maximum allowable gap between baguettes is 3 mm. And so that the sharp corners and edges of the profile do not damage the PVC film, they are carefully processed with a file and sealed with aluminum tape.

Important! This is the most critical stage on which the reliability of the entire structure depends. The profile must be firmly fixed.
If the baguette staggers, you need to screw in one or more self-tapping screws to fix the structure. Sometimes this is not enough, in such cases a spacer is made from a piece of profile, one end of which is attached to the ceiling, and the other presses the baguette to the wall.


Installation of internal and external corners
There are some nuances here. One baguette must be used, there should be no joints in the corners.

Installation is carried out as follows:
- A tape measure measures the distance from the previous profile to the corner.
- The measurement is postponed on a new baguette and in this place a cut is made with a grinder or a hacksaw for metal. Cut from the back (adjacent to the wall).
- Then the profile is carefully bent and fixed in such a way that there is no gap between the baguette and the wall.
Features: one incision is made for the inner corner, and three for the outer corner, with a distance of 10 mm between them, after which the trimmed parts are removed with pliers.


Installation of mortgages and wiring for spotlights
Next, preparations are made for the installation of lighting. On the ceiling, they mark where the lamps will be located. It is desirable to mark projections on the floor. Then, after installing the stretch ceiling, it will be easier to find the fixing points for the lighting fixtures.

Then mortgages are made. For installation you will need:
- universal platform made of thermoplastic (suitable for any luminaires with a diameter of 50 to 115 mm);
- flexible metal hangers;
- short screws "bugs" 9-10 mm long.


Installation takes place in this order:
- Before starting work, a ring of the required size is cut; it should be slightly larger than the diameter of the lamp.
- The hanger is bent in the shape of the letter "P" or cut in half and screwed to the platform with short screws (two on each side are enough).
- Then the mortgage is applied to the ceiling and the places for fastenings are marked.
- Holes are drilled with a perforator and plastic dowels are inserted.
- The mortise is attached to the ceiling with 51 mm self-tapping screws.


Note! The lower part of the platform should be flush with the tensioning web. To do this, a thread is pulled between two opposite profiles, along which the mortgages are aligned. If the platform protrudes, just bend the gimbal slightly.

The next step is wiring. We will use a cable of the SHVVP 2 * 0.75 brand. It is quite enough for the installation of 20 lamps. Electric cables stretch out to the mortgage. The same suspensions are used to mount the wire. So the cable will not fall onto the canvas in the future. For added protection (especially in wooden houses) a corrugated pipe is used.


All luminaires are connected in parallel in a circuit using terminal blocks of suitable power. Most often, a rating of 3-5 A is sufficient (for a power of 660-1100 W).

The ends are stripped of insulation and tucked into the terminal blocks. The wires are brought out 10-15 cm below the platform and retracted behind the mortgage, so as not to interfere with the tension of the web. After that, you can proceed to the next stage.

Before starting work in the room, all windows and doors are closed so that there are no drafts. The film is carefully unpacked and unfold. Then special crocodile clothespins are fixed in the corners of the room and the canvas is hung. Surfaces touching PVC are soft and free of sharp edges, so they will not damage the film.


It is important to hang the canvas correctly, the harpoon joint strip should be directed with the folded part down.
After that, the room is heated with a heat gun to 50 ° C. It is directed so as to warm up the canvas. PVC film becomes elastic and stretches well, and the edge softens.

Then the canvas is pulled up and tucked into a baguette. To do this, use a special metal spatula with a curved surface. The edge of the harpoon is put on the tool and carefully inserted into the recess of the profile. Then the spatula is removed.


The installation procedure is as follows:
- First, the film is fixed in one of the corners. Then - in the opposite.
- After that, the canvas is tucked in the other two corners.
- Further, moving from the center of the walls, the film is inserted into the baguette around the entire perimeter of the room.

There is no need to adjust the tension, as it is calculated when cutting. It is important to avoid distortions of the canvas, otherwise folds will form.
Bypass pipe
Often in rooms, heating or water pipes pass through the ceiling. In such cases, the installation becomes somewhat more complicated. Additional components will be required, namely plastic contours, the size of which exactly matches the diameter of the pipe.

For PVC ceilings, the technology is as follows:
- The distance from the center of the pipe to the nearest walls is measured.
- The dimensions are transferred to the canvas, taking into account the shrinkage of the film. To do this, the resulting value is multiplied by 0.92.
- Then the plastic bypass is cut off and tried on to the pipe. It should not adhere closely to the profile, it is necessary to leave a gap of 4-5 mm.
- After that, a thin layer of "Cosmofen" glue is applied to the plate and the outline is pressed against the film from the wrong side.
- Further, several cuts are made inside the ring in the form of a sun. Then the edges of the film are folded back and glued to the plastic. After that, a straight cut is made to the end of the blade.
- Carefully remove the harpoon on both sides of the problem area (about 30 cm each).
- Warm up the fold with a gun.
- Tuck the middle into the baguette.
- Then - the centers of free sites.
- Continue until the entire canvas is installed.
- Fill up all gaps between the foil and the walls.
- Install ventilation grills. Then the air will quickly pass into the space behind the canvas, and the pressure will equalize.
- Before starting the installation, check the connection of the gas cylinder, hose and gun.
- Make sure that the equipment is in good working order. At the slightest suspicion, it is better to contact the masters.
- View the date of the check of the condition of the cylinder (indicated on the body).
- Refuel or repair the equipment only in specialized workshops.
- Do not lengthen the hose yourself.
- Do not point the gun at a gas cylinder and do not place it near a radiator, heating pipe or other source of high temperature.


This completes the installation of the stretch ceiling. You can finish finishing and bring in furniture.

Important: in case of use ceiling plinth fastening is done only to the walls!
Is it possible to stretch the ceiling alone
The usual single-level structure can be mounted alone. The basic installation principles remain the same, although it will take longer. But the installation of a two-level ceiling or more complex shapes will require assistants.
If the work is done alone, when marking, the laser level is installed on a platform stand or a special holder (a rod that is fixed with a spur between the floor and the ceiling). During the beating, a screw is screwed in at the mark point and a cord is pulled from it. You can also attach the rope to the tape.

The second likely problem is one person installing a large, heavy chandelier. Such a lamp is difficult to hold and fasten at the same time. If possible, it is better to choose something simpler and lighter (a compact chandelier or built-in lamps).
The nuances and secrets of installing stretch ceilings
In the process of work, beginners often have various difficulties. If you do not know the nuances of installation, mistakes can lead to irreparable consequences. Let's consider the most common problems encountered during self-installation.
How to properly heat a stretch ceiling
When stretching the canvas, the distance from the heat gun to the PVC must be at least 1 m. The heat gun is not directed to one point for a long time, but smooth swinging movements are made. Heating should be uniform. Otherwise, the film may be damaged.

If the installation of a stretch ceiling is carried out together, one person refills the canvas, and the second stands behind and warms up.
How to tighten a stretch ceiling
Wrinkles may form during installation. To straighten the film, do this:

Attention! If it was not possible to remove the fold, the operation is repeated, but a larger area of the film is released.
What to do when the web collapses
After installing a stretch ceiling, an unpleasant problem sometimes arises. When a door or window is opened, the film will pull in and adhere to the base slab. The outlines of mortgages and other elements located behind the canvas become visible.

The reason for the collapse is the difference in air pressure. With the flow of air in the room, it rises, but remains the same behind the ceiling.
There are two ways to fix the problem:
In the first case, the ceiling is carefully examined to find all the gaps. The slots are sealed with a sealant.

The second method is more preferable, since additional ventilation will provide ventilation of the interceiling space, which reduces the likelihood of fungus. For the location of the gratings, discreet places are chosen: in the corners, behind curtains, etc. A hole is cut out in the canvas. For this, a protective ring under the lamp is used. Then a small ventilation grill is glued on so as to completely cover the opening. The product can be matched to the color of the ceiling.


It is enough to install two grilles in opposite corners.
How to choose lamps for lighting fixtures
The film melts and turns yellow from high temperatures. Therefore, traditional incandescent bulbs are not suitable. For PVC ceilings, energy-saving or LED devices are used. They consume little electricity and have a long service life. When using halogen and incandescent lamps, the power should not exceed 35 W. The most popular are G5,3 and GX53 spots.
Security measures
To warm up the canvas, use a heat gun. But when working with it, there is a danger of explosion or gas leakage. Therefore, it is imperative to follow the safety rules:
An electric gun is safer to use, although it is more expensive. But it is more difficult to warm up a large room with its help, so it is recommended to use it.

Features of operation and maintenance of the coating
It is very easy to pierce film ceilings with a sharp object, you need to be careful during installation. It is also important to take this property into account during further operation.
It is unacceptable to use abrasives or acetone for cleaning. They will damage the coating. It is also forbidden to press hard on the canvas while washing.

Modern film ceilings are treated with an antistatic agent, dust hardly settles on them, but sometimes cleaning is still required (especially in the kitchen due to grease and splashes). Wet cleaning is suitable for PVC. Take a soft sponge or rag, slightly moisten and wipe without excessive pressure. Suitable products are glass cleaner, dishwashing gel or soap solution. Then the surface is wiped dry. Glossy ceilings are additionally treated with a weak solution ammonia, this increases the shine.
Thus, DIY installation of stretch ceilings is a relatively inexpensive and durable finishing method. With the correct installation technique, the coating will last for decades. And if you have certain building skills, the work can be done alone without the involvement of assistants.