Video construction of a bath from a bar. How to build a bathhouse from a bar with your own hands: we understand the step-by-step instructions and assembly rules.
The log house of the bathhouse is distinguished by its coziness, environmental friendliness, durability, and it is always possible to build it from a bar with the involvement of experienced specialists or independently.
The strength, durability of the bath certainly depends on the quality indicator of the selected wood, the correct installation. However, the advantages of a wooden bath assembled from a log house are obvious:
- simple laying of wood (compared to logs);
- the minimum shrinkage rate is about 6-10 cm;
- affordable cost.
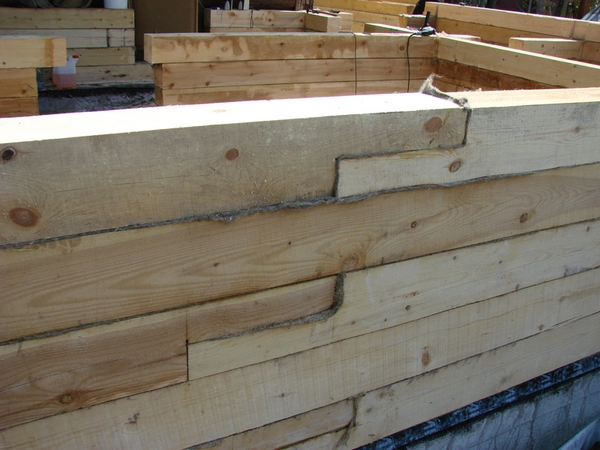
If you look at the log house of the bathhouse in the photo, then it is not difficult to make sure of the attractiveness of such buildings! However, there are nuances in the correct selection of wood, which will determine the subsequent durability, strength of the structure being erected.
Photo 1 - blockhouse of a bath from a bar
Timber selection rules
Here are the basic rules, adhering to which you can harvest high-quality wood, and build an exclusive log house with guaranteed durability:
- the best time for harvesting wood: the period December-March;
- felled logs are cleaned of branches, bark, leaving only strips at the ends 10-15 cm wide in order to avoid cracking;
- after cutting, the tree is allowed to “lie down” for 30 days;
- logs are stored in even piles or in bundles. Distances: between the logs themselves - 5cm, between rows - 10cm, from the ground - up to 20cm.
There is no way to independently harvest wood, planning to build a steam room from a bar? Then you should sort and carefully select the purchased beams.
Sorting wood
- deep, resinous cracks - "pockets" indicate the possibility of rapid decay of wood;
- "Blue", which appears in spots on the surface of the selected timber, speaks of the process of decay (see photo);
Photo 2 - Blue on the wood
- traces of woodworms - bugs, other insects - a sign of low-quality wood;
- a curved surface is unacceptable when laying beams. Although, having cut a curved beam, it is quite possible to use it for a different purpose.
IMPORTANT! Each bar must have a dry structure, without signs of mold damage.
Built saunas can be additionally decorated various finishes, elements. And you can leave the building without further processing of the outer surface with finishing materials, simply by opening wooden structure protective composition of paint and varnish type.
Sauna frame made of profiled timber
The construction of a bath with the use of a convenient profiled beam is the most popular way of building such structures.
Photo 3 - view of the profiled bar
The profiled timber in question allows craftsmen to quickly build baths, which differ:
- attractive exterior;
- the lack of the need to perform subsequent internal, external finishing;
- the correctness of the forms;
- high rate of thermal conductivity, sound insulation;
- environmental friendliness.
Why profiled timber?
The presence of fixing elements
The manufacturing technology of the profiled bar in question implies giving the material a smooth surface by carefully grinding the edges, the correct shape. Also, each timber after preparation has elements of convenient fastening such as a thorn / groove.
Therefore, further assembly of the entire structure is carried out rather quickly, without the use of additional gluing materials, which saves labor and costs.
Shrinkage
The percentage of shrinkage of baths built from profiled beams prepared by masters is 3.2 ... 4.5%, which is lower than the shrinkage rate of log wood.
Heat dissipation
Comparison of a profiled bar with a standard log showed that bars with a cross-section of 15x16 cm in terms of thermal conductivity are equal to logs with a diameter of up to 24 cm.
Quality
For the manufacture of the considered profiled beams, well-dried wood of known conifers is used due to the low susceptibility of the resinous material to putrefactive processes.
Log cabinets made of profiled timber are less prone to cracking if the wood was originally purchased of high quality, or it is properly harvested.
Do-it-yourself log house from a bar
Have you decided to build a steam room from a wooden bar yourself? Let us help you with practical recommendations!
Initially, we note that it is easier and much faster to assemble a steam room from a bar than to build it from logs.
The next plus is the ease of assembly. For example, profiled beams are assembled as a constructor thanks to the presence of ready-made grooves.
End cuts (grooves)
There are many types of cuts.
Photo 4 - Options for standard end cuts
Photo 5 - Options for standard end cuts
The simplest one is L-shaped, called by experts "in the paw". Such a cut is easily done independently with a traditional chainsaw.
Initially, a template is made, according to which it is subsequently easy to cut out the cuts. First, cross cuts are made, and then bevels. This is more comfortable.
IMPORTANT! Choose bars of exactly the same length.
Photo 6 - Template for making an L-shaped cut
Foundation
The first advantage is the ability to assemble the structure directly on the foundation erected by the craftsmen, which is impossible when using log timber.
When laying the foundation beam, waterproofing should be performed. A layer of material is applied between the foundation itself and the prepared, sorted beams.
Waterproofing layer
Photo 7 - Diagram of the device for waterproofing a log house
The photo shows a diagram of the device of the waterproofing layer. It includes bitumen, roofing material. An antiseptic is also used. The sequence is as follows:
- molten bitumen is applied to the foundation;
- on top of the bitumen - a layer of roofing material;
- bitumen layer;
- a layer of roofing material;
- mortgage beam.
The second layer of bitumen is applied exclusively after the previous one has hardened. And the embedded beam is pre-treated with an antiseptic composition from the side that subsequently comes into contact with the roofing felt sheet.
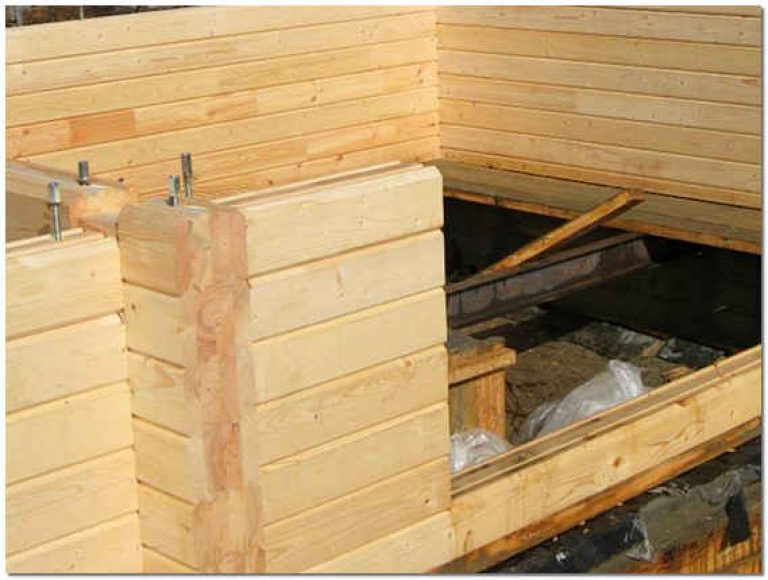
Embedded timber
IMPORTANT! The first crown bar is taken with a size of 200x200mm.
The log house after the formation of the foundation implies the laying of the first crown layer with your own hands.
Photo 8 - Scheme of the first crown
It can be seen that the slats, previously laid out on the waterproofing, serve as the basis for the embedded beam. The slats should be selected with a thickness of 15 mm and pre-treated with an antiseptic.
These slats increase the service life of the beams, raising them above the foundation and excluding decay. The resulting space is filled with assembly foam. It turns out a kind of ventilated pillow.
IMPORTANT! Do not fasten the first crown row! During the erection of the entire structure, it will be reliably "pressed down" by its weight. And if you need to restore it, then the procedure will be easy to carry out.
Laying horizontality is checked as standard by the building level.
Photo 9 - Horizontal laying of the first crown
Subsequent layers
IMPORTANT! The bars of the second, subsequent tiers are taken with dimensions of 150x150mm.
On the first crown, the sealing material is initially laid: natural moss, ordinary tow, rolled jute. The sealant spreads out evenly over the surface, with an outward release of 10 cm (except for jute).
After laying the II crown, it is fastened with pins or pins, inserting them into the pre-drilled relief holes. Note that it is undesirable to drill such holes after laying the timber - the laid seal will wind up on the drill.
Photo 10 - Fastening the crowns of the log house
IMPORTANT! After laying all the planned crowns, the last 2 crown rows are not fastened! After the structure has shrunk, when installing the necessary ceiling beams, they will need to be removed.
Openings
When building a log house for a bath yourself, remember the need for openings for the projected windows and doors. They can be equipped with direct construction or after.
Windows, doors after the construction of the building
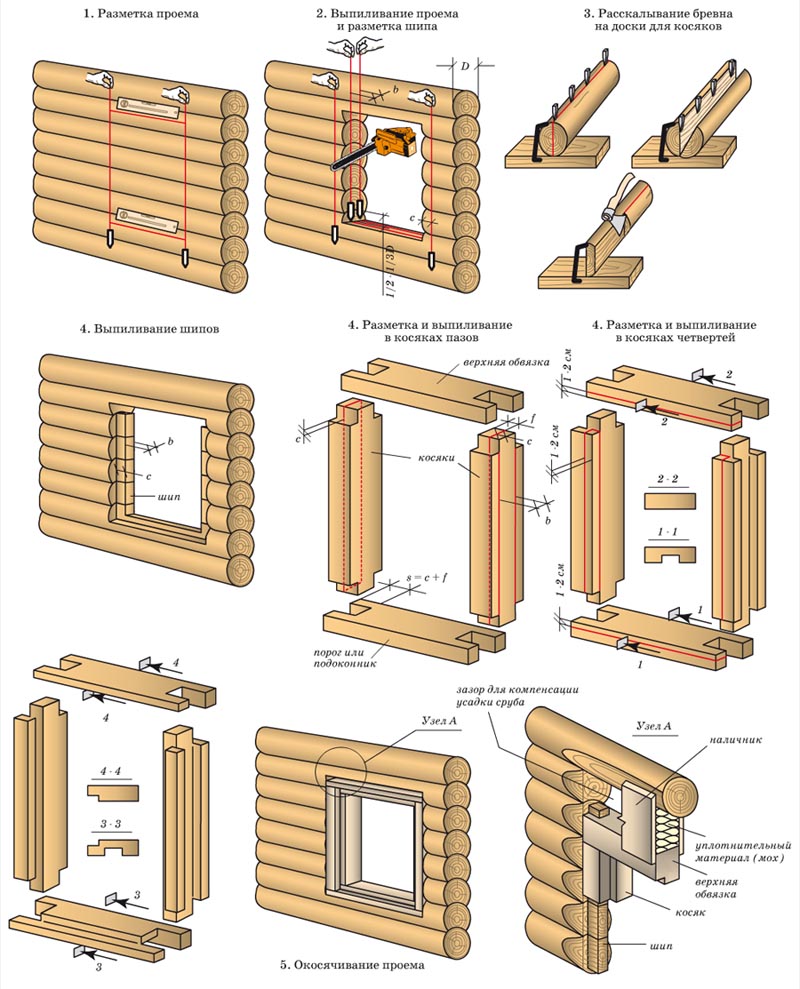
The most time consuming is the embedding of the openings after the construction of your bath. Here you have to make a special cut, as shown in the diagram.
Photo 11 - Variant of cutting when constructing openings after the construction of a log house
Bath openings arrangement
It is much easier to equip the openings of windows, doors during direct construction. During construction, inter-beam gaps are left, where the loot is subsequently inserted. This option allows you to cut openings of the required size.
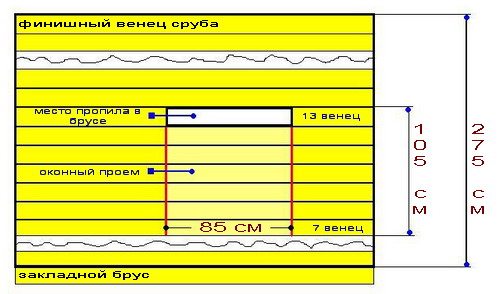
Photo 13 - The device of the doorway during the construction of a log house
IMPORTANT! The windows and doors themselves should be installed only after the erected bath has shrunk - about six months. The mezhventsevoy sealant will settle, the timber itself will dry out. The structure will shrink about 10cm. Therefore, built-in windows, doors will be distorted.
"Wintering" of a log house
After the construction of all the crowns, the finished log house should be covered with a board with a thickness of 50 mm. Additionally, you can put roofing material or slate and leave the structure to "winter" for 6-7 months.
Log caulk
If you used ordinary tow as a sealant, then after "wintering" the log house you will need to caulk it.
The procedure is pretty straightforward. An ordinary hammer and a special caulking machine will help to carry it out (see photo).

Photo 15 - View after caulking a log house
Have you used jute? Then you do not need to carry out caulking!
Do-it-yourself log house from a bar video
Here you can watch a video to visually assess the complexity of the construction of baths using a bar.
$ Blockhouse of a bath from a bar price
The log house of the bathhouse, which is planned to be built from a bar, will differ in cost. The price of such a building will certainly depend on the required dimensions of the material, the scale of the structure, the complexity of climatic conditions, etc.
But the minimum, standard rates for today are as follows:
- Kiev - from 1600 UAH for 1m 2;
- Moscow - from 3500 rubles per 1m 2.
Do you want to build a bathhouse, but do not know what material is best to use to implement your idea? Then be sure to pay attention to the timber. A bath made of this material will be environmentally friendly, reliable and durable. At the same time, you can handle the construction of such a structure with your own hands.
There is absolutely nothing complicated in self-building a bath from a bar. This material has many advantages over its closest analogue - a rounded log (log house). Among the main advantages of the timber, the following points should be noted:


However, in order for a timber bath to fully manifest all its advantages and serve for the longest possible period, you must responsibly and competently approach the choice building material.
What kind of timber can be used to build a bath?
The most important operational parameters of the finished steam room directly depend on the quality of the wood. First of all, pay attention that the logs are intact. No cracks or other defects are allowed. Even minor damage can lead to big troubles in the future, as a result of which the wood will rot and collapse.

Make sure that there are no blue spots on the surface of the wood. Such defects indicate the presence of rot inside the material, the development of which, in most cases, is provoked by a variety of pathogens. It is impossible to use such material for the construction of a steam room and any other building.

There should be no noticeable traces of damage by beetles and other pests on the timber.
A high-quality timber has a perfectly flat and smooth surface. It is strongly recommended to refrain from buying material with distortions and any other damage - when laying the crowns, all deviations will clearly manifest themselves.


Bath building guide
Pre-compose yourself, order or find a bath project in an open source. Calculate the required amount of building materials for the project and start building a bath from a bar. Start by arranging the base.
The first stage is the foundation
The finished wooden steam room will have a relatively low weight, which makes it possible to abandon the arrangement of monolithic buried foundation structures. A timber structure will feel great on an ordinary strip or columnar foundation.
To equip the base of the tape type, dig a trench around the perimeter and under the walls of the future structure, fill the bottom of the pit with a sand and gravel mixture, lay a reinforcing mesh, install formwork and pour concrete. The optimal foundation depth is 70-100 cm. When choosing a specific depth, be guided by the soil freezing indicators for your region.
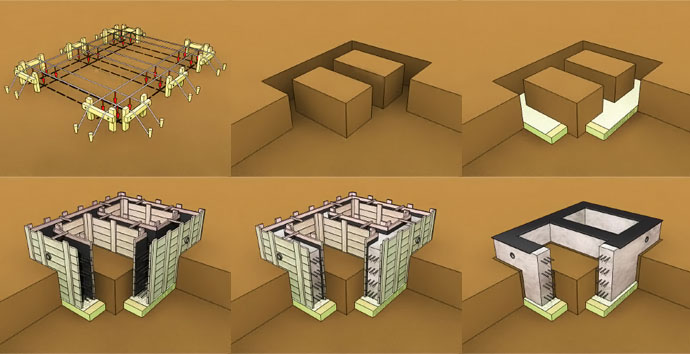
Strip foundation- erection procedure

The foundation should rise above the ground by at least 50 cm - this will provide the necessary protection of the lower rims from excessive moisture.
Place sand and gravel strips within the perimeter of the base strip. In the future, you can fill them with concrete or build a wooden floor - choose a specific option at your discretion.
For arrangement columnar foundation it is necessary to erect supports made of bricks or concreted asbestos pipes around the perimeter, in the corners and under the future inner walls of the bath. Under each such support, you should first equip a concrete "pillow". Place the posts in 150 cm increments.

Regardless of the type of base chosen, it must be subject to additional reinforcement.

Let the concrete gain strength within 3-5 weeks and proceed with further work.
The second stage is waterproofing the foundation

Apply molten bitumen to the surface of the base, and on it - a layer of roofing material. Let the bitumen harden and repeat the operations done. As a result, you get a reliable two-layer moisture protection.
Before proceeding with further work, saturate all wooden elements with an antiseptic. Such processing should be carried out after the preparation of the cuts for fastening the beams, if such cuts were absent initially.
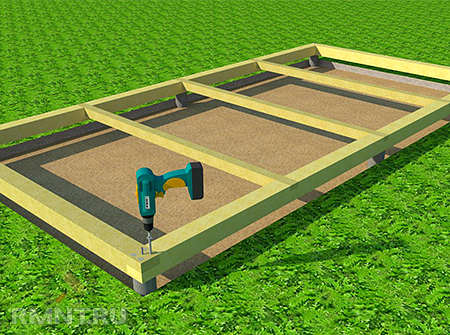
The third stage - the first crown

Start laying the first crown of the walls. To do this, first place slats up to 1.5 cm thick, pre-treated with an antiseptic, on the waterproofed base.Place the slats in steps of about 30 cm.

Place the first circle of beams on the slats. Thanks to the slats, contact of the timber with the bath foundation will be excluded. This will provide additional protection against wood decay and will significantly extend the life of the material.

Lay the first crown without securing it yet. Make sure that it is laid correctly and evenly using a square and a level.
Align the lower rim bars if necessary, and then attach them to the foundation. There are several ways of fastening. The most optimal and frequently used method involves fixing the timber with anchor bolts.
However, developers quite often refuse to attach the lower beam to the foundation. In practice, the structure stands perfectly well without fixing the lower crown, supported by its own weight. The advantage of this solution is that in the future, if necessary, the bar of the lower crown can be replaced with much less effort.
Blow out the space between the first crown and the base with polyurethane foam.

The fourth stage - the rest of the crowns

For laying out the walls of the bath is perfect wooden bar section 15x15 cm.
Cover the first crown of the bar thermal insulation material... Jute or moss are traditionally used for insulation. You can also use tow. In the case of using moss or tow, the thermal insulation should be laid out with a 10 cm overlap along the edges. In the future, you will use the raised edges for caulking.
How to build a bath from a bar
Lay the second crown of the timber and fix it with wooden dowels. Pre-drill the mounting holes of the appropriate diameter. Usually, the length of one dowel is enough to fasten 2-3 rows of timber.
Lay out the walls to the required height. Every 3-4 rows, check the structure with a square and a building level. Place a seal between the rims.
The two upper rims do not need to be fastened. The wood will shrink. Ceiling beams can be mounted only after the wood has shrunk. To mount the beams, the upper rims will need to be dismantled.
Fifth stage - door and window openings
There are two options for arranging openings for mounting doors and installing windows.
In accordance with the first variant, the aforementioned holes are created after the completion of the construction of the log bath. To do this, you must first leave small gaps in the crowns in the places where doors and windows are installed. The dimensions of the gaps depend on the dimensions of the installed products.

After the completion of the construction of the bath, you will simply have to make openings with a chainsaw for mounting doors and windows.
In accordance with the second method, openings for doors and windows must be left even during the construction of the bath. This option requires a more significant investment of time and effort. To accomplish the task, you will need to use special grooves and bars with end cuts.
Sixth stage - caulking
Leave the finished lumber box for "wintering" for 6-7 months. During this time, the wood will shrink sufficiently. For the period of "wintering" cover the timber with boards and slate.
If you used tow or moss as a mezhventsovy sealant, you can skip this step of the instructions - you will most likely not need an additional caulk in your bar bath.

However, experts recommend that you still study the state of the structure. If you find noticeable gaps, be sure to caulk. To do this, twist the tow or moss into a bundle and insert the material into the gap, followed by compaction.
You can also use jute sealer to fill gaps. By most indicators, this material is superior to tow and moss, but it costs a little more.
Seventh stage - roof


The roof must become reliable protection your log bath. You can start arranging the roof structure only after the wood shrinks, otherwise the roof will lead and it will be significantly deformed.
First step. Lay down wooden beams over the top wall trim.
Second step. Attach the rafter legs in 100 cm increments to the fixed beams. To connect the rafters in the ridge part of the roof, cut them at the required angle.
Third step. Nail solid plank flooring to the rafters (if for finishing soft roll material will be used) or build a crate (if you plan to trim the roof with tiles, slate or other sheet material).


Fourth step. Install the final roof covering according to the instructions for the selected material.

Fifth step. Cover the ridge with galvanized iron. This will protect it from adverse environmental influences.
Sixth step. Sew up the roof gables with suitable materials at hand - clapboard, wooden board or siding. In this moment, focus on your individual preferences.
After completing the roofing work, proceed with insulation and other insulation work, interior decoration and the arrangement of the steam room in accordance with your project.

Following traditions and in order to save money, most of the owners of their own plots build baths from high-quality, but inexpensive materials. For example - wood.
As a rule, such paired rooms are built from logs or beams.
Lumber properties
The popularity of baths of this type is quite understandable.
Advantages
- If a bath is being erected from a beam of 100 by 100, or a little thicker, it gives the walls absolute evenness with a small thickness. Consequently, your steam room will be more spacious and tidy.
- Buildings from a bar are easier to construct than from a log. For example, it does not need to be trimmed and trimmed by hand.
- Timber log cabins shrink minimally.
- The construction will be easy. Therefore, there is no need to build an expensive foundation.
- Buildings made of such timber look aesthetically pleasing.
- Low price when compared with stone materials.
- The timber is environmentally friendly and makes it possible to create the correct microclimate in any building.
Features of the bar and its use

The ease of installation of the log house is provided by the specific properties of the timber.
- Its raw materials are logs... They are hewn from all four sides.
- This lumber is impregnated with antiseptic compounds... They increase the service life of the block logs.
- Manufacturers produce a special type of timber - glued... This is the most expensive and high-quality type of material, providing fast construction.
- Usually, timber harvesting for timber is carried out during the cold season - from December to March.... Such raw materials are of better quality than summer ones.
Note!
After the wood is harvested, it should mature for about 40/45 days.
The trunks are freed from the bark, at their ends it is left - about 10 cm.
The material is stored in stacks.
The intervals between the trunks should be 5 cm, between their rows 10 cm, the height of the stacks from the ground level - 20 cm.
How to choose a project

A standard bath made of timber 10 to 10 or slightly thicker material can be equipped according to a standard design.
- Usually, they involve the construction of three main premises: a washing room and a steam room.
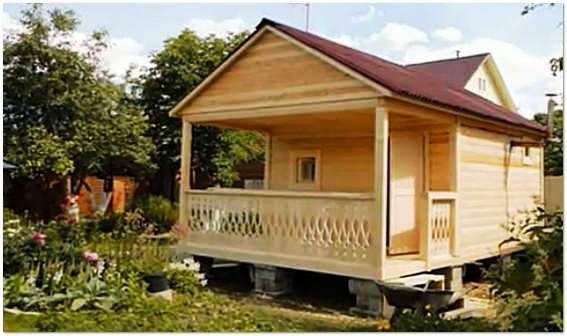
- The structure, at your choice, can be built in one, two floors, or the last one can be replaced with an attic. In addition /, the building can be supplemented with a balcony, veranda, terrace.
- To relieve wooden building, the instruction advises to construct the lower floor completely from a bar, and to make the attic or the second tier a frame.
Construction of a log house
First, the construction of the walls is carried out.
Base types

When constructing a light bath from a beam of 100 by 100 mm, two types of bases are optimal.
- Columnar bases. Brick, stone, concrete, wooden supports are placed around the perimeter of the steam room, its corners and at the intersection points. The pitch between the posts should be about 1.5 m.
To increase the strength, the supports must be reinforced and protected with waterproofing between the basement plinth and the first cobbled crown. In this case, you can use liquid bituminous mastic or roofing material. - The laying of the tape base consists of digging a trench, constructing a formwork of the required width and pouring it with concrete. Optimally, the height of the ground part of such a foundation is 30/50 cm. Such a foundation also requires reinforcement and waterproofing of the walls.
Assembling the walls
- The first crown (row) of beams is the basis of the whole frame. The durability and quality of the entire building depends on the literacy and accuracy of its installation.
- Having laid the first row, you can start the actual construction wooden walls... First, the beams are adjusted to their length. Then, on their opposite sides, grooves are cut out to connect the elements at the corners of the frame.
Note!
It is undesirable to use metal nails and screws when fastening the bars.
It is best to replace them with wood dowels (wedges). They are driven into pre-made holes.
- The connection goes like this. The upper bar is drilled completely, the lower one - half. Further, the upper beam is removed and pins are driven into the holes until they stop. , then the bar is installed back.
- It is advisable to use natural materials as a heat insulator - moss, flax, jute. They need to caulk the walls from the inside and outside.
Preparation of the log house for the shrinkage period
The inevitable shrinkage of the walls is influenced by such factors.
- The type of timber used and its dimensions. Profiled analogs shrink by 2.5 / 6 cm. The glued material settles by 2 cm or less.
- The total area of the building. A two-story or cobbled steam room with an attic will settle more than a one-story building.
- The type of lumber and its moisture level. The larger it is, the greater the shrinkage.
- The location of the steam room. Everything matters here: whether it was built in the shade, in the sun, on a flat area or with an uneven relief.
Taking into account all these points, a bath from a bar 100x100 should be erected with your own hands, with their laying in the project.
For example: keeping in mind the shrinkage, one should rafter system fix only in some places. So, it will shrink in proportion to the corresponding process in the load-bearing walls.
You can prepare a log house for shrinkage like this. The top of the crowns are covered with boards having a thickness of 4 centimeters or more. Slate is mounted on top. When about six months have passed, you can start facing work.
Output

A thin beam has many advantages when constructing a steam room. However, one must not forget that it must be protected from external and internal influences. If you read the video provided to you in this article, you will learn a lot of useful information on the topic we voiced.
These days, it is very difficult to imagine a comfortable Vacation home without the classic Russian bath, which is the favorite vacation spot for the whole family. It should be noted that for the construction of such a bath, wood is most often used, which is considered an environmentally friendly and easily processed material.
Land work on the arrangement of the foundation base begins with the marking of the site. Further, in accordance with the applied markings, a trench with a depth of about 70 cm and a width of a little more (about 10 cm) of the section of the timber used for assembling the log house is pulled out. The bottom of the trench is covered with a layer of sand, which is then carefully compacted using a special ramming device.
Before pouring the concrete mixture from boards or ready-made boards, formwork is constructed, for which you will need special spacers to secure it securely. After pouring and completely drying the concrete mixture, the finished foundation is covered with a layer of roofing material used as waterproofing, after which it will be possible to proceed with the direct assembly of the log house itself.
Log house preparation

- After laying the first crown (strapping), floor logs from a bar are mounted in it using the plunging method, on which the subfloor will subsequently be laid.
- Fastening of the beams is carried out by the method of joining them according to the type of blind connection "thorn in the groove". And for reliable fastening of adjacent crowns to each other, wooden dowels are used, hammered into mating bars.
- Special jute fibers are most often used as a sealing material laid between the crowns of a log house.
- Upon completion of the assembly of the log house, it will be possible to start making internal partitions, cut into the crowns of the log house in pre-marked places.
Roofing

At the end of the construction of the bath frame, it will be possible to start arranging its roof. Note that in the buildings of the type we are considering, gable roof structures are most often used, excluding the accumulation of snow on them. Their installation includes the following operations:
- on the last crown of the log house, inset-nests are made, intended for fastening the rafter legs;
- counter-lattice slats are attached to the rafters from below, along which the attic ceiling is subsequently sewn;
- in the niches formed by the rafters, first it is laid polyethylene film, performing the function of a vapor barrier, and then the plates of the insulation material of your choice are laid;
- on top of the insulation with a small gap, a special roofing film is laid, used as waterproofing;
- at the final stage of the formation of the "roofing pie", a crate is sewn onto the rafters, which serves as the basis for laying the covering.
The ceiling of the attic is most often sheathed with clapboard or drywall.

The interior decoration of the bath building is usually reduced to the insulation and decoration of the walls and ceilings of its premises, providing comfortable conditions for taking bath procedures.
As decorative material for finishing the steam room and washing room, it is best to use larch, which is distinguished by the presence of resinous secretions and high resistance to moisture. In addition, larch retains heat well, but also does not heat up to a state that can cause skin burns.
The inlaid floor in the wash compartment and in the steam room can be made from edged boards laid with small gaps through which waste water will be removed from the room. An additional convenience of such a floor is the ability to disassemble it and dry the floorboards at the end of the bath procedures.
Benches, shelves, and other items interior decoration bath rooms are made of soft wood, which must be carefully sanded and pleasant to the touch. Photos and videos with a step-by-step overview of all the previously described operations can be found in the corresponding section of our website.
Video
This video shows the construction of a bath from a bar 150 × 150:
To build a bath, you can use different kinds building material. The most widespread is construction using the most ancient technology - from wood. You can build a bathhouse from logs, or you can from a bar.
How to build the right bath from a bar with your own hands
The timber fits perfectly into the rows, looks beautiful, practically does not shrink, keeps heat very well. Lumber walls are easier to build than log walls. They can be installed directly on the finished foundation, in contrast to logs, which are first adjusted on the ground, and then transferred to the foundation and build walls from them.
This type of construction is the most cost-effective. Almost any person with experience with a power tool and a little desire can build a bathhouse from a bar with their own hands.
I do not want to describe the disadvantages or advantages of building from certain materials. Each material has its pluses and minuses. Let's take a closer look at how to build a bathhouse from a bar.
The technology of building a bath from a bar. Selection of material
To build a bathhouse from a bar with your own hands, you will need a profiled bar.
When laying the first few crowns (a complete row of beams around the perimeter is considered a crown), it is best to use a larch beam, since it rots less in a humid environment.

For subsequent crowns, starting from 2-3, you can take conifers wood (cedar, spruce, pine), as they are warmer and water-repellent due to the presence of resins.
The optimal size of the timber for the outer box is considered to be 150x150 mm, and optimal size internal partitions - 150x100 mm.
As an antiseptic, the old grandfather's method is still considered the best. According to him, each bar is carefully processed with engine oil, and the very first crown (salary) should be processed from all sides, and all subsequent ones are processed from three inner sides.
Preparation of the construction of a bath
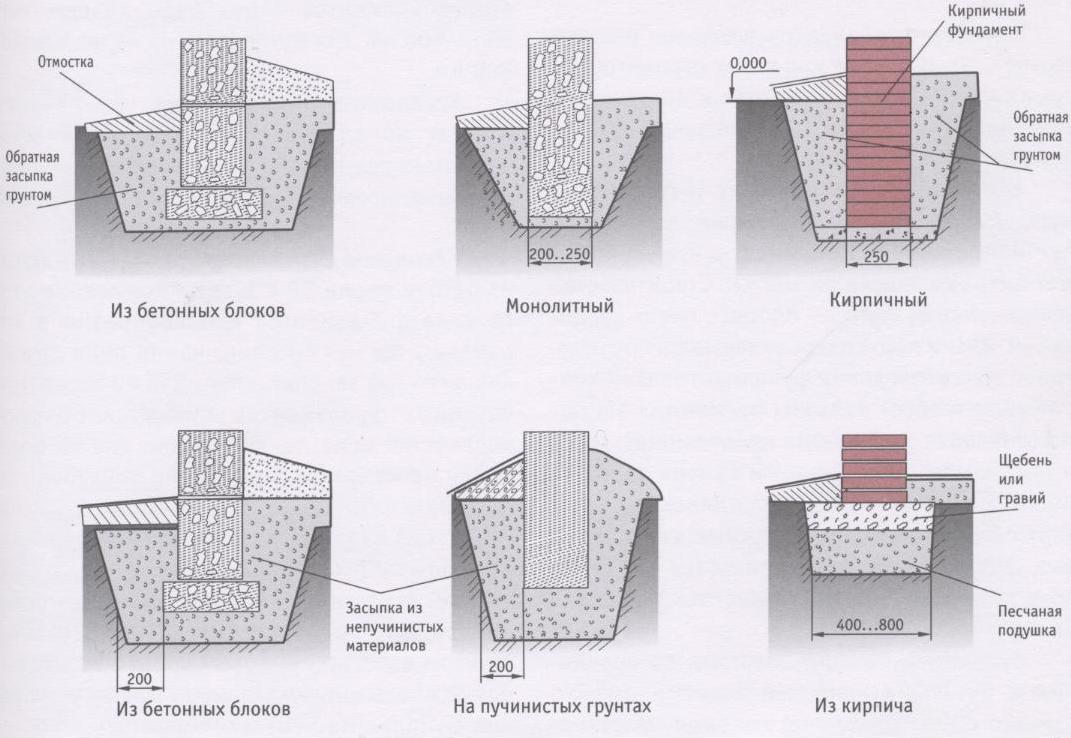
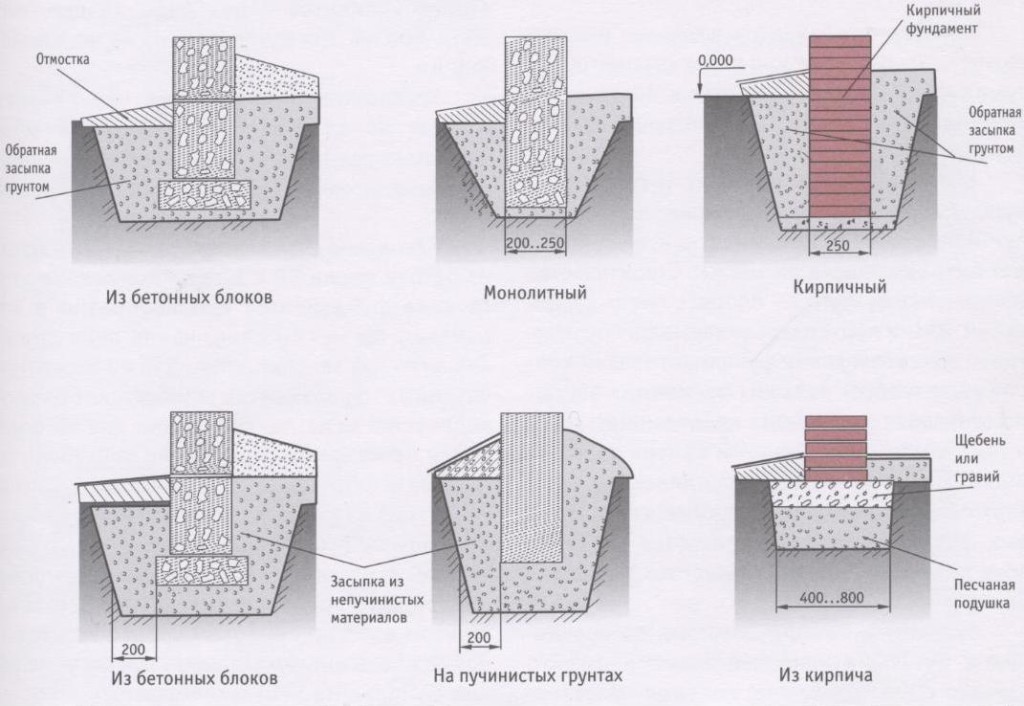
According to experts, the foundation for a bath is recommended to be made in the following most common ways:
- Strip foundation - concrete is poured along the perimeter of the structure to a freezing depth, or to a depth of 55-70 cm, the soil around is then additionally insulated.
- Columnar foundation - pillars are placed in the corners and around the perimeter, at a distance of approximately 1.5-2 m from each other. Usually it is made of bricks, and a concrete "pillow" is poured under each pillar.

In both cases, the waterproofing between the first crown and the foundation is made of two layers of waterproofing material, for example, roofing material.
The height of the part of the foundation that protrudes above the blind area should not be less than 150 mm, and the width should be 100 mm more than the thickness of the timber.
When filling the foundation, remember about the "embedded" from the reinforcement, in order to then carry out the fastening with the first crown (frame).
Rim seals
Sometimes "dashing masters" are advised to use polyurethane foam as a sealant. I want to note, firstly, this will result in a considerable sum of money. Secondly, polyurethane foam quickly turns yellow and collapses from external exposure to ultraviolet rays and internal exposure to moisture.
Foam is used guided by a certain technology, laying slats, but this is long and cumbersome, therefore it is safer to purchase ordinary seals for a log house.

There is a large assortment of different insulation materials for wooden buildings on sale. The easiest way to use is jute (tape insulation). It is rolled out along the entire length of the bar and fastened with small nails or a construction stapler.
Walls
Let's start assembling a constructor from a bar. It is important to remember that when assembling walls from a bar, making a tight fit is unacceptable. When the tree dries, it will shrink in thickness, but the length will always remain unchanged. The space must be loosely filled with insulation.

The number and length of the timber for each wall is determined on the basis of the bath room plan, taking into account the overlaps on the corners and cuts for installation interior walls... We prepare a template along the length from a board or rail using an electric saw, according to the template we will prepare a bar for 2-3 crowns. We will mark up the template in the way that is convenient and understandable for us.

The timber is fastened to each other according to the following scheme:
- we lay a new beam and adjust it in place;
- we drill holes with a step of 1.25-1.50 m, drilling the newly laid beam and half the underlying one;
- we remove the new beam, and drive a wooden dowel (dowel) into the hole of the lower one, the length of which is equal to two heights of the beam;
- we lay the insulation along the length;
- we put the bar in place, check the horizontal position, combine the holes and pins and hammer it into place until it is firmly seated.
We will put the door blocks on the strapping row, which is located in the washing compartment above the floor level, and the window block at the required level. We set the blocks by plumb lines, then we fix them. Over the window boxes and doors you need to leave a gap of about 80 mm for shrinkage, then it must be filled with insulation.
Preparing the structure for the shrinkage period is the last step in the question of how to build a bathhouse from a bar with your own hands. It lasts 6 months or more. At the end of this period, you can start Finishing work inside the building and the arrangement of the bath.
P.S. And for dessert, I suggest watching a video clip: Building a bath from a bar
