Distribution of electricity in a private house. Installation of electric wiring in the house
Electrification of the private sector directly requires a serious approach. Some arrangement, including laying of wiring in the house, is performed on their own. Neglecting professional workers should be justified, otherwise no effect, except for the lack of security when using electricity, you will not achieve. In order to avoid such problems, let's talk about how the wiring is made in a private house.
An ideally positive outcome is required to be guided by the installation rules and some PUE requirements. For the happy owners of the house itself, the tips that we will give below will be useful.
Tip! Be sure to make the wiring of wiring in the house, you need to create a scheme to which you will be oriented in the process of work.
If neither twist, but the use of tools for wiring tools is necessary, since it is impossible to achieve with bare hands to achieve accuracy and error-free execution. Therefore, we offer you a list of tools that first should be acquired:
- screwdriver indicator;
- tester or multimeter;
- hammer and perforator;
- pliers, Passatia;
- flat and curly screwdrivers;
- insulating material Liquid insulation or tape);
- stroboresis.

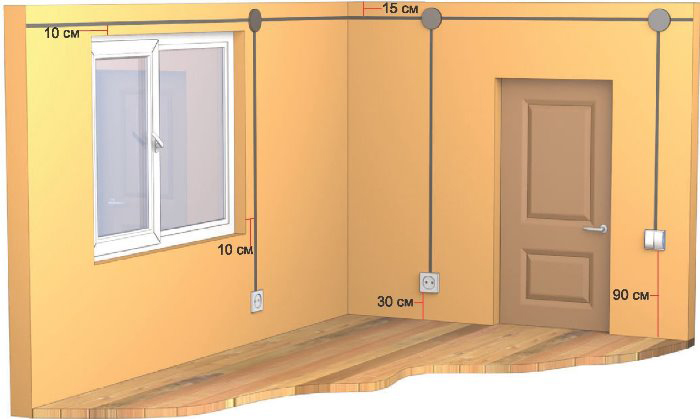
When installing wiring at home, comply with the requirements of powerful consumers: sockets and switches. If you believe in modern Eurostandards, the floor socket is located at a distance of 25 cm, and the switch is 90 cm.
What type of wiring to choose a hidden or open?
Choosing the type of wiring for your home, you should pay attention to the raw material from which the house is built. For example, wooden walls Both ceilings require exceptionally open wiring, which is hidden by special boxes and cable channels.
Important! Open wiring in a wooden house must have an additional layer of insulation for safe operation.
For houses made of brick and a stone block, both open and hidden wiring can be used, but in both cases there should be access to repair if problems are formed either when new items are connected to the main network. Consider and cross-section of cables, since the adherence to the load of electricity and wire parameters is required.

How to make the wiring of wiring in the house: Procedure
Remember, all the steps that we consider below must accurate to be observed, the result of the efficiency of the electrical network depends on it.
- We are accepted by preparatory stage. It is important here to have everything at hand, what kind of working devices you will need to see above in our article.
- Then we proceed to install the meter, it must be checked for performance.
- At this stage, it is customary to install protective mechanisms, such as RCD, differential machines or circuit breakers.
- Know the shutders under the wires, we use drill and strokesis. Remember the location of the entire network and the consumers included in it must already be in your hands.
- Observing a schematic drawing, we deposit the wires into the shoes, if necessary, use fastening loops.
- On top of the stroke, the grout to the alabaster or gypsum putty. Do not forget to install junction boxes, the connection of the wires in them should also be extremely correct.
- For open wiring, you only need to fix the wires on the wall surface, but it is better to immediately hide them in protective boxes.
Important! You can not use tools that are not intended for work. Immediately exclude knives, scissors and blades.
In the same way, the wiring wiring in the apartment is also pre-created a diagram. However, in this case there is still a mass of nuances, such as coordination of work with managing economy, determining the schedule of repair work, as you live are not alone in the house, and the neighbors are familiar to the neighbors.
Selection of wiring, to pay attention to?
Obviously, the power consumption of the private sector is several times higher than in the apartment buildings. It follows that you need to choose cables with a cross section of at least 10 square meters. mm. Usually instead of single consumers, their group is formed, for example 3-5 sockets in one case. For these devices, it is recommended to install circuit breakers.
Tip! Perform layout electric wiring In a three-phase network, so that all phases have the same voltage.
By installing "automata" on the lighting system, it is better to use adaptations with a force of up to 10 amps. If you decide to completely replace the wiring in a private house, you need to use exceptionally copper cables, this is provided for by the PUE rules. All the usual use of aluminum conductors, but they are not enough. Avoid connections of aluminum and copper conductors.

Wiring Rules
Any contacts with electricity often bring sad consequences, and so that they do not have to be guided by the following tips:
- do not place outlets right in the toilet. It is not only dangerous, but also prohibited by standards;
- consumers in the bathroom can be mounted, but provided that children do not get. It is better if a separate transformer is connected to these devices, which is outside the room;
- do not forget about grounding sockets, especially if they work from them washer, Microwave or dishwasher. For such cases, the installation of the ground loop should be installed near the house;
- do not allow yourself negligence in the case with stretching electrical wiring: only dry hands, overalls and compliance with safety requirements.
During the article, we figured out how to distribute wiring in the house, and in conclusion we want to emphasize that without a predetermined project and the work scheme, starting the installation of the wiring is not recommended. In addition, without skills and pre-acquaintance with electricity, it is impossible to start the cable laying.
Wiring in the apartment with your own hands is not a myth, but a reality for which you do not need to learn to the electrician or read several sweaty volumes in physics.
It is enough to know several rules to pave the cable at home and make the right project. However, you should not forget about risks, because still we are dealing with electricity.
To carry out electrical wiring in the apartment, you need to own the theory and behave carefully in practice, not forgetting about precautions.
The wiring scheme in the apartment is an indispensable speech for the wizard.
New wiring is required or with overhaul when it needs to be replaced, or when designing from scratch is made, often at the stage of construction.
Why not hire an electrician who knows all the subtleties and can carry out electricity? The main thing is the price.
Typical wiring in the apartment costs about 1000 rubles for square meter, and in atypical cases, the gasket will be released much more expensive.
On the other hand, wiring in the apartment own efforts is spending only on the material.
First of all, starting the installation of wiring in the apartment, it is worth paying attention to cables.
Often B. ordinary apartment You can find an aluminum cable. Previously, he was chosen due to low cost, but it is more reliable to replace the copper wires.
The fact is that literally in twenty years, the aluminum cable becomes very fragile, becoming the cause of burden and closure.
If moisture falls on it, the corrosion begins, the entire wiring diagram burns onto the damage of one wire. Because of these reasons, the use of aluminum in the apartment is prohibited.
It will correctly make a copper cable - let it come out more expensive, but it will be safe.
Stages of work

You can replace, sticking to a simple plan:
- created a scheme for an apartment;
- the layout is drawn up, its compatibility with the project is checked;
- study of repair today;
- wiring laying is performed;
- connecting machine guns, sockets, switches.
Do not forget about grounding. IN modern apartment At the same time, several (or even more) devices can be operated at once.
We all could at least once feel hardly tangling when touched to the technique. But if you forget about grounding or make it wrong, the blow becomes very dangerous.
Therefore, the wiring scheme implies grounding. Make it with your own hands will not be difficult if you know the principle of work.
But we can say that there is a ground in each apartment - it is served one of the wires and is called a zero. So that it worked correctly, you need to spend your own hands.

This process is quite simple: the wiring is mounted in a three-core wire, one cable will play the grounding role. It is connected to the connector sockets and to a certain technique in the apartment.
It will correctly be grounded inside the shield - then the protective function of the elements will be close to 100%.
Wiring wiring at points should be done at the very end when mechanisms and instruments are installed.
Principle of circuit drawing
The scheme that can be done even with their own hands is needed for a number of reasons:
- without difficulty, it is possible to calculate the amount of material, with which you need to work for posting in the apartment: required wires, their sections, determine how much it will be in the apartment outlets, switches, as well as designate the location of the shield;
- design allows you to find the right places for the power elements;
- helps in the future repair the hidden parts of the elements carried out.
The scheme and plan of the apartment or house are kept on the scale with the application of distribution groups. Without the last wiring in the apartment, it is impossible and even dangerous.

Usually in the apartment you need to make a minimum of two shield: introductory and internal. From the inner in the room there are branches of wiring.
The main groups look like this:
- sockets;
- lighting;
- powerful devices;
- sockets and techniques that need to be made and connect in the bathroom and in the kitchen;
- economic extensions.
The project and the calculation is important to do so that all the wiring goes not to one group of points - then it turns out too much load.
Even at the stage, when the project is only created, you need to think about protective devices for each individual group and make them with your own hands.
The power and location of the instruments will affect the choice of the scheme, which master will prefer to use. Such data will help you choose the number of outlets for the apartment and the section that the cable must have.

Many people may have a question: what is the difference between the house scheme from the apartment scheme? In practice, there are few differences.
The main difference is to enter electricity - it falls into the house in external wires, in the apartment it is a cable from the distribution panel.
How to make wiring?
In the apartment most often you can meet concrete or brick wallswhich are covered with paint or plaster.
The project of the electrical wiring of the apartment may imply that the cable must be laid or a combination method, or hidden. What is the better way?
It is worth understanding that there is a mass of options, and all that can be made with your own hands are based on the features of the apartment.
Wiring can be laid even on bare concrete WallsAnd on top to cover it with plaster or paint.
Payment essential materialsTo perform the procedure with your own hands, it looks like this: you need a pipe and a flexible sleeve (usually metallic or PVC).
Open wiring should be laid in special channels.
By performing the project with your own hands, we are determined with the security system.
To do this, inside the distribution panel of the apartment, a prerequisite is the presence of machines that protect against closure.
Some experts advise to make protective shutdown devices instead of machine guns, which are turned off the instruments when electricity surges.
What should be the wiring in the bathroom and the bathroom, what choice of machine guns will be correct?
If you do the installation with your own hands, then try to avoid the installation of the junction box in this room, the switch is better to pave it not in the bathroom itself, but somewhere near, for example, in the corridor, near the door to the room.
The outlet is allowed to be installed, but with additional moisture protection mechanisms.

Markup is better to carry out strictly horizontal or vertical lines.
Designing is carried out so that the lines do not intersect with each other, and the track is parallel to some wall.
If you decide to make wiring under outdoor coating, then, from her to the wall, there should be a small distance.
How to choose the right section for wiring wire? This indicator should always be greater than the calculation of the planned load on the network (and more than 2 millimeters square).

Calculation and scheme suggest that for different groups We need different sections. When installing in the apartment, all the wires in the cavities are protected by pipes and sleeves.
The cable and wires that will be connected must be equipped with open-air distribution boxes so that you can easily get to them if necessary.
In the corridor will be enough and one or two sockets, but in the rest of the rooms the apartments can be made more.
The plan does not regulate how to have a rosette in the apartment, but it is believed that the optimal distance from the floor is above 30 centimeters.
Calculation where the switch is to be placed in such a way that each family member can reach it.
What else to take into account during the planning?
The plan is a real rescue for any owner when installing, especially if all work is carried out with your own hands.
It takes into account all the rules that will help avoid problems and carry out the correct calculation of materials throughout the apartment.
The wiring scheme in the apartment is the thing absolutely necessary for both work, and for further repair.
First of all, it is important to remember that from the counter in the apartment in every room there are at least two branches - for switches and sockets.
Particular attention should be paid to the bathroom, the project for which is a real headache when laying with your own hands.
The most optimal option will be installed in this room only lamp on the ceiling and boiler when it has a need.
The plan can be made so that in the adjacent rooms apartments the sockets were located opposite each other in the wall.
In this case, one hole is drilled for two groups, which allows you to pave one branch, saving the cable for wiring in the apartment.
As for the project with the designation point lamps In the apartment, deciding to do it with your own hands, it is worth specifying such elements as a separate chandelier.
The calculation here is made so that the branch goes into the center of the ceiling, then the wiring will be paved more convenient.
A competent plan assumes that it is a separate branch to each chandelier or lamp.
If you think that the plan is not so important, especially when working with your own hands, then it is not.
The fact is that your calculation and plan still need to register in the energy service.
This procedure is free, but if the calculation of the wiring is incorrect or even dangerous - get ready for the fact that the plan will have to redo.
Therefore, the correctly compiled scheme is extremely important. Another question is how to do it? To date, it is not necessary to go to the Bureau or hire an engineer.
All actions, if desired, are held with their own hands.
It is allowed to make a project in computer editors: CorelDRAW or Photoshop. In case you have no experience in how to create a project on a computer, you can draw it on paper from hand.
How to repair wiring with your own hands
Situations when wiring burns out or breaks - not uncommon. How to repair it? The electrician can be waited long, and he will take a lot of work.
Therefore, many choose repair with their own hands. The main thing, do not forget to use the means of protection: gloves, glasses, good tools.
Repair of wiring or wiring can be complete or partial. Basically, the apartments use hidden wiring, and at hand there is not always a plan where branches are marked.
If the project is lost, that is, the output is to use wiring seeker. Such an appliance works by the type of scanner.
If in the apartment, as the project required, the aluminum cable was laid, then better or cause a qualified wizard to replace the wiring, or not touch the wires at all.
If you are not sure that you can spend such a procedure with your own hands - then call the masters. However, there are such situations where a joint scheme for aluminum and copper wires works.
Use twisting in such cases cannot be used. How to be? Very simple: to choose terminals and clamps for such purposes.
Terminals for wiring in the apartment are common mechanisms used to connect the wire from different materials.
It is beneficial to use such devices, because they are constructed in such a way that the cable is not oxidized.

In no case do not forget to reveal the apartment for the repair of wiring. However, how then to connect tools that run from electricity?
This uses a special connection connection scheme. On a dense plank or piece of plastic, you will fix the rosette and automatic on 16 A.
The branch is given from the meter, after which the apartment itself is de-energized.
For standard repair work with your own hands or when replacing wiring, we will need such tools:
- bulgarian with a circle (if the walls are of stone or concrete, then with the appropriate nozzle for stone);
- perforator that can drill concrete;
- soldering iron;
- indicator phase designer;
- screwdrivers (handles must be isolated);
- lamp;
- knife for mounting;
- building level;
- spatula to hide wiring with materials (for example, plaster);
- portable electrollamp.
In general, all these tools for wiring in the apartment can be easily found from any master who came across apartment repairs.
(No ratings no)
Tell us about us!
The decoration of walls, floors and ceilings of the apartment or an individual house should always be proceeding only after the scheme has been made and conducted wiring and TV, telephone and other networks.
Paper electrical cables And they will pull them into junction boxes with their own hands with most of the hosts, how to do it all you will learn from our relevant instructions in the "" section.
Now I will focus in more detail on how to make electrical wiring Alone in your home. If you have no new construction, but is held overhaul And you decided to replace all the electrocabilities or simply add or transfer outlets, lamps or switches- Be sure to read our article "".
Step-by-step instruction:
- Before proceeding with electrical work- it is necessary to draw a plan of an apartment or home And to apply the locations of the intended installation of furniture, television, refrigerator, washing machine and other household appliances. If you are going to buy new furniture, then I recommend to find out its exact dimensions.
- After the scheme of the apartment or the house is ready, it is necessary to determine the installation locations of electrical sockets and switches.. Be sure to sockets will stand near the household appliances, a computer and in other necessary places, as well as I recommend to place a few more sockets on the walls - in the future they will most likely need. Provide installation in one block with electrical outlet Additionally, television, computer or telephone in places where it is necessary. Pay special attention to the selection of places to install outlets in the kitchen - consider the dimensions kitchen furniture and the convenience of connecting technology. Switches are put in rooms at an altitude of 90 centimeters, and the sockets are 30.
- Throwing will be decide on the installation and selection of the species and number of lamps and chandeliers. How to do this in our article "".
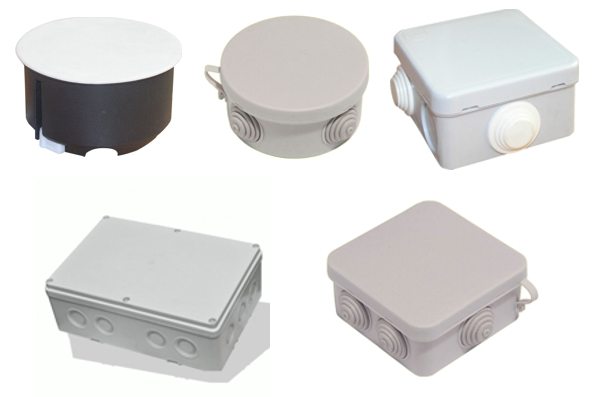
- The next thing to be applied to the plan these are installations of junction boxesin which cables or wires are connected (). They are always installed in easily accessible places and over switches. One room in most cases is enough one box. The sockets can be connected with a loop or one from another, but do not advise you more than 3.
- The next stage will be application markup Cable trails passing lines.
 Try to choose the shortest track, but it is not lower than 15 centimeters from the ceiling at right angles, as well as comply with the generally accepted rules of the electromotion (minimum indents are indicated in the picture above). If you edit the screed, then the option will be the option of laying cables on the sockets in PND pipes or metal - in wooden floor. Some pave electrical cables on sockets in the stroke at the level of their installation.
  But I did it only in the rooms where it was not known exactly the height of the subsequent installation of the level of the suspended or stretch ceiling, which would not be damaged when the profile fastening holes are dried around the perimeter of the room necessary to install these types of ceilings.
 - After marking getting Started with walls and fastening electric cable in them. Overhead stretty ceiling Wiring is attached open over the ceiling surface. Transitions through the walls are made in the pipes.
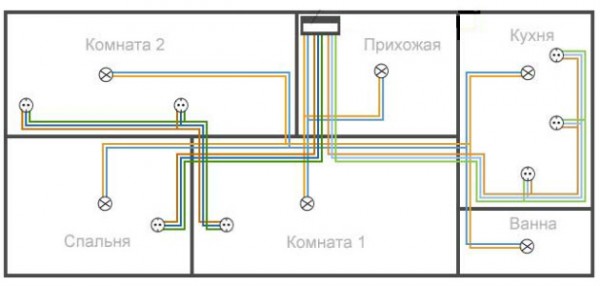
- The last stage is connecting cables to the electrical wheel. There are quite a few different schemes. As a rule, there are 3 groups in the apartment and another fourth on an electric stove, if available. 1 line goes on the room, the second to the kitchen, the third on the bathroom and the bathroom. There are many different variations, sometimes a separate group is on the washing machine. But the most optimal and reliable power supply scheme for 3 or 4 room apartments Or a private house will be consisting of 3 ordinary automata on a separate inclusion of lamps for 2 rooms, a corridor + 3 room, bathroom + kitchen.
 I also recommend putting 3 diff-automaton separately on the rosettes of the kitchen, 2 rooms and all other premises.
It is necessary to pave separate power to the washing machine and the electric stove. In this case, the cross-section of the copper cable on the washing machine should be at least 2.5 square millimeters (automatic 25 ampere), and on the electric stove is not less than 6 square meters. mm. (Automatic 40 A).
It is desirable to carry out an electrical cable to the house to entrust the professional: from the accuracy of compliance with the rules and quality of execution mounting work depends not only homemade, but also the safety of people, devices that feed on electricity. However, if you own basic knowledge in the field of electricians, then installing the wiring in a private house with your own hands you are fine forces.
Important!
Even before preparations for the construction of wiring at home, a place for the dispenser's panel is determined. It must be installed in the non-freezing winter indoor indoor at least 1.5 meters from the Earth / Paul. With the help of the shield, the electrical panel is controlled inside the house.
Before installing outlets and switches to be prepared, which includes:
- Schematic representation of the future wiring;
- Sketch of the circuit on the walls and the ceiling (markup);
- Choosing and cutting cable livers;
- Punching trench for cable (if they are hidden).
We will describe in detail about each stage of preparation for the installation of the electric pipe in the house.
Options for electrical wiring
Installation of wiring in a private house with your own hands begins with outline of two schemes:
 Both schemes are attached to their discretion depending on the number of electric energy consumers and selection of places for their installation. Even it is not necessary to use the general assessments of the electrocopy nodes: it is important that you just do not forget how to read them. However, Ignore the rules described below should not:
- For high-power electrical engineering, refer to the grounding scheme (connection through a triple cable consisting of lived: "Earth", "zero" and "phase"). It is necessarily for a boiler, washing machine, electric stove, as well as for light sources that are chain nodes in rooms with high humidity (bathroom);
- Wiring lines for socket sockets and lighting devices to break each other into several groups.
Posting distribution rules for socket sockets and lighting devices:
- The power of any socket family should not exceed 4600 W when purchasing wires with cross-sectional area (hereinafter referred to as PPS) 2.5 square meters. mm made of copper;
- The power of any group of luminaires should not be higher than 3300 W when purchasing a wire with 1,5 kV PPS. mm made of copper;
- Do not make a circuit in which the outlets are associated with the "Clay" method. In particular, it concerns the nests with the stipulated ground: along the length of the residents "Earth" cannot be taken out.
Each line of wiring from group and unit sockets, groups of lighting devices and single lamps are moving on the diagram to the distribution panel in which the autotlists are provided. On all single and each seven sockets need one automatic. Its power should be compared with the PPP of the core used (compliance with the limit value of the current, which the wiring is able to transfer with all the devices included in the circuit feeding with electricity). For lighting devices, the power current of the automata is usually included in the range of 10-16 A, and for outlets and groups of them, one of the following values \u200b\u200bare selected: 16, 25 or 40 A.
Marking
Schedule the route of the electrocabylide starts from the dispenser's panel, by marking the path of each of them to consumers and the route of each of their branches. We must certainly celebrate places where the path changes the direction and passes through the obstacles, but so that the rules are not disturbed:
- The cable should go either strictly vertically or strictly horizontally;
- Marking paths, and, consequently, the installation of horizontal wiring should be made with an indent of 0.2 meters from the line intersection of the wall and ceiling plane to reduce the risk of damage to the cable protective sheath;
- All turns of the electric pipe must be performed at right angles;
- Overlapping the attic and between the floors, the electrocabel should pass through the shortest path that comes from the distributor.
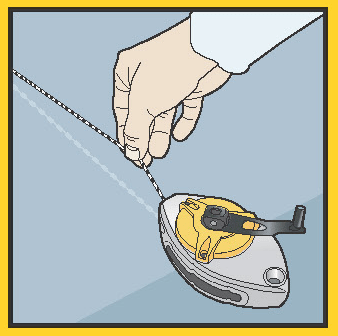
To make it convenient to place the wiring track, use the marking cord bought in the store. It can be done independently: just paint the cord with paint, lime or black coal. Work with him like this:
- Mark for yourself the starting point and secure in it the cord of the lace;
- Tension the cord and press the remaining end to the last point of the track;
- Hand Take the central part of the cord and release it;
- Suggesting about the surface, carbon particles, lime or paint are flying out of it. They settled on the plane, forming a clear mark-up mark in the form of a straight line.
Attention! Despite the fact that the markup has already been implemented, the electrical wiring scheme cannot be disposed. They can be useful: subsequently, you still want to care for more than once again.
How to mark installations of installations and connections, switches and sockets
Where the electrocabolic branch, descends to the switches and sockets, necessitate the installation of the connection box. But it is replaced by the installation box if you have a hidden wiring, and you use switches with closed sockets.
Nuances marking:

Attention! Follow the security rules. Due to this, the distance from the sockets and switches to grounded devices made of metal (sink, stoves, pipes) should be at least 0.5 meters. In the storeroom, it is impossible to install sockets with switches, but you can install them from its outer side.
Wiring markup in high humidity rooms
To outline the location of sockets and switches in places such as shower, sauna, bathroom or bathroom, you need to remember that 4 zones are distinguished in them:
- Zone of the mixer or crane;
- Zone of sink, soul, bath, sauna;
- Zone from sauna, baths and sinks, covering spaces within a radius of 60 centimeters from them. The presence of stationary partitions is not considered;
- Zone, covering space within a radius of 240 centimeters from zone 3.
Attention! In zone 1, 2 and 3, install electrical wiring units is prohibited. In the 4 zone are allowed to install a socket with a protective shutdown device (UZO), which are triggered when the current leakage is 30 mA.
How to place on the ceiling lamp
Procedure:
- On the floor, spend straight lines connecting the opposite angles of the room;
- At the place of their intersection, put the bold point;
- Transfer it to the ceiling using a plumb;
- From the point marked on the ceiling, take the track of the wiring route that combines the light source with the connection box.

Attention! If in the room you want to have more than one lamp, you first need to outline the axis, which goes longitudinally. Then it should be noted on the axis where the chandeliers or lamp will be installed. Using a plumbing tags are demolished from the floor on the ceiling.
Installation of wiring in a country house
Before starting the installation of electrical wiring, you need to prepare a set of tools:
- Mounted knife;
- Screwdriver Set;
- Passatia;
- Bulgarian;
- Rounds (can be replaced by ticks for stripping cable tips);
- Indicators of the phase and integrity of electrocups;
- Gloves out of 100% rubber;
- Perforator - electric drill.
Check for materials:
- Electric shield;
- Insulating tape;
- Switches with rosette boxes;
- Installation boxes, you can connect (if it is open wiring);
- Tags predestined to marking wires;
- Terminum to combine cables of different thickness and sections;
- Cable of selected diameter and section.
Tip! For domestic wiring, select a wire with a cross section from 1.5 to 2.5 kV. mm. However, for cables that go to powerful devices (stove, boiler) are allowed to use thicker cables. This will help relieve resistance inside, as well as perform wiring more secure.
 If all the tools and materials are present, you can begin operation.
Cable preparation
First use the mounting knife to bite the cable of the desired length: each piece must be equal to the length of the route between the connection and installation box, as well as between other structures. If the route between them is too long, you can install intermediate box. But it will be better if the number of adhesions will be minimal.
Attention! Cut the wire with a reserve of 10-15 centimeters to produce electrical work on connecting cables inside electrical circuit nodes.
Types of wiring: open and hidden
After preliminary preparation, it is processed to its direct installation according to the diagrams. You can do this in two ways: open and closed. Open method Suitable if you are going to make the installation of wiring in a wooden house with your own hands. And closed - in the houses from foam block or brick. Consider how it is more.
Open wiring
If you do not want to spoil the finish or make the installation of wiring in a wooden house with your own hands, stop at this version of the work. Installation is made:
- In plastic plinths;
- Plastic cable channels, which in the fire itself sweats;
- Fireproof corrugated sleeve.
Today it is recommended to stop the choice on the electrical box (cable channel) or corrugated sleeve. The latter is usually used in household premises. It is strengthened to the surfaces of plastic holders, and they can already be attached to anything: dowels, screws or simple self-draws.
 The electric box includes two parts in the form of the letter "P", which are connected by the lock. To the wall first install the lower part of the box in which the cable is placed. Then the top of the box is installed so that the jester snap-on lock is heard.
 At points where the wiring branches, the branching boxes will be needed. And for the assembly of switches and socket nests you will need supports from insulators (plastic, wood). They are called submerscribes.
Hidden wiring
it optimal option For stone houses. The hidden wiring method provides for laying a cable into a stride, which are made according to the markup. And for hidden nodes, removing are done, which are deepened by 6-7 cm into the wall. Subsequently, the box is fixed with plaster or cement composition, and the channels are attached.
 Hidden wiring is harder than open. And if you need access to the cable, you will need to destroy part of the wall. But in terms of aesthetics, this is the best option, since the home design does not deteriorate from the sockets casually sticking out of the walls.
When the place is closed, where the wires are connected, provide for special boxes that are fixed strictly on the markup. It is important that after mounting the wiring to the boxes remained access. Otherwise, control of compounds during operation will be impossible.
Installation of boxes
To enter the cable in the boxes you will need insulating sleeves. They can be replaced by parts of PVC tubes. They are simply necessary if the boxes are made of metal, as the holes for the wires in them have sharp edges. The cable can easily get damage.
 The box itself is performed by soldering. You can also connect cables using clips or sleeve crimping. Sometimes B. residential rooms Make twists. This is not the most reliable connection option, but it is quite suitable for the premises where the humidity is always low. It is only important to make a dense twist and thoroughly insulate it.
Outlet sockets and switches
Installation of sockets and switches are made after the installation or connecting boxes have already put on their own places, like the opposite. The cable must already be supplied to the place of installation. The installation method will be directly dependent on what type of wiring you selected: closed or open.
If open type wiring
You have already understood that in this case there will be noisters. Their role is performed by pieces of insulating material - circles with a radius of 3-4 centimeters with a thickness of 1 centimeter. For this purpose, organic glass, tree, getnaks or textolite is perfectly suitable.  At first, the submersers are mounted through liquid nails or self-tapping screws with countersunk hats. Then they strengthen either the switch or a socket device with a removed plastic case, which hides the inside of the socket.
Wires lead to the outlet: be sure to "phase" and "zero". Sometimes "Earth" is connected. In the gap of the phase wire. This means that only the phase is supplied to it from the connection box, which returns to the box to another way: through the lamp. As for "zero", it goes in parallel "phase", but he enters the switch.

Attention! You can not serve a phase and zero wire on the switch, as inexperienced "electricians" do. As a result of this compound, a short circuit is obtained.
In order not to confuse the phase wire with others, during its gasket you need to use tags. And if they are not, it remains only to remember the color of the "phase". If the wiring is already installed and connected, then you can find the phase using an indicator screwdriver.
Standard Cable Coloring:
- Blue - common, or "zero";
- Yellow with a green strip-spiral - grounding, or "earth";
- Black, white, brown or red - phase, or "phase".
Attention! Sometimes electricians are confused by the colors of the wires, and under the "zero" may well be the "phase". To protect yourself during electrical installation with the already executed wiring, check the phase wire with an indicator screwdriver. But if you made the wiring yourself, with the definition of destination of each of the wires you should not have problems.
If the wiring of the hidden type
Installation is made in plastic or metal installation boxes:
- From the switch or box of the socket, remove the cover on top of the plastic;
- The terminals inside connect the cable according to the principle described for the open type of wiring. An exclusively phase wire is supplied to the switch, and to the lamp - along with zero, so that they meet together at the box. Phase and zero wire are coming to the outlet;
- From the inside, lock the switch or the socket socket in the box with spacer clamps. For this purpose they are tightened with a screwdriver until the screws are stopped;
- When the sockets with switches are already reinforced inside the junction box, screw the protective body cover made from the plastic on top. It closes the inside of the box.

Attention! Despite the manifold of switches and sockets, the principle of their installation in the case of open and closed wiring remains the same. Therefore, this instruction can be considered universal.
Now laying operation electric wires The house completed. It remains only to connect electrical appliances and light sources. And your home will come comfort and warmth.
Recently, capital and country Construction It became very popular. Many homeowners prefer to create the house of their dreams personally, without resorting to the services of firms.
Without electricity life modern man unthinkable. Therefore, the electricity supply of the dwelling is the priority task of the homeowner.
People who decide to build a house with their own hands face the need for its electrification. It also happens that in the existing housing wiring in very poor condition and is subject to replacement.
We will consider all nuances of the connection of the housing to the power grid, the installation of electrical wiring of different types, examine the common errors in detail in order to avoid them in practice. Also in the article will be guidelines for commissioning and recommendations on popular issues.
Regardless of whether you want to connect online new house, or restore electrical subsidies in the old (for example, with a complete change of wiring), you will have to undergo many bureaucratic procedures. To obtain permission, it is required:
Drawing up a circuit of electrical wiring
Start mounting wiring in a private house with your own hands is best with a fundamental electrical. This will greatly facilitate further calculations of consumables and determine the installation sites of the power elements.
The elements should be included in the wiring scheme:
- Sour from the nearest support to the introductory electrical panel
- Introductory /
- Internal batcher with consumer groups:
- Outlet group
- Lighting
- Power Group (Military appliances (Boiler, washing machine, machines)
- Hozblok (garage, basement)
Scheme, how to spend and make electrical wiring in a private house with your own hands:

Separate RCOs / automata are installed on each of these groups.
Also, when drafting the scheme, you need to have a general plan at home, where to mark the direction of cable gasket and the installation location of sockets and switches.
Well, if the wiring will have two separate circuits. Then it will be possible to turn off one to repair, and from the second to power the necessary lighting or soldering equipment.
Based on this data, the schematic diagram is built, the total length of the cable required in each case, the placement of power elements, accounting devices, the location of the feed cables is calculated.
What you need
Let's try to figure out how to do it yourself and spend electrical wiring in a private house. In order to spend high-quality electrical wiring in the house, the following materials and tools will be required.
Consumables

Required tools
- (Bulgarian with diamond discs)
- Chisel assembly
- A hammer
- Cable cutting scissors
- Putty knife
- Emery grater
- Passatii
- Roulette
- Screwdriver
Selected at the calculation of the total load. On average, it is 0.5-0.9 square millimeters per 1 kW of power. It is best to use a copper stranded wire. He is better leaving twisting, elastic, steady For short loads.
The number of sockets, switches and other elements is calculated when compiling a schematic diagram. Babes and boxes are better to take from self-fighting or non-combustible materials.
Hidden wiring is better to spend under the plinth, not in the stroke. This position of the cable eliminates the drill or nail into it when repair workIt has access to it and it is possible to check or recomatulate.
Video, how to do and hold an email in a private house with your own hands:
Step-by-step installation instructions
In different homes are recommended different type wiring. In wooden, it is most often done, and in concrete buildings with many technological voids - hidden. Consider the nuances of mounting and conducting electrical wiring in a private house with their own hands.
Open (outdoor)
Often used in country wooden houses. It can be performed both in special boxes, under plinths and in, from a special cable and on porcelain-fasteners, fixing vertical elements.
To spend open wiring in the house, you need:
Closed
Mounted more complicated. To hide cables in the walls, you need:
- Place the walls with a marking cord
- With the help of a grinder cutting on the walls of the groove 2x2 cm
- Stroboresis cut places for installation of junction boxes, switches and sockets
- Install boxes and conversion. Fix them asbestos or screws with dowel
- Progress the groove
- Put in them cable. Previously need to cut into pieces of the desired length
- Secure it in the groove plaster. Fastening step - about 40 cm
- After 20-25 hours, when the plaster dries completely, clean it
- Install switches and sockets
That's all the simple steps required for your own housing electrification.
Step-by-step video instructions, how to spend electrical wiring in a private house with your own hands:
Installation of fittings
In the fashionable now retro-wiring of an open fittings can be the most diverse. In addition to switches and sockets, porcelain rollers are used there. Fastening each of the objects should be attached at a distance:
- Rollers-insulators: 10-12 centimeters from each other
- Wire twisted single-core - 1 centimeter from the wall
- Sockets: not lower than 35-40 centimeters from floor and not lower than 15 cm from kitchen table
- Switches - from 50 to 150 centimeters from the floor
You cannot install switches and sockets at one level. This rule also applies to electrical wiring of a hidden type.
Security rules, errors and ways to avoid them
Sometimes homeowners neglect some nuances or allow inattentive errors that can seriously affect fire safety. We will look at the most popular of such mistakes and how to avoid them.
- Aluminum wires. In no case cannot be used. They are fragile and can break down when replacing the socket or switch. It is better to pay more expensive, but take copper.
- IN hidden wiring It is forbidden to use stranded wires. The terminal does not keep such a cable very well, so the point of constant heating is created. This can lead both the sink / switch root, and to the fire.
- Do not connect wires from each other different metals directly. To avoid oxides, do it only through the terminal to eliminate the possible contact of the metals.
- Waterproofing. It is impossible to neglect it in rooms with high humidity: bathrooms, kitchens, storage rooms, terraces. Its absence may cause electrical strike.
- Place the length of the wire With maximum accuracy. Put twists in direct areas, especially if there are not enough 10-15 centimeters, is strictly prohibited!
- Stroke under the groove. Its depth must be 2-2.5 centimeters. It makes no sense deeper with cable, and a smaller groove is difficult to launch.
- . They should be located almost under the ceiling. This is done for the convenience of maintaining wiring and avoid confusion of cables of various purposes.
- Duties under wire. They must be strictly vertical or horizontal. Possible cable savings in diagonal laying can lead to a drill or nail in it during repair or finishing works in the House.
- Section of wire. It should not be too thin. Thin wires do not maintain high load and buried. On the socket group, the optimal cross section is 2-2.5 mm, on the lighting - 1.3-1.5 mm.
And a little about safety technician. Work with a home electrician only when the plugs off. The lesion of the current can lead to the saddest consequences.
Check and commissioning
After full mount electrical wiring you need install all scheduled machines, UzO and electrical appliances. After that, boldly invite a specialist from the energy reports to check and put into operation the electrical work of your home.
Acceptance tests of your object must be completed issuing a positive conclusion about the safety of the electromotion, the possibility of further use of equipment. With the "Connection Access Act" you should apply to the power supply organization. On this basis, it must connect your object to the support and make a service agreement.
It is not necessary to save on consumables and tools - after all, in the future, a qualitatively work done will be the key to your tranquility and comfort.
Make electrical wiring own forces – the case is simple, but requiring care and scrupulsiness. If you come to this case responsibly, the wiring will serve you for many years and will be guaranteed safe.