Cumulative tank for water supply.
The lack of water in the country area can not only spoil a good mood, but also damage to all your plants. In order to avoid this, there are special plastic in which you can store large liquid reserves. But not always the owners country houses Have the opportunity to buy expensive to the cottage. In this article we will tell you how to create an excellent capacity for free.
Old tires as an alternative to expensive tanks
If you think about the acquisition of plastic water capacity in the country in a specialized store, think if you have old tractor tires on your site. It is from them that can create excellent water capacity for almost free. To do this, you will not need complex technical tools and certain skills.
Where to find them if not in the country?
Large tractor tires can be found on the nearest tire terminal or maintenance station. An ideal option will serve as an old tire from diesel if there is no such, you can take cargo tires. In any case, the costs of their transportation will be cheaper than the purchase of plastic water tanks.
Application
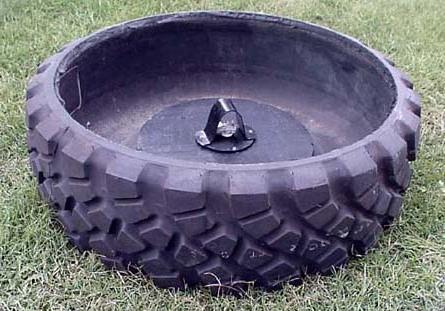
It is worth noting that such budget tanks will not suit the capacity for drinking water. This is their main drawback. Most often, tractor tires are found in villages, where the owners have their own geese, pigs or chickens. For them, just such water will come true. For plants, it will also be useful. In addition, such a rubber tank can accumulate water itself (in this case it will be rain). Unlike plumbing, it does not contain chlorine. Therefore, it has a positive effect on the growth and development of plants. And if you have a tire of large sizes (with a diameter of 2 meters), it can be fully used as a mini-pool. Plastic containers for water in the country of such a function are not performed.
Benefits
The main material from which the tire consists is rubber. Such material is universal as a water reservoir. His main advantages are strength, environmental friendliness and durability. Rubber does not miss water at all, besides, it does not rot, respectively, will serve you for many years. Such a tire is very difficult to pierce, while plastic is very vulnerable to mechanical damage, and especially cuts. No one will steal such a reservoir. It does not have any value, but it performs the same function as expensive plastic water tanks in the country.

How to install a tractor bus?
To begin with, you need to align the place where the tire will lie. Then you need to proceed to the preparation of the tire - the sharp knife cut its upper part. So that the water does not "run away", the bottom of the tires fill in a broken brick, and better concrete completely (for this you will need about 30 kilograms of sand and 10 kilograms of cement). Wait until everything is driving. Everything can be started with its filling and operation. Tractor tire is an excellent alternative to plastic water tanks in the country!
Solve problems with the water drive for the shower can be in two ways: to buy finished products in the store or make them with your own hands. The second option is much more preferable for several reasons:
- there is an opportunity to choose the volume of capacity for your own needs. Depending on the design of the shower and the number of family members, it is possible to establish a container with different volumes;
- if you wish, you can install additional automation systems. If there are minimal experience in performing plumbing work without big problems, you can make automatic tank filling, water fence only from the upper warmed layer, electric heating, etc.;
- low cost. All structural elements can be used, nothing needs to buy. If you have to go to the store, then only for cheap quantities;
- pleasure from independently done work. This is an important factor, in many cases all the others outweighs.
The article will give a detailed step-by-step instruction of the manufacture of several versions of the tanks for the shower, each has both strengths and weaknesses.
The shower tank can be metallic from galvanized sheet steel, stainless steel or carbon (black) iron and plastic. In order to consciously choose optimal options, you should familiarize yourself with the real comparative table manufacturing materials.
| Material of manufacture | Benefits | disadvantages |
|---|---|---|
| Almost unlimited service life. But it is unlikely that this advantage is critical for shower buildings in country areas. | Technological complexity of manufacturing. Professional instruments are required, the ability to keep welding with stainless steel. Another very unpleasant drawback is a high price. |
| Lifetime for up to fifty years. Easy of the tank, the ability to install even in fragile supporting structures. | The complexity of manufacture, you need to have special tools and skills for soldering. At cost, the average positions occupy. |
| For most cases, the optimal option for both the price and the operational indicators. | Require a periodic cleaning of the inner surface, the painting layer should be restored on the external one. |
| Cheap stand, there are no problems with the search. | Fenced with negative temperatures and rigid ultraviolet radiation. |
| The service life is several decades. | For the price arrange not all users. |


Experienced practices are advised to make a tank for a soul from b / in plastic or metal containers. Such a container is easy to find, in most cases nothing will have to pay.

For one wash, it is quite enough to 40 liters, depending on the number of family members, you can calculate the optimal dimensions. For information it is worth saying that industrial companies during the manufacture of tanks for the shower proceed at the rate of approximately 20 liters per person, 40 liters allow not only to take a shower, but also fully disappeared without the need to save water.

Plastic barrels
A very common version of the manufacturer of the tank for the shower, differ in good indicators of physical strength. It is allowed to apply both new and use former in use. The volume may be different, from 50 to 1000 liters. For the soul there is no need to use large tanks, it is enough to have a volume within 50-200 liters.

For all plastic containers there are two general requirements:
- material of manufacture - resistant to ultraviolet rays plastic. It is quite difficult to find such containers, and they are not suiced;
- must have a dark color, and preferably black. Plastic should be painted with mineral paints during pressing polyethylene. Most plastic barrels of blue or white. Why is it recommended to have a container made by their painted plastic? Because the paints on the surface of the plastic can not be held for a long time, during one summer they will be twisted. The reason is not only in the low adhesion coefficient, but also in large values \u200b\u200bof temperature extensions. And all dyes negatively react to changing the linear size of the painted surface.
Step-by-step instructions for the manufacture of plastic tank
If you have an old plastic barrel, then it needs to be carefully flushed. Capacity can be considered clean only when different odors completely disappear. For installation in a vertical position, a frame should be made and the base, the emphasis is located across the entire bottom area. To reduce wind loads, it is better to put a barrel of the side of the side, but then problems arise with the sealing of the lid.

How to seal the cover
Step 1. Thoroughly rinse the connection site with a barrel, remove the oily spots, dust and dirt.
Step 2. Scroll through the cover, check whether it fits tightly across the circumference. If necessary, align the lid. For this, deformed spaces heat the construction hairdryer, install the cover in your place on the barrel and hurt much. In this position, the cover is held until complete cooling. Work in mittens, observe security measures.
Step 3. Re-degrease the surface and gently lubricate with special glue. If you have an apparatus for welding plastics - excellent, such a seam has a strength of not lower than 90% of the strength of the base material. If there is no device - use glue.

Step 4. Wait until the adhesive composition is completely dry. Time depends on the brand of glue and drying conditions.
Step 5. Re-apply glue in the places of fitting the lid to the barrel and again let it dry. Do not rush, do not allow skips.
Step 6. To enhance the strength of the connection, once again lubricate the place of the joint and turn it tightly clean polyethylene film. Top of film torn soft wire.

Instead of wire, it is permissible to use the clamp
If you have little experience of such work, then do not rush to install a barrel on the shower room, first check it on strength and tightness. Everything is fine - cut into the top of a small hole, connect the reinforcement and shower. Loves leakage and eliminate them fail - put a barrel in a vertical position.
How to make a cut in plastic barrels
Not such a simple question as it may seem. The fact is that it is precisely about the inserts that the points of increased tension of the material are formed, and the microcracks appear over the time, which increase until complete destruction. As a result, there are a barrel to change completely, repairing such leaks is very difficult. Yes, and after repair, no one can give a guarantee that in the same place or next to it after a few weeks, the problems are again not detected.
For high-quality sink, you will need a drill with a set of drills of the corresponding diameters, rubber gaskets, bolts and metal plates. The sink is made not only under the watering can, but also for the flow of water and draining surplus.
Practical advice. For all connections, use a silicone hose. It is not afraid of frost, resistant to UV rays and which is very important for plastic barrels, soft and does not create additional loads on the connections node.

Step 1. Buy the inserts for the tank. They consist of washers, rubber seals, fittings and nuts.

The number of pins depends on the number of pipelines connected to the barrel, and the diameter is selected taking into account the size of the conditional passage of the hose. Additionally, you will need a clutch for the crane, a crane, a shower, a float from the old drain tank. If you plan to install additional automation reinforcement, then simultaneously buy elements for fixing it to a plastic barrel. It is desirable to connect / disconnect the hose to use quick-dispersion, they make it much easier to care for the dacha tank.

Step 2. Prepare two metal plates on each insert size of about 5 × 10 cm, a thickness of at least one millimeter. It is at the expense of them that the site that perceives static loads from the connected plumbing fittings and dynamic efforts arising during the inclusion / shutdown of the watering can or the water supply valves can be significantly expanded. Be sure to remove sharp corners on all sides of the plates with a disc closure machine on all sides.
Step 3. In the center of the plate, drill a hole under the insert, for two plates you will need two holes, pass the sharp corners and bursavar after the drill.
Step 4. In barrel, drill the hole, the location must meet the requirements for the placement of the insertion and its specific purpose. In a round plastic barrel, it is quite difficult to drill a hole, the drill constantly "runs away", the greater diameter.
Practical advice. Drill holes will be much easier if you use simple recommendations.
Clamp in the passats of a small carnation and heat it with a lighter until a red glow appears.
Without giving time to the metal to cool, very quickly in advance marked place to register with a hot carnation in a plastic barrel a small hole, you can also have a non-separation.
Take the drill with a diameter of approximately 2 mm, drill through the hole. The label made will hold the drill in the desired position. It will be the center, then you can continue to work with a reduction drill.

Step 5. Entridly remove all burstles around the perimeter of the hole, they should not interfere with hermetically installed metal strips.

Step 6. Bend the metal plates along the radius of the barrel. Use for this by any pricks. There is nothing terrible if it is not possible to be perfectly bend the plate, but it is desirable to strive for such a result. The more accurately the radii will coincide more square Contact, the smaller the load per unit area, the more efficient the device is valid.
Step 6. For a complete guarantee of the exception of leaks, lubricate the surface of the plates by any glue or sealant, you can make the same operations with the inserts.
Step 7. Install all elements in place, metal plates must be from two sides of the tank. For fixing the nut, the assistant will need, one is difficult to do it. But it all depends on the size of the container. Remember that standard rings have nuts with left-thread, screw them counterclockwise.

Constantly control the position of the plates, do not allow them to turn and change the initial proper position.


By the same algorithm strengthened holes for all sings. Do not be lazy to make a strengthen, it increases much of the time of operation of the tank for the country soul. Next to the thread, a crane, hose, fast connector or other equipment for the tank is fixed.

Video - installation of removal on plastic barrel
Metallic shower tank
We will not consider rather "exotic", in our opinion, options for the manufacture of stainless steel tanks. Let us dwell on the two most successful - from the finished barrel or welded steel of ordinary quality.
1. Metal tank of finished barrel
Initially, it is necessary to talk about the types of barrels, their advantages and disadvantages.
| View of barrel | Benefits | disadvantages |
|---|---|---|
| Low price and availability. Currently, such a container is used to store the majority of liquid and bulk products, they can always be bought in the store or find the ex-in use. Have low weight, easy mounted on simplified frames. | Difficulties are arisen with the fastening of the insertion and plumbing reinforcement, the service life rarely exceeds ten years. |
| Mesh thickness up to 1 mm, which allows you to reliably fix the additional elements of the tank. Lifetime fifty and more years. | Currently, it is difficult to meet thick-walled barrels, at cost, they are much superior to thin-walled. A little more weight, a volume of at least 200 liters. Such operational parameters can narrow the spheres of possible use. |


Metal barrel manufacturer
In the bottom of the barrel is made a hole for the soul watering. If the barrel is thinned, then it is recommended to install metal plates to enhance the connection location. How this is done - described above on the example of a plastic barrel. For water supply, the hole should be made in the upper part of the tank. During the manufacture of a frame for a tank, be sure to take into account the weight of the filled container, the fixation must be reliable and safe.

2. Production of leaf steel tank

The optimal option for many cases has a number of advantages.
- Ability to manufacture a tank of any capacity. This allows you to maximize the needs of users.
- The shower tank at the same time can serve its roof. For this, the size in length and width must respond to the shower parameters, the framework of the structure simultaneously serves as a frame for the tank. IN step by step instructions Manufacturing We will consider this particular option.
- The tank is allowed to install all systems for automation of pouring and additional artificial water heating.
Step-by-step instructions for the manufacture of metal tank
For the manufacture, it is necessary to prepare sheet iron with a thickness of about 1 mm, the size of the sheets depend on the length and width of the shower cabin. For most cases, 1.2 m × 1.2 m is enough.
Step 1. Draw a sketch of blanks and calculate the volume of the tank. For example, we will take a volume of 100 liters. With a length of 1.2 m and width of 1.2 m, the height should be: H \u003d 100000 cm3 (100 liters): (120 cm × 120 cm) \u003d 6.9 cm. Round up to 7 cm. For the tank you need to prepare two plates size 120 cm × 120 cm for top and bottom. And four plates of 120 cm × 7 cm for sidewalls.
Step 2. Transfer sketches of metal blanks. Clean its surface from rust and dirt, accurately draw the contour of the workpiece. Dimensions need to be transferred only for one sidewall and tops, these items will continue to be used as templates for the rest.
Step 3. With a circular fluffy machine with a disk for metal cutting, cut the blanks. Check that the dimensions are fully the same.
Important. While working with the Bulgarian, follow the safety regulations. By trauma, this tool takes the first positions. The disk should rotate the operator, it is extremely important. Newbies are trying to change the direction of rotation, they do not like that sparks fly towards the worker. It is very dangerous, in this position, the Bulgarian can snatch, injuries from her complex and heavy.
Step 4.. Conduct sections of cuts, try to achieve the most flat line. The gaps of no more than two millimeters are allowed. Try to pre-fold all the items and check their quality.
Step 5.. Start welding separate elements. Adjust current strength welding machine and electrode diameter. Metal should not be abrupt, this condition significantly reduces the strength of the seam. In addition, the strong current burns thin sheets through, close the holes are then difficult and long. Keep in mind that the weld during the cooling "pulls", the value of the corners changes. To avoid mistakes first grab two elements in several places and let them cool. After that, check the corners and, when detecting deviations, correct them. Only after such preparation can be applied to solid seams.
Step 6.. Take off the flux along the entire length of the seam, check its integrity. There are skipping - impose a re-seam. If production experience welding work It is not enough, then professionals are recommended at the bottom of the shower tank to apply seams from the inner and outer side. The lid is welded only on the outside.
Step 7. Seat the location of the water input and canoe watering sites. Taking into account the diameters, drill holes, to the grinder to subduct burstages. We do not recommend you to boost the fitting with a carvings, much easier to purchase special cuts in stores. They have a set of washers and rubber pads, quickly installed in place, do not require special knowledge. Pretty adapters are quite difficult, newcomers will definitely be leaks.
Step 8. Repeat all the weld seams from the flux, pour water into the tank and check the tightness of the container. There is no leakage - pour water, clean the surface and keep painting external walls. Paint, of course, should be black and for external work.
The finished shower tank can be mounted above the shower. If you have a desire to make it from a stainless steel, then the technology is almost no different. Except for changing the welding and brands of electrodes.

You can find options for manufacturing a tank for a shower of galvanized sheet steel. Do not consider this option successful for several reasons:
- very thin walls require additional special measures to strengthen them;
- zinc has low adhesion with most coatings, paint will quickly suck. And use special expensive paints is economically inexpedient;
- for the manufacture of the tank, the elements used in the connection places are bend, and then searched. It is very long, you need to have or specially do bending devices;
- without a solid experience, the soldering of galvanized sheet gland is not necessary to hope for a positive result of its work.

How can you improve tanks for the country soul
Each owner of the country area, taking into account his needs and opportunities, can independently improve the tank, establish the simplest mechanisms that allow not only to increase the comfort of water procedures, but also reduce the cost of its service and preparation. We will not concern complex automation, consider only the most "budget" options. Although they are low-cost, but in terms of efficiency, safety and durability of use, there is no expensive analogues of industrial production.
Water temperature
For those who already use the simplest shower in the country area, it is no secret that the water temperature changes during washing. Sometimes the temperature difference can cause significant discomfort. It is impossible to completely eliminate such a phenomenon, but there are several ways to minimize the difference and increase the water temperature in the tank? We will not consider factors depending on the location and color of the surface, we will focus on purely technical solutions.
- Make water fence on top of a tank. The easiest way, but very effective. To do this, you need to attach a flexible hose Ø 15-20 mm to the inlet opening. The main thing is not the size, namely flexibility, the hose can be made from various materials, the wall thickness does not have. The shower water moves by gravity, there is no increased pressure, on the contrary, it is somewhat lower than in the container due to physical phenomena arising during fluid movement. The length of the hose connected must be about 20-25 cm more than the maximum height of the barrel. Specific values \u200b\u200bare determined taking into account the features of the hose. The main requirement - it should not be completely blocked while working and not disturbing the flow rate of water. The upper end of the hose is fixed to any float (it is better to take a piece of foam) from the bottom. As they fill or empty the barrel, the float will move up / down, and the intake end of the hose always takes water from the warm top of the top layer.
- Install the simplest electric heater. Now in the implementation there is a huge number of devices that differ in power, price and method of fixation. Choose for yourself the most optimal taking into account the maximum number of different factors. You can not focus on the power. In addition to the additional heating of water, the heater will perform another task - to constantly mix it in the tank. Mount it at the bottom, warm water Will climb up, and cold go down. Due to the continuous mixing, the temperature of the water in the entire volume will become the same. If you wish, you can additionally install a temperature sensor or time, but it is already quite complex work. Yes, and the presence in the tank with water conductive elements has a negative impact on the safety of using the shower.

Filling a tank
There are two most frequently used tank filling methods: manually bucket or using a valve valve. Both methods are often used and have the right to life, but we advise you to make the third option, in our opinion very successful. In addition, almost no additional costs will be required, and all works will take no more than an hour of time.
Step 1. Prepare details. You will need a hose and an ordinary float mechanism from the drain tank toilet bowl. As a rule, they very rarely fail, such elements can be found and used for a tank during the replacement of plumbing equipment. If there are no old - buy in a specialized store, the price of devices is available to all consumers.
Step 2. Drive the hole in the container, do not forget to install additional plates to strengthen the scene.
Step 3. Install the float, use the sealants to exclude leaks.
Important. If for all cases described above, small leaks are considered an unpleasant phenomenon, but not critical, then with a float compounds should be hermetic. Otherwise a large number of water flowing can cause very unpleasant consequences.
Step 4. Adjust the position of the float with such a calculation so that the barrel is always filled with the desired volume. If there is a desire, you can make a drainage insured hole, insert the tube into it and bring out to a safe place. The tube will give the opportunity to notice the malfunction of the work of the float and minimize the consequences of the "Flood". But you can not do this, the shower at the cottage is not that room, to especially take care of the leaks, the main thing is that not all the water leaves. Of course, at the time of a long lack you need to not forget to completely turn off the water supply.

The float will give the opportunity to constantly keep the barrel filled, and this allows you to take a shower at any time. If an electric heater is installed in addition, then the shower is running until autumn, which is very important for many small cottage owners.

The version of the tank for the shower should always be thought out before the start of construction, and not the opposite. If you have temporary shower, then you should not lose a lot of effort and tank makers. You can meet options for use for these goals of fuel tanks from passenger and trucks, large canisters, dairy bids, etc. Professionals recommend paying attention to efficiency and, of course, the designer view of the soul. The tank should not be brought into the eyes, and fulfill its tasks "imperceptibly."
And last. In everything you need to observe the optimal ratio of value and quality. You have a landline shower that is planned to be used in cool autumn days - think not only about the electric water water in the tank, but also about thermal insulation. It should be removable and installed only in cases where the sun's rays are already not enough to heat the water to the desired temperature. It is best to use foam plates, they are quickly installed and removed, several seasons can be used. For the price arrange all consumers.
Video - shower tank with your own hands
One of the most unpleasant household problems is the lack of water in the crane. It is easy to survive the lack of light or gas, but water is a mandatory component of a person's life, and when there is no or not enough, problems begin. You can keep constantly in the house there are several water tanks, such as plastic bottles, but much more practical to determine what a storage tank is needed for water supply and a system scheme for a private house in order not to lose in comfort and continue to use household appliances And the sink with the bathroom, as if nothing had happened.
Why do you need and how to use it
If for some reason the pump does not work in the system of autonomous water supply, or there is no pressure in the centralized urban water supply, then it is possible to feed it into the sink or tank of the toilet, from a pre-dialed backup capacity. Simply put, it is better to always have a supply of drinking water in the house and use it in emergency situations.
For ease of use of the reserve water reserve, the accumulative capacity must be integrated into the plumbing so that it is or automatically used in the absence of external pressure, or it could be used by a simple turn of the valve.
There are a lot of variations, how to install and connect a storage capacity, depending on the type of water source, a possible arrangement of the capacity and even the planning of the house. Enough to choose suitable option and determine the type of accumulating tank itself.
Types
Cumulative capacity can be a container with sufficient internal volume, made of corrosion storing material and safe for storing drinking water. Materials are used as:
- polyvinyl chloride;
- stitched polyethylene high or low pressure;
- polypropylene;
- stainless steel;
- steel coated with waterproof varnishes and ceramic coatings.
 Plastic tanks
 Galvanized steel, though it has resistance to corrosion and waterproof, but over time, the protective layer of zinc can drop, especially in places of compound and welding.
The design is highlighted:
- open containers that have a neck with a lid or without, but with hermetic walls and a bottom;
- closed fully sealed tanks of membrane type.
In the first one, everything is simple, the entire internal volume is filled with water and, if necessary, merges through the nozzle, fixed at the lowest point.
In the case of membrane accumulating pots, a useful amount of at least one third is less than the volume of the entire design. A part of the volume is discharged under the air chamber separated from the water using a robust elastic membrane. As the water capacity is filling, the membrane presses on the air chamber, creating overpressure. When it is required to get water back, the valve opens, and it enters the plumbing under the action of the accumulated pressure.
With lower or top
There are three options for connecting the accumulative capacity and the use of water stock:
- Top arrangement of capacity. In this case, the water fence is carried out under the action of gravity force. The higher the hydroaccumulator is located relative to the consumer, the stronger the water pressure. Every 10 meters of height add 0.1 atmosphere, or about 1 bar.
- Bottom location of a simple storage tank. Gravity will no longer help, and the pump is used to supply the water supply to the optimal level.
- The accumulating containers of the membrane type themselves create the required pressure for water supply. The lower location at the consumer level is optimal for them, since there will be no advantage from the installation in the attic or tower.
How to determine the optimal option?
If a house with several floors is the ability to arrange a cumulative tank in the attic, then this will allow you to do without additional installation of the pump, and you do not need to spend money on an expensive membrane tank. In fact, this is an analogue of the water tower. However, raise the container so high to ensure a comfortable pressure at 2-2.5 atm. All the same difficult. Especially since the question arises about the insulation of the tank, so that in winter the water does not freeze in it.
In the event of an emergency turning off the water of the existing pressure of 0.2-0.3 atm. It will be enough to take advantage of the mixer in the sink, toilet or even the shower, but it will not be possible to use part household appliances, for example, a washing machine or dishwasher, which requires greater pressure to trigger electromagnetic valves.
Installing a capacity to a level with a consumer is suitable in cases where there is no possibility to raise the tank into the attic or at least on the floor above. The same applies to the installation of a cumulative tank in the apartment. It will take a small pump for water supply to the plumbing under pressure. To ensure an adequate mode of operation, the pump will require an expansion membrane tank.
The accumulating tank with the membrane is perfect for storing the water supply of both when using centralized water pipes and in the offline system. At the same time, it does not require additional equipment or upper arrangement. However, its value is significantly higher than any conventional cumulative capacity even in combination with a simple pump.
Volume of the tank

In case of problems on the line of urban water supply and turning off the water usually repair work Per day or two. However, accidents happen for holidays, and in places where fast repairs It's simply impossible, then you have to wait much longer. The optimal will be the stock of water for 2-3 days at the calculation of the use of the toilet, maintain personal hygiene and cooking.
A seven of three people are quite enough 100 liters per day when using water in economy mode. For one wash, approximately 80 liters of water are required, or more precisely, you can learn in the passport washing machine. Similar to dishwashers.
It turns out that for 2-3 days when using household appliances, it is necessary to look for a cumulative capacity of at least 500 liters, half of the cubic meter.
However, there are a number of restrictions:
- The larger the volume of water and the accumulative capacity of the open type, the faster it will begin to overcome the sediment. It is not recommended to use more than 200-250 liters for long-term water storage in everyday life.
- The margin of the strength of overlapping and bearing walls should be taken into account. Tank installation must be laid at the design stage of the house.
- When using autonomous water supply, the volume of the accumulative tank, especially the membrane type, should not exceed the debit of well. If this rule does not work, then definitely need the protection of the pump from idle.
The cumulative tanks of the membrane type are limited in their volume and are not able to give the entire margin of the stored liquid. To form a stock over 300 liters, you will have to connect several tanks of a smaller capacity parallel to each other.
General Connection Rules
A tank with water on the prepared platform is established: a concrete base, bandaged with a foundation, or an enhanced metal frame from a profiled pipe. The design should withstand the semi-third weight of the tank and water in it with full fill.
The inlet nozzle can be any suitable diameter, water supply occurs under pressure. The outlet and the pipe to the water supply pipe is selected with a diameter of one and a half or two times more than the cross section of the main line. Optimal size 32 mm.
Insulation, even the highest quality only slows down the decrease in temperature in the tank. To prevent water freezing when installing a container on a unwanted attic or on the roof, you should use any suitable system for heating the pipes and the drive itself.
With centralized water supply
Any type of connection of the accumulative capacity requires the presence of a check valve on entering a house or apartment. It is the valve that will prevent the flow of stored water back to the pipeline, and not to the consumer.
Top connection
The tank is installed under the first floor ceiling, the floor above the bathroom and kitchen or in the attic. The tank should have a fitting at the top for water supply, one more slightly higher to reset into the sewage during overflow and the fitting at the bottom of the water for the fence of water.
Already after entering the coarse cleaning filter, the counter and the check valve is installed a tee from which the pipe goes to the inlet of the tank, the shut-off valve or controlled valve is installed before the nozzle.
A shut-off valve is connected to the output fitting and the pipe is lowered back to the water supply system with which it is connected by a tee.
The hose for the discharge of excessive is lowered into the sewer or is outputting the house in the parisade or drainage system.
To control the filling, the mechanical valve with a float is used, similar to those used in the toilet tank.
To use stored water, just open the output valve.
Lower connection
Connection is performed identically the first option. However, at the output it is necessary to install the pump to create an additional pressure in the plumbing. Before each use of water will have to turn on the pump.
Simplify life will help ready pumping station or pump supplement by the expansion tank membrane type and pressure switch.
Lower connection of the accumulative tank with the membrane
To connect the tank, only one pipe is used, connected to the water supply through the tutor with the valve. The cutting is carried out in the same way after the filter, counter and check valve.
Before use, you must configure the pressure in the air chamber. Make it is necessary strictly in accordance with the instructions for the selected model. It is pre-studied normal pressure in the plumbing, moreover, taking into account the oscillations during the day. The average value that is used to configure the tank is taken. Only it will be possible to use the maximum of the useful volume of the tank.
For autonomous water supply
As in the case of a centralized water supply, there are several connection options.
Water tower
The accumulative tank is installed at a level of 15-20 meters above the ground level on a strengthened tower or attic. Water OT borehole pump or the pumping station is served directly to the tank, and already he is heard in the bathroom and in the kitchen in the house. The pressure in the system is provided by the height difference between the water level in the tank and the faucet faucet in the house.

The disadvantage is a permanent passage through the water tank, which will cause the accumulation of precipitate with time, even if you pre-install the filtering system.
The advantage in the simplicity of the design and a minimum of expensive elements, with the exception of the construction of the tower and the mandatory insulation of the tank to protect against freezing, even when placing it in the attic.
Lower connection of the accumulative tank
The container is set to the pumping station or on the first floor in the house. It is filled during the usual operation of the pump due to water from the well. The limiter is a float switch.
Such an option saves when excessive water consumption and reducing the water level in the well or well. However, it is useless when the electricity is turned off, since the pump requires a pump to supply the final consumer from stock.

Membrane accumulation tank
The membrane tank for storing the supply of water is installed after the pumping station and the check valve, with the lower connections. If a pumping station for some reason does not work and does not support the pressure in the system, then water comes from the accumulating tank.
Remote country sites Often cut off from the central water supply system, which makes it much difficult to care for cultivated cultures. During the season, the plants require abundant irrigation, especially in hot and arid weather. If you build a well on the site quite problematic, you can create your own storage, where water will accumulate and flee.
Install the watering tank on the site can afford each. With it, it is organized by timely irrigation, and the prototype of the water supply system is created, which allows the use of liquid for various purposes.
What materials make storage tanks
Storage and water supply tanks are presented in the market in different options and produced from metal or durable plastic. Buying a capacity for watering for a long time, should be taken into account, from which material it is made. Modern polymers allow creating very strong products with high technical characteristics. In quality and strength, they can exceed metal counterparts.
Metal

The reservoir from this material is a classic option familiar to most dachens. Iron products are used for fluid accumulation for many years. All who work in the country and uses an artificial drive from metal, know about all its disadvantages:
- corrosion exposure;
- fast pollutability;
- non-easy care.
Eliminate the metal tank from the destructive corrosion is quite difficult. To keep it holistic appearance Outside, it is enough to paint the surface of the paint. But inside the water will create a constant impact that destroys the metal. After a couple of months, a precipitate is formed at the bottom of these tanks. Internal cleaning - the occupation is complex. The positive side is a good heating of the barrel and its content under the rays of the sun.
An alternative solution will be the acquisition of a stainless steel product that does not have such drawbacks. It also applies to an option with high financial costs.
Video: Watering Barrel, Stand Maintenance
Durable plastic
Purchase a 500 liter watering tank and a more reasonable decision, based on the fact that they do not have the disadvantages of metal structures. Such products are made of high-tech plastic, which allows you to withstand heavy loads. Unlike cheap plastic, they are not afraid of temperature differences. Also preserves integrity under the influence of large water pressure.
.jpg)
One of the main advantages of plastic tanks is their light weight. They are easy to transport and install in the desired place. Installing the plastic design can be independently without special equipment.
In order for the winter tank to be broken when the water freezing is freezing, it is either completely descended, or throw into a large log or plastic 5-liter bottles that completely closed the surface.
To make a container for watering to a large volume, it is additionally strengthened by special metal rings. This design gives the final product to the pressure to be created by water. The next advantage of products made of plastic is the price. It is more accessible from metal analogues. The manufacturing technology of plastic containers allows the buyer to buy tanks of various forms:
- cylindrical;
- rectangular;
- square.
The form of the container does not affect the quality of irrigation. The main thing is that it concisely fits into the surrounding landscape and was convenient for installation.
Eurocub

Eurocube has a cubic form design that is reinforced from the outer side with a durable metal grid. Capacity is installed on a special pallet. This is a great option for organizing a drip irrigation system with a fertilizer additive. It is designed for one cube of water. The design involves the presence of a twisting cover and a crane for a liquid drain located downstairs. To protect against rupture, the same technology is used as described above.
How to calculate the volume of the tank for watering
If in the manufacture of metal capacity you can independently determine the volume - from 1 to 10 cubes (more volume may not withstand the supports), then the plastic buy ready. In general, the drive depends on the area of \u200b\u200bthe irrigated area. On average, 1 square takes about 30 liters of water for one watering. Thus, if the area of \u200b\u200bthe neck or section is 50 sq.m., then the minimum volume of the tank will be 1.5 cube (1,500 liters), and the water supply must be made.
Gardeners on sections of 6 acres usually set 3-cubic containers, which is sufficient for the weekly irrigation.
Installation of containers for watering
All positive characteristics of reservoirs for storing and supplying water for irrigation of plants are leveled with poor quality installation and location. Therefore, it is important to properly place and set the container for watering on the site. The drive must be at the site of the rainwater. This is the easiest way without any effort to replenish the stocks of this resource. Rainwater is the most useful for plants.

It is necessary to determine where the barrel will stand:
- underground;
- on a surface;
- on a special platform.
Installation of the product in a suspended condition allows you to set the crane, and by connecting the hose to it, to obtain the pressure from the own weight of the water. Otherwise, the pump feeds from the barrel is installed.
For reference! To create the optimal waterpover pressure for the necessary pressure, you need to raise the tank to a height of two meters. So it turns out the pressure of 0.2 atmosphere. It is advisable to make it higher, but at the same time you need to think well how to make a stable pedestal and how to give it the optimal rigidity.
Technical advantages of using a vegetable irrigation tank
The use of the pump to raise water from the well is quite enough to provide household needs. However, their power may not be enough to supply fluid to the planted area. Inexpensive pumps are not able to work under pressure in 3-4 bar. The pump will work on marginal capabilities, but will not create optimal conditions for irrigation.
If a watering tank is installed on the site, this problem will be solved. Gradually, the pump will be pushed the required amount of fluid for the abundant irrigation of all plants. So that the water from the barrel came and flowed through the hoses, there is no need to create high pressure. Automatic protection installed on the equipment will turn off the pump at the end of the water.
To protect the pump from a constant shutdown or possible breakage, it is necessary to set the level, declining to which the water will re-enter the tank. It is possible to protect yourself from overflow using a float crane.
If we take water at the cottage directly from the well, then it will come to plants in the cold form. It adversely affects their condition and causes development. various diseases. Liquid passing through accumulative capacity, heat up to temperature ambientwhich is optimal for garden crops.
The well may contain various particles that will be in water in suspension. Their getting on the plants is not desirable. After a few hours in the reservoir water will give a precipitate on the bottom with all harmful impurities.
Modern solutions for the manufacture of watering containers
Those who do not want to connect hoses, valves and other equipment for the improvement system of irrigation, should acquire a capacity for watering based on the installation inside the tank of a special equipment system. This is the water supply station under pressure, which is configured to automatically irrigate landings.

Such a set of equipment consists of:
- durable plastic tank;
- powerful submersible pump;
- filters;
- locking valve;
- valves;
- automatic water level control systems;
- lower drain.
Such systems for irrigation of the site have a number of key benefits:
- function in silent mode of operation;
- provide maximum pressure;
- filtered and warm water;
- control the level of fluid in the tank.
With the proper installation of a barrel used for everyday irrigation, land plot will be fully secured necessary for care garden plants resource. The main thing is to correctly determine the volume of the container required for your needs. It must correspond to water flow on your site with a small margin.
Video: Capacity for watering and outlook
The correct watering of plants is constant, timely and strictly dosed irrigation. This can be done either daily independent watering of the beds, or the arrangement of automated irrigation system. In this and subsequent articles, we will tell you what and how to do this.
It is difficult to overestimate the value of watering. If the plants are not allowed moisture, it will lead not only to the absence of a crop, but even in the worst case, to the death of the entire plant. For one-air, it's not so scary - died, nothing, put a new one, but in the case of a bulk, bushes and trees, the loss of plants will be especially offensive. The fact is that water is not just a moisture dissolving organic and mineral fertilizerscontained in the soil thereby ensuring the possibility of their absorption. Precisely from the water and carbon dioxide Plants produce for themselves nutrients - This process is called photosynthesis. It turns out there is no water - no food. No food - the plant dies!
Many novice gardens have the following myth - if it has been raining, it is not necessary to water. It is not right! Try after the rain flowing the top layer of the soil. You will see that only 2-3 cm is moistened. Further dry, and the roots of the plants are located at this depth. Only very strong or tightening rains in reality can sufficiently moisten the soil, so it is raining or it is necessary to water, it will still have to water.
Well, with the need to irrigation, and abundant, figured out. But what to do, if on the street heat, the sun is mercilessly, and watering the plants turns out only once a week only on weekends, when is it possible to go to the cottage? It is unlikely that plants will withstand a similar mode. Output one - Mount the automatic plant watering system. About how to do that it will be necessary for this and what tasks will have to be addressed to achieve the goal, it will be discussed in this and.
At the beginning, let's deal with what the stages of solving the task of arranging the automatic irrigation system will have to undergo.
Selection of water source for watering
Initially, water on the plot can be delivered in two ways:
1. The site conducted a central water supply on which water is applied on schedule.
- the amount of water that can be poured into its portion is still fed by pipes, is not limited;
- since the storage, as a rule, performs a large metal container heated by the Sun, then water has already optimum temperature For watering.
- limitful time frame. If you did not have time to pour, while water is served, then wait for the next session.

2. On the site there is a well, from which the water fence is made.
- you yourself give so much water as needed, and then when it is necessary.
- water in the well cold and not suitable for watering plants without prior heating;
- there are no rare cases when water in the well is not enough enough to ensure fully the daily need, so you have to save.
Strictly speaking, the third option is possible - the central water supply with an unlimited margin. In this case, if the water is fed rather warm, then the accumulative capacity, in principle, is not needed and this article is simply not relevant. If the water in the water pipe is cold, then this case is similar to the water supply option from the well.
Conclusion: both options along with their positive parties have a number of shortcomings that impose restrictions on the use of them as a self-sufficient source of water watering. You can get rid of these disadvantages if you equip the cumulative container in which the water will be pre-injected, it will heat up in it, and watering will be carried out in the end of it. On how to make such a container and ensure in it a constant and sufficient water volume will be told in this article.
Installation of water supply system
The second stage of the work will be the organization of the water supply system to consumption facilities. It is clear that you can simply connect the hose to the output from the drive and walk with it through the garden, watering plants. However, this is, firstly, it is inconvenient - to carry a long "intestine", secondly, unsafe for plants - high risk damage them chatting in beds with a hose, thirdly, this option will not help solve the main task - to make the system automatic watering. Ensuring the supply of water to consumption places is the necessary second stage of the work being implemented. This can be read in the second article.

Organization of the watering system
The last step is the organization of direct watering of plants. There are two most popular watering methods: spray and drip watering. The latter today becomes especially fashionable. However, it is impossible to forget that not all plants prefer the drip version, as in this we are trying to convince his army supporters - cucumbers, for example, they like sprinkling. In addition, different plants have different irrigation regimens - one water must be submitted constantly, another much less often or in smaller quantities. Therefore, the entire watering system is a combination of various moisture techniques of different beds, with an individual mode for each, taking into account the temperature and humidity conditions of the environment. You should not forget about two factors: aesthetics - everything should look carefully and be convenient to use, and mobility - over the years the plants are changing in places, this is called crop rotation, therefore, after them, the system of watering should be connected to other beds. Despite the seeming difficulty, everything is not so scary. How to organize it all, we will tell in the third, final article.
Installation of the accumulative tank. Principles and nuances
Consider all the necessary operations in stages.
Before mounting a storage tank, it must be purchased. Here the first question arises, what volume of the capacity will be enough, can a banal two-toll barrel be suitable?

The answer to this question cannot be unequivocal. Different plants require different amounts of water, so it will not be exactly calculated. One thing can be approved with confidence - you need at least 40 liters of water to three-meter bed, otherwise the result described above in the case of a small rain. In such watering no sense - it will not reach the roots of moisture. Generally speaking, for a garden with a total area of \u200b\u200bbeds, about 0.5 weaves for a week I need a minimum of 1 m 3 of water. From this and should come.

The next question is how to install, or rather, how much should the container be lifted to ensure a comfortable watering for watering water? Everything is easier here. Water column in 1 m gives pressure of 0.1 atm. Consequently, the barrel raised to a height of 2 m above the ground will give about 0.2 atm. This is bad enough. It is clear that it is better more, but do not forget that when you lift you will come across a number of passing tasks that you need to decide:
- organization of a powerful pedestal. 1 m 3 of water has a mass of 1 ton. Plus the mass of the tank itself. The design should be stable and have a solid platform, and the higher the pedestal, the more difficult it will ensure that it requires the required rigidity;
- the most good water is rain. It is stupid not to use the possibility of her collection, for example, from the roof. To do this, you need to install the container so that the neck or top of the tank is slightly lower than the catchment. At the same time, it will be possible to lay a chute from them or a pipe with at least a minimum bias;
- capacity over time is stolen - it is inevitable, because it will stand in the sun, so once in 3-4 years it must be cleaned of deposits. It is not always possible to do this without removing the reservoir from the pedestal, and its high height will greatly make this task.

Thus, too highly installed capacity will create an additional pressure, but it creates a lot of problems during its operation and maintenance. As practice shows, the optimal will be height in 2.5-3 m.
Capacity is installed. Before filling it with water, you need to solve another task - to overflow. It is a discharge pipe at the top of the tank. If you organized the collection of rainwater, that is, the amount of incoming water in some cases you are not controlled, then the prevention is particularly relevant. So that the water does not flow through the edge, overlapping the adjacent territory, a pipe is derived from the top of the tank and is discharged to the desired distance, for example, in a ditch or drainage.


Organization of automatic water level control in the tank. If you are constantly on your site, then you will not be difficult to periodically fill with water tank as needed. But if we want the plants and during our absence, the water will be spent constantly, including when we are not. Independently controlling the level of water in the container in this case we cannot. Therefore, it is necessary to make a system of automatic filling the tank with water with the control of its level. There are quite a lot of ways to implement it. The solution will depend on how water flow into the tank is carried out. Perhaps two options:
- a separate pump serving only it is connected to the container. In this case, you need an electronic system, which includes and disconnecting the pump at the right time;
- the tank is connected to the existing water supply, central or individual. In this case, a mechanical system is required that opens and closing a certain intake crane at the right time.
Consider the first option - a separate pump that fills the container. Everything is simple enough. The obvious solution will be a float switch.

It is a plastic box, inside which the switch and the steel ball is located. Depending on the water level, the float changes its position from the extreme top to the extreme lower. In the upper position, the ball opens the contacts. The pump is turned off. In the lower position closes, including the pump. To adjust such a switch, a special ship is used, which is put on the cord. The float rises and falls along the arc with the center at the point where the ship is located. By connecting the pump to such a switch, configuring the release length and the location of the cargo, you will provide the desired moments on and off the pump.

The float switch is not the only option. On the Internet you can find other ways to automatically turn on and off the pump for water supply. For example, you can find a description of a device based on multiple electrodes. However, perhaps, it is the float switch that is optimal optionAs as a result of its availability, it can be bought in almost any store selling pumps, and the price of it is about 800 rubles. and as a result of its reliability in the work.
Consider the second option when the cumulative tank connects to an existing water supply system. What do you need to do in this case? The above version is not quite suitable for us. Indeed, we cannot turn off the pump itself, because it works constantly, providing the necessary pressure in the plumbing. If the container is connected to the central summer water supply, then in this case the described decision is not an option, because there is no pump here in principle.
To solve the problem, the entire system should be supplied with a certain crane, which opens when the water level falls below a certain level, and does not close until the water reaches the maximum. A crane with an electric drive can cope with the task in combination with the float switch.

That is, in this case, our switch can serve, but only if it controls the pump itself, but a crane. True, this combination will cost quite expensive - 800 rubles. Switch and about 2500 rubles. crane. Perhaps cheaper to buy a separate type "Kid" type and connect it to the tank. But I want it to be simple and inexpensive! It turns out that there are such options. Consider the most obvious and simple option - the water supply by timer.
In the shops of gardening goods you can buy a simple device - an electronic timer for watering:

It is a crane opened and closed according to a given program. To begin with, connect the container directly and flow the filling time and time of emptying. Connect the device to the pipe that feeds water into the tank. We program it to turn on after certain intervals - the time of emptying, and at certain times - the filling time. Such an option, although not the best, but, in any case, the easiest and most requiring additional work. In addition, in water pipelines where water is applied on a schedule, it is generally almost the only one - the period of operation of the device can always be adjusted at the time of water supply.
The described options are not ideal - the first roads, the second is inaccurate. There is a fairly cheap device that ensures the control of the water level you need in the tank.
You need to buy in any plumbing store Banal float valve for toilet bowl.

We disassemble it. Pear we will not need. We take a metal rod rocker.

Cut and bending it to such a condition:

We collect the valve.

We drill a hole on the skirt or make an additional puck with a hole. We put on the spring with one end. Another engage in the hole.

It turned out a device in which the spring holds the rod rocker in the "open" or "closed" position. Now we mount the valve into the side wall of the drive well in the middle between the desired water levels, maximum and minimal. Next, we bind a thick fishing line to the rod, it does not reprove with time. The other end of the fishing line is tied to the float, on which the cargo is fixed. Our task is to ensure that the float keep buoyancy is sufficient in order that when filling the tank with water to lift the rod rocker, overcoming the resistance of the spring, and at the same time he had a sufficient mass to switch this rod down when the water level falls.

Thus, in full tank floats float in the extreme upper position. The rod is raised up and held in this position spring - the valve is blocked, water does not come. As the float is spent, lowered down, along with water level. The valve is blocked by a stem held by the spring. Upon reaching the lower level when the fishing line stretches under the action of the mass of the float, the rod switches to the "open" position. In the container will begin to flow water until the float floating on the surface does not pull the line up and will not switch the rod to the "closed" position.
Everything is quite simple. True there are several nuances:
- it is necessary to achieve the correct combination of buoyancy and mass of the float. This can be done only experimentally;
- the float valve for the toilet must be of good quality, otherwise the rod under the action of the spring will be moved to the lobby and simply will not switch;
- since in a closed position when the water level falls, the valve will hold only the spring, then it will be necessary to choose the optimal pressure of water in the water supply system at the inlet to the container so that the spring should be coping with its duties;
- there is a risk that, dropping, the valve will touch the rod and switch it ahead of time. This problem is easily solved by mounting on an additional protection valve, for example, cut from a five-liter plastic bottle.
All described operations are pretty simple. The system requires one setting, and then it will work as a clock, providing a constant water in your accumulative tank.