The optimal size of the bench with a back. Do-it-yourself garden bench for a summer residence: drawings, dimensions, photos
Wooden benches and benches that are on household plots, give the opportunity to relax. But you can not install a simple bench, but make with your own hands a whole corner for relaxation, with a table and other components of the ensemble, and from scrap materials. In this case, rest will complement the opportunity to enjoy the beauty of nature and the results of your own efforts. There are many attractive ideas on how to make a bench. Simplified versions of wooden benches with their own hands can be created by anyone, there would be a desire.
In the garden or near the house, I want to place more greenery.  Flower beds can be combined with a bench... You will need 2 wooden boxes in which flowers grow; planed, polished boards are placed between the boxes. The bench can be placed near the wall, several long boards can be stuffed onto the wall to make a back.

Wooden boxes can be replaced with stone or concrete bedside tables... They will last longer, you will have to take care of them less. There are ready-made concrete beds. The board can be purchased already processed, or you can do it yourself. Instead of a board, use half a log. The option is selected based on the style of the plot / garden. The seat is fixed with a metal corner with dowels (if it is metal), it is attached to the tree with self-tapping screws from the bottom or with bolts through and through.

If there are large plants in flowerpots, you can do the following: the bench will embrace the plants... Vases need strong, because they will be legs. There is a similar version of a plank bench without plants. Supports are created from boards of equal size, the seat is equipped from a bar.
Support for a bench made of wood in the garden can be hollow building blocks... Processed bars are inserted into the holes, resulting in a bench seat. The edges of the timber should be rounded for ease of sitting. It is preferable to use large blocks with thick walls. In the absence of those, they are well fastened together. First, the blocks are attached (for example, with pins), then - the bars (with bolts or dowels).

Benches made from logs
If the site is decorated in ethnic style, then you will have to move away from the usual options for garden benches with your own hands. It is preferable to use logs, with or without bark. A seat for a garden bench, made with your own hands from logs, will serve as a trunk sawn along. The back of a bench made of wood will be a smaller trunk or a cut closer to the edge. The legs of a wooden bench are made from narrow pieces of logs.

Another version of a bench made of logs without a back is with a seat made of a very thick board, with legs from a deck of large diameter. A groove is made in the deck for laying the seat of a wooden bench. With an ax, a grinder or a chainsaw, you can make a recess without much difficulty.

On the summer cottage a desktop is often needed. It is possible to make both a wooden bench and a table from a log. The table top is made of boards, the rest of the components are made of logs of different diameters or from halves.
Using branches
The back, legs, armrests can be created from thick and not very thick branches, the seat can be equipped from a sanded and processed (peeled from bark, polished) unedged board. Another option for a beautiful bench made of wood, which can be installed in the garden or in a summer cottage - boards and branches located in different directions... Such a wooden bench does not require any special skill. And the more careless the work, the more attractive the outwardly the result.

Wicker backs are rarely seen on benches. Around the tree, you can arrange a seating area and a bench. The constructions are simple, as is the flooring. A swing and a gazebo will complete the picture. Above the bench, you can place a pergola - a light gazebo. Complete relaxation will be facilitated by the arrangement of a pond, fountain or waterfall.
Wooden and metal options
 Fully metal garden benches can be beautiful, but in the summer such products get very hot, and in the winter they are impossible to sit on because they are cold. Metal and wood benches do not have these imperfections. The legs, the supporting structure are made of metal, the seat and back are made of wood.
You can make a bench from a profile... Rectangles are welded from it, jumpers are welded to the sides. They hold the seat planks. In a more perfect form - with armrests, backrests, pillows, the design looks very comfortable. The big seat makes the bench a sofa, the pillows are upholstered foam rubber for furniture. The same style solution is presented in the tables. A frame is taken from a professional pipe, and a tabletop is created from boards.

Significant nuance: If the seat or table top is made of several adjacent parts, then they should not be joined end-to-end. A gap of 3-4 mm should be made between adjacent planks or bars. The wood will swell and dry out, and the gap will allow the surface to remain nearly level during these processes.
To achieve smooth lines will allow options in which the pipes are bent. The result is garden benches and a table with rounded edges. This kind of garden furniture is safe to use. A round or profiled pipe is bent, leaving on the sides in the shape of the letter "P" with a large back. Its length is equal to the length of the bench. For the table, the dimensions are slightly larger.
- We need 2 identical blanks for the table and bench.
- Planks of the same length are cut. For the seat, boards of 40 cm are needed, for the tabletop - at least 55 cm.
- Fastening to pipes is done with furniture bolts with a flat head. The hats will not stick out; a slightly larger hole is made under them.
Benches made from planks
 Even common thing you can make it unique if you treat the task creatively. For example, legs and armrests can serve wooden wheels... The simplest option is a board with X-shaped legs.
It is possible to make a bench from the boards in the shape of the letter "P". The main task is to fix the legs and seats well. You should use a thick board or timber that does not bend. You can put the board on the edge to make it stiffer. The corners installed from below will give reliability.

An interesting option: the legs are made of boards of different lengths. Every second is made shorter by the width of the seat plate. The task is simple: you should not violate the dimensional parameters, the connection is made with nails in the seat.
Non-trivial and familiar options
You can attach the seat to a large stone. It is beautiful, but it is not pleasant to sit on it in winter. You can also make beauty from bamboo trunks. Not everyone can make a stone bench - not everyone has the appropriate equipment. Consider more familiar options.
A simple garden bench will look unusual thanks to the use of a special material. Suitable for arrangement timber with rounded edges... Small logs are trimmed on the sides, the same result is obtained. The legs are unusually assembled: the bars are placed flat on top of one another.

How to make a garden bench about 120 cm long, about 45 cm wide, 38 cm high? The edges of the timber are rounded off with a cutter, or a profiled timber is used. The price will be more expensive, but the work will be easier. It is well crafted and easy to connect. 5 bars are spent on one leg. 45 cm is multiplied by 5 pcs. - it turns out 2.25 m. 4.5 m of timber is required for 2 legs. The seat needs a board 40 mm thick and 90 mm wide. For a bench seat, 5 boards 1.2 m long are required. 1.2 m multiply by 5 pieces - it turns out 6 meters.
- Planks for the bench seat are cut and processed. The edges are rounded. With absence grinder Either the router needs to use sandpaper. You can also arrange for the sawmill to work and grind to reduce the amount of work.
- Boards of the same length are sanded and varnished.
- The bars for the legs are folded one next to one, aligned along the edges.
- Lines are drawn along the places of fasteners. The distance between them is 7-10 cm.
The pins are suitable for metal, you can make wooden pins. For them, holes of a slightly smaller diameter are drilled, the depth of the hole will be half the length of the pin. They are hammered into one piece, a second piece is inserted into the hole from above. You can add glue to such a connection, but the structure will come out one-piece. With a pin connection, the main task is to place the holes one above the other. This will create a smooth edge.

- Measure the same distance from the edge using the template. A piece of plank approximately 1.5 cm wide is needed. Holes are made at this distance from the edge of the bars.
- Applying exactly along the edge, you need to mark the intersections with the perpendicular lines.
The pins are staggered, holes are made through one intersection. Holes on one bar from different sides are staggered. The legs are connected to the seat on the pins: 2 pins go to each bar.
Technologically, this type of connection is correct, but it is not easy, you need a certain skill. You can simplify the task: fold the bars one on top of the other, secure with clamps, make a hole through in two or three sets, placing them in the center and at the edges, connect with a long hairpin, with washers under the head and a nut. To the legs of the seat strip garden bench nailed from above or attached with pins.
Do-it-yourself wooden bench, time to move on to finishing. If the seat is attached with nails, then take wood mastic, add fine sawdust, stir the mixture. Cover the joints, after drying, smooth with a sandpaper until smooth. Then cover with varnish or wood paint for outdoor use (not covering, leaving the texture of the wood visible).

A bench made from broken chairs
 Everyone has old chairs. They should be the same and fairly strong. Disassemble 2 chairs, leave the part with the back and legs. Connect 2 backrests with bars with a suitable section. For greater rigidity, at a distance of about 20 cm from the floor, make a frame with crossbeams. It will serve as a footrest or storage space.
After sanding, paint the resulting product with regular paint. Different types of wood are painted over only with covering paints. Apply by brush or balloon. Cut the seat out of thick plywood (8-10 mm thick), cover with foam rubber, fabric.
Garden chair or bench made of pallets
 It will also be possible to make cargo pallets garden furniture do it yourself. You don't have to disassemble anything. The seat will come out of one, the back will come out of the second. You need well-finished planks for the armrests, for the legs you need bars.
In the pallet, the attachment areas are reinforced with pieces of bars, screwed with self-tapping screws on both sides. From a bar with a cross section of at least 100 * 100 mm, 4 identical segments with a length of 80 cm are cut. They are screwed in places that have been reinforced. The legs are allocated 20-25 cm. Fastening is done with 4 self-tapping screws with a length of at least 150 mm.
The armrest supports are screwed on. It is necessary to adhere to verticality and provide the same distance on the legs so that the seat is level. If there are errors in height, you can file it, but you will have to do it from above. Deviations from the vertical can be corrected only by screwing the leg back.
The legs are screwed on, now a second pallet should be attached to the rear uprights, and plates for the armrests should be placed on the sides. A piece is cut out of furniture foam rubber, which is covered with a cloth. You can sew back cushions with your own hands... Looking for a loft-style armchair? Then walk with an emery cloth or grinder, process the surfaces to a smooth state. The coating can be done with paint, which gives the wood a dark color.
To garden plot was comfortable enough, it should be properly equipped. Garden benches are an important component. You can make them yourself different ways and from various materials.
Bench made of concrete slabs and boards with a back
Looking at the drawings of the bench, you can find out the features of its device. You can make such a structure with your own hands relatively easily, quickly and without high financial costs.
Making a bench with a backrest with your own hands in step by step instructions described in great detail.

Assembly: initial stage
After the preparatory work, it is time to process the wood. In order for a do-it-yourself bench with a back to serve for a long time and decorate the site, the materials must be pre-processed.
Tree cover antiseptic compounds and let it dry. After that, you can start collecting backs.

On one of the two-meter boards, fifty centimeters are measured from the edges. At this level, the edges of theton slabs. From this mark, another fifteen centimeters are measured to the center of the board. The first boards will be attached here. From the resulting marks, we measure seventeen and a half centimeters - the gap between the back boards. Next, we measure out fifteen centimeters for two more boards. There should be a gap of five centimeters between them. All this can be seen in the drawing.

Wood glue is applied to areas of fifteen centimeters. Planks are applied to them, the length of which is sixty-five centimeters. Additionally, they are fastened with self-tapping screws.

Pieces of seventeen and a half centimeters are glued on top between the boards of the back. In order for the parts to stick well together, they are clamped and held until the glue sets. After gluing is completed, the back is covered with an antiseptic.

All wooden parts can be coated varnish... This will give them additional stability and attractiveness.
Assembling the main part

It is better to assemble the main part of the bench from both sides. Concrete slabs are placed between the boards, and in drilled holes insert threaded rods M16 fifty-five centimeters long. You will need four of them.

The rods are fastened with M16 nuts and washers. Twist them simultaneously from different sides to make the bench even.


Simple do-it-yourself bench
You can make do-it-yourself benches for a summer residence quickly enough if you follow the instructions. Consider four options for such garden structures.

On the drawings all its features are detailed. Making such a bench with your own hands is quite simple. The only tricky part is the concave seat.


The number of parts and their dimensions are shown in the table.

Do-it-yourself bench making from wood begins with blanks necessary parts. Planks and beams are cut into pieces of the required length.

The manufacture of seat supports will be somewhat more difficult. You will need to markup on the blanks. Along the edges, two points are marked at a distance of seven and a half centimeters from the bottom side, and in the center a point at a distance of four and a half centimeters. They are connected using a flexible plastic ruler and cut out jigsaw... Sections are processed with sandpaper.


The seat supports are attached to the two upper side bars. One on each edge and one in the middle. Next, the supports are screwed on, spaced from the outer ones by the width of the legs. All connections are made with self-tapping screws.

The boards are attached to the resulting base. seating. It is advisable to deepen the caps of the self-tapping screws.

Then attach legs... They are attached to the seat supports. The lower drawers help to fix the legs.


The finished product is covered antiseptic and varnish.
Simple bench number 2
To make such a garden bench with your own hands, you will need concrete flower girls and boards. Flower girls are required to create a bench base. Use two with a rectangular base and two cubic.

In order for the base to be stable, the flower girls must be glued together or connected from the inside with brackets fixed with self-tapping screws. A drainage layer and soil are poured into the container. This increases their resilience.
The bench seat is made of planks. To do this, they are cut into pieces of the desired length. These blanks are laid so that they have a distance of half a centimeter. Then they are connected using transverse strips. The planks are placed in three places: at the edges and in the middle. Corners are attached to the slats. With their help, the seat will be fixed on the flower girls.


Do-it-yourself bench with a back

Prepare the details of the bench indicated in the figure. They are processed antiseptics before connecting.


Then the supports are assembled from the parts. Pre-round the corners and chamfer. First, parts A and B are connected with a bolt, and then B, C and D also using a bolt.

The inclination of the backrest is determined by part D, after which it is connected to part A. Similarly, but in a mirror image, another support is made.

After that, the back and seat are assembled. For this, the supports are placed so that there is a distance of twenty centimeters between them. First, the front and rear strips are screwed to the supports, then all the rest, and finally the stops are screwed on.

In the last step, the back of this bench is screwed on.

Bench number 4Another option for a simple do-it-yourself bench. Its length is one hundred and twenty centimeters. The height from the ground to the seat is fifty centimeters, the height of the back is also fifty centimeters.

The base is made of boards, the thickness of which is five centimeters, and the width is from ten to twelve. One of the legs continues to support the backrest. Supports are connected according to the "half-tree" method and fastened with bolts.

The basis for the seat is a bar fixed with self-tapping screws. The short legs on the back of the bench are connected with a collet to increase stability. The seat and back are covered with boards of lesser thickness. The surface is painted or varnished.
Simple bench with a back for a summer cottage

The dimensions of the structure and wooden parts can be seen on drawings benches. If we consider how to make a bench with our own hands, then this option will be the most optimal in terms of the simplicity of the process and the result obtained.


It is better to purchase materials already cut to size. If there is no such option, then you need to saw them yourself.
The resulting blanks polished. The ends of the boards are processed with an electric plane.

The back legs of this simple bench with their own hands are at the same time a support for the back. To create the desired level of inclination, the workpieces are marked out.
The attachment point is marked at a height of forty centimeters seating... Above, the board is cut at an angle of twenty degrees. The cuts on the two workpieces must be the same.
Collect first legs benches: the front ones are connected with the back ones using a bar. Better to do this from above and below.

When the side pieces are assembled, they can be joined together by seat boards. The boards are screwed on with self-tapping screws, leaving a distance of one or two centimeters.

To strengthen the structure and increase its stability, make the lower harness a bar on the legs. For the backrest, two boards are attached.
Finish work by finishing covering which will protect the product from moisture and adverse conditions.

DIY pallet bench
Make a do-it-yourself bench from pallets it's easy if you connect your imagination. This will require three or four of these wooden structures... Some will need to be sawed to get additional parts. The simplest design of a do-it-yourself bench from pallets, when two pallets are attached perpendicular to each other, creating a back and a seat.


So that the structure does not turn out to be too bulky, it is better to cut the pallets to the desired size. The elements are fastened with self-tapping screws. Adds side pieces for added strength and legs. All this can be seen in the photo.


Since the material of the pallets is raw, rough, you will need it first. grind... This will eliminate splinters.
The manufacture of a bench with your own hands from pallets is being completed with varnish or paint.


Puzzle bench
You can make such a bench with your own hands if there is a wide board and shovel cuttings. Curly seats are cut out of the board in the form of puzzle pieces. Legs from shovel cuttings are attached to them. Individual stools are obtained, which quickly gather into one long bench. All stages of manufacturing are discussed in detail in step-by-step photos.


Benches from unnecessary chairs: two do-it-yourself options
First option

To create such a do-it-yourself bench for a summer residence, you will need four old chair.

From the first two chairs are filming parts from the front of the seat.

The remaining saw off the front feet are slightly lower than the seat structure.

From the resulting details, you need take off old varnish or paint. For this, a special agent is applied to the parts, which dissolves paint and varnish coatings. Then the softened layer can be removed with a spatula.

The racks should be drill holes for dowels. Holes are required on the front and front sides.


The dowels are greased with glue and inserted into the drilled holes.

When the dowels are glued, you can assemble base benches. To make the structure strong, the parts are fastened with self-tapping screws. Construction surface sands itself.


For seating benches choose a board that is suitable in size, cut off the excess.

If several narrower boards are used, then they are glued together with wood glue. For a tight connection, they are clamped with clamps and wait for the glue to dry.

The finished seat is also glued to the base with wood glue. Heavy objects are placed on the board and clamped together with the base with clamps.

When the glue is dry, cover the seat with masking tape and color other structural elements with wood paint.

The tape is removed and the seat is processed stain... Finally, the entire bench is varnished.

Second option

To make a second garden bench with your own hands from old furniture you need two chairs. It is better if the back and hind legs are not separated.

Two identical chairs take away all parts of the structure except for the rear legs with a back.
Take bars five centimeters wide and three thick. Cut off two parts equal in length to the width of the chairs, and two pieces as long as the finished bench will be. A rectangle is assembled from these four parts. It is fixed on the backs of chairs with self-tapping screws.

Similarly, another frame is assembled. Several transverse strips are attached to it. This structure is attached under the seat, making the bench more reliable and acts as a shelf.

If the chairs have old cover, then it is removed with sandpaper. After that, the surface is putty with a special compound or coated with a primer. When the layer is dry, it must be sanded with fine-grained sandpaper. At the end, the structure is covered with paint.

A seat for a garden bench with their own hands is made from Chipboard or plywood... A rectangle is cut out of the selected material, which is half a centimeter larger than the base on each side. Then cut a piece foam rubber with the same dimensions. A rectangle is cut out of the upholstery fabric. It should be five centimeters larger than the seat on each side.

Foam rubber is laid on a sheet of plywood, it is covered with a cloth on top. The fabric is attached from the inside of the furniture stapler.
The seat is attached to the base with a piano hinge.
Swing bench

To make such a bench for a summer residence with your own hands, you should prepare necessary materials... Manufacturing begins with the creation basics constructions. The seat bars are attached to the backrest bars at the selected angle.


Additional ribs providing rigidity.


The seat is attached planks, by drilling holes in the base bars for fastening. They do the same with the back.


Armrests are installed on both sides of the seat. They can be bolted in place.


The resulting bench cover wood preservatives and varnish. It is very important to paint over everything as carefully as possible.

The bottom of the bench is reinforced with metal profile. Chains are attached to the profile, on which the swing bench will be suspended. It is imperative to check the reliability of the beams on which the bench will be suspended.


Log bench
To make such a bench with your own hands from wood, you will need chainsaw... A thick log with a length of one meter is taken as the main material.

Log mark out, to make two slightly unequal parts. The back will be made of the smaller one, and the seat will be made of the larger one.

Chainsaw log sawed along the label. The resulting irregularities are immediately cut off with the same saw.


The cut triangular piece is cut into pieces and inserted into the holes in the seat. The back is fixed on top. The bench is almost ready. It remains only to give it a more decorative look.


You can put the seat on legs... To do this, grooves are made in the lower part for installing a pair of logs as legs.


Bench-transformer
The design features of the transformer can be seen on the bench drawings. A do-it-yourself transformer bench is made from a planed boards, which is sawn to the named dimensions.


In chopped timber details holes are drilled for fasteners.


At the table top, the boards located on the edge can be made wavy.

In the material intended for countertops, holes are drilled with a diameter of twenty-two millimeters and a depth of three centimeters. Cuttings of the same diameter will be inserted into them.

The edges of the parts and the edges are processed and rounded. 

All elements are assembled with screws and screws. Screws are needed with dimensions 6x70 and 6x90, screws - 8x80.


Wooden parts stain stain.

The structural parts that will move are connected by hinges.

Parts of a round are placed between the boards of the tabletop. cutting.

Set the stop for backs.

Do-it-yourself transformer bench is covered varnish.


Rocking bench
Making an original bench with a back with your own hands is not difficult if you have tools and materials. First you need to consider the drawings of the bench, which do not contain a large number of details.

The lateral parts are transferred along the pattern to eurofaner three centimeters thick. They are cut out with a jigsaw and the ends are processed with a grinder.

To fasten the connecting strips, markings are made. Then holes are drilled. After assembling the frame, the rails are fastened with self-tapping screws. The attachment points are sprated, and the entire product is varnished.

Bench around the tree
The simplest version of such a bench is hex. The size depends on the size of the tree. Measurements are made at the height of the seat. To the result obtained, another margin of fifteen to twenty centimeters is added. If you divide the result by 1.75, you get the length of the inner side.

For cutting, boards ten centimeters wide are laid in four rows at intervals of one centimeter.

The cut point is marked at once for all rows with an angle of thirty degrees. So cut out six sets of blanks.

Legs are used with a height of sixty to seventy centimeters. They are connected with crossbars by drilling holes and using bolts and nuts.

The seat is installed so that the joints are located in the center of the ribs of the legs. First, the outer parts are screwed, and then the inner ones. In this way, the entire hexagonal structure is assembled around the tree.


At the end, the back is made and the apron is mounted. The result is a do-it-yourself circular bench with a back.

The finished product is processed oil impregnation.

Bench made of curved branches

A bench made of curved branches will look original. This will require branches for the front, two legs, a horizontal top, and a couple of transverse branches.

Sawn branches so that they fit together as accurately as possible. Then they are connected with metal corners.


The back part is made in a similar way and connected to the front.


The finished product is placed on a flat area and the seat is assembled.

Bench options
- Log bench that blends well with the surrounding nature. It consists of half a log used for a seat, and two short round logs that are legs.

- Beautiful wooden bench with a back and armrests, reminiscent of a sofa. Curved and cut elements make it look more attractive, while the knots and unevenness left behind give the design a natural look.

- Bench made of wood and metal... The base of the structure is metal. The wooden parts of the seat and back are fixed to it. The thin metal parts make it look light.

- The bench is of a simple, classic shape. It is made of rather wide wooden planks. This width allows you to comfortably sit on the bench. The armrests complement the design.

- Original bench made of wood with figured details. This option is well suited for a plot with a natural, rural design. Carved legs and armrests, curly back - all this gives the product its originality.

- Bench with an interesting backrest... Curved parts gradually tilt back, creating a unique design. The seat is slightly curved but has a more traditional look.

- Complex of wood- a table with two benches. The design looks traditional thanks to the material used. Original decision is the fastening of all components into a single structure.

- The bench is made of solid log
... A single piece has been cut out of it, combining the back and the seat. Legs are attached below. The log is required rather large.

- Bench with storage box for toys... Outwardly, it looks like an ordinary wooden sofa bench, but under the seat it has a drawer into which you can put various things.

- A comfortable bench made of wood with a simple shape. The base is made in the form of a rectangular box. The back is also simple with a straight shape. The seat has soft cushions for added comfort.

- A wooden bench located around a tree. It is made as if it consists of four benches, each with one armrest. The composition looks attractive and comfortable.

- Bench of a simple shape made of wide boards... It looks solid, but its dimensions are somewhat concealed due to the gaps between the boards and the light in blue in which it is painted.

The benches and benches in the garden at the summer cottage are a popular place to relax. Sometimes putting an ordinary bench is not interesting and corny.
After all, there is an opportunity to build a whole corner for relaxation and comfort, so as not just to sit on a bench, but already to enjoy nature, from your garden, from fruits planted with your own hands. There are many different ideas here.

Bench structures are usually lightweight and do not require special skills. Anyone can create a seating area with a bench, if they wish.

Idea options
Everyone saw a photo of an ordinary bench. But you don't want the simplest bench for your garden, you want something more original and beautiful.
If everything in your garden is already decorated and the whole area is in order, then the bench will never be superfluous. And, if you are just starting to equip your site, then it's time to start with equipping a bench.


Wooden bench
A do-it-yourself bench made of wood will harmonize well in the garden with all kinds of flower beds of beautiful flowers.

The easiest way to build a garden bench is two boxes made of wood, in which inflorescences grow, and between them a couple of polished boards. If necessary, this bench can be placed near the wall, if possible.

Many people do not like such material as wood, because it gets wet quickly and it is very difficult to care for it. Instead of wood material stone and concrete come to the rescue.
In order to make a bench with a back, you need to try a little. For the backrest, already processed wood is most often bought. The easiest way to fix the seat is with metal corners.

TO concrete material they can be attached, thanks to the dowels, and to the wooden material with self-tapping screws from the bottom or bolts through and through.

Many summer residents are wondering how to make a bench on their own for home and garden. And every year this question is gaining popularity.

Many give preference to the shop benches that are already ready, but by doing the work on their own, you can completely surrender to the process and turn on your imagination completely.

Metal bench
Metal benches are installed by a minority, since, of course, they are aesthetic and original products, but in summer time- this is a material that heats up to crazy temperatures, and if it gets even a little colder, then the material becomes icy, and it is impossible to sit on it.

If you really want to use metal in the process of creating a bench, then you should combine two materials in the work: metal and wood. In this case, the seats and backs are made of wood material, and the structures of the legs and additional elements are made on the basis of metal.

There are many different original benches in this style.

Note!

Recently, pipe benches have become very popular. From shaped pipe with the help of cooking, rectangles are made, and jumpers are attached to the side walls, on which the bench seats will rest. This is a very reliable and safe way to create a bench with your own hands.

If this option is slightly improved, then armrests are used for greater convenience and comfort. A bench in the garden with a wide seat, like a sofa, will also look elegant and original. This is comfort, convenience and luxury!

For complete comfort, you can put decorated pillows on such benches so that you can not only sit, but also take a nap in nature.

Benches from boards
Simple bench from the boards will also look aesthetically pleasing, the main thing is to be able to do it. There are the simplest designs, like ordinary benches, and there are more complicated ones in the form of a sofa or an elongated chair.

IN modern style It is easy to assemble such a bench, you just need to connect rectangles with partitions made of thin boards to each other.
The main thing is to turn on your imagination. Even the most simple work can become the source of a masterpiece.
Note!


Various shapes of benches can be made on the basis of thin boards. For example, in the form of the letter P. Here the main thing is to fix the seats and legs well and securely. Such a bench is easy to manufacture, but will last a long time.

Photo of a bench with your own hands


Note!


Garden benches today have not only a practical purpose, but also an aesthetic one. They are used to complement a pre-planned interior. Making a garden bench with your own hands is quite simple, it requires minimal skills in using a hand tool. The optimal material for the manufacture of such items is wood, since it is the easiest to process.
Preparatory work
Before proceeding with the work, you need to find drawings of garden benches on the Internet and select suitable option... You should not dwell on overly complex structures if the skills of a professional carpenter are lacking.
Tool selection
When all stages of work are planned on paper, you should prepare necessary tools... If a do-it-yourself garden bench is made of ordinary wood, then you will need the following items:
- screwdriver with a set of bits and drills;
- a hammer;
- plane;
- Grinder;
- hand saw or circular saw;
- level with a ruler.
It is very important to use a quality and reliable measuring tool. Otherwise, the product may end up being asymmetrical.

Material
It is equally important to find a tree with the right dimensions. This will minimize processing - most of the time is spent just on adjusting the dimensions of individual parts.
The wood must be well dried beforehand. Otherwise, after the completion of the manufacturing process in the sun, the entire structure may be skewed. This will make it impossible to operate the garden bench.
When all preparatory work finished, you can proceed directly to the assembly.

schematic drawing of a garden bench
Manufacturing and fitting the main parts of the bench
Making a garden bench with your own hands begins with preparation main constituent components:
- 1- front legs;
- 2 - hind legs passing into the back;
- 7 and 4 - cross beams;
- 6 - longitudinal beam;
- 3 - slats for back and seat.
 It is very important to avoid using wood that has any serious defects in its structure. Such as bitches and the like. These types of inclusions reduce the strength of the bench, especially if it will be located outdoors. Breakage can occur at the most inopportune moment, leading to injury.
 If, for any reason, it is necessary to use material with defects, it is necessary to process the illiquid area to the maximum using a grinder or planer.
All elements of a garden bench made of wood must be made strictly in accordance with the dimensions indicated on the drawings. A discrepancy of even a few millimeters will lead to the subsequent need to rework the entire structure; trimming the details of the garden bench will be required.
Assembly work
When all the necessary elements are ready for the garden bench, it remains only to reliably connect them together. This stage is no less important than all the others. You can make a connection different ways... The following hardware elements are most often used:
- nails;
- self-tapping screws;
- bolts, washers, nuts;
- wooden chops.
The choice of a specific connection method depends on what kind of load will need to withstand garden shop or a bench. If a child will be using this piece of furniture, then it is quite possible to get by with ordinary nails or self-tapping screws. If the load reaches several tens of kilograms or even hundreds, then it is best to stop at bolts and nuts.

To connect the elements of a garden bench made of wood using bolts, it is necessary to prepare a drill, as well as a drill of the appropriate diameter. It should be slightly larger than the diameter of the bolts used. This will allow you to insert them without much difficulty. If the size of the hole is larger than the diameter of the head of the bolt and nut, then special washers should be used.
If you want to hide the presence of bolted joints, you can use a special crown. With its help, small indentations are drilled in the places where the bolt goes through the wood. The washers seem to fall into the resulting niches.
It is very important to choose sufficient depth. After that, the niche itself is carefully poured with a mixture of PVA glue and small chips. Or, round elements of suitable size are made and glued into the niche. In this way, you can make the garden bench as aesthetically pleasing as possible.

To make all the holes as symmetrical as possible, it is enough to arm yourself with a pencil and a ruler. With the help of these tools, the distances from the sides of the wooden elements of the bench are measured and two segments are drawn. A hole is drilled at the intersection.
After all the holes are prepared, you should arm yourself with keys of a suitable size for tightening the bolts and nuts. The assembly is performed in the following order:
- a base is assembled, consisting of legs (element 1 and 2), as well as a longitudinal beam (element 7);
- cross beams are screwed (elements 6);
- bars are attached to reinforce the structure (elements 4, 5);
- in the last turn, the beams are nailed, which play the role of a seat (element 3).
 The last step is the manufacture of special wood plugs. A jigsaw is useful for this simple operation, but you can also use a simple fine-toothed hacksaw. To prepare such elements, you should pick up a small round bar of a suitable diameter, cut it across into parts, the thickness of which will be equal to the depth of the niche where the bolt and washer are located.
Most often, the following diameters are used for the manufacture of plugs, mm: 15, 20, 22, 24, 30, 32, 35.
After the plugs are ready, you can simply glue them onto PVA glue or waterproof sealant - if the bench will be located outside all year round.

Protecting your garden bench from moisture

The last step in making a garden bench with your own hands is to protect it from moisture. This will extend the life of the product for as long as possible. It is quite simple to do this - you need to stock up on a roller, a container for a special composition, as well as a means to protect against decay.
Antiseptic impregnation
It is important to choose just the impregnation, a composition with a penetrating effect. It includes various kinds of acrylic resins and other additives. All this is often mixed with a special antiseptic composition that prevents rotting and damage to the tree by various kinds of insects. This is especially true in the garden.
In the process, it is advisable to use protective equipment such as gloves and goggles. The contact of various compounds for protecting wood from rotting on human skin can lead to unpleasant consequences. You also need to use glasses - many substances evaporate quickly when room temperature... If they get into the eyes, it can lead to very sad consequences.
Painting a garden bench
Important: after the impregnation has been carried out, it is necessary to varnish the bench. It is advisable to use a special varnish designed for outdoor use, capable of withstanding temperature changes.
If painting with enamel or anything else is envisaged, it must be done immediately after impregnation. And only when a layer of paint has been applied, should the wood be varnished.
You can make metal garden benches with your own hands, as well as forged ones. But this process is quite complicated, it requires specialized tools and skills. Wooden furniture has a very large number of advantages - it is very light, durable, strong, and also easy to repair (which is especially important). Making a garden bench out of wood with your own hands is very simple. There are many different drawings and manuals available on the Internet.
If, sitting on a bench, you want to relax and be inspired, then it is more logical to place it near something beautiful: a pond, a flower garden or an alpine slide.
Garden bench with your own hands is not an easy task, but you do not need to be a professional in woodcarving or welding. It is enough to have small skills in working with a hammer, saw or welding machine, materials and desire.
Soon you will have comfortable and beautiful benches for the garden, made by hand.
Having the desire and the necessary materials, it will not be difficult to build benches for the garden.
Required materials and tools
With a creative approach, a garden bench can be made from almost anything. The most optimal and simple option is a wooden bench, for which you will need boards and varnish with a primer from materials, and a screwdriver with a jigsaw from tools.
If you want to see a metal bench on your site, there will be a completely different set of tools: a welding machine, metal pipes, a pipe bending device, a grinder.
If there is none of the above, and the desire to see a bench on the site is great, you can use any materials at hand. Bricks or car tires with a board in the middle, wooden boxes can also serve as a bench. Even from plastic bottles and cardboard you can build a nice bench.
Step-by-step instructions for making a bench with your own hands
Garden benches made of wood with backs
Most often there are two types wooden benches, made by hand: an ordinary bench and a bench with a back.
For convenience, before starting work, it is better to draw a drawing, choose the size of interest and buy boards that are suitable for the size. If this is not possible, you need to use an electric jigsaw or saw, and independently prepare the elements of the bench.
Read about the types of perennial fast-growing shrubs for hedges.You will need:
- 5 boards 1.5 m long and 15 cm wide, it is better to choose a thickness of 3-4 cm;
- 2 legs, which will also be a support for the back - 900 x 150 mm and a thickness of 3-4 cm;
- 2 front legs - 360 x 150mm with the same thickness as the rear legs;
- bars 40X40 mm;
- screwdriver and self-tapping screws;
- varnish and impregnation;
- electric jigsaw;
- sandpaper.

The drawing will help you in making a garden bench.
Having prepared all the necessary materials, you can get down to business.
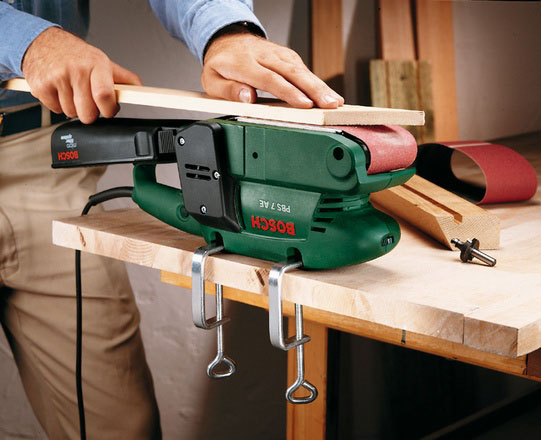
Before bonding the boards, they must be well processed so that rest on the bench brings pleasure, and not splinters. The longest boards that will fit the seat and back should be sanded with sandpaper (or a sander).
If the house has an electric plane, it is necessary to use it to make the shape of the boards rounded.
The blanks for the rear legs need to be finalized, giving them the correct shape.

The legs, which are also a support for the back, are processed with a grinder
We take boards 90 cm long and mark a division of 40 cm - the height of the bench. From this division at an angle of 20 degrees, cut off the upper part of the board with a jigsaw, while the board should stand on its edge. We get the back leg and the angle of inclination of our future backrest.
The most difficult and important is the cut, it must be even on both workpieces in size and depth.
We cut the timber to the width of the bench - 50 cm. We connect the legs with it, it is better both from above and from below, so the bench will turn out to be more stable. Distance between legs 28 cm (front and back).
We fasten three long boards with screws using a screwdriver to the upper bars of the finished legs, with which we tied them.
We collect the back of the bench. We attach the two remaining boards to the previously prepared cut. The distance between the seat and the board is 20 cm, the boards are 2-3 cm.
You can strengthen the structure. To do this, you need to attach a board along the length of the bench to the lower straps of the legs. This will add even more reliability and stability.

We cover the bench with varnish to make it decorative and durable
Garden benches made of wood without backrest
Similar to the steps described, you can make a simpler bench without a back. For her, we need everything the same, except for 90cm boards going to the rear legs, instead of this two more boards 36cm long. It is assembled according to the same principle as a bench with a back.
Metal and wood garden benches
It is much more difficult to make a bench from metal and wood than just from wood, but it looks stronger and more solid.
You will need:
- grinder for metal;
- welding machine;
- locksmith vice;
- metal pipes 30X30 mm;
- metal primer;
- wooden seating boards and varnish, for processing.
Seat frame. We cut the pipe into 4 parts: 2 x 1500 mm, 2 x 400 mm. We weld in the shape of a rectangle.
Legs. Cut off from metal pipes 4 identical pieces for 460 mm legs and weld them with welding machine to the corners of the rectangular workpiece.
Bench back... Tubes of 440 mm are welded to a pipe with a length of 1500 mm on the sides in one direction. This blank is then welded to the rectangular part of the bench.
The structure is ready, it is necessary to wipe the welding seams, polish and cover the bench with a primer.
To add rigidity between the legs, additional metal ribs can be welded to the back (inside diagonally) and to the seat.

A bench made of wood and metal is ready
Seat. For the seat, it is preferable to use wooden boards, which must be processed by sanding before screwing.
They are attached along or across, depending on your desire, using bolts (preferably with rounded caps).
IN metal frame using an electric drill, holes are drilled into which the bolts are screwed. You can also use metal staples so you don't need a drill.
Finishing installation works, we process the wooden coating with varnish.
Garden benches made of stone
Wooden garden benches look beautiful, but they require careful maintenance. But the stone benches are not whimsical to maintain and are easy to assemble.
If the site has orphan stones of different sizes, they can be used to build an almost exclusive shop.
We take large stones and lay out the seat and back from them. We lay out the armrests from small stones. We put some decorative pillows and you can sit down to rest.
Such benches are inconvenient to move around the site, but they look original.

We make a bench for the garden ourselves
Description
Instructions for making a garden bench step by step, each step is described in detail and illustrated
Victor Sergeev