Mastery furniture from cardboard: master class. Cardboard furniture - a choice for those who take care of the environment
Give or make a home for her dolls for her daughter - it's just the beginning. Next, this house will have to furnish. It is a bunch of toy furniture, techniques, accessories. On how to make furniture for dolls will be told in this article.
How to determine the size
Dolls, their houses and furnishings are reduced copies of us and our dwellings. And the most reliable way to make doll furniture with your own hands and not mistaken - measure the real items, reduce them several times, and then work with the obtained values.
Furniture for dolls - copies of our furniture
How much to reduce real sizes depends on how small or a great doll is, because they are from 7 cm to 60 cm or even higher. Accordingly, the furniture for them needs different sizes. To determine the number to which real dimensions should be divided, the average human growth in centimeters (170 cm) is divided to the height of the doll. We get some kind of number. Here on it and it will be necessary to divide the size of real furniture.
For example, the height of the doll is 15 cm. Calculate: 170 cm / 15 cm \u003d 11.3. That is the number and divide all the parameters of "human" furniture. It is still worth saying that it is 14-15 cm that is the most popular size among the doll population. Therefore, most of the finished furniture is made in a ratio of 1:12. It is possible for us to use existing dimensions at least in order to be oriented with the scale of the required parts and the number of materials.

So, the most common sizes of dolls:
- doll-man 150 mm;
- doll-Woman - 140 mm;
- doll-child - 75-100 mm;
- toy baby - 65-75 mm.
If you need furniture for dolls of such sizes, its parameters will be such:

If you have more toys more / less, you can not adjust the dimensions. With a great difference, you will have to increase or decrease (and you can count on your own).
Doll Furniture made of match boxes
The easiest way to do furniture for dolls do it yourself from ordinary match boxes. They are glued with the help of PVA glue, creating certain structures, then glued with paper or cloth, self-adhesive film, etc. You can use wooden beads as legs, drawers for drawers from small butt on legs or from long beads.

From match boxes you can make chairs, table, chest of drawers, bed, bedside table. Another thing is that the furniture is obtained for very small dolls, no more than 10 cm high. Although, you can use a larger number of boxes, gluing them into blocks, and from these blocks to create furniture for dolls with a height of about 15 cm. Also, but to work with others Materials are not much more complicated, and they are more plastic and allow you to create products of more elegant forms.
It may be your first experience in making puppet furniture. Later it will be possible to take on something more serious.
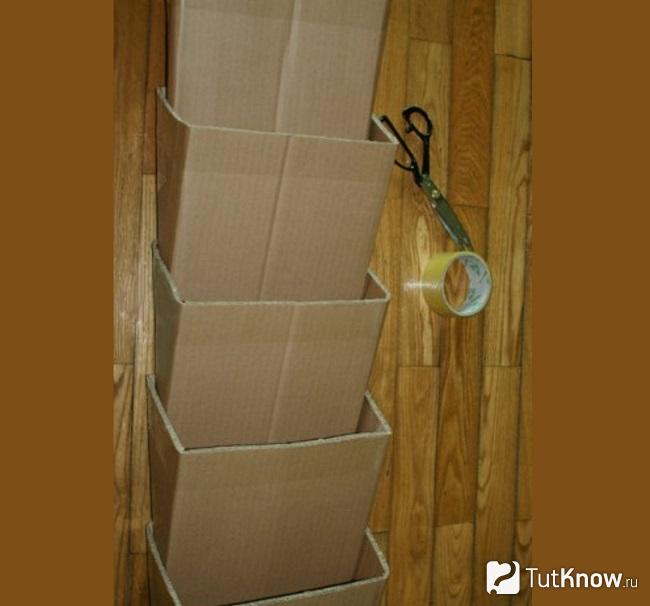
Furniture for a doll house of cardboard
You can try your hand in the manufacture of furniture for dolls using cardboard. The material is inexpensive, affordable, it will be possible to try and mistake, redo. Cardboard usually connect with the help of PVA glue, you can use a glue gun or any universal glue that can glue cardboard, fabric, wood. Just making furniture for dolls with your hands from cardboard, you will also use these materials. If we talk about convenience, it is preferable to the adhesive gun - glitter quickly, it is convenient to work comfortably, the connection is reliable.

To make furniture for dolls, you can use the usual packing cardboard. He is cheap, but the furniture from it turns out very tender. It is unlikely that the child is enough for a long time. But, as "first experience", this a good option. More reliable obtained products from cardboard for scrapbooking. It is a tight, uniform, has a different thickness (from 2 mm and more), may be with a textured surface, extruded by one-photon patterns, a pattern with one or both of both sides. The lack of such cardboard is to buy it, and some types of such cardboard are not too cheap.
Cardboard Bed for Dolls
This bed for dolls from cardboard is designed for a large doll - up to 50 cm of height. If necessary, all specified dimensions can be reduced.

This option can be made literally for 10-20 minutes. It does not need glue or other clamps. Details are kept due to grooves cut in cardboard. The width of the groove is equal to the thickness of the cardboard, the length of the slots and the size of the blanks are listed on the diagram.

Green and yellow dots indicate the combined cuts. They are inserted alone in another, on what the assembly ends. If you like this model, it can be done from plywood.
Schemes for the manufacture of cardboard doll furniture
Basically, furniture for dolls from cardboard is glued. To make something openwork from this material or very complicated is unlikely to succeed, but the manufacture of simple models does not take much time. Having a diagram with dimensions, you can even do without explanation. Everything is so clear.
Such models can be done on the eye. Without a "upholstery" they look unsightly, but after quite a decent bedside table with doors and open shelf - scheme one, different execution
Furniture schemes for dolls can be used not only for making cardboard. They can be transferred to the paneur and cut with a jigsaw.
Cabinet for dolls from girlfriend
The toy cabinet can be made of plywood, paint or envelop wrapping paper or self-adhesive film. There, probably, the questions will not arise - everything is clear, and if there are questions, you can look at their solution in the "natural" closet. But you can make it from all inexpensive materials. Furniture for dolls with your own hands and good that the cost of it is very small.
From a cardboard box
The main task is to find a box of dense cardboard suitable size. Moreover, it will be easier to work if it is packaging - with rejuvenable edges. Such a bending part is the finished door. It will only be necessary to finish it - hang the mirror, attach the handle, etc.

One of the options for homemade furniture la dolls - wardrobe
What is needed for work
It will take good tape for work, better - on a paper basis, as it is then easier to glue the finish. If there is a glue gun or construction (a large stationery fit) stapler with brackets is also not bad. If, in addition to cardboard and paper, you will also use other materials, the glue is better to find the universal, which glue paper, cardboard, fabric, plastic. We still need scissors and a stationery knife, a ruler.

If the box found is too big, it can be reduced, cutting off unnecessary. So that the bends were smooth, take a ruler. We apply to the place of the future fold, several times we go along the lineup of a stupid solid object (with a snap or fork). After that, the cardboard bend will be easy.
Filling for a toy cabinet
From trimming or from another box, cut the shelves. They should be a little - by 5-8 mm - longer and wider inner cabinet space. Surplus bend so that sides are formed from all sides. In the corners, folds are formed, they are gently cut off. One of the parts bending 180 ° and glue to the shelf itself. This side of the shelf will "look into the world." Three other parts bend at an angle of 90 °, we wash the glue and the shelves insert into the closet. In the photo on the right you can see how the shelves are glued. But that the places of attachments do not get into the eyes, the sides are better to wrap down.

Make furniture for dolls with your own hands - it's no less pleasure than playing with her
In addition to the shelves, you can still make a crossbar for hangers. It can be made from bamboo speakers, for example, you can try to use a tube for juices, a wire, etc. Hangers can also be twisted from color wire or cut from bags from juice, from plastic bottles etc.
Finish - creative process
Next, it's a finish. You can paint the cardboard with watercolor or acrylic (better) paints, shove the wrapping paper, cloth, felt. You can simulate a mirror surface - to attach foil (food, for example). If you want to make a "plastic" surface, look for bottles from under the water of the desired color, cut off the neck and bottom, and the "body" use as a finishing material.

Finishing - the process is creative, but, first, use the materials simpler, softer, feel easier to work with them
Handles can be made of wire, from beads, long beads. For toy larger cabinets, you can find buttons or buttons. All this "beauty" adhesive after "washing" the cabinet.
Warding Doll Cabinet Newspapers
We need old newspapers, PVA glue with a tassel, a glue gun, a couple of wires or threads, wrapping paper for trim and paint.
From the newspapers twist the dense tubes, we wash them along the edge of the PVA and leave up to dry. Then the tubes can be glued together. For this operation better suitable Adhesive pistol. There are two ways: first collect large blocks, then chop them into fragments of the desired length or immediately cut the tubes of the desired length and glue immediately blanks in size. The second path is more painting, but the waste is less.

The finished walls of the cabinet should be copped with each other. To rigidly fix the angle of 90 ° better to use a thin wire. First, wash the joints with glue, then put the walls one to another. If the wires interfere, they can be removed after drying the glue.

For the same technology, the bottom, the top, shelves are glued. Doors will need to do a little differently. So that they open up, two strips of about 1.5 cm wide from the scotch. On the edge of the door, the tape is sampled so that a little more than half hung in the air. With this free tape, we glue the door to the wall, but so that between the wall and the door there was a clearance of 2-3 mm (just tape). This will give the opportunity to close the doors. The glued door is fixed on the other side of the second scotch band.

The second way to fasten the doors - on wire. Only this time it should be tough and thick enough. Cut a piece that is 2 cm longer than the height of the cabinet. Immediately on the wire on the one hand, we make a loop using 1 cm. The loop is bending at an angle of 90 ° to the wire. Make a hole in the bottom and roof, we skip the wire through the bottom, the loop remains downstairs. We wear the door on the wire using the extreme tube instead of hinges. Slightly flexing the wire, we produce it into the hole in the roof of the cabinet, bending the surplus, fixing the door. We repeat the same operation with another door. Please note the door to the tape is needed to finish the cabinet, and on the wire - it is possible after.

There are some little things that need to say a few words. The legs and handles for the cabinet can also be made of paper tubes. Just twisted them from the paper that you finish the toy. Cutting it into a dense roller, the edge is glued with glue, then cut on the segments of the desired length and stick to the right places. Instead of the tubes there may be wooden sticks, beads, etc.
Puppet Bookcase or Lines Shelf
You can make furniture for dolls with your own hands from school wooden lines. They are good for those already processed, have the same width and thickness. In the stationery store you can find the desired size - more / less, wider / already - at will. For example, for the manufacture of a puppet bookcase, you need 6 lines of 15 cm long.

Still, you will need a jigsaw. If there is an electric - excellent, if not, is suitable and manual, as it is not too much work. We also need emery paper with small grain, glue (PVA or carpentry) and paint (acrylic or gouache).
From the line, cut segments: 4 pieces of 6 cm, one - 8 cm. The edges sand up to an even state, remove the markup and bar codes. Between the two line, we have the shelves (which are 6 cm), we leave the same distance from above the same distance - under the cover (segment of 8 cm). The joints are missing the PVA liner or carpentry, we connect and tighten with a painting tape, we leave for a day. When the glue is dry, we glue the latest item - the lid on top. Actually, the shelf itself is ready, it remains to paint it.

To obtain a smooth and bright color, the design is better covered with white, after drying it is already painted with the desired tint. Also made with your own hands, doll furniture can be decorated in.
Furniture for dolls: photo ideas
You can make furniture for dolls with your own hands from the most unexpected materials. How to use newspapers and wooden rules you have already seen. But you can make tables, chairs, chairs, sofas, beds, shelves, cabinets, etc. From sticks for ice cream.
Garden bench or sofa - depending on the finish
What is good for this material, you probably have already understood - it has rounded treated edges, the same in size and well-processed. If the sticks seem too rough, milk them to smoothness with the help of sandpaper with small grain.
From the clothespins, quite good chairs and chairs are obtained. They are disassembled on halves and are connected using joinery glue. Figure products are obtained by almost several dozen minutes.
Armchair, table - also you can make clothespins
Almost always for the manufacture of doll furniture use wooden clothespins. But no one forbids to take plastic. It is also difficult to work with them just the difficulty in the fact that the wooden is easier to refine, changing the thickness of the form, etc. If the product is simple, refinement does not require, you can also take plastic. They are more diverse in shape and sizes, already painted, so there is less than one with them.
With an increase in skill, you can go to a more complex material - a fane or wood. The complexity is that the outtage and cutting of miniature parts requires filigree accuracy, perfection and takes away the mass of time. But you can do everything you wish.


Corner writing desk for doll ....


Plywood Wardrobe Cabinet - Play Accuracy Very High


It seems that this material is unreliable, but it is not. Applying certain technologies, you make cardboard furniture that can withstand considerable loads. This is perfect for the children's room, it is environmentally friendly and will not feel sorry if the child scratches, draws an inexpensive subject in a low-cost.
How to make cardboard shelves?
Before you begin such global furniture objects, like a wardrobe, dressing table, chest of drawers, practice simplest products.
To make such a shelf you will need:
- corrugated cardboard;
- construction knife;
- pVA glue;
- newspaper or other paper;
- universal glue;
- acrylic paint;
- acrylic lacquer.

The dimensions of this shelves are: in height it is 80 cm, in a width of 77 cm, its thickness is 20 cm.
For the product to be strong, take the cardboard, between the layers of which are two layers of corrugations.
Cut this material on the strips of 20 cm wide. For each shelter, you will need two identical rectangles. Cardboard cut the narrow strips. Flexing them, stick to the inside of each pair detail.

Spread the blanks with each other. As you can see, collect the shelf of cardboard is needed as follows: Mark where the following parts can be located at an angle of 90 degrees to this. On these two billets you need to make cuts on half of the width, then put one to another, thus connecting them.
Now the ends of the shelves and them themselves should be saved with newspapers or paper. To do this, use PVA glue, slightly diluted with water. When it dries, cover the shelf of paint into one or two layers. When and it will dry, you need to apply lacquer layers with intermediate drying of each. So that furniture from cardboard was more durable, do not spare it. In this case, 5 layers of varnish were used.
Similar shelves can be signed on the wall with the help of corner brackets. If you have a set of corrugated cardboard boxes, then connect them with plastic clamps or double-sided tape, it turns out an excellent shelf or rack.

This product is easy to decorate self-adhesive paper, wallpapering or painting.
From this material, the wonderful shelves are obtained for shoes, and some of them can be hung directly on the wall using double-sided tape.

You can make as many sections as fit on your wall so that you can easily get the top pair. See how the section is folded.

Everyone needs to be fixed with scotch. Then put the box one to another, secure the side with the help of a furniture stapler.
But how else do the shelf under shoes or on the wall.

To carry out such work, you will need:
- cardboard;
- scissors;
- glue pistol;
- newspapers;
- pVC glue;
- acrylic paint;
- acrylic varnish;
- tassels.

You can collect such blanks using special plastic mounts, Scotch, as well as cutting each half in thickness, insert each other.

Using PVA glue, attach to the ends of the shelf of the newspaper.

It remains to decorated furniture from cardboard. It is nice to paint it in your own hands to the desired color, then covering varnish or salaby self-adhesive wallpaper.

Creative cardboard furniture ideas
The beauty of such a material is that even without having a house of plumbing tools, skills, you can create things of the original form, for example, such a rack.

To do this, you will need:
- big box, for example, from the refrigerator;
- glue pistol;
- scissors;
- paper;
- pVA glue;
- paint or decorative film.

Using contours, you need to recreate the middle and front part of the shelf, attach these parts to the rear with the help of rubber from the cardboard.

Now it should be saved by strips of cardboard sidewalls, all shelves, then attach the paper here.

At the bottom will be located 2 drawer, They cut out on the form of these holes from the cardboard. Then you need to sharpen your work when the solution is driving, walk along the surface of shallow sandpaper. Now the surface being processed is ready for decorating. Paint it either fall or perform decoupage shelves.

See another master class. In it from cardboard create an original shelf in the form of a snail. The children will certainly become a new object of furniture, they will add their toys here, and in a nominating shelf? Written accessories.

That's what you need:
- corrugated cardboard;
- glue pistol;
- scotch;
- scissors;
- wire;
- two big beads;
- pencil.

There will be another central, repeating their contours between these details. We strengthen all 3 details with transverse jumpers using a tape and adhesive gun.

Take ends of cardboard strips. Determine the size of the future drawer. Create it from the Cardboard Rectangle, gluing that at the corners, attach the front panel.
To give a box of greater rigidity, you can stick it on a cardboard sheet a little more sized.

Problet corner elements, curvature bends. At the top of the snail attach 2 colored wires, and on their tips - large beads. Instead, you can use the lacing limiters by removing them from the old jacket or by buying a store.

It will remain to decorate such furniture made of cardboard chosen way.
This unique material can also be given other interesting forms, make the shelf with their own hands in the form of octopus or flower with a box in the center.

First, the rear and front wall are cut from the corrugated cardboard, as well as the central item. They are fasten with transverse strips from the same material.

The ends are closed with extruded paper, corners and connecting details are sickling with scotch. Please note that it needs to be cut on one side, if the bonded surfaces with bends.

To make a box, cut a big rectangle and a circle from cardboard. The first part need to be a little bend, fix on the second with a tape. The corners of the shelf are strengthened by the same material.

Check out the following creative ideas.

Such a stand for books or anything either will also be crammed from corrugated cardboard. To craft you will need:
- corrugated cardboard;
- pencil;
- scissors;
- brush;
- paint.
- detail of the body;
- two identical billets for the front and rear legs;
- one central detail;
- four rectangular shelves.

On round blanks from the edge, you need to draw wavy lines, then cut down this contour. Using the stationery knife, make in these circles in 2 cross-cut, and one passes through them vertically.
When wetting, the cardboard is deformed, so it is better to paint the product, but blanks. They are covered with dense acrylic on both sides. They give a little silent, put under the press so that the cardboard does not change the form.
Then you need to start assembling. On the sheep body, put the rear, front, side part. Then in the slits you need to push two shelves with one and two on the other hand. More This process is illuminated in the video at the end of the article, and the schemes will help create such a shelf.

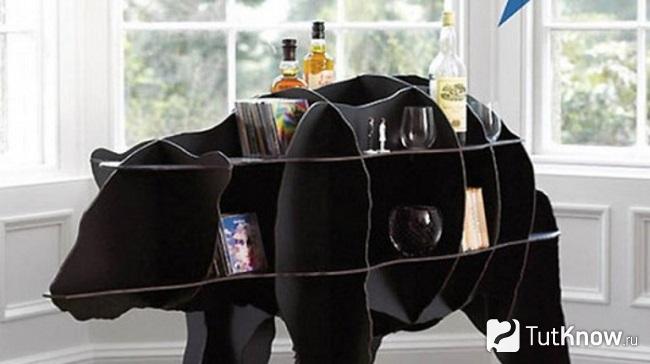
You can put a lamb on the MDF leaf, fading the legs, put on this stand. By the same technique, the original shelf is performed in the shape of a bear.
If the workpieces and this product are painted and covered with several layers of varnish, it will turn out to be durable. Here you can put a CD, bottles, books.
Dresser from cardboard with your own hands
Seeing this product for the first time, it is unlikely to guess, from what material it is made.

To make such a chest, take:
- 2 boxes from refrigerators;
- stationery knife;
- self-adhesive film - 2 meters;
- flislinic wallpaper - 1 meter;
- acrylic paint;
- furniture handles;
- sandpaper;
- glue universal;
- pVA glue.
First assemble the product box. To do this, strengthen each detail of the cardboard strips bent zigzagochny, the second one on the steam blank is glued on top. They must be left at least overnight under the press, to dry and not lost the form.

For the box you will need two horizontal or vertical parts, connect them into a rectangle, gluing from the sides. To make the back wall, just get a cardboard sheet here.
The chest will be with nominating boxes. First, at the sidewalls of this product, attach a cardboard strips 2 cm. Then glue the shelves on them, each collected from two parts.

In the size of the resulting holes, create drawers. Bled Details Connect, give them time to dry.

Start decorating. Put the walls of the workpieces with wallpaper, then the furniture object itself is a self-adhesive film.

It will be a wonderful chest of cardboard, in which you can store a small haberdashery, including threads and yarn.

For these small items for needlewomen, another similar product can be made, but smaller. You will put it on your desktop so that the threads, needles, needles are always at hand. The size of this product is 14 by 15 cm.
Take:
- tight of tight paper A3;
- self-adhesive film;
- ribbon;
- glue;
- lover;
- finishing elements.

As you can see, from one sheet you will have two drawers. Cut each billet on the red lines on the side, start the strips, as in the following photos.

Cropped edges are hiding inside, lined. Thus, you need to create 6 shelves. You will need compartments for each that are created according to the following scheme.

Slide on the red line, bend the leaves, which then need to be glued to the joint.

Now take 4 sheets of dense cardboard in size 14 by 15 cm. They will serve as delimiters for the created shelves. Make them between the chest of cardboard, gluiting.

In the resulting intervals, it will be necessary to plug the boxes and cale the walls of the adhesive tape. What dresser got the top and bottom, cut out two rectangles on a centimeter more than the boxes, stick to the place.

Previously, these details need to be decorated with self-adhesive film, in this case it was used like a tree. In the same way decorated and the boxes themselves.
Its side walls bend in one direction, they are made from a rectangular sheet of cardboard, the rear is made in the same way. In this dresser there are shelves for drawers. They are also made from corrugated cardboard and are connected using a glue gun.

For a greater fortress, the drawers for the chest are made of paired parts, on all sides they are punctured with a thin cardboard or paper. Then the product decorate the self-adhesive film.

How to make a table from cardboard with your own hands?
As you understand, it is also easy to make it easily from this material.

It can be a coffee table, coffee, coffee. To make it, you will need almost all the same materials listed above, this is:
- corrugated cardboard;
- stationery knife;
- acrylic paint;
- acrylic varnish;
- adhesive tape;
- hot pistol;
- pVA glue;
- cardboard tubes from rolled material.
For the legs, you will need cardboard tubes. You can ask for this cast material in a shopping store. It is wound on the oilcloth, the film.
When everything you need at hand, start to create. To make a worktop, cut down two identical rectangles from cardboard, strengthen them with trimming of the same material. Cardboard ribbons need to be folded by harmonica, fix the edge to one of the surfaces. What are them more than the finished products will be stronger.

Place the second table detail on top, and stick it. On the side glue cardboard strips and self-adhesive paper.

Collect the worktop at your discretion. In this case, a red and yellow paint was used.

Note the hole for the legs, go here the stationery knife. Insert them, secure with a hot gun.

This is such an original table, which, despite the fact that it is made of pressed paper, it turned out quite strong.
If you also wanted to make furniture from cardboard, certainly try to make it easily. It will help you in this promised plot, because such a shelf it is very easy to make, the result is just wonderful.
If you want to see what else can be furniture from cardboard, including beds stools, chairs, then read the presented by the photofit.
To create a creative apartment, as well as add it an individuality, you can make furniture from cardboard with your own hands, patterns and schemes are so simple that it can even make it possible to make items. A variety of options will allow you to choose the desired piece of furniture and make it, involving in the process of all family members.
At first glance, you might think that cardboard is a fragile material that requires special circulation. On the one hand, it is right, on the other - by choosing the desired type of cardboard, you can not worry about its further operation. Furniture from cardboard will be different in durability and practicality, if you follow the sequence of work and recommendations on the use of tools.
To select an option for self-making furniture products, you need to consider several offers:
- Toy furniture from cardboard - beneficial and creatively produced independently furniture for dolls. If children require the purchase of a new Barbie house with all accompanying accessories, the production will be the production of such an option with your own hands;
- Shelves for books - are considered one of the simplest products from the cardboard. For their manufacture, it will not be necessary a lot of time, and the books do not have a large load on the cardboard;
- The original table is not a dining table, on which the dishes are constantly located, and a small magazine or coffee table. On such an end to the furniture, the child can perform developing tasks, because it is designed for a small load;
- Dresser - In such a furniture, it is convenient to fold documents or paper, and children's accessories will also fit here. Chest easier to make from cardboard boxes from major equipment, such as refrigerator;
- The shelving for shoes is the original stand for shoes in the form of triangular cells appropriately fit into any entrance hall. Entering the room, all guests will be surprised how convenient and practical got a rack;
- A small chair for children - as cardboard is not intended for large loads, furniture for children is what you need. A small chair for the kid will be his favorite subject, there he can draw or play.
As can be seen, cardboard furniture is easy to perform. For its manufacture, you need the easiest material and a minimum of tools.


Rack for shoes


Toy
Necessary materials and tools
No matter what type of furniture will be selected for self-made, the list of materials will be unchanged. This necessarily includes the main raw material - cardboard.
So that the products are durable, it is necessary to give preference to the three-layer cardboard. The quality of the material can be checked on the cut.
If a single-layer analog was bought in advance - you should not be upset. This option is well obtained. puppet Domika And furniture for dolls. If it is used for work on real furniture - you need to glue several layers of cardboard to give greater strength.
List of materials and tools for work:
- Scotch - it is better to purchase paper, ordinary and bilateral;
- Stationery or acute building knife;
- Scissors;
- Roulette and long line;
- Pencil and stationery;
- Sandpaper - for stripping sections;
- Kraft paper;
- Glue - depending on the type of cardboard, you may need PVA, thermoklay or moment.
If all listed materials and fixtures are prepared - it is necessary to move to the manufacture of selected furniture. Experienced custom cardboard wizards recommend novice to choose simple work, such as shelves or a table.

To make the furniture made by their own hands at home, it turned out not only beautiful, but strong, a number of rules should be observed. They will help make it easiest quality products that will enjoy all households:
- The layer of the layers - when working with a single-layer cardboard or to strengthen the furniture, it is necessary to glue the material. Bonding cardboard with each other, try to lay the layers perpendicular to each other - this is how they give increased rigidity;
- The selection of glue is people who have already made furniture from this material, advise the use of glue moment. It does not wet after applying and instantly fastens the details of the products. You can also purchase a glue gun and thermopal, which are melted when heated, creating an adhesive trail;
- Why do you need kraft paper - kraft paper are used to wake ribs and jokes of furniture. With this stroke, furniture looks careful. Before makeing pasting, the joints are cleaned with sandpaper. It must be remembered that the paper can not cut - it needs to be sworn. So layers will become smooth, without transitions;
- Features of cutting - During the manufacture of furniture from cardboard, special attention is paid to cutting material. Usually the stationery knife is used - it is important that it is always sharp, because the accuracy of parts depends on it. If the thick cardboard is not cutting, you can use a jigsaw.
Applying the electrolovka, the work goes much faster. It is important to carefully cover the details and prevent errors, because the tool is too powerful for cardboard.

Cut the cardboard with a knife

Select the desired cardboard type

Use craft paper

Carefully choose the glue
Step-by-step instruction
So that the manufacture has passed quickly and not accompanied by problems, exists step-by-step instructionThe master class of furniture from cardboard consists of a phased description of each action. It begins with the creation of the drawing, then there is a formation of details, their strengthening. The finish stage is the assembly of furniture. Each of the stages must be considered separately.
Creating a drawing
The first thing you need to do is to perform a furniture drawing. To begin with, it is drawn on the usual sheet of A4 format to see the reduced version. In such a sketch, it is important to register all sizes and observe scaling. If there is a skill of work in special programs, allowing to develop products of products - we are worth using them.
The first drawing should have an image of a product in a total volumetric form. Next, it is necessary to draw a projection of furniture with a view from above, on the side, from behind separately. The next step will be an image of the product details: each item must be drawn separately.
When the drawing is ready - it must be transferred to the sheets of cardboard:
- With the help of a roulette and a long line on the surface of the raw materials, they paint with a pencil, measuring the necessary dimensions;
- It may take a carbon to work so that the corners of future furniture are smooth in the figure;
- When dealing with a thin cardboard, try not to leave scratches with a pencil, and in the manufacture of furniture from corrugated cardboard - line draw clear and deep;
- Coloring parts is necessary in compliance with all indents and possible reserves of distance.
You can use the finished patterns or come up with your product that answers specific dimensions and preferences.


Formation of details
It is worth noting that when cutting parts should not be visible bends. If the work is made on the box from household appliances - Better to cut on smooth faces. From the six-layer cardboard, you can make furniture with your own hands with high strength, for example, a shelf for shoes or books.
Product details are formed using an acute stationery knife. Masters advise to use a building knife if working with multi-layer raw materials is supposed. As the knife is blown off, the blade changes. Dumb knife will not be able to cut off the necessary part along the contour - you have to redo the pattern.
Depending on the type of furniture assembly, details can be:
- Inserts;
- Glued;
- Extensive.
The last option involves gradual cardboard extensions to achieve optimal thickness. Such a move will additionally strengthen the model, without giving it to suitable under loads. It is advantageous to use cardboard sleeves in the design - special tubes having high density. They are suitable for the production of legs to furniture, as well as for assembling structures in the original style. For example, a chair from cardboard pipes looks creative and can withstand human weight.

Insert

Glued

Extension
Strengthening designs
Each item after cutting with a knife should be processed. This happens in the following way:
- Stripping. Sliced \u200b\u200bedges of the module must necessarily be sanded. This technique will give them smoothness and will prepare for further processing;
- Casting. For this, kraft paper is used. It must be broken with his hands, after which, with the help of glue, PVA gently caught the edges. You can apply paper on the entire surface, which creates additional hardening.
Durable and reliable will be furnished, assembled with grooves. In the photo below, you can see the principle of manufacturing such furniture: in the process of the pattern, the oblong holes are additionally outlined, which are subsequently cut out. The supplies are inserted into the grooves, which fastens the frame on both sides. Thanks to this, the furniture becomes stronger.
Often use rigidity ribs that additionally fix the foundation for furniture. With the help of them, you can independently strengthen the countertop from the cardboard, the shelf for shoes, a shelf for books. The ribs of stiffness and grooves are necessarily wedged with glue. Strengthening the design, in the future you do not have to worry about the durability of furniture.

Treat the surface of the sandpaper

Puck the surface of kraft paper
Assembly process
All prepared details glue with an adhesive gun or glue moment. If the assembly is carried out using the grooves - they are also sampled for strength. All irregularities on the surface of thick cardboard are recommended to be embedded with a putty - it will not leave the traces, but it will nestly hide under the trim.
Details requiring gluing layers must be put under the press. For this, books or other heavy items will fit well. After gluing them, they are left for several hours, and better for a whole day, until complete drying. All the resulting edges must be masked using craft paper. Carefully get the resulting corners to give them roundedness. Next, it's small - decoration. Several options allocate:
- Decoupage - wipes sacking;
- Acrylic staining;
- Wallpapers;
- The use of self-adhesive film;
- Decoration with mixtures.
Finished furniture can be used for its intended day after the day after production. Everyone can make furniture from cardboard with their own hands, how to find patterns and schemes will be discussed below.

Apply glue to the coating

Click elements

Pottle cracks
Furniture from cardboard – new Trend. In the movement of recycling, that is, in turning unnecessary to the right one. The craftsmen from all over the world make full-fledged furniture from ordinary cardboard boxes, and today we will see which one.
I am sure that you have repeatedly concerned the question of how you can use cardboard boxes, especially from under the technique of type refrigerators and televisions. They are such new, beautiful, durable. Sorry to throw out! A little bit, very little work - and you will have excellent furniture from cardboard.

Furniture from cardboard looks completely like ordinary furniture - for example, in the photo on the right you see the rack from ordinary cardboard boxes, inserted one into the other, placed on the ends with paper tape and painted waterproof paint in white color. This rack costs the hosts in the price of a liter canister of paint, and looks very worthy. As you can see, if you clean the cardboard well, the furniture becomes quite water-repellent and many vases with flowers can be placed.

Note the photo above and the photo on the left is that this furniture from cardboard is easy to disassemble - the boxes are not glued, but are connected by plastic clamps, such as those who use in street cafes so that the wind does not carry a tablecloth from the tables.
You probably have doubts that the furniture from cardboard is quite durable. I also had them. But I was convinced that if you take two boxes from under the technique (one slightly less than another) of a dense corrugated cardboard and insert one box to another, then the resulting "double" box turns out to be quite rigid design.

Furniture from cardboard is not intended for large loads, but drawing up books or accessories into it, as in the photo on the right, it is quite possible. As you can see in the photo, the cardboard does not bend under the weight of books, and the furniture from cardboard looks like a full-fledged purchase rack.
Of course, making furniture from cardboard must be carefully - carefully cut "closures" from the boxes, insert one box to another, if necessary, if a smaller box is too small, and a blank space remains between its walls and walls of a large box, pave this space by other sheets of cardboard . Crop the boxes so that their cut (shelves' ends) were smooth. Skin this cut paper scotchpie (you can first point it to be a smooth surface). To raise the place where the scotch and cardboard is closed. And carefully paint.
However, you can not paint furniture from cardboard, but to leave the remnants of the wallpaper:


Furniture from cardboard can be wrapped inside with a beautiful cloth, as in the photo on the left, and then to this fabric on the pins, trailers all sorts of accessories - photos, notes, reminders, etc. In the photo on the left, however, not furniture from cardboard, and furniture made from under wine, but the essence of the same.
To hide the furniture from cardboard with cloth, use the usual stationery buttons, well pressing them fabric.

Collecting together a lot of cardboard boxes and paint them in different colors, you will get excellent furniture for the nursery. Such cardboard furniture can help you very much for the period between moving and final repairs.
In such an improvised rack, many children's things will enter, and it will cost you about 500 rubles (Bank of white paint and several calves).
But it is especially important in the furniture from the cardboard that the kid itself can participate in its manufacture, and it will be very good.

If you are going to make furniture from cardboard not for saving considerations, but from creative - use different paints, fabrics, remnants of wallpaper, pieces of self-adhesive film, etc. Petray combination can be very beautiful, if you carefully pick up colors!
Furniture from cardboard, as I mentioned above, - perfect solution For nursery. Firstly, it is very cheap, so you can relax on the subject of damage. Secondly, it can be made anything, and this stimulates your and child fantasy.


___________

It is difficult to believe, but the table in the photo on the left is also from the cardboard. Again inserted one into another cardboard boxes. They are glued together and are saved by self-adhesive film under the tree. What acts as a countertop, I did not quite understand - perhaps the chipboard board, and maybe there are also several layers of cardboard.

Furniture from cardboard has become so popular in the West, which agency appeared in Australia, which manufactures it on an industrial scale. In the photo on the right - a table of cardboard, fully made of secondary raw materials, that is, no one needs cardboard boxes. All cardboard furniture is very durable and can be used as ordinary furniture.
In order to be better seen that furniture from cardboard, the manufacturer does not paint it.


______________________

Well, in order not to get up twice, I will tell you in this article about the furniture from the boxes, which are used by trading networks for transportation and storage of products.
In the West, everyone just go crazy for such furniture, and on sites, where it is told how to make furniture from cardboard or from boxes, even write: "If you are lucky enough to find drawers from fruit or wine ..." Why was lucky - because retailers As a rule, relate to their property very tremble and try to squeeze out of the packaging maximum possible, the boxes are used to complete wear, so finding boxes in good condition is not easy.
But sometimes they can be obtained as a gift when buying wine in large volumes.
And then the Europeans expected to work to work in complete delight of Masters or the same racks as cardboard furniture in the photo above, or other interesting things.


Special chic is considered not to paint the boxes, but leave them in pristine form - with all scratches, the stamps of the former owner and stains. Boxes are only sandwiched to avoid the dominance, and their appearance remains the same.


It comes to the fact that famous designers, creating an environmental interiors, make custom furniture, imitating furniture from drawers, as in the photo above.

It is very fashionable to fasten to the drawer wheels and get a cot for a doll, as in the photo on the right, mobile nightstand or drawer for flowers, as in the photo below.
It is clear that applications from such a box on wheels can be a lot - for example, in this way we can make a serving table if you put boxes on the side.


Furniture from boxes can be almost any - here, for example, someone made for their living room and a coffee table, and a rack from the same boxes, painting their white paint.
My taste is rude, but it is obvious that the owner and sought this effect. In general, this is such an uneven, coarse color or the complete absence of such as in the photo above, is now in great fashion.

It is funny, but you can make furniture even from plastic boxes that are used to transport bottles as in the photo on the right. Adjust the legs from below, and from above - a pillow, and here you have a beautiful funny empty. Of course, he is not suitable for any interior.

You probably noticed in all photos in this article that the furniture from cardboard and from the boxes is not universal - it is suitable only to the interiors with a high proportion of humor, built on the nobility of the owners to all expensive and glamorous and on their love for everything ridiculous, homemade.
For example, this post bed one Spaniard made from two plywood boxes, screwing on top of the old shelf to them and painting independently acrylic paint. Nothing special, but pleasure is the process of manufacture. Plus, she does not stand anything, but the eye is still pleased.

Excellent wall shelves can be made of plywood or wooden boxes. It is very simple - saw the box, sand it and cover with varnish or paint according to your taste. Pastoral, cute, funny.
________________

See which boxes for dishes can be made of fruit plywood boxes:


I hope this article was useful to you - if so, click the "+1" button, "I like" or your icon social network. Thank you!
A rather stylish table, made under the tree and the skin, and not just a table, and the table folding.
Author's Words: Pretty stylish table, made under wood and skin, and not just a table, and the table folding. 1. So, the first photo. Cut out the basic form for our .. Um, probably it is worth named with legs. In general, cut out the shape for the legs of the table. One thick layer is visible in the photo, but it is not a gluing and not fat cardboard, as it may seem at first glance. The author, apparently, cut out all 6 supports (3 for one side and 3 for another) at a time. It is very reasonable, since with a similar approach, Tol will be more symmetrical and, hopefully, will not be fused. 
2. Now we collect every support. We start from the middle, with the middle plank. Doing grooves, it is best to make them simultaneously on the middle bar for the second support. It must be what:

3. Now fill the grooves with the response parts. The width of all inserts should be equal, and the height correspond to the height of each particular element to which they are attached (well, that, I think, is quite understandable and in the photo).
I want to say that the exact dimensions of the table are unknown, I do not think that he is big, most likely it is something like a coffee table, but the same design can be extrapolated to a more serious subject, for example, make a table for the living room. Why not? So you will have to set the width and height of all parts yourself according to the shared scale.
To strengthen the compounds, use quick-drying glue - a moment or, which is even better, we use a glue gun for this. 
4. To the main central part of each support on the sides using the same adhesive guns, we glue the side parts of the cardboard sheets. As you can see, the table detail is already quite stable)). Here on this photo is not yet visible (it will be noticeable in the following) that the author when gluing into one whole side support strengthened the joints additionally sinking the edges of the lattice with pieces of cardboard, so it turned out that composite elements The side supports would seem to consist of a double cardboard sheet. 
We remember that two pieces should be two.
5. Only on the last photo we have left no closed outdoor sides. In the next photo, they are already neatly closed with cardboard plates. The author lowered this procedure in his photo, but there is nothing particularly difficult here. Cut out the width of the lateral support a rectangle from cardboard, slightly bending it, winding, for example, on a stick to give it a curved shape, and with the help of adhesive guns, attach to the side parts of the supports. You can try to stick all this with one layer, bent it accordingly. But the author, and it is really more convenient, cut a rectangle into two parts and stuck their joint-B-joint separately. On this photo, two supports are already with the sidewings and here the bottom of the table is glued: the bottom parts of the supports are glued to the layer of thick cardboard (you can pre-glue two sheets of cardboard).


6. Now on the basis of the glued bottom, we make this extent:

Inserts in the grooves in the central part are not yet needed, just cut out them, try on and put it aside. And the cutting on the right and to the left of the central part cover again, the layers of cardboard are glued with a glued pistol
1.

2.

7. On the next photo is not visible, however, a permissive (rigidity ribs) should be held on top of the first layer of cardboard. They need to be very scrupulously customized so that they were in almost one level with the top edge of the oval cutout in the side supports so that the cardboard layer lay closely lying tightly on the rigidity themselves and it would be glued to this very upper edge of the oval cut. In general, see photo: 
Yes, and do not forget about the grooves in the central part. Now they can be fill.
At the same time, we finished and the inner sidewalls of the table supports. As you can see - I will reduce and inside, we have everything is placed with cardboard.
1.

2.
 8. Now pull-out drawers. How to do them, I think it is quite clearly visible in the photo. It's all about the accuracy of measurements. The only reminder is the front "wall-wall" make out of two layers of cardboard (although it would be possible to strengthen the whole box in a similar way ..)
1.

2.

3.

4.

5.

But such partitions not only organize the space inside the drawer, but also strengthen it. 
9. The next stage. Now we return to the top again. On the surface of the cardboard sheets on both sides from the central part, we again glue the ribs of stiffness, extincting that they turn out to be flushed with the overall surface of the side supports. At the same time, we close the lateral "insides" of the table sheets of cardboard. 
10. Now that we have a tabletop. Remember the same thing that we have a folding table.
The tabletop consists of a lower thick sheet of cardboard (two sheets can be glued together), the perimeter of which is equal to the perimeter of the table of the table. The upper cover sheet of cardboard is the same. Two sidewalls are sticking with tightly narrow strips of cardboard. In the end, the table looks like this:

But the internal structure is this: 
These elements come from the sidewalls of the table and add up, forming a small surveillance:
1.

2.

11. Decoration. Here is an honest word, I really did not understand what the author did specifically. If anyone thinks - write.
I tend to the fact that the alignment went to ordinary paper-kraft, then the paint was painted from above in several layers, polished to get rid of the joints (yes, all the joints on cardboard should be placed with paper scotch). External boxes of boxes and countertop are decorated with material "under the skin". Such can be reached in needlework stores for binding of books) and in construction and wallpapers there must be something similar. From above, probably dark varnish. 
Taken from here
Chair from cardboard
I do not know if this idea is useful to someone from readers. I'm not at all sure that someone wants to apply it in practice, and yet. She may well push readers to other interesting solutions. In any case, I like what happened. We will assume that I want to boast)

It happened that upholstered furniture from the group kindergartenIn which my Polina walks, they gave another, a new group. Our children just nothing to sit on. My girlfriend Tanya, who is worried about the whole soul for our kindergarten and trying to help me in every way, told me, "Lena, I read on the Internet how to make a chair from cardboard. And I did it. Come on him a case? " Well, the case is so case.

It was clear that this is such a temporary measure - let at least one chairs will be in the group until something decides with upholstered furniture. Tanin Chair seemed unstable. He, how to say it ... "played" as a harmonica. It seemed to me that for more than a week he would not like. Somehow it was a pity to spend a big piece of fabric on him. But Tanya spent on cutting and bonding 2 days! I decided to make a chair early and then squeeze it.
I did not photograph in detail the whole process of work (there is never time for it)), but here are the main stages. I wanted to make a chair. Sustainable and strong. It seemed that several kids would jump on it (and I was right))). So, first was made by such a "sandwich" in the form of a semicircle: Chipboard - between them Bruksi - chipboard. It turned out the base with a thickness of about 10 cm. This is to ensure that the walls can be fixed. For the same purpose vertical racks. Front wall - plywood; The back is organic (it is so good in the one))). Bend the backrest first drawn on the eye on the remnants of the wallpaper, the back of the back is slightly higher. The base is 4 legs of old polynic wooden cubes.

Polina loved the chair already at this stage)) Here you can see that I started sticking the cardboard, filling the inner space of the chair. This is the same corrugated cardboard from the boxes from which the tannin chair was made. Not all layers are solid, most are just glued pieces, between them somewhere and gaps, it does not play roles. First glued on the pva. But soon refused him, because The cardboard swells from him as a wet waffle and deformed, so I had to put a cargo on top, wait until he dried ... long and uncomfortable, so after several layers I went to joiner glue. Great thing in all respects.

In the photo it is clear how the walls turned out. In the course of work and at the end I lined them with a knife. Everything is so easy to cut)) Further foam + glue moment gel.


And case. (It was the most pleasant part)) ready.

from MarriTty
The chair turned out soooo heavy. But I think it is a plus - at least not turnover)) Well, of course fabric .... These are just some remnants that were found at home. Sitter on the armrests, although the fliseline was punctured, could not count on a long life. But we wanted temporary furniture, which is not a pity will throw away.
For more than six months, the kids broke the cloth on the armrests. I think to fix the upholstery, because Everyone was attached to the chair, and in itself it is just unnecessary. But the remake of the upholstery is a completely different story.
I also offer several photo ideas from the Internet