Simple bench from boards. Benches (shops) from wood with their own hands
Organization of a country recreation area with their own hands - an interesting occupation. An integral element of the arbor, a quiet area of \u200b\u200bthe courtyard surrounded by a living greens, or cozy space On the porch at home - a bench with a back. Such garden furniture will allow you to relax and spend time for a pleasant conversation, a cup of tea or with your favorite book.
Features of manufacturing beamed
The construction of benches takes time, practical and creative approach. Before proceeding with work, a drawing should be prepared, which will help to quickly achieve the desired result.
Depending on the type of material bench, the manufacturing tools are needed. The main requirement for the safety and convenience of work is the serviceability of devices and the ability to contact them.

Assembling a garden shop according to the drawing is not determined by the strict principles of execution. But, as well as from any landscape element, first of all, durability, convenience and stability are required.
If the load bench's load is not distributed evenly, it will be impossible to operate.
For making shops use different materials. The choice is primarily associated with the availability of raw materials and ease of processing. If the tree in free access is on each dacha, then concrete and metal will have to be purchased. To perform some processes, experience is necessary to process the material itself, which causes the difficulties of self-making.
Background bench design
Such a garden shop consists of several parts performing different functions:
- The legs are the elements of the support, allowing the product to be stable to the site. To keep the balance of the bench, even when no one sits on it, the legs on the side of the back are wider. The height is taken into account in accordance with a comfortable fit - 40-50 cm.
- The seat is a horizontal bench surface that is attached to the legs.
- The back is used for the convenient position of the sitting. This element is fixed to the upper parts of the rear legs or the edge of the seat.
- Armrests - details optional, but useful. Serve for convenient arrangement of hands sitting and give a bench more completed. You can make a connection in different ways: with a seat and back, with one of these parts or by eliminating armrests from the legs.

Wooden - the most simple

For work, use the usual carpentry tool - manual or electric. Assembly elements most often serve as boards, rails and bars. Standard configurations and sizes of building elements help create the right geometric shapes and securely bore parts. For such options, benches pre-draw a drawing of a future design:

Metal benches
Purely metallic garden shop - a rarity. Iron as a material for a bench has a number of shortcomings: a cold surface, rigidity, processing complexity and others. The only factor due to which the metal sometimes preferent with a tree is a longer service life. The disadvantages of the material can be easily bypass if you use soft linings on the seat and back.

Metal product
Elements of the usual iron bench and methods manufacturing design are the same as the wooden shop. Instead of boards and bars use metal and pipes. From the corners, a height beam or profile, legs and intermediate transverse supports for the seat and backs are performed. The pipes with a round cross section are also suitable. To form a plane to use a better profiled pipe: it is solid and creates a flat smooth surface.
Stone and combined shops
Garden benches made of granite, concrete, marble - heavy and complex stationary design, which is difficult to do on their own, using one material. Claw treatment may take several months.

Bench of stone and wood
High aesthetic value has stationary options where the racks (columns) from the stone are legs of a shop. Perform such work simple, more complex in the manufacture - the upper elements of the bench. In the country, instead of a stone, a concrete can be used, from which it is not difficult to create an interesting shape of the legs with cutouts under the seat.
Increase the area of \u200b\u200bthe laying bench with the back is optional - concrete is firmly connected to the ground.
The combined option, which also deserves attention, is a garden shop from metal and wood. Such a design has a number of advantages: the iron frame increases the service life, and the wooden elements of the back and the seats are easy to replace in case of breakdown. The highlight of the benches add wrought details and curly armrests.
Wooden, metal and concrete beenesses with the back require surface treatment immediately after manufacture. Antifungal and anti-corrosion products, primers, enamels, paints, varnishes protect materials from damage to insects, mold and exposure ambient. Conducting such events allows you to extend the service life of the garden shop.
If, sitting on a bench, you wish to relax and inspire, then to have it more logical from something beautiful: reservoir, flower garden or alpine slide.
Garden bench do it yourself - it's not a simple, but also a professional in a wood thread or in welding business should not be. Enough have small skills in working with a hammer, saw or welding apparatus, Materials and desire.
Soon you will have comfortable and beautiful benches For the garden, made by their own hands.
Having a desire I. necessary materials, to build shop shops will not work
Necessary materials and tools
Garden shop with a creative approach can be made from virtually anything. The most optimal and simple option is a wooden bench for which the materials will need boards and varnish with a primer, and from the tools - a jur capital with a jigsaw.
If you want to see a metal bench in my area, there will be a completely different set of tools: welding machine, metal pipes, a device for flexible pipes, grinding machine.
If there is nothing of the listed, and the desire to see the bench on the site is large, you can use any prickly materials. Bricks or automotive tires with a board in the middle, wooden boxes can also serve as a bench. Even out plastic bottles And cardboard can be built a cute bench.
Step-by-step instructions for the manufacture of bench do it yourself
Garden benches of wood with backs
Most often there are two types of wooden benches performed by their own hands: a bench ordinary and a bench with a back.
For convenience, before starting work, it is better to draw a drawing, choose the size of interest and buy suitable boards. If there is no such possibility, you need to use the electric jigsaw or saw, and independently prepare the elements of the shop.
About the types of perennial fast-growing shrubs for living inges, read.You will need:
- 5 boards 1.5 m in length and 15 cm wide, the thickness is better to choose 3-4 cm;
- 2 legs that will also be supported for the back - 900 by 150 mm and a thickness of 3-4 cm;
- 2 Front legs - 360 per 150 mm with similar rear legs thick;
- brussia 40x40 mm;
- screwdriver and self-tapping screws;
- varnish and impregnation;
- electric jigsaw;
- sandpaper.

The drawing will help you in the manufacture sad benches
Prepare all the necessary materials, you can proceed to business.
Before fastening the boards, they need to be well treated so that the rest on the bench brought pleasure, and not the off-bes. The longest boards that will go on the seat and the back, you need to span using sandpaper (or grinding machine).
If there is an electrical runt in the house, it is necessary to make the shape of the board of the round.
Billets for the rear legs need to be modified by giving them the right form.

The legs, which are also part-time support for the back, process the grinding machine
We take a board with a length of 90 cm and mark the division of 40 cm - the height of the shop. From this division at an angle of 20 degrees, we cut off the upper part of the jigsaw board, while the board should be an edge. We get the back leg and the angle of inclination of our future back.
The most difficult and important is the cut, it should be smooth on both blanks in size and depth.
We rebuff the bar in the width of the shop - 50 cm. We connect the legs with it, better and from above, and below, so the shop will turn out more stable. Distance between legs 28 cm (front and rear).
Three long boards with self-drawers with a screwdriver screwing up to the upper bars of the finished legs, with the help of which we associated them.
We collect the back of the bench. The two remaining boards are secured on the previously prepared section. The distance between the seat and the board - 20cm, boards - 2-3 cm.
You can strengthen the design. To do this, the legs should be attached to the lower strapping of the legs along the length of the shop. This will give even more reliability and stability.

Cover the bench varnish to give it decorativeness and durability
Garden benches made of wood without back
Similar to the actions described, you can make a simpler bench without a back. For her, we need all the same, except for the boards of 90cm going to the rear legs, instead two more boards 36cm in length. She is going to the same principle as a bench with a back.
Garden benches made of metal and wood
Making a bench made of metal and wood is much more complicated than just from the tree, but it looks stronger and sufficient.
You will need:
- metal grinding machine;
- welding machine;
- scrolls;
- metal pipes 30x30 mm;
- metal primer;
- wooden boards for seating and varnish, for processing.
Frame for seating. Cutting a pipe for 4 parts: 2 to 1500 mm, 2 to 400 mm. Weld in the form of a rectangle.
Legs. Cut from metal pipes 4 identical pieces for legs 460 mm and weld them with the help of a welding machine to the corners of the rectangular billet.
Back Bench. A tube of 440 mm is welded to a pipe of 1500mm in one direction. Then this billet is welded to the rectangular part of the bench.
The design is ready, it is necessary to sweep the welding seams, polish and cover the lavender of the primer.
To give stiffness between legs to the back (inside diagonal) and the seats can be welded additional metal ribs.

Wood and metal shop ready
Seat. For the seat, it is preferable to use wooden boards that need to be processed before screwing, walking with sandpaper.
They are attached along or across depending on your desire with bolts (better with rounded hats).
In the metal frame with the help of electric drills, holes are drilled in which the bolts are screwed. You can also use metal brackets, then the drill will not need.
Finishing mounting work, Wooden coating process lacquer.
Garden benches of stone
Garden benches of wood beautifully look, but they need careful care. But the stone benches are not speculating in maintenance and easy to assemble.
If there are insensic stones in different sizes on the site, of which you can build a practically exclusive shop.
Take large stones and lay out the seat and back of them. From small stones laying armrests. We put out several decorative pillows and you can stay rest.
Such shops are uncomfortable in moving around the site, but they look original.

We make a bench for the garden themselves
Description
Instructions for making a garden bench step by step, each step is described in detail and illustrate
Viktor Sergeev
IN country house Or at the cottage, each person wants to have only high-quality and multifunctional garden furniture, which will not take a lot of space, and at the same time will perform maximum functions on the household plot. Therefore, the transformer bench will excellent decision For joint tea party in a family circle. There you are at the same time a shop, and the table, and most importantly, you can make this design with your own hands.
Bench Transformer - Description of the construction, principle of operation
Such a bench for country house It is a fairly simple design that can easily transform a table with two comfortable benches. And in the folded embodiment, this is a regular bench with the back and handrails. She will not take a lot of space in the territory pricework And at the same time it will be able to fulfill all its functions in full.
Functions and convenience benches
This is a compact and practical bench that is easily turning into a fairly spacious table and two comfortable benches. Due to the high degree of mobility, you can install it anywhere in the household site.
The only disadvantage of such a bench is its considerable weight, as a lot of wooden boards will leave a lot of wooden boards, but it will be sustainable enough, reliable and durable, if you do everything correctly and accurately on the developed instructions in compliance with all technological processes.
Preparation for building construction: Drawings of the project with dimensions
Before starting to build a bench - a transformer, you must prepare all the materials and tools, and also make a good drawing or find it on the Internet.
We offer you a typical drawing - a bench's scheme - a transformer with the dimensions specified on it. The most difficult action is to create a mobile mechanism, so initially it is necessary to prepare all the blanks, which will then be collected in a single transformational structure.
For the manufacture of bench - the transformer will need to purchase lagged edged boards and a timber. It is best for such a design larch, birch, pine, beech, ash or oak (if it turns out, since it is very expensive).
The board must be well polished, have high quality and comply with all conformity standards. If you buy a board on a sawmill enterprise, you will definitely ask the availability of a certificate of quality on their products, as under the guise edged board Oak you can sell a completely different product, and if you do not understand the wood, then it is best to take a carpenter with you, which disassembles the types of board and its quality.
Material Calculation and Tools
To build a bench - transformer we will need:
- Two bars with a cross section of 90x45x1445 mm;
- Five bars with a cross section of 90x32x1480 mm;
- Two bars with a cross section of 90x45x1445 mm.
To work, we will need such tools:
Stages of making shop-table
- The first step will be the production of a frame of the frame. To do this, it is necessary to cut 8 of absolutely identical bars with a length of 70 cm and on them to be at the bottom and at the top of the oblique cuts (also the same), in order to be able to get the perfect equilibrium with a further installation of the design under a specific slope.
- Next, we make a frame under two benches made of polished edged high-quality board. Cut four cuts of 40 cm and as many segments of 170 cm. On all boards, the angles must be cut off so that you can then make two completely identical rectangles a little oblong shape. For their docking, we use special cooked screws or nails. But for the beginning, drill the drill the same holes in the boards (the length of the boards is 1.7 meters).
- In the framework of the design it is necessary to make several strong strengthening elements that will further form a comfortable seat. For this we take wooden bar. And you nail it in increments of 500 mm. So we divide the design to the sections and protect the future bench from lateral deformation.
- The legs must be screwed to the seat at a distance of 10 centimeters from all corners diagonally. We do it so that the jokes are near the "seams" or a little further. It is very important to make the highest quality elements of the design, that is, fix on 2 or 3 bolts that pass through the timber and the upper part of the cooked legs. The bar need to make grooves in which we will hide bolt hats. And under the nut we cut off the hacksaw too much.
- Next, we make a rectangular element of 70x170 cm from the bar, which, from the inside, connect with additional parts that ensure the stiffness of the structure. In the future, we use this item for the backrest or countertops.
- At the moment, the framework we do not close the shields, as it will be difficult to collect all the mechanism in a single whole. Also complicated the transfer of the design.
- Three elements of the element we connect to the common system. This work is quite complicated, as it will be necessary to work with large parts of the future bench - transformer. It is best to produce all work on a smooth floor or on a special big table. All connections we make moving and fasten them with hinges or ordinary bolts.
- Cut off two 40 cm long bar for fastening them between the bench and the shield of the table at the corners. They will be at the bottom of the shield, but with the side of the benches itself.
- Cut off two more bars with a length of 110 cm so that the back is inclined. Breep them with self-draws or other fastening elements In another bench, but in this case, the fastener is placed not from the near side, but in the very center. Otherwise, we will not be able to properly connect two benches together with each other.
- After we collect the entire design, and you will carefully check the work of each rolling element, it will be possible to begin to stem from the outside. To do this, we take the edged well polished board, but you can take a bar or chipboard (if the bench - the transformer will not constantly stand on the street). Thus, we performed the technical stage of work.
The bench - the transformer can be covered with a veneer and then water-repellent varnish that the yacht decks are painted. Varnish dries about 36 hours. But still a bench, covered with varnish, is not recommended to keep on the street in the rain and snow.
If the design is performed correctly, and you will care for it, it will last you at least 20-25 years. Very often, the masters replace the tree with the metal, which looks not so beautiful and aesthetically, but the service life is significantly increased.
Second version of the transformer bench made of metal profile and wood
Materials and Tools for Design
Bench - a metal profile transformer is made similarly wooden, but only with some changes.
For the manufacture of such a bench, we will need:

Stages of manufacturing design
- We clean all metal profiles from rust so that then it was easy to work with the material - cooking pipes and paint them.
- And then according to the drawing drawn, cut the workpiece size in size.
- We make a frame of seats. To do this, weld the pipes as shown in the figure and, if necessary, enhance the design.
- In the future, this design will perform the role of the table as well as the bench back. We also had to change the angle slightly.
- Weld up another seat.
- After implementing all welding work We begin to drill holes and twist everything on special furniture bolts (their length should be at least 60 mm). Then we insert the washers between the iron elements so that it is easier to decide.
- Here we see the final version of the bench - a transformer, where an additional durable leg is drawn to one of the beats and a few changed the angle and feet in the second shop, since the angle of inclination was treated in the back, and it became sharper. In order for the bench does not shift, it was necessary to digest the design.
- For the legs, cut the "heels" with a size of 50x50 mm made of metal sheet so that the bench is more stable and not "drowning" into the ground, if it is on a soft soil.
- Depending on the size of the design, we cut off the board and span them well. It will be our seats of shops and the surface of the table.
- As a result, we get an excellent finished design bench - transformer.
Finish shop
Then we all the boards do so impregnate with an antiseptic agent, with antipyarem and let them dry. Stain with water-repellent varnish, oil or acrylic paint. We apply a varnish or paint into several layers.
The bench is not just necessary, even the necessary subject for cottages, and also powerful decorative decoration. Most owners of private possessions prefer to build shops independently. Much time, costs and forces This occupation does not require, and the bench will become exclusive.
Materials for manufacture
First you need to decide on the material for the bench. Traditionally, the most popular shops made from wood. It should be borne in mind that the manufactured item will be in an open-air, therefore, it must be designed from wood, maximum resistant to moisture, temperature drop and other climatic influences.

Benches for cottage from metal are durable, reliable, resistant to any precipitation and mechanical damage. To steal the courtyard, they make them with various curls, patterns, flowers, creating beauty and original design.

Benches made of monumental stone, capital, powerful and can be performed according to completely different schemes, from treated and polished stone or pristine with flaws.

The plastic bench is lightweight, convenient in transportation and, with proper work, it may be quite strong, reliable and will decorate your garden.


Benches with flower beds
One of the most practical options when the bench is combined with flower beds. Sit on such a product, breathing the flavor and enjoying the flowering of plants, nice and cozy.

There are several options. Between two wooden boxes, put a polished board, or several interconnected and the bench with flower beds is ready. However, a tree that contacts the soil will not last long, so wooden boxes can be replaced by stone or concrete.

Fasten the boards between the stone flower beds is easy with a metal corner. In concrete, he is attached to the dowels, and in a tree - self-drawing.

If you work from scratch, without the presence of ready-made items, you will need an instruction how to make such a bench. Prepare materials: pencil, roulette, boards, saw, screws and nails, hammer, glue. To plant flowers - Earth, pot and plants themselves.


Next, we make measurements of free space under the bench and look forward to its dimensions. The boards must be polished, in order to avoid the offplaces or other skin damage and to give the most presentable species.

It is necessary to cut 52 identical segments to half a meter. 12 of them set aside, and out of 40 buildboxes, which will simultaneously support a bench. To do this, lay out their turrets - on 2 parallel boards, put 2 perpendicularly and so on. There should be two boxes of 20 planks each.

Made from long boards, we make a frame, while engaging them with each other. Bonded long boards combine with two finished turrets with glue and screws.

From the remaining 12 boards, we make two more small turrets and attach them to ready-made support boxes. Good boards drag the surface of the seat. In the boxes insert the pots with flowers and shop ready.

Mounting bench
Another simple way to make a shop - use building blocks and bars for this. Processed, they are easily inserted into block holes.

Though the shop and looks primitively, and it is unlikely to fully decorate your territory, but it is easy to perform and perfectly suitable for rest, for example, in a garden or near water.

Make a simple metal bench is easy if you have elementary welding skills. Prepare a welding machine, a corner of metal, a grinder to cut the pipes, and the profile pipe itself.

With the help of a grinder, cut 3 identical billets, 120 cm long. It will be a seat. From the steel corner, we cut 2 crossbars and put perpendicular to the seats for seating, weld with the welding machine, and we attach 2 legs for a future bench.

Rates a distance of about 20 cm from the seating, we weld the transverse bar to the legs. For a bench stood to the legs below you need to quickly welcome 2 corners perpendicularly, they actually will be based on the whole design.


Metal is painted in the desired color. Sitting on a cold coating is not very comfortable, so we can put wooden boards on top of the metal seating, securing them with dowels;

Beautiful bench with backrest do it yourself
If you wish to make a bench for cottages with your own hands special, exclusive, not like the neighbors, for this you will need some skills, financial investments and free time.

To make a wooden shop for a country house, you need to make a scheme. Drawings and the corresponding photos of benches can be found ready on the Internet or design your own, individual option.

First, do measurements, decide on the dimensions of your future product. Remember that in standard cases, the height of the bench will be up to 60 cm.

It is necessary to carefully calculate the length of all components of the elements, boards, think over the location of decorative parts. When all your thoughts you crawled on paper, start purchasing materials.


To make for cottage plot A bench of a tree with a back is necessary to prepare three types of wood - a thick log, ordinary boards up to 3 cm and a bar, a diameter of up to 7 cm.

From the tools you will need a hammer, nails and self-tapping screws, a screwdriver and a screwdriver, a simple pencil, a ruler, drill and to cover the tree - paints, varnishes and brushes.

The shop is done in 4 stages. Legs, seat, back and on the latter - collection of construction.

To make the legs take a log, 3-4 cm thick, refuses the pancake, width and height and cut out the legs with a hacksaw. The legs should be the same, the slightest distinction between them will lead to a breakdown of a shop. If necessary, spend them.

The back is made in the form of two supporting bakers, a thickness of at least 3 cm. The length of the back should be identical to the length of the seating. Mounting boards can be baptized, leaving the fence between them, or make the back of solid.

The seating of the shops are made of Bruusyev - they will help make it reliable and durable. The number of bars depends on the proposed width of the shop and from the desire to leave the gaps between them or make a solid seat. Cutting the bars of the same length, be sure to span them.

At the last stage, you must collect all the blanks together. The board, 4 cm thick, it is necessary using nails to corner two legs to get a P-shaped design, backrest board and seat bars. Complete with the legs and seats among themselves.

On the seat to nail the planks perpendicular to the pinch of the back. With the help of self-screws, consolidate the back. So that the bench had a presentable look, it must be carefully polished and covered with varnish or paints.

You can build a bench and using undergraduated means - wooden pallets, bricks, clays, stones, and even bottles. The main thing is that it be practical, appropriate and fit into the interior of your yard.

Photo benches for giving


An important subject for country and just garden plot It is a garden bench with her own hands, whose drawings can be found on the net. Although it is possible to produce it according to any suitable schemes, including those made independently. The benches can be made from various elements and parts, including sweater materials, and are much cheaper compared to ready-made and purchased options. And they look much more original and more attractive.
There are quite a few different schemes and drawings of benches with your own hands, each of which is suitable for its own. By the installation method, they are divided into three groups:
- Stationary modelsinstalled in a permanent location and having a foundation base;
- Foldable optionswhich can be folded and moved. Most often these are ready-made purchased options, although it is possible to make them manually;
- , best suitable for children.

Considering the various materials for such benches, most often preferred wood and metal. Sometimes a stone is selected for this - although it can only be used if there is an appropriate design of the cottage. And, if desired, even wooden stumps, brices, pallets, or. It is necessary to select a specific option depending on its tastes, the availability of suitable parts for the manufacture and creative abilities.
Benches for the cottage from metal and wood
Deciding to make a bench for giving with their own hands, first of all pay attention to options with metal carcasy. Their feature is increased strength, durability and possibility of use in all conditions. Although for ease of use, bench should use:
- anti-corrosion coatings for metal protection from;
- additional details for seating and backing from other materials (most often - wood or plastic).

In the manufacture of a bench completely from metal - for example, from wrought elements or metal grid She will weigh much more. In addition, it will be uncomfortable to use it in the heat and in the cold. Therefore, the combined design using wooden elements can be optimal option. First, because the wood looks better than other materials (especially if using larch or oak). And, after processing with paint or special varnish, it can serve a lot longer, not exposed to fungus, mold and sun rays. Another reason to choose for the design of a garden bench is the tree is the ability to harmoniously enter this material in, in contrast to the use of stones and plastic.

Photo benches do it yourself from stone
Stone garden bench with their own hands, whose drawings can be even simpler compared to wooden and metal structures. In addition, the stone is the most profitable material. Most often, it is not necessary to buy it at all - suitable elements can be found on the territory of their own dacha. Among other advantages, stones are worth noting:
- long operational term stone benches are able to serve dozens of years;
- reliability of the resulting design, which is almost impossible to damage. And there can be no precipitation or temperature differences;
- the ability to fit perfectly into some types of landscape, becoming an excellent addition for other stone elements.
In the absence of territory, fountains decorated using such beams, or install it is undesirable. Although other buildings can add them, during the construction of which similar materials were used. The shops in the ensemble with and, the foundation of which is made using stones, or with the help of stones, is advantageous. And one of their few drawbacks is the problem with the manufacture of the back, which is missing for all.

Photo of garden benches with their own hands from girlfriend
You can not only from the finished boards, but also from more accessible and existing materials available, saving and time, and funds. It was after the choice of such an option on the summer site a product may appear from the residues of building structures and even cut trees. So, one of the drawings provides for the manufacture of a bench from the stumps, easy to handle and looking naturally treated trees.
The design of such a product may be as follows:
- a pair of cut bases of trees serves as supports for a bench;
- for the back and lower crossbar applied pants;
- the seat is made of part of the trunk.
For the manufacture of such a bench, it is enough to have a circular saw and certain woodworking skills. If they are lacking for the seat, the same stiffs can be used or. After the manufacture of the bench is covered with varnish and it looks even more profitable for the finished option.

Ideas of garden shops and benches do it yourself
Any wooden bench with your own hands is made by definite drawings. But, if the simplest options provide for the design of the product consisting only of supports, seats and backs, more complex options may also include such elements:
- boxes for placing toys and inventory;
- forged parts that perform the role of decoration;
- wooden speaking as a support.
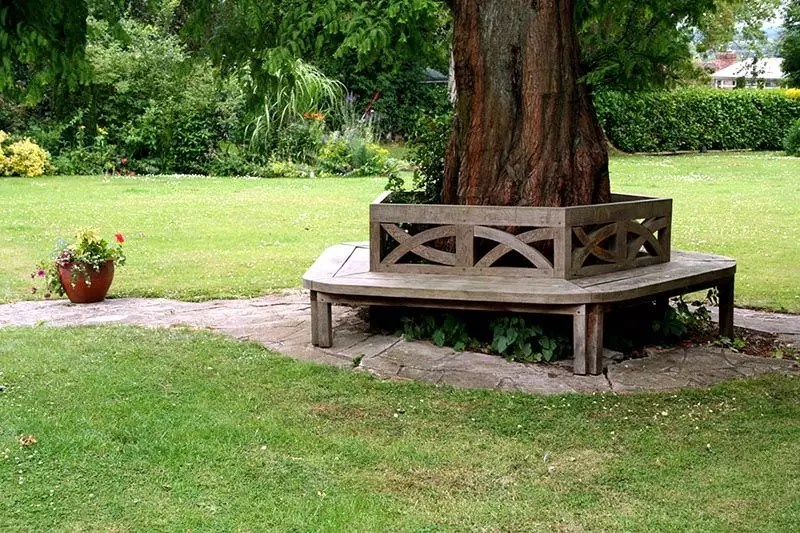
If desired, the bench can be manufactured with or without armrests. And can also have several backs, acquiring the type of double or triple chairs. And even get a non-standard rectangular, but a curved or polygonal form - this option is often used for benches and shops in or around a tree.
Bench with storage box
To build a garden bench with your own hands, you will need not so much time. Whereas among its advantages, you can call the creation of an additional place to store things. Inside such a bench, children's toys are often stored, eliminating the need to use special cabinets or boxes for this. And sometimes a bench with a box installed in the garden is used to store garden inventory.
Choose a product suitable for size and color landscape. Especially since such functionality will increase the cost of a product that is faster and more profitable to make it yourself. This follows:
- Find materials, which are most often used wooden boards;
- Make the side parts, the walls of the box and the seat, using self-strokes and metal corners as fasteners;
- Cover the outer part of the lacquer bench;
- For ease of use to locate on the seat wooden benches - Or shelter the surface with a cloth.

The product is suitable not only for the garden or the country area, but also for. And among its advantages, it is possible to name a simple manufacturer that does not require special skills and tools. In addition, boxes in such a bench can be located under the seat, and inside the side supports. And the inner part can be divided by half - with separate seat lids.

Production of a simple garden bench with their own hands
Assemble a simple bench with your own wood with a tree with minimal cost Time and funds may not even be too an experienced joiner or a person who has never been engaged in the manufacture of furniture. The main stages of such works are as follows:
- Preparation of materials - boards, the total width of which must correspond to the size of the bench, and two wooden boxes or concrete torms;
- Installation of supports and, if necessary, their fixation;
- Installation of the seat with the help of corners;
- Grinding the bench surface using sandpaper.

If there are drawers on the sides of the bench, they can be used as vases. To do this, the Earth falls asleep inside, and decorative plants are planted. It looks good and asymmetric option - when on the one hand there is a built-in improvised mini-flower bed, and on the other hand there is a normal support.
How to make a cottage bench with your own logs?
It is not bad in terms of practicality and time making a solution will be a garden bench made of logs, for the manufacture of which materials will be needed:
- the trunk of the tree, which will be used for the seat, and for the legs;
- the second trunk of a smaller size, from which the back is made;
- pins and self-tapping screws, with which elements are fixed;
- circular saw and drill.
For the manufacture of a bench in each of the details holes drill. They are installed pins, fastening parts of the structure. The product is additionally strengthened by self-draws. And for the convenience of use and enhance the operational period, polished and covered with varnish. The disadvantage of such an option is the need to use special tools, plus - almost complete lack of waste. Wood residues can be spent on the heating of cottages or cooking on wood stove (The optimal option for the cottage), and even make another garden furniture from them.

Garden benches with your own hands in an ethno-style
One of the most fashionable current options sadroom furniture A bench in the style of Rustic (an analogue of the American "), which can be perfectly fit into the surroundings of the cottage, cottage or. For its manufacture, the materials of two types are used - practically untreated wood, with the remaining bark, or ordinary boards and a bar. It is advisable to use curved and rounded parts in the manufacture of such benches. Even the boards from which the back will be manufactured must have a slightly rounded shape.
The bench in an ethno-style looks good in the ensemble with a wicker hedge. Especially if you make the back of this garden furniture using weaving. This will require a certain skill in the location of the branches (between which, in contrast to the manufacture of baskets, the gaps should remain), but the result will exceed all the expectations.

Details of gardening furniture with carvings are suitable for the landscape made in the Moroccan style, for which natural materials and rounded shape are characteristic. Bamboo elements are perfectly combined with the Chinese style of the plot. And low double benches - with the Japanese style of the garden and at home.
Drawings of benches for giving with their own hands: photos and features
In order to make a garden bench with your own hands, the drawings are needed. Even the simplest designs consisting of a back, legs and seats require measurements and layouts of the holes - this preparation will allow you to get even and attractive to the type of product. If the scheme of the bench is more complicated, it will take some time on the manufacture of drawing, given all the details and sizes - from the height of the supports to the width of the armrests.
Double garden bench with your own hands drawings
A classic drawing of a wooden bench with a back for accommodation 1-2 people consists of such elements:
- design pattern;
- brief assembly scheme;
- sizes of bars for support and boards for the back and seat;
- schemes for fastening legs that can be installed on a constant foundation or do not provide for fastening to the base.

The drawing is not posted, due to the presence of direct lines on it. In addition, it is not necessary to consider the load on the foundation, in contrast to more hard structures. And, if desired, dozens of already ready-made variants of double products are easily on the network.
For the manufacture of the most simple beamets With the back of the tree with their own hands, there will be 120-140 cm boards and a thickness of at least 30 mm. Such dimensions are quite enough to accommodate two people. You will also need 2 pins for the back of a length of at least 40 cm and two more - for supports on which boards will be laid. The diameter of the reference elements can be any, but the optimal option will be approximately 65-75 cm. In addition, there will be needed boards for the back, the length of which corresponds to the log parameters for the seat, (electrical or chainsaw), drill and 12 screws of 10-15 cm long.

Important! When handling the saw, security rules are required. And, if there is no skills to work with such a tool, it is worth or seeking help to a more pilot master, or choose another design option.
Bench for garden cottages with their own hands
If we consider the process of manufacturing garden benches in more detail (which may be needed for a person who has never fulfilled such work), the main steps can be reduced to the table. With the help of a table form, even the owner of the country area, having nothing to do with the woodworking and the furniture assembly, will be able to collect a decent on appearance and durable design.
Table 1. Assembly instruction for simple wooden shop
| P / P stage number | Description of the technological process | Instruments |
| 1. | Fitting boards on the size of the shop or the purchase of already ready-made elements with the same parameters. | Saw or Lobzik |
| 2. | Treatment of wood and ends, which are attached to the rounded form | Emery paper, file |
| 3. | Select an angle of tilt rear supports. To do this, the boards are taken with a length of 0.7-0.9 m and the mark is raised about the middle. Part of the board at an angle of 20 degrees is cut from one side. | Saw |
| 4. | The connection of the front and rear supports, the distance between which should be at the level of 270-300 mm. | Self-tapping screw, screwdriver |
| 5. | Connection of boards for the back and seats with supports. The gap should be equal to 15-20 mm. And the distance between the edges of the back and the seat is about 20 cm. | |
| 6. | Coating the surface of the bench varnish. | Brush, varnish |

Garden bench do it yourself from progress materials
The budget version of the garden furniture can be a bench with their own hands, which can be easily found on the network. For its manufacture, so-called Euroallets are suitable, different from the usual EUR marking. The width of these elements is greater than the standard for the bench, so the pallets are desirable to make a little smaller in size, shorter, for example, up to 60 cm.
Among the simplest variants of the bench from Pellet are distinguished by three:
- Structures of 4 palletsThree of which act as a basis, and the fourth serves as a back. The euroallets for the back remove part of the bars, and the rigidity of the bench is strengthened by a wooden rail;

- Benches of 4 cropped pallets. The back is fixed using ropes, and wallpaper nails are applied to design;
- Products of just 2 pallets, one of which remains the whole, and the second is cut. In the design, the wheels are used, which allows you to move the bench.

The advantage of using the Europallet is their favorable price. If desired, they can be reached almost free. However, due to the standard and not entirely suitable for benches, this material is a bit limiting creativity. And it can also be supplemented by boards, and other elements to enhance the design and give it a more aesthetic species.
Drawings of a garden bench with a back of a tree with their own hands
Standard technology of manufacturing a bench-transformer with their own hands is quite simple and will not require a lot of time to assemble. And the result of the work will be a set of 2 benches and tables that are easy to decompose and assemble back to save space on the plot. Stages of manufacture of one of these structures will be approximately as follows:
- Drawing preparation;
- Choosing materials. For a bench transformer, you can take conventional boards with a size of 3.5 x 12 x 600 cm. You can also use five-meantimeter rails and boards 120 mm wide for the table top;
- Cutting bars for legs of shops and tables and manufacture of holes at their ends;
- The manufacture of cuttings with a diameter of 20-22 mm, with which the design will be folded and folded;
- Steering processing;
- Assembly individual elements In the finished design with the help of fasteners - screws and screws.

Now it remains only to paint the resulting transformer shop. And after drying the paint, set on the moving parts of the hinge. To enhance the performance characteristics, it is recommended to cover wood with varnish.
Garden bench do it yourself: Photo of successful homemade
Taking a decision on the arrangement of its country or, you can choose for the manufacture of benches and bears dozens different options. And use for their manufacture various materials - from purchased to those who were at hand. Often such homemakes are not only not inferior to factory products, but also surpass it, if not for strength, then for aesthetic characteristics.

Due to the fact that such structures are most often located on the street without, one of the main points in the manufacture is mandatory processing with special materials. For metal, it is paint, for wood - impregnation and varnishes. While the color bench, its size, materials and style are chosen exclusively in accordance with the taste and capabilities of the owner of the site.
You may also be interested in: