How to cover the cloth plastic container. Box for trifles with your own hands: Materials and tools
In almost every house there is a thousand little things for which it is necessary to find a storage space and so that such a container logically fit into the interior of the room. The easiest option is to make decorative boxes with your own hands from the girlfriend, they can be decorated in suitable color or use fabric with a pattern.
Decorating the finished box (MK)
Using the finished packaging box (most often from under shoes) will be the ideal option To store the desired trifles. You can also use paper cardboard boxes, household appliances, dishes or other suitable size.
For decorating such a box, materials are suitable: colored paper (normal or decoupage), color cardboard, ribbons, sequins and beads, seashells, coins, etc. In such a situation, it is best to apply any fantasy, but with the condition that the box will harmoniously fit into the interior of the room. Most often, the box is trimmed or enclosed with a cloth, you can use a piece of foam rubber for softness.
If the box is designed for small things, then you can use the space inside the space into several compartments of various sizes.
When choosing a box, you need to take into account its purpose:
- determine the desired desired size;
- the box can be taken from under paper, kettle or iron;
- buy the cut of the fabric of the appropriate size and color, glue and sewing accessories.
 Suitable any cardboard box
 The tissue is most often glued or sewn with the outside, and on the inside of the box for softness. Here step-by-step instruction how to do it:
1. It is necessary to make measurements of the box on all directions and make a cutting fabric for these sizes.
2. Sew harvested fabric pieces. The material can be taken in one color or for different sides - contrast tones (choosing your taste).
3. All sides of the box are labeled with glue, and the cloth is glued to the box.
4. Internal and external seams after drying are stitched by a needle manually.
5. Advance can be done to the box to make handles from color braid.
6. Box decoration - Flight Flight.
 Cardboard box decoration process
 On video: Master class: decor box with cloth.
Boxes from various materials
For the manufacture of the boxes, linen, shoes, or different trifles fit in each house, you can use various materials. This may not necessarily be a cardboard, other products suitable for hardness, density and texture are fully suitable.
From cardboard
DIY decorative boxes made of cardboard or tight paper can be any form - from classic parallelepiped, cube to the original shape (heart, asterisk, oval, etc.). The principle of manufacturing the product is very simple. First you need to draw the details of the future box, given the allowances for gluing. Then cut and connect glue. Such a box can be closed with a magnet, velcro or a conventional removable cover of the same form. The decor of such a box depends entirely on the taste of the hostess.
 An example of creating a cardboard box
 On video: Cardboard box with your own hands.
From wood or birch
Very popular now made boxes do it yourself from Berest. They rush out of birch strips or miserable in the form of a body. Details in such bark baskets can be fastened with a fishing line. For the manufacture of wood boxes, most likely, you will need men's hands that will help cut sheets of plywood or a small board. To fasten and cut the patterns on the lid, it is also better to attract a man.

From newspapers
Another interesting option (But labor-intensive) - weaving baskets from newspaper tubes. Manufacturing technology is as follows:
1. Tubes are harvested separately in large quantities. They are wound on the iron needle, the tip is fixed with glue.
3. The most durable tubes are glued to the base (box), retreating several cm between adjacent.
4. Then begins directly the proceedings of the base (according to the principle of the sloping).
5. After the edge of the edge of the tubes is either fixed with tweezers inside, or clipped. The resulting woven box is painted and decorated with pieces of fabric, ribbons, shells, etc.
 The process of weaving from newspaper tubes
 On video: Master class: basket made of newspaper tubes.
From plastic bottles
Bottles are made using the middle part, which is cut and rectangular details are cut:
- You just need to prepare 6 parts for the box.
- Using the hole in each such workpiece, holes are cut throughout the perimeter.
- Then the details are tied with a crochet and combine threads.
- For the lid, small sidewalls are also made so that it closes the casket tightly.
- Further decoration of the box box - the flight of the fantasy of the hostess.
 Plastic Box Making Process
 On video: Box with plastic bottles.
Boxes for linen (MK)
Such decorative boxes for storing books, shoes, linen and different trifles can be made in large quantities, there are many for this. different options. One of the practical options for the dressing room is a whole set of boxes with inscriptions or with photos of shoes, so as not to look for each time the right pair. It uses standard packaging boxes for shoes, preferably of the same size.

Very necessary thing in the women's wardrobe is a box-organizer for linen with various cells for every object of clothing. Such an organizer can be made again from the cardboard:
1. It is necessary to measure exactly all sizes inside the box: the box of the box with cells must accurately coincide with the dimensions so as not to move in the future.
2. Stripes from cardboard are cut out, open with paper or cloth on both sides, the frame must be thoroughly copped, shook from the inside and outside all the angles.
3. For cells, strips for partitions are cut, the easiest way to make cells of the same size are easiest.
4. Similarly, we glipulate the bands of the cells on both sides, leaving 1 cm from each edge (ears) for gluing subsequent to the frame.
5. For fastening among themselves, slots are made at the desired distance: in longitudinal parts from the bottom, and in the transverse one; Stripes are inserted into each other through the slots - the lattice turns out.
6. The grill is inserted inside the frame and is fixed by the "ears" in the frame (glued or stapler).
 Making Box For Lingerie
 Made in this way the boxes with cells can be decorated, saving with colored paper and any decorative trifles (lace, ribbon, etc.).

By the same principle, the container for sewing accessories is made using a finished shoe box. Only cells are better to do different sizes (for scissors, pads with needles, coils). The lid in such a box is better to make a folding and buttons on the button.
The easiest way is to buy a ready-made casket in the store. But a thing made own handsAlways unique and unique. Therefore, any hostess will prefer, putting your work and fantasy, create the necessary boxes for storing all sorts of little things in your household yourself, saving money.
Surely, each of us came across the problem of the disorderly location of things, whether it is a garage, living room or children's. The most affordable I. a practical decision This problem will be boxes and drawers for storing various kinds of things. Of course, they can be easily found in any supermarket. But why spend money if you can make original and beautiful storage boxes with your own hands.
How and how to decorate cardboard boxes
Decoration lovers can find everything you need for this classes in specialized stores. There you can pick up any materials and other items to your liking. But if you show a little fantasy, then decorating the storage boxes with your own hands will be fully implemented from girlfriend. To do this, you can use the remaining houses of fabrics, fabric ribbons, multi-colored paper, unnecessary jewelry, remnants of wallpaper and the like.
Storage boxes do it yourself: master class
There are many varieties of both the boxes for things and the ways of their manufacture. At first, it is necessary to determine the dimensions of the desired product and choose the corresponding box. For the manufacture of any box you will need:
- finishing fabric or adhesive paper;
- wide scotch;
- scissors;
- glue ("moment" or "PVA");
- sewing tools and stationery clips;
- accessories for decorating.
Other materials can also be used. Consider how to make the most common types of boxes for things.
Box for things with partitions
The so-called organizers for storing things are quite popular, with their own hands it is also quite simple. For the manufacture you will need a spacious box, as well as cardboard. The selected box is completely covering the cloth, flashing the joints or using the stationery clips for this. Next, break a conditionally box into several cells and make the internal partitions from cardboard by its dimensions. Partitions will whip with a cloth or adhesive paper.

When the glue dries, make slots on the partitions and secure them between them. Install partitions into the box and you can place things in it.
Make a CFR to store things with your own hands on the same principle. It will be possible to store different clothing items if you choose a large drawer with hard walls, and use more hard cardboard for partitions. Cafers can be made both open and equipped with a lid.
Book storage box

For its manufacture, you will need a box without a lid that closes it. If necessary, it must be trimmed, stuck sections. So that the books it is convenient to get, their height should be greater than the height of the box itself.

If you need knobs for lifting - Rush the neat openings in the walls. Next - all sizes from the box are transferred to the fabric and make an internal and exterior cutting.

All parts of the box are smeared with glue and place them uniformly cloth, removing the folds. When the adhesive will die, connect the inner and outer parts with each other, as well as position the holes in the handles, which are pre-cutting them.


To decorate the seam itself, use a decorative thread or close it with a strip of another fabric. The box is ready, now you can put your favorite books.
Bilateral box for things
For its manufacture, the box is well suited from under. Cut in the long walls of the box centered two symmetric inverted triangles.

Digit a direct line between the tops of the triangles, dividing the bottom of the box in half, and bend it along the line.

Then squeeze the connecting planes with glue and glue them together.

Transfer the dimensions of all parts of the box on the fabric or adhesive paper when the glue will dry, plunder the box. If you wish, you can make sides of the "shelves" from both sides from the box.
Storage box of jewelry or stationery
For its manufacture, you will need 5 shallow jars and cardboard sheets. Selected jars Clamp inside and outside with a finishing cloth or adhesive paper. To do this, cut the rectangular strips for the parties by their height and ten circles in size for the bottom of the cans. Next, cut two circles from the cardboard with such a diameter so that 5 jars were placed on it. Also from the cardboard you need to cut a rectangle for connecting the circles, the height of which will be equal to the height of the jar, and the length is equal to the circumference of the large circle. Carved figures cross the finishing material. After that, one of the circles you need to put jars, and glue them.

We have led only a few varieties of organizers and technologies for their creation. It is worth it only to make such a useful thing, and you will see as far as an exciting occupation. Invent and create beautiful boxes for storing things with your own hands, they will help not only bring up your home, but also decorate your home.
February 17th, 2016
To streamline all your things, and keep the house clean, special boxes, bags and organizers are needed. Some of these things can be found in stores and in the markets, while others can be made with their own hands. Here are several interesting ideasHow and where you can store various things so that they do not occupy a lot of space, and they could be easily found:
1. How to store small things: Mat-bag.
With the help of this mat-bag that you can buy or make your own hand from a tarpaulin, rope and threads with a needle, you can easily remove small toys (designer, for example) after the children finished playing.
2. How to make an organizer for jewelry
If you pull the line or durable thread on the usual frame, then you can hang jewelry on it - it is not only convenient, but it looks beautiful.
3. Containers for storage of things.
Also, different things can be stored in one or several supports for logs.
These stands can be purchased in the store or make it yourself from boxes, for example, cereal boxes.
This is how it is done:
4. Storing personal small things.
Fruit vase can also be used for storing small things, such as earrings, lipsticks, keys, key chains and others.
5. Storage systems.
If you find this simple and functional shelf, then you can save a lot of space in the bathroom.
6. Convenient storage box.
You can also order such a narrow dresser for the bathroom or toilet, which takes very little space, but in this case you can store a lot of necessary things. With a great desire, such a chest can be made independently.
7. Organizers for storing small things.
If you have such a basket or a box of similar dimensions, then you can use it as an organizer for different little things. You can add small notes to indicate that it is located in each branch of the organizer.
8. Organizers for stationery with their own hands.
9. Convenient organizer for storing toilet paper.
10. Organizer for the kitchen with his own hands
Folding into one basket several empty canned cans (preferably of the same size), you can store various kitchenware in it.
11. Organizer from empty canned cans for storing things with their own hands.
To connect all banks, use cardboard and wide scotch. Stick cardboard strips to the bottom of each can. If you wish, you can all banks and stuck with scotch through the perimeter.
12. Organizer for storing papers from boxes with your own hands.
* Cut the diagonally a small piece of the box.
* From the next box, cut off part of the larger to make the ladder when you connect it with a large box. It is advisable to compare the size of the next box with the size of the previous one.
* From the third box, cut a piece of even more.
* Connect all the boxes with each other with the help of a scotch - wrapped it around all the boxes - or bilateral scotch - gluing the boxes among themselves.
* If you wish, you can wrap the whole design with wrapping or colored paper so that it looks more aesthetic. You can also decorate it according to your taste.
Another similar organizer:
13. Organizer for the Office.
From the box and cardboard bushings of rolls of toilet paper can be made convenient organizer For stationery, in particular for pencils, markers and pens.
14. Free portable organizer from the box from under the juice.
You will need:
Empty box from juice
Stationery knife
Twine
Hole puncher
Different stationery.
1. Well rinse and dry the box from under the juice.
2. Cut part of the box side with a stationery knife (see image).
3. Make a hole a few holes along the central part of the box. The number of holes depends on the number of pencils and the handles that you are going to use.
4. Make a hole in the outdoor part and grind a piece of the twine. Tie it on the node to get a handle - it can be easily opened and close the organizer.
5. At the top of the box, cut the hole for the adhesive-pencil. There you can also insert pencils or handles (instead of glue).
You can fill the organizer with different stationery. Now you can take it with you.
15. Dream catcher with their own hands - organizer for jewelry.
You will need:
Thread for knitting.
1. Divide the hoop.
2. Tie one end of the thread to the top of the ring.
3. From the first node, pull out one end of the thread by 6-7 cm and link the node. Tick \u200b\u200bthe other end to the other side and also tie to the ring. Repeat until you get a geometric shape inside the circle.
5. Repeat step 4 until you get a web, fully covers the circle.
Now you can just hang your earrings, beads and other decorations on the crawl. If you wish, you can make a small loop in the chambers, so that the craft can be hung.
So that the dream catcher was even more like an Indian symbol, you can attach feathers to it.
16. Organizer for storage of brushes do it yourself
You will need:
Bamboo rug (sushi mat)
Wide rubber
Thread and needle.
1. Wrap the gum around the first part of the rug and secure several seams.
2. Start rumming through the metal parts, leaving large, medium and small parts for brushes.
3. At the end of the rug also wrap the gum and secure several seams.
Now, inserting tassels into an elastic band, you can twist a rug and take it with you or put somewhere where it will take little space.
17. Organizer for underwear with his own hands
You will need:
Box (from under shoes, for example)
Scissors
Wrapping paper (if desired)
18. How to make an organizer for stationery (video instruction)
19. Organizer for underwear with his own hands (video)
20. Organizer for cosmetics (video)
16 practical advice that will be useful to everyone who goes on the journey for the first time.
Recently, more and more people can afford to travel to other countries. And if for one flights on the plane have already become the norm of life, then ...
Each apartment must have such things that are required quite often, but being in a prominent place, spoil the impression of the interior.
Even if they were removed somewhere or hiding, after a while they will need again, and after use will remain in sight of everyone. Rescue in this case is decorative boxes in the interior that give the highlight of the room and at the same time copes with the storage function. Special joy for lovers to decorate their home on their own, the fact that you can easily make various decorative boxes with your own hands. It can be a large storage box for storing bulk things or small boxes for various trifles.

Storage of things in boxes not only allows you to hide unintentional items for the eyes of foreign objects, but also remarkably organizes space. The folding of things in different triggers, boxes and boxes will allow you to quickly find them quickly. Children Similar storing of things teach to accuracy and order, and some adults too. So that numerous storage containers did not look kill, you can do or decorate decorative boxes with your own hands.

Options, how can I use boxes, weight: decorations Many fashionista stored in special chests, shoes are already sold in boxes, office supplies of children and adults are easily placed in boxes from candy or cookies, craftswomen and needlewomen try to fold sewing supplies, beads, fabrics etc. in different packaging. Numerous charging for phones, tablets and other gadgets is also better to clean in a separate place so that they are not distributed throughout the house in chaotic order. The same applies to children's toys or other necessary and important trockers. Large decorative boxes in the interior can perform the function of the chest or PUPPI, if they are made of quite durable materials.

Application in different indoors and interior styles
The boxes and caskets will become an indispensable assistant in any room: from the living room to the bathroom. In the living room in large boxes, you can store whole sets for parties with friends, where they will fit board games, maps or other entertainment adopted in the company. You can also store photo albums or individual photographs, rarely used dishes, tablecloths or sets for needlework. The advantage will be that it will not be necessary to get separately various items from the table or cabinet boxes, everything will be in one box.

In the kitchen for storing in boxes even more things: dishes, towels, edible reserves in the form of croup, tea, coffee, etc. By the way, decorative baskets are particularly well looking at the kitchen interior, for example, to storing fruit, season or in the form of flower supports.

In children's bright decorative carton boxes You can use for toys, cubes, designers, clothes and shoes, books, coloring and many other things. Together with the child it is better to sign the boxes to teach the baby to lay things at the right places. But the timely parental revision of his boxes will never hurt.

In the bedroom in separate baskets, bed linen can be stored, various cosmetics for use before bedtime, logs or some intimate little things. If the bedroom is combined with a dressing room or a boudoir, there will be reasonable "storages" for cosmetics, jewelry, accessories, hats, etc. will be appropriate. If numerous things are stored in closed or even open boxes, any room will not look closed.

Excellent open decorative boxes in the interior of the hallway. They can be put on the shelves or even hang on the wall. Here it will be possible to store various little things in the form of keys, umbrellas, players, without which it is unthinkable to access to the street, tools for the care of shoes, newspapers, torn buttons and replaceable shoelaces. What can be lost if you leave it in the depths of the apartment, never get lost in the basket in the hallway.

In the bathroom in boxes and baskets, you can store towels, some washbasins, home cleaning facilities, if they are stored here, and not in the storeroom or in the hallway. The only thing in the bathroom is better not to use decorative cardboard boxes, because increased humidity It will negatively influence them.

The decorative function of the boxes is very important: when choosing a specific color, shape and pattern, you can successfully emphasize the interior style. So, the gentle pink tones of round boxes perfectly emphasize the femininity and tenderness of the bedroom or boudoir, plastic translucent containers successfully fit into the style of high-tech or minimalism, the caskets with an interesting and surround decor will harmoniously look at classic interiors, a certain ethnic pattern can be chosen for interiors in Japanese, African or scandinavian style. It is appropriate to watch wicker decorative baskets in the interior of a rustic house or in eco-style urban apartment.

Almost for any style of the interior and any room, you can create decorative boxes with your own hands by choosing a suitable material or decorating the already existing container.
Decorating ready-made boxes
It's easier, of course, decorate the finished box. Thus, decorative cardboard boxes can be made from existing packages from under shoes, paper, dishes, household appliances and electronics. If you need more durable materials, you can use old buckets and basins, plastic or wooden containers from under fruit and even beerboxes.
Decorating decorative boxes with your own hands by any materials: paper for applications or decoupage, cardboard, beads, sequins, shells, coins or natural material. It all depends on the imagination of the author and the style of the room in which such a box will be.

Most often, of course, the decor is used for the interior of the apartment. You can make a box softer, attaching to the lid of the foam rubber, to sheathe or wake the box with a cloth, divide with cardboard an internal space into several compartments and beautifully store various little things. This option is sometimes considered as gift packagingAlthough it looks often better than the gift itself.

Material manifold
If all existing boxes in the house disappeared incomprehensible way, you can make them yourself, using those materials that are at hand.
Cardboard or tight paper
The most common option, of which you can make decorative boxes with your own hands, are products from cardboard or tight paper. What is interesting, the form of such boxes can be the most different - from the traditional parallelepiped or cube to the casket in the shape of a heart or star.

The principle of operation here is as follows: First, the sweep of the future box is drawn, and then it is cut and glued. If information is about what is scanning, from the times of geometry lessons, it remained in the distant past, you can simply cut separate sides of the cabinet box for gluing or fastening, and then in turn to connect. The box can be closed with a magnet or velcro, but no one has canceled the simpler version with a completely removable lid. The further decor of such a container fully lies on the conscience and fantasy of the creator.
Wood
Make a casket or wood box easily, if there is a man who will take it nearby. You can use small boards or plywood, but independently bore parts and cut original decorFor example, on the lid, the ladies will still be quite difficult.
Hello expensive needlewomen - guests and regular readers of the Mimin Creative website. I am Natalia Pisel, I am glad to present my job today - from all your favorite American fabrics for Patchwork.
Do fabric baskets - this is my passion. Square and rectangular, round, with handles and without, big and small - all boxes are beautiful. They are easily and nice to sew, and in the interior without them is generally empty and sad nothing is missing. So we make textile ku do it yourself for storage Total in the world.
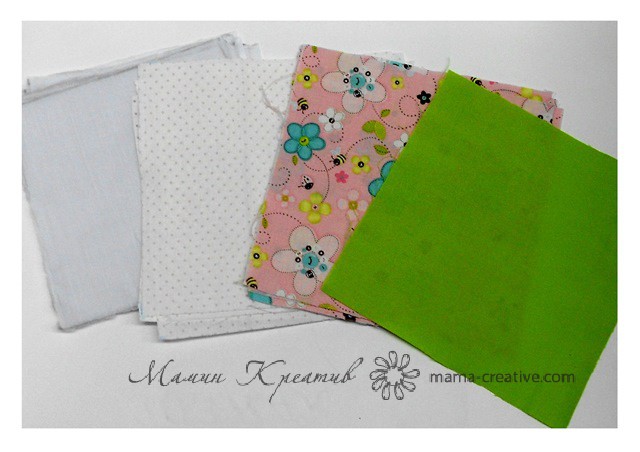
For the project we will need:
- Fabric cotton 3 colors;
- Dublerin on a woven base with a point applying of glue;
- Threads in tone - pink or white;
- Scissors, sewing needle;
- Pins.
1. Cut the fabric and dublerin on the squares of 20 x 20 cm. Green for the bottom - 1, pink with flowers - 5, white in polka dot - 5, seal - 15 pcs. If your machine does not take a thick thickness, then the doublerin needs to cut 18 x 18 cm so that the seams lay on its edge. I did so. Seal details for tops in two layers, internal - in one.
2. First we do the sides. We sew the parts into a circle with an indent from the edge of 1 cm. But below (in the bottom of the bottom) you need to leave not flashing 1 cm. 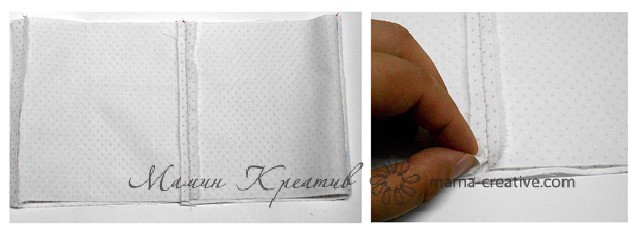
3. Then we sew bottom. Each side I sewed separately, stepping them with pins. Corners in the end should look like the photo below. We get ready-made inner box.

4. We do the external layer on the same technology. We leave at the bottom one not stitched side for turning.

5. We fold our textile boxes with the front sides to each other. Put a line at the top with an indent 1 cm. Soak basket of fabric Through the bottom.

6. On the front side, too, we also make a line on the upper edge with an indentation of 0.5 cm. Then we sew the bottom of the secret line.

7. We smooth the textile box, form corners and facets.
