Swan from plastic bottles with their own hands: simple manufacturing techniques. Plastic Bottles Swans
How to make different crafts from plastic bottles for giving and house?
For most people, a plastic bottle is an ordinary garbage that litters a house. But in the skillful hands, at first glance, nothing to turn into a very beautiful, and most importantly, a unique decoration for pricework.
The big pole of such man-made decorative objects is their cheapness, and that is why the family with the smallest income can afford to decorate the living space like a decor. If you are interested in a similar idea, then let's understand together what can be made from empty plastic bottles.
What can be made of plastic bottles with your own hands?
Simple swans from plastic bottles Plastic bottle flower
 Plastic Bottles Lake
  Plastic Bottle Decoration
  Plastic bottle chandelier
 Plastic Bottles Flowers
  Plastic bottle toy
 Plastic bottle toy
  Plastic bottle fence
 Until recently, with the help of plastic bottles, they gave contour flowerbams, beds and garden paths. But over time, the folk craftsmen realized that the plastic was very fatty material from which many beautiful things can be made. Therefore, people began to experiment and from unnecessary garbage began to be obtained beautiful bulk flowers, garden lights and chandeliers, various kinds of stands, vases, candlers and even full-fledged fences.
To create all these masterpieces, the wizard used bottles of different sizes and shapes, cutting out the blanks, carefully connecting all the parts between them, and then squeezing them with their paints in the desired color. Yes, and remember that plastic can not only be cut if you take a blank and hold it a bit above the heat (electric tile or lit candle), then you can make very beautiful volumetric compositions with perfectly rounded items.

 Plastic Bottles Swan
 Manufacturing of plumage
 On the Internet, you can find a lot in different ways manufacturing plastic swans For garden decoration. But unfortunately, all of them are quite complicated and therefore people who have never been involved in needlework in most cases they are not entirely understood. That is why we decided to introduce you to the manufacture of a swan, with which absolutely every person can cope.
Materials for the manufacture of swan:
- One five-liter bottle
- Up to fifteen bottles of milk or kefira (needed for the manufacture of plumage)
- Wire and scissors
- Piece of hose
- Paint for painting finished products
Warming swan:
- So, for a start, we take a black marker and draw on the bottle of the line, for which the opening will be cut out (flower pots can be inserted into it). How to do this correctly you can see in the picture placed above.
- Next, take a piece of the hose of the desired length, insert a thick wire into it, and then give the workpiece with your hands, which will visually remind the neck of the swan. Insert the finished blank in the neck of the five-liter bottle.
- At the next stage, proceed to the manufacture of the sonces of our swan. To do this, cut out of the dairy bottles of the billet imitating feather. And so that it is as much as possible to natural, take it around the edge with sharp scissors, and then heat the resulting fringe above the burning candle (it will help to get thumbs up).
- After that, cut off with several dairy bottles of the neck and the ass and put them on the hose (we make the imitation of the neck of the swan). In the most extreme bottle, we cut off only the ass, and leave the neck on the spot, and form our decorative bird's head out of it.
- At the final stage, we take previously prepared features and gently glue them to the resulting body. We do it in such a way that there are not even the slightest lumen between them.
 Pigeons of plastic bottles
 Immediately I want to say if you want to reduce the time of making pigeons, then use white bottles of milk or kefira to create such decorative objects. In this case, you will not need to cry out absolutely the whole workpiece, it will be enough to decorate her head.
So:
- Prepare a standard milk bottle and cut the neck as shown in the master class
- After the body of the pigeon is formed, go to the manufacture of his head
- To do this, we take a piece of thick foam and the maximum sharp knife cut out the blank visually reminiscent bird's head
- At the next stage, go to the manufacture of a pigeon
- This can also be done as shown in the workshop or method that was used to manufacture a swan plumage.
- After the features are ready, make a small hole in their lower part and secure wire in it.
- In the last stage, connect all the workpieces between yourself and correctly color the head of pigeons with paints
Plastic bottle peacock

 Pavlin's torso
 Making a peacock plumage
  Fastening of plumage
 Tail manufacture
  Manufacture of a head
 Making feet peacock
 Final assembly birds
 If you want to make a beautiful peacock, then you will have to be patient. Unlike swan and pigeon, such requires a characteristic of her plumage. This means that in this case it will not be enough to cut the right feathers. They will need to be completely connected to each other and only after that attach to the body of the future peacock.
Peacock production:
- So, for starters, make the body torso. To do this, you will need to use one five-liter bottle, two half-liter and two plastic sticks
- Next, go to cutting feathers and the formation of large pieces of plumage
- When the plumage is ready, start making the tail. Be sure to take into account the sizes of the body and watch it is not too big.
- When the tail is ready, start using the foam head (immediately paint it with paints)
- Connect all the details of the peacock among themselves and, if you wish, install it on a heavy stand
Plastic butterflies
 Plastic Bottle Butterflies
 Cutout template number 1
 Template for cutting number 2
 Cutout template number 3
 Plastic bottles are the perfect material for the manufacture of beautiful and bright butterflies. Depending on the bottle of which value you will use for this, you may turn out both very cute little butterflies, and very large, able to be an independent object of the garden or courtyard of a private house.
The most pleasant thing is that the manufacture of these bugs does not require some special skills from people. All you want to do, stock bottles of the desired size, scissors, paints and, of course, fantasy.
- To begin with, cut off the neck of the neck and the bottom (you should remain the most supplied middle part in your hands)
- Draw a butterfly on a leaf or find a suitable template on the Internet.
- With a black marker, transfer the butterfly outline to the bottle
- Cut the drawing with sharp scissors and show off it as you see it
- Finished butterflies can be attached to the wire, and then place them on flower beds or just on the lawn
Yes, and if you have stained paints, then you can paint the transferred outline on the bottle, and after complete drying, cutting out already completely finished butterfly. Since in this case there will be quite convex lines, then you will have the opportunity to fill them with small rhinestones or fuels.

 Ladybugs of plastic bottles
  Ladybugs from the bottom of the bottle
 If you want to make God's cow as quickly as possible, then go to the red bottles (1 pc.) And black (2 pcs.), As well as an ordinary stapler. One bottle will imitate the torso of the bugs, and from the other you make characteristic points.
So:
- Cut from a bottle of red billet, imitating wings
- Next, take a bottle of black and cut the mug from it
- On one of them draw beautiful eyes and attach to the bottle cap
- The remaining black mugs with a stapler fix on the wings of God's cows
- At the last stage, attach the wings to the bottle and the craft will be ready
If you wish, you can make a similar bug and from plastic covers. To do this, you will need to just take paints and paint them correctly. Such small ladybugs Stant beautiful decoration Plants that grow in pots.
Plastic Bottles
 Plastic Bottles
 Owl from a plastic bottle made by the method with which we will now introduce you to be as a complete flower potAnd the original kashpo, which can be either installed on the floor, or hang on the summer veranda.
- To begin with, cut the top of the bottle
- Using paints, give the blank the desired color
- Next, take a simple pencil and draw a drawing on it, which will imitate the face and plumage of owls
- Using a knife for cutting plastic, give the right shape
- Add the volume of the owl with the help of contrasting lines
Yes, and, if in the future you want to use such a craft exclusively as a flower pot, then do not cut holes that imitate the plumage. It is possible to achieve such a visual effect with paints, simply by correcting the features. Such a pot can be used to grow indoor colors or for growing spices.

 Plastic Bottle Pig
 As you already understood, crafts from plastic bottles may have several destinations immediately. The plastic pig is also no exception, therefore it can be a flower pot, flowerumba or a full-fledged decorative object.
If you want to make a pig solely for decoration, then act as shown in the master class. If, in the future, you plan to plant the plants into it, then prudently cut out at the top of the workpiece, the opening of the desired size and additionally reinfeit it with a plastic rim.
So:
- Sut off the four liter bottle of the neck (it will be our feet of our pig)
- Confirm them on a wire, and then fix on a five-liter bottle
- Next, out of the middle of the plastic bottle, cut rounded blanks (it will be the ears of the piglet)
- Ears kpripim on the top of the bottle closer to the neck
- At the next stage, we cut out two small circles and fix them on the piglets
- At the very end, we paint the whole blank in gentle pink color and with paint white and black color draw our pigs

 Chamomile from plastic bottles
 If you want to decorate your home or household plot with flowers that will please you round year, then try making them out of plastic bottles. Now we will teach you to do very beautiful and most importantly, the most realistic chamomile, which will become the most beautiful decorative object of your dwelling. Make them best precisely from white milk bottles. Since they are more pliable, you will be much easier to form thin petals of chamomile.
Simple tips:
- First do cut out of the middle of plastic bottles of the same diameter circles
- Next, begin to form a flower itself from them.
- To do this, first divide the circle into four parts.
- Further, each of the four segments again divide into four parts
- If you do everything right, then you will have 16 ideal petals
- At the next stage, take nail scissors And neatly round the edges of the petals
- Then cut out a small circle out of plastic and keep it around the edge
- Hold this workpiece over the candle while the edges will not be filtered
- Paint the resulting billet in yellow
- From a green bottle cut out the correct star shape (it will imitate a cup of flower)
- From the same green plastic cut the characteristic leaves
- Take the wire and wrap it with an atlantic ribbon or corrugated paper.
- Connect all the details of each other and the chamomile will be ready
Plastic bottles roses
 Plastic bottles roses
 Similarly, roses can also be made. Petals and stem can also be made as for the chamomile, but the bud himself will need to make a little different. In this case, you will need to cut a rectangular blank from the plastic and divide it exclusively into four parts. Another nuance in the manufacture of bud is the lining of the ends of the petals. In this case, you will need to warm the blanks more than usual, and then with the help of a round wooden stick, give them the desired shape.
If you give up this stage, you will eventually get a rose, but a poor flower that can hardly be used to decorate the house or garden. Yes, and, remember, if you need to paint plastic, then you need to do it before you start connecting the petals in the bud. Since the finished workpiece will turn out quite volume, then you simply will not be able to punish it as well as possible and as a result, your rose will have ugly spaces.

 Plastic bottle palm
 Tips manufacture
 If you want to be conquered on your household plot, you do not need to buy expensive saplings and wait for years until they grow to the desired size. If you wish, you can make such a tree from plastic bottles of brown and green:
So:
- At the initial stage, make the barrel from the bottles
- To do this, cut the bottom of the bottom and the neck, and then start inserting a bottle into the bottle
- When a hollow blank will be ready, reinforcing it with a wooden stick or iron rod
- Next, begin to make the top of the palm
- To do this, cut off the bottles of the bottom, and then cut them on thin stripes
- Inside of these billets, too, it will be necessary to insert flexible rods or plastic hose
- At the very end, you will only have to secure the top on the trunk and securely fix the palm tree on the flowerbed.
Plastic Vases for Living Or Artificial Colors

 Plastic Vase in Decoupage Style
  Vase with pattern
 Vase with weaving
 The easiest way to make a vase from a plastic bottle, just cut off the neck, and then paint the surface of the obtained billet into the desired color. And so that such a drawing looks more effectively, it can be additionally calculated by a floristic ornament or to be caught by rhinestones and fuels.
Plastic Vase in Decoupage Style:
- Take a two-liter bottle and cut it out its top
- Make the external part of the workpiece with PVA glue, and then apply the selected napkin on this layer.
- Gently crumpled everything with a soft tassel moistened in the globe, and wait for the top layer to dry
- Next, take a decorative tape suitable and style and with glue to attach it along the edge of the throat of the vase
- If you wish, you can additionally reorganize the vase with beads and ribbons
Plastic Bottle Puff
 Plastic Bottle Puff
 A little higher we have already told you from empty plastic bottles you can make various decorative ornaments for home and garden. And now we will teach you how from plastic you can make a soft pouf, which will decorate any interior.
But remember if you want in the end you got perfect product, then use the same size to make it the bottle. In the event that you can make the pouf simultaneously from one and two-liter bottles, then you will definitely not be able to create something for a truly high-quality.
So:
- First, prepare 16-20 identical bottles
- Using scotch, scrape bottles pairwise
- When you cope with this task, create a circle from blanks and also lock all scotch
- Measure the diameter of the workpiece and on the basis of this data cut two circles from dense cardboard
- Place the bottles between them and turn everything with scotch again
- In the next stage, cover the workpiece with foam rubber and gently sew all with small stitches
- From the appropriate material, sew a removable cover and put it on the otfik
Brooms from plastic bottles

 Brooms from plastic bottles
 For the manufacture of brooms, it is best to take two lithing bottle. Their size allows you to create a rather bulk fringe, which is effectively fighting with garden garbage.
- First, find a smooth wand that will imitate the top of the broom
- It will be better if its diameter will allow you to put on it a blank from plastic
- Next, take the bottle and cut her donyshko
- Then with sharp scissors, cut the blank on the strips, not reaching the neck
- Make a few blanks in a similar way and insert them alternately in each other.
- Secure all the wire and dressed on a smooth wooden wand
 Plastic bottle mosquito trap
 As you already, probably, understood the plastic bottle in skillful hands can turn into a fairly beautiful and original thing. But besides decorative elements From this material can be made for mosquitoes, which can be placed both within the house and on summer terraces. How to make this miracle device you can see in the figure, located slightly higher.
Remember, if you want the trap to cope as well with your tasks, the fluid in it must be changed every day. It is advisable to do it closer to the evening, it is pre-drained from it old and rinually cutting clean water. When complying with all these nuances, you can forget what mosquitoes are and even in the most wet summer season to enjoy calm nights.
Video: What can be made of plastic bottles for the garden and the country house?
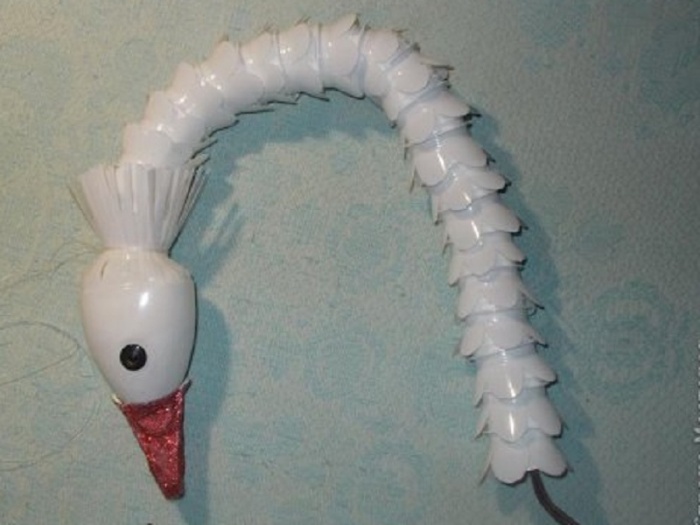
Graceful bird always fascinated by its grace. Accommodating in the garden The symbol of loyalty happened to be having everything at hand affordable Material. Information, how to make a swan from plastic bottles, proposed in three versions, will make it possible to pick up each most acceptable way.
Swan Kashbo Bottles
Crafts based on plastic bottles are distinguished by different categories of complexity. Step by step guide It will help to cope with the task of laying a swan even a novice master. The main thing is to be patient. One bottle of 5 l and a lot of white plastic containers with a volume of 1 L is the main material of the spectacular craft. It will also be necessary:
- metal rod for neck swan;
- foreck, tape and thin wire for connecting individual parts;
- metal mesh serving the base of the wings.
Preparation of individual details
The manufacture of a swan is preceding preparatory stage. Work begins with cleaning plastic bottles from label residues and glue. On the clean container there is a markup according to the photo. The top line was carried out below the neck for 2 cm, the lower line above the corrugated part of the plastic bottle is 1 cm. Between them there is perpendicular straight line. The cut is performed as soon as possible.

For neck, the parts made of plastic bottle with the neck are cut on 6 parts, cylindrical elements are divided into 8 fragments.
Attention! All angles on the billets are spinning, 3 paired holes are formed at the base of the petals.
A neat swan head is obtained from a plastic bottle of 0.5 l as follows:
- the neck with a plug is removed;
- at the cone-shaped section, an incision for the seam is made;
- all other knitting lines go with a gap of 0.5 cm;
- end of clothespins, which will play the role of beak swan, melted over fire;
- the holes are pierced on them, the holes in the plastic bottle are formed at a similar distance.

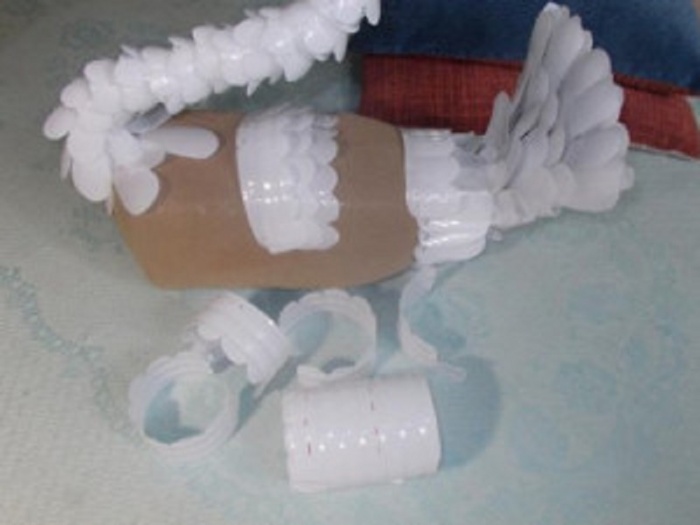
The base of the swan body represents the packag of 5 liters, on the bottom and the lid of which they make holes for fixing the neck. The opening from the side should allow you to freely penetrate inside the tank of the hand.
Assembly process
When separate elements Swan decorated, you can go to the assembly of details:
The result of a painstaking process will be a spectacular swan from plastic bottles, similar to the photo below:


Combined Option with Tire
There is another interesting and affordable option Making birds with majestic neck bending.
Housing
According to the proposed master class, the swan from plastic bottles will be no less fascinating. The main difference is the function of the body performs a tire with a diameter of 50-55 cm.
Case formation:
- The tire is cut in half. Work carefully, so as not to be covered with cord.
- One piece is shortened by 10 cm.
- Both parts are combined in the shape of an egg with a width of about 45 cm and securely fixed.
The result will be a blank presented in the photo:

Head
Making swan head:
- The basis of the part is the foam 20x12x10 cm.
- The head with the beak after cutting is subject to careful grinding of sandpaper.
- On the back of the head is prepared for a 5 cm recess on the fixation of the neck.
- Swan's head is evenly treated with putty.
- After drying the solution, the surface is grinding with papers of smaller grain.
- The workpiece covers the paint white, black and of blue color. An example is the following photo:

Neck
The process of creating a bird neck based on plastic bottles:
- The rod with a length of about 2 m give the desired outlines.
Tip! It is better to refuse from the steel detail, it is too difficult bend and can burst.
- Corrugations will need about 80 cm. When using the old material, it is thoroughly cleaned from contamination.
- One edge of the corrugation is drawn up with cuts for mounting the swan head.
- Fixing the neck of the swan to the body and the head is carried out by self-drawing.

Plumage
On the fusion of the Swan will need:
- plastic white bottles - about 40 pieces;
- construction grid;
- pliers and knife;
- wire, nippers.
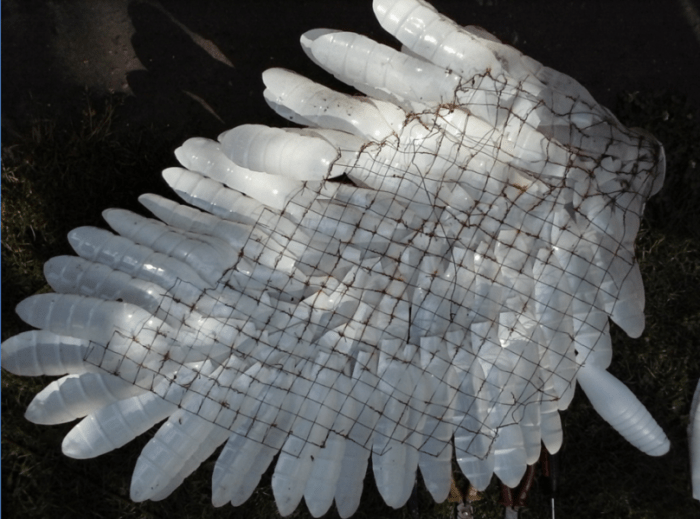
Avoid corrosive processes will help staining with white paint grid for outdoor work. One plastic bottle serves as the basis for 5-6 winch feathers. On each billet from the plastic bottle, 4 wire holes are prepared. Optimally use copper material that lights easily. Feathers are connected to the wire of the mustache to hide the connection sections. The process of forming the wings and the tail of the swan is identical, the difference lies only in the outlines of the grid.

Installation and installation
When all parts of the tire and plastic bottles are ready, proceed to the grazing of the swan. The plot on which is planned to place a decorative figure is made up of bricks, a board or a car cover. It will be a kind of podium.
The joint of the neck with the body is carried out by self-drawing. The end of the rod is strifted in such a way that it is possible to fix it in the soil. Wings between themselves are fastened with wire, plud is clamped from behind. The tail of the swan is fixed. The head made from a plastic bottle is screwed to the corrugation screws. The elegant bird from plastic bottles will become a decent decoration of the site.

Grace in the garden
Another version of the crafts based on a large plastic bottle also has practicality, thanks to the possibility of placement inside the colors.

The content of the article:
Make a cottage extraordinarily attractive easy. For this, it is not necessary to spend big money, it is enough to put empty plastic bottles in bags, and then choose ideas from the proposed and implement their lives. Such work inspires, allows you to make a plot well-groomed. It will certainly be paid to the neighbors and guests will be paid to him, and the owners themselves are nice to be in such an atmosphere. Start the conversion from simple work, which allows you to arrange a fabulous corner on your household plot.
Lake or Pond for Bottles
To make a reservoir itself, special skills will not need, depending on its size, you will need 30-250 bottles. First, outline the shovel seat of the future fairy pond. Inside its contours, select Derne. It can be folded into a bunch, cover with dark film, periodically water water and kitchen waste, and next year You will have a wonderful compost.
If you are not using a virgin plot of land, then simply imitate it with a shovel and, starting with the middle to edges, lay the blanks. To make them, do hard in the plastic bottle of the neck along the shoulders, now press the workpiece upside down in the ground so that the packaging looks over the surface of the soil for 8 cm. You can use for this type of site design. Lower halves of bottles remaining from creating other things. The main thing is that they are not shorter than 10 cm.
If you use only the bottom of plastic bottles, then fill it with soil, turn up the bottom to the bottom of the workpieces rise above the ground surface. Place the container close to each other so that the lumens are minimal.
After performing several rows of inverted plastic bottles, paint them in a blue color. It is better to do this at once, since if the lake is big, it is difficult to get into his center difficult. If you do not have a numerous container, do the lake gradually. Coperty can be decorated with large stones. So that the pond was picturesque, plant several plants around the edges.
Decorate the lake with water lilies. How to make such crafts with your own hands was told in one of the previous articles, and from this you will learn how to make a swan from the girlfriend. Such a bird looks great not only near the lake, but also in any other corner of the garden.

For this type of creativity, you will need a tire from the car wheel. Color her B. white color, Attach the iron brackets to the outer part of the solid wire. It should rerupt the bottom of the tire, then output it up and bend in the shape of a swan neck.
Now put on the wire plastic plumbing hose if you do not have this, and a piece of watering rubber is suitable. Its upper part is slightly falling on both sides, put the bird's head here. To make it, do a soft bottle below the shoulders, making a cut figure. Put the blank on the wire, make out of a small bottle from under Ketchup Beak. If you do not have this, then cut the triangle from plastic, glue his two opposite sides. Having placed the beak into place, cover it with red paint. You can make a head from a synthetic foam rubber, and to take a hose from the old vacuum cleaner.
The head and neck are painted in white, and black tick the place of connecting the beak and the face so that you clearly designate the oncoming part and the eyes of the bird.
If you have extra time, then before making a swan, modify the tire slightly. As can be seen in the photo, on the one hand there are small cuts on it, on the other - solid, it makes it so that the tail remains. The place of the cut is fastened with a bolt with a screw.
Bird with fluffy feathers from plastic bottles
Swans made with their own hands, obtained elegant if they are beautifully fused. To do this, you will need white plastic bottles from the milk.

In the next photo you see how to make wings. For this out metal grid Cut them the basis in the form of a triangle with beveled corners. To make a plumage, take plastic dairy bottles of white. From each cut the neck and bottom. Divide the resulting canvas on 6 parts, also rounded with scissors each of them. These are feathers. To attach them, use awl and fine wire. Make punctures in blanks and tie them to a cellular grid.
Cover her feathers on both sides. Attach the 2 wings to the bus using self-tapping screws. You can do differently, pulling the wings with each other with the wire through the tire.
How made graceful birds from plastic bottles?
Another elegant swan can be made of the following materials. To work, you will need:
- large plastic bottle of rectangular shape;
- putty;
- thick wire;
- bandage;
- sand.

Now dustly lubricate the entire outer part of the canister. Take the bandage, starting to restore it with a wire from the bottom up, also generously obscure it with this solution. As a result, you get the neck of the graceful bird. Where there will be a head, bandage will need to be treated even more, glorify it with a putty. Subscribe this part of the workpiece.
We proceed to the wings. As in the first case, there will be a large-scale iron mesh. To attach it, first cover the bird's body with a primer, let it dry, then attach the grid and secure it with the side parts of the swan with a putty.

You can leave the wings in this form or decorate them outside with feathers of plastic dairy bottles, and from the reverse side, hide the grid under the layer of putty.
You can give to dry the product, then paint your eyes and the beak of the bird in the right colors. If you want to use a swan, like the original Vazon for the cottage, then fill in the sand with sand only by a quarter, and put the fertile soil from above and plant your favorite flower. Or make the second bird. As a result, you will get here such beautiful swans made by your own hands.

How to quickly make bottles of snow-white birds?
If you have a little empty container, and you want to decorated your site as soon as possible, then read how to make a swan quickly and from a small amount of materials. Also he can not only decorate country cottage areaBut also become a beautiful and original flower club. For this, transparent containers are quite suitable, they need to trim the necks on the top of the shoulders.
Observe the form of a future flower garden on Earth. Fill the bottles of sand or unnecessary soil, for example, clay, paint them in white. When the paint dries, insert bottles on the planned markup in the ground about a quarter, turning upside down. So that they keep well, keep them in a circle wide scotch in 2-3 layers. It also needs to be covered with white paint.
Head and neck Swan are made of plywood. First draw this part of the bird on the workpiece, and then drink it. As shown in the photo, show off this detail with the corresponding paints. Pour fertile soil in the flower bed, put flowers and you can admire the original creation.

Plastic swans can be made without much trouble. For the manufacture of the next you need only:
- 5-liter canister;
- milk bottles;
- scissors;
- glue;
- paints;
- wire.

Canister Put horizontally on most, cut the top sidewall from it, pour on a third of the wet sand. Insert a hole in the bracket done in the cork in the tube, bend it in the form of a neck and head of the bird.
From the dairy bottle, cut one one. Cancel it from the bottom to the shoulders on 6 parts, round the resulting feathers with scissors. Make so all the container, and then take turns to wear blanks on the bird's neck. In the neck of the last top to inhale her beak. You can also make it from plastic or polymer clay.
Now you will need some more dairy bottles. From each cut out 4 sticks, get them on the canister, starting from below, so that the rounded part of the feathers look at the top and slightly wil. After the glue dries, put a pot with a flower in a canister. The master class pums the story about how to make graceful swans from plastic bottles.
Decorating plastic bottles Duty Pond Lake

If you imagine that the lake with floating swans is located on the island, then why not install palm trees on his shore? It is also made of plastic bottles. With your own hands, make such products very interesting. If you do it together with the children, they will certainly grow up creative peoplecapable of looking at any materials, find the ideas of crafts.
For palm trees you need:
- metal fittings of the desired length;
- plastic Bottles of Brown and Green;
- scissors;
- candle or lighter.
First break the labels. If they are glued too high, then place them for 40 minutes in hot water, then remove, sometimes helping yourself with a knife.
Now cut the bottom from bottles, make a break point zigzag, slightly bent the resulting large jar out. Stick the reinforcement in the planned place so that it holds tightly, start to ride the bottle of the neck down.
Such a technology for creating is suitable if you have little suitable packaging. If it is more, then use only the bottom of the bottle. Drill in each hole with a drill, and then slide on a metal rod, as shown in the photo. And on the next photo you see how you can make a trunk for palm, if you have an unnecessary log and donyshki from brown bottles. They are nailed or attached to self-pressing to a wooden basis, but the bottom leave free so that the village can be inserted into the ground.

How to make palm leaves from bottles?
When you place the southern tree barrel, proceed to its leaves. For them you will need a plastic container of green. The master class on the manufacture of palm trees from bottles will describe this process in detail.
There are a lot of options for obtaining this part of the tropical trees. If you like the idea with a wooden basis, then you can make leaves simple way. This requires large plastic bottles with a pre-cut bottom. Cut them from the bottom to the shoulders, not reaching the neck, on the plurality of small tapes.
Now in the upper part of the wooden palm tree, drive metal rods, slightly lower them and slide on each bottle of the neck down. What you succeed, also seen in the photo.

But another way of manufacture of plastic bottles of leaves. To do this, the packaging of any size is suitable, you need to cut off the bottom and do on large bottles of 4, and on the small - 3 cuts to the shoulders, rounding them. These are billets of leaves.
Now at the edges of each sheet, make a thin fringe. In the center Leave the gap of 1-2 cm is a lodgment of the sheet.

On the top of the trunk put on the bottle brown color Without bottom neck up. On the lid, make 6 holes crosswise with a soldering iron or a drill. Dress through two holes that are opposite, one rod or wire, through the other two - another rod, and through the third pair of holes - the third wire. Now lift the first billet of the leaves for each rod, then the second, and so on. You should have 6 details of the leaves, each consists of six bottles. For reliability, secure them between themselves on the covers with wire.
So that the bottles do not jump from the rod, on the back simply bend it. And that's what you think.

If you want to visually see the process of making palm trees, then watch the video:
Swan has always been a symbol of beauty, grace and grace. Make a swan of plastic bottles with your own hands is easy. Although it is necessary to show abatinity, patience and spend a little time, then a beautiful swan from simple plastic bottles will be a great ornament for a garden or cottage.
This article will present a master class in the craft, two techniques for the manufacture of swan with detailed instructionswho are supported by photos and video materials.
Here are some photos, as the swan should look like:

Stage creation composition
At first it is important to choose a place in the garden or at the cottage in which the swan will stand. Such an original bird is used as a football for flowers or other plants. The name of this craft is a swan of Kashpo. Stunningly spectacular and functional thing.
First technique
For crafts, materials will be required as:
- Five-liter large plastic bottles;
- 0.6 millimeters of iron wire;
- Metal grid to make wings bird;
- Putty;
- Roller for putty;
- White bandage;
- Tassel.
It is necessary to cut a bottle of pressure, and bend the wire and give the look of the numbers two, make a hole in the bottle tube and paste the wire. Strengthen the design with special ceramics glue, and to be stronger inside the product, flood with stones or broken bricks. Hole fill with wet sand.

How it works? Under the pressure of sand, the bottle should become more rounded and take the shape of the bird body.

The workplace for working on the cradle should be closed by cellophane. At the next stage of work it is necessary to make a solution of putty. To swan it is easier to sculpt, a solution is required to do thicker. In order to make the bottom of the product, the first layer of putty should be smeared directly on cellophane.

Put the bottle on top of the solution and neatly spatula to align layers.

The next stage is to make the bird's neck. To do this, we must begin to deceive the wire with putty. Starting from below and do it with wet hands.

Similarly, to deceive the entire bottle with a spatula, a thick layer of two centimeters.

To make the wings of the bird, you need to bend the grid into the shape of the wing, attach to the side of the bottle and pick up, fix the putty. Wait until the solution grabs.

When the putty grabbed, to deceive the bird wing with a solution.

While the wings dry, you need to deceive the bird's neck.

During the workflow, wet the wet white bandtik.

It is required to form the tail of the bird. To do this, part of the grid to bring at an angle of 40 degrees and hold the solution. Then hold your head and leave to dry the product for 30 minutes.


From the bottom of the tail to make roundness at the bottom of the tail.

Make the top of the tail in several stages.

View of the tail from above.

View of the tail side.

When the harvesting for swan is ready to dry, you need to launch it, paint white paint and check.

Lovely swan ready!

Second way

For crafts, such materials will be required:
- White liter plastic bottles Exactly 25 pieces and one bottle of 500 milliliters;
- Five-liter transparent bottle;
- One light-visible bottle of plastic, volume of five liters;
- Three meters thick wire;
- Women's elastic tights;
- Sinypron and corks from bottles;
- Leske and wire;
- Small pebbles;
- Red fabric for beak;
- Scotch;
- Eye buttons.
First you need to prepare bottles. Remove the neck, corks, rings, flying out the labels. Next you need to cut the bottles, but before cutting, draw clear lines for which you cut.

The half-liter bottle is cut, remove the neck and cork. Making cuts to a bottle cone. The first incision to do on casting seam. Next, make the beak, melt the ends of the clothespins and a clattold of a seboard two holes. Scotch and collect two halves of the clothespins. Torso swan to do with a 5 liter bottle.
Next you need to assemble the product. Bend thick wire into two parts and skip through the wire in the bird's head. In the head, put the syntheps and drive the plugs alternately with 6-petal parts.
That should be the neck:

To strengthen the body, you need to skip the cervical wire through the bottom of the five-liter bottle and output through the hole in the lid. To stabilize the product to fill the bottle of stones. From the ends of the fishing line make the tail. Cut and strengthen feathers with synthetic thread.
Crafts of the majestic swan ready!
Video on the topic
Light videos, how to make a wonderful swan from bottles.