Installing the fan in the bathroom. How to install a fan in the bathroom
In modern homes, it is not always possible to achieve high-quality air hood with natural ventilation. It is not always possible: a bad design of the house, changing the drawing designs from the neighbors. Therefore, people have already long started to establish forced hood in the bathroom. This is necessary in order to pump up air with high humidity, which poorly affects almost any material that is used when repairing the bathroom. Montage itself on empty walls It takes no more than 30 minutes, but will bring you a lot of positive moments. Fungus, mold, dampness and constant high humidity - all this can be avoided by simply installing electric hood to the bathroom. In this article we will tell about how to install and how to connect the fan to the exhaust.
- In modern homes, it is not always possible to achieve high-quality air hood with natural ventilation. It is not always possible: a bad design of the house, changing the drawing designs from the neighbors. Therefore, people have already long started to establish forced hood in the bathroom. This is necessary in order to pump up air with high humidity, which poorly affects almost any material that is used when repairing the bathroom. Mounting on empty walls takes no more than 30 minutes, but will bring you a lot of positive moments. Fungus, mold, dampness and constant increased humidity - all this can be avoided by simply installing an electrical exhaust to the bathroom. In this article we will tell about how to install and how to connect the fan to the exhaust.
Preparation of ventilation canal
Installing an exhaust fan must be installed until the tile laying. In each modern houseA ventilation channel is already provided for the exhaust. Most often it is located in the corner of the bathroom, between the toilet and the bathroom, in the wall. In order to avoid problems with circumcision tile with further work, it is best to mark the mounting hole, slightly retreating from the wall. If the hole that was done during the design is small for your fan, then you can increase it with a perforator and shovel nozzle. Before continuing to work, pull out the feed cable from the switch so that it does not flush, it is necessary to place it in a corrugated tube. The absence of a cable complicates the situation. To connect the system will have to stretch wire of VVG. With 3 copper cores with a cross section of 1.5 mm.
Bathroom and toilet ventilation is an integral part. Ventilation provides optimal microclimate in these rooms, both for humans and objects and interior items.
First, ventilation significantly reduces indoor air humidity, which is especially relevant for the bathroom and toilet - rooms with high humidity. Reduced humidity prevents the formation of mold and deterioration of electrical appliances and interior elements due to high humidity in room. Secondly, ventilation eliminates unwanted smells and prevents the reproduction of bacteria.

Ventilation can be both natural and artificial. In the absence of the possibility of providing natural insulation of the bathroom and toilet (no windows in these rooms, high tightness of windows and doors installed in the apartment), artificial ventilation is used, which is implemented by installing fans specifically designed for ventilation of household premises.
One of the stages of installation of the ventilation system in the bathroom (toilet) is connecting fans to the electrical network. Below will look at the features of connecting these fans.

When connecting ventilation fans, first of all, the fact that the bathroom and the toilet belong to the premises with increased level humidity. Consequently, all elements of electrical wiring and fittings for its installation must have a housing with a sufficient level of protection against moisture. As a rule, the degree of protection of the housing of the mounted structural elements of the wiring is not lower than IP44.
How are the fans connect to the electrical network? In this case, it all depends on its constructive features. There are types of fans, the inclusion and shutdown of which is provided by the built-in switch, which is performed with a cord. By pulling the lace down, you can enable or disable the fan.
In some fans, it is possible to open and closing the ventilation hole, usually the switch is embedded in this closing device and opening the opening. By pulling the hole in one rope opens, and the fan begins to work, pulling over another rope, the fan hole closes and it turns off from the electrical network.
If the fan does not provide for the above devices or for one reason or another, they are inconvenient to use (for example, if the fan is high enough relative to the floor), then a switch must be installed on and off the fan. For this purpose, switches used for lighting equipment are suitable, since the power of the fan is usually small.

As mentioned above, all elements of electricians mounted in the bathroom, including switch, must have reliable protection from moisture.
Where to take food for ventilation fan? The power consumption of this electrical energy consumer is small, so it is not necessary to carry out a separate line for its power. It can be connected in the nearest, and in the absence of it to take line from one of the sockets located in the bathroom. If the bathroom has a socket, for example, for washing machineYou can connect the fan from it.

The operation time of the fan in the bathroom or toilet can be installed using the timer. For these purposes, both universal timers and fans with embedded timers can be used.

Enable the ventilation fan of the bathroom can be carried out automatically. The main task of the fan, as mentioned above is a decrease in the level of humidity in the room, based on this principle, it is necessary to implement the automatic switching on the fan in the event of an increase in the level of humidity in the room. It turns on the ventilation fan in case of increasing the level of humidity in the room to the set value.


As for the toilet, where, in addition to reducing the level of humidity, the fan eliminates unwanted smells, one humidity level sensor is not enough. In this case, a motion sensor is installed to implement the automatic fan. That is, when a movement appears in the sensor detection zone, it gives the voltage to the fan and, accordingly, in the absence of movement in the sensor detection zone, the fan is turned off after a while.
It is advisable to choose a motion sensor in which it is possible to set the time after which the load is shutdown in the absence of movement in the room.
In most cases, the installation of motion sensors and humidity levels are neglected and limited to the installation of the switch to control the fan manually.
Connecting the hood fan in the bathroom can be performed in several ways.
- Through the door opening sensor or movement
- humidity sensor
- directly from the light bulb or lamp in the bathroom
But the correct thing is that it will be done through the light switch, installed on the lighting in the bathroom, or through a separate two-block key.
How not to connect and why
The first options have a lot of inconvenience, initially not quite noticeable. 
For example, you mounted the power on the door opening sensor. It turns off by timer in 5 minutes. It would seem very convenient. 
However, on interroom door It is quite problematic to establish such a sensor. Not to mention other points of operation. For example, what to do if you delayed the toilet longer than the time set.
Open and close the door again? And if in the kitchen guests?
In addition, the cable will have to be conducted under the tile, drill several extra holes, etc. The simple sensors of the movement of capricious moisture and very quickly fail. 
We will have to select expensive models with appropriate IP moisture protection, according to zones in the bathroom. 
Someone considers the most convenient option to install a switch on the hood directly inside the bathroom. However, PUE prohibits do it. 
Connecting the fan in the bathroom through the switch
Therefore, we consider the most correct and reliable way - connecting from the switch to the lighting, located on the outside of the bathroom. 
For installation, you will need quite a few materials:

Which one is better to choose, read in the article "The Best Cable for Wiring NYM or VVGN-LS". 
The body has most plastic hoods, so such models do not need to be grounded. If you have ventilation with metal elementsthen here you will need 4 residential cable 4 * 1.5mm2 

The loads are small here, so these disputed for many terminals are quite appropriate. No twists with subsequent welding, soldering or crimping. 

Varieties and characteristics
The model ERA model is most popular in our market. It will look more in more detail. 
Other mechanisms and models with a timer from Vents, Ballu, Electrolux are connected in a similar way.
Here specifications and detailed data on all popular models:
Electrolux EAFM-100TH ERA SB D100 Optima Vents 100 K Domogen 100 C ERA D 100 E 100Sc Ballu Green Energy Era D 100 4C et Vents 100 Quiet


Hooding modes in bathroom
These fans with the timer have two modes of operation:


Switching modes is performed on the control board in the upper right corner.
There are similar jumpers and other manufacturers. 
When working in the "Toilet" mode, after switching on the light and power supply to the fee, ventilation immediately starts working. Once the light is turned off, the fan does not stop, but will continue to spin certain time.
This time you specify yourself by unscrewing the adjusting screw with a screwdriver.


In the "bath" mode, the work is somewhat different. This mode is suitable for shower and bathrooms, without toilet.
For example, if you take a shower or bath, the noise of blades and drafts will only interfere. Therefore, when the light is turned on in the room, the fan does not work.
If the light has burned over 90 seconds, then only after it is turned off, it will be triggered and start the exhaust. Its further work will continue so much time as you twisted the timer's adjusting screw.
It is managed by all this business just the same from the switch to the light standing in the corridor.
Connection diagram and connection of wires in the distribution unit
As a rule, over this switch from above there is a camshaft with wires. It can enter 3 cables: 
- One descends down to the switch (OFF)
- The second is the food coming from the camshaft (gr.
- The third - goes to the lamps in the bathroom (light)
 How to correctly connect, and what will be the connection scheme of all these wires in the distribution unit and on the fan itself? Schematically, this can be drawn as follows:


To connect all contacts, from the box to the installation site of the ventilation, you will need to pave another vVGNG-LS cable 3 * 1.5mm2.


The ends of the cable are cleaned with both sides and subscribe.
- L-phase power
- T-Phase for Hood Control by Timer
- N-zero


You do not need to twist anything, put everything on Wago clamps.
At first phase L, connect to the main feeding cable by an argument from the camshaft. 
Please note that for correct drawing, the control panel should always be present on the terminals of the control panel.
That is why one phase cable vein connects directly to the light switch.
Therefore, a three-in-room cable is used here. If only 2 wires enter the bathroom in the bathroom, it will not work out the scheme with the timer.


Phase T, which is served on the fan timer, is connected after the switch. That is, to that wire that goes on the lamps in the bathroom. 
Thus, ventilation management is carried out through the light switch. It remains correctly connected all the conductors on the fan itself.
Remove the protective decorative frame to get to contacts. 
In the upper right corner is a timer. Immediately adjust it to the approximate time of work. Adjustment is carried out in a wide range - from 15 seconds to 45 minutes.
Some from the factory is out of the factory, almost no zero. As a result, the blades cease to rotate immediately after turning off the light. 
People think that the hood broke. Although it was enough just to twist the screw.
Now connect the cable to the appropriate terminals:


- Phase custody of food L - to terminal with similar labeling
- The phase of the fan timer - on the middle contact with the inscription T
- zero - on the remaining terminal N
 Please note if you have only 2 phase wires and zero, then that the system worked at least in manual mode, you will have to make a jumper between the terminals N and T.
Then the device will only work when you turn on and disconnect the light keys. About any automation and time delay here cannot be speech. 
Even on some models, the correct connection of zero - n and phase - L conductor affects. If your fan behaves in an incomprehensible way and works or vice versa refuses to work correctly, try changing them in places.
Check the indicator the glow, where exactly the phase comes and check again with the diagram of the device specified in the passport.
Fasteners are best done on glue or sealant. 
Drilling holes under a dowel is often problematic:
- either holes are located close to the edge of the tile
- Or in this place may be fittings, and the perforator will simply break the whole wall

Here what is called how lucky.
Connection through two-block switch
Another suitable option is to connect the fan through the same light switch, but already two-block. 
Here the scheme will look like this: 
In fact, the extract you will sit regardless of lighting. But for this, most likely you have to change a classroom model on a two-bowl. Plus pull the extra cable from the camshaft down. 
There are here and "pitfalls". First, do not confuse the connection of the phase on the switch contacts.
And it meets completely and nearby. 
Secondly, do not forget that through this switching apparatus, it must break the phase, and not zero. Even with the right initial connection, with time the scheme can swap spontaneously.
A sufficiently local electrician, in a shared panel or accession wiring, accidentally change the two conductors L and N. And in your entire apartment automatically, the polarity will be changed on all switches. 
What will it be threatened? Well, for example, when you turn on only one fan second key, you can flash, flash and shine neon lights In the toilet.
The effect is quite known for LED lamps. 
Connection directly
If you initially abandoned cut boxes and use to switch in-depth, then the third connection scheme will be similar, and the differences here are practically not noticeable.
Just all the connections are performed directly in the opposition. You can crimp or on the same Vago clamps, if the place allows.

There are still expensive trimmed models with remote controls. 
They are connected in two ways:
- Directly with the distribution machine - a forced manual shutdown is made by the button on the fan itself.
- through a separate light switch key
Connection errors
1 Installation of the switch on the hood inside the bathroom.In Pueue of the 6th edition of P.7.1.39 by direct text it was said that the installation of switches in bathrooms and bathrooms is prohibited.
In PUE Edition P.7.1.52, the wording changed a bit, expanding the definition of "switches" to "switchgear" and "control devices".
True left a loophole for models with laces. 
However, many have doubts about interpreting "outdated" rules. After all, there are other items, which, as if contrary to the foregoing.
For example, paragraph 7.1.47
That is, how to put the switch can, but just do it in zone 3. There's a single outlet. 
In homes with improved layout, such sizes of bathrooms come across, as the zone 4 can be found if you try. 
In the small apartments, in addition to the first two zones, nothing else will fit. 
But how is it paragraph 7.1.52? Maybe he relates more to public buildings, and not to simple apartments and residential buildings?
This is what a specialist who has a direct relation to all this rules responded to these contradictions: 

You have it over you can sculpt anything, no one forbids. You can connect sockets with loops. 
Either lay the cable without corrugations. 
Some even in private houses, instead of air inlet, the cip wires are buried in the ground and nothing. 
But if this object will give up according to the acts, then the conclusion of the energy reports you will most likely not get. And you will have to redo everything.
According to the rules of security, there should be no compounds in the bathrooms without appropriate moisture protection.
And find a similar moisture-proof switch is not an easy task.
Otherwise, due to moisture on contacts, you first, after some time, these most contacts will burn and will be spoken, with unpredictable consequences. 
And secondly, due to leakage currents, which will certainly be present on such a switch, you to look for the cause of false positives of the RCD.
If you do not have it, wait for shock. At first, insignificant ticking, and then who knows. 
Moreover, even if it is a touch switch, then there is a ban.
It is allowed to install them inside, only when powered by batteries or from ultra-low voltage sources. Here is another answer of the specialist: 

 It would seem the easiest and most minority option. But do not forget that for the correct operation of the fan, the voltage should always be present at its board, regardless of whether the light is on in the bathroom or not.
And if you choose ventilation from the nearest light bulb, then it will work for you only while this light bulb is on. 
Extinguish the light coming out of the toilet, it will turn off and the extractor, and does not really carry out the room. Yes, and swimming in the bathroom, I don't want to feel a permanent draft from the ventilation mines. And if you have a pretty powerful and productive fan? 
There is no particularly big error, but as mentioned above, in the process of operation, you may encounter with uncomfortable moments. 
In addition, if you can approach the fulfillment of the rules with all the rigor, then these are the most sensors are essentially nothing like control devices.
And place them inside the bathrooms, without appropriate protection and execution, again it is not recommended.
Well, do not forget about their short service life and possible glitches with spontaneous turning on-shutdown.
Bathroom in an apartment or house - always "wet place." Even if you are not satisfied with the puddles on the floor. Water is cold and hot, couples, wet towels - everything evaporates moisture. And in the bathroom it is hot and the greenhouse effect is obtained.
The excess of dampness and heat, ideally, must "leave" in ventilation, but what you know, its effectiveness in city homes is far from the norm. Moreover, both in the old Fund and in new buildings. The reason is that ventilation is a natural type everywhere, that is, without additional exhaust.
This in America on high-rise buildings are tremendous fans, and the air is removed by the air due to the difference in pressure and temperature. As a result, it moves medium, and even barely barely, if the old houses are old, and the channels are scored.
And our "wet place", the bathroom, slowly will acquire all the low-oiled flora and fauna in the form of fungus, mold and even the wet. To get rid of such a neighborhood or pre-stop it, you need to put an exhaust fan in the bathroom. He will pull out all the dampness to where it follows, and attack in the form of low-oily settlers you will be happy.
How to choose a bathroom and toilet fan
It seems that everything is simple, we decided that you need a fan, we go to the store and buy. But quickly only cats will cause. The store helps a large surprise from a heap of species and models. Where are a few dozen, and where and a couple of hundreds will go. And you will "hang up" above the question, "What fan to put in the bathroom?".
No wonder. Different types, Power, models, installation methods, characteristics - Chest leg will be broken in this diversity of technical progress in the ventilation area. Sellers and those disassembled if the range is huge.
Therefore, we made a "guide to fans for the bathroom." To facilitate your task and help quickly buy the desired equipment. And first we will deal with common characteristics Bathroom fans
So let's go!
1. axial, centrifugal - what it means
This is the type or type of fan. He talks about the design of the equipment and his work.
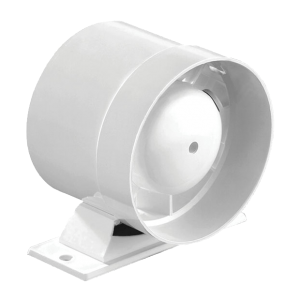
Axial fan - This is a paddle impeller in the housing. Screw the impeller motor, on the rotor of which it is attached. The blades are tilted inside the plane of the placement, they are well drawn air and move it in a straight axis. Therefore, this type is called axial fan. It is characterized by good performance, noise is medium, it is most often taken to install in the bathroom.
Centrifugal fan It works differently. Air sues turbine with blades. Inside the body, the flow is twisted into the spiral and receives additional acceleration due to the centrifugal force. It turns out the stream not in a straight axis, but at an angle of 90 degrees to a special device - snail. The centrifugal fan is called even radial.
It is characterized by less productivity, compared with the axial, but can "drive a stream" under pressure from different strength. The noise level is low or medium, depends on the direction of the bend of the rotor blades. With the front bend, the noise is less, with the rear - more accurate, but it saves electricity.
2. invoice or channel
Ventilation equipment is for outdoor installation and for internal. The outdoor type of installation is fastened on the wall or ceiling to the output of the ventilation hole in the mine or the pipe system. Channel fan is the built-in equipment that is put inside the ventkane (duct). The ventilation channel systems are constructed from metal or plastic. For the bathroom, plastic channel systems, such as Vents, are used more often.
Often, the exit to the ventilation shaft is located in the toilet. For drawing from the bathroom, they put an air duct with a fence lattice. Ventilation sleeve pulls to a mine window. Channel fan with an additional grille is installed in the toilet. The hood at the same time takes the air out of the entire bathroom and directs the house at the ventilation mine. According to the design, the exterior and channel fans are made by axial, and centrifugal.
3. Selecting the fan in the bathroom
Power level or fan performance is one of the main characteristics. In fact, it is extracting and choose, paired with a design (axial / centrifugal). Productivity "says" how many cubic meters of air the fan pumps out per hour - 100, 200, 300.
To choose proper power, It is necessary to calculate the volume of the bathroom and multiply it to 8. "The G8" means a sanitary requirement for the multiplicity of air change in the room in an hour. Simply put, the fan must pump the volume of eight bathrooms. Then there will be purity, beauty and no mold.
Example! For urban standard bathroom with dimensions 1.7x1.5x2.5m with multiplicity of exchange 8 performance is needed from 51 cubic meters per hour. Axial fans are released with a capacity of 80 cubes. Such a hood cope with the task even with a margin. The centrifugal model usually "runs out" from 42 to 100 cubic meters per hour.
4. Selecting the fan in the bathroom in terms of noise
It is clear that the hoods are noisy, but not much strongly. If you want a very quiet - take the axial model from the Silent line. In the design, they are made fastened the engine on the Silent blocks, which "quench" noise and vibration. Among the "quiet" you can choose a model with noise level even by 22 dB.
Centrifugal works in the pitter, because the turbine gaspets air under pressure. But also noisy, approximately like a cooler in the computer. He does not prevent you from watching movies, listen to music or play games. So the fan will be simply background if you are in the bathroom when it is turned on.
Attention! Noise is a secondary characteristic. The most important thing is that the exhaust "drown" the desired air volume for a good microclimate and approached the design of the ventilation.
5. What a fan in the bathroom or toilet is better - reviews about additional features
Modern technique is able to a lot, and fans are released with different additional features. The list includes:
- Additional sensors. They measure humidity or react to movement.
- Sleep timer. On it is set to shutdown delay, the minimum 2 minutes is the maximum 30.
- Light indicator. Glows until the fan works.
- Lace switch. You can turn on and off the exhaust at the right time. For example, when you take a shower or bath. That is, when the light is lit in the bathroom, the fan does not start automatically.
- Automatic blinds. They are used to close the ventilation grille after turning off the channel fan.
- Check valve. Its main task is to obey the penetration of strangers from the ventilation mines.
According to the reviews of our customers, most often take a model with humidity sensors and a shutdown timer. Check valve, which overlaps the air from the mine or channel back to the fan, has already become part of the design. It is very rarely sold separately and is considered an additional option.
6. Degree of moisture protection
All bathroom fans have an increased moisture protection within 4-5, dust protection can be both zero and 3-4. In the passport of the equipment will be indicated IP X4, 34, 44, 45.
With the characteristics we figured out, now let's talk about the assortment.
Fans in the bathroom and toilet in the site catalog
Our store offers well-known and popular brands of household fans for the bathroom:
| Soler & Palau. | Blauberg. | Fresh. | Era | Vents. | Mmotors JSC. |
Let's divide them by groups and get acquainted closer.
1. For the city bathroom or bathroom of the standard area, the most popular type of exhaust fan is a model with a capacity of up to 100 m3 / hour
There is a catalog:
Overhead axial fans
Soler & Palau.
| Silent-100 CZ SILVER DESIGN-3C | SILENT-100 CZ GOLD | Silent-100 chz | Silent-100 CMZ |
| Ecoair Design 100 H (with humidity sensor) | Ecoair Design 100 m (with a lace) | Ecoair Design 100 S (basic model) | EDM 80L |
| Silent-100 CZ | |||
Power 65-95 m3, noise 26.5-33 dB, in the silent basic model there is a feed valve and a quiet stroke bearings (CZ), in the remaining models it can be optionally added - timer (R), humidity sensor (H), cord switch (M ). |
|||
Blauberg.
Mmotors JSC.
The capacity is 60 cubic meters, noise of 25 dB, ultra-thin models with a thickness of 4 cm.
Channel axial fans
To install in a round air duct take channel models. We offer Bulgarian from low-power Mmotors JSC.
| BO 90. | BO 90T. |
Power 50 m3, noise 36 dB, operating temperature + 100-150 ° C.
Centrifugal fans
Due to the design and creation of additional thrust, such exhaust, even at low power, more efficiently, axial. They are more expensive, so they take them less often. Although the "utility" of the centrifugal fan quickly pays for its value.
The main operating mode is the minimum speed and minimum energy consumption. Hood perfectly "pulls" for a long time in the background, for "duty" cleaning. When enhanced humidity, the maximum mode is activated and the air replacement in the bathroom is turned on.
From centrifugal offering the fan of the company ERA
| Era Solo 4c. |
Three-speed, productivity 42/64/100 m3, noise 25.8-30dB, equipped with a check valve and filter. Suitable for wall / ceiling installation and for mounting in the vent hole.
2. In new homes, with apartments of a large square, Thaukhas and cottages, the bathrooms are spacious and for their cleaning put drawings with a capacity of 100 to 400 m3 per hour
In the catalog, the site presented models:
Axial fans on the wall or ceiling
Blauberg.
| Aero Chrome 100. | AERO STILL VINTAGE 125 | Aero Still Vintage 150 | Aero Still 125. |
| Aero Still 150. | Deco 100. (ceiling) |
Power 102, 154, 254m3, noise level 31-33-38DB, in all models there is a check valve, additional options are denoted by alphabetic marking, t - with a timer, ST - with a cord and timer. Ceiling capacity from 105 cubes, noise of 37DB.
Soler & Polau.
Productivity 175, 180, 280, 320m3, noise level in the Silent 35-36DB series, from other models 42-47DB.
Productivity 140-183, 250-290m3, noise level 30-33, 36-38DB.
Productivity 110-132m3, noise 17-22DB. Fans of a new generation. Equipped smart system control, speed switching mode, sensors. Can work automatically on the built-in program or run in the selected mode through a smartphone or computer.
Channel Extras
Blauberg.
| Tubo 100. | TUBO 125. | TUBO 150. | Turbo 100. |
| power 137, 245, 361 m3, noise level 38-39-40DB. | two-speed, power 170/220 m3 per hour, noise - 27 / 32DB, fastening on the wall or ceiling. | ||
Soler & Palau.
intelligent, maximum power 106 m3, on a quiet mode - 72. The noise level is 31DB (22 in quiet). Basic moisture control, timer, speed control Additionally - work on the motion sensor. Suitable for non-stop ventilation at power up to 40 m3 / hour.
Exhaust fan in the bathroom - optimal option
If we talk about choosing and answer the question, "what exhaust fan in the bathroom is better?" That optimal options will be several:
- for a regular bathroom with a separate ventilating hole;
- for general ventilation bathroom;
- for a large bathroom.
The bathroom has a direct access to the mine.
The optimal option is a wall-mounted axial fan with a capacity of up to 100 cubic meters per hour. Take Blauberg or Soler & Palau. In most models there is a check valve, it will protect from the reverse air flow from the mine when the extract is turned off. And during work will quickly clean the air and make it very quiet (sound background within 25-33DB).
Models S. classic design from Blauberg.
German hoods quite a budget option, Spanish there is both budgetary and expensive. Although "high costs" are very conditional. You take the equipment that will work for a dozen years, and even more. So, share the price for the operation of the fan, and we get costs for 10 meals in a cafe, even for an exhaust for 6,300 rubles.
If the apartment is removable, or just bought in the old Fund and while you plan to do without overhaul, take an inexpensive fan from the era:
| Favorite 4. | Optima 4. |
The price within 400-500 rubles is pulled perfectly, of course it is faded, than imported, but their 2-3 years will work out as a clock.
Total ventilation in the bathroom
If the exit to the mine is located in the toilet, an air duct and a channel fan should be put to the exhaust from the bathroom. The optimal option will be
| Tubo 100 from Blauberg | Silentub 100 from Soler & Palau | Silentub 200 from Soler & Palau |
They quickly clean the bathroom from moisture and steam. The air intake from the bathroom and the toilet will go through the ceiling lattices.
If you want to split ventilation:
- Place the Deco 100 ceiling fan in the bathroom. Performance is higher (105m3) than the estimated for a standard bathroom (51m3), but it should be. The hood will have to "drive" the air through the pipes with the bend, so the power supply is needed for fast air exchange.
- In a pair and for separate toilet ventilation, set the channel fan. The optimal will be model Vents IFAN D100 / 125. It can work in turbojam with a capacity of 106 m3 and 72 cubic meters. In addition, there is a mode for constant ventilation, on minimum power up to 40 cubic meters per hour.
| Deco 100. | Vents IFAN D100 / 125 |
Ventilation for large bathroom
If the bathroom is a large area - choose a powerful fan. Optimal options There will be:
Axial outdoor
| AERO STILL VINTAGE 125 | Intellivent White | Silent-300 chz |
Channel
| Tubo 100. | TDM100. | Pro 4. | iFAN D100 / 125 |
Centrifugal
| SOLO 4C. |
Outdoor and channel axial fans are taken with a power reserve, so they are fasterly cleaned air and directly into the exhaust mine, and through the sleeve. Centrifugal creates increased pressure and big reserve Performance is not needed.
To establish a hood in the bathroom will have to perform three stages of work.
1. Get the cable from the switch
The cable is needed a triple, for example, VG 3x1.5 mm2. It is best to "throw it" in the corrugation under the tile and in the wall, if the bathroom finish is not over. If the bathroom is finished, then we deposit the cable in the corrugation by capital ceiling, you can additionally take the cable channel. All this is "good" by hiding for suspended or stretch ceilingAfter installing and connecting the exhaust.
2. Secure the fan
When the cable is laid, you need to install the fan in place. The outer is fixed on top of the wall, channel inside venetu hardness. Note, the standard opening width is 10 cm, just under the insertion of fans with dimensional marking 100mm (the diameter of the flange or the device itself). Such an intelligence is designed to pass the air with a volume of up to 100 cubes per hour. The power of the hoods, connecting with the cell of the pipe, "fits" into this requirement or slightly exceeds, by 10-15 m3.
Fans with a greater productivity are connected to the air ducts with a diameter of 125 mm or 150-160 mm, and the hole will have to expand. Otherwise, the hood or flange simply will not fit into the lumen.
Information to think! Is it possible to put an adapter from the "more to less" diameter for the exterior fan? You can only need. You will get a decent gap between the hood of the hood and the wall. The slot will prevent the fan correctly. In addition, on the rear panel, which will not fit to the wall, will settle moisture and gather dust. And "cutting" the width of the lumen you "cut" and the bandwidth of the channel. The ratio "Channel Diameter - Fan Performance" is chosen non-random. Your unfortunate hood will try to shove 150-200 cubes where "prolazit" is only a hundred.
Installation Fan in Bath - Mounting Methods
Hood can be installed different ways. Putting on the wall to attach with self-draws or glued, channel insert directly into the hole and fasten or first install the pipe into the lumen, and the "fix" the fan is already in it.
To install an overhead hood, Remove the front panel, which is fastened with a screw in the end or plastic snaps. To install on a self-tapping screw, place a pencil for holes on the wall, then drill and insert the dowels. Apply the fan and tighten the screws.
For fasteners on glue or liquid nails, apply it along the edge of the body to the fan and on the wall. In order not to miss the wall, circle an exhaust contour and wake glue inside the rectangle, slightly retreating from the edge. Press and fix the painted (assembly) scotch, so that the glue grabbing.
Note! We do not recommend using ordinary scuffs, because it can leave traces on the wall and fan itself.
The feeding cable in front of fastener is output into a special opening outward. If it is uncomfortable, you can drill your own, in the right place. The front panel is placed after connecting the power cable.
To install the channel extract, use a piece of the duct of equal diameter, in which the fan is placed with the protrusion. The housing of the hood tightly "gets up" in the circular channel and fixed without additional fasteners.

If the hull without protrusions, then it is fixed in the pipe with self-draws through special grooves. For such fans it is more convenient to first insert a hood into a piece of the air duct, fasten, output the cable, and then install the entire assembly in the vent hole and fix the mounting foam.
For models with fasteners on the body, the insert is not needed. The fan is simply screwed to the wall of the hole.
3. Connect the fan in the bathroom to the switch
Power connection to the exhaust - the most responsible stage. Wet room requires a mandatory cable laying with grounding. Therefore, use a three-core jn for one and a half squares (3x1.5 mm2), as on the lighting in the bathroom. Electric power The fans are not high, as a rule, within 14 watts, and the cross-section of 1.5 square is enough to work with an exhaust without overheating cable.
The ground wire is required to divide the working zero on the n and zero zero on PE. Even if you have an apartment in the old house and the grounding contour is missing, the PE-tire is installed in the shield for connecting "land". It improves the safety of your wiring and protects from trouble in the form of a shock.
How to connect the fan in the bathroom choose yourself. If you want to continue a little longer, place the switch to two keys and divide the lighting and ventilation.
Connection diagram through a two-block switch will look like this:

Scheme with a classroom switch suitable for infrequent use of the bathroom, for example, in one-room apartment with one tenant. The extractor turns on along with the light and turns off the same way. For additional ventilation will have to leave burning and light. Kilowatt-hours It will not turn a lot because of this, if not only light. But there, the "lion's share" will be behind the fan, and not light bulbs in the bathroom.
Connection diagram with a classroom switch looks like this:

Both schemes are suitable for exhaust without additional features.
Connection Fan with timer and other sensors
How to connect to the switch in the bathroom fan with a timer and other sensors, we will tell in more detail. The main difference in the scheme - on the timer there is a separate power to start the hood along the signal of the width sensor, movement or the timer signal in models with deferred start. Simply put, separate phase / zero wires on the engine and the timer are on the fan. The engine circuit is associated with the fan switch key, and the timer circuit with the light switch, and "activated" as soon as light bulbs in the bathroom are ignited. If a double-block switch is used. You can and turn on such an exhaust key or it will work automatically from the built-in timer.

If the switch is common, then the scheme will be different. When the light is turned on, only the hood timer will receive, and when it works, the fan engine circuit will be closed.

In models without a timer with a humidity sensor, the nutrition "starts" on it.
As you can see, the connection schemes are quite simple, but do not forget about the installation rules - wires connect on terminals, without twists and sticking ends. Putting down in a junction box or in-depths. The front panel and insect grid put in the overhead fans in place correctly, without distortion.
Let's sum up
How to be if the "guidebook" helped, but remained doubts? Contact us! Fans know in the face. Mounting and connection schemes will tell at any time of the day and night. As a multiplication table.
To get rid of excessive humidity, fungus and mold, as well as to create good air circulation, it is customized to equip in the bathroom forced ventilation by installing exhausts in ventilation pipe. It is better to deal with this business in the process of repairing your home or bathroom, because the installation of the fan in the bathroom is preferably foreseen. It does not require a developer a lot of costs, and it will not be superfluous.
The need for forced ventilation
Forced ventilation in the bathroom should be done if normal system Ventilation is not effective. Reliable signs of faulty ventilation are mirrors, condensate on the walls and constant dampness. In the bathroom without a fan appears nasty smell and pathogenic microbes - mold and fungus that have a negative impact on human life and health, reducing the deadlines for the operation of the shower cabin and washing machine, as well as leading to the destruction of seams between tiles.
If you encountered these problems, first of all you need to check the ventilation channel for good condition. It is very simple to check it out: bring the air balancing match to the lattice. If the flame dares to the lattice or go out, then everything is in order with the ventilation channel, it copes perfectly with this area of \u200b\u200bthe bathroom, and additional ventilation is required.

And when the match does not swear, the flame on the craving reacts weakly, without having tangled, then it's time to clean the air ducts and install an exhaust fan. To clean the ventilation channel on the roof, lower the cone-shaped girc. In the absence of a "Anglassy" traction, you can do the clearance under the door - cut the piece of door to the bathroom in a couple of centimeters.
This "advice" no criticism withstands. It helps not always, secondly, it should be remembered that on the street of the 21st century that many owners have expensive doors, with a design that suggests their tight closing. How does not even the most expensive door look like after this kind of "modernization"? It may better think about how to install a fan in the bathroom.
Requirements for setting
In order for the fan for the bathroom to perform its work qualitatively, bother about compliance with several conditions:
- It is necessary to ensure the presence of the ventilation channel, which is functioning normally. If it is clogged, the extract will not help you. It is necessary to clean the channel at mandatory.
- Remember that the fan, pulling the wet air, replaces it new. Thus, you need to arrange a small gap under the door under the door, which has a thickness of up to 2 centimeters, otherwise create high-quality ventilation will not work.
- The key to good ventilation of the bathroom is a properly selected fan, taking into account all the indicators of its operation: performance, noise characteristics, safety, functionality, quality and prices.

Preparatory work
Independent connection of the fan in the bathroom - the case is not at all difficult, but useful, as the extract is necessary to each room of this nature. Choose a waterfront fan with hydrostat that control the humidity in the room. Such a fan is turned on by itself when the humidity in the bathroom increases above the installed.
An independent setting of the exhaust fan in the bathroom involves the cable laying, the procedure for expanding the ventilation channel, if necessary, connect the exhaust to electricity and direct installation into the ventilation channel, seal the emptiness by mounting foam, podpackle, if desired after becoming a foam. The process is not complicated, and you can cope with this own forces without attracting specialists.

To increase the efficiency of ventilation, it is necessary that on one side of the bathroom there was an air inlet (inlet ventilation), and on the other - the air outlet (ventilation exhaust). But too close to the location of the exit and the input reduces the ventilability of the room. For a blow to a bathroom of fresh air at the bottom of the door, install the grille. It can be purchased in a construction store and install yourself on any door or purchase a bathroom door with an already installed lattice.
Connecting the fan to power
How convenient will be an exhaust fan in use, depends on its technical and functionality, as well as on its inclusion method. When choosing a specific fan connection scheme in the bathroom, you need to weigh everything "for" and "against" if possible, because the unsuccessful option is not always appropriate.
Using a cord
There are several options for connecting household exhaust fans for a bathroom to power electricity. Many hoods are equipped with a switch in their enclosure. As a rule, this is a cord that comes out of the housing. Drechaya for it, the device is turned on or off.

However, such models are not always comfortable, because the fans are often installed under the ceiling or in another hard to reach place - above the bathroom or toilet. If a repair work The bathroom has not been finished yet, then a similar type of pulling on the exhaust is presented to the most profitable, you can additionally install a switch in a convenient location instead of the cord, paving a separate electrically conductor from the fan to it and hiding under further facing.
With lighting sources
Turning on the fan can be carried out simultaneously with light sources. When you enter the bathroom and turn on the light, the extractor is also turned on, and, accordingly, when you turn off - it turns off, that is, the switch one for two. However, if the "timer" function is not provided in the fan, he simply may not have time to update the air to the end before your room departing. In addition, if you go to the bathroom at night, you will overcome all households annoying noise from the fan.

Two-block switch
If there is no damp in the bathroom and the system forced ventilation It is necessary exclusively when taking a shower or bath, you can connect the fan to a separate switch immediately before entering the room. Install the two-block switch at the input: one key will be responsible for lighting, and the second is per exhaust fan.
Independent inclusion
In this case, you yourself can turn on the fan and turn it off at first need, pulling over the rope or pressing the button. Automatic shutdown additionally provides for the installation of the motion sensor or humidity level. The exhaust fan in the bathroom begins to work with the molded humidity level or when responding to the movement of people, and turns off after certain period On the timer. This technique is quite convenient, but not available to everyone, therefore it is urgently rarely used.
Stiring
By installing the fan in the bathroom and its power connection, you must comply with all safety standards. Before starting work, you should make sure that the electrician on the network is turned off. When connecting the contacts of the wires, it is recommended to use not "twists", but special terminal blocks that give more reliable contact.
To the place of installation of the exhaust fan, still squeeze the copper wiring. For cosmetic repair Bathroom without replacing tile wiring needs to be used over the tile. In order to maximize cable masking, it can be sent to a special plastic box. You can start the fan after connecting the device to the power grid.
Fan preparation
The most convenient place to install the exhaust fan in the bathroom is considered an outdoor opening room that leads to a shared mine. Such a technological hole is present in almost all apartments to create natural ventilation. The standard ventilation channel is able to provide air passage that is injected with a fan with a capacity of no more than 100 meters of cubic per hour.
To install the drawing into the opening of the ventkane, it must be selected, taking into account the diameter of the channel for a dense fit of the device. The diameter of such a hole, as a rule, is 100, 150 or 125 millimeters.

If the diameter of the ventilation channel is less than the diameter of the exhaust fan, then you can easily correct it, you only need to expand the hole by the perforator. If it turned out a larger diameter than a similar fan indicator, select plastic pipe Or corrugation under the drawing diameter and insert it into the hole.
After that, close the pipes around the pipe with mounting foam. After setting, cut the surplus foam with a sharp knife and underpox if necessary. We need to put only in that situation when the size of the opening exceeds the size of the ventilation grille.
If the bathroom in your house is too big, then you are recommended to buy a more powerful exhaust fan. In this case, it is necessary to pierce the additional ventilation channel to install such an appliance. Such a procedure can be trusted exclusively by qualified specialists.
Installation of the fan in the bathroom
Before connecting the fan to the bathroom, it is worth checking the presence of an insert in the insertion in which the installation and operation of the device in Russian is described in detail. Goods that go without such instructions may not be qualitative or delivered to the territory of the country illegally, and it provokes many problems with their maintenance and repair.
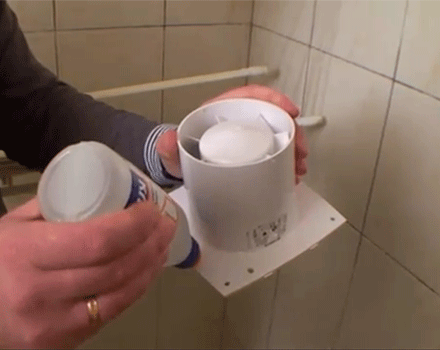
Installing an exhaust in the bathroom in time will take you at no more than 15 minutes. Remove the facial cover of the device. In place of the adjoining device to the wall apply silicone or special polymer glue. Plastic fans are very light, so such a consolidation technique will be quite enough.
Next, insert the fan into the pipe, corrugation, or directly into the hole, press it tightly for a couple of minutes to the wall and attach the front cover on the screws, they often go bundled with a fan. To through the lumen of the drawing into your house, various insects did not penetrate, set the fan before fastening the cover of the mosquito net.
Now you know how to install a fan in the bathroom. Extra fans intended for bathrooms, many advantages, but practice is known one fairly large drawback - high noise characteristics. Drop the instrument to get only with several ways: you can escape the ventilation channel with a special sound-absorbing material or install the noisemaker directly behind the fan.