Paths from plastic bottles - a budget option for arranging a summer cottage. How to make a garden path from plastic bottle corks
Where else can your imagination unfold if not in the country. Here, the abilities of a housewife are manifested in all their glory. In addition, often this does not require large investments. How much material is around that is practically thrown into the street. Empty bottles and their corks are firmly in the first positions here. Decorations for summer cottages are not only beautiful, but also quite cheap.
And how much joy they can bring to children and adults. A plastic bottle is 100% used. The covers will make beautiful panels on the wall of the house. You can make original tracks from traffic jams from plastic bottles in the garden or lay out a beautiful area near the house. You can organize a sports corner for the child, where he will not only play, but also receive a boost of vivacity. Covers can be used to set up an obstacle course. It is better to lay them with the smooth side down, leaving the ribs on top. In this version, a good massage for children's feet is obtained. Tracks made of corks from plastic bottles turn out to be very beautiful if you make a pattern, choosing harmonious color combinations.

However, there is one condition here. There should be a lot of prepared material, and it is difficult to cope with this problem alone. It is necessary to connect friends and acquaintances in order to collect the required amount. It can take several years to collect the material. But on the other hand, how pleasant it will be to warm your soul with a photo made with your own hands, taken in a warm season, will allow you to remember a pleasant trifle even in winter. It takes a long time to collect the plugs, because their sizes are small, so you can come up with another option. For example, make tracks from plastic bottles. There are several technologies you can take advantage of. If you want to use the whole bottle, then it is better to make a border out of them, thus defining the shape of the path. For this purpose, we dig a shallow narrow groove on the sides of the track. In it, with the neck down, we tightly lay the bottles along the entire route. Then we return the earth to its place and tamp everything around. If the land in your country house is good, then you can stop at this stage.

If clay prevails, then it is better to make the inner part of the track from corks from plastic bottles. Or combine all the parts of the bottles. The tropics, created from plastic bottoms, look very beautiful on the site. To do this, cut off the bottom of the bottle by 1/5 of its height. Leave the top for blanks that can be used to create plastic palm... In order for the tracks from corks or bottoms from the bottle to keep their shape well, it is advisable to prepare the base. If you follow all the recommendations, then first you need to pour crushed stone, tamp it well and pour coarse sand on top. Having created a dense pillow, you can lay out a pattern of a path from corks from plastic bottles. This, of course, is a very laborious process, but what a beautiful site it turns out. If you want to make a more durable coating, then it is better to place the plugs on a prepared concrete base. But this must be done quickly, until the cement has set. You can also use metal plugs. They also fit well and can serve as decoration.
The autumn season is not only a time for harvesting a rich harvest, but also optimal time for the preparation of suburban area for winter, namely, for garbage collection. Plastic bottles left over from summer picnics are exactly the situation when it is a pity to get rid of, and there seems to be no benefit from them. However, resourceful owners with a rich imagination and great aesthetic potential will find the best way out of this situation. The creation of garden paths from plastic bottles, in our opinion, is the best way using a plastic "treasure", which can give the site additional originality. Are you interested? Then this article is for you.
Garden paths from plastic bottles. Preparatory activities
It would seem that tracks made of plastic containers, what could be easier? But this event also requires careful preparation. First, you need to decide on the type of garden path that you want to recreate in your garden area.
And there are several options:
1. Tracks from whole plastic bottles;
2. Tracks from cut-off bottoms;
3. And, finally, the tracks from the caps from plastic bottles.
Stocking up the necessary tools, in this situation it is a shovel, bucket and scissors and get to work. Depending on the typical characteristics of the garden path, the preparatory measures will also vary. But let's start in order.

Tracks from whole plastic bottles. Manufacturing technique
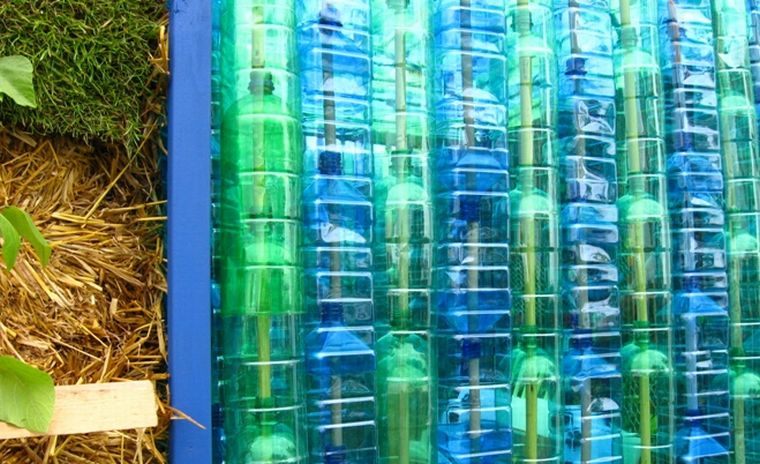
In order to make a path from whole plastic bottles, they dig a trench, the depth of which is 1.5 shovel bayonets, and install a wooden formwork. The trench is covered with broken brick, glass, gravel and stones of various sizes, as well as other construction waste, covered with a 3-centimeter layer of sand on top and carefully tamped. In accordance with the dimensions of the future track, select the approximate number of containers and cover them with fine gravel, sand or dry earth and shake thoroughly until the contents are compacted. The filled containers are placed horizontally in the prepared trench, while the necks should be located at the edges of the path.

To compact the laid out bottles, we place a board on them, and, having walked over it several times, we compact them evenly. The gaps between the bottles are filled with sand and dry cement and sealed again in the same way. After walking on the boards, they remove the excess dry filler and, after sprinkling with water, leave it until the cement sets. After waiting for the complete hardening of the cement, the formwork must be removed.
How to diversify a homemade track? Basic techniques
That's all, the track is ready. But sometimes the soul requires aesthetics, and so that the path is not only functional, but also a decorative element of the site, there are many ways. Here are some of them:

1. The first and easiest option is to use multi-colored yogurt containers, the various colors of which will invariably delight the eye;

2. And you can not look for easy ways and take ordinary transparent plastic bottles and, before pouring crushed stone and sand into them, put pieces of foil, colored paper and shiny candy wrappers in them. So you will get rid of excess garbage and give the track additional decor.

But this is not enough. After removing the formwork, you will notice that the necks located at the edges spoil a little general form decorative track, and perhaps a little disappointed. But this problem also has the simplest solution - a border made of the same plastic containers.

For this purpose, the bottles are also filled with sand and installed in a pre-prepared trench with the necks down. This will not only protect the track from destruction, but also give it additional originality. If you show your imagination, you can organize such a border not only as an addition to a garden path made of plastic bottles, but as an independent decorative element that can be used as a fence for a flower bed or other elements of landscape design.

And as a decoration for a bottle track, at the same time, you can use a do-it-yourself border made of bricks or flowers.

A path from the bottoms of plastic bottles. How to do it yourself?
To recreate a path from the bottoms of plastic bottles on your site, you need to carry out the same preparatory measures as when making a path from whole plastic containers: dig a trench, fill it with construction waste and a 3-centimeter layer of sand and carefully tamp it ... and then the procedure changes.

Together, whole plastic bottles, we take scissors and the same plastic containers and cut off the bottoms, while leaving a fifth of the bottle.

In the meantime, we prepare the trench by thoroughly moistening the sand layer with water (remember that the sand must be well moistened).

The bottoms are deepened into the sand all the way, if they are colored, then you can show imagination and lay out the most exquisite patterns, and in the gaps between the bottoms, you can place lids from plastic containers to make a whole panel.


For owners who are professionally engaged in gardening, the following advice will be useful: you do not need to throw out the necks from plastic containers, in the spring they can act as excellent greenhouses.

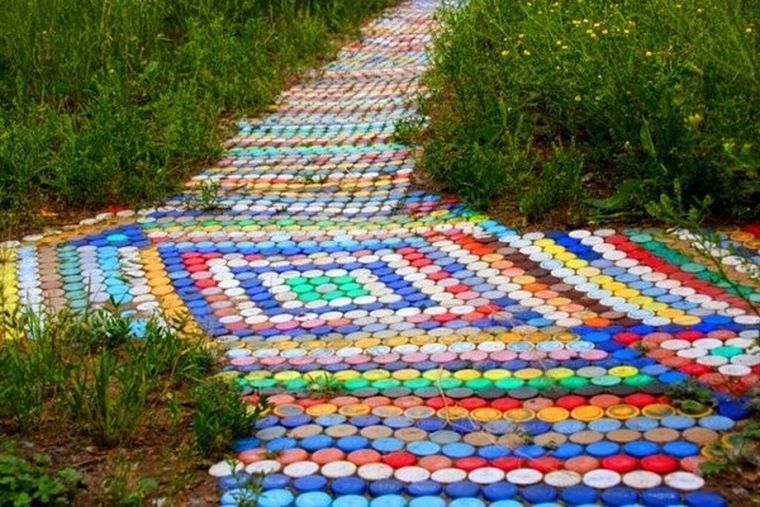
Tracks from traffic jams. A work of art in the "mosaic" technique
After considering the above methods, you were able to make sure that plastic bottles Not only cheap stuff, but also waste-free. In conclusion, it remains to consider the last option, which involves making garden paths from plastic bottle corks. You can also do this in several ways:

1.Place the corks evenly, creating an even coating;

2.Or ribs up, then you can use the treadmill as a foot massager.
To do this, we again dig a shallow trench, the dimensions of which correspond to the desired dimensions of the future track. The main problem of your idea can only be the amount of material that will be required not just a lot, but a lot. Therefore, in order to implement it, you will need to notify all friends and relatives in advance about your plans, which together will help you collect the required amount of material.

So that the material does not change its location over time, the technology of their laying has been slightly modified. So what do we have? As before, to create a garden path from the covers, they dig a trench, the dimensions of which correspond to the dimensions of the future path, fill it with construction waste and carefully tamp it.

In the meantime, a mortar is prepared, consisting of one part of cement and four parts of sand, and building glue is added, which is necessary so that the caps do not subsequently change their location. Next, the caps are placed on the solution, this can be done either in a chaotic manner, or following a certain sequence that will create an exquisite pattern on the track. In this case, the covers must be immersed as deeply as possible in the solution, and when it dries, get rid of its excess.

Further, as before, the boards are laid on the newly laid out track and carefully tapped with a hammer. Experienced summer residents, who previously practiced creating a garden path from covers, calculated that more than a thousand plastic covers would be needed to lay one meter of walkway.

After completing all the above activities, you can enjoy the multi-colored mosaic path, the only drawback of which is the high slipperiness of the path in winter period... But this problem can be easily solved, it is enough just to sprinkle the path with sand.

Usually there is no time to direct the beauty on the site - the strength goes away. But the owners, sparing no time, make their site beautiful and comfortable. They can become a decor option, because going to the dacha, a lot of containers with water, with juice are taken, and a lot of it accumulates over the summer. You should not collect everything in coolies and take it to a landfill - this is a great material with which you can decorate a site, make unusual and beautiful things.
An example of the original path to the house made of corks from plastic bottles
Just turn on your imagination and imagination. Below are step-by-step instructions, using which, it is easy to create an unusual art object on the site. It will take a little from you:
- free time;
- hard work;
- patience.
Some believe that there is nothing difficult in arranging a track made of corks from plastic containers, since it is easy to work with waste material - this is not so. If you want to surprise your neighbors and please your loved ones with the beauty of your work, then you need to adhere to the basic rules in the arrangement. And in most cases they relate to preparation for work.
 Option for a path in the garden from bottle caps
 It should be noted that plastic is an ideal material for and including tracks, since its decomposition time is 100 years. Corks have a very wide range of colors. In addition, they do not lose their external data for a long time, but even if the corks fade in the sun, it is enough just to paint them in the desired color.
Material required to create a track:
- Multi-colored, different-sized bottle caps.
- Juice bag lids.
- Metal bottle caps.
- Lids for jars and eggplants.
- Wine corks.
The requirement for the material when arranging the track, there should be a lot of it, you need to lay it tightly. The greatest load falls on the tracks. Without laying the material tightly, it will quickly fail, and it will be a pity for wasted energy.
 Concrete cork walkway construction option
 - we measure the diameter of the cork - for two-liter bottles, this value is equal to three centimeters;
- per 1 meter, there are 33.5 pieces. traffic jams;
- on the square meter you need to stock up on 1122.5 plugs;
- the area of the track is multiplied by this figure and we get the amount of material.
It turns out a very large figure, which no family can master the collection, even if they consume a lot of liquid. Where to get the material:
- tell your neighbors, relative, acquaintances about the idea to create beauty on the site;
- advertise on the internet;
- walk through cafes and canteens, arrange with the staff to collect traffic jams in a separate package.
Read also
Pillows for garden furniture- DIY sewing and pattern
There are inscriptions on the corks, they are completely unnecessary - the corks are soaked and washed thoroughly. Water-resistant decals must be removed with solvent.
 Trail of traffic jams in the playground
 How to make
There are several options for laying plugs:
- For a flat and smooth surface - with the plugs facing up.
- For ribbed, massage track - ribs up.
- For good texture - upside down.
The latter option is applicable in closed places, when precipitation falls in traffic jams, water and dirt accumulate. And it is very difficult to care for such a coating.
What is the scheme for laying the plugs
From this moment, creativity begins. Before paving the path, you need to decide on the pattern that you will lay out on it. You can make a scatter of colors by laying out the corks in rows, the result will be a colored spotty track of plastic corks - which will attract attention with its multi-colored highlights. If you are an extraordinary person, then you can create your own ornament. You can use any patterns for embroidery.
 Laying track from plastic corks
 A track made of corks with even geometric shapes will look good - this option is simple to execute, it is enough to make the markup correctly. There are plots on which summer residents created real works of art with their own hands. You can safely experiment, and with the involvement of all family members. You will do some useful things:
- create a beautiful and unusual track;
- get unspeakable pleasure from the process;
- establish creative communication with children.
Often during such fun game with the kids and you get real masterpieces.
Materials and tools
This stage must be approached with all responsibility, despite the fact that the material is inexpensive. The process requires a lot of patience, so you need to make sure that the cork path will serve you for many years. Plastic corks as a garden path
Important! It is worth thinking about making a garden path in the country, as it will decorate the site.
Many people prefer to make garden paths out of plastic corks, but it is worth noting that these paths become slippery in winter. I would like to give advice, do not use this material for the paths that you walk on in the winter. Use them only for paths between beds where you do not walk in winter.
 Option for a path from lids in the garden
 For paving, you will need:
- a lot of corks of all kinds of shades;
- cement;
- sand;
- outdoor glue;
- formwork material.
It is worth noting that you cannot do without accuracy in creating a dacha path from this material, be patient and proceed:

More recently, plastic bottles have been garbage for the whole world, besides, which decomposes over several centuries.
Thanks to folk craftsmen, they found various creative applications and one of the directions - decorative country paths.
The use of bottles in landscaping
Do not underestimate eggplants, because they can be an excellent material for creating a decorative element on the site.
This option can look creative and elegant if you apply your imagination and ability to work with your hands to it.
The main uses for bottles
The use of bottles for garden paths can be divided into several basic ideas:
- full use of bottles;
- using the bottom of the eggplant;
- the use of a large number of lids from plastic containers.
Lid track
Preparation of material for work
To use plastic bottles as a track, you first need to:
- wash well from the remnants of the drink;
- remove all labels so that they do not spoil in the future appearance;
- dry all material in the sun.
Also, before starting work, prepare all the necessary material:
- sand or ordinary earth;
- crushed stone;
- shovel;
- bucket;
- garden shears (it is more convenient to use them when cutting eggplants, but if you do not have them, then perhaps use house scissors);
- leveling boards;
- formwork - box.
Having prepared all the tools, you can get to work. Let's consider in detail the main options.
Option number 1 - we use whole bottles
Do-it-yourself step-by-step instructions for making a track from whole plastic bottles.
We fill all the bottles with sand or earth. This is necessary so that in the future they do not squeeze under your feet, so you need to properly tamp the sand in the container, periodically tap them on the ground.

Advice! Spend this lesson with children, it will be very interesting for them, and you will save your precious time.
We dig a trench about 1.5 times the size of a shovel.
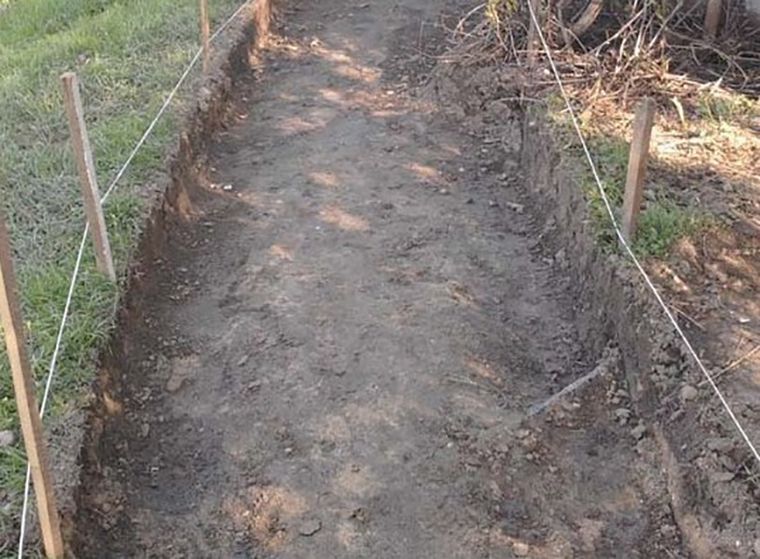
We install formwork. We take boards of the required length and thickness of about 15 cm. They can be fixed with wooden stakes on the other side of the path.

We put household waste into the trench (sticks, broken brick, dry leaves, etc.), then fill up the sand pillow. This is necessary so that in the future the path does not go into the ground under your feet.

We lay the bottles horizontally, then we lay boards on them so that they evenly submerge the ground. 
Jump on the boards so that they tamp down more tightly, involve children in this part of the work.
We fill the empty spaces between the containers with sand and cement, then we go through the board.
Using a sprayer, pour over the filled mixture and let it dry so that the cement hardens. The track is ready!
To make the garden path look more fun and interesting, initially paint all the bottles in different colors.

In the photo, a ready-made path from whole plastic bottles, made by hand
Large bottle lane
Garden paths can be used both for their intended purpose and for the creative appearance of the site.
For example, if you make from eggplants a large number of beautiful flowers and plant them like a path on the site.

An unusual appearance will be if you use 5-liter plastic bottles.
We wash the bottles, dry them and cut off the lower part.
We insert one eggplant into another, and fill the voids between them with sand. We put two or three rows in the trench, depending on how wide you want the path.
We fill in the building mixture between the rows and use a sprayer to fill it with water so that the cement hardens.
How to make a garden path from cut plastic bottles, you can watch in the video.
Caps are also used
A more interesting option for a summer cottage path, if you use bottle caps.
Call the children to create such a path. Making mosaics will cheer them up. But first you need to prepare your workplace.
Draw a path for the future. If desired, install formwork and thoroughly compact the ground in the selected area, before placing construction waste there.

We lay out all the plugs.
We put the boards on top and tamp them so that the covers are on the same level.
For a pleasant look, you can also fill in the gaps with sand and walk again with a board, then with a brush to remove unnecessary soil already on the finished summer cottage.
A cork track will look more elegant if laid out like a mosaic, in the form of a beautiful pattern.

A pleasant foot massage will be a path of inverted covers. 
The principle of creating a track is similar, only at the end of the work it is not necessary to fill it with building mixture.
This path is not intended for constant walking, only for medicinal and decorative purposes.
The use of bottoms is also encouraged!
A good foot massager will come from the bottoms of the eggplants.

To do this, you need to initially wash the bottles and cut the bottoms.
Sort by size and color.
If desired, you can paint in multi-colored colors for greater brightness on the site. 
We prepare the trench as described above.
Then we put the finished bottoms, tamp and get the finished version.
Additional decoration of the track
As an additional decoration, you can use glass bottles.
After removing the formwork, voids remain in which glass bottles can be installed with their tops and bottoms up to ground level.
The result is a beautiful appearance. You can make a road fence if you install the glass container with the neck up, while burying only 15 cm in the ground.
More interesting option decoration will be the decoration of the area around the trail. Installing crafts made of the same plastic along it, for example, frogs or chamomile. In this matter, the main thing is your imagination.

Glass bottle tracks
Glass bottles are traumatic tools and therefore must be used with extreme caution. Not everyone dares to have glass under their feet, but if you do everything right, your health is not in danger.
The method is fully consistent with the plastic bottle trail.
Be sure to fill the bottles tightly with sand so that there is no air. Otherwise, the bottle will crack underfoot. Then you put it in a trench with the neck down, fill the gaps between the bottles with a building mixture.
Then you can put shiny paper or glitter with rhinestones in transparent glass bottles. It also depends on your imagination.

conclusions
From all that has been said, several important points can be emphasized:
- Observe step by step instructions when laying a summer cottage path.
- If you are laying a groove from the lids, then it is better to take the time and make a beautiful pattern so that guests will be delighted with your site. Or you can lay out some puzzles to make your friends more interesting to spend time at your home.
- Consider safety when using glass bottles.
- When arranging your summer cottage, always think about practicality, and a garden path from a plastic container is just this option.
The colorful rug resembles a garden path made of plastic bottles, created by an enterprising summer resident with his own hands. Everything can be put into business: the lids, and the bottoms, and the whole container. Durable material will last for more than a dozen years, and replacing a damaged element is very simple: remove it by inserting another.
The area of the bottom, and even more so of the lid, is very small in comparison with the scale of the idea. Therefore, a lot of material will be required, even if you build a path from whole bottles. But it will also solve the problem of plastic waste. For work, in addition to the bottles themselves, you will need:
- shovel;
- rubber hammer (mallet);
- cement, sand and PVA glue (construction);
- other decorative elements: shards of glass and tiles, colored pebbles, etc.
If you want to lay out a track with a pattern, then you can pick up simple patterns for cross stitching, knitting, children's mosaics, or draw them with your own hands. Rice. one.
Considering that the plastic becomes slippery when it rains, you need to arrange the elements of the track so that there are gaps between them filled with sand or concrete.
If you want to give the track additional properties of a foot massager, then the bottle caps can be laid out so that the threaded hole is located on top.
The uneven edges of the bottoms themselves can perform massage functions. This is very beneficial for children as it helps to form the correct arch of the foot.
Before laying out the bottle mosaic, you need to mark the contours of the path on the ground and dig a trench about 15 cm deep under it.Installation of plastic elements can be done in two ways:
- on a sand pillow;
- on a concrete base.
In the first case, the trench must be covered with river sand and carefully tamped down. After that, you can immediately start packing the bottles. For the second method, you will need plywood or board formwork to slightly raise the surface of the walkway above the ground. A cement-sand mortar should be prepared from 1 part of cement and 3-4 parts of sand, adding 100-150 g of PVA building glue to a bucket of mortar.
We lay on concrete
For creating a path from whole bottles, it is best to the way is suitable with laying on concrete. In this case, the elements will not move, and any plastic container can be used: from yogurt, shampoos or detergents, drinks, etc. To prevent the bottles from crumpling under the weight of a person walking along the path, they need to be filled with sand and tamped tightly inside. Colored opaque containers are decorative in themselves, but in transparent containers from water, the sand will look dull and unattractive. Therefore, in such a container, you can pour ASG mixed with fragments of colored glass or a bat tiles, shell rock, building chalk or alabaster. Pieces of foil or Christmas tree rain mixed with a filler such as sand or ASG are also suitable.
Having compacted the filling of the bottles, they should be closed and laid in the formwork in rows, circles or in any other way on a prepared sand cushion. To level the surface, you need to lay several boards on the bottles and walk over them 2-3 times. Then pour the formwork with the laid track elements with concrete mortar, leveling its surface. At this stage, you can complement the drawing of a path from plastic bottles with colored caps inserted between the containers in the concrete that has not yet hardened.

Allow the solution to set a little and remove drops from the plastic surface with a stiff brush. You can finally clear the track from the cement that has got on the bottles after the solution has completely solidified by rinsing it with a stream of water from a hose. Rice. 2.
Covering from lids or bottoms
Such coatings are made according to the same technology: a cut-off bottom with curly ribs or a lid must be sunk into sand or concrete mortar so that a small part is above the base.

To perform this work, you need to dig a trench, as described above, and place a pillow of ASG or sand on the bottom. The thickness of the layer for the concrete base is 10 cm. If the base is made of sand, then you just need to fill the trench to the top, compact the sand and fill it up as necessary, leveling the path with the soil surface. For a concrete base, a formwork should be installed on a sand cushion, the edges of which will be raised above the soil by 5-7 cm.
Since the caps or bottoms need to be immersed in the base material, which takes time, it is better to prepare a concrete solution in small portions and pour individual fragments of the track. Each part must be made of such a size so that all the plastic elements can be installed before the concrete sets. Especially a lot of time is spent on drawing up a mosaic pattern from colored parts. Rice. 3. All this must be taken into account when choosing the size of a fragment of a track with a concrete base.
On any basis, the installation of plastic elements is carried out according to the following scheme:
- 1 In accordance with the selected pattern, place the bottoms, cut at a height of 10 cm, or bottle caps on the prepared base.
- 2 Press the plastic part into the mortar or sand. The bottoms are slightly more difficult to press in than the lids, so a rubber mallet can be used to immerse them in the base material and to level the mosaic surface. With light blows on the bottom, it can be very accurately adjusted to the already installed ones.
- 3 Use a broom or a brush to remove any sand or mortar particles that have accidentally fallen on the surface of the plastic.
The concrete takes about 10 days to fully cure, and the sandy path, paved with lids or bottoms, can be used immediately.
When paving paths with mosaics from colored parts, you need to be as careful as possible and follow the chosen pattern. Lids or bottoms can be of different sizes. Gaps between larger parts can be filled with smaller ones. The combination of plastic with shards of tiles or glass elements also looks very good.