How to lay a right platform from paving slabs. Requirements for the foundation for sidewalk
Often people who born and grew up in the city refuse to acquire country houses and plots, since the latter are associated with mud spoiled by shoes and many other, unsightly for citizens with the moments. However, civilization does not stand still, and today there are many ways to organize the masters. cottage plot And the extractuation of country territory, thanks to which you can forever forget about the impassable mud. One of these methods is the arrangement of the sidewalk with a tile with durability, durability and high decorative characteristics. Despite the fact that the laying of paving slabs is not the only way to improve the household territory, often give preference to him, for its simplicity, the relative cheapness and lack of need to use specialized equipment (for example, an asphalt roller during the asphalting of a plot or a plagin for concrete concrete during concreting territory. ). One more a distinctive feature Tile coating, which can be attributed to the benefits, is the ability to take the technological pause in the process of arranging the sidewalk, which cannot be said about asphalting and concreting. Given the relevance of the topic, we counted you need to tell about the process of laying paving slabs. Due to the fact that the inalienable stage of laying the tile is the preparation of the site, in this article we will answer the question: "How to prepare a platform under paving slab?».
Requirements for the foundation for sidewalk
How to lay paving slabs and stay satisfied with the result? To do this, it is necessary to comply with a certain set of requirements required when laying the specified material. Many of them relate directly to the quality of the base under the paving slabs. Basic requirements are as follows:
- Drainage, the need to arrange the development of the accumulated water and preventing its destructive impact on the sidewalk;
- The arrangement of the waterproofing system, namely the use of a special substrate, prevents excessive accumulation of moisture;
- The organization of the drainage, implying the slope of the area and the system of special stock channels;
- The surface must be as smooth as possible, which will ensure the perfect location of the shape elements of the pavement;
- Availability of deepening, which will provide the ability to arrange a drainage system and lack of movement individual elements And, as a result, deformation, in the case of soil sewn.

What should be prepared before making the tile laying?
Before proceeding with the preparation of the foundation for paving slabs on the street, purchase all the required tools and materials:
- Paving slabs and a corresponding calculated number of curbs required for finishing a platform selected for power;
- Metal or wooden stakes or pins;
- Horizontal level that will be needed to fit the horizontal pavement;
- An ordinary wage or hose with a divider required for moisturizing a sand pillow and base;
- Metal corner, rakes and channels needed to align the base subfolding;
- Broom.
- In addition, to carry out the markup of the site you will need a twine, a shovel and other garden tools to remove the upper fertile layer of the soil, the construction of trenches and editing borders.

How to prepare the land for laying paving slabs: the main stages
Laying of paving slabs - multistage process, including several stages:
- Preparing a platform for laying paving slabs;
- Arrangement of the so-called underlying layer or pillow under the paving slabs;
- Direct laying of paving slabs.
Soil stabilization and its subsequent preparation
The preparation of the platform for sidewalks includes a set of measures, the complexity of which will vary depending on the initial state of the soil. If it is relatively smooth, the preparatory activities will be sufficiently simple: etching and irrigation of vegetation, the final alignment of the soil (elimination of bugs and falling asleep) with its subsequent rubbing.
If during the level of soil leveling, you encountered large irregularities of its surface on significant areas, to prepare the ground, it is necessary to take advantage of special construction equipment, such as excavators, scrapers and bulldozers, as well as modern control and measuring instruments, for example, laser level, Called Levelier.

Arrangement of the underlying layer
After you stabilized the soil, eliminating all the irregularities on its surface, and made its markup with the subsequent setting of altitudes, you can proceed to the arrangement of the underlying layer. This stage is also necessary as the previous one, and to align the platform for paving slabs is impossible without arranging the underlying layer.

The underlying layer is a kind of multi-layer pie, for the installation of which a number of bulk stone materials used to prepare the base under the paving slabs are required. They are placed on a stabilized soil in a certain order, depending on the intended loads on the sidewalk, followed by a mandatory murdration of each of the layers. The thickness of each layer is also a variable parameter and depends on the totality external factors. The function of the underlying layer is as follows:
Due to the presence of the underlying layer, the tile is protected from the destruction due to the movement of the soil in winter;
After the arrangement of the underlying layer, the smallest surface defects remain unnoticed during the stabilization of the soil, as a result of which the surface acquires a more aesthetic appearance.
There are a number of technologies in accordance with which the preparation of the underlying layer is carried out. The choice of each of them depends on the intended load on the sidewalk and the conditions of its operation.

If the load on the moving trucks will be affected on the sidewalk, or you faced problems with natural soil, which will be installed, it is recommended to give preference to the first embodiment involving laying the following layers:
- Cement mortar (layer thickness is 3 cm);
- Reinforced concrete (layer thickness - 10-15 cm).
If you plan to install a platform intended for the movement of passenger vehicles, the preparation of the underlying layer implies the stacking of the following materials:
- Cement-sand mix (layer thickness of at least 3 cm);
- Sand or explosion (10-centimeter layer);
- Crushed stone, which is placed in a layer of 20 cm.
If the mounted track is intended only for movement of pedestrians, it is necessary to prepare the underlying layer consisting of the following materials for its arrangement:
- The cement-sand mixture, the number of which should be sufficient to prepare the 3-centimeter layer;
- Sand (layer thickness is 10 cm);
- Crushed stone (the thickness of the layer is also 10 cm).
How to choose the most appropriate technology for arranging the underlying layer?
As it was already noted earlier, when choosing the necessary technology for the arrangement of the underlying layer, first of all, it is necessary to take into account the conditions under which the sidewalk tiles and tracks in general will be operated. If the pavement tiles will be used for the installation of only pedestrian tracks, the first version of the preparation of the underlying layer involving concreting loses its relevance. This is due to additional costs that concreting may result.
Important!Often, the owners of country territories and sites located within the city will have to be faced with the sorting of soil caused by the large content of Suglin. In such cases, experts recommend to give preference to a second embodiment of the underlying layer intended for the movement of passenger transport.
How to align the courtyard under sidewalk, if there is a need to arrange the arrangement of the underlying layer in accordance with various technologies? When one piece of the territory paved with paving slabs is designed for the passage of passenger vehicles, and the other is only under pedestrian zones, it is quite logical that it is necessary to give preference by the variants withsting higher loads. However, experts believe that this is an excessive waste of money and recommend combining several options on one object. This will maximize the cost of laying paving slabs.

Laying paving slabs on the ground
If during operation on the track, powerful tile, is supposed to be the effect of only low and medium loads (movement of people and passenger cars), laying paving slabs can be made directly to the soil. In this regard, it does not need stabilization by concreting, followed by the reinforcement of the foundation.
But despite this, it is necessary to take into account the characteristics of the soil and the intensity of the loads imposed on the track and, relying on the data obtained, correctly select materials for the arrangement of the underlying layer and make it laying. In addition, the modern construction market offers a number of underlying materials that can be directly laying paving slabs. The use of these materials provides natural circulation of precipitation, which allows the soil to "breathe", which is impossible in concreting or asphalting of the soil.

Arrangement of the underlying layer: brief description of options
How to level the platform for paving slabs? IN modern conditions The most popular are the following options:
- Laying paving slabs on herbsco;
- Laying paving slabs on the screening;
- Laying paving slabs on the sand.
Important! When using the same materials to prepare the underlying layer, the parameters of the finished design, such as the thickness of the underlying layer, the presence or absence of geotextiles may vary. All this is calculated in accordance with the SNiP, taking into account the alleged loads and the type of soil.

Laying Tile on Hard
Laying the paving slabs on the garment is relevant if the pavement is characterized by the presence of a significant slope. This is quite explained. Hard is dry cement-sand mixture, the grasp of which occurs under the tile when falling out the first precipitation. A similar effect can be achieved if after laying a hose tile from the hose. This technique will provide a reliable clutch of the tile and eliminate its slide towards tilt.
In addition, experts recommend to give preference to this option and in the event that the land on which the paving slabs will be laid, does not have sufficient water absorption. In this regard, choosing between two options - laying tiles on sand or on the galts, give preference to the latter, since the insufficient water absorption of the soil can cause the leaning of sand from under the tiles.

Important!Laying the tile on the gartster, remember that it is prone to quick burnout under the influence of the scorching sun, in connection with which, when working under the scorching sun, try to speed up as much as possible and reduce the time of work, as well as provide a shadow. In addition, the use of wet sand reduces the storage time of the galts, which is due to the absorption of moisture by the cement and the launch of the process of its solidification.
Laying tile on sand
This method is traditional in the arrangement of sidewalks. Laying tiles on sand is largely similar to that when using the garment. It is also produced on a layer of compacted gravel with a thickness of 10-20 cm, which performs the function of the pillow under the paving slabs. In this case, the thickness of the sand layer should not exceed 10 cm, which will prevent excessive shrinkage. Having preferred the technology of laying paving slabs in the sand, it is necessary to pre-exclude the flushing out of the sand from under the tile. To do this, around the perimeter of the plot paved with tiles, it is sufficient to equip the border, which is concreted from the outside with a solution made on the basis of cement of strength grade at least M100.

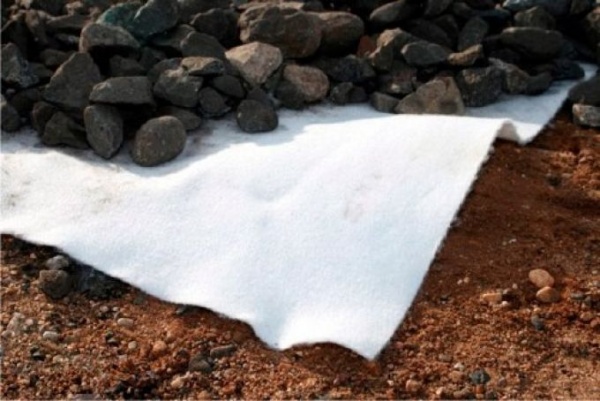
Prevent sand leaching will allow both a geotextile layer laid under a layer of sandy mound. The laying of geotextiles can be carried out on another, more advanced technology, implying the use of two layers of geotextiles - one is placed directly to the stabilized soil, and the second is on the ramble layer of rubble.

Laying tile on screening
This option is considered the most budget alternative to the first two methods of laying tiles. The granite dropout is a material that is a waste production of rubble and consisting of rubble sand and small fragments, due to which it can be used as a base for paving slabs, as well as a rubbed and sand layer. At the same time, it is easily tumped and, unlike sand, has a smaller shrinkage.
Important! Despite all the advantages of dropout, its independent use is not welcome if the soil is distinguished by instability and low water absorption. In such cases, it is equipped with a drainage layer of rubble, after which they produce the laying of paving slabs on the screening. In these cases, the inclusion in the laying technology of geotextiles is also welcomed.

Laying of paving slabs on a monolithic base
This technology is considered one of the most expensive, but often without it fails to do. We are talking about those cases where the operation of tiled tracks will be carried out under conditions of increased loads that can not be able to perceive the traamy bulk base.
The essence of this technology is to create a monolithic platform, not susceptible to problem soils that are prone to deformation, cracking and sending. In addition, the platform will contribute to the uniform distribution of loads on the sidewalk. The technology of creating a monolithic base includes two options:
- Laying paving slabs on asphalt;
- Stacking paving slabs on concrete.

The first option is used in cases where the wear of the old asphalt coating occurred, but its disassembly is not planned. In this regard, the most worn-out areas of asphalt are removed and their concrete mortar is poured. Available pit is also poured concrete. After that, they begin directly laying the paving slabs on a 2-centimeter solution layer.
The second option involves the installation of a concrete pillow on a pre-prepared reinforcing mesh frame with cell sizes 10x10 cm. Laying tiles on concrete monolithic base Most often is practiced on unstable soils, as well as in places with constant intense loads, for example, in parking lots.

After you have prepared the foundation in accordance with one of the technologies discussed above, you need to start directly laying the tile. There are many laying technologies, however, we consider the most common option - laying on the guides.

Around the perimeter of the site on which the laying of the tiles will be made, pegs are installed. Subsequently, high-rise marks will be made on them, which are connected by Kapron twine. Thanks to this reception, we get the top of the future tile canvas. The tile is placed by strips with a width of 3 m, the length of which is determined by the distance from one stretched twine to another.

Tile laying recommend starting from the corner, the closest to entrance door Houses, or from the main element of the landscape. In the process of laying the tile, it is necessary to press the base as much as possible to the base, and each element of the pavement is sealing with a rubber hammer and a wooden bar. For this, the tile is placed on the base, after which, tapping with a rubber hammer through a bar, carry out its maximum pressing. After completing the laying of the tile, it produces its final treatment with the help of vibrating plates, which will allow finishing material to finally get into place. Thanks to this reception, the surface of the tile will become as smooth and smooth as possible, and water will not accumulate on its surface.

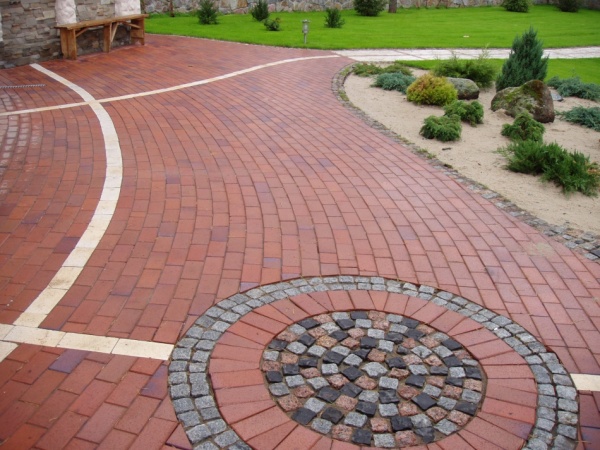
By laying the tile, take care of the purchase of special angular tiles with rounded edges, with which the corners and individual ornaments lay out.

Upon completion of the installation, the tiles fall asleep with sand. For these purposes, you can use a special color painted sand under the color of the tile or contrasting shades, which will allow the coating the greatest decorativeness.
To change asphalt coating in the courtyard of the mansion and the pavement tile comes in the country.
Paving slabs are much more attractive and more practical than asphalt coating.
She is stronger and practical asphalt and its external look more attracts attention. The tile is not afraid of rain, perfectly harmonizes with buildings facades. For her styling, they do not need a special technique, it is easy to put it properly.
Tools and materials
To perform work on laying paving slabs, you may need:
- metal pegs or wooden;
- rubber hammer;
- construction level;
- the hose equipped with a divider;
- broom;
- rake;
- shovel;
- long rail (rule);
- master OK;
- cord;
- traaming;
- cement brand is not lower than M-100;
- sand;
- geotextile;
- pipes with a diameter of about inches;
- gravel or crushed stone;
- sidewalk tile;
- curbstone;
- bulgarian.
Back to the category
The main stages of work
Back to the category
Preparatory work

Selected for laying paving slabs The plot needs to be placed using the rope and pegs that make it easy to make yourself.
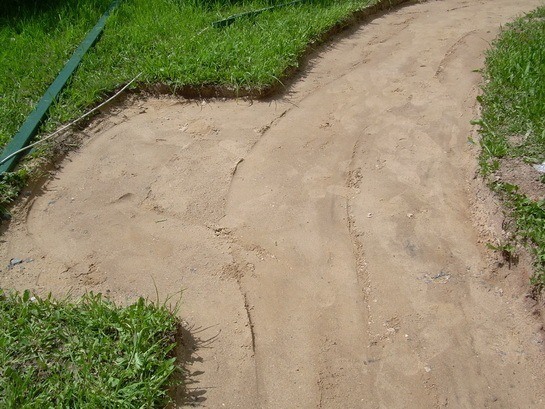
How to properly lay paving slabs? Start need from the preparation of the site. Not bad to have a plan with all sizes. In any case, you need to independently measure the area to correctly calculate the number of materials for work. Plot for laying is placed using a cord and pegs. They marked the boundaries of the site under the laying of the tile. After that, the ground is removed. Make it must be evenly over the entire area of \u200b\u200bthe site. Dern is removed to a depth of about 20 cm. It is advisable not to leave the seeds of plants and their roots.
After the garment is notched, the area is covered with rubble or gravel, aligns and trambed. At the thus prepared, the base is placed in a layer of sandy cement mixture. Its thickness can be up to 40 cm. For the arrangement of pedestrian walkways, 15-20 cm. Sand and cement are mixed in a 3: 1 proportion. To make the mixture tightly, it should be saved with water. Between the layer of rubble and sand can be put a geotextile layer. It will protect the pad or track from the germination of grass through the tile.

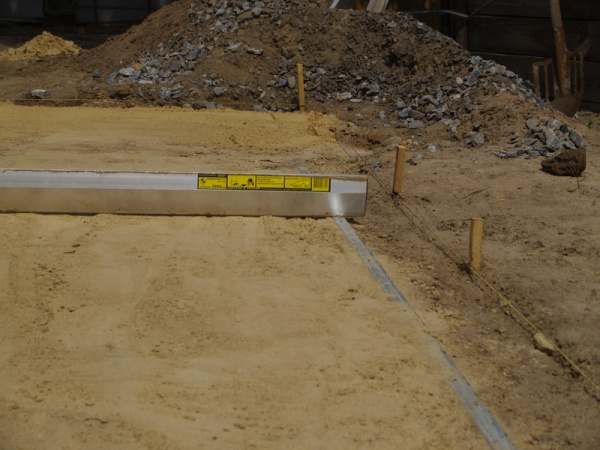
Stretch durable thread or fishing line. With the help of the level, its horizontal is checked.
At this stage, you need to decide on the direction of the direction of the site. It is usually done in the yard away from the house, in the direction of the street. The level of the street in this case is taken for the initial, zero mark. Along this line, two cavals are driven. There is a durable thread or fishing line between them. With the help of the level, its horizontal is checked. Level level is applied from below.
From one carriage, the thread or fishing line is pulled perpendicular to the first. The free end is tied to the third peg and drive it into the ground above the first two. The angle of inclination should be about 5 degrees. The fourth peg is driven, the fishing line stretches. It turns out a rectangle denoting the site for laying tiles.
The entire platform is divided into strips a width of less than the length of the rule. Bands are limited to pegs and fishing lines. Now the shovel and robbles should be crushed in each strip. The gap between the soil and thread should remain in two thickness of the tile. Not much accuracy is not needed. The soil who will have to be plugged will need to be tamped.
Back to the category
Laying paving slabs

Under the threads denoting the boundaries of the strip, lay steel pipes. Pipes should be strictly parallel to the threads and are at one height.
Now you can go directly to laying paving slabs. First, it is necessary to prepare a mixture of 5-6 parts of sand and 1 part of the cement. The sand should be wet. Lay this mixture on the surface of one strip and thoroughly tamper. Under threads that limit the strip, put pipes. Rule skipped under the fishing line and spend it on the surface of the pipes. They will show where to add, and where to remove the cement-sand mixture. As a result, it turns out a flat surface.
Paving tiles before laying should be inspected and sorted. It can have defects. The main of them is indicated: turtle, plate and propeller. In the first case, the pavement tile is convex, in the second - concave, in the third - curved. Such spending tiles while you can postpone.

Be sure to leave between the tiles of small gaps of 3-5 mm so that water during the rain through them went into the ground.
The tiles are fitted with a minimum gap from each other. If necessary, bubbling with a rubber hammer. Controlled by the level. If necessary, cut off the excess part of the stone use the grinder. After laying the paving slabs, it is necessary to sprinkle with clean fine sand, then rub the mop with a rigid pile or broom.
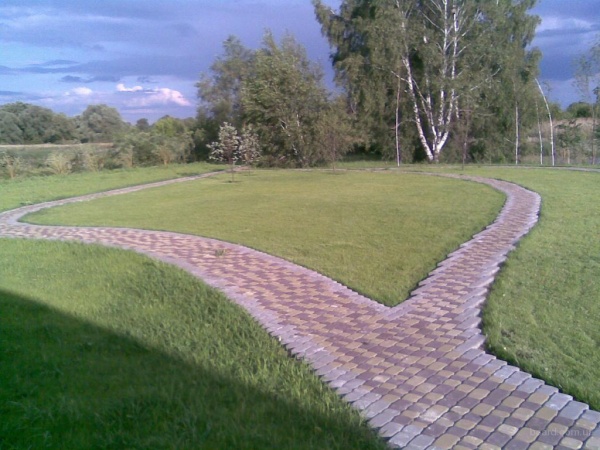
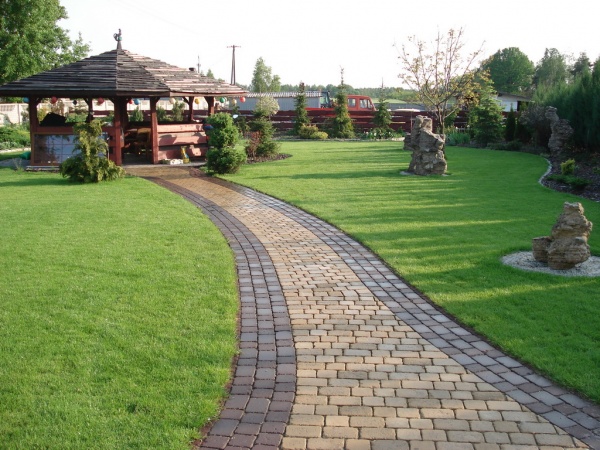
Paving tracks in the country, properly laid out with their own hands, give a special attractiveness to the whole site. They can be straight and winding, with patterns and without them. Tile you can lay out various steps, terraces and inclined tracks.
It is necessary to correctly pick up a tile of thickness. For the construction of pedestrian walkways, 40 mm thick tile is perfect. For the campling zone, a thickness of about 55 mm is already needed. For the passage of a cargo car put a tile of even greater thickness. Previously, a pavement was used for these purposes. For the designation of the boundaries of the track, borders may be needed.
There are several options, how to properly lay paving slabs with your own hands in the yard or in the country area. If it is put on sand with cement, then with the tile time and the base turns into a monolith. But even in this case, the ability to disassemble the entire structure. Causes of disassembly can be different.

Install the border sections and secure them on the intermediate with a thick solution.
The substrate from rubble is recommended for unstable soil. On the sandy soil you can do without a substrate. In any case, the surface on which the tile is planned to be placed is thoroughly aligned and tamped. In this case, the soil can be satisfied or removed. When using borders, it is necessary to understand that they can be closed or slightly above the track. The main task of these elements is to hold the tile from possible sprawling on fragile soils. Borders give the clearer outlines to the laid array. To install them, trenches are equipped with a layer of sand in 5 cm. A curb plate is installed on this pillow, aligned with a level, fixed.
In the same way, the entire border is stacked. For fixing individual elements, sand or soil is used. The depth of the trench should be such that he spoke on the surface of the tile by 60 percent of its height. It is better to calculate the width of the path from the border to the curb in such a way that it does not have to cut and customize the tiles.
On the rammed soil, the sand is poured by a layer with a thickness of about 7 cm, wetted with water and also tram. In the camp zone, a layer of rubble must be added and the reinforcing grid is stacked. When aligning the surface, especially in the courtyard of the house, you need to leave a slope of about 5 degrees for water drain. In practice, this is approximately 5 mm for each m. The bias is taken away from the house, and not the opposite.

Such paving track Periodically need care. It is sometimes cleaning, in winter, removing snow or ice can not be used tool with metal tips. No need to paint and process the tile and process with chemicals.
The first row of laid tiles can be fixed with cement mortar so that the tiles do not spread or lay them from the border. To comply with the levels of rows, you can pull the cord. Cutting and laying tile pieces is better after laying the main array. Fully laid tiled surface can be rapid additionally vibrating plates if there is such an opportunity. Then the surface will be perfectly smooth. It remains to sprinkle all with river sand and nim the brush to fill all the seams. You can fill the seams between the tiles with a mixture of 1 part of cement and 10 parts of sand. Watering necessarily. If the playground or track is in a wet place, then sand can be taken 3 parts.
The paths laid with their own sidewalk tiles require periodic care. They need to wash, remove snow and ice from them. It is undesirable to use sharp metal tools. Painting and processing the paving slabs with chemicals is not necessary. It is harmful for tiles.
No one will argue with the fact that it looks much better and more attractive than the coating of asphalt.
In addition, such a coating is practical. If before starting work, how to explore the question, how, it will be possible to avoid many errors. As a result, it turns out a beautiful coating for the country area, which will be perfectly harmonized with the facades and objects of the site. On the surface of the tile coating, when proper layingAfter the rain will never accumulate water. When heated, it will not melt and extract harmful substances. She will last for many years. But if the owner of the country area wants after some time to change the old tile on a new one, it will be very easy to do. It is easily dismantled. Yes, and put the paving slabs with their own hands will not require some special technique or skills.
The tile is a beautiful coating for the country area, which will be perfectly harmonized with the facades and the objects of the site.
At the unstable soil, under the specialists recommend putting the substrate from the crushed stone. If the soil is mostly sandy, then the laying of the crushed stone is not needed. If the track will be placed on the same level with other surfaces, it is necessary to make an additional recess by the place where the track will be held (about 15 cm). If you should strive to make its surface as smooth and correct. The smaller the surface will be, the longer the track will serve and perform its functions. If in the process of laying it will be necessary to remove or plug the soil, it needs to be done. On an uneven, unprepared surface, exactly put the tile will not work. Following the planned plan, in places where the tile will clash, you need to drive a wooden pegs and pull the rope along them. If the track is in several levels, each platform for the level is aligned separately.

If the track is in several levels, each platform for the level is aligned separately.
First of all, side borders are installed. They can be made not much higher than the path or one height with it. The main task of borders is to prevent the spreadsheet of paving slabs and keep it in place. To install them, you need to dig a trench, fill it with cement mortar and level blocks by level. Fixing them, sand or soil is being sweeping. Some use invisible backups instead of ordinary borders. And after they begin to align and tarnish the surface of the tile laying itself.
Back to the category
Preparation of the surface with your own hands
Initially, it is necessary to ravage naturally crushed soil. The sand layer is full, about 5 cm thick. It is wetted with water and after some time (until the sand is still wet), observing the same level over the entire surface. On top of the layer of sand, the layer of rubbank is poured. It is compressed and poured with a special fastening solution. If it is planned that the track will not only be pedestrian, but cars will also ride, then a reinforced grid is placed on top of the crushed stone layer. If there are also cargo transportation on the way, experts advise to increase the thickness of the working layer at least one and a half times or enhance the cement substrate. In order to ensure trouble-free rainwater flow, it is necessary to level the surface at a low angle (maximum 5 degrees).
Strokes on the ground can be done both longitudinal and transverse. During operation, you must not forget to use the level all the time. The last layer (sand-cement) is mixed from the proportion of 3: 1 and poured a thickness of 3 cm. This mixture is properly spread to the track portion and spoil with robbles. The better the reasonably the foundation is done, the longer the track will be.
An extremely simple technology of laying paving slabs in the courtyard of a private house allows you to perform work by the forces of an individual developer without attracting specialists. It is enough to organize the coating slopes, mount the lavety, select a rational layout scheme and the material to which pavement will be made depending on the operational loads.
Nuances of operating coating in the yard
Before you begin to decorate the compounds of FEM Power Elements, you need to learn how to properly plan the relief of the site and reduce the budget of the territory landscaping. FEM are budget option Finishes in comparison with asphalt concrete coating, allow to align irregularities by terracing and manufacturing slopes of 4 to 7 degrees required for self-removable removal of rain and melt drains.
To put the paving slabs exactly and ensure the maximum coating resource, the following nuances of operation should be taken into account:

Important! Livnevka (point or linear) is necessary in any case, since the FEM is made of concrete, rubber or polymer concrete, and all these materials are delayed by moisture on the surface.
Paving cauldron paving
To put the tile in the yard should be given the features of the technology:
Tip! Counting the number of paving slabs is better to produce after the courtyard markup, taking into account the layout scheme, the presence of curvilinear sites and retaining walls for the terraceing of the site.
Marking of the yard
At this stage, it is necessary to beat off a single horizontal level of the yard, create slopes and terminate the cords zone with cords. To put the paving slabs on the bulk mixture, it is necessary to have a rigid base, it is desirable from soils with minimal clay content. In practice, the developer faces the following problems:

In the last variant, steps are automatically added to move between terraces. It is better to perform them from FEM elements to preserve the unity of landscape design style.
Therefore, the courtyard markup is necessary to delineate the pavement zone, from the surface of which the fertile layer will be removed and replaced by a nonmetallic material. To do this, pegs or pickles are used, the cord is tensioning along the outer edge of the wets or the lavender trays.
Requirements for the base
If there is clay in the soil, it will swell in winter and destroy the coating. In fresh embankments, on the contrary, the soil will seek over time. Therefore, in the first case, part of the soil (the upper 40 cm) is replaced with an inert material in which there is no clay and the swelling is minimized.

In the second embodiment, the black soil is also removed, but it is already at a depth of 0.6 m, 15 - 20 cm layer of rubble is falling asleep and is molded 10 cm. Pide concrete throughout the courtyard surface. Figure power elements are stacked on a layer of sand with a thickness of 15 cm minimum or garbage (1/6 cement, sand, respectively) 10 cm thick minimum. All layers are mandatory compacted by vibrating plates.
Preparation of mixes
Putting the road surface can be for a solution, a dry mixture of garment or pure sand. The first option is expensive, the coating has zero maintainability and extremely sensitive to bases of the base. Special advantages in comparison with clean sand does not provide, since for the normal formation of the cement stone it is necessary, at least, the minimum water-cement ratio, and not accidentally penetrated into the lower level of moisture.

Preparation of garbage from cement and sand.
Bordeur and Livnevka
The resource and the quality of the pavement directly depend on the technology of installation of storm trays and garden borders. These elements are higher than paving slabs, for them will have to deepen the trenches around the perimeter of the paving zone. Laying them on the basis, should comply with technology:

The laid grease falls asleep outside the ground, from the inside with a nonmetallic material (sand or crushed stone) in a single level with the surface of the underlying layer. Livnevka trays and rainmakers are mounted at the bottom points of the paving zone. To reduce the budget of landscaping the territory of Livnevka trays can replace borders on one side of the yard.
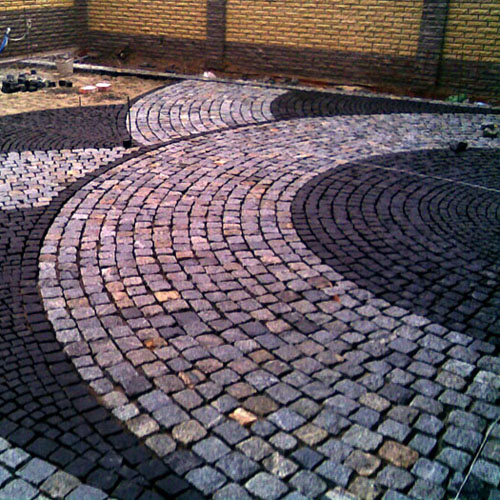
Laying whole tile
On the manufactured base of the paving, it is stacked by technology:

Fig. 8 Aligning Hard Rule
- power - according to the selected figure and scheme of laying figured pavement elements, paving slabs mounted on the lean bulk material close to each other.
Rule is made of smooth dry edged boardAt the bottom of the two sides of which rectangular was created with hacksaw. In contrast to the plug-in tile glue, you can go immediately, so the work is more convenient than weighing in front of you. This allows you to align the entire surface of the pavement according to beams and put the elements of the FEM for one reception, which dramatically improves performance.

Flashing Staying Laming Sanding And Sand
Tip! With high-quality alignment on the beacons of herbs or sand, the paving slabs do not even need to be messenge to rubber. After backfilling the seams, the entire surface of the FEM is subjected to alignment and sealing vibroplitis, eliminating homemade Masters from manual labor.
Cutting and filling seams
Without crumbling of figure cells, it is possible to do only on sites of the correct geometric shape, and even that, not for all FEM collections. Paving tile trimming is necessary in adjoining nodes:
- in the grooves, foundations, basements;
- near the rain-seekers and at intersections;
- on radius, winding plots.
Curra FEM is carried out by a diamond disk or snap-free with a stone. Unlike some borders, the sidewalk reinforcement has no reinforcement, it cuts out quite easily.

For some modifications, FEM manufacturers produce halves, which allows you to do without trimming.
In the last stage laid facing material You need to additionally protect against displacement at the time of use. For this seams should be filled with quartz or career sand. Particles of these materials have a torn edge, so they are self-slipped inside the seams under their own weight, do not wash away with shower and do not blow by the wind.

Fammets FEM.
The sand is poured with piles along the paving zone before sealing the veneer of the vibropilet, is sweeping the brush over the entire surface of the yard. Bulk material penetrates into the seams.
Conjugation knot with gentle
If it is planned to be brought by paving slabs all the yard territory, the default germ is also decorated with this material. Therefore, it is necessary to take into account the nuances:
- the width of the scene must be 15-20 cm more of the roof projection on the ground;
- the slope of the scene must be from the walls outside 4 to 7 degrees;
- the relief of the courtyard, in turn, can have a bias towards the cottage.
Therefore, around the perimeter of the breakfast should be mounted a linear lavender from surface trays. Either ensure drainage with waterproof surface concrete coating In dot rains, installed at the lower points of the yard, and organize the slopes of the pavements in their direction.

The knot of interfacing of the scene and the paving coating of the yard with the elements of the lavety.
Important! At the stage of the manufacture of the underlying layer, pipes of drainage sewage from rain-seekers towards the underground tank for receiving and accumulation of effluents are stacked.
Thus, the pavement of the courtyard paving slabs own forces It does not represent difficulties for an individual developer, even on uneven relief. It is necessary to take into account the composition of the soil and its carrying ability depending on the operational loads on this decorative coating.
Tip! If you need repair masters, there is a very convenient service for their selection. Just send in the form below detailed description Works that need to be performed and offers to you will receive offers from prices from building brigades and firms. You can see the reviews about each of them and photos with examples of work. This is free and does not oblige anything.
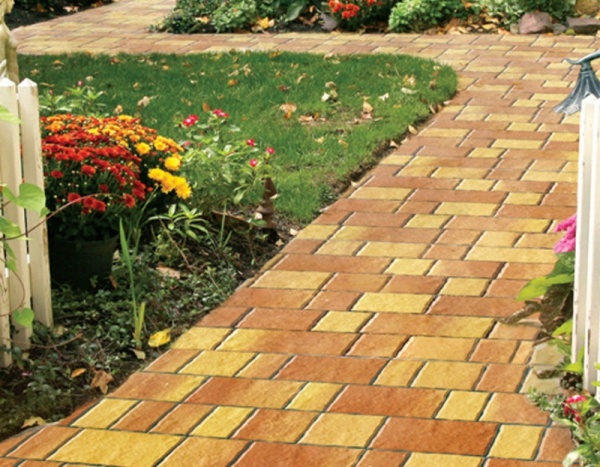
The paving slabs Millions of the owners of cottages and country houses are chosen as a material to improve their sections: devices of the scene and tracks, platforms, recreation areas and places allocated for vehicles. The sidewalk tile is almost perfect for these purposes: an acceptable price, simplicity of laying and subsequent care of it, the possibility of simple and rapid replacement of damaged areas, frost and wear resistance of the material, good performance characteristics, the richest choice of textures, drawings and colors. Ecologicaly clean construction material. Add to this the constant appearance on the market all new types of paving slabs with previously unexpected and attractive capabilities (rubber paving slabs, polymer sidewalk tiles, tiles with volumetric color drawings), and the causes of such popularity will become clear.


Choosing tile
This is not about choosing a color, drawing, textures. In this matter, every buyer is guided by its preferences and its vision of the design of the site. We are talking about the operational characteristics of this material.
As you know, there are two ways to produce tiles: vibrating and vibratingressing. The advantages of the first way lies in diversity color Gamma., rich in the choice of existing forms, in which the mixture is poured into the production of paving slabs, and the ability to make an individual order to material almost any configuration. If you need a unique, exclusive design, which you want to shake native, acquaintances and neighbors, you need a vibrolytime tile. It should be remembered that she has a rather short service life (about 7 years) and operational characteristics limited in comparison with the vibropressed tiles. It is not suitable for paving sites with intensive load, including car parking.
The vibropressed tile (of course, the corresponding type) can be used for any purpose, including for the paving driveway pathways and vehicle parking spaces. Some of its varieties, first of all, are used for maintenance of roads. Such withstands the weight of heavy vehicles. The paving slabs made by the method of vibropressing has excellent performance, wear and frost-resistant, it has a long service life (marketers speak of 200 or more years. Reception, known since the time of Khoju Nuzreddin, who resonantly believed that during this time someone That of those participating in the dispute will surely dare. But, in any case, the durability of the vibropressed tile is definitely enough). Improving equipment and consistently high demand for paving slabs allow manufacturers to offer buyers all new types of this material. And if quite recently it was possible to clearly divide: original design - Vibrol tile, reliability and operational characteristics - vibropressed, today this facet disappears, and erases its vibropressed tile manufacturers.


Planning site, markup tracks and playgrounds
Make up the plan of the site on which the tracks will be laid and the platforms are equipped. After developing a plan, we pass selected places and with the help of pegs, roulettes and cord make marking and measurements. This is a very exciting occupation, just imagine that you are a prospector in the Wild West, and collapses a new golden area. Define the width based on the area area. It is believed that the ideal width of the track should be 1 meter. Practice shows that at each site you can allocate such an area under the track and that width of 0.5 meters is quite comfortable. You decide.
Important! Placing future tracks and sites, keep in your head that we will need to make a small slope when laying for water drain. To do without sufficient experience, the transverse slope in both directions from the track axis is unlikely to work from the first time, so we will limit ourselves to the bias of 2-3% away from the house. After completing the work on the markup of tracks and sites, we count the required amount and prepare materials and tools for work.

Materials and tools for laying
From the materials we will need:

Go to the tool:

Everything is ready, you can proceed to laying tiles.
Preparation of the foundation
According to the made markup, dig a trench. We need to remove the turf at least 20 centimeters. Carefully remove the roots of plants from the trenches. Soil take out so that the trench is with a side slope. So we can achieve water drain from paving slabs.

After completing earthworks, starting the bottom of the trench thoroughly tamper. Builders for this purpose use a typewriter for tamping, but if you have no such farm, you can make a manual or just take a small log. We make grooves for the installation of curbstone.

Attention! There are two points of view when you need to install a curb stone.
Many believe that the sizes of the tiles are known, the width of the seams between the tiles is approximately known, so it is necessary to install the border at the base preparation stage. The logic is in this. As it is in the statements of specialists, it is impossible to define the width of the track in advance. Paving tile is not a ceramics for a bathroom or kitchen, the thickness of the seams will not work the same and in the end the border will have to shift. What kind of opinion is worth listening to? To the first. It is only necessary to navigate not to your eye-diamond, but on special plastic crosses. Such are used when laying ceramic tile. Take one-piece cross 2 mm.
We drag the bottom of the trench geotextile. Now no weed to the sun will not break through the track. We fall asleep geotextile with a layer of rubble with a thickness of about 20 cm, wetting water and begin to the ramp. Tribute intensively, we need, so that after this operation remains a layer with a thickness of no more than 15 cm.
When laying the paving slabs on the galts (a mixture of sand and cement) or on the sand over the rubble, a sand pillow is made. If you want to lay on a concrete base, rubble must be poured with a solution prepared from a dry plaster mix. After solidification of the solution you will get a ready-made concrete tie.
Go to the installation of curbstone in the groove. Pre-fall asleep in the groove crushed stone, we will tamper, align, lay in the groove cement mortar And install the border. Check the horizontal building level. We remember that the height of the border stone should be below the height of the surface of the laid paving slabs so as not to prevent the flow of water from the track.

We drag the rammed crushed stone geotextile and smell on top of sand. We need to make a sandy pillow. Geotextile prevents the sand in the rubble pillow and its clogging, because the crushed stone will perform the drainage function in the "Pie". Sand rave with a robber and tamper. Then we rush to the formation of the puddle on its surface. When the sand serves, make its surface completely even. We use improvised "lighthouses" from pieces of pipes of the same diameter. Pipes cut into the sand and we make the surface with a smooth surface as they make a floor tie. The base is ready.