Layout at home from the box with your own hands. Cardboard house - master class with a detailed description of decorating options (110 photos)
Big and impressive handicraft, but what you can't do for your favorite children!
Materials:
- cardboard,
- glue "Moment Crystal",
- acrylic paints,
- acrylic lacquer,
- sintepon
- pieces of fabric,
- braid,
- beads
- wooden sticks
- brushes,
- mass for modeling
- scissors,
- wire,
- beads,
- mirror,
- suspension for beads
- pieces of wallpaper
- pencil,
- line
- disposable containers
- fantasy.
Operating procedure:
It so happened that one of the daughters got sick with a windmill, and I needed to take them at home. Decided to make everything together house for our dolls. Mastery on the principle: I was blinded from what was. We did not find the finished box, but there was a large piece of cardboard and many small pieces of diverse thickness and textures. I thought that the house we would have a small of two rooms, but not there was something: 2 young designers had their thoughts about our house.
As a result, we began to do dollhouse In 3 floors for 5 rooms (Subsequently, the upper floor was divided into 2 parts and 6 rooms came out).
Layout
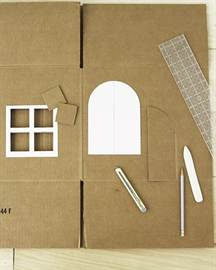
From a large piece of cardboard, I cut 1 part - this is the rear wall of our house and 2 side (see photo 1).

Next, 2 side walls bent and began to glue the floor and the ceiling (photo 2).

The house has dimensions: height - 74 cm, width - 50 cm, depth - 30 cm.
The workpiece of our house I sailed with pieces of wallpaper and suitable paper (see photo 3).

Outside, the house is saved by wallpaper, the roof is a 3-cm cardboard strips for 31 cm, glued flashes.
The frames are glued from the cardboard strips.

Our house needed a diverse puppet which we tried to make with your own hands from the girlfriend. All glue to the eye without preliminary drawings and patterns. Just cut off the cardboard rectangle and the necessary pieces were glued to it. All furniture is painted acrylic paint and covered with acrylic varnish.
Bedroom
So, room №1 - Bedroom. There are a lot of furniture in it, and the first thing to start is. It is fairly easy to glue it, just look at the photo 4.

The cardboard blank I covered acrylic paint, after drying the paint covered with a varnish, glued soft mattress, added a few soft pillows and covered.
The following furniture items are a chest of drawers and a bedside table (photo 5 and 6).


The principle of their manufacture is one - a small cardboard box to which false drawers are glued. The bedroom found a place and a comfortable rocking chair (photo 7).

Big I. spacious wardrobe Also found my place (photo 8).
 In the photo 9 the whole room in color.

You can also see how to make a bed for dolls (and other furniture) on the canal of "self-class":
common room
Room Room 2 - Total Room To view the TV. The TV in our house is flat - a large cardboard rectangle was covered with black acrylic paint, after drying, a suitable picture is glued and everything is covered with acrylic varnish.
The main place in this room is spacious, it houses a numerous doll family.
The base of the sofa is a cardboard blank (photo 10).

The back and armrests are covered with paint and varnish, and the base is glued with syntheps and cloth. The table was already at the daughters - this is a wooden designer, on which we stuck a piece of cardboard and all together were painted.
Room number 2 we see in photo 11.

Video how to make a wardrobe:
On the second floor of our house there is a music lounge and a kitchen.
Living room
IN music living room Mounted fireplace (photo 12).

He, in contrast to all our furniture, is covered with cracks. At the beginning, it was covered with white acrylic paint. After its drying, a layer of cracker-medium is applied. After drying this layer, a layer of ferrous acrylic paint is applied. After drying, the entire product is covered with matte acrylic varnish.
Since the living room we have a musical, then the piano (photo 13) was glued out of 6 match boxes. It immediately was covered with colored paper, but the paper turned out to be poor quality, and in the future it was painted, like all the furniture in the house. In addition, I glued 2 square beads to him - these are pedals.

The chair for the piano (photo 14) glued out of cardboard, painted and decorated with a velvet pad.

Sofa (photo 15) and armchair (photo 16). I glued them out of the cardboard and decided not to bite the cloth, but just paint paint, my daughter gladly helped me in this. After applying the varnish, they are very similar to the leather.


All musical lounge after furniture staining (photo 17).

Kitchen
Room №4 - This is a kitchen, it is small, but spacious. Kitchen set - This is a large wardrobe in the form of the letter G (photo 18).

The washing is a small plastic container from the jam, and the crane is flattered from the masses for modeling, and a small suspension locker:

Plate y on electric with 4 burners (photo 20), the door opens.

In the kitchen we have 2 stools (photo 21) and table (photo 22).


The fabrics were glued and dishes (photo 23).

In the photo 24 our kitchen after the use of paints and varnish.

On the upper floor we have accommodated children's and toilet room.
Children's room
IN children's The main place is the two-tier bed (photo 25).

She has soft mattresses and pads. The room has a small table (photo 26) and stool photo 27.


There is also a locker for toys (photo 28).

In this room, the window I did not cut through, but simply glued the cardboard to the side wall. The room is decorated with color alphabet (carved from paper packaging from children's toys). In the photo 29 children's in color.

Almost all chandeliers in our house are glued from disposable containers, beads, sticks from roosters and braids.
Only one that is in the musical lounge, made of beads, wires and accessories from Bus.
I glued to the house and the ladder, but we have until the gear, since I am afraid that if you glue it, it will interfere with the simultaneous game of 2 children.
Bathroom and toilet
For toilet room We need toilet, sink and bath. It was necessary to make them quick and just.
And I decided to simply cut them out of the masses for modeling. What subsequently we did with your daughters (photo 30).

Let them are imperfect, but they are made together.
Save our works somewhere. Next, we painted them with white acrylic paint and covered with glossy acrylic varnish. The tank after drying was pretty heavy, then I replaced it easily (cut out from the tube and painted). So that the sink stably kept on the wall, I glued the bedside table. The bedside table was painted as all the furniture in the house. Next, I was stuck to the wall and the floor of the house, and then glued the sink. A crane is glued to the sink (molded from the masses for modeling) and beads. The finished mirror was not found, and it also from cardboard.
The toilet is made of several parts - the bases, sticks from the rooster, the tank (from the tube), chains and beads.
All this construction is supplemented with sidewa - cut out of cardboard and sealed with a one-photon cloth.
Photo 32 All toilet room in color.

That's how quickly and fun from the girlfriend, together with my daughters, we built our puppet house. Such crafts always cause joy in children.
Let him still pretty simple, but his daughters are quite happy with them and play together together.
And more video, how to make a house for dolls with your hands from plywood:
Another interesting:
Look also:
Knit a monkey toy (crochet)
Anna Moses master class, how to link a monkey - a symbol of next year. Very soon we ...
Pumpkin (crochet)
In this master class, we are together with Anna with a hook soft ticking, which will become excellent ...
Chest and house boxes
For the birthday of the Little Mermaid I needed a chest, but those that I saw on sale were just a scale ...
Kitty kitty (crochet)
The modern toy industry changes rapidly. Which toys do not see on the shelves in the magician ...
Apache Cave and Toy Fire
Are you already familiar with our Indian Apache? Since he does not have his own Wikiyup, Irina Ma settled ...
Rapunzel Dress for Barbie Dolls (Crochet)
Each little girl dreams of a large and beautiful doll house for Barbie. And every home cat dreams of his house from the cardboard, wherever he could leave, without sobering the hosts. Having learned to make houses from cardboard with your own hands, you can not only please your children and pets, but also to beautify the interior originally. This article shows the most requested schemes of houses from cardboard with their own hands with MK.


Necessary materials
Materials and tools do not require additional costs, everything needed in the farm of any family:
- carton boxes of different sizes;
- adhesive gun or super glue;
- knife and scissors;
- pencils, markers, markers;
- Watercolor paints, gouache;
- Sequins and other decorations for the decor.

Useful tips:
- when creating a box, it is better to use corrugated cardboard;
- Cardboard must only adults;
- For the stability of the product it is better to take cardboard pipes;
- In the house for children, it is advisable to make the door opening out. So there will be more space for games;
- Do not throw away small cardboard boxes.
Refuge for cat
Cardboard house for cats can be built with the whole family for a very small amount of time. The first thing to be done is to draw on the door and windows in templates.
Start to pick up the bottom of the box. Bend opposite sash, apply glue on them and on top to heat the remaining sash. Put them to each other until the glue is dry. At the top end of the box cut off two wide sash. Next, cut off from one left fold half and bend it. The same to do from the second whole sash. Secure them with glue in this position.

The next step is to create a roof. On the top of the second box, on a small sash, draw lines from the center of the vertex to the lower corners. Also done with the second sash. Then cut one big sash. On the first drawn line, cut off the edge, and the second beg. The same actions repeat with the second sash.

At the bottom of the second box, cut off wide sash, and from the first less cut off exactly half so that when gluing two boxes it was a hole. Glue boxes. Then take the first cut-off wide sash and glue it to the bottom of the second tier, to strengthen.
A roof will be made of the second box. To do this, cut a piece of 45 sizes to 115 centimeters. Bend it along the long side of the input. Lubricate the triangle glue of small flaps on the top of the second box and glue them to a wide sash. Apply glue from above and glue only the first side of the roof so that the cat can look out from under it.

House ready!

Dollhouse
This wonderful gift for children can be made independently from ordinary cardboard boxes.
The house will consist of two floors and two rooms. To start connecting the boxes among themselves. From the bottom, on the side and on the sides, stick more on the sheet of dense cardboard. Scotch and strengthen the design of the house and give glue to dry.
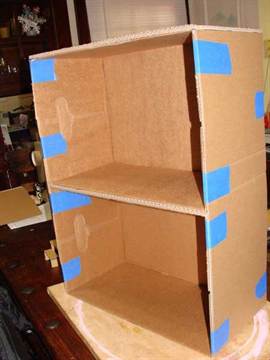
In order for the design to become more durable, strengthen the walls with a thin cardboard.

Next Stage - Room Decoration and external view Domika. Wall decorate appliques from colored paper, add mirrors, curtains on the windows, toy furniture. In order for the doll to "climb" to the second floor, the staircase will need a staircase that will consist of two parts.
From thin paper cut steps for the end of the staircase. This is done to cut out of cardboard. Pick up the desired width and height of the steps.

Carry out a couple of parts from a dense sheet of cardboard. It will take a pair of rectangles for steps and bottom.

Glue the side parts of the stairs and squeeze their hands so that they become more dense.
In childhood, everything seems a little different and big, beautiful, modern house Does not seem comfortable. Any jewelry raised in the children's room, toddler, although it will be appreciated, but not like you would like. It's all about the usual desire to have your own island: a small house where the child will be able to hide from the "big" problems, play dolls or read the book. To ensure a small little man with a welcome housing, we suggest make a house from cardboard for children with your own hands. Templates of such a home are too big for publication, so we will offer reduced copies of children's mansions.
Tools and materials
What cardboard house can talk about if you did not prepare tools and consumables? Of course, no about what. So beholding the following items:
- Big cardboard box from household appliances. There is a used packaging from the refrigerator, a washing or dishwasher, several plasma TVs, cabinets.
- Stationery knife
- Roulette and large ruler or rake (twist level lines)
- Old wallpaper or Watman if an individual design is planned
- Glue for wallpaper
- Hot glue and adhesive gun for details
- Normal and bilateral scotch
- Pencil or marker
- Blanket for roof
- Carrying and light bulb to spend light in the house
- Rafters for the roof of plastic tubes trimmed by foam
If everything is ready, we take a baby in an oakku, a good mood and go to a good way - to elegant cardboard house for kids!
The process of creating a house of cardboard
Primarily, decide With the size of the house: optimally, if the walls are at least 1-1.5 meters. This will allow the child to feel inside comfortable. In the presence of a ready-made box of specified sizes, preparation for construction is noticeably reduced. If there is no big box, connect together equal In the height of the piece of cardboard with the help of tape and create the desired area of \u200b\u200bthe future mansion.

 Cut in the roof round hole With a diameter of 6-10 cm, the grinding the light connected to the carry. Secure it with a wire from the ceiling. It is desirable that the light bulb is not installed in the center, so the child will not touch her head and escape injury. Take the rule every day check The state of the lamp to protect the child from possible troubleshooting.
 Shift on the walls of the house old wallpaper or Watman. Wallpaper is better to glue on special glue, and Watman on the usual PVA. It is not recommended to glue a dense paper for double-sided adhesion, as it can turn off at the most inopportune moment. If you decorated Watman's walls, then better idea For registration will be bricksDrawn by marker or paint.
Arm yourself with a pencil and make marking for windows and doors:
- If you are planning closing door, measure 70-90 cm from the floor. Next from the top point, swipe perpendicular to the smooth line 40-50 cm to the right or left. Cut the door on two lines, bend it at the end of the horizontal line. To provide a child intimacy of space, attach a hook from ordinary wire to the door. Be sure to put the tip on it so that the baby does not scratch.
- Another door option - cutting a monolithic rectangle From the cardboard wall. In this case, the door will turn out completely through. So that the child could retire, offer to arrange the door with a light plaid.
 Cut the window with a single square of cardboard or make 4 small squares that imitate the window sections. Do not forget about the decor: stock curtains for new apartment kid. It is better if you alone attach them with the help of two-way tape or hang fabric to stretch along the wires of the wire.
 On this house can be considered complete, although, perhaps, another detail remained: hang a sign with the house number and the name of the street. This is another surprise for the baby, because it lives at any address: why not settle, for example, on Baker Street?
Furniture for a house of cardboard
Be sure to finish a new kid dwelling. Very important provide comfort on the initial stage Settlement. Furniture can be purchased in IKEE or make it yourself. On our site, for example, you can learn how to make it easily needed by any girl. It is recommended to use the following items for the decor:
- Books
Of these, you can make a mini-table or an end. - Pillows
Perfect for a homemade sofa or bed. - Artificial flowers in pots
Little neat pots will decorate the kid's house. By the way, here you can find out how to create your own hands in the form of a cat. - Terry bathroom rug
Such a litter becomes a real Persian carpet in the cramped conditions of the baby's domical. - Statuettes
Give your child the right to choose: he will certainly separate the favorite items on the stylized furniture of their cozy corner.
 Templates
Unfortunately, imagine templates This big house is impossible. Therefore, we publish reduced copy schemes of cardboard houses that can be easily made alone.
Cardboard Domikov Gallery
Be sure to look at the cardboard houses that made children together with their parents. Perhaps it is here that you will find a dream house.


All children dream of toy houses that they are ineptly trying to build from the fact that they have at hand. And sometimes the parents do not even guess that there is a material in the house from which a wonderful home for children's games can be made is an ordinary cardboard. Without special efforts from the cast material, it may turn out beautiful and comfortable home - Favorite place for children's games.


Decorating the house, children will develop their fantasy. The toy house can become a spaceship for them or princess castle, involving them in an amazing adventure. Taking your toy housing, children to lend order in the house. Reaching in the house, they can organize a secret society or tell each other horns.
Make a house from cardboard with your own hands will not be much difficulty. Kids must be connected to the building process. It is very interesting and exciting! Helping in construction, children will receive the first architectural knowledge and skills.
Materials and tools
The house of cardboard does not require large material investments. Materials and tools for construction will be found in the farm of any family:
- Cardboard boxes of different sizes, adhesive gun.
- Scissors, acute knife, pencils, markers, markers, tape.
- Acrylic or watercolor paints, gouache, shine and various decorations.
Operating procedure
The consistency of the construction of the house from cardboard can be different, depending on what architectural constructions You want to create. But the general algorithm can be described like this:
- Find a sketch or scheme on the Internet, print on the printer and start acting. If you are an experienced master, you can draw a sketch of home yourself.
- According to the diagram, cut the parts and glue them in the desired sequence of scotch.
- Joint efforts are fun decorate their structure.
Useful advice
- It will be wonderful if the corrugated cardboard will be in your boxes.
- Work on cutting cardboard should only be carried out by adults.
- For the sustainability of the house it is advisable to find cardboard pipes. They can be asked in the store that sells goods in rolls. If you do not find, make pipes from cardboard. To do this, simply roll it into a roll.
- Try to make the door door opening out, so that children have more space for games.
- Do not throw away small cardboard boxes. Of these, you can make a beautiful puppet castle for a princess or garage for machines.
Options for cardboard houses made by your own hands, there are many. You yourself can come up with something interesting. We offer several master classes and original ideas For the manufacture of houses that you can easily build with your children.
Folding Cardboard House DIY - Master Class

We will need: a large cardboard box, scissors, a sharp knife, tape.
Step one:sut off the top of a large box, as shown in the diagram. Sliced \u200b\u200bparts set aside. We glue the side seams of the box with scotch.
Step second:i turn over the box and connect it parts in places where it is indicated by the yellow arrow in the diagram. From the cut parts we produce the roof, connecting parts of the scotch in the places specified by arrows. Attach the roof to the side parts.
Step Three:we cut the cardboard in the place indicated by yellow dashed lines in the diagram. Connect parts specified by yellow arrows.


A comfortable and functional house is ready. It can be disassembled at any time, play it and fold it back again.
Cardboard House with Door - Master Class

We need: a large cardboard box, a sharp knife, scotch, acrylic paints or gouache.
Operating procedure:
- Cut the roof and side parts of the house from the cardboard.
- We collect a house and sample the scope of the side of the side seams.
- We glue the roof and cut the door from three sides, as shown in the figure.
- The window can be cut or draw.
Cardboard Mill DIY - Master Class

We will need: a large cardboard box, knife, tape, wooden wand, screw, rope, acrylic paints.


Operating procedure:
- We fold the box as shown in the diagram. From the sides, we cut triangular frontaths, and on the roof we make holes for the window and pipes.
- By pattern, we make a cardboard tube.
- In the tip of a wooden stick, screw the screw and rope to the roof.
- According to the scheme, we make a screw and fasten it on a stick along with a screw so that it spins.
- Cut in the end two triangular windows and secure pipe.
- Color the mill with bright colors.
Barbie's house - master class

We will need: two small cardboard boxes, knife, tape, glue, acrylic paints, colored paper.

Operating procedure:
- We take two boxes, cut out the side of two windows and glue them together, as shown in the first drawing.
- We glue the shelves, rear wall and roof made of two cardboard segments.
- Cut out beautiful windows, then paint the resulting house with paints or stuck with colored paper.
Cardboard Cat - Master Class
From the cardboard you can make a wonderful cat house for your favorite.

We need: two are not very large boxes, knife, tape, glue.
Operating procedure:
- We make two small houses in the size of the cats according to the scheme given in the second lesson. Only one of the houses should be without a roof, do not do the door.
- Cut the window, as shown in the diagram and glue one house on another. We hope that your kitty will like her new dwelling.
Interesting ideas of cardboard houses do it yourself


- Cottage with starry sky can be made of cardboard boxes skillful hands.
- Surprisingly beautiful doll houses are obtained from cardboard, if they are saved with a bright cloth.
- Unusual architectural cardboard structures simply affect the imagination.
- Puppet house-transformer can be made from cardboard on the attached scheme.

We hope that our lessons, ideas and advice will help you in creating wonderful toy houses. You will certainly get a joyful mood and indescribable emotions as a result of your creativity.
Do not rush to throw out cardboard boxes if there are children in your house. Such a thing, unnecessary at first glance, will serve as an excellent house for dolls, toys or even for the child himself. How to make a house of cardboard, we will tell in this article.
How to make a house cardboard for dolls
Make a house for dolls from small cardboard box. To create such a product, you need to stock:
- cardboard boxes of suitable size;
- glue, tape;
- scissors and sharp stationery knife;
- watercolor paints and tassels;
- colored paper;
- any finishing materials that are enough fantasy.
Multi-storey cardboard dollhouse is made as follows:
- Boxes, of which it is supposed to build the floors, you need to strengthen your scotch in all the edges, so that the house does not collapse in the game process.
- Then you need to cut windows. To begin with, it is better to draw exactly a pencil, and then cut out the stationery knife on the outlined lines.
- To create a multi-storey house box, you need to put on each other and glue with each other.
- Now it is necessary to make a roof. For this, there are two cardboard sheets of suitable size and fasten at an angle of 45 °. The roof is installed on the top box.
- So that there were separate rooms in the house, it is necessary to make partitions. Like everything else, they are made of cardboard and installed inside the boxes.
- In principle, the puppet house is almost ready, the most interesting thing remains - to decorate it. It is possible to separate such a toy structure as you like, for example, caught with colored paper or cloth, decorate with ribbons, lace, beads, buttons, or something else. If you want to attract to the process of the child, then you look at the walls of the house with simple white paper, and let the kid himself sneaks them at its discretion.
- Like outside, from the inside the house also need to decorate. There will be unnecessary remnants of wallpaper, fabrics, oilcloths.


How to make a house from cardboard for a child
It is no secret that kids simply adore for themselves small improvised dwellings out of everything that falls at arm. You can help your child and make a cardboard house from a large box for him, which remained, for example, from a refrigerator or washing machine. The process of creating such a craft is similar to the previous one:
- The cardboard house should be durable, so from the inside all his joints and corners are punctured by scotch.
- Draw the windows with a pencil, cut off the stationery knife. Make the door in the same way.
- If the box is low for a child, the top can be cut off and attached the roof of the L-shaped roof.
- You can decorate such a house by any infringement materials. You can salary with paper or wallpaper, just paint or paint. Can be used natural materials For decor: cones, branches, leaves.
All details children's house It is better to fasten with a scotch tape or a stapler, because the glue will not give the desired result and the house will disintegrate.

