Wall from a bar in different installation options. Installation of walls from a bar
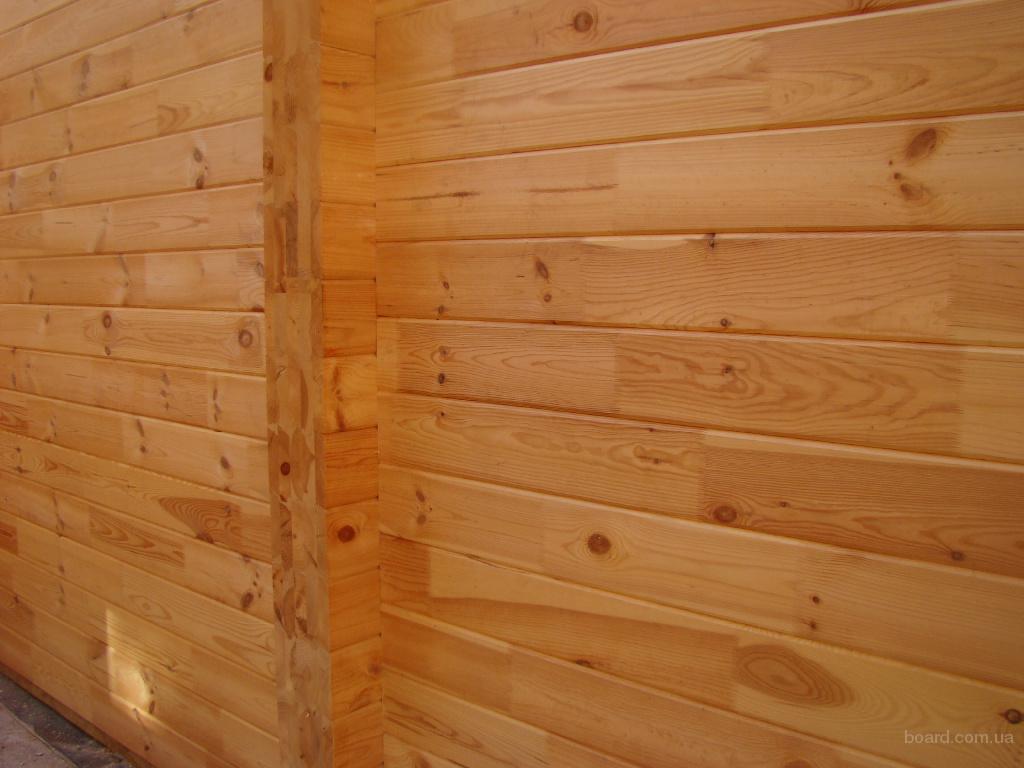
The use of wood during construction has never lost its popularity, because it is great for any form of climate. In most cases, during the construction of houses, a wooden bar is used, since it, among other things, helps to achieve a certain comfort, without thinking about the air conditioning system. It is made of solid wood, which is filled with 4 sides. It is very convenient during construction due to the fact that he has the same thickness over the entire length.
The first thing in the construction of the house from the bar need to perform waterproofing the foundation, and then lay the timber on it.
Through the timber in the closed room, about 35% of air per day can penetrate, it absorbs moisture with wet weather and, on the contrary, gives dry. Therefore, there is often laying of timber during the construction of wooden home.
For such stacking, the following tools will be needed:
- chainsaw;
- perforator;
- screwdriver;
- ax;
- drill;
- roulette;
- building level;
- nails;
- harness;
- corner.
It is also necessary to remember that during construction it is best to check the diagonals, angles and level of walls.
Main technology laying
The laying is carried out with due preparation, before starting work, the tree is needed to clean and process. The technology of laying timber with their own hands at first glance may seem too difficult, but it is worth all the items in order to subsequently have no trouble that happens:
- If you build a house from a bar from a bar, then you need to make a complete waterproofing of the foundation, for which it is necessary to lay the runneroid 2 times, and after glazes. It is necessary to ensure that all the layers of the used materials used are larger than the foundation itself, not less than twice.
- Before starting the laying of the first layer of timber, with their own hands, it is necessary to accurately place everything. After that, the tree should be processed by an antiseptic together with the flame. If there is no need, separate bars need to be copped with each other with special brackets or nails.
- You need to lay a bar so that it fits tightly one to one. Make sure that there is no emptiness, because to the lowest level of laying the floor structure itself will be attached to withstand a large load.
- If the bar is not straightforward, then it follows it to hump up. On the ready-made wall, you need to check the curvature, the maximum assumption is up to 5 mm.
- The bars among themselves must be fastened with large metal nails (copiers) scored by approximately 30 mm. They should be scared in a chess order.
- After the main laying of the bar, you need to think about insulation. The insulation is needed with a thickness of approximately 0.5 cm, stacked without bending.
Back to the category
Methods of laying timber
Methods of laying during construction are very similar, only some nuances differ.
- The laying of the method of "Pedderv" is that on the corners of the ends of the timber, it is necessary to cut off and attach to each other with a complete mix. If a house is built, then, for compounding with partitions in the future, in the outer walls you need to leave special openings (so that in the future it was possible to insert a slice).
- The method of laying "additive" is the easiest and most common. The bars should be stacked alone alternately, the place of the joints is fixed with the help of brazers, and metal brackets are attached in the corners.
- To competently put a t-shirt bar, it must be connected to the type of genital boards. First of all, it is necessary to connect the corners with the Pestraeva method, the following rows must be combined with vertical swords. To achieve the verticality of the wall, they must be connected by vertical braids.
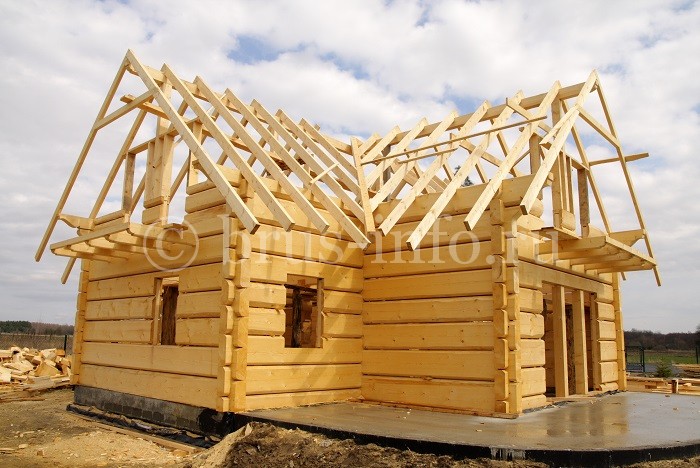
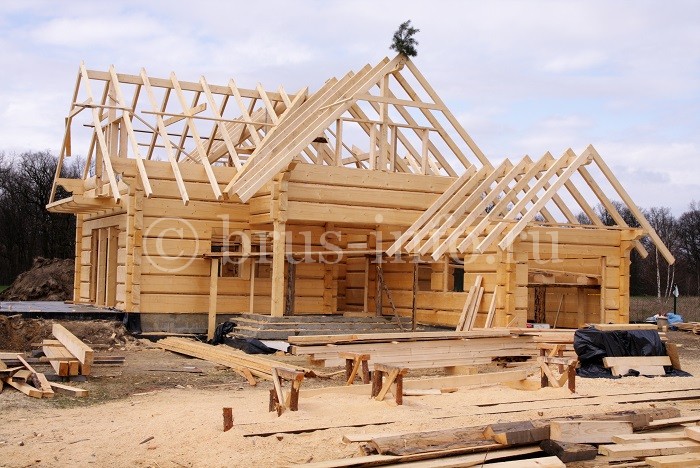
Three most time-consuming and important stages of construction can be distinguished wooden srubaif not taken into account finishing work: Construction of the foundation, build box, roofing device. The most impression is the assembly of walls when the house literally grows in front of the eyes, and the results of the work seem most significant. But this is also the most responsible moment. From the way the bars of walls and partitions are laid, the durability of the construction, its heat engineering and aesthetic characteristics depend on the durability.
First Crown
It should be borne in mind that after some time the lowest crowns can suffer and they will have to be changed. Therefore, as the first circuit, the most persistent materials, for example, a bar or a larch board, are the so-called salary. It is placed on the coated waterproofing surface of the foundation. No additional fasteners are required, because the side offsets will prevent a huge mass of the house and the strength of friction. In addition, how to raise a house from a bar to replace the salary if it is tightly connected to the base?
So, the Laying of the Lower Crown is one of the most responsible moments in the grazing assembly. Next will be easier.
BRUSEV connection
Even if you apply a dry profiled timber, it is better to be restrained and creating additional elements of the stiffness of the walls. We are talking about wooden rods (impudent or viscans for the junction of bars), which are clogged into a hole of two neighboring crowns. The sequence of work can be represented as follows:
- salary device;
- bookmark of the Second Crown;
- laying jute tape;
- fastening the third crown;
- drilling holes, starting with angles (indent to 150 mm) by 1.5 thickness of the bar for the diameter of the wrenches in increments of up to 1.5 m.;
- bringing copplifics to 1.3 thickness of the timber with a subsequent drowning by 1 cm;
- laying jute tape;
- bookmark fourth crown;
- now the holes are drilled with the displacement on the ½ of the previously selected step. It turns out that all the viscans will be clogged in a checker order, and each subsequent chip element will be associated with the previous one. Next scoring brazen, stacked jute and cycle repeated
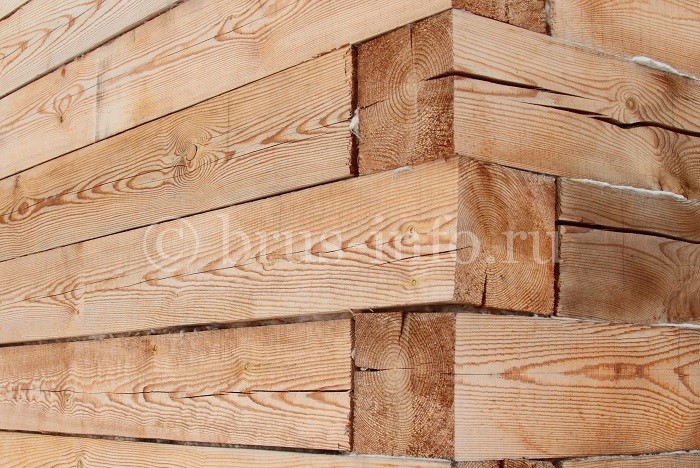
Certain difficulties occur when choosing an angular connection. Well, if the bowls are drinking in the factory conditions. And what options are suitable for the manufacture "on the place"? Relatively simple are the variants of the device in a warm angle, in Pedderv, in 1-, 2- or 4--side bowl, etc. The compounds are cut by chainsaws according to a predetermined pattern. Before bookmarking seal seams with a jute ribbon. You can read more about the types of angular mounting in GOST 30974-2002 - there all the options are pretty clearly. Try to pay more attention to this issue, because Through the corners there may be a lot of heat, plus there is a risk of overwhelming these parts of the cut with all the ensuing consequences.
Konopka
We have already said that the seal is laid at the wall assembly stage, if the bar allows the profile of a bar (for the ridge it is not necessary). If an ordinary sawn timber is used, then the cacopate is carried out in two stages. First, the jute is placed on the surface of each new crown (with a stock in width), and then clog the remains in the intervals between the bars. After a while when the house gives a shrinkage, it is possible to form new interventical cracks. They are causing rollers from jute or packles (flanutin, etc.). Read more about this here.
Device partition
The construction technology of partitions is largely determined by their role: the usual separation of the area of \u200b\u200bthe house into separate rooms or the performance of the supporting structures. In the first case, the developer has many ways to implement the intended:
- use of a conventional carcass, plasterboard, clapboard or rashball;
- the use of a beam of a smaller thickness connected to the walls through the grooves in them;
- fastening a full-size sawn timber in a cup (supporting partitions)
The last option implies gradual laying of the material, along with the installation of the crowns, all other are applied only after the shrinkage of the cut.
Operactions in the wall
Window and doorways can be arranged in two ways:
- dropped after shrinkage box. It is assumed that in this case the maximum stiffness of the church is guaranteed, because Any openings weaken bearing structures. At the same time, this approach prevents the natural ventilation of the house from the bar - there is a risk of molding of wood;
- made immediately after grab assembly. We are talking about the installation of the cluster: the grooves are cut into the openings under the bookmark bar, which will serve as an additional element of rigidity that prevents the side displacement of the wall of the wall. Vertical mortgage elements make less length than the height of the opening - taking into account the future shrinkage. Subsequently fix the box
Finally
The construction of the box is a fairly responsible stage of construction. wooden house. It must be passed as quickly as possible - in order to avoid influence on the sawn timber and the scoring rays of the sun. That is why this process is often proceed in winter.
So, you have already erected the foundation for your bath, and a timber has chosen as a material for the walls. An excellent option is quite durable, eco-friendly and easy to handle! If you are a newcomer in construction, then the bar is the optimal choice.
However, even so simple and universal Material Requires some knowledge and skills that are necessary when the walls are erected. Especially for a building such as a bath, for the arrangement of which certain additional actions are needed.
Before starting the construction of a bath from such a material like a bar, it is necessary to calculate the size of the lumber for the walls, learn how to connect the bars and split them along the length, choose a heater for laying between the crowns and much more. Consider these questions consistently.
Primary information on the construction of a bathroom
Building a bath, especially walls for her, may be quite expensive. The modern building market presents a huge range of materials, both traditional and modern, which are widely used in the construction of a certain appointment. But the wood for the bath is the most chassis for a variety of reasons. This is the long-standing traditions in construction, and widespread, relatively low price, environmental friendliness and simplicity in circulation.
In this case, the material is much simpler in the work, moreover, which does not require additional processing, in the event that you buy it, and do not make it yourself.
In order not to incur additional costs for the insulation for the walls, it is worth taking a bar with a cross section of 150 x 150 mm. Such thickness of the walls of wood is optimal, and will allow the use of a bath during the course of the year. In order for the connection between the bars is more dense, and the type of the finished wall is aesthetic and pleasant, each timber is required to be as follows.
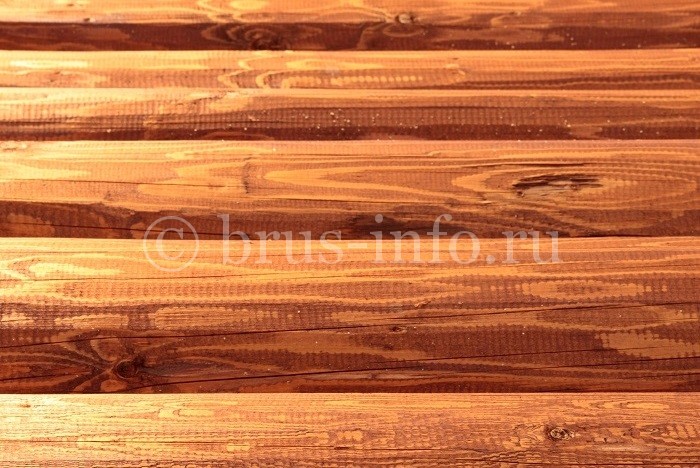
One of the main positive qualities of the timber is that the walls of this material do not require; They look self-sufficiently, you only need to carefully treat the bars. If you plan to decorate the outer sides of the walls, it will be enough to strict material only by the side of the internal space of the bathroom.
The first step in the construction of a bath from a bar - installation of a strapping crown on a prepared foundation. Optimal option Wood selection of timber for a strapping crown - solid rocks of ash, oak and larch. Be sure to treat construction material antiseptic substances.
Laying of the first crown
The voltage and stability of the entire cut of a bath from a bar depends on how high-quality you will check the first crown. And to prepare for this work it follows thoroughly by calculating each step in advance.
Before carrying out the masonry of the first, initial binding crown, on top of the foundation of the bath should be laid a layer of waterproofing. Before this, check with a level: it must be accurately horizontal. In the event of a drop in more than 1 centimeter, perform alignment with a concrete solution.
After that, place a uniform rubReroid to several layers, wrapped with each other mastic. Experts call the optimal next laying technology: 2 rubberoid layers, stamping board, another layer of rubberoid. The bars of the first crown are connected among themselves to the Polterev, and in order to prevent the bars subsequently, the tricks are configured.
The next step is insulation of a bustling crown. For this, it is optimally suitable for a layer of flange fiber, laid on top of a bar. The following crown is stacked on the insulation layer, and so on, alternating timber and thermal insulation. This will help to avoid imagination in possible cracks, as well as play an important role in the subsequent hydraulic and vaporizolation of the bath from the inside.
Choose a bar for the first crown correctly
The timber must be selected and prepared in advance so as not to be distracted by the little things and disadvantages in the construction process. To install the first crown, select high quality material, since it depends on the integrity of the structure during operation:
- the bar must be perfectly smooth;
- there should be no bitch and chips on the surface;
- the main condition is the maximum density of the rings of the bar; For the manufacture of such a material, the middle part of the tree is taken;
- the bar with traces of the blue on the surface of the wood is categorically unacceptable not only for the first crown, but also for the entire cut.
The finished timber generated in the factory is usually already processed and is fully ready for operation, but additional processing does not prevent, especially for the construction of the bath. Masting a pretty machine with a mastic, which is pre-mixed with working out. The impregnation based on this composition is perfectly absorbed in. The ends of the bar do not need to be processed, they must remain naked and produce moisture when drying and shrinking the structure.
It is from how thoroughly you will handle the timber, it depends on how long it will last faith and the truth of the lower crown, and hence - and all the walls of your bath.
Methods of castle connections BRUSEV in SRUB
There are several ways to connect timber in the walls of the baths that will avoid wind exposure and cold temperatures On the outside. Consider each of them in more detail.
Method First: Jack Job. With it, the bars are joined by one to each other, with each connecting seam overlap overlapping. So that the jack connection was reliable and with time did not lose its qualities, follow the ends of the bar: they must be absolutely smooth. Scotched the angle of 90 degrees.
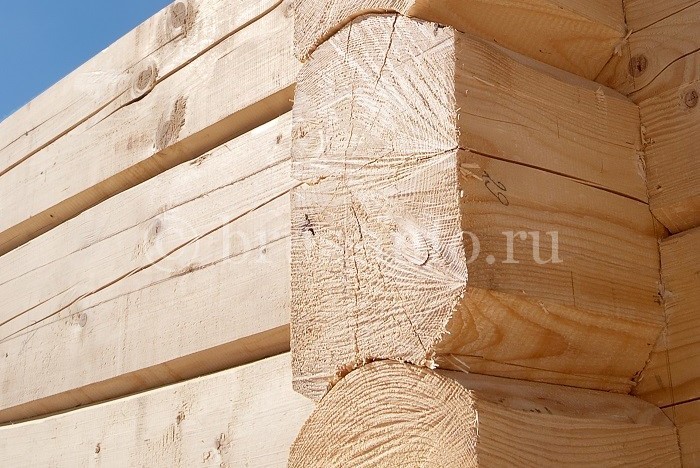
However, the jack connection, even very dense, does not exclude quite high heat loss through such corners of the bath. Well, since the bath must be warm and cozy, it is worth considering such a way as a "warm angle", which represents the connection of bars in a native spike.
For such a compound in the end part of one of the bars, a sample of a special groove is made, and in another bar, on the end, the vertical spike is made. In some cases, a nipping on the principle of double or triple slit spike is made, that is, there are several vertical spikes on the bar, respectively.
Whatever type of brue connection you have not chosen for the walls of your bath, most importantly - do not forget to bookmark the interventory insulation between bars. This will simultaneously increase the density of the construction of building materials and will serve as excellent thermal insulation for the entire cut.
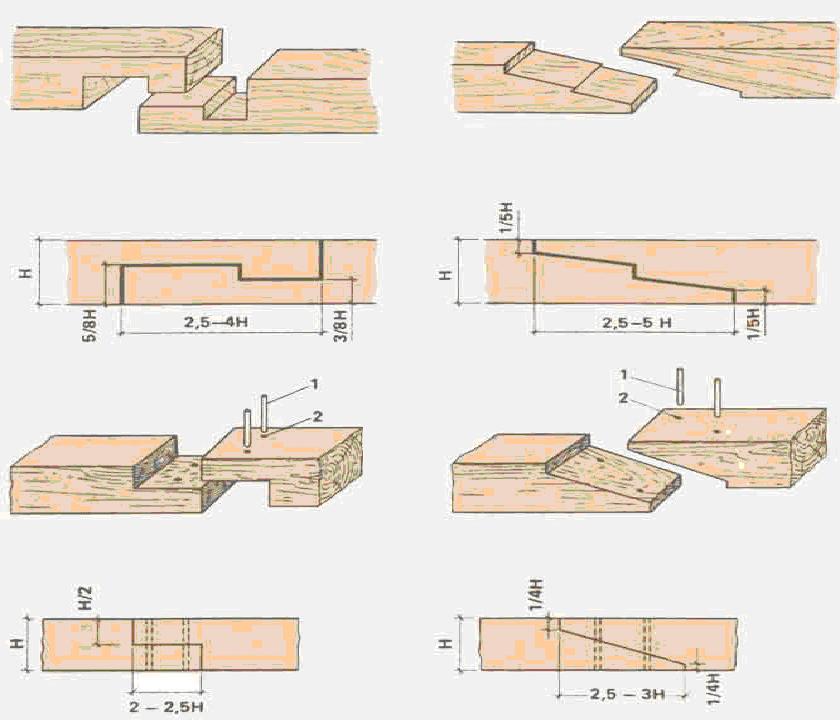
Sometimes during the construction, the splicing of BRUSEV in length may be needed. In this case, the "On-scatch" method is not recommended for the use. For such work, there are types of splicing, applied from a long time:
- inclined cut on the ends, or oblique bite;
- preventing the formation of slotted fades with a comb;
- the method of direct lining, in which the cutting length is twice exceeds the thickness of the timber;
- a relatively new and more practical method of oblique laying and lining with oblique bailization, providing countering the side loads.
Insulation, used for laying between the crowns
As mentioned above, the flange cloth is the most optimal material to ensure insulation between the crowns. Now it can be bought in any construction supermarket. Such a heater is produced in rolls of different widthsdepending on the size, which greatly simplifies the choice, and it is very easy to cut on the bands at the selected length. This material is made from natural natural fibers of jute and flax, the composition is respected in strict proportions.
During the production process, a high density can be facility and a homogeneous thickness in which the fibers are fastened with each other with a special needle with jar.
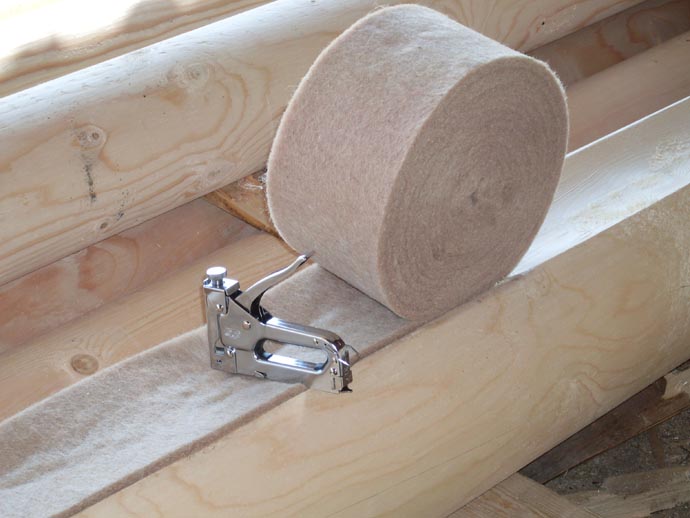
Putting the flashes in the construction of the walls as a heaters in the process of building walls, you save yourself from the need for additional standphicle, and after the shrinkage of the bar ends, the walls will take a type of solid monolith. Such a canvas will not spread out due to the loads attached by the crowns, will ensure uniform insulation along the length of the seam, resistant to the effects of moisture, wind and dust, temperature drops and other climatic neudes.
Agel for timber
The groove crowns should be connected to each other throughout the perimeter, as well as in the corners on the castle connections with the help of waders, or wooden round heaters. Such pending should be made from wood solid rocks, that is, larch, oak or ash. The process of manufacturing a heater is: Take a chalkboard-inch, cut square rails from it. After sawing them to the required length. Remove the raits rounded the shape of the sidewalls and rocking the sidewalls.
There is much simpler and not costly, "lazy" way to make braid. Buy in the store ready-made cuttings for shovel and rabel, and cut them according to the desired size. It can save money and money, especially time.
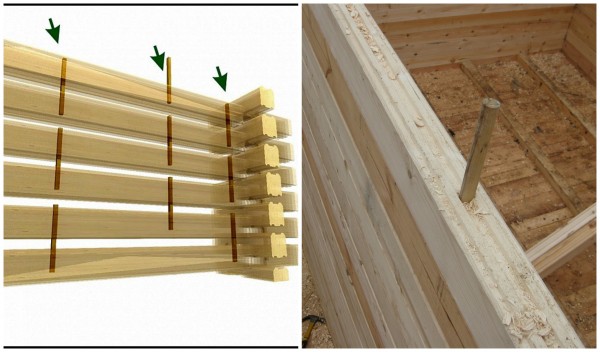
Installation of napillates in the bar is made at a meter-one-meter distance from each other, and necessarily on each side of the log cabin. It is necessary to fasten the timber in those parts of the wall, where windows and doors will be located, and the fastening should be made in 15-20 centimeters to the place of the cutout under the box. This will later eliminate the twisting of the cluster of the masonry array during the drying of the wood and during the shrinkage of a bathroom shrink.
In order to install the brazers, holes with such evolve are drilled in a bar in front of the top, so that the two upper timers are stitched through, and in the third it turned out the grooves depth from 5 to 7 cm, no more. Strictly withstand the diameter of the heater: it should be about 2 mm smaller hole diameter. If you do not comply with this rule, then during the shrinkage of the cutting of the walls can "thread", which will lead to their significant breakdown and affect the boxes for windows and doors. The bellhead should be easily included in the hole when driving and interposed inside the upper bar on 5 centimeters.
This method of installation of napillates is one of the most common, but far from the only one. Many masters found their own method that became familiar. After all, Savior main function Begroeble - eliminate the displacement of the timber inside the masonry and provide a cut of the correct shrinkage during drying, in the process of which the wood will be free to move on the surface of the heel.
The technology considered above will make it easy, without special professional skills, build the walls of the necessary height, while taking into account the natural drying of the wood, and accordingly, the shrinkage in the height of the structure of the structure is about 7-8 percent.
Video on the topic
Elimination of works on the construction of walls from a bar
After the construction of walls from a bar for your bath is completed, without losing time should be installed ceiling beams and the construction of the roof. It is not worth delaying with this, since the open inner space of the bath is susceptible to the harmful effects of precipitation and wood, as well as rotting the used wood.
When the roof is installed, you can safely be done for the work on waterproofing walls from the inside and decorative finish outside. But this is a completely different story, you have to do a lot so that the bathhouse pleased you, your family and guests. And every step we will look at the following articles.
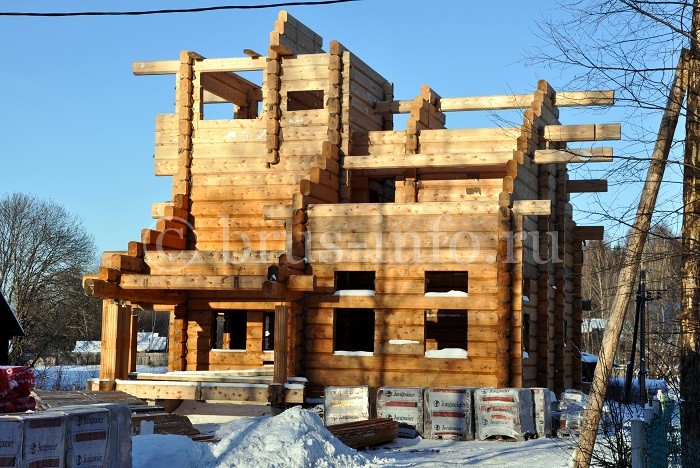
During the construction of a wooden house, the main part of the bar is on the construction of walls and partitions, the rest is for the ceiling device. The laboriousness of the work is determined by the parameters of the selected building material (the size of the section and length) and the fitness of the building. But if you do everything correctly, the process of assembling a log house will seem pretty simple. In this article, we will try to figure out how to build the walls from the bar.
Construction of walls in a house from a bar
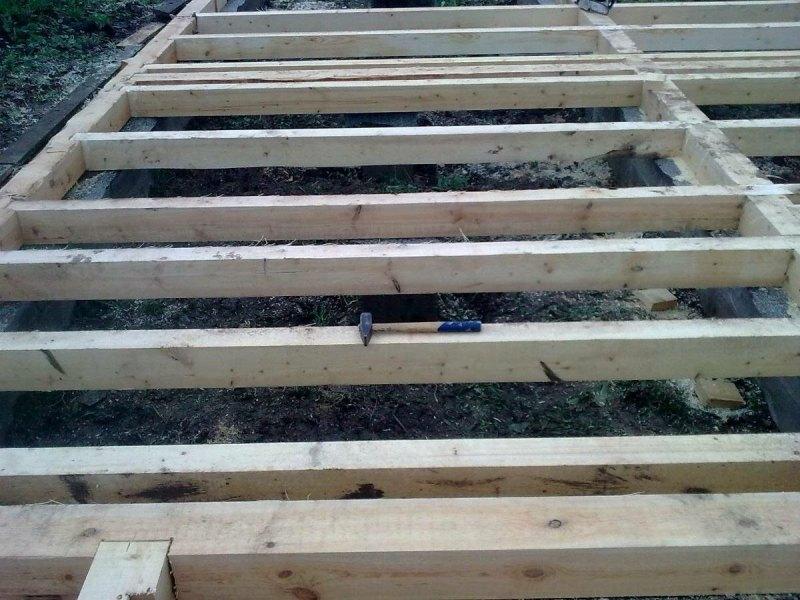
Salary, i.e. The lowest crown is suited in such a way that there is a layer of waterproofing between it and the foundation (as a rule, two layers of rubberoid). As a material, a timber from larch is often used for it, because It is considered the most resistant to rot. Between the bars for maximum insulation of the seams, layers of pakley (jute fiber) are paved - the stacks of the walls are also entered. In order to avoid the displacement of the bars relative to the installed plane of the facade, they are connected by nucleons, representing wooden bars of cylindrical shape. Mustows are fixed every 2 bar in such a way that they are all combined into one system. For this attachment, the height is placed in a height of a checkerboard at a distance horizontally in 1500 mm. From other angles and partitions The minimum indent is 150 mm. As the walls are erected, they are engaged in the ceiling device: beams are either embedded in a crown, or used, which avoids the weakening of the supporting structure.
Corner compounds of walls from a bar
Significant problems may occur when an incorrect device of angular connections in wooden house: Thermal losses through them can reach 50%, and maybe with this approach to fly into a penny. If the usual non-disfocated material is used, then most often the angles of the first crown are connected to Poledev, and all subsequent in the warm angle (in the groove), when spikes are cut on one bar, and on the other - the groove. Between the connected elements, the jute fiber is paved, providing a dense landing and irrepressibility of the angular connection. The spikes and grooves are cut by chainsaw after marking on the template (as the latter it is convenient to use a sheet of tin). The profiled bar can be connected in the same way, and you can in a cup: one-, two- or four-way. For a deeper study, we recommend familiar with GOST 30974-2002.
Partitions in a house from a bar
For partitions, a timber is used with a thickness of 100 mm - this is quite enough to provide the necessary stiffness. The height of the material is taken as the same as for the main walls: most often in the course there is a timing of 100x150, 100x200, which is after installation. Construction inland walls It is convenient to carry out simultaneously with the construction of external. The easiest way to compound them is to drink the grooves in the main wall, in which the bar is inserted for the septum with spikes on the ends. If the thickness of the inner walls is small, then you can cut the grooves under the thickness of the partition bar. Partitions can also be erected by frame technology, trimmed with clay or plasterboard.
Window and doorways
If it is assumed that the log house will dry out for a while (when using the material natural humidity), then the door and window openings are not equipped immediately, indicate only their contour and only part of the bars laid on it. Approximately half of the BRUSEV leaves through the opening with the goal to ensure maximum wall rigidity during drying.
Typical Technology Card (TTK)
Cutting outdoor walls from wooden bars
I. Scope
I. Scope
1.1. Typical technological card (hereinafter referred to as TTK) - a comprehensive organizational and technological document, developed on the basis of the methods of scientific organization of labor to carry out the technological process and the determining composition of production operations using the most modern means Mechanization and methods of work on a certain given technology. TTK is designed for use in the development of a project manufacturing (PPR) construction units and is its component according to MDS 12-81.2007.
1.2. In this TTK, instructions on the organization and technology of production of work when cutting out outer walls from wooden bars has been determined by the composition of production operations, requirements for quality control and acceptance of work, the planning complexity of works, labor, industrial and material resources, industrial safety and labor protection measures .
1.3. The regulatory framework for the development of technological maps are:
- typical drawings;
- Construction standards and rules (SNiP, CH, SP);
- factory instructions and technical conditions (TU);
- norms and rates for construction and installation work (GESN-2001 Yenir);
- production rates of consumption of materials (NRRM);
- Local progressive norms and rates, labor costs, the rate of consumption of material and technical resources.
1.4. The purpose of creating a TK is a description of the decisions on the organization and technology of work on the work of the exterior walls from wooden bars in order to ensure their high quality, as well as:
- reducing the cost of work;
- reduction of construction duration;
- ensuring the safety of the work performed;
- organization of rhythmic work;
- rational use of labor and machines;
- Unification of technological solutions.
1.5. On the basis of the TTK as part of the PPR (as mandatory components of the project's work project) are developed working technological maps (RTK) to perform separate species Works on the logging of exterior walls from wooden bars.
The design features of their execution are solved in each particular case of the work project. The composition and degree of detailing materials developed in RTK are established by the corresponding contract construction organization, based on the specifics and volume of work performed.
RTC is considered and approved as part of the PPR by the head of the General Contracting Construction Organization.
1.6. TTK can be tied to a specific object and conditions of construction. This process is to clarify the amount of work, means of mechanization, the need for labor and material and technical resources.
Procedure for binding TTK to local conditions:
- consideration of card materials and choosing the desired version;
- checking the compliance of the initial data (work volumes, time standards, brands and types of mechanisms used by building materials, the composition of the workers' link) adopted option;
- adjustment of work volumes in accordance with the selected version of the work of work and a specific project decision;
- crosses the calculation, technical and economic indicators, the need for machines, mechanisms, tools and logistical resources in relation to the chosen version;
- Registration of the graphic part with a specific binding of mechanisms, equipment and devices in accordance with their actual dimensions.
1.7. The typical technological card was developed for engineering and technical workers (manufacturers of works, masters, brigadiers) and workers performing work in the third temperature zone in order to familiarize them with their work with the rules for the production of work on the logging of outdoor walls from wooden bars using the most modern means of mechanization, progressive structures and materials, ways to perform work.
The technological card is developed for the following works:
|
Volume of walls |
- V \u003d 100 m . |
II. General provisions
2.1. The technological card was developed on a set of works on the hatching of exterior walls from wooden bars.
2.2. Works on the logging of exterior walls from wooden bars are performed in one shift, the duration of working time during the shift is:
Where T. - the duration of the work shift without lunch break;
TO - reducing coefficient of production;
TO - Processing coefficient.
In the calculations of the time and duration of the performance of work, a single mode of operation with a duration of the work shift is adopted 10 hours at a five-day work week. Clean working time during the change is made taking into account the coefficient of decline in the development due to an increase in the duration of the shift compared with the 8-hour working shift to equal TO
=0,05
and processing coefficient TO
=1,25
Total time for the 5-day working week (" Guidelines According to the organization of the Watching Method of Work in Construction, M-2007).
where T. - Preparatory and final time, \u003d 0.24 hours., Inc.:
Breaks associated with the organization and technology of the process include the following interruptions:
Obtaining a task at the beginning of the shift and delivery of work at the end 10 min. \u003d 0.16 hour.
Preparation of the workplace, tool, etc. 5 min. \u003d 0.08 hour.
2.3. The work performed when cutting out outer walls from wooden bars includes:
- installation, movement and disassembly of inventory lobes;
- laying of carrier exterior walls with a thickness of 600 mm from aerated concrete blocks;
- installation of reinforced concrete jumpers above window and doorways;
- Installation of monolithic reinforced concrete belt.
2.4. The technological map provides for the execution of works by a complex mechanized link in the composition: mobile gasoline honda power station
ET12000.
(3-phase 380/220 V, n \u003d 11 kW, m \u003d 150 kg); benzomotor saw "Crown-202"
(N \u003d 2.45 hp, m \u003d 6.8 kg); automotive boom crane ks-45717
(Load capacity Q \u003d 25.0 T) as a leading mechanism.
Fig.1. Chainsaw "Crown-202"
Fig.2. Honda Et12000 power station
Fig.3. Cargo Characteristics of automotive boom crane KS-45717
2.5. For cutting outdoor walls as basic materials used: universal, roofing ePP hydroizol
in accordance with GOST 7415-86; wooden bars
The size of 6000x180x180 mm in accordance with GOST 8486-86.
Bar - Ready Material Made From Breed coniferous rocksfilled in factory conditions into four Cant. For the manufacture of walls of the house from a bar, smooth tree trunks are used, harvested in winter. The thickness of the bar for the calculated temperature - 40 ° C should be at least 18 cm, for - 30 ° C at least 15 cm.
2.6. Works on the logging of exterior walls from wooden bars should be performed, guided by the requirements of the following regulatory documents:
-
;
- Snip 3.01.03-84 *. Geodesic work in construction;
________________
* Snip 3.01.03-84 do not work. Instead, operate SP 126.13330.2012
- Defense allowance 3.01.03-84. Production of geodesic works in construction;
- Snip 3.03.01-87. Bearing and enclosing structures;
- One hundred nostroy 2.33.14-2011. Organization of construction production. General provisions;
- One hundred nostroy 2.33.51-2011. Organization of construction production. Preparation and production of construction and installation works;
- Snip 12-03-2001. Labor safety in construction. Part 1. Common Requirements;
- Snip 12-04-2002. Labor safety in construction. Part 2. Construction Production;
- PB 10-14-92 *. Rules of device and safe operation of lifting cranes;
________________
* PB 10-14-92 do not act. In exchange, federal standards and regulations in the field of industrial safety are operating "The safety rules of hazardous production facilities on which lifting facilities are used. - Note the database manufacturer.
- EAS 274-88. Safety regulations for the operation of arrogant self-propelled cranes;
- RD 11-02-2006. Requirements for the composition and procedure for conducting executive documentation during construction, reconstruction, overhaul Capital construction facilities and requirements for acts of examination of works, designs, sections of engineering and technical support networks;
- RD 11-05-2007. The procedure for maintaining a common and (or) special journal for carrying out work in the construction, reconstruction, overhaul of capital construction facilities.
III. Organization and technology for performing work
3.1. In accordance with the SP 48.13330.2001 "SNIP 12-01-2004 Organization of construction. Actualized editors" Prior to the start of construction and installation work at the facility, the Contractor is obliged in the prescribed manner to receive project documentation from the Customer and permission to carry out construction and installation work. Performing work without permission is prohibited.
3.2. Prior to the production of work on the logging of outdoor walls from wooden bars, a complex of organizational and technical measures must be held, including:
- develop RTK or PPR to cut out outdoor walls from wooden bars;
- appoint persons responsible for the safe production of works, as well as their control and quality of implementation;
- to negotiate members of the Safety Brigade;
- establish temporary inventory household premises for storing building materials, tools, inventory, workers heating, food reception, drying and storage of working clothes, bathrooms, etc.;
- provide a plot approved for the production of works by working documentation;
- prepare for the production of work machines, mechanisms and equipment and deliver them to the object;
- provide workers with manual machines, tools and means of individual protection;
- ensure the construction site by fire inventory and alarm means;
- prepare space for storage of building materials, products and structures;
- protect the construction site and put warning signs lit at night;
- ensure communication for operational dispatching management of work;
- deliver to the work zone necessary materials, devices, inventory, tools and means for safe work production;
- Check quality certificates for wooden bars, Padl;
- try the construction vehicles, means of mechanization of work and equipment according to the nomenclature provided for by RTK or PPR;
- draw up an act of readiness of the object to the work of work;
To obtain the Customer's technical supervision permission to start the production of works (clause 4.1.3.2 of the RD 08-296-99 *).
________________
* RD 08-296-99 does not work. - Note database manufacturer.
3.3. Prior to the production of work on the logging of exterior walls from wooden bars, provided by TTK preparatory work should be performed, including:
- free workplace from garbage and foreign objects;
- to arrange the lighting of the working area;
- prepare and split the front of the work;
- establish and test the scaffolding;
- Check the level of the horizontal base under the wall;
- produce a geodesic breakdown of the axes and marking of the position of the walls in accordance with the project;
- Submit materials, devices and tools in the amount required for work.
3.3.1. The first three rows (crowns) are performed directly from the flooring. Subsequent rows are laid out with ppa-4 hinged and panel lobes (see Fig. 7) or with metal stupid forests. The process of installing scaffolding is considered in a separate technological map.
Fig.4. Hinged and Panel Scaffolds
And - in the lower position (masonry of the second tier); B - in the upper position (third tier masonry)
1 - triangular supports; 2 - a working flooring; 3 - onboard fences
3.3.2. Hinged and panel ledges are made up of a triangular welded farm, which attached wooden bars and flooring. When performing a stone masonry of the second tier (above 1.2 m from the overlap) of the ability to rest on the folding triangular metal supports, when their farthers are connected in the middle part of the lobes and the flooring site is located in the lower position, the height of the flooring is 1.15 m. When laying a third tier (above 2.4 m) Support supports take up the top position. Disconnecting the supports in the center and lifting the abilities of the tap, the folding supports at the expense of their own mass soldering and securing them with the workflows at the working flooring, it is possible to increase the height of the lumps up to 2.05 m. The abilities must be equipped with stairs with non-slip supports to move workers between tiers. Ladders for lifting on tiers are suspended to transverse links and rest on the flooring shields. The stairs are put in the working position at an angle of 70-75 ° to the horizon.
Installation and permutation of the lobes perform car rod
kRS-45717
. To control the quality of the work performed between the working flooring of the dismisses and the built design, the gap is left to 5 cm.
3.3.3. Marking of the places of the walls of the walls produce a method of native serifs from axial points of the building. Axial dots are broken from the axes H.
and Y.
Broken grid available in working drawings. Points are fixed on the pickup, located outside the work area. For a relative mark 0,000
The pure floor level corresponds to the absolute mark of the General Plan.
3.3.4. The picking consists of stubborn pillars to a depth of 0.6-0.7 m in the land of 0.6-0.7 m, and horizontally nailed with the outer side of the boards with a thickness of 30-40 mm (on the edge), at an angle of 90 °. The upper edge of all boards are horizontally, which is controlled by level. The distance between the columns of the clips is 1.5 m, and the height above the ground level is 0.8-0.9 m.
Fig.5. Wood pallet
3.3.5. The geodesist with the help of theodolitis transfers the main axes of the walls to the pickup with the fastening of them with two nails, clogged into the flooring boards, intermediate axes are transferred by the method of linear measurements. Staining between the nails of the wire, the fixed axes of the walls are obtained. With a stretched wire with a plumb of the axis of the walls, they are transferred to the surface of the foundation and secure their paint in the form of lines and crosshairs. For vertical breakdown of walls from constant references, markers are transferred to the picking and fix the clogs of nails.
3.3.6. At the end of the breakdown, the position of the walls is checked on the theodolitis and secure it with remote natives. The accuracy of the breakdown is assigned to Snip 3.01.03-84 * (Table 2) and is coordinated with the project organization or it is calculated directly and is set. Damaged in the process of work, the centering points must be immediately restored.
________________
* Snip 3.01.03-84 does not work. Instead, there is a joint venture 126.13330.2012. - Note database manufacturer.
3.3.7. The work performed must be submitted to the representative of the technical supervision of the Customer for inspection, and documenting by signing the act of breaking the axes of the capital construction object on the ground in accordance with Appendix 2, RD 11-02-2006 and get permission to cut the walls.
3.3.8. The actuator scheme should be applied to the actuation of the axes to the axis (breakdown) of the main axes of the building, indicating the location of items, types and depth of the mortgage of their signs, the coordinates of points and high-rise in the accepted coordinate system and heights.
3.3.9. The completion of the preparatory work is recorded in the general journal of work (the recommended form is given in the RD 11-05-2007) and should be taken on the act on the implementation of safety safety measures, decorated according to the annex and, SNiP 12-03-2001.
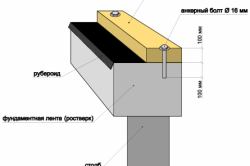
3.4. Waterproofing foundation
3.4.1. Since the surface of the foundation is evenly rarely rare, an aligning layer is first applied. To do this, at the top of the foundation, a moisture-repellent cement-sandy solution layer 1-2 cm. Between the foundation and the wall from the bar need to make cut-off waterproofing, which will prevent the capillary subfinder. The solution is put on a layer of waterproofing from a rolled material of a series of soft roofs - ePP hydroizol
With an overlap at least 150 mm so that the outer edge remains to be closed with a future final edge of the wall, and from the inside there was up to 3 cm insulation for the dissolution of it on both sides.
3.4.2. The work performed on the foundation waterproofing device must be submitted to the representative of the Customer's technical supervision for inspection, and the documentary registration by signing acts of examination, hidden work, in accordance with Appendix 3, RD-11-02-2006 and obtaining permission to perform subsequent work on the cutting of walls.
Fig.6. Waterproofing device
3.5. Erecting blocking walls
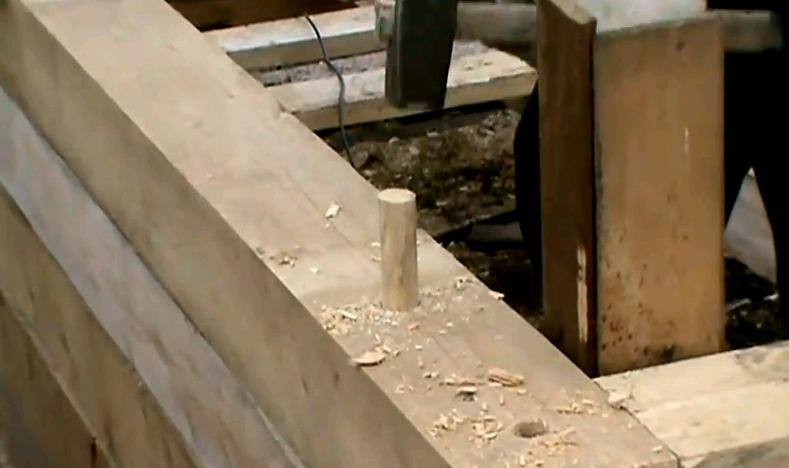
3.5.1. The assembly of walls from the bars is customary to start with the installation on the foundation of the first crown, the angles of which are connected by "in the Poltera", regardless of the selected method of connecting the corners. Next, either continue the assembly of "in Pedderv", or the bars on the corners are mounted using a key, or - "in the dressing with a native spike". Similarly, the technology of assembling chopped walls, a layer of sealing from pacular, moss, felt or hemp is stacked between the bars. To prevent vertical shifts, the bars are combined with a round wooden brazing with a diameter of about 30 mm and a length of 20-25 cm. The holes under the bellows are drilled after the timing of the bar on the pass to a depth equal to the half-and-and-half height of the bar and 2-4 cm exceeding the length of the bell.
3.5.3. There are several types of cutting of walls from Bruusyev (see Fig. 7).
Fig.7. Word wall
A - conjugation of an angle with a fixed spike device; b - fastening of bars by brazen; B - pairing angle on the knaps; g - interface of the outer wall with the inner; d - covering broken walls by boards; e - sealing the opening; Well - cladding paving walls with bricks;
1 - indigenous spike; 2 - chamfer; 3 - base; 4 - waterproofing; 5 - palable; 6 - berth (spike); 7 - sword; 8 - Klimmer from galvanized roofing steel; 9 - insulation
3.5.4. As seals between the bars use the pass, felt, hemp. But the best option is to use the flange linen. This is a modern material, easy and practical in work. In addition, it ensures the uniform position of the seal between the bars. The gaps are compacted immediately during work.
In a year or two, after the completion of the main sediment of the walls, all seams of external and outer walls are sealing - the walls of the walls.
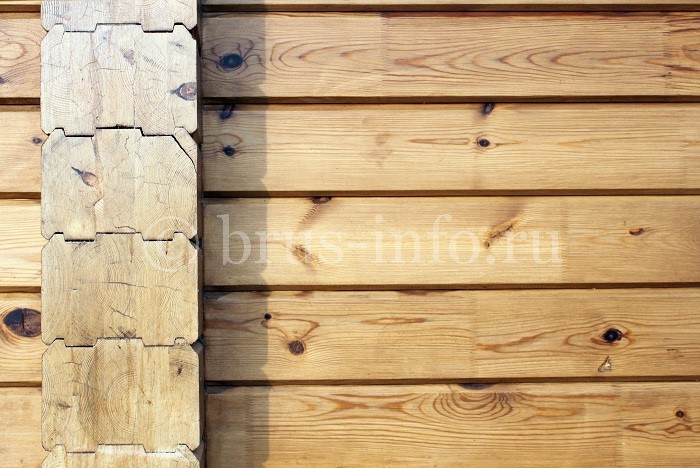
3.5.5. If the walls from the bar are not assumed to be shattered or closed by another material, then to improve the outflow of water from the seams on the upper outer edge, the chamfer 20x20 mm is torn. Chamfer should be made on all the bars before assembly. Another fact that the lack of a longitudinal groove makes the walls are more thought out even with a very good pantry, the lack of a longitudinal groove makes the walls. Special weak place According to injection, corners are, therefore, the angle is desirable to perform as shown in Fig.8.
Fig.8. Protection of the corner design of the frame from purring:
1 - spikes from solid wood; 2 - antiseptic panel; 3 - trimmed boards; (all sizes in mm)
Fig.9. Section of a broken wall:
1 - bars; 2 - window box; 3 - caulking; 4 - inner wet plaster; 5 - panel roll on beams; 6 - backfilling; 7 - rafters; 8 - draining; 9 - product for ventilation; 10 - waterproofing; 11 - Wooden floor
3.6. Assembling walls "in Polterev"
3.6.1. The assembly of walls "in Polterev" is a method whose name has been gained due to the removal of the bars of the upper or lower half of the thickness of its array in the corners. The assembly begins with drilling in the corners of the bars of holes for arrogance with such a calculation so that one heel can connect several bars at once.
3.6.2. They are needed in order to avoid twisting BRUSEV. For this, every three bars are dried, and wooden bells are inserted into them. The distance between the brackets, approximately half the meter. In addition, nails and fittings can be used as aging. The use of nails is more justified, because due to the corrugated surface of the reinforcement, during the shrinkage of BRUSEV, they may freeze and form large gaps. It uses nails with a length of 250-300 mm. In addition, they tighten the bars, nails due to the smooth surface allow you to "move" with bars during shrinkage. So that the nails do not pushed the upper crowns, the nails are removed in the bars to a depth of 3-4 cm with Dobochnik.
3.6.3. After laying the first crown, connected by molecules in the corners, the seal is put on it, and the bars of the next crown are put. After performing the angular compounds of the second crown, proceed to the rallying of the crowns among themselves. To do this, in the second crown, after 100-150 cm, the holes are drilled and scored braided. The heater, clogged into the second crown, should enter the body of the first crown at least half of its thickness.
3.6.4. If the long-long is not less than 2.5 crown thicknesses, and the tool allows you to drill holes to such a depth, then the third crown is placed and, the three crowns are rapidly.
3.6.5. This method of cutting, if not adopting special measures, gives a high design of walls highly blown in the corners. To reduce the injection of angles in vertical joints, the grooves are cut and made dense inserts from wooden knaps.
3.6.6. If you leave the ends of the bars for the sample of half the sections of the bar, it is possible to get an assembly of walls with a residue that is applied less often than a cut without a residue.
Fig.10. Cutting walls from timber
A - in dressing; B - in Polterev
1 - groove for brazen; 2 - braided; 3 - Drain board
3.7. Assembling walls "Landing with a native spike"
3.7.1. The assembly of the walls "in the dressing with a native spike" also begins with drilling holes in the corners of BRUSEV under the arrogance and laying the first crown, connected to "in Polterev". After laying the first crown, the way of pairing the corners changes.
3.7.2. To connect the angles "into the dressing" with a native spike, the ends of the bars are treated in a special way. On the conjugated bars, the corresponding packages under the spikes are selected.
3.7.3. The technology of rolling the crowns among themselves is the same as when assembling walls "in Polterev".
3.7.4. The indigenous spike dramatically reduces the injection of angles and gives more warm wallsBut the spikes and grooves must be accurately manufactured and must be tight into each other.
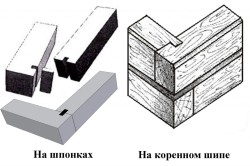
3.8. Assembling walls on the knaps
3.8.1. The assembly of walls on the swords provides for the same initial operation as with the two methods described above - laying the first crown "in Polterev".
3.8.2. To pair the bars on the knaps in the bars, the grooves are cut down and the swords are inserted into them. The swords must be tightly in the grooves, otherwise the pairing will not be reliable.
3.8.3. The location of the joints and the knaps alternate through the crown so that the finally the angle of the wall obtained the view of the angle, which is shown when cutting the walls "in the dressing with a native spike".
3.8.4. Often, to save time, the conjunction of the crowns using napillates is replaced with a compound with nails, the length of which should be at least the one-and-alone thickness of the bar. Another technique, facilitating the work when cutting the walls "in Polteraeva" - instead of plug-in wooden knaps, metal plates are clogged with a width of 2-3 cm and high, 1-1.5 cm more than half of the height of the bar.
Fig.11. Cutting walls from timber
A - connection on the swords; B - connection of spikes
3.9. Conjugation of walls
3.9.1. The conjugation of external and inner walls has many solutions, some of which can be: pairing on the knaps, into the dressing, writing through and live on half of the width of the bar.
3.9.2. Wide can be performed with the location of the wedge on one side of the insert. We recommend the location of the wedge alternate. Sometimes they make a compound of a frying room - the wedge is made on both sides. Then the alternation is naturally not required.
The word of the inner walls to the outer without the residue is produced by a cross-cutter or secret frying pan (see Fig.12) or any T-shaped compound shown in Fig.12. If there is a need for a crusade, then the methods shown in Fig.12 are used.
Fig.12. Wide inland walls to external
Fig.12. T-shaped connections of bars
A - with a secret oblique spike ("in the paw" or "swallow tail"); b - with a straight stepped lining
Fig.12-b. Crosses of bars:
A - with a straight line in the trip; b - with a straight overlay of incomplete overlap; in - landing into one nest
IV. Quality and Acceptance Requirements
4.1. Control and assessment of the quality of work when cutting out outer walls from wooden bars should be carried out in accordance with the requirements of regulatory documents:
- SP 48.13330.2011. "Snip 12-01-2004 Organization of construction. Actualized editors";
- CNP 3.02.01-87 *. Earth structures, grounds and foundations;
________________
* CNP 3.02.01-87 is not valid. In exchange, the SP 45.13330.2012. - Note database manufacturer.
- Snip 3.03.01-87. Carriers and enclosing structures.
4.2. The quality control of the work performed should be carried out by specialists with the involvement of an accredited construction laboratory equipped with technical means that ensure the necessary accuracy and completeness of control and is assigned to the manufacturer of works or master, performing work on the logging of exterior walls from wooden bars.
4.3. Construction control of quality of work should include input control of project working documentation and engineering results, as well as the quality of the preceding work, the operational control of construction and installation work, processes or technological operations and acceptance controls of completed compliance with conformity assessment.
4.4. Transportation and storage
4.4.1. Transportation of wooden bars carries out transport of any kind in accordance with the requirements of GOST 9238 and the technical conditions of loading and fastening of goods.
When transporting the BRUSEV should be protected by products from mechanical damage and humidification.
Loading and unloading of bars from vehicles should be carried out by a mechanized manner using soft sling or a forklift. It is forbidden to load bars in bulk and unloading them by discharging. The use of steel cables will damage the smooth surface of BRUSEV.
The bars should be stored by type, categories, classes and stacked stacks of not more than 2.5 m high. Blocks must be protected from moisture.
If long-term storage of bars before the start of construction and installation work should be partially unpacking packs for drying, i.e. Remove the film with the sidewall pack, leaving only the cap - "cap".
Remove the film from the top face of the package only immediately before starting work.
4.4.2. Transportation rolls of hydroizol
It should be carried out in containers or packages installed in covered cars or other closed vehicles. It is allowed with the consent of the consumer transportation of waterproof without containers or packages in a vertical position no more than one row in height, while the rollers of waterpore should be protected from mechanical damage and contamination.
In coordination with the consumer, other transportation methods are allowed to ensure the safety of waterproof.
Loading into vehicles and transportation of waterproofs are produced in accordance with the rules for transporting goods acting on the transport of this species.
Rolls of waterpores sorted by brands should be stored in a dry closed room in a vertical position not more than two rows at a distance at a distance of at least 1 m from heating devices. When storing rolls in containers, the number of their rows vertically is not limited and is determined by security requirements.
The shelf life of waterproof - 6 months from the date of manufacture.
Upon expiration of the storage period, the waterproof should be verified for compliance with the requirements of the standard. In the case of compliance, the hydroizol can be used for its intended purpose.
4.5. Input control
4.5.1. Input control is carried out in order to identify deviations from project requirements and relevant standards. Input control of the construction materials, structures and products entering the object:
- the registration method by analyzing data recorded in documents (certificates, passports, invoices, etc.);
- external visual inspection (according to GOST 16504-81);
- technical inspection (according to GOST 16504-81);
- if necessary, the measuring method using measuring instruments (checking the main geometric parameters), incl. laboratory equipment;
- control tests in cases of doubts in the correctness of the characteristics or absence of the necessary data in certificates and passports of manufacturers.
4.5.2. Input control of incoming materials is carried out by the Commission appointed by order of the Director of the Construction Organization. The Commission includes a representative of the supply department, production and technical department and linear ITR. The organization of input control of purchased products and materials is carried out in accordance with the instructions:
- N P-6 dated July 15, 1965 "On the procedure for accepting production and technical products and consumer goods in quality";
- N P-7 dated April 25, 1966 "On the procedure for accepting production and technological products and consumer goods by quantity."
4.5.3. In order to control the working documentation, it is checked for its completeness and sufficiency of technical information in it for the work of work.
With the input control of the working documentation, it is inspected by employees of the technical and production departments of the construction organization.
An error has occurred
Payment was not completed due to technical error, cash from your account
They were not written off. Try wait a few minutes and repeat the payment again.