Repair key. Wall Keywords: Most interesting ideas for your home
In many families, just annecdotal has become a situation with constant loss of keys. And they are after long-term searches in absolutely unexpected places. If you buy a key chain with a signal, then besides the keys you will have to look for a pawl to the keychain. How many not agree with all members of the family, but the result is the same. So comes to mind a reasonable way out -.

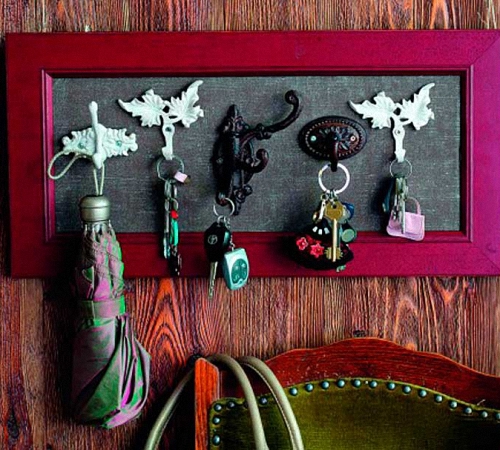
So that in the most inappropriate moments did not have to look for the keys that constantly turn out to be in their place, will help the key. There are many options for such lockers for keys. So for the manufacture of the metal key, you will need such tools and materials: a slice of fine metal, a two-component glider, the details for the attachment, as well as for the art decor: a large bearing, wrench, different parts from faulty hours. To make a key to do it with your own hands, first it is necessary to choose metal small parts, of which the composition is compiled: they are laid out on the door of the cabinet like the "safe". Then the details need to be located on the table top by the same drawing that was on the door. To better remember the compiled pattern, you can photograph the picture. Then, with the help of two-component glue, all parts are glued in turn on the door, located horizontally so that metal objects are not shifted when the glue is frozen.

Although at the design of such a key, many small details located in chaotic order were used, such a locker is designed to maintain the paw in the keystroke. For more convenience, on top of each hook for keys, you can even glue the appropriate inscription: "basement", "balcony", "house" and the like.

This simple method confirms how simply the key is made with their own hands. The master class of this process can be seen on many sites. It can be represented by videos, and photo galleries. Convenient in work and step by step instructions. Here is an example of such a simple work, which results in a very functional subject. Moreover, not only the keys will constantly be on the ground, but the keys itself will turn into a pretty decorative detail of the interior. In order to make such a simple key, the following tools and materials are needed:
- sheet of plywood or fiberboard
- acrylic dye in aerosol,
- black varnish for cracker in aerosol,
- napkins,
- acrylic paint,
- brush,
- pVA glue
- contours
- acrylic glossy varnish
- hooks, loops,
- sheet of sandpaper.
Step-by-step master class: keyword do it yourself
A pocket key can be made in the same way, with your own hands, but, of course, smaller sizes. It can be placed in a leather case like a notebook. Well, for a wall key of a sheet of plywood or fiberboard, a square is peaked out, which is first polished to eliminate irregularities. After stripping, the blank is covered with yellow acrylic aerosol paint. After a while, after drying, the paint is evenly superimposed with a black spray lacquer, after applying cracks to appear immediately. Drying time varnish about half an hour. Then you have to go along the edges of the billet with a foam sponge with acrylic paint of black. It turns out simple workpiecein which the cracks are filled with black. Further, the key is easily covered with blue paint with a sponge, which will add the effect with blue cracker. The technique of decoupage is performed and the key to the skin with their own hands. At the same time on the skin, and in this case - on the workshop of the Fiber Plata, the print from the napkin is fastened. It is cut to the desired size. The napkin is applied to the workpiece, and acrylic white paint is painted the place under the napkin, since without primer a place under a napkin, the drawing is lost. After drying, the paint is taken by a napkin, laid out on the file (front side down) and on it with a fan tissue of the average degree of rigidity, starting from the center, glue type PVA, half-diluted with water. In this case, the napkin is neatly stretched. The file turns over and the napkin is transferred to the workpiece. Through file she neat slow movements The air bubbles and excess glue are expelled. Due to the fact that the napkin is stretched during wetting, the primer is applied only along the contours of the dry sheet of napkins. Smooth motion file is removed from the blank with a glued napkin. The product is dryed, an acrylic varnish is applied with one layer on top, and after drying it with a sandpaper-zero (with the smallest grains), irregularities are polished. On the wall key, with your own hands made in the technique of decoupage, decorates and vague. But first, drawing a napkin with acrylic paints and contour. Following the drawing, after drying all the paints, the work is fixed with several layers of varnish (the glossy acrylic is best fitted). Between the application of the layers, the intermediate dryer is made within a few hours (the time depends on the thickness of the applied layer). After drying the lacquer with a carrier peach-colored contour in the form of a point figure, a complete completion of the created composition is performed. In conclusion, two loops and a golden hint hook are taken and fastened to the workpiece, and the hinges are attached imperceptibly. As for the napkins used for decoupage, they can be selected so that the drawing shown on them fit into the overall interior of the hallway.

Wall keyword do it yourself
Another "safe" for keys is made of wood. This original key is done with your own hands very simply according to the instructions. For its manufacture, you will need such tools and materials:
- little locker with hooks for mounting on the wall;
- red and white acrylic paint;
- paper glue (preferably PVA) and two-component glue;
- acrylic-based lacquer;
- three-layer napkins, which depict flowers;
- mirror;
- furniture handles - six pieces;
- cardboard;
- pistol with liquid nails;
- drill, drill for woodwork.
Initially, the width and depth of the locker is measured. Then a small box is glued out of a durable cardboard. Its size should be less than a wooden drawer sizes to easily enter the key. A ready box can be used, but its front wall should be done slightly below the rest. Further drawer is painted in white colorAnd after complete drying of the white layer, red paint is applied. This wooden key is done with their own hands in the technique of decoupage, but if you have a desire and opportunities, you can reorganize it differently: apply a picturesque drawing, ornament, you can decorate the product with a collage or mosaic. In general, there are no restrictions! In our embodiment, the picture that has been cut out from the napkin, pasted on a white sheet, and over the figure is applied with a layer of acrylic varnish (strictly from the center of the element to its edges). After drying, the varnish are cut flowers and glued on the box. After drying the glue on top of the picture and the lacquer layer is applied to the entire door. To achieve a glossy effect, you can apply 2 more layers of varnish. Already on a dried surface, a furniture handle with shortened screws is attached. From the inside of the door on a two-component glue, a mirror is mounted for a key to the tree, with their own hands decorated, had the most present appearance. A box is inserted into the key, the hooks for keys that can be supplemented with inscriptions with the place of their destination. Again, the product is decorated to taste the master or customer.
As one of the simplest key options, you can make this desired thing for 15-20 minutes using the usual photo frame of A-4 format. Initially, the glass is removed from the frame. Before making a key with her own hands, the drawing sketch is made on her pencil substrate. For example - wood, flowers, house, floral ornament and so on. The drawing can be done using the stencil. Then the details are drawn by acrylic paint or marker. While the drawing dries out, the keys under keys are prepared. Their role will be performed by small nails, each of which is risen on the bead.

As you can see, performing absolutely simple and simple, and the result is useful, and a pleasant eye!

Wall keyword do it yourself - video
Well, when each thing has its own place, especially if these are small items that are stored, somewhere to fall and get lost. Especially concerns these keys from the apartment, car or garage. Accidentally left in one and sometimes even the most prominent, but not familiar to them, they can not always be found on time. Therefore, it was invented a place for storing keys - this is a special locker or a shelf with hooks on the wall, and the name of him the key. Such a wall key is very convenient, because thanks to her all the keys will always be stored in one place, which means that they will always be in sight and never lose.
Keywords: Wall photo
Keeper keys - what is it happening?
Everything without exception is the key for the house wall, because it is much more convenient when they are at the level of the eyes, they are visible well and convenient to get out of them or hang the keys. It can be manufactured from a variety of materials: wood, metal, leather, plastic, glass. In addition, the keystones are intended for home and office premises. They are open and closed. The latter look in the form of a small locker. In addition, not rarely shelves and cabinets to store keys and additional functions are performed. For example, in their designs there may be a shelf for letters and newspapers, a built-in small chalk board and other useful functions.

Konestics Shelf photo
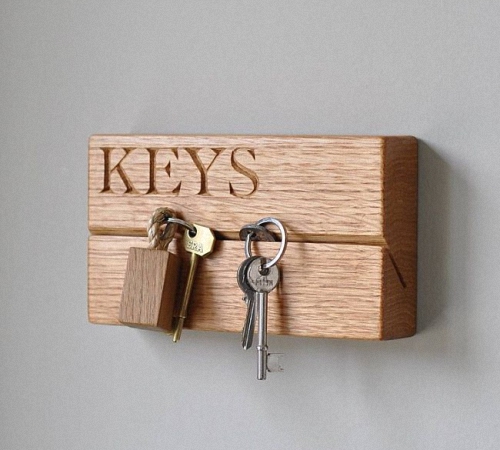
The most popular model among our compatriots is a wooden wall key. It can not only buy ready in the souvenir shop, but it is easy to make it yourself from ordinary skulls, pieces of plywood or even from a tree twig.

The ready-made models die with a unique variety of designs, very beautiful collage-key keys, made in the form of appliqués. Unique and have a special value for hand-made variants from valuable wood. Models from such noble woods like walnut, teak and oak will look great, both in the hallway modern and in homes performed in all the rules classic interior.

Wooden clock wall photo
No less decorative wall keys are those manufactured with skin participation. To give them even greater aesthetics, they are additionally decorated with chrome metal. As a result, they look very stylish and elegant. A similar key in the interior of the hallway will be its highlight, which will definitely not be ignored in the first arriving guests.

Beautiful wall key
What to choose a key to the house, open in the form of a shelf or better to use the closet key?
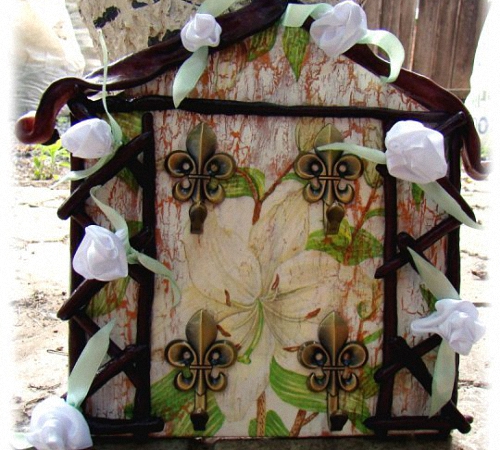
An open key to the house is good because it is easy to use, because you do not need to open anything to hang or take the key. But the locker key always looks more profitable due to its volume and form of the rectangle. For example, a beautiful, rectangular, correct shape, the key to a glass door hanging on the wall will always look solid. The appearance of other models of this design can be coordinated. For example, a decoupage keypad always looks, attractive thanks to vintage or fabulous design. A similar key in the interior will become the universal favorite of the whole family.

Teacher in decoupage style photo
Some models are bright, beautiful and immediately rush into the eyes, while others sometimes detect at first glance in the interior not just. And the fact is that they can be secret and are often hiding in other interior items. For example, the clock hanging on the wall may well be a key. There are such models for the hinged panel of the dial of which, just and can accommodate the keys slot. Wall key-clock is original solution And it is suitable for those who often take guests and does not like to store all the keys in a prominent place.

Keywords: Wall photo
Where to hang the key?
Everyone knows that the key is hung in the hallway, but where exactly should it be placed? On any comfortable and free space on the wall. There are no strict rules in this situation, but the more logical to hang it or closer to the doors or where the outerwear hangs. So the keys always be in front of their eyes before the easiest. Gathered, got dressed, took the keys went and on the contrary - came, locked the door, hung the keys. Thus, the keys are now just hard to put in another place and forget about it, because now they have their own beautiful house And they never lose home.

Keystitch in the hallway photo
The key key is another way not only to maintain order in its own entrance hall, but it is a good opportunity to bring the highlight to the interior of this room and give it uniqueness. On the photo of the gallery presented below, you can look at the original work of the masters, which create beautiful decorative keywords with their own hands.
Keywords: Wall photo


 Keywords: Wall photo


The key is convenient and original way Storage keys in order. Two types of keystorms are distinguished - wall and pocket. We offer to familiarize yourself with the original ideas for the manufacture of wall keys do it yourself.
Wall-mounted keyword - varieties and characteristics
The design features of the keystores changed in the ratio with the type of keys used. With the big popularity of spring and suvalid type locks, the size of the key was large and very original. The keysticors had various forms, for their decoration was used forging, wood carving, painting, etc. Home keys were made in the form of linings on the walls, in order to avoid damage to the metal key.

One of the most popular options is the manufacture of a knob key, which easily fits into any type of interior, takes little space and is distinguished by simple design.
The keystones in the form of small shelves are also compact and conveniently in operation. For the manufacture of the simplest key, it is enough to use wood or plywood. For such a key, you can also store other small items, such as glasses for example.
If the house has a large number of locked rooms, sheds, attacks, etc., then there will be an urgent setting of a large size. Most often, it has the shape of the board, each of the fragments of which has a certain type of key. The location of such a key is usually close to the kitchen or in the utility room. For a standard set of keys used for locking entrance door, A small key is installed, usually located in the inlet.
When restricting access to the key, you need to install the location of the cabinet. Such keystones are placed in secluded places, some of their options are additionally locked by the key or special code, which is even more convenient.
The most popular key option is the keyboard. Their widespread is explained by the simple design, ease of operation, convenience. independent manufacture. Such a key is quite realistic to make from the usual cutting board. However, it is recommended to choose for the manufacture of key to the key to the keystones that have oblique grooves. Next, you should install fixing elements for keys. Most often, it is nails or self-tapping screws. If necessary, the keystitch is painted in the ratio individual features Rooms and installed on the wall.
High reliability is different keystone in the form of a wooden bar. All keys fasteners are located firmly, without the possibility of deformation.
Another option to manufacture the key is a frame. It is perfectly combined with a wall, makes the interior unusual and original. It is enough to build out of wood or other materials framework, attach hooks for keys and hang on the wall. If there is a solid finish, it performs the feature of the selected image on the wall. To fix the frame on the wall use glue or additional fasteners. The installation method is determined individually depending on the material from which the walls are made.
In order to combine several useful properties The keysticiation, we recommend to look at the key to the organizer. There is a place for such a spacious shelf not only for keys, but also for various papers, notes, reminders.

If there is a need to install secret constipation or storage not only keys, but also additional documentation, we recommend to stay on the key to the closer. Sometimes the front door of such a key additionally performs the function of the clock.
Another subspecies of the keyboard in the shape of a closet is a key-house. For its manufacture, the wood is most often used. The front door of the keystone is decorated with carvings, original drawings or even decoupage. The size of the key of the house is less than the cabinet, it is more compact and spacious.
Wall Keywords: Wall Kind - Master Class
If there is an unusual, original box in the house, you can also build a key. In such a case, the accessories are attached on the back wall of the box to hold the keys, and it is fixed on the wall without self-draws. Note that the box in this case must be made of wood.
You can make the same key from the old wooden box, additionally by performing its scenery. For additional strength, wood is covered with moisture resistant compositions.
Quite often, the key is made from plywood residues. With the help of a special tool, it is possible to create incredible artworks in the form of small key. For additional protection of plywood, it is covered with varnish, pre-alone. Art dupile On plywood allows you to make a keystitch in the form of a horse, heart, stars, animals and plants.

In production, this process is performed using laser installations. However, it is quite real and at home. For these purposes, follow the instructions below:
- draw or print a drawing on the printer that you want to get;
- prepare a hand logs;
- in the presence of a vibratory jigsaw, use it for cutting particularly thin items;
- with the help of manual cut, the production of the workpiece is performed, in order to hide small irregularities, the surface is additionally processed with the electric delicti of the tree;
- for the manufacture of such an appliance, the presence of an old soldering mechanism and nutritional block will be required.
We offer an option to manufacture a key in the form of a key of plywood. For its manufacture, prepare a sketch of your form you like. It is especially interesting such a key to children, since it is distinguished by an extraordinary form and resembles a "golden key."
Keywords: Wall-mounted hands photo:

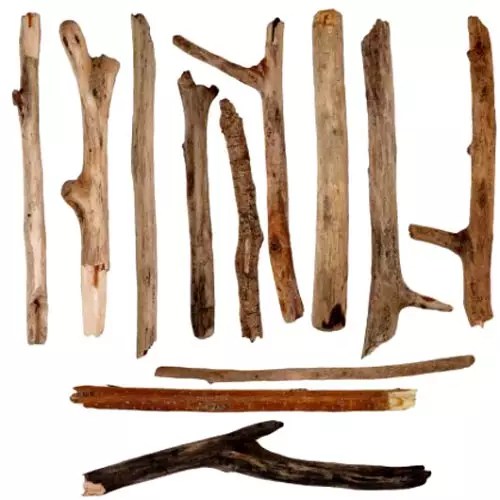
For the manufacture of original keyword keys, with their own hands, it is enough to use simple technicians. The first option is fixing on a wooden plank branch branches from bitch allows you to get a completely original key. Do not choose too small branches that can break under the influence of gravity from the key. Do not forget to additionally process the wood with antiseptic compositions.
The second way is to use the previously dried Borovik mushroom. These elements are characterized by high strength and long service life. With old dining room utensils in the form of forks and spoons can also be built original keystones. Bending the plug in a certain position, the original coach hanger is obtained.
In the presence of experience with various techniques on the decor of the key, it is possible to build whole masterpieces in the form of wall keys. From polymer clay you can make the key to different shapes and color solutions. The most important thing is that this element must be harmonized with the common interior design style. After drying, the polymer clay acquires special strength and is distinguished by a long service life. Additionally, the keyner is fixed by the fittings of the appropriate size.
For baking, the finished part uses the oven. Only after fully cooling the part is ready for operation and further opening with varnish.
The prepared surface of the key is also decorated in the decoupage technique. To fix this removal, lacquer is used on a matte or glossy basis. Allocate two methods of decoupage - direct and reverse action. The first implies the preliminary surface coating of the primer, applying glue and sticking the picture.
In the second method, use pictures of the transferable type installed on the surface. Keywords: Wall-mounted with your own hands Decoupage - is distinguished by original and unusual external species. Particular attention should be paid to the absence of wrinkles on the surface of a decoupament. Possible option to decorate the key 3D decoupage. However, for this it is necessary to have experience in carrying out this kind of work.
How to arrange and make a key word with your own hands
Wall-mounted key design process should be paid special attention. After all, it is from the quality of this process that will depend on both the aesthetic attractiveness of the product obtained and the duration of its operation.
Most often, wooden keystones can be stained, opened with varnish or artificially aged. For painting of wooden products, we recommend using paints on acrylic basis. The duration of their drying reaches five hours. They differ wide color gamut, the presence of simple and glossy shiny shades. With their help, you can imitate wooden, metal, nickel, chrome surfaces.
After applying paint on the keystone wall wooden with your own hands, it is possible to get a thin, durable and elastic coating. Thus, it is possible to achieve the effect of the overpaid surface. For these purposes, an abrasive sponge is used, which is treated with the surface after staining.

As additional elements for decorating the surface of the key, we highlight such funds:
- lucky - these compositions allow you to obtain a glossy, matte, textured or smooth surface;
- lucky with a 3D effect - allow you to create a rather thick protective coating, which has individual optical components and make the image convex;
- textural type pastes - after drying, it allows you to create an image in the form of texture of the composition, cracking.
The technique of decorating the Klackle key consists in obtaining a cracking surface. At the same time, many varieties of this technique and various types of compositions for the formation of cracks are distinguished.

How to make a key wall-mounted photo
Special attention should be paid to the key, with a secret mechanism. This version of the key is the form of a conventional picture, which opens with the help of a special constipation. By pressing the secret bar, you can open the key. The secret plank, in which case, is equipped with special skos, which allow it to open and close with one touch.
For the manufacture of such a key, you need to have special experience and knowledge. First of all, you should draw up drawings and determine the picture opening mechanism. Next, it is necessary to build a frame part.
Inside the picture there must be hooks for the location of the keys. Additionally, the mechanism is equipped with spring mechanisms and clamps. We recommend purchasing such a key in a specialized store, as it will take a lot of time and effort to make it possible.
Another option is a hidden key - a keystitch in the form of a shelf with a hidden lock. For its discovery, a special magnetic key mechanism is used. Therefore, for opening such a key, you will need a special key.

Wall Keywords: Wall Kate
In the process of working on the key, it will be necessary:
- trimming plywood or sheet DVP;
- acryb colors;
- lacquer for handling wooden surfaces;
- napkins;
- tassels;
- glue;
- furniture elements and fasteners.
For the manufacture of such a key of wood or plywood, make a rectangle or square. In order to give the surface maximum smoothness, additionally sew it. After performing stripping, it should be covered with an aerosol paint. Next, the billet is covered with varnish in several layers with complete drying of each. Further actions on the decoration of the surface are determined individually and described above.
To secure any decor, a moisture-resistant varnish is used, which will keep the key to destruction. Additionally, fix the fittings for keys on it. With the help of screws hang a finished product on the wall.
Production of the keyword key with your own hands is quite an individual process, the order of which is described in the drawings and depends on the preferences of the wizard performing the work.
Useful advice
If you want your keys always in your place, and you did not lose them, then perhaps you should think about the key.
Some keys can be made with your own hands, and others acquire.
Here are the most original keystones that will suit anyone who wants to have order in the house and who welcomes original ideas:
Keystone (photo)
1. The clavicle in the form of honey cells.
For labor bees, this ecologically secure keyboard contains five magnetic hooks that are gently attached to their places. Material - bamboo.

Wall-mounted key
2. Lego Klyuchant.
Children, Loego lovers, and anyone will appreciate the convenience of such a key. You can attach any detail here to improve the key.


Keystone from a tree
3. Kochist of squirrels.
If you are lucky enough to find suitable wood, then you can make a key out of it, having screwed the hooks and attaching it to the wall or simply putting it on the floor or on the table.


Here is another closer option from Koryagi

The key to the hallway
4. Klyuterna, as in an old hotel.
The design is simple, but tasteful. He will return you back in time with its vintage view. You can add a number for beauty or registered shortcuts.

Keystone on the wall
5. The key to the door handle, as in the book "Alice in Wonderland."
These handles are made in style door handles 19th century. They were carefully painted and to attach real keys to them, keychain keys were made, which are inserted into the "lock". Handbags can also be hung on such handles.

Wall-mounted keyword
6. The key to the nautical theme.

Keyman house
7. The keystitch in the form of a garage.
This key is similar to the previous model, only instead of the shelves - a small garage, and instead of ships-key chains - a minibus. This key can also become an excellent gift.

Keywords: master class)

8. The key to the tennis ball.
You will need:
1 Tennis Ball
Stationery knife
Superfloa or suction cup
Shilo, big nail, screwdriver or other sharp object
Toy eyes (optional).

1. Make an incision ball in the center, using a stationery or ordinary knife. Be careful, as the tires in the ball are dense and the sharp object may damage.

2. Opposite the door, make a shill hole for the suction cup. If the ball is simply glued to the wall or chalkboard, then in this case you can no longer remove it.


* You can glue toy eyes for beauty.

How to make a key of a tennis ball (video)
Keychable for home
9. The keystitch in the form of piano.
Keychains are made in the form of black keys on the piano, and the keystone itself in the form of white keys. Black keys are attached to white. In addition, each "black key" is a whistle.

10. The keystitch in the form of peacock.
When you insert the key in this toy peacock, it reveals the tail.

Wooden key
11. Romantic key.
Among the incorrigible romantics, there will probably find those who want to go to the house such a key. Keychains in the form of wooden men (he and she) are attached to wooden house With a heart in the form of a heart.

Sleeping key
12. The keystitch in the form of a fun face.
It is suitable not only for keys, but also for glasses that are put on the "nose". Such a key must not be attached to the wall, it is enough to put it on the table and hang the keys on her mustache.

Metal key
13. The keystitch from the wrench.
Such an invention will be useful not only for storing keys. You can use this intended wrench at any time.

Wall keller (photo)
14. Keystitch in the form of a crocodile.
Just glue or attach this crocodile to any surface and hang on its mouth keys and put various trifles.


To not be in complex situation When leaving the house, it is necessary to take care of a permanent location for keeping keys. For this purpose, most use a key with sufficient seats. Having placed it in a convenient place, it's hard to forget the keys by going to work or walk. Returning, you can quickly consolidate the bundle in the place allotted. If a wall key is made with your own hands, it will definitely become a stylish element. It is only necessary to show fantasy and carefully read the master class on the manufacture of a specific model.
Read in the article
Wall key: Photo will help you find an idea
Deciding to make a wall decorative key on its own, it is worth deciding on the size and design. Numerous photos represented by authors so useful fitallow you to find a suitable idea for subsequent incarnation. It is only necessary to determine which model deserves attention.
Take note:

For the manufacture of key can be used various materials. Depending on the stylistic design of the corridor or the hallway, preference is given to metal, wood, plastic, skin, their combinations, and a number of other materials. The form and design of the product is selected individually.

Wall-mounted key for home have a beautiful design, and therefore are capable of becoming a stylish element of the interior. It is only necessary to show your creative ability, come up with an interesting form and choose non-standard design.
Most often do wall key Open. In this case, you can quickly post the key in the place allotted. Closed models suggest the presence of a special door, which will have to open before you take or hang the key. On the one hand, you can not be afraid of a random fall of the bundle. On the other hand, you will have to spend some time on the opening / closing of the door.


Functional product purpose can be wider than simple keys. Wall key with a clock will control the time. Filing to work, you can appreciate this opportunity. Do not have to spend precious minutes for a permanent check of the remaining time.

The size of the product may also differ. It all depends on their destination. The keysticiation can be:
- Nasty. Located on the wall closer to the exit;
- Pocket.Do not allow losing the keys inside the bag;
- Desktop. Closed models installed on in the corridor;
- Cabinet. Suitable option For those who are installed in the corridor. Creating the door of the cabinet, it will be possible to more rationally dispose of the limited space of the hallway.
The purpose of the product has an impact on its dimensions. As a rule, the key keys are large, and pocket - small. This allows the latter to wear not only in the handbag, but also in pants pocket, reducing the risk of rubbing the fabric.

For the manufacture of products of all types, various materials can be used. Each options deserves special attention in the process of choice. It is worth studying the features of each material individually to make later right choice.

We make a wall wooden key independently
Tree is the perfect material for the manufacture of interior items. He can give any desired shape and size. For work, conventional carpentry tools and a little imagination will be required. Using the wood of precious breeds, decorating the finished product with unique thread, you can get stylish decoration For their hallway.
The wall keystone made of wood is made of wooden elements connected by nails and screws, as well as hooks. The easiest option can be a wooden plank of a small width, into which a certain amount of hooks is screwed. For the manufacture of such a product requires a minimum of time. Making a beautiful product, even if there is no experience of carpentry work.

If it is not possible to make a product on your own wall wooden keystitch able to become optimal decision. You can always pick up optimal option For a specific interior, choosing an open model of an interesting form.
Wall-mounted metal key for high-tech interior
Metal products are characterized by high strength and large capacity. They are in demand in offices, schools, business centers. IN residential buildings The devices are able to add solidity and give uniqueness to the interior. Especially winning they look in, decorated in the style of techno, loft or high-tech.

Make a beautiful product from metal on its own difficult. The lack of special equipment will not allow to form a solid connection. individual elements. Best of all the metal wall key to buy in the online store. Here the price is usually lower than in ordinary stores, but the range is more.
Metal products have a number of advantages. They are:
- Do not burn;
- Do not melt;
- Well preserve the form even with a significant mechanical effect;
- Withstand fluctuations in temperature and humidity in the presence of a special protective layer.
The keystitch from plywood do it yourself: just and tastefully
It is well handled cutting. It allows you to form a product of any shape and size. It is enough to take advantage of becoming the owner of a stylish and functional product.
The advantages of products from plywood should include:
- Size stability. The material is manufactured in the factory conditions, and therefore its characteristics are known in advance;
- Low weight. The finished product can be attached to any wall;
- Simplicity of processing that can be performed at home;
- Smooth surface, which reduces the requirements for subsequent finish.
The keystone wall can be made from plywood simultaneously with keychains. They can be used instead of hooks. It is enough to combine the keychain with a groove prepared for him.

For the manufacture of such a product follows:
- Purchase Faneru, the thickness of which is less than 10 mm and rings with chains;
- Prepare an electrolybiz;
- Cut in a variety. The keys itself will consist of the upper, lower part and keyfobs;
- Transfer the contours of the template to Faneru;
- Cut the elements of the future product using jigsaw;
- Using emery paper to polish the cut line;
- Drill in hole holes under the rings;
- Connect the top and bottom of the key. PVA glue can be used as adhesive;
- Perform the finish of the product and keyfobs.
We make the key with your hands from the cardboard
In order for the finished product well to hold the form, it is worth using a tight cardboard for its manufacture. It is not necessary to acquire specifically. You can use a box from under cookies or any other products. This will significantly reduce the cost of manufacturing the keystitch.
What you can make a wall key with your own hands from the box will allow you to understand the photo. Focusing on the images represented, you can develop a sketch of your own product. On it can be understood which materials will be required for the manufacture of the product. In addition to the cardboard itself, it is worth preparation of glue, hooks and materials that will be required for decorating. Given the low durability of cardboard to mechanical exposure, it is possible to provide lining from plywood.

Examples from other materials: Use the Council
Combined structures are particularly popular, in the manufacture of which are used. different materials. Popular plastic products. They can be operated in all conditions. In the manufacture of wall keys, with your own hands, photo on the Internet, as it is impossible, will allow you to choose a suitable execution.

Keywords: master class: master class
The work sequence will depend on the purpose, the type of product used by the material, as well as the desired design. It should work carefully, after performing each item. Separate attention should be paid to the design of the product. Decoupage technique will form a beautiful drawing on the surface even in the absence of specialized education.
Making a pocket key
If the product is planned to wear in a handbag or pocket, its sizes must be relatively small. Focusing on the dimensions of the largest key, which is in the bundle. The material from which the key will be manufactured must be durable and mild at the same time. Most often, preference gives natural or artificial skin.

The key pocket with his own hands is made in the following sequence:
- We are preparing the material and tools: skin, ruler, seer, durable threads, scissors, preferred clasp. We work out a sketch of the future product. Attention is worth paying the smallest detail. Sketch is better to portray in a natural value;
- We cut two details: big and small. The width is greater than to exceed the ligament dimensions by 2 cm. In this case, the keys will be conveniently placed inside. The length should be halved to exceed the length of the largest key + 8 cm, of which 5 cm will come to the details of the solo-rolled valve. Little will be the inner value of the valve to which the feed part will be fastened. It must be 1 cm already wide part, and the length is 4.5 cm. This is 0.5 cm less than the valve itself;
- Send the fastener. The length of the velcro should relate to the dimensions of the front of the key. It should be fixed on a piece of thick fabric. To form stitches with a sewn in the skin, we do holes. Velcro should be located 2 mm from the edge. The main and response is sewn. The latter to the inside of the valve;
- Apply decoration. The product can be decorated with embroidery or decoupage. Also beautifully looks appliqué;
- We connect the inside of the valve with the main part. We do around the perimeter of the product with a step of 3 mm hole. Stitch from the inside to sewing machine or in manual, using the seam "forward to the needle";
- Cut the narrow strip of leather, with which the keys will be attached. One end is sewn to the bottom corner. The second end we put in the form of a loop and fix. The ring will be used to mount a ring designed for key bundles.

We make a wall key
You can make a wall key with your own hands in different ways. One of the options may be the use of bitch of any tree. Preference is worth giveing \u200b\u200ban oak, larch or other tree. It is advisable to choose the workpiece with the original form. Works are performed in the following sequence:
| Photo | Description |
 | Using the emery squeeze the wood. It is advisable to completely get rid of the bark, as it can cause the appearance of insects. |
 | In the area we drill the required number of holes that will be used for fastening hooks and fixing the finished product to the wall. The diameter of the opening is selected less than the diameter of the hook thread. |
 | With the help of a simulated product, the desired tone is given. After drying, the composition with a tinted surface with the help of fine emery paper, risen fibers are removed. |
 | The surface is covered with varnish, which gives the product a characteristic shine. Depending on the desired result, preference can be given to matte or glossy composition. The choice will depend on the desired brilliance. Kleisser Freaky to the wall and screw the hooks. |
The key to the hallway will look beautiful in the bath or wooden house. For an apartment decorated in modern styleThis option may not be the best choice. Various drawings applied by electrical burning can be used as decoration. Other options are possible. For example, drawing pattern.
Decorate the decoupage in the technique
To decorate the key wall with your own hands in the technique of decoupage as follows:
 | Preparing the table on which work will be performed. The countertop can be displayed with an old oilcloth or standard trash. Prepared a blank of a decorated key, white acrylic paint, a sponge. |
 | Sponge omit in the paint and with the help of missing movements are staining the workpiece. Using the sponge instead of the brush allows you to give the surface a unique texture. In the presence of unpainted sites, you can use the brush. As a rule, it is thus stained with a zone in the fastening of hooks. |
 | Let the workpiece dry. The paint should not remain on hand. For complete drying of the painted surface, it takes about an hour. We apply the second layer and give the product to dry for two hours. If the formed layer turned out to be inhomogeneous, the base is viewed in separate places - another layer of acrylic paint should be applied. |
 | We prepare the glue composition consisting of an equal amount of water and glue PVA. With it, the napkin will be glued to the base. |
 | Cooking a napkin. If it is three-layer - separate the top layer. The remaining for work will not need. Maximum caution should be taken to not damage the decor. |
 | With the help of a fan-shaped tassel applied glue composition to the key. Gently glue the napkin towards the middle. Surplus gently tear off. At the edges we apply an additional layer of glue. We leave until complete drying. |
 | Apply an acrylic varnish layer with a brush. Let the layer dry. To ensure a sufficient level of protection of the formed decor, you should apply a minimum of five layers of lacquered coating. This will reliably fix the pattern on the surface and give the surface characteristic shine. To give a clarity formed contour on the fins of the product, you can apply black acrylic paint. After complete drying, the irregularities available on the surface of the product can be removed using sandpaper, and then re-apply several layers of varnish. |
Article