Children's house of plywood drawings. How to build a children's wooden house in the country and on the tree
To organize leisure a child, parents have to break their heads in search of a suitable solution. In fact, the answer is simple enough: that the child spends the day in active games, it is necessary to organize his personal space. The way out of such a situation will be a children's house with their own hands. In any yard you can allocate small plot Under the construction of a house for games. It remains only to choose a scheme, materials, tools and proceed to work. Acquainted with detailed instructions You can in our article.
Common views
In order to make a children's house, you can use the most different materials that remained after construction or repair, if any, you have prove them in a construction store. Undoubtedly, lumber are the most popular:
- bars;
- plywood;
- boards.
Consider common options.
Plywood

Building game Domika From plywood begin with design, that is, they create a drawing or layout for which it can then be calculated the required amount of material and make the workpiece. At this stage, places reserved under the door and windows are noted. For the construction of the most simple summer hut there will be enough pair of sheets of the selected material, but in general, the flow will fully depend on the dimensions of the structure. Take into account some more important points:
- the windows are located on the floor at a height of 60 cm;
- the doorway should be higher than the growth of the child by 15-20 cm;
- the size of the future house must allow the child to feel comfortable;
- the roof is equipped with an angle of 45 °;
- plywood sheets can be cut into a regular saw and grind up nails;
- all angles are definitely polished by emery paper so that the child does not injure in the game process;
- when choosing paints and varnishes, it is best to prefer safe and non-toxic species.

Note! The location of the house must be beneficial for parents: it must be viewed as much as possible from the windows or from the porch at home to constantly monitor the child.
Wooden boards

If you want to equip a durable and reliable house in the country, in which the child can play round year, you should choose exactly wooden boards. This material has an explicit advantage - a tree with proper processing is practically not subjected to wear. Such moments are taken into account:
- for the frame, the bars are chosen with a cross section of 5 cm;
- to enhance the strength, the framework is inhabited by reductions with a thickness of 2 cm;
- the finished house is covered with deck varnish;
- the painting stage is suitable from the creative side, selecting bright colors and drawing your favorite cartoon heroes of the child.
Note! As in the case of any structure in a wooden gaming house, it is necessary to provide waterproofing for the roof.
Hut on legs

To make a simple house, but a bizarre place for playing games, it is best to stop on a fabulous hut on legs. An important stage is the initial one. Having the right and calculated drawing, you can count on receiving a practical and kinder house. Choosing the material to create the most interesting element - legs, you can stay on:
- wooden bars;
- metal pipes;
- stones.
For decorating the most different combinations will be suitable. In addition, you need to pay your attention to such moments:
- The height of the legs should not exceed 70 cm.
- The base of the legs are poured with concrete for stability.
- For convenience and comfort there must be a low staircase or open steps.
- The whole house is collected from wooden boards: first the frame is knocked down, which is then trimmed by boards.
Note! Since the house is a place for active games, the legs should not be high. The design should be safe and stable.
Step-by-step construction instructions

To make a simple children's house from a tree, you will need to highlight a little of its time, collect material with a tool and proceed to work.
Materials
Start any construction is necessary with planning. Only a clear scheme will allow you to calculate the desired amount of material and make purchasing. For the described game house, there will be such materials:
- Boiled panels (180 × 240 cm) - 6 pcs.
- Processed timber (with a cross section of 10 × 10 cm, 180 cm long) - 4 pcs.
- Processed timber (with a cross section of 5 × 10 cm, 240 cm long) - 6 pcs.
- Processed timber (with a cross section of 5 × 7.5 cm, 240 cm long) - 2 pcs.
- Ruberoid - 1 roll.
- Screws (30 mm) - 2 pack. 500 g.
- Screws (75 mm) - 1 pack.
- Toler nails.
- Morilka - 10 liters.
- Thin plate.
The racks are formed from a bar with a cross section of 5 × 7.5 cm, a length of 240 cm. It is precisely the base for the board panels.

Note! Picking up the veil, you should choose two colors: 7 l - "light cedar" and 3 l - dark green.
Instruments
From the construction tool you will need:
- shovel;
- traaming;
- level;
- a hammer;
- drill screwdriver;
- circular Saw;
- billing;
- tassels;
- stationery knife.

Note! Perform cuts with a disc cap is needed from the inside of the panels so that the outer side is not formed.
Completing of the work
Before making beautiful house For games with their own hands, it is enough to familiarize yourself with the next algorithm of actions.
Paul and walls
- The platform for the future house is selected, aligned and tamper. If you wish and the availability of free funds, it is recommended to dig a trench and flood the layer of rubble for the supporting bars with a cross section of 10 × 10 cm.
- The length of the support bars is equal to the distance between two extreme racks of the board panels, that is, 140 cm. For convenience, you can take a bar with a cross section of 5 × 7.5 cm and a 240 cm long, attach to one panel, mark the location of it. Thanks to the marking, you can install lags without much difficulties.
- The soil is aligned, focusing on the lowest point. First, the first reference bar is installed, which will be the front, after which it comes to the rear. Check evenness and horizontality, and then you can install two central.
- To close the supports with each other using 2 bars with a cross section of 5 × 10 cm and 240 cm long. They must pass between the racks of the board panel, which will be the floor. Fix them with screws. Educated voids should be filled with soil, leave the air layer about 3 cm, which is necessary for normal air circulation.
- The board panels are cut on the necessary size and choose the most flat for the floor. It must be put so that it does not come into contact with the soil anywhere. To achieve this, you can additionally use crashes. The edges must completely coincide with the support bars.
- For proper cutting of the side panels, the height of the side panels is first placed, that is, 150 cm. It is also necessary to leave a stock of 5.5 cm. Crop to spend only from the inside.
Note! Do not forget to leave a small margin in width for the back and front panel. Thanks to this, they will be able to overlap the side of the side. To ensure the adolescence, it is necessary to measure from the external edges of the racks for another 2 cm.


Roof
- Since the roof is the most complex element of the design, you will have to focus and pay all your attention. The laboriousness lies in the need to unscrew all the stands of the rear panel, so that they are then attached again. On the front panel, measure the distance from the central top point to the side, which is located below. This will determine the placement of the racks for the roofing panel.
- Note that the rack that runs along the skate should be placed exactly at a distance of 5 cm from the axial line. In this case, during the installation, both racks will not be superimposed on each other.
- In the role of additional racks (if any), it is best to apply bars with a cross section of 5 × 7.5 cm. During laying, they should constantly check their perpendicular to the top of the roof. If necessary, they are aligned at the bottom edge.
- All irregularities on the tops are successfully masked by a skate.
Note! Remove and rearrange the racks only one at a time to maintain rigidity and strength.


Finishing steps
- For the doorway, there will be enough dimensions of 60 × 120 cm. This size perfectly fit into the span between the racks. But if necessary, you can choose other sizes.
- First of all cut the window (windows), and then go to the door. Note that you need to be careful and attentive with the door, do not drink it to the end, as the panel is still not fully fixed and the design will lose stiffness.
- All elements are covered with mourn and varnish. Painty materials should be applied both from the inside and outside to form a protective layer.
- Using 75 mm screws, all elements are fixed between themselves and to the support bars. When the frame will be fixed, you can completely cut the doorway and install the roof.
- The door and shutters are manufactured, the porch is going and fixed.
The most recent stroke is internal decoration House, manufacturing furniture, such as tables and chairs.
Note! It is not necessary to insert glass into the window openings, you can do without them at all. Plexiglas suitable, which is safe.
Don't forget that interior arrangement Also plays a big role, especially if we are talking about small princesses, which in the time of the game imitate adults. No matter what material and design to create the game space were chosen, your baby will be happy. It is in the house he will be able every day with pleasure to spend an active holiday watch, developing fantasy.
Video
See which beautiful house can work out of boards, timber and siding:
And here it is shown how to build a house from OSP:


Perhaps it is difficult to meet a child who would not dream about his own little house. This can be anything - a textile tent, a wooden hut, a plastic house and even a slash or vigvam. And it does not matter where such structures are installed - in the country area, or in an ordinary apartment - it is important that it was a personal place for the baby's games and a free time. Such space is very necessary for children, any children's psychologist will tell about this, especially if a separate children's room is not provided in the house. The article will talk about how to make a children's house with your own hands.
The need for a personal "corner" is important to satisfy, because only this will lead to the full development of the younger personality. Here the child should feel the owner, he himself puts furniture or brings toys, removes inside, brings purity and beauty. It helps to raise responsibility, and also gives you to feel myself safe. In addition, it is also a great place for educational games.
Children's house photo

That is, as experts assure, any child requires a secluded place where he could feel confident, defended, could play, either to engage in creativity, or just relax from all and from all. Of course, today manufacturers of children's toys offer a wide variety of options for children's gaming houses or tents. But it is so nice to make a house yourself, the more you can attract this work and the future owner of this property.
It will only be to create a children's house project and choose materials from which the idea will be implemented.
A variety of children's game houses
Wooden children's houses
- To date, the choice of materials is very large. Of course, the wood remains in the first place. This is a natural product, environmentally friendly and easily accessible. To work with wood enough simple tools - hammer, saw, screws and nails.
- Of course, if there is a desire to build a real masterpiece, you will need a more serious set of equipment, but in principle there is nothing complicated here and it should always be done with your own hands. Also, these categories include products such as MDF, DPV, plywood, lining and other wood-based materials. They can be combined with each other, or apply independently. It all depends on where the construction is planned to be installed, and how it will be used.
Cardboard or Cardboard Box
- Easy and easy to build a house of cardboard or cardboard box, Even children can do it. The basis may be packaging from household appliances, for example, from the refrigerator, washing machine, TV, etc. Cardboard It is advisable to take thick and dense, then its strength will be higher. All structural elements - doors, windows and others are easily cut out by the usual stationery knife and scissors. To make this procedure more accurately, it is advisable to pre-draw boundaries.

- The roof is made of glued pieces of cardboard or one large, depending on the project of the house. It is possible to glue the parts between themselves with PVA-glue or scotch (it is especially important to strengthen the joints so that the product is quickly in disrepair). After the design is assembled, it should be bright and beautifully decorated. It is easy to perform armed with ordinary gouache and tassel. If there were pieces from wallpaper in the house, you can beautifully glue the walls and roof by this material.
- Decorate the inner and external part recommended entrusting to the child so that he felt the owner here. True, there will be no longer a lot of durability. Therefore, such a house is best kept in a closed room (in an apartment or house), and if we use on the street, then only in dry, weak weather. This rule also applies to the next category of materials - textiles.
Children's fabric house
- From the fabric you can build a wide variety of baby houses. Most simple sight Is a slash or tent. To create them enough to come up with the foundation (frame) and cover it with a fringe of the fabric, an old bedspread or a sheet. This construction is both stationary and collapsible, it all depends on the fancy of the wizard.
- For the frame perfectly fit plastic pipes (PVC), which are used for water supply, or thin wood shelters. Purchase product data is quite easy in a construction store, the price of their low. In cases of creating wooden carcassAll items should be taken and painted. Such a procedure will prevent the appearance of the offplace and scratches in the child.

- Much efforts will not need to make chalas, enough 3-5 guides to link between themselves for the tops (from one end), and to install the structure to a solid support with a free end, installing guides in different directions. Then fasten the fabric to the walls formed. Since the floor in the design is not provided, it is necessary to lay a dense carpet so that children, playing on the cold floor, did not catch fire. IN summer time Such a children's house can be taken out into the garden. This is a pretty mobile design that the child can move at its discretion.
- Another option is to simply build a slash, it is based on a gymnastic hoop as a basis or to build a wire frame. Fix such a product should be consolidated to the ceiling, or if there is such an opportunity on the street, over the tree branch. It is important to open the material correctly, with a proper approach it is easy to make windows and doors from individual pieces of fabric. If the frame does not work out, you can take an ordinary table as a basis and tighten it with a cloth, like a cover, leave a place to enter, that is, make a folding canopy and the house for games is ready. Children will be happy to spend time in such a place, especially if the table is big and there is where to turn around.
Children's house of plasterboard
- Another material that is successfully used in the construction of structures of various complexity is plasterboard. Such a house can be a decoration of any apartment, the main thing, to create a project so that he fit into the interior. As a frame, both aluminum profiles are used and wooden bars. Touching drywall sheets to the base with the help of self-tapping and screwdriver, it is important to ensure that the sharp ends of the hardware do not go inside the design, otherwise the child may accidentally be injured.

- If the second floor and staircase is scheduled in the house, then the overlaps need to be made as strong as possible, and the steps are best done from the boards, as the plasterboard is easily breaking under weight. The children's house from drywall will already be like a whole room, here it is allowed to put real furniture and even carry out light. But it's better not to use such a construction on the street. Especially if the plasterboard is not moisture-resistant and unprocessed additionally. Otherwise, all beauty will disappear literally in one season and the next will have to build a new cozy house, And this is the cost of strength, time and means.
- These materials are the most common to build baby gaming houses, but this does not mean that these are the only possible options. Some craftsmen manage to create buildings from any submitted means, for example, from plastic bottles Or build a house from sand bags. In general, there would be a desire, and there will be opportunities.
Wooden children's house do it yourself
Since it is all the structures from wood are the most durable, durable and safe, it is worth considering the stages of the construction of wooden houses in more detail, and learn about the necessary set of materials and tools.
Choosing a place to build a children's house
- So, first of all, you should decide on the place for the future structure. This is especially important if a stationary house is planned, which will be located on one site for a long time. The dream of every child has a house on a tree, but if it is not possible to completely secure this option, it is better to avoid such a building. Children cannot sit still, they need to move, and moving games at high altitude can lead to injury, which is why it is recommended to stop on the hut built on Earth. Moreover, it is this option that is easily supplied with a variety of designs, including a sandbox, swing and even a slide.

- On the panstone It should be denoted the location of the future house. It is best if it is a quiet place where there is a light shadow from the midday sun. It is also important to keep in mind that it is necessary to allocate additional territory for games. Such a place should not be occupied by the garden or other economic needs, but completely given to children for games. It is necessary to take into account, first of all, not for the children themselves, but to calm the parents, because noisy games can lead to the fact that precious landings will simply be destroyed.
Preparation of foundation and gender
- The size of the construction is chosen arbitrarily, for a small orphanage, sufficient length and width of 140-160 cm, and the height of about 1-1.5 meters. The first thing you have to do is prepare a foundation. As a base, the area can be filled with rubble, or well-racked sand and even ordinary earth.
- There are several options for laying outdoor boards. You can remove the top layer of the turf, pour the resulting place to rubbish, align and lay the supporting bars on the prepared platform. Another option assumes that only the corners of the structure will be on special reference blocks, for example, from cellular concrete. Such supports are laid on prepared sand pillows. That is, placing the corners of the future building, in each of them a recess is recessed by 30-50 cm. The whole earth from the fossa is pulled out, and the sand is falling asleep, which is thoroughly tamped. In order to most accurately place the angles, it is possible to put the main framework frame in advance.

- Blocks are set on the prepared sand layers at one level. Horizontality should be measured with the level and floor framework. Further, it is important to take care of the waterproofing layer, it will help the house to simultane more than one season in integrity and safety. Ruberoid or only, as well as more expensive materials, including various mastics are used as an insulator. In addition, you can use the option in which the free space remains under the floor, to purge the boards.
- The next step will be the installation of the frame. The rates of the required length are stacked on the foundation blocks, or on the supporting bars (if an option was selected with a rammed platform), and are connected to a rectangular box with a corner and screws. Metal corners will make the design of durable, but still for greater reliability, additional transverse bars should be installed. If a big house is planned, then there will be 3-5 such spacers if the construction of modest sizes, then a fairly one more boards in the middle.

- Further, the framework prepared in this way, the floor is laid. For sex you can use separate boards, Wooden shields or chipboard sheets, MDF or HDF. The main thing is that they can calmly withstand the weight not only the child, but also an adult. It is recommended to use a gender board with parameters: length 6 m, width 13.5 cm and thickness 28 mm. As a rule, 4 boards are enough to mount the floor.
- Another rules when building any structures made of wood, is to protect the surface of the wood from moisture exposure, as well as insect damage. And the children's house will not be the exception. It is desirable to impregnate the boards from two sides with a special composition, in which there is both moisture-repellent components and antiseptics.
Installing walls and roofs
- When the floor figured out, you can start creating walls. To mount this item, you should create a frame of bars, which will be covered in the future with clapboard or shields. The main thing is not to forget about the doors and windows. First of all, a timber is installed in each corner of the future orphanage. For these purposes, it is possible to choose products with a cross section of 60x40 mm, sufficient length in 3 m. Each element is cut into three parts, 1 m high or two parts of 1.5 m. Next, the bars are installed under windows and doors.

- To secure the main bar, it is necessary to put it with nails to the floor, but so that in the future these nails can be easily pulled out. This is due to the fact that the most durable fastening of the details of the structure can be made only on special fastening corners, which are installed a little later. Between the rapid bars (approximately half a height), be sure to install additional spacers, which will also serve as a fastener system. Unforgettable that the bars are connected on top of the barcas, which will be the basis for the roof. When the base for walls is ready, nails are alternately pulled out and metal corners are mounted on their place. It is important to consolidate the angular fasteners all the corners and butt elements, only then the house will really be durable.
- The bars that are installed horizontally mark windows and doors. It is necessary to calculate their height in advance. The calculation is carried out from the width of the casing boards, such parameters should be laid so that during the trim it does not have to cut the board by its width or close the floor of the window. That is, we consider how many full boards will fit into the remaining opening from above and below and at such a height and fix the horizontal struts.
- And the last thing you need to do to complete the frame is to put the roof bars. To do this, we kill two bar each by an angle (in the form of an unfinished triangle, the basis of which will be one of the walls), and the free ends strengthen on the upper bars of the walls. Such triangles can be from 2 to 4 pieces. In mandatory, one is set on the opposite walls of the house, opposite each other, and one or two can be installed between them, it all depends on the size of the structure. Also these bars must be consolidated by corners.

Drawing of baby house

Covering the children's game house and its design
- Now you should proceed to the construction of the structure. To create walls, you can apply lining, shields or boards. The option with the clap involves a faster skin, as items do not have to be customized, and they are easy enough to connect with each other. Roof closes edged boards And on top can be labeled runner, tile or ondulin, everything already depends on the possibility of builders.
- Since we have a children's house before us, it is advisable to discones it in bright colors. This can be done in conjunction with children. In addition, the windows can additionally decorate carved platbands that are available in free sale, or make them independently. Inside the structure, it is recommended to install shops and a table, but, of course, this is not the only option to decorate the interior. Before the house often make a porch, which was either originally entered into a plan, or it is easy to complete separately.
- It is important that the house for children is completely safe. This concerns its stability and reliability of the connection of the elements among themselves. Also, during the kids during the game, they did not hurt and did not scratch, all the boards should be fugged and well protected by a layer of paint, varnish or verse. Metal corners, screws and nails are pretty closely close, so that they do not drank and not sticking out.
Today, choose the option for the construction of a game house for children will not be difficult, because there is a lot of photo and video of this topic on the Internet. The approximate cost of the structure is 5000-15,000 rubles, this cost includes the purchase of boards, hardware, paints and other materials. But often, many parents can build a children's house for playing their child for free, using only infirm materials.
Gaming children's house video
Do not refuse to your freight in such pleasure as a small house. This will help the child to fully develop and feel happier. If it is not possible to arrange a place for games on the street, then it can always be done right in the apartment. Do not forget to delight children, and they will definitely please you with their successes.
Moscow is a multi-family city in which everything is more difficult to find a cozy playground. But so I want the younger generation to play on the street with comfort. Therefore, sometimes there is no other way out, how to make a children's house with your own hands. Besides, it is very simple!
How to make a children's house with your own hands with a minimum effort and costs
For those who started large-scale country construction, there is no shortage of wooden pallets. They can be passed, getting for this a small remuneration, but you can put into the case. In addition to diverse furniture, pallets are perfectly suitable as a practically finished designer for a small house!
House of pallets - what is needed for this
In order for the construction to take place without delay, and small customers were satisfied, you should deliver the necessary materials in advance:

Also should not forget about the instrument. You can screw the screws as manually screwdriver, so and speed up the process of a screwdriver or a drill with a nozzle. Cut windows and doorways are more handy with an electrolovka, but a manual saw is suitable for inappropriate. And to be lost all the irregularities so that the kids do not wear the palm, we will succeed and the grinder with a grinding nozzle, and ordinary sandpaper.
How to collect a house in one day
It is best to paint a miniature house to the assembly, especially if painting is planned and from the inside. To do this, first the walls are collected first and the central jumpers with "cubes" are removed.

After that, the boards are grouped and painted. It is important to remove or cut all nails after dismantling the elements - after all it costs everything for children.
Also at the stage of the draft assembly (without fixing with self-draws), windows and the door are placed and cut. The door can not be done, limiting only three walls.
As soon as preparatory work Finished, you can start assembling:

It remains to put the chairs and the "program of affordable housing" performed!
Children's house, like framework construction

In addition, insteading the construction and making it at least 3x3 m, in the future such accommodation can be used as a guest.
Foundation for home

This will require a benzobur that can not be bought, but to rent. In the velocked holes, the pipes are installed and covered with sand. Concrete poured inside the pipes.

Even conventional metal rods can be used, and the lags on them to "ride" through the holes done by the pre-hole.
Assembling at home

If a warmed option is planned, it will have to do everything on technology - to fill in the bottom of the cranial bars, to drain the waterproofing, lay the insulation and only then sew the sexual board.

The lower strapping is fixed, racks in the corners are erected and fixed, and the vertical is checked by the level. Then the inner racks are put. The distance between them needs to be done the same. If the insulation laying is planned, then the distance must be 1-2 cm smaller than the mat's width - the insulation must be inserted tightly.
The top strapping of the frame, and the locations of the window and door openings amplified by jumpers. The dimensions of the openings should be thought out in advance, since their width will depend on the distance between the racks (minus 8 cm per box).

Given a small height, you can do it even personally. First, extreme rafters are installed and evaporated in terms of level, and then between them at an equal distance are all others. When the roof is insulated, the step of the rafter must correspond to the width of the insulation (for example, two mats can be placed between the rafters).

To simplify work with windows, the windowsill is placed before installing the frame. Children really like to sleep in the attic, so if the height allows, it is better to make an attic overlap, without forgetting about the window.


Interesting ideas of children's houses
If you want to do something beautiful and multifunctional, you can build a gaming house in the form of a gazebo. The kids will grow up, and the gazebo will remain. You can even make a full housing, with a slide and fire pole, as in the photo.

But much more joy to children will bring a personal house on the tree! It is also difficult to build it, but quite feasible with your own hands.
Simple trees on a tree
If there is an old tree on the cottage, the hand is not climbing, it is possible to turn it into a shelter for small "robinsons". For this, at the desired height around the barrel, a pre-assembled frame frame is placed and fixed.


Do not stick pillars to the ground. Even the antiseptic treated and bitumen, they quickly rotate.
Much more reliably make the foundation from concrete blocks laid on a sandy-gravel pillow. The blocks do the holes in which special anchors for timber are inserted.

This provides a solid compound of foundation and pillars.
Brussia along the entire length must be pre-impregnated with antiseptics that prevent rotting. But bitumen or rubberoid, laid between the anchor and the tree, will not help - the moisture will be flipped down the post down.
To build your children's house will be able to each. And for those who are not fully confident in their abilities, the whole construction process is presented in videos - from the foundation to the roof!
Children really like to play, building your house out of boxes, stools, sofa pillows, blankets. Industry suggests various options Houses made of plastic, wood, plywood. They are performed with a device slide, stairs, windows, doors, swings, sports field, fences (photo 1,2,3,4,5). An interesting design decision is a children's house equipped with a tree (f. 6.7). Children's huts can be calculated on the installation indoors (f. 8) or in nature (f. 9). Dominics for children made in industrial conditions have beauty, functionality, exclusivity, security. They have a lot of advantages and one disadvantage - a high price. The financial problem can be solved by an alternative way: to build a children's hut personally, taking into account its conditions and desires for your child.
Ideas
On the Internet, there are many ideas for the production of children's houses from the tree with their own hands of different sizes, types, projects. Hut from a tree for children's games can be with:
- door or without it;
- 1st, 2, 3, 4, 4, 5 and more windows or openings;
- slide;
- sports complex;
- terrace, fence;
- closed, open, semi-closed form;
- staircase, several floors;
- interesting architecture;
- large and small sizes.
(photo 10, 11, 11a, 11b)
 Photo 1-5 - Options for simple single-type houses 160x160
  Photo 6-9 Warmhouses for the street and premises
  Photo 10-11 - Game houses of different sizes
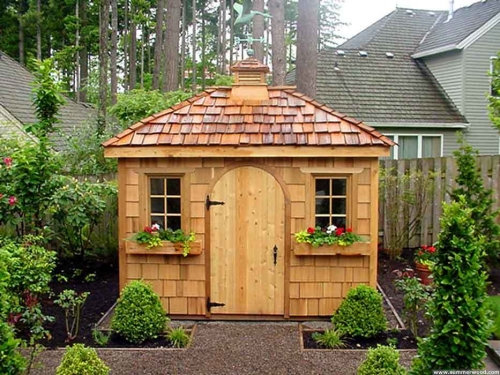
  Photo 12 - Options for simple game zones
Materials
Try to build a children's house made of wood with your own hands with lengths / width / height of 160/160/140 cm and the height of the skate 90 cm, as in photo 12. It is simple in the manufacture and selection of material and consists of:
- 4 blocks for the foundation;
- 11 genital boards with a length of 1.6 m;
- 4 bars for the foundation;
- 6 roofing bars for rafter "legs";
- 4 bars for the cutting of the frame;
- lumber for riggers, tightening, jumpers;
- cutting board for a framework of a frame;
- calcaris with carved execution.
For assembly, you will need nails, screws, fasteners. You can cover the building for children's games on Ondulin.
Attention: To protect children from the Russian Academy of Sciences and the regionalolation, you need to buy fugged building materials, create chamders on the corners. When installing the structure, it is necessary to inspect each board, an army as needed. If there is a bitch in the board, which can over time fall, it is better to put such a workpiece from above, where the baby's hand will not be caught.
 Photo 13-18 - Step-by-step manufacture Children's house made of wood, part 1
  Photo 19-24 - Step-by-step making of a children's house made of wood, part 2
  Photo 25 - Playground do-it-yourself with the use of artistic wood thread
  Photo 26 - House for children's games with their own hands
Making a children's house from a tree with their own hands
Create a drawing of the future house based on the recommendations.
1. First you need to prepare the site, align it. The finished teremok weighs a little, because it will not need a full fundament. But in order to ensure the stability and durability of the structure, it is necessary to put concrete blocks in the corners, processes the recess in the ground to one shone shovel. The blocks are placed on a sandy pillow (f. 13). Of the 4-wooden bars, a square is made 160x160 cm (F.14). In the corners, it is strengthened by fasteners. With the help of the same corners, you need to install the jumper in the middle (F.15).
2. Floor board is laid on the frame with a length of 1.6 m. It will take 11 segments with a width of 16 cm. It turns out a ready-made frame frame (F.16). It needs to be treated with an inside with a special mastic from rotting and pests (f. 17). Then the finished frame should be put on the foundation blocks, paving between the concrete and the woodproofing layer of the rubberoid.
3. Next is made framework of walls, taking into account doors and windows. The design is enhanced by fastening corners (photo 18). Separately manufactures rafters (F.19). For our hut, there will be 3rd rafters (F.20). They are installed as in an ordinary house. But the skin on both sides of the skate is made close, but on the sides - with a small step (f. 21.22). Next, the roof is crumbling ondulin - inexpensive and light roofing materials.
4. The walls of the walls are carried out by clapboard. For elegacity, doorways and windows are decorated with carved platbands. Smooth curly corners will give the hut beautiful view And they will guarantee the safety of children. With facade oil paint. Different color your hut for children will be a part of the fabulous children's world (F.23).
5. Stationary shops can be made for different games in the house. They are usually installed near the walls. In such a hut, it will not be superfluous to be a small portable table, others are not bulky items (F.24).
Which of us in childhood did not want to have your own gaming house? Remember all these "headquarters" in the bushes, chalashes from chairs and blankets? And a children's house on a tree, peeped in foreign films and seemingly the limit of dreams? Today the range of stores is replete with various models capable of making such a dream with reality. Well, if the purchase of a finished house does not afford you, you can always make a children's house with your own hands, creating your own individual corner for the game for a child.
Beautiful house for children
- Private house owners or cottage plot Can create a children's house on the street.
- Well-made models performed from whole logs.
- The original version for boys is a ship in the form of a ship.
- Dream of childhood - a game house on a tree.
- In the apartment, too, you can equip a children's house, while you can use more affordable MaterialThan for the street - cardboard, fabric.
Painted small house
Why do you need a children's house
Such seemingly a simple gaming element actually brings a child a lot of benefit.
- Personal space of a child. Here you can retire, keep your secrets, get used to the presence of your "Comfort Zone". It adds confidence to children.
- Space for role-playing models (remember everyone known "mother's daughters"?). Psychologists insist that such entertainment is important for the formation of personality and awareness of social roles.
- The original way to teach a child to order. Clean the apartment - boring. But to clean in your own house - another thing. This is the vacancy of a useful habit - from a smaller to more.
- IN one-room apartment This is an excellent way to provide your child with its territory.
- Decorating such a house helps to develop a feeling of taste. So, be sure to connect the child to the setting process. And it is better to trust it with children.
Course Massif
The advantages of creating a children's house do it yourself
- Saving. Finished houses are very expensive. Creating with your own hands allows not only to please the child, but also take care of the family budget.
- Reliability of materials. You know what you work with, and you can be confident in the environmental and safety of the selected materials.
- Confidence in the strength of the design. In the case of a children's house, the degree of reliability of fasteners plays a key role in child safety. Only making it yourself, you can be sure that it will endure any children's games.
- Choice optimal design and sizes. When the house is done personally, you have the opportunity to immediately make it in the right style and with the desired size.
Little house for children
We start planning
Look at once again the estimate and drawing. Count how much time and money will require your undertaking. If necessary, make edits. Remember: this repair in the corridor can be postponed from year to year. But the unfinished gaming house will be a strong chagrin for children.
Little house in the room
We choose the material
Children's houses are made of wood, cardboard or tissue.
The tree is the best option for gaming houses on the street. It is durable, allows you to create structures various design, environmentally friendly and aesthetically attractive.
Frame of children's game house
Cardboard and fabric - good options For apartments, where the mobility of the design plays a big role. It is possible that sometimes a house can simply interfere with the walls of the apartment, and the fabric and cardboard can make it easily disassembled or even folding.
House for games
We choose the design - from simple to complex
Log house
This design is not only complex in the assembly, but also requires serious investments, because wooden log It is not cheap. But from a visual point of view, this option is flawless. If the tools allow - to beat the child a fabulous house.
Little house for children games
Go to construction
Consider the process of creating a children's house with your own hands on the example of a construction of a bar. To begin with, we are determined with the drawing. When the selection of the design is over, proceed to the purchase of materials.
We will need the following materials:
Little house for a doubl
For a start, we collect the frame from BRUSEV according to the drawings. Next, get the resulting frame of boards. Important detail: minimal thickness The boards is 2 cm. Thinner options will give too shaky and unsafe design.
Children's game house do it yourself
A roof frame is created and the house itself is installed. After that, the roof coating is performed (depending on the material selected). We recommend Ondulin as Safe and Durable.
To improve security, the house after the assembly is better covered with varnish or paint.
Small house
A few words about communications
Yet the game house is not a full housing. And communicate to it will be superfluous. Water is better to give a child in separate containers, smoothly for the game. And electricity in the children's house is not safe. It is better to choose lamps on batteries, or give the child a table lamp.
Bright children's house do it yourself
Special attention should be paid to fire safety, especially if the game lodge is made of wood. Be sure to treat all the wooden surfaces with special flame retardant colors or even close siding.
Small house
Finishing Stage - Interior Design
Again, remember that the house is designed for games, and not to stay. Accordingly, the requirements for the setting of him others. There are no closets for clothes or other bulky furniture. They will only overload space by staring at the child a place to play. Equip the house simple benches Along the walls - so your child will be able to accommodate in it, and friends come to him. To avoid falling furniture, it is better to immediately mount it in the floor. From mobile options, add soft knitted baffies or a pear chair if the size of the house allows. Also an excellent option for a game house - hammock.
Wooden house for children
Children are usually played on the floor, so the table in the house is not required. But soft bedspreads for the floor will not interfere.
Remember that order in any room, including the game, directly depends on the presence of elements capable of organizing this order. Want to have a toy in his house in his house? So, provide it with boxes or boxes for storing such toys. You can install the real chest in the house. With him, the process of collecting toys will become more fun and more pleasant.
Big Castle
Of the functional items in the house will also successfully look at the easel or chandelts. To create in its corner - solid pleasure, and the child will certainly appreciate this opportunity.
The house for the girl from the inside can be equipped with a toy kitchen. Little princesses will undoubtedly appreciate this approach and the opportunity to play in mom.
Children's house for children
Do not save on the external decoration. Add carved elements to the house - shutters, balusters, railing. Install the bright vane or even flag on the roof. If the house is high - attach a rope staircase or rope. All this will make a house not only more attractive, but more interesting for games.
Children's house for games
Let's summarize
Children's house is a whole bridgehead for their own hands. If there are even minimal carpent data, you can create something for a child, unique, give him a game space and a place for development. For whatever models you do not stop the look in the end - try to attract construction and children to the process. So you will give them love for physical work, crafts, creativity, teach them by dedication, develop their creative opportunities.
Children's house with a fence
The house created by the hands of the parents will be a daily reminder of your feelings and an undoubted member of daily children's games. And finally, the creation of a children's house personally is the ability to realize dreams not only to their son or daughters, but also their own dreams of childhood. Create a child a house bigger and no doubt, you also have a place.
Ready to paint a children's house
Video: Build a children's house do it yourself
50 Photo of the ideas of the design of a children's house:


