The bas-relief on the wall is the best ideas when designing a design and a modern sculpture (115 photos). Bas-relief on the wall - Stylish interior decoration
His house wants to make beautiful and original. The most reliable way is unique homemade decorations. One of the very interesting ways - Bas-relief on the wall. This is a three-dimensional image of a plaster or any other similar material. Gypsum in pure form is used very rarely - it freezes too quickly without giving time to processing. Most often use gypsum plaster mixes. They go with additives that facilitate work. With them, you can make a bulk wall panel with your own hands even without experience.
Total Bas Account Creation Technology
To make a bas-relief on the wall, it is necessary to prepare it to start it: clean, align. Already on a flat and completely dry surface, you can start working. When you are going to make large bas-reliefs, it is advisable to climb the wall - for a better clutch of the composition with the wall.
Bas-relief on the wall can be of varying degrees of complexity. This is complicated. For beginners is clearly unasamed. But you know what can be done in perspective
For first experience, it is better to start with small products - type of medallions (round or square) with simple embossed images. As the basis for such products, it is best to take moisture-resistant. Under it can make a frame (from the profile, for example). In this form, the bulk composition can be outweigh from place to place. It is easier to master the basics of technology.

This is all the technology in general terms. There are nuances on which it is worth stopping separately. The first concerns applying the starting layer of putty on the walls and transfer of the pattern. In more complex compositions, the bas-relief on the wall begins with the transfer of contours of the drawing. Do it with a pencil or chalk (if you know how to draw) or using the image printed in the desired size and the copier-plated software. Then those places on which we will apply putty are covered with soil (for better clutch), and then with the help of mastehins (small spatulas of different forms) we apply the first layer of material. Next, the sequence of actions is similar to the described.
Materials for creating bas-relief
The most common question among beginners: What putty is better to take for the manufacture of bas-relief? In principle, come on any finish gypsum spacure. Each wizard has its favorite brands and compositions. Here are a few that can be recommended:
- Knauf Uniflot. Very durable and plastic. From it you can form a deep relief - not fall off and without reinforcement. Failure: dear.
- Fugeen. Slightly less durable, it cuts a little worse. Much cheaper than Knauf Uniflot (almost three times). You can also make a relief without any problems.
- Pufas. This is a gypsum putty with cellulose fiber. Processing time - about 60 minutes, it is applied to a layer of any thickness, it is well cut, it is easily grinding.
- "Rotband" for the lower layers and the "tilt" for the upper.
- "Acryl Putz" (Poland). Finished acrylic putty. It is good because he is slowly "grasped", to study the parts of the hour and more (depends on the humidity in the room).
In addition, impregnation is needed. They are selected based on the starting characteristics of the material. There are compounds that strengthen the hearty materials, penetrating deep and binding particles of materials with each other. This is necessary, since the panel of gypsum weigh decently, create an additional load. Without prior preparation, they can fall off from fragile grounds. You can use the moisture-proof soil concentrate firm PUFAS. It is suitable for everyone mineral grounds, Including wood and wood plates. Aquastop moisture protection is suitable for bulk grounds.

In addition, these compositions are used:
- before starting work - to improve the clutch with the wall material (or base);
- for layer-by-layer processing - when creating a deep relief, when one layer of putty is applied to the already dried, imposed earlier;
- for finishing impregnation before painting - for leveling absorbing ability and that the paint lay down exactly, emphasizing the relief, and without being upgraded.
For layer-by-layer processing, primers are needed, which create an adhesive surface on the surface. In this case, you can put a new layer of putty even on the surface of the surface. For these purposes, the minor of the deep penetration of Ceresit and the impregnating PUFAS soil is suitable. They can also be used for finishing processing before painting.
Instruments
The tools for creating a bas-relief are needed for two types of work - for applying putty and to remove / cut off the extension solution. Therefore, the set of tools and fixtures is quite extensive. To apply putty or decorative paints, use:

These are all tools that may be needed. From the necessary: \u200b\u200bKelma, spatula, chisels. Mastichens are very comfortable, it is difficult without scalpels and a confectionery syringe. But stacks are a tool for perfectionists - for accurate improvement of the relief.
Making a bas-relief from plaster plaster: photo report
For the embossed picture on the wall, a maritime theme was chosen - with fish, octopus, algae. Great option for obtaining first experience! A light pattern that can be formulated gradually.

Preparatory work
The drawing with a pencil is transferred to a pre-aligned and projected surface. For the manufacture of a bas-relief, a gypsum stucco stitching / Sheetrock (with a smaller stamp) is used. During the dilution of the solution, a smaller amount of water is added: to take 0.5 liters of water to a kilogram of the mixture (instead of 0.6 on the recommendation). With such a kneel, the composition is harsh, but it is so better for making a relief image on the wall.

Immediately knead a small amount of solution: the gypsum plaster quickly loses elasticity (15-17 minutes) and you need to have all the volume not only to lay out on the wall, but also align and give the desired outlines. For the first time, knead grams of 300-400, lay out, attach some form. If in the process you will feel that you can cope with a large volume, knead more.

Little way, masticine is laid out the solution, filling the contour of algae, cut off excess, as far as possible
With such tactics - small portions of the solution - most of the time takes exactly to knead the putty. It is better to knead in the dishes with high boards - a bucket or a saucepan. However, of them, the frozen solution is hard to delete. If there is an old ball in the house, you can cut up the top and knead the putty in it. Even small particles are easily removed from such a container.
Put powder into the container, add clean cold water, quickly mix with a spatula, then bring the composition until uniformity, leave for 5 minutes, then mix again. There must be homogeneous thick pasta No lumps or heterogeneities. Exposure time and "setting" is indicated on packing with putty, if you use another composition, follow the manufacturer's recommendations.
Formation of small details
To begin with, it is easier to start with a shallow relief. When forming small parts, we take a small amount of solution on the celma, we apply to the desired place, trying to swing well to the clutch of the solution with the wall is good. If the wall is covered with a primer that improves the clutch (the surface is slightly rough and lipgy to the touch), there will be no problems. If the details are very small - such as the suckling of jellyfish - it is more convenient to put a masticine solution.

The bas-relief jellyfish from gypsum or acrylic putty make a slightly harder ...
Having a mixed portion of the solution on the wall, immediately proceed to equalizing and forming the relief. We work the edge of the Kelma, masticines, knives, rocks, scalpels - to all that is at hand and that can give the desired shape surface. If during the process it is already dried, but not yet modified, it can be mixed out of the sprayer and try to refine in a few minutes. When you achieve the desired degree of perfection, clean the tank for the knead from the residue and knead the new portion. Note: capacity should be absolutely clean. The slightest particles will leave scratches.
We form the main reliefs
In the manufacture of a bas-relief, which will be outside the wall will be no more than 2 cm, no reinforcing structures are required. With a greater thickness, in those places where the layer is planned 2 cm, screws are screwed. On them it will be possible to navigate when applying plaster, they will support the solution, without letting it crawl.

Fish and sink have a larger volume - in some places more than 2 cm. Here they screw the screws for reinforcement
In this bas-relief, the most speakers are fish and sink with pearls. In those places where a thick layer will be laid and screw the screws. Pearl roll separately, having blinded the ball and putting it on the self-tapping screw.

The thickest place is head
In places where the relief is assumed to be deep, it is possible to apply a solution at no one, but in several layers. At the same time, it is completely optional to smooth out. The more uneven the surface it turns out, the easier it will impose the following layer. When the required volume is achieved on a certain site (for example, a fish head), we begin work on small details - eyes, mustache, gills, etc.
When elapping small parts, not over 100-200 grams of solution - while cut, align, the solution is seized, therefore large portions are simply not needed.

After the drawing from the putty on the wall is ready, it is left for a couple of days until complete drying. Then you can start grinding - we take sandy paper with an average grain, process, achieving the desired smoothness. When the relief is ready, it is re-made fine-grained emery.

Two days and more, may dry elements with deep relief. Smaller - algae, waves, jellyfish - dry faster. With them and you can start. While they will bring them to mind, dry and thicker details. After the grinding is completely over, we remove dust with a thick brush. If desired, you can spend pressure. Next, covering decorative panel From the plaster in the primer of deep penetration.

The last step of making a bas-relief on the wall - painting. The way of color everyone chooses himself. In this case, an ordinary water-emulsion was used (the primer was under the paint on water based). This can be considered that you made a bas-relief on the wall with your own hands. In this case, a large composition was obtained on two free adjacent walls.
One advice: the bas-relief on the wall looks better with specially designed illumination. So before leveling the wall, output the ends. After aligning and driving the surface, install those lamps with those lamps that will further highlight the embossed pattern. So with this light it will be necessary to grind the made you volumetric panel From the plastering mixture. Only in this case it will look good. Because if you work with a different lighting, when installing regular luminaires, you can detect a "nightmare and horror".
Bas-relief on the wall: photo ideas
Without experience, it is very difficult to understand what and how can be done using conventional plaster plaster. In fact, the volumetric paintings from the gypsum can be the most different themes, but the most common - flowers, trees and landscapes (urban, country). In this section, we collected a certain amount of the most diverse bas-reliefs on the wall. With their help, you can imagine the topic for art modeling on the walls. In fact, the process is similar to work with plasticine. 


When watching TV shows or videos, many admires an unusual stucco, adorning the walls of the most different rooms. Today, man-made bas-reliefs are no longer limited to the luxury category, and they can be found not only in historic buildings, theaters and chic mansions. Most apartments and private house owners successfully use this decor element in their own interiors.
Surface preparation - knead the solution and replenish the background
Any residential premises need individuality. In this regard, the bas-reliefs made by their own hands are distinguished by indisputable advantage: their sizes and shapes are not limited, the materials for their manufacture are sold in any construction store for a quite affordable price, and their manufacturer is a creative and very entertaining process.
First of all, choose the wall of the wall that we will decorate. Pay attention to its illumination, whether it will be natural light from the window or need an artificial illumination, because it is the game of light and shadow visually increase the volume and emphasize the texture of the image.
Now pick up sketches and determine the size of the image. Of course, the scene from the hunt or reproduction of famous Mikelangelo's webs in your living room would look great, but you can hardly get them into reality, so it's worth starting with small elements that include plant ornaments, geometric shapes, and even easier some Abstraction details.
To work, we will need:
- Latex gloves;
- Trowel;
- Putty knife;
- Wide flat brush;
- Palette knife;
- Food film.
Before starting work, the surface is sure to: remove the old coating from the wall site, align, if necessary, plastered and necessarily coated with a layer of primer for better clutch of materials. The wall is left until complete drying.
Made stucco from clay, alabastra, gypsum or plaster mixtures based on it. The recipe for the preparation of a gypsum solution is 1.5 kg of gypsum per 1 liter of water. For plasticity, a little PVA glue is added to it and everything is carefully mixed. From the resulting soft "test" it is easy to form a future bas-relief, and it should be started from the main background. This is usually surfaces with some texture. For example, several random brush strokes on a wet plaster or the motion of the painting roller will leave the original traces.
A good background for bas-relief will be, imitation of brick or stone masonry, small "sandy" pattern, left by a conventional sponge or the textured surface of deliberately coarse shockting. In case the bas-relief is not planned in the form of a panel, but as a separate protruding element, then the wall around it must be pre-cracking with painting tape to protect it from contamination.
Start to buy - create a sketch and give the volume
When our sculptural "canvas" is ready, you can carry the main drawing on it. In this case, a solution is needed, namely, 1 liter of water now take 2 kg of plaster. The finished mixture should not be disseminated by hand and to keep the form given to it.
In the stucco, the easiest to start with plant elements. Planning a grape vine, you need to place the location of the branch, the leaves on it and a large berry brush. Whether this image of a flower, a silhouette of a tree or part of the architectural column - is important to observe the scale of all elements of the image relative to each other. If you do not know how to draw, you can use trained stencils or make a drawing sketch on a transparent film by copying it, for example, from the monitor screen. To draw a tree, it is only worth highlighting a flashlight with a flashlight and the shadow obtained on the wall on the contour.
Next, we turn to the most complex and responsible stage - drawn out the sketch give volume. The mixture, which is designed for stucco, should be very plastic and do not harde it quickly, as it should be applied in several stages, giving each layer to dry. Given this, it is better to prepare small portions of the solution and immediately use them.
If it is assumed that the bas-reliefs from gypsum and putty will be voluminous, then their most speakers are recommended to additionally reinforce, screwing into the wall of the self-tapping screw or consolidating the usual gypsum bandage on it. Separate bulk figures can be created using cardboard and foam blanks, which are attached to the wall and are coated with a mixture.
It is possible to give the texture to plant elements using their natural analogs with a clear drawing of the residences - tightly attach to a mixture of grapes, maple or even liked indoor plant, Remove the spatula or ordinary knife surplus the shnotka around, forming a clear edge. Leave an item for several hours to dry and remove the remains of the leaves.
For similar "prints" or as a decorative element of the bas-relief, you can use other healthy items: burlap, shells, decorative stones and etc.
The convex parts can also be pulled out from the gypsum using the prepared shape of plasticine and liquid gypsum solution. Elements such as berries, protruding flower petals or tree branch, are best cut out by hand from alabaster (the solution is prepared, following the instructions on the package), and then attach to the wall, firmly pressing and failing on all sides.
"Free" Plaster - a simple method for obtaining decorative elements
Simple I. available way obtaining volumetric parts - "free" drying. It is usually used to create compositions from suiterate patterns created from paper wipes impregnated with plaster, as well as for forming floral and vegetable bas-reliefs. This method is available even for beginners, it is only worth choosing the materials and harmoniously combine them.
For the "free" drying, the architectural gypsum is best suited from which the liquid solution is prepared. For stirring, you can use a building or a conventional kitchen mixer or perform it with your hands. So, by 1 kg of gypsum take 0.7 liters of water. In order not to form lumps, it is the dry material that is added to the water, and not vice versa, and it is better gradually, in small portions, after mixing it thoroughly. In order for the solution to be more plastic, and the finished bas-reliefs did not crack, it is recommended to add a little PVA glue diluted with water. In the final version, the solution should be homogeneous and consistency to be close to liquid sour cream.
This composition dip the sprigs of plants, buds, elastic inflorescences of living or artificial colors, and also impregnate paper napkins. The resulting workpiece is laid on a flat surface, shining polyethylene filmAnd leave to dry. Flowers and paper elements need to be laid as they will be recorded in the interior. This will make it possible to form a flat base on every detail, which will then be attached to the wall. After a complete drying (not less than a day), the workpiece is again dip in the gypsum mixture and again lay in the same position for drying. Repeat such a procedure until the elements are formed by a layer of plaster in 1.5 mm thick.

Ready parts are attached to the wall using thick acrylic plaster or PVA glue. To finally fasten the finished composition and give it a monolithic appearance, the whole relief with the help of the brush is deceived by a thick plaster solution, paying particular attention to the places of connection of attached elements. You can learn the basics of sculptural craft today, just sitting at the monitor screen. In the network it is easy to find a suitable master class, with success to master the first lessons, and over time to take and for the paintings.
The best material for such a modeling is the gypsum mixture based on PVA glue. The weight should be elastic and thick, like soft plasticine. Now you can remember your kindergarten experience and try to make a cherry, flower or even a bee. No need to be upset if the subject of art did not work. You can use ready-made forms - to buy in the store for creativity or take a silicone form for baking or ordinary figures from the children's sandbox. In this case, the gypsum mixture of dense of sour cream is poured into the prepared form and leave until solidification. The resulting model is removed and glued onto the wall in a certain place of the composition.
Finishing - clean, paint, protect against moisture
At the end of the work, all the roughness should be smoothed on the resulting panel. To do this, it is best to use a small piece of fine-grained emery paper. Act neatly without excess pressure so as not to destroy the necessary texture elements. Sometimes after such treatment, other disadvantages appear - small cracks, irregularities or small holes, remaining from air bubbles. Now is the time to finally lift and fill.
The finished bas-relief on the wall is thoroughly cleaned from plaster dust and crumbs and necessarily processed by primer. Now you can proceed to decorative finish Images. Most often for this use acrylic paints and satellites. Drain the bas-relief in different colors, apply restrained two-color halftones or stop at a nine white color - to solve you, it all depends on the stylistic version of the panel and, of course, from your desire.
And at the end of the stucco, a protective coating of the type of hydropobizator, acrylic wax or varnish is applied. Especially important is such protection for bas-reliefs in the premises with high humidity, for example, in kitchens, in bathrooms, unheated corridors.
Colorful bas-reliefs - volumetric patterns - you can easily be seen on the walls and ceilings of private houses and apartments. The cost of handmade on the modeling and painting of the sculptural panel is too high and the master services are not available to everyone. Therefore, an ordinary homeowner who wants to decorate the dwelling in this way, nothing remains except to make a bas-relief on the wall with their own hands. But since not all people are endowed with artistic abilities, we suggest considering simplified techniques to create such images.
Cast stucco in forms
To extend the bas-relief scenery on the entire wall, shown below in the photo, you need to have drawing skills, because its contour is first applied to the surface. If you are talented in another area, then the output is simple: make silicone molds, cast plaster decorations in them and stick onto the walls.
Reference. Of course, you can go easier: buy at an affordable price decorative elements Molding made from modern materials - polyurethane or foamflast. But much more attractive and more pleasant to create an individual pattern to your taste, suitable for room design.

The task number one is the manufacture of a volumetric prototype - counter-relief, the basics for the future form. As a rule, various flowers, grape vines and other elements of nature, which are equally good in any room - the kitchen, a bedroom or living room are acting on the walls of the landscape. The prototype of the picture you like can be made in such ways:
- cut out of plasticine or clay;
- cut out of wood;
- to transfer the contours of the paper on paper and give them a relief using plaster plaster, as shown on the video at the end of the section:
- finally, apply ready-made convex images and figures.

This looks like a silicone form.
Note. You can attract all family members, including a child who knows how to handle the plasticine well.
Now it is necessary to purchase silicone with a catalyst of hardening, whose number depends on the size of the resulting sculpture, and continue to act on such instructions:
- Make a pouring bath, whose side is above the prototype by 1 cm. The simplest option is to lay counter-relief on the glass and cut around plasticine sides.
- Mix silicone with a catalyst in proportions indicated on the package. To control the quality of the mixing, a slightly food dye can add to the solution. Fill it into the bath.
- After waiting for the frozen, remove the silicone shape and remove the circles around the edges.
- Prepare a solution of gypsum or alabastra (consistency - as in liquid sour cream) and fill in the recess in the form, protruding the spatula. Give 10-15 minutes to clarify.
- Remove the finished bas-relief, process its edges and stick to the wall, ceiling or home fireplace.

Pouring prototype with silicone solution
Council. If your pattern is thin and extracted shape, after filling the gypsum, gently laid along the entire length of 1-2 trimming steel wire for strength.
As a bas-relief with your own hands is cast from plaster, demonstrated on video:
Application Relief Image - Master Class
If you have everything in order with drawing and there is a desire to become a novice sculptor, then for the application of the bas-relief does not necessarily do molds. Create a volumetric pattern from colors directly on the wall using such technology:
- Clean and align the wall surface. Treat its deep penetration with the primer and lift 30 minutes until it dry.
- Prepare plaster plaster and apply it with a uniform layer with a thickness of 3-4 mm. It is not necessary to make a surface smooth.
- Using a simple tool - plastic spoon, spatula and trowel, perform the desired drawing. Below in the photo depicts an example - an ornament from blossomed roses.
- When the plaster is freezing, carefully remove the protruding edges of the petals of the resulting petals. If necessary, work out the drawing by the stationery knife.
- Cover the bas-relief of the primer. So that there are no passages, it is recommended to add a little dye into it.

Figure is formed by a conventional spoon
Note. Figure, apply the skylight, not leaving an empty place. The dimensions of the elements do not play the role and can be different, the main thing is that in general the picture looked good.

At the end of the finished bas-relief remains painting with a brush - Maclith. The ends of the petals can be tinted with a different color with a wide flat tassel, as shown in the master class on the video:
Create a full-fledged bas-relief
This is the most difficult technique requiring not only the skills to draw, but also some skills in the imposition of textural plaster. It is necessary to start work from choosing a picture and places on the wall where it will be applied in a surround form. It is necessary to correctly assess the lighting of the site, as the bas-relief looks great in the interior due to the game of light and shadow. If it is not possible to easily choose a place, then make a picture on any wall, but later install 2-3 lamp over it, as implemented in the photo.

Council. When you embed a large embossed pattern, the master is close to the surface and can not see how the entire picture changes in the process. Therefore, for a beginner sculptor, it is important to learn how to assess the correctness of actions and it is more often for the result of your works by the part.

Use the following technique to create a bas-relief:
- Transfer the contours of the selected pattern to the surface of the wall. There are 2 ways: just draw them with a pencil or copy to a transparent film. The latter is applied to the wall where the thin layer of putty or Marseille wax has already been applied, and the outline is extruded on the lines slightly pointed item.
- Press the pattern volume by imposing on the surface of plaster plaster (consistency - thick). This needs to be done in several layers and without a rush, forming the outlines of each detail with a spatula or another convenient tool.
- Since the solution works for a long time (about 3 hours), give the bas-relief clarity, removing excess plaster with a stationery knife or a narrow spatula. If you removed too much, then adjust the finish putty.
- After solidifying the convex image, remove the remaining sharp edges and clean the pattern with sandpaper.

Council. Do not use solutions of pure gypsum and alabastra, they freeze too quickly and do not allow you to adjust the details of the pattern. Do not forget to prepare the surface of the wall - align and cover the primer.
When the bas-relief is ready, it can be painted in the desired color (usually white) or to paint, creating a real picture. How the master does, shown in the video:
Conclusion
Independent creation of bas-relief is not easy. Follow patience and time, and in the process of work, observe accuracy. Without experience, it is not necessary to immediately take on the big image, first practice and apply a small 3D pattern on a skip or other smooth surface. This will make it possible to understand the nuances of the formation of small parts and master the solid technique.
The bas-relief is the type of sculptural decoration of the premises and structures in the form of a convex to half the volume above the plane of the convex image. It is performed from suitable for thread, modeling or casting in the forms of materials (decorative plaster, alabaster, polystyrene, clay, wood). It is used as an element of design design, for architectural decor (design frieze, pylons, consignments, fountains, capitals, facades).
Bas-relief on the wall of plaster, putty, other material can be a storyline or abstract, made in a classic, antique, modern or other style. A branched tree, baguette, a flower of plaster on the wall will become a win-win solution, will add harmony, liveliness, coloring even the most unpretentious, "modest" interior. Inaccessible in a wide range in the past due to the high cost today, colorful or monophonic protruding images have become achievable for anyone who wants. Among the variety of possible options for decorating premises Gypsum pictures in last years Steel super popular and occupied advanced positions.
Such a drawing will perfectly decorate the wallStep-by-step production of the volumetric etude
By asking the question, how to make bas-reliefs on the wall with their own hands, nonspecialists mistakenly believe that the master sticks to the plane produced by an industrial method of a piece of gypsum miniatures. Creating a bas-relief is the process of artistic modeling of plaster (other materials) directly on the wall with their own hands (master) or technique for the production of blanks, free drying, by another method of parts of the future picture, with the subsequent glue of the "tiles" or parts of the thumbnail.
The procedure for implementing the bas-relief on the wall

Each bas-relief is unique and individual. Even the master with experience is impossible to create two identical etudes even for one drawing.
 Each drawing itself is unique, it is impossible to repeat it.
 What is needed for making miniatures from alabaster
Bas-relief on the wall of plaster can be done with their own hands. To implement the project, the following minimum skill is required:
painting;
preparation of solutions;
production of stencils;
creating wire structures.
 To create such a drawing will require experience and knowledge in the field of construction
 The formation of the bas-relief requires knowledge of mixtures properties (time of setting, the ability to add dyes, determining the optimal density of the solution for different works) of which the image will be performed. It should be borne in mind that when working with a layer of 10 or more millimeters, it is necessary to make an axle from the wire that prevents cracking of the gypsum.
 What would not turn to the master, you can use the taming forms
 To perform:
drawing (in natural sizes);
a pair of round + as many flat painting brushes, a thin carsion bruster (children's) for drawing;
graphite pencil, feltaster or marker;
malyary Scotch;
stencils required thickness;
capacity for breeding kneading;
special tools for creating reliefs (masticines);
materials from which the matrix will be made (for example, silicone) and the mixture for the bas-relief;
paints, kel (colored bas-reliefs);
confectionery (for thick lines) or medical syringe (for clearance of the finest streaks);
sustainable reliable forests (goats).
With the help of loops, stacks, cutters remove excess solutions, line the edges, create separate elements, give it details layer on the layer the necessary forms. When creating a bas-relief on the wall with your own hands, the tools are dipped into water to remove balances to avoid the appearance of drowshes and other unwanted contaminants. At the end of work, all tools are clean. The syringe disassembles, cleaned, dried.
 All work should be carried out carefully and on recommendations
 Step-by-step leadership of the implementation of the Etude "Vine"
Consider how to form a bas-relief on the wall with your own hands on the example of the production of the image of a grape vine with a cluster, curly sheets. Work is performed by execution method different parts From alabastern mixture, followed by their fixing on the wall. Berries and leaflets are molded in the forms, the vessels stem and the mustache are drawn manually. In the production of large heavy parts, use for reinforcement and facilitate fastening on the wall of the wire of the wire.
The first stage of creating a surround bas-relief with their own hands on the wall is the performance of the composition in full size and transferring the outlines to the place of the future picture. Sketches are transferred by drawing along the film (performed by the marker). On the prepared wall apply the basis of a thin layer. Polyethylene canvas are placed in the required space and secure, sketch contours are driven. The sample is removed, and the outlination remains on the surface. The contours are also transferred to a dry plane. In this case, after fixing the film, the edge is rising from above, and the lines are drawn by a conventional stylist pencil.
 First you need to draw a drawing sketch
The second execution point of the bas-relief is the manufacture of a form for leaves and grape berries. Consider the execution of the matrix of sealant with filler (talc / starch). The filler is poured onto the board and kneaded with a sealant as ordinary dough. The subject of the corresponding figure (oval or ball) and the size is pressed into the resulting material. After soaring silicone, the sample is removed. It turns out a matrix for the formation of berries. For leaflets, you can use the factory silicone / polyurethane matrix, or make a template independently specified in the manner. Sample shape of leaflets for bas-reliefs are made of plasticine or salted dough.
 For leaves and berries you can make forms
The third time is the stirring of the composition and casting of individual gypsum elements. For the pouring, a solution is made from one part of the water and two parts of the gypsum. Water is taken room temperature. Other ingredients (sand, plaster, etc.) when the composition of the composition of alabaster for bas-relief is not used. Dry gypsum powder is gradually added to water at a constant moderate stirring (to avoid the formation of lumps). It is not recommended to intensively interfere with the solution. The mixture will enricts oxygen, and the part will turn out with air bubbles. Products are extracted after the final pouring of the gypsum.
 With the help of refrigerated forms you can make a very beautiful drawing
The fourth stage is to prepare the plane and gluing separate elements on the bas-relief. The plane is covered with stengips or acrylic putty, then reeded by the selected manner. Berries and leaflets are attached with gluing (indulging) ready-made parts specified on the sketch. For fastening heavy elements, wire (steel) with a diameter of 2-3 mm is used.
The fifth step is to perform the stem and mustaches. Performed on the bas-relief syringe for decorating cakes. Particularly thin lines are performed by a medical syringe without a needle.
 Leaves and berries can be made with a syringe for cakes or ordinary
Last item - finish finish Baself. Coloring is performed by specialized paints for stucco (thin halftone is obtained by decisive). Bright accents In the bas-relief execute acrylic paints. Then it is made by covering the pictures previously specified.
Bird, butterfly on the wall at the bunches or leaf diversified and decorate the etude, give him individuality and a special charm. If the thumbnail is made from individual parts, all the points of the connection are neatly closed, smoothed and stitched to obtain the effect of a single web.
 At the end of the drawing need to be treated with protective equipment
 Modeling on the walls by stencil
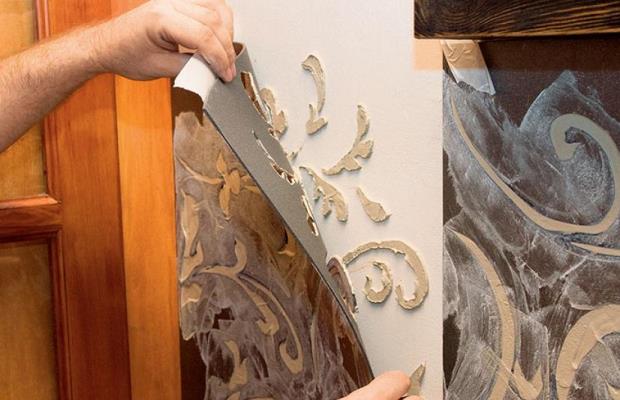
If you need to create a bas-relief with a repeated fragment (for example, flower, curl, sheet) simple method There will be work with stencils. With such an art finishing of the premises will cope with any. Even the one who never knew how to draw, constructs a unique artistic smearing without much effort and special skills. The pattern is printed on the usual printer. The template is made on a suitable material by cutting out those elements that need to be applied to the wall. You can buy factory stencils - drawings for bas-relief on the wall. They are offered in a large assortment in building stores.
 You can apply the drawing by stencil
 The template is fixed in any convenient way (for example, painting tape). Empty places are filled with dense alabaster or other solution (the thicker stencil, the thicker makes the knee) with a layer in cliché and leave until complete drying. If uneven edges turned out when separated, they are stamped with shallow emery paper. Subsequent processing is made by a common method for all methods.
 Pattern for drawing can be fixed in any way.
 Of all the above, we can conclude that you can perform a beautiful, bright and attractive attention an outstanding pattern on the wall with your own hands can each. Independent creation of bas-relief in own home - This is nothing increasing pleasure in the process and unique decor element as a result. It is worthwhile to go to the interior of the apartment, houses or public institutions (cafes, restaurant, clinic, etc.) will gain its own unique atmosphere.
Video: how to make bas-relief with your own hands
Video: Master Class. Bas-relief flower
Tsugunov Anton Valerevich
Reading time: 4 minutes
People always seek to make their home unique and beautiful. And no matter how difficult it is to achieve originality in a typical apartment, there is always a way out. One of the most nontrivial and elegant solutions is to create. Many novice masters seem to be too complicated, but it is not at all. To cut the wall panel, it is not necessary to be an artist or sculptor. Looking video with a master class to create a bas-relief on the wall with your own hands for beginners, and having acquainted with step by step instructionsshown below, you will easily cope with the task.

Necessary materials and tools
To create a bas-relief, some specific tools that can be purchased in construction and art stores will be needed.
List of materials and devices that will be needed for work:
- sketch of the image;
- polyethylene film;
- trowel;
- pencil;
- marker or handle;
- stencils;
- gypsum or gypsum putty (you can also use clay or alabaster);
- special primer;
- painting brushes;
- mastichens (special blades of different sizes that are used to create volumetric images can be plastic or metal);
- sculpture loops;
- malyary Scotch;
- latex gloves;
- for colored bas-reliefs - a kel or paint of the desired shade.

Preparation
All master classes on the bas-relief begins with the preparation of the sketch. But the very first, preparatory step is the choice of premises and walls where the creation of a bulk composition is planned.
- First you need to consider the interior of the room where the bas-relief will be. Volumetric images can be made in any room, but most often they can be seen in the living rooms and bedrooms.
- Then you need to decide on the wall on which the bas-relief will be created. At the same time, it is necessary to take into account how much space will take a panel, whether free space is enough for it. The lighting is necessarily taken into account, since the perception of the work depends on the light. If it is not enough, it makes sense to organize an additional bas-relief illumination.
HELPFUL INFORMATION: How to Align the Walls Plaster: What is the plaster better, far from the beacons and without (video)

Now you can choose the appropriate sketch. Newcomers should not immediately take on complex multi-layered and very volumetric figures. For a set of experience, you can limit more simple forms: leaves, flowers or fruits. Do not immediately try to fulfill a complex storyline, where there are many acting persons. But too primitive images also make no sense: they will look not very interesting.

Novice masters easier to work with plaster or gypsum plaster. They are plastic, well hold the form, quickly collapse.
Creating a bas-relief of plaster plaster
Work on the bas-relief should begin with the preparation of the image that will be transferred to the wall.
Stage # 1. Working with a sketch
At this stage, a bas-relief sketch sketch is created.
- First, the picture is transferred on paper, which is then covered with a film and redraw the contour on it. The drawing can be circled with a handle, marker or felt-tip pen. The most important thing is that he is not erased. The image is ready.

- Now they prepare the foundation. A layer of acrylic putty or Marseille wax is applied to the wall. After that, you can handle the wall with fine-grained gypsum (SATHENGIPS), then it will not be perfectly smooth, and the putty will better adhere to it. It will be the basis of the future bas-relief. The putty roll up with a spatula, then the layer is allowed to dry a bit.
- When the material starts to be captured, after about 15-20 minutes, it can be transferred to it. The film is fixed on the wall using painting tape. At the same time, one edge should be left free so that you can raise it when it takes. Then the stencil on polyethylene will be powered by a pencil or another suitable object, such as a back side of the brush or stylus. The image is imprinted in the wall.
Stage number 2. Main part
Now they go directly to the formation of the bas-relief. This is the longest stage, in the process of which the image gradually becomes relief.
- The putty layer on the layer is applied to the wall over the drawn contour.
- Each layer is given to dry, but only then apply the next one.
The putty must be moderately thick, plastic and felt gradually.
- All the parts of the bas-relief are drawn by masticines, and in complex places use sculptural loops.
If the items are very convex, it is desirable to screw the screws into the wall that will reinforce the design. This will allow the bas-relief to keep the shape and not to crumble.

Stage No. 3. Refinement, Fixing and Coloring
The final stage is the fixation of the bas-relief and its subsequent color.
- Finished panels need to dry well.
- Then you can enhance the bas-relief sandpaper, to cherish roughness and sharp corners. It is important not to rearrange and not remove too much. At the same stage, all small flaws are corrected: the slots are smeared, small details are chicted and so on.
- Ready bas-relief is processed by primer, and after drying it - paint. Water-emulsion paint is best suitable for putty.
Council. In order for the wall around the bas-relief, it is too smooth, you can apply a layer of plaster, and then go through it with a folded polyethylene package or crumpled paper. The surface will immediately become textured.

Creating a bas-relief of plaster
Separately, it should be disassembled how to make a bas-relief on the wall with your own hands from the gypsum, since the technology is somewhat different. With this plastic material, which involves many options, convenient and easy to work both professionals and beginners.
For the modeling of bulk parts, it is better to use a mixture of plaster and plow glue. By consistency, the material must resemble plasticine.
- Optionally for a long time to form a layer of layer each piece of bas-relief. For most typical images produce ready-made forms. They can be found in specialized stores and departments for creativity. In the form poured the gypsum mixture and dried it. The finished elements are removed from the forms and glued in the right places panel. Uncomplicated compositions can be fully connounced from such elements.
HELPFUL INFORMATION: Best interior decoration - modular composite paintings on the wall

- Some details will have to be molded manually and then stick to the wall, for example, the grape brushes or miniature leaflets are made.
- If the parts are quite large, then preferably inside the form to place the wire that will reinforce the design.
- When the image is ready, all the slots are closed. For this you can use both the solution itself and white sealants.
- The finished picture is covered with primer, thanks to which the bas-relief will not hide and get dirty.
