DIY plywood for kindergarten. Drawings from plywood for artistic cutting with a jigsaw
Before you start making DIY plywood figures for the garden, you first need to decide on the type of plywood. The durability and attractiveness of the garden figurine depends on the choice of one or another type of plywood sheet.
Which plywood to choose?
Today the construction market offers a huge number of different types of plywood. For garden figures, BS, FB and FSF are best suited. Such brands have increased moisture and frost resistance.
Cheaper FC option. The moisture resistance indicator of such a brand is lower than that of the above types, therefore, before painting it (FC sheet) it should be treated with moisture-repellent compounds.
It is better not to use the FBA brand for garden crafts, since this type does not tolerate atmospheric phenomena. An outdoor figurine will last a maximum of one season. But if you are going to update the figurine once a year, then the FBA plywood, previously impregnated with drying oil, will do.
As for the number of layers, both single-layer and multi-layer plywood sheets are suitable for the garden.
An important point! If you are going to make an outbuilding, then a thin sheet will do. For ground figures, it is better to use plywood, about thirty millimeters thick.
Blueprints
The selected figure can be printed on a printer or you can create a template. As a rule, beginners choose the second option, since using a template it will be easier to reproduce the figure on a sheet of plywood.
In the figure and on the plywood, a grid is drawn, of the same scale / size. Then all the contours are transferred from the paper to a plywood sheet.
What do you need to work?
For work you will need:
- stencil, pencil;
- plywood sheet;
- jigsaw;
- screwdriver and self-tapping screws;
- Sandpaper, acrylic paint and brushes.
An important point! If you are going to install a figurine that does not lean on anything, then in this case you will need to mount pegs on which the figurine will “sit” in the future.
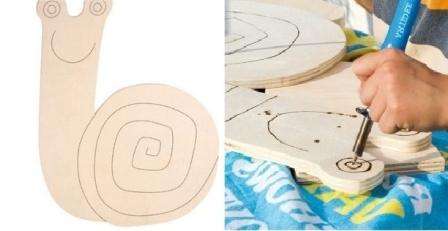
DIY plywood garden snail
The snail will be a wonderful decoration for anyone garden plot.
Manufacturing process:
- A snail is drawn on paper. Then transfer it using carbon paper to plywood.
- Using an electric jigsaw, the constituent elements of the craft are cut out.
- Use acrylic paints to decorate the figure. You can select all the contours with the help of burning.
DIY plywood stork
The stork will not only decorate the garden area, but also bring happiness and joy to the house. You can install it, for example, near a pond, fountain or in the center of the site.
Manufacturing process:
- For work, you need a plywood sheet with a thickness of six millimeters. A stork figurine, 0.85x, 58 m in size is cut out of it.
- For the stand (stork legs), plywood about twelve millimeters thick is used.
- All cut out elements are cleaned with "sandpaper".
- A hole is made at the end of the "legs". It will be necessary to insert the body of a stork into it. The hole should be about five centimeters deep.
- Using self-tapping screws, the legs are attached to the body. In order for the product to serve for a long time, you must first make holes for the screws.
- The product is primed.
- Color the figurine.
If attached to the pediment, then thin plywood will come off for the "leg". If desired, you can create not one, but two storks and a nest. After staining, the products are attached to the facade using self-tapping screws.
DIY plywood bird feeder
Manufacturing process:
- For the base, you will need four slats (two are long, and two are slightly shorter). Create a rectangle from them.
- Cut out the bottom and roof for the feeder from the sheet (should fit the size of the slats).
- Racks are made in the corners.
- The resulting product is painted with acrylics. You can also use burning to make an interesting pattern on the roof of the feeder.
DIY plywood hedgehog
Manufacturing process:
- Draw up drawings of the figurine on paper. Then cut a hedgehog out of paper.
- Apply the template to the plywood sheet and trace the contours of the figure with a pencil.
- Then, using a jigsaw, a hedgehog is cut out of plywood.
- All edges of the craft are sanded with fine-grained sandpaper.
- Coloring the product.
DIY plywood butterfly
Their plywood can be made not only large figures, but also small ones, for example, various insects, butterflies and various bugs. Such figurines can be attached, for example, to a garden house, birdhouse or gate.
Manufacturing process:
- The butterfly can be drawn directly on plywood. If you do not have the ability to draw, then in this case you should create a template. Apply the stencil to the plywood and trace it with a pencil.
- Using a simple jigsaw, the product is neatly cut out.
- In order to cut out the patterns inside the wing, holes should be drilled within its area.
- Then, the canvas should be inserted into the holes made and secured.
- Cut the product along the contour.
In addition to the garden figurines described above, you can also install a unique, green frog, cat, fox, bear and many other fairy-tale characters on the site.
All owners of suburban areas love to stroll through their estates while admiring their crops and fresh air. It is worth saying that today it is very fashionable to decorate your own summer cottage. And many owners of such real estate think over the design of the garden plot to the smallest detail, making it unique and memorable. You can use completely different items to decorate a suburban area. But it will be interesting to design a garden with cute plywood figures that will help your garden plot to transform. In order to create such figures, it is enough to have your own imagination. Also, you have to put in some effort for this job. And if you want to know about what crafts to make from plywood for the garden and vegetable garden, then this publication was created especially for you. And all because here you can find the most interesting options for crafts.
Some information
Today, you can make completely different crafts from a piece of plywood. Everything here will depend on your preference. For example, you can build:
- mail boxes,
- containers for flowers,
- bird feeders,
- cute decorative fences.
And in order for your crafts to delight you with their beauty for a long time, you should choose a high-quality plywood sheet that has not been spoiled by excessive moisture and other factors.
During work, you will need not only plywood, but also acrylic paints, felt-tip pens and a jigsaw.
How to make bright and funny plywood figurines to decorate a summer cottage.
So, in order to create such funny bunnies or such a curious figure, you need:
As you can see, everything is simple here. And if you already want to do something original, then we will offer you interesting ideas that you can easily translate into your life.
But such a funny and bright cat can decorate the fence of your summer cottage.
And to create this cat you need some decorations. For example, you will have to find a wire and a bow. If we talk about the progress of work, then everything is done very simply. The finished figurine of the cat is decorated, and then, when it dries, it is decorated with decorative elements.
Original plywood flower bed.
A practical garden decoration is such a functional flower bed. However, such a flower bed will require high-strength plywood, which must first be processed and painted brown or another color. In such a piece of plywood, it is worth cutting out holes and then inserting pots with petunias or other flowers into them.
And you can also make such flower beds. For this purpose, you will need figurines and empty pots.
And here are some more craft ideas:
Finally
Here you could see plywood crafts for the garden and vegetable garden, which you can easily do with your own hands. You should only look at photo ideas of such crafts in order to recharge with an interesting thought.
In general, choose for yourself. Create fun figurines that can decorate your garden and vegetable garden and make it attractive.
Plywood figurines are an original and budgetary decoration for the garden. How wonderful it is to stroll through the cozy shady garden, enjoying the fresh air, the scent of flowers, and the singing of birds. I want to decorate my own garden, give it individuality, so that each guest understands that the personal plot has a soul. Available today a large number of garden figurines from polymer materials... However, they are quite expensive. We offer you some ideas plywood figures that you can do yourself.
DIY plywood crafts
Funny figures;
Unusual flower pots;
Bird feeders;
Fences.
It is very easy to make figures out of plywood, even a teenager can cope with this, of course, under the guidance of adults, and children will be happy to help in decorating the work with paints.
Summer resident made of plywood
Plywood is sheets of thin wood veneer that are joined together using different adhesives. The thickness of the sheets can vary from 3 to 30 mm, so it is possible to choose a suitable material texture. It depends on what kind of wood the veneer was made from.
Considering that plywood is made of natural material, precipitation and low temperatures do not pass without leaving a trace. When choosing a material, you should pay attention to moisture resistance. For outdoor use, look for plywood labeled FKM and FSF.
Cheerful dog made of plywood
Grinding. Plywood sheets are divided into sanded on one side (Ш1), as well as on both sides (Ш2) and unpolished (NSH). Oil or acrylic paints are suitable for decorating your masterpieces. They are not afraid of exposure to ultraviolet radiation for at least several years.
Step-by-step master class on how to make plywood figurines
Now you can start making do-it-yourself plywood figures. For work, you may need:
Pencil;
Plywood 20 them thick, moisture resistant;
Stencil;
Sandpaper;
Electric screwdriver and self-tapping screws;
Glossy varnish for wood.
Diy plywood firebird
DIY plywood snail
Plywood snail for garden
Scarecrow from plywood for a summer cottage
Many of us spend a lot of time in the garden. At the same time, we want to be surrounded by coziness, convenience and beauty. Hand-made plywood crafts are a wonderful way of self-realization and decoration of a garden.
Nice to play guitar after a bite of sausage. If mice are not caught, it will be bad.
Working with plywood is easy and pleasant. The material is affordable. In the simplest version, crafts will additionally require paints and some self-tapping screws. Few tools are required, see the maximum list below.
You can make decorative crafts for garden beds and fences, heroes of fairy tales and cartoons for a playground, birdhouses, bird feeders, flower pots and so on from plywood. Asking the question what can be made of plywood with your own hands, we conditionally divided all the figures into two groups: simple ones, which are made from one piece of plywood, and more complex ones, which are assembled from several parts.
"Cartoons" for children and adults
Plywood flat figures
Almost all of the examples above are cut from a single piece of plywood.
For making crafts with your own hands, it is better to use a sheet with a thickness of at least 10 mm. In this case, the image will not warp and will last longer. At the same time, it is preferable to use moisture-resistant plywood in the garden and vegetable garden.
There is no dispute about tastes - the choice of your favorite option is yours
The procedure for making a figurine from plywood is as follows:
- The contours of the drawing are drawn on a sheet of plywood with a pencil.
- The craft is cut with a jigsaw around the perimeter.
- The contours and flat surface of the workpiece are processed with emery cloth.
- Borders of coloring in different colors are drawn on the part with a pencil.
- The craft is consistently painted with all colors. Adjacent paint coats must be completely dry before applying the next color.
Guys from our yard
It is convenient to fix the finished product with self-tapping screws to a fence or wall. Look at the photo: you can "fasten" hair, buttons, shoes, a tail made of wire, and so on to the craft.
It is important that these elements are securely held, serve for a long time under the sun and rain, and do not pose a danger to people.
Animals, as always, are beneficial: the deer holds a pots for flowers
With your own hands, you can make a variety of decorations for a summer residence from one piece of plywood. We have selected several interesting options.
Why does a dog need a hare if it has a bone?
These birds are clearly not friends.
Storks, swans, chickens: no one will fly away from you!
The grandmother is solving an important problem: what would she cook for her grandfather and granddaughter?
Grandfather understands well that there will be no lunch without firewood
The granddaughter wastes no time and decides to milk the goat.
Volumetric crafts for the garden
It is wrong to say that bulky plywood crafts for the garden are much more difficult. Of course, you will have to cut out a few parts with your own hands. But some of them should be painted with the same color, which simplifies the work.
It is difficult for a donkey to understand how it is possible to sleep for so long, he is a donkey!
All parts are prepared according to the scheme described above, and then fastened with self-tapping screws. Of course, the three-dimensional figure looks more interesting. The photo clearly shows that it is necessary to use a material with a thickness of 15-20mm. Each detail has its own shape and size. They can be placed optimally on the sheet of material and plywood can be used sparingly.
The dog guards, the cat helps: in general, everything is in business
It is especially pleasant when a hand-made craft not only decorates the yard, but also performs a useful function. In the photo you can see just a few examples.
Is the watcher on the lookout for birds - or a hedgehog?
Templates and layouts are not problems
It's better to make templates yourself. Firstly, it is not difficult, and secondly, you can make templates for your own and a new drawing when you get tired of repeating other people's ideas. Note that there are a huge number of children's applications for colored paper crafts, which are quite simple to cut out of plywood.
The easiest option is to apply the drawing directly to the plywood. Moreover, if you had five drawing classes at school, it is not at all necessary to copy what you have already done.
Otherwise, a grid should be applied to the drawing you like. Then, on a sheet of material, the same grid is drawn with a pencil. All elements of the picture are transferred to the plywood "in squares". Conveniently, the squares in the drawing and the workpiece can have different sizes, that is, the drawing can be transferred to any scale.
The most convenient and modern way to do the work using a computer, which we did. Almost everyone has a Microsoft Power Point program, where you should copy your favorite picture. The program pre-sets the size of the sheet for printing on the printer 29.7x21cm.
We have a piece of plywood measuring 57x77 cm, and we set the size of the picture based on the availability of material. You need to understand that the program takes into account the size of the entire image.
Then you need to print fragments of the picture on the printer, sequentially shifting it relative to the sheet for printing. For the convenience of printing, a grid of sheets for printing should be applied to the drawing and grouped with the image.
Now the sheets should be glued into a single image and cut along the contour after the glue dries. A paper template is laid on a sheet of plywood and outlined with a pencil. Subsequently, separate parts of the drawing are sequentially cut off from the template and also transferred with a pencil to the workpiece. You can cut it out!
How to keep your work and longer
It will be very disappointing if a self-made craft peels off and warps from the first rain. So it is better to take a number of measures to save your own labor.
First, it is better to use a moisture resistant material. Secondly, it is necessary to soak it from moisture, for example, "pinotex". You can use acrylic and oil paints. It is important that they are for external use. If you want to leave the natural color of the wood, the craft should be covered with a transparent yacht varnish.
Prepare that the figure will have to be repainted every two to three years. If the plywood begins to delaminate, it should be putty before painting, for example, with silacryl sealant. It is very effective to hide the craft from bad weather for the winter.
Let the video help you in your work. It remains to wish you good luck!
- Creating figurines
- Plywood selection
- Image
- Cutting out figures
- Stork on the roof
- Plywood butterflies
Perhaps everyone knows the figures of traffic police officers with patrol cars, installed on the side of the road and designed to discipline road users. They, if over time and cease to scare drivers, still revive the boring roadside landscape. Despite the rather realistic look of these crafts, they are made using a very simple technology. If you own an art brush, you can easily create the same silent guards for your site, since it is not difficult to cut them out of plywood. Nevertheless, it is better to install animal figures in the country or in the garden, which will create a more relaxed atmosphere than models of law enforcement officers.
Plywood figures will help diversify the boring natural landscape of the site.
Creating figurines
To get animal figures out of plywood, it is not necessary to have the professional skills of an artist.... Of course, they will help to create complex compositions "in the style of realism", but simpler installations can also please the eye. It's great if a child's hand is attached to their coloring.
You can install the figures in any place you like, but it is still desirable that they do not look ridiculous there. The figure of a fox is hardly appropriate, for example, in the water of a pond, and a frog should not be fixed at all in a vineyard. Otherwise, everything is quite simple.
Plywood figurines are an original and budgetary decoration for the garden. How wonderful it is to stroll through the cozy shady garden enjoying the fresh air, aromas of flowers, singing of birds. I want to decorate my own garden, give it individuality, so that each guest understands that the personal plot has a soul. Today, a large number of garden figurines made of polymer materials are on sale. However, they are quite expensive. We offer you some ideas plywood figures that can be done.
DIY plywood crafts
- funny figures;
- unusual flower pots;
- bird feeders;
- fences.

It is very easy to make figures out of plywood, even a teenager can cope with this, of course, under the guidance of adults, and children will be happy to help in decorating the work with paints.

Summer resident made of plywood
Plywood is sheets of thin wood veneer that are joined together using different adhesives. The thickness of the sheets can vary from 3 to 30 mm, so it is possible to choose a suitable material texture. It depends on what kind of wood the veneer was made from.


Considering that plywood is made of natural material, precipitation and low temperatures do not pass without leaving a trace. When choosing a material, you should pay attention to moisture resistance. For outdoor use, look for plywood labeled FKM and FSF.

Cheerful dog made of plywood
Grinding. Plywood sheets are divided into sanded on one side (Ш1), as well as on both sides (Ш2) and unpolished (NSH). Oil or acrylic paints are suitable for decorating your masterpieces. They are not afraid of exposure to ultraviolet radiation for at least several years.
Step-by-step master class on how to make plywood figurines
Now you can start making do-it-yourself plywood figures. For work, you may need:
- jigsaw;
- pencil;
- plywood 20 them thick, moisture resistant;
- stencil;
- sandpaper;
- electric screwdriver and self-tapping screws;
- paints;
- glossy varnish for wood.
Diy plywood firebird

DIY plywood snail


Plywood snail for garden
Scarecrow from plywood for a summer cottage


Now you can start making do-it-yourself plywood figures. For work, you may need:
- jigsaw;
- pencil;
- plywood 20 them thick, moisture resistant;
- stencil;
- sandpaper;
- electric screwdriver and self-tapping screws;
- paints;
- glossy varnish for wood.
Consider also a support for the decor. Make pegs in advance, they will be needed for the base. Tip: Shovel cuttings available at the hardware store are suitable as pegs. From a sheet of drawing paper, make a stencil, depict a silhouette of a figurine on it and cut it out.

DIY plywood snail
target = "_blank"> http://www.svoimi-rukamy.com/wp-content/uploads/2015/10/ulitka_2.jpg 448w "width =" 448 "/>
target = "_blank"> http://www.svoimi-rukamy.com/wp-content/uploads/2015/10/6..3_cr.jpg 448w "width =" 448 "/>
target = "_blank"> http://www.svoimi-rukamy.com/wp-content/uploads/2015/10/6.5_cr.jpg 400w "width =" 400 "/>
target = "_blank"> http://www.svoimi-rukamy.com/wp-content/uploads/2015/10/6.2_cr.jpg 400w "style =" margin: 0px; padding: 0px; border: 0px; font-style: inherit; font-variant: inherit; font-weight: inherit; font-stretch: inherit; font-size: inherit; line-height: inherit; font-family: inherit; vertical-align: bottom; max-width: 100%; height: auto; "width =" 400 "/>
Plywood snail for garden
Scarecrow from plywood for a summer cottage
Making the Scarecrow is not much different from the previous master class. We also draw a sketch. Use a template if necessary. If your drawing is really bad, you can search the web for a life-size pattern and print it. Advice: plywood can delaminate during work with a jigsaw, to prevent this, the sheet should be impregnated with a solution that consists of half of PVA glue and water, in a 1: 1 ratio. You will have to apply the solution in 2-3 layers. Apply the next layer after the previous one has dried.
target = "_blank"> http://www.svoimi-rukamy.com/wp-content/uploads/2015/10/9_cr.jpg 448w "width =" 448 "/>
target = "_blank"> http://www.svoimi-rukamy.com/wp-content/uploads/2015/10/11_cr.jpg 400w "width =" 400 "/>
When coloring the figurine, do not forget to add shadows, for example, to the Scarecrow's hat. Blush on the cheeks and sisal hair, ribbons, buttons will add liveliness to the composition.

Diversify country cottage area hand-made crafts from various materials will help.
One of their main distinctive features is the ability to create such products from any available materials. Crafts made of wood and plywood for your summer cottage will be an excellent decorative element. They can also be of practical use, be useful in everyday use.
Plywood crafts for summer cottages
Plywood is a thin board made of wooden plates by gluing. It is great for crafts, as it is quite often found in a summer cottage, and it is not involved anywhere. The same can be said about various wooden utensils, as well as simply twigs and tree stumps.
- Availability. You can get these materials at the dacha anywhere: remove from old and already unnecessary furniture, take from those left after renovation works stocks are easy to find lying around on the site, as well as many other ways to find them ubiquitous.

Craft material is not hard to find
- The cost of the craft. This advantage grows out of the former. You will not spend any money on the manufacture of the product, because the material and tools are already there. Except for advanced crafts that require additional processing. But all the same, the price will be much lower than when buying similar products in a store or from private craftsmen.

The cost of wood products is quite small
- Diversity. A huge number of crafts can be made from plywood and wood, both simply decorative and helping in everyday life.

There are many options for wood crafts for giving
- Ease of creation. Materials are easy to process, and all the necessary tools will be found at their summer cottage. It is enough to have a saw and a plane at your disposal and you can already create.

Plywood and wood are easy to process
- Appearance. The tree is natural material and plywood is made from its fibers. This means that their appearance after processing it will be quite pleasing to the eye, and the product itself will serve as a good decoration for your summer cottage.

Crafts made of wood and plywood for a summer residence will be an excellent decoration
The main disadvantage of using wood and plywood as a craft material is its poor weather resistance. After rain, the product may start to rot, losing its beauty. But treating the craft with a water-repellent agent can temporarily solve this problem.

Treat materials with a water-repellent agent to extend the service life.
To the table of contents
How to make a craft yourself
The process of creating a craft can be divided into three main stages: thinking through the design of the product, preparing and processing the material, and assembling. Separately, it is worth highlighting the decoration process. It is not necessary, for the simplest crafts it can be thrown back. For more complex products, decoration occurs after the material has been processed, and sometimes after the assembly of the finished product.
Thinking over the design of the product
It is with thinking over the design of the future product that the manufacture of crafts should begin. In the event that the craft is simple, then there is no need to draw up the exact dimensions. If the product is planned to be complex in shape and with many components included in the structure, then it is worthwhile to calculate in advance the dimensions of one or another component, as well as the method of fastening them together.

Sketch of plywood crafts for a summer residence
Material procurement and processing
The second stage is the procurement and pre-processing of the material. If a wooden product is used as the basis for the craft, then it will have to be divided into its component parts. If it is solid, then the individual parts can be obtained by sawing off, but if it is collapsible, then simply disconnect them from each other.

Marking the material into its component parts
The procurement of plywood sheets consists in the selection of the whole, as well as sawing off the normal parts from the rotten ones.
Now you can start the processing step. All work should be done with gloves. First of all, you need to give the plywood or wood the shape you need for the product; a household saw is best for this. Next, you need to get rid of external defects in the material, such as irregularities and gaps, if they do not become special elements of the craft. It is necessary to make the surface of the plywood or wooden part even, so that it is not possible to get a splinter in contact with it. This is done with sandpaper; in especially difficult situations, a plane will help.

Grinding the material before starting work
An interesting solution for wooden crafts, it will be the use of a groove connection when joining parts. It is quite difficult for a beginner to do this; special care and precision of actions is required. But, thanks to all the efforts spent, you will get a craft that will be easy to assemble, and then disassemble without violating the integrity of the structure.

Groove connection of wooden parts
When the details are already sized and smooth, you can proceed to the decorating part. Wood and plywood are fairly easy to paint as they have just been sanded with sandpaper. You can take any paint for outdoor use, including aerosol. One layer will be enough. After that, the product should dry completely.

Plywood and wood crafts are easy to paint
In the case of future use of the craft in the open air, it should be additionally treated with a water-repellent agent. For this, a suitable varnish or spray is suitable.
Assembling the craft
The final stage is directly assembling wood and plywood crafts for your summer cottage. It should be started only after the workpieces are completely dry. It all depends on the complexity of the product. For example, if this is a simple wooden box, then it is enough to connect the individual parts and nail them together. For more complex products, the assembly process will be more labor intensive.

Assembling a simple box made of wood
For some items, the decoration stage continues after assembly. The corners are smoothed, the joints are closed and the thread is applied.
To the table of contents
What crafts can be done
It is best for a beginner to start with the simplest products and gradually, gaining experience, move on to more complex ones. The crafts themselves can be divided into two categories: they are used simply for decoration and are also of practical use. Let's consider several examples from each group, differing in the complexity of execution.
Examples of decorative crafts
Such products are intended simply to delight the eyes of the owners and guests of the summer cottage.
Wooden shoes will serve as an excellent decoration for the hallway country house... For their manufacture, a square plywood with a side of about twenty centimeters or a thin piece of wood of the same size is suitable.

Decorative shoe made of plywood
To begin with, the workpiece should be divided into two equal parts. On one of them, outline a cut line that coincides with the future shape of the shoe. And cut with a saw. It will be more accurate to do this with a power tool. Next, you have to process the workpiece by removing roughness on a flat surface, as well as smoothing out irregularities on the cut.

Painted boot for hallway decor
Before further work, you should attach the unfinished product to the second part of the board or plywood and outline its outline. Prepare the second workpiece according to the same principle. As a result, they should turn out to be approximately the same shape.
The next step is to make holes for the laces. The easiest way is to mark several paired holes on one workpiece, attach it to another, and then drill them. It is advisable to smooth the resulting holes with sandpaper, for a smoother shape.
After the craft is almost ready, you can start decorating. For example, paint a boot in some color or just leave an inscription on it. For greater safety, it should be varnished. After the craft dries, you need to complete the composition by threading the laces. Now the shoes can be put in a prominent place, surprising your guests with them.
A more complex option for decorative crafts will be a wooden keyboard. To execute it, you will need a piece of wood of the appropriate size, more desire, and a lot of free time. After all, the manufacture of such a craft will be extremely laborious.

Making a keyboard out of wood
It will also require a special tool for creating internal corner cuts and subsequent key engraving. But, as a result, you will get high-quality decorative craft, which perfectly complements the desktop or any other place in a country house. The inside of the fence will be a rather original idea for its placement. Any guest will appreciate such a craft.

Ready-made wooden keyboards
Crafts made of wood and plywood for a summer residence are a reflection of your creativity. Working with products that are nested own ideas and ideas, brings special pleasure. And with a little effort, its result will always delight you and remind you of your own thoughts at the time of creating the craft.
Examples of practical crafts
For such crafts made of wood and plywood for your summer cottage, there is a suitable use on the farm. But, along with this, they can also come out beautiful.
A commemorative photo can be placed in a custom-made wooden frame. The design of this product is as simple as possible, a plywood sheet of appropriate dimensions is used as a basis. And for framing, four small pieces of wood are suitable.

Drawing of a simple frame for a photo made of wood
The first step is to procure the necessary materials. The plywood sheet is adjusted to fit the photo. Two pairs of thin pieces of wood are cut according to its dimensions. They must be cut so that when they are framed, they are joined end-to-end.

The pieces of wood for the frame must be joined together
After finishing preparatory phase the materials of the craft are carefully processed so that they are smooth.
The assembly of the product itself is as simple as possible. A plywood sheet is taken vertically, a photograph is superimposed on top of it, a small piece of wood is also installed at the very top, and then fastened together. The connection can be made with nails or special glue. In the second option, the plywood sheet should be larger than the photo. This is how all four pieces of wood are connected. Remains of glue are carefully removed. If the fastening took place with the help of nails that went through, then their sharp tips must be bent so that they could not be injured.
After all these steps, the photo frame is ready. You have received an easy and practical craft made of wood and plywood for your summer cottage.

Ready wooden frames for photos
Making a bench for a suburban area will be much more difficult. First you need to decide on its dimensions and approximate design. After that, prepare and cut out the required number of wooden blanks, as well as connecting elements. Carefully process everything, paint, varnish and proceed directly to the assembly itself.

Figured plywood photo frame
This product can also be designed with a variety of decorative elements such as carved legs or a curved back.
Simple and original craft idea
A hand-made hanger will become a product that simultaneously includes external beauty, ease of manufacture, and practical use.

Original plywood hanger
For its manufacture, it is necessary to prepare a sheet of plywood approximately half a meter long and thirty centimeters high. Next, you need to draw a sketch of the future product on it. The easiest way to do this will be by attaching a real hanger to the sheet and tracing its contours.

Drawing of a plywood hanger in the shape of a tree
Next, you have to carefully cut the workpiece, carefully process it, smoothing out the bends and roughness on both sides. As a completion, you can put some kind of inscription on it. Such a hanger will have a pleasant appearance, and also perfectly replace the store version.

Plywood hangers will add zest to the interior of the cottage
Infinitely many products can be made from such materials for a summer cottage. And not of the same type, but as diverse as possible, which will combine both beauty and practicality or each function separately. Crafts made of wood and plywood for your summer cottage will be an excellent decoration for a country house or plot.
To the table of contents
Photo gallery - crafts made of wood and plywood for a summer residence


 to the table of contents
 Video
How to cut plywood crafts with a jigsaw - simple drawings for beginners

Wood and sheets (slabs) based on it are one of the cheapest and most flexible materials. For those who like to work with a jigsaw, plywood is primarily of interest.
It is her home craftsmen who most often choose for the manufacture of various crafts. If you organize the work correctly, you can create real masterpieces.
Features of the choice of plywood
Crafts from this material are made for various purposes, but basically they can be divided into two groups - for decorating premises or territory (for example, fences from the inside, a garden plot, and so on).
Variety of plywood
If you focus on the optimal combination of indicators such as quality and price, then FSF or FC products are selected. It is characterized by resistance to dampness and temperature fluctuations. This alone is enough to ensure the durability of a hand-made craft. But there is a fundamental difference between these types of plywood - in the component composition of the glue, which holds the veneer layers together.
In the first case, it is toxic, therefore FSF sheets are used only for outdoor work. But for crafts intended for indoor use, FC plywood is quite suitable. Its counterparts are much more expensive, therefore they are not considered as material for simple, easy-to-make crafts.

Type of sheet grinding
It is not difficult to understand: Ш1 and Ш2 - respectively, one- and two-sided; NSh - coarse plywood. That is, the craft still has to be "brought to mind", polished. The choice according to this parameter depends on how it is planned to be arranged and placed in the future. A sample fixed on the wall and, for example, a figurine (stand, vase, toy or other) that is viewed from all sides are different things.

Plywood texture
Much depends on personal preference. If it is planned to preserve the natural appearance of the tree when applying the protective coating of the craft, then it is better to purchase birch veneer plywood under the varnish. But for the subsequent painting, it is advisable to choose pine.
For various plywood crafts, it is advisable to focus on the use of paints on oil or acrylic base... The explanation is simple - they are less susceptible to fading in the sun, therefore, you do not have to frequently update the outer coating; it will not change its original appearance for several years.
Plywood grade
When choosing a sheet for crafts, you must first of all inspect it for knotty and inclusions. Significant defects will not only complicate the cutting of the material, but also initiate the appearance of cracks or "holes" (as a result of falling out of the same knots). Next - inspection of the end surfaces. During the cutting process, plywood is subjected to dynamic loads (vibration). If at least signs of veneer peeling are noticeable on the side parts, such material should not be purchased, even if its price is too tempting.

In the future, in the process of making crafts, many problems will arise. As a result, the rejection of plywood and its increased consumption. In aggregate terms, this in terms of money will come out about the same in comparison with the purchase of high-grade material, and in terms of the time spent and the quality of work - a big minus.
Thickness of sheets
If the crafts are cut with an electric / tool, then it is limited to 30 mm. For a hand jigsaw, it is advisable to use relatively thin plywood; maximum three-layer. That is, no more than 9 mm thick.
What you need to work
Jigsaw
This is a priori, since we are talking about making crafts using such a tool. The question is - which one is the best to work with. Electric models they are much more expensive than manual counterparts, but they have a lot of advantages. We have already talked about the choice of a jigsaw.

For example, high speed and accuracy of cutting, clean edges, the ability to change the cutting parameters and a number of others. If a plywood craft is not a one-time, short-term hobby, then it is worth spending money on an electric / jigsaw. It is versatile, and will come in handy on the farm more than once, because depending on the type of file it can “work” not only with wood, but also with non-ferrous metals, plastics, and plexiglass.
It is somewhat more difficult with a manual jigsaw. Its design is quite simple - a frame with screw clamps and a handle + file.

The nuance is that the cutting blades break quite easily (from excessive pressure, changing the position of the hand tool), and therefore it is advisable to purchase them with a margin; fortunately, they are cheap.
Hacksaw
It is needed only at one stage - when cutting the dimensional sheet into separate fragments. Doing it with a hand jigsaw is an unpromising and unprofitable occupation; time and files will be spent a lot.
Stand
Nobody will cut plywood by weight; This is clear. Cut out the details by laying the sheet on the tabletop - there is a risk of damaging it. It is in order to ensure the "safety" of the latter that the stand is needed. You can make it with your own hands from trimming the board. How such a device looks like (one of the options) can be seen in the figure.

The fixation of the stand on the base is made with clamps (on a non-working table) or self-tapping screws (in case there is a carpenter's workbench in the extension, shed, garage). Although these are not the only mounting options. How to proceed is easy to understand, depending on local conditions.

Skin
The ideal tool for fine woodworking - Sander... But for plywood crafts not different large areas, it doesn't fit. Therefore, only sandpaper; medium fraction - for primary grinding of workpieces and with fine grain - for finishing.
Additionally
- Files and files.
- Awl.
- Simple pencil and carbon paper.
- Glue, if the craft is created as a composite or multi-level, that is, with the fixation of two or more figured fragments in separate areas.
- Varnishes, paints, stains.
Examples of drawings and sketches of plywood crafts
Copying "one to one" in this case is hardly advisable. Any work done with your own hands is a process with a creative component. That is why the dimensions should be determined independently, depending on where it is supposed to place (or how to use) the craft. For example, will it "look" in specific location whether it will organically fit into the interior of the room.
Even if you like the drawing, it is not difficult to change the geometry of the figure by applying the scaling rules. Moreover, when it comes to drawing a contour on plywood with a simple pencil; to correct any mistake, it is quite easy to correct something in some areas. It is not much more difficult to modify any sketch, adding something of your own, original to the sample.

There is another solution - you can download any picture you like from the Internet. Printing it at the right scale is not a problem. It remains only to transfer it to plywood using carbon paper and shade the areas that need to be cut. This is when it comes to curly crafts. It's even easier with an outline pattern; cut exactly along the line - and that's it, you're done. All that remains is to do the decoration of the product.


Basic rules for cutting with a jigsaw
- Laying under a rigid backing sheet. It is in order to ensure the hardness of the surface under the plywood that the stand is used. A sheet, even a small one, bends quite easily (under pressure), therefore, without this device, a high-quality cut, strictly along the line, will not work.
- The working body of the jigsaw (saw) must be strictly perpendicular to the end of the sheet. Moreover, constantly, throughout the entire process of cutting the material.
- The tool is fed along the line in a translational motion, but without effort. Otherwise, the file will break immediately. As well as when it deviates from the "vertical".
- Cutting holes "blind", that is, somewhere along a sheet of plywood, with an indent from its edge, is done as follows. At any point of the outlined contour, a "hole" is drilled with a slight offset to the center of the fragment. The diameter is chosen so that the file fits easily into it. Once attached to the tool frame, you can cut in any convenient direction.
- A curly cut in plywood suggests sharp turns, smooth bends, and so on. First, at the point of changing direction with a jigsaw, without changing its position, it is necessary to make a small hole in the material. To do this, you need to continue the cut with a file, strictly maintaining the orientation of the tool, and at the same time turn the piece of plywood. As soon as the plane of the cutting part coincides with the required direction of further cutting, it can be carried out along the marked line.
Having mastered the manufacture of fairly simple plywood crafts, you can take on more complex options. As an example - self-assembly furniture (shelves, bookcases, original hanging shelves). With a skillful approach to business, excellent tabletops are obtained from plywood, cutting boards, window trims and so on. It is easy to make a folding chair from this material, with various modifications. Who is interested in this, all the details are set out in the article.
Plywood also makes great frames for paintings and photographs. For those who have a plot, it will be possible to do the decoration of outbuildings; the same gazebo, a house above a well, or something else. There are many options. The main thing is to want to learn.
In the process of preparing for cutting with a jigsaw, do not forget that all drawings and drawings are nothing more than the basis for developing your project. A little imagination, time, effort, and you can make a truly real masterpiece from plywood.
No comments yet
woodguide.ru
Crafts from plywood for a summer residence - we cut out with our own hands
The dacha has long become a place of mental rest and recovery after the everyday work of a city person. Some summer residents prefer to make a mini-collective farm on the site with the regular planting of various useful vegetables and fruits, while having all the necessary products all year round... Someone just wants to relax on a piece of nature, breathe in the unpolluted air or go to a barbecue. But the rest is especially pleasant when the summer cottage is really well-groomed.
Beautiful decorative elements made of plywood can make any dacha a work of art, and a weekend at the dacha will be much more fun. Crafts from plywood and cutting from plywood (how to cut from plywood can be found here http://moyafanera.ru/instrumenty/vypilivanie-iz-fanery.html) - it's not so difficult. The main thing is to have a correct understanding of materials and tools.

 The first and the most main criterion a job well done - right choice material. The most common in this business is plywood: its physical qualities are most suitable for cutting with a jigsaw. But there are several varieties of plywood that correspond to a specific type and scale of the future wood product.
To work better with physical properties plywood, you need to understand how it works from the inside. Plywood sheets are made from veneer - a sheet of wood (from 0.5 to 1.5 mm thick), which is made by cutting a thin layer from a solid wood different ways(by peeling, planing or sawing). The most natural and most durable material is natural veneer, made by planing or sawing. The plywood itself is made by gluing several layers of veneer in a crosswise order (along and across the fibers) in a factory or manually. It is a very durable material available in many building stores and has excellent qualities for both crafts and household work. The only thing that should not be allowed is moisture intake. There are a great many types of plywood: painted, with substrates of other materials, from peeled wood, from a single cut (or rather, a saw cut), etc. The sheet is usually 0.5-2 cm thick.

If the work is large-scale, with large elements, then it is worth taking thick, multi-layer plywood. If you have to cut out miniature parts, then a thin sheet of plywood is more suitable here. But in any case, the material must meet a number of requirements, paying attention to which, you can choose a good product wisely:
- Veneer color. It must match the style and character of the future product. You can close your eyes to the heterogeneity of the color of the original material only if varnishing or painting is applied at the end of the work.
- Optimum sheet thickness. As previously noted, each job requires its own material parameters. And for volumetricness and greater artistic effect, you can use plywood of different thicknesses when working on one product (if the item is typeset).
- Specific moisture content of the material. A very important criterion for maintaining the performance of the jigsaw (or rather, reducing the frequency of replacing removable saws) and simplifying work with wood. Before starting cutting, it is better to dry the material as much as possible so that it becomes "more pliable".
- All works that are more difficult than simple linear figures are best done from grade 1-2 plywood: this way you will save yourself from unnecessary unpleasant moments in the form of cracking or, conversely, excessive flexibility of the material when cutting.
- It is better to carefully select and inspect each sheet when buying, because such small flaws as barely noticeable spots or knotty cuts are invisible only on the sheet, but on finished work can be conspicuous.
- It is also advisable to take sheets without cavities or holes filled with resin, avoiding delamination or poor-quality sizing of the layers.
In addition to the base of the product, there are a number of products that will enhance the appearance of your woodwork and extend its lifespan. This is especially important when the plywood figurine is subjected to weather tests, standing in the sun and under the influence of moisture in the country. There are several methods of final processing: painting, staining (impregnation with varnish or paint), lamination, etc. Usually 1-2 layers of paint and varnish coatings are enough to create protection for plywood crafts.
You can also cover the product with an ornament or pattern. To do this, you can use various types of paints: acrylic, gouache, watercolors. The main condition for painting: before starting, sand the plywood and prime it with acrylic varnish or even PVA - this way its decorative qualities will become much better.

Choosing a tool for working with plywood
Tools for cutting out products from plywood are both manual (hand jigsaw, hand drill, screwdrivers) and electric (jigsaw, band saw, electric drill). What you should definitely stock up on before starting work with plywood:
- Two types of jigsaws: electric and manual. In this type of needlework, these are 2 indispensable tools that are not always interchangeable;
- A set of files of various thicknesses: the files will dull and sometimes break, so an extra one will never hurt;
- Files for grinding and shaping edges;
- Various household tools: a hammer, pliers, a set of screwdrivers, an awl (for working with parts and assembling the finished product);
- Hand drill and drills of various sizes for it;
- Pencil, charcoal or chalk, whichever is more convenient to work with for drawing.
- Copy paper for drawing, if it is not possible to draw by hand;
- Sandpaper for final sanding of the product.

Also, it is important to equip a place for comfortable work with tools. There are specialized workbenches for sawing, but you can do without it if there is a table on which it is convenient to place a jigsaw and other tools. But it is better to equip the table with an additional platform for the machine: basically, this is a formatted piece of timber attached to the table, which will serve as a platform and a clamp for a jigsaw.
A jigsaw is often used for coarser parts: small and technically complex elements are best cut by hand. A band saw is generally applicable mainly for thick sheets, the elements of which are often made large: the saw's power is even higher than that of a jigsaw, therefore it is rarely used for artistic purposes.
A drill or awl is used to drill holes and small parts that cannot be done with a jigsaw. A thin drill can also be used to round curls and other curly elements.
There are 3 types of saws, which are the main working element of a jigsaw:
- With fine teeth and a thin ribbon;
- With large teeth and a thick band;
- Double tooth file.

For inexperienced craftsmen, the second option is more suitable, since it is easy to use and contributes to the rapid development of dexterity in sawing, the so-called. "Stuffing" hands. Unlike a coarse tooth file, a thin band file exists for small parts and is much more difficult to operate. In the hands of a beginner, it can easily break, because without experience in working with complex parts, it is impossible to feel the tension of the file. When buying, you need to pay attention to the quality of the teeth and the strength of the blade: a good file bends freely.
Work technology
Before starting cutting, we prepare the necessary materials and tools. We check the quality of plywood. If it suits your task, you can start sanding its surface before cutting with coarse-grained and fine-grained sandpaper.

After that we make a sketch or transfer the drawing of the drawing to the material (it is better to sketch the sketch so that you have to cut less along the fibers). It is advisable to make the drawing neatly, without smearing the parts, since it will be more difficult to cut them out later.

According to the drawing, holes are made with an awl or drill in those places where the saw will begin with a jigsaw. Try to plan and drill all the holes in the plywood in advance, as once you start sawing, the sheet may crack under the drill. Before cutting out curly parts, it is worth practicing the technique on simple objects.

In the process of work, the jigsaw (file) is directed from top to bottom, so it is important to correctly fix the blade so that the cutting part is directed downward. It is also important to properly thread the blade before starting work so that there is tension in the saw band. But you do not need to leave it in this state after the end of the work, just as you should not leave the file stuck in the product - it can easily break.

When working at the machine, be prepared to constantly change the position of the workpiece: make several cuts in 1 hole, thus allowing free rotation of the workpiece around the blade.
If the tool deviates from the pattern while cutting, try to free the blade by giving the file free space and correct the direction.
At the end of the work, all edges are brought to a smooth state with a file and sanded with sandpaper - now the product is ready for coating with paints and varnishes. Here you need a brush for varnish or PVA glue. It is desirable to cover the product in 1-2 layers. If in the future it is planned to apply painting to plywood, it is better to cover it in 1 layer.

Drawings and drawings of plywood crafts for decorating a summer cottage
Here are examples of some plywood work for a summer residence, made by sawing with a jigsaw. Thanks to them, the garden and the cottage as a whole looks well-groomed, which inspires to create your own masterpiece. It takes a little practice and imagination to create your own work.


And a few examples of drawings will help you decide exactly how you can decorate your garden in the country:


moscowsad.ru
Plywood crafts: products for home and garden
Plywood is a fertile material for crafts, has an interesting texture, flexible, easy to saw with a jigsaw, drilled, glued. If you have a rich imagination and skillful hands, then a great variety of crafts can be made from plywood. A special place is occupied by movable plywood crafts.

In the photo - a panel, the price of which is labor and patience
It's nice to please your child with an original toy made of plywood, which you can't buy in any store.

The rocking horse will please the baby
Plywood turns ... into a work of art
Crafting and creating things with your own hands is a fascinating and rewarding activity. This hobby allows you to productively take a break from routine work, to decorate the house with original hand-made products.
At first glance, it is a banal plywood, but in the hands of a craftsman, it turns into amazing platbands for a country house or cornices of extraordinary beauty.
Plywood crafts can be different both in purpose and in appearance. Kitchen chopping boards, photo frames, flower vases, plywood teahouses, interior details and even furniture are just a small list of what can be made from regular plywood, but high quality plywood.

Handmade box - why not a masterpiece ?!
Best plywood
The requirements for the quality of plywood for crafts are high. It is desirable that it be plywood without defects of the "elite" grade. These are the properties of premium birch plywood.

High quality products are the key to a successful product!
Sheets of this grade have rigidity, strength, practically have no flaws. It is not prone to warping (unlike coniferous plywood), due to its rigidity, it firmly holds the screws even at the edge of the sheet.
There are no non-glued places in it; when sawing, it will not reward you with unpleasant surprises. Such plywood will make excellent products.
Advice! Don't skimp on material costs. Low price and quality are not compatible concepts.
Crafts for home
You can also make a "sea" of useful things, for example, a housekeeper or a napkin holder. The most commonly used plywood is 8 mm.
It can be from different tree species, have a different color palette, from dark red to bleached birch. The structure, depending on the type of wood, is also diverse.
Unique crafts are taught from multi-layer material. 5-10 ply plywood will make a wonderful seashell that will adorn your desk or Christmas tree decoration.
To make a snowman, you will need material and tools:
- Ornamental material;
- Scissors;
- Jigsaw;
- Acrylic paints, brush;
- A piece of tape;
- Glue stick;
- Wire or thread.

snowman
In order to make a fridge magnet, you do not need much skill, it is done very simply:
- any drawing is applied to the sheet;
- cut out along the contour with a jigsaw;
- processed with sandpaper;
- painted, varnished.
It remains to glue the magnet, the plywood craft is ready.
And if you want the neighbors to "burst" with envy, looking at your site, decorate it with interesting plot points.
Designer country things
Plywood + fantasy - you get a very original craft for the garden, let's call it a "cheerful gardener", which will feel good among the rose bushes. Or make a company of "perky little people" that children will surely like. The main thing is that the figures are bright and colorful.
The production technology of the figures is simple, blanks are cut from the sheets, which are painted with acrylic paints.

The most interesting corner on the site
Practical advice! If the edge of the sheet delaminates during sawing, it must be strengthened with PVA glue diluted with water. The procedure should be repeated several times. After drying, the ornamental material will become of better quality.
As you can see, even a schoolboy can make crafts for a summer residence. Let's complicate the process and make multi-layered figures.
To do this, you need to use the template:
- cut out individual parts;
- color them;
- after drying, connect together with glue and self-tapping screws.
You can make bird feeders, birdhouses and much more from plywood sheets.
Plywood as an ornamental material attracts craftsmen with great opportunities. Not the last aspect for the choice of material is the look. It is important that the product in which you put your soul into it does not lose its presentation in the near future. And plywood for summer cottage crafts must certainly be moisture resistant.

With certain skills, you can create such beauty with your own hands.
What else can be made from plywood
Today, in the age of urbanization, wooden souvenirs and gifts are appreciated, they bring warmth to the house, give a positive mood. Crafts made of wood and plywood are exclusive and beautiful.
Unusual, original pictures are obtained from plywood - an excellent gift for family and friends. As a gift for your beloved, you can make a unique pendant, for example.

Flower stand, but can be used as a corner shelf for the desired item
Little experience, but there is a great desire - to create a masterpiece is not a problem. Using diagrams for plywood crafts, you can even think about building a reliable, good boat.
The instruction and experience of joinery is yours faithful assistant in boat making. But the boat, perhaps, is not necessary for everyone, but such a wonderful candlestick will not leave anyone indifferent.

Such an item will decorate any interior.
The candlestick is cut out of 3 mm plywood with a jigsaw:
- 5 elements are drawn on a piece of material;
- First, the inner contours are cut, and then the outer ones;
- Details are tightly fitted and "set" on glue;
- On a lathe or a cutter, a hole is drilled for a candle;
- The assembled candlestick is cleaned with sandpaper;
- The finished product is varnished in two layers.
If desired, the candlestick can be tinted with stains in any shade.
Summary

Plywood craft schemes are faithful helpers
If you want - feel free to get down to business, everything will definitely work out!
In the video presented in this article you will find additional information (also learn how to make an unusual box out of plywood with your own hands).

Do-it-yourself correct beds in the country
Fretwork, a hand saw, has more than 450 years of existence. The first mention of this instrument appeared in 1870 in a book about ornaments. Over the past few centuries, with the help of this miracle jigsaw, all kinds of decorative items have been made: picture frames, various inserts for furniture, stylish boxes and boxes.
Much has changed since that time. The jigsaw has also undergone changes - now it has become electromechanical. And this is not surprising. The need for this tool has not gone anywhere, as in the old days people are engaged in creativity, some for pleasure, and some for profit.
Tool for making decorative and openwork crafts
 Sawing with a jigsaw is a type of creative activity with which most people are familiar from childhood, from school. At least it wasn't that long ago. When labor lessons began at school and the girls learned sewing and needlework, the boys were introduced to such a tool as jigsaw.
It's easy to use, and plywood jigsaw crafts carry not only artistic value, but also practical application. The manufactured products can act as souvenirs: various boxes and toys, as well as have practical use in everyday life. Decorated elements of the house porch, windows, stylish benches with carved legs, beautiful kitchen furniture and many other useful wood products can be made using this wonderful tool.
The perfect hobby tool
A hand jigsaw is a tool for curly cutting out of plywood or some other material, for example, from plastic. Its manual version is budgetary - its cost does not exceed several hundred rubles, and its scope is very wide. Curly sawing with a hand jigsaw is a fun activity. This is not only a pleasant pastime, but also practical benefits, not only financial, but also moral.
The construction of this tool is very simple:

Electromechanical jigsaws
The electric hand-held jigsaw has become an indispensable tool in the household. It can be used to cut various materials: plywood, wood, plastic, metal, ceramics, etc.
 This tool works from electrical network 220 W and is a plastic case with operating elements, equipped with a control knob. The main component is the saw blade., which is attached to the rod located at the front of the apparatus.
The rod is driven by an electric motor. The movement of the cutting blade is reciprocating. In some samples of this tool, to speed up the sawing process, the principle of a pendulum stroke is implemented, that is, the file moves not only up and down, but also back and forth.
Cutting blades - consumable and they need to be changed from time to time. They are functionally different from each other - there are nozzles for wood, metal, ceramics. There are thicker blades, with more or less stiffness, with coarser or finer teeth. An important characteristic of the files is their shank. The most common now are U-shank and T-shank files. It is with such files that you need to purchase a jigsaw - then there will be no shortage of consumables.
 An electric tool differs in many respects, but in this article we will pay attention to only one important factor - this saw blade backlash... This characteristic affects the direction of the cutting blade when curly cutting. Jigsaws of many brands do not cope with the task of a perpendicular cut, this is especially sensitive when cutting thick wood - the error can be up to 5 mm.
The experiments carried out on the figured sawing of a tree showed that the best jigsaw turned out to be a tool from the company Festool. Popular firm Makita in this competition she showed herself not with better side- the error of the perpendicular-shaped cut turned out to be quite large (up to 5 mm), also the entry into the tree at the jigsaw of this brand occurs with large chips.
 is already a professional cutting equipment. Its design is more complex than the equipment discussed above. The principle of its operation can be compared with sewing machine, which has a jigsaw blade instead of a needle. The quality of the products obtained with this unit is incomparably better. The error of a perpendicular cut with a large thickness of the workpiece is zero.
The only drawback of this electromechanical device is its high price. But this is compensated by the comfort of work on it and high productivity with the highest quality of the products obtained.
Manufacturing technology of decorative and openwork products

To work, you need the following:
- Plywood or timber.
- Template, drawing or drawing of the future product.
- Manual or electric jigsaw.
- Files and files of various configurations.
- Wooden square and ruler.
- Skin of various grain sizes.
Cutting drawings
To get started, you need to determine what should happen at the end of the work. To do this, you need a drawing or template of the future product. You can think of it and draw it yourself, or use it ready-made solutions... There are many collections containing drawings and diagrams of crafts. The internet is rife with diversity too interesting ideas... And for almost everyone there is a curious diagram or drawing.
Usually, diagrams of small crafts are removed on A4 paper. To create drawings of decorative and stylish furniture or other large-sized household items, Whatman size A0 and A1 is used, however, other paper and cardboard carriers can also serve for this purpose, for example, pieces of unnecessary wallpaper glued together.
After the drawing is selected, it must be transferred to the material from which the craft will be made. There are several ways to do this:

Technology
After drawing a drawing on the workpiece, from which the future craft will be made, they begin to saw it out. Sawing begins from the internal elements of the workpiece. and only then the outer contour is cut out. This procedure is more convenient - it is much easier to hold the workpiece.

Holes for the jigsaw blade are drilled in the sharp points of the inner contour, which also makes work easier. The holes must be drilled carefully, as chips can form on the back.
To avoid this, you need to follow simple rule- do not drill the holes completely. For example, if the thickness of the plywood is 3 mm, then the depth of the drilled hole must also be set to 3 mm. This is easy to accomplish if you limit the depth of entry of the drill into the plywood with electrical tape - wrap the drill with it, leaving only the tip 3 mm long without electrical tape. After drilling, turn the workpiece over and make holes with an awl.
After the workpiece is cut out, it needs process and grind... If the outer contour is not difficult to process, then grinding the internal elements is sometimes difficult, especially in sharp corners. Such places are difficult to grind with a file or file. Therefore, ingenuity can come to the rescue. You need to cut off a thin strip of sandpaper and insert it instead of the jigsaw and then hard-to-reach places it will be much easier to process.
The principles of sawing with a hand or electromechanical jigsaw are similar, but there are differences.
Hand jigsaw
 When working with this tool, an additional device is required - sawing machines... It should be equipped with a clamp to attach to a workbench or table. This device serves as the base on which the workpiece is sawn. This add-on can either be purchased at the store or made from a piece of thick plywood yourself.
When working, the workpiece must be fixed at chest level - this will make the work more comfortable and maintain posture.
Hand jigsaw requires care and patience.... The files of this tool are quite fragile, therefore, you need to avoid sudden movements and distortions of the blade, and also during operation do not allow the file to overheat, for this you need to pause work every 10 seconds and let the cutting blade cool down.
When sawing, the jigsaw should remain in one place, that is, it is not moved forward or backward, the movement of the hand jigsaw is vertical, reciprocating. Only the workpiece is moved, smoothly turning it, without stopping the forward movements of the hand jigsaw.
Sawing with an electromechanical tool
The principle of operation is very similar to that of a hand tool. The difference lies in the fact that for a manual jigsaw you do not need additional equipment (machines with a clamp). And also when cutting out, the figured movement is made not by the workpiece, but directly by the tool itself. The wooden workpiece is firmly pressed or attached to the workbench, and all figured movements are performed directly with a jigsaw.
 The jigsaw has an advantage over manual- this is the thickness that he can cut out figuratively. A piece of wood with a thickness of 50 mm is not available for machining with conventional, non-electric tools. So, if you need to decorate elements of the porch or furniture, then you can't do without a jigsaw.
The choice of a power tool must be approached very carefully, since not all tools allow high-quality shape sawing of great depth.
Safety engineering
Safety fundamentals are mandatory for all types of physical work..
