Build a large gazebo with your own hands. We build a gazebo with our own hands
For the construction of a wooden gazebo, you must choose optimal sizes structures, the type of foundation, the shape of the structure itself and the materials for the walls and roof. The further process consists of several stages: drawing up a drawing, pouring the foundation, assembling the frame and sheathing. In the absence of experience, one should start with buildings of small size and regular shape, which greatly facilitates the task at hand. With this approach, do-it-yourself gazebos made of wood are obtained the first time.
Firstly, wooden gazebos are divided into open and closed. The first option is light seasonal buildings that are not intended for use in the cold season. Closed gazebos are more permanent structures, with a solid roof, often glazed or with one blank wall. Secondly, garden gazebos made of wood can have a square, rectangular, round shape, and also be six- or octagonal.


Any type of foundation is suitable as a base: shallow tape, slab, columnar. You can even install the gazebo on a cinder block or flat laid logs. The larger the dimensions of the structure, the stronger the foundation for it should be. Another difference is the material for the walls: it can be wooden bar, slats and boards, as well as solid logs.


So, in order to choose the right type of construction, you first need to decide on the purpose. If you need a gazebo for a family vacation in summer period, an open type option of small size is suitable. As a base, you can use a cinder block, brick pillars, a columnar foundation made of pipes or logs. If gatherings with friends or celebration of family events in a wide circle are planned in the gazebo, you should pay attention to the spacious closed-type structure with a slab or ribbon base.

It is much easier to build a square or rectangular gazebo than a round or hexagonal one. Using logs and planks to build walls also simplifies the building process, but curly lattice walls look more sophisticated. All this should be taken into account when choosing materials and drawing up a drawing. In addition, the elements of the gazebo must be combined with the landscape of the site and the residential building.

Construction of the foundation for the gazebo
After drawing up the design drawing, choose appropriate place for its construction. This area should be level, open enough, away from sheds and country toilet... It is desirable that the place for the gazebo is on an elevation, then the foundation will be protected from flooding and dampness. After removing vegetation and large stones, markings are made for the foundation.

Column foundation for a gazebo
This is the simplest and a budget option foundation. To make it you will need:

Support pillars should be located at the corners of the gazebo and under the load-bearing walls every 2 m. If metal pipes or log trimmings are selected as supports, holes for them are prepared using a hand drill. The diameter of the holes is 10 cm larger than the diameter of the pillar, and its depth is approximately 70 cm. For pillars made of brick or cinder block, pits are dug with a shovel, giving them a square shape. The depth of such holes should not be less than 50 cm.

Sand is poured at the bottom, and then crushed stone; the thickness of each layer is about 10 cm. Metal pipes are cut into equal parts so that after installation in the pits they rise 15-20 cm above the surface. The metal is treated with an anti-corrosion compound and dried. They are lowered into the holes and aligned vertically. A piece of reinforcement is inserted inside each pipe, the length of which is 10 cm longer than the length of the column. Now concrete is poured into the pipes, and the space between the walls of the pit is clogged with soil and stones and tamped.

Instead of pipes, you can take dry, dense logs. They are treated with an antiseptic, and then coated with bitumen mastic and dried. After that, the supports are lowered into the prepared holes, tamped or poured with concrete.

If blocks or bricks are used as pillars, the bottom of the pit is covered with a pillow of sand and crushed stone, a piece of reinforcement 70-80 cm long is driven in the center and the pit is filled with concrete solution to the top. When the concrete stands, its surface is covered with roofing material, and a brick or cinder block is laid on top. The reinforcement should be in the center of the post and protrude 10 cm above its surface.

This type of foundation is perfect for a small round or square gazebo. The boundaries of the site are marked out, after which the soil is selected to a depth of 40-50 cm. The bottom of the pit is leveled and tamped, covered with sand to a height of 10-15 cm, spilled with water and tamped again. Then crushed stone is poured with a layer of 15 cm and a reinforcing mesh of rods tied with wire is laid.


Having retreated from the edge of 10 cm, at the corners, vertical sections of reinforcement are fixed so that they protrude 15 cm above the foundation.A low formwork of plywood is installed around the perimeter, reinforced with spacers, and poured with concrete mortar.
Shallow strip foundation

This option is best suited for a spacious enclosed gazebo. On the site, the boundaries of the base are marked, denoting them with hammered pegs with a rope stretched between them. The width of the tape should be slightly larger than the thickness of the walls, usually 25-30 cm. The depth of the trenches is 50-70 cm, depending on the density of the soil. The bottom of the trench is covered with sand, then gravel or crushed stone, reinforced with a lattice of metal rods. The formwork is made low, enough for the foundation to rise 10 cm above the ground.

When the foundation has stood and hardened, you can proceed with the installation of floor slabs. This will require:
- dry timber with a section of 10x10 mm;
- edged board thickness from 2 cm ;;
- nails;
- hammer;
- drill;
- level;
- jigsaw.
If the gazebo is rectangular, installation of the floor will not take much time. The timber is treated with an antiseptic, dried in air and cut to the width of the arbor. First, the beams are laid along the perimeter of the foundation, using reinforcement protruding from the concrete for fastening. To do this, holes are drilled in the tree, twigs are threaded through them and bent with a hammer.

DIY garden gazebo - drawing

Next, intermediate logs are laid at a distance of 30-40 cm; be sure to check their horizontal position in order to exclude a slope of the floor. The logs are fastened together with nails or self-tapping screws. After that, the timber is sheathed with solid boards, pre-treated with a primer. This method is not suitable for round and hexagonal arbors; there the bars are mounted either in the form of rays diverging from the center, or in the form of trapezoidal cells.

For a log gazebo, a frame made of timber is not needed; construction immediately begins with laying the walls. Roofing material is laid on the foundation, and the first row of logs is fixed on top. The logs should be located along the perimeter, excluding only the doorway. At the ends of the logs, grooves are cut out and the corners are fastened. It is advisable to join the logs only at the corners, so the appearance of the gazebo will be more attractive.

Having laid 3-4 rows of logs around the entire perimeter, they move to the corners of the structure. The logs are sawn into pieces about half a meter long, grooves are cut and laid at the joints of the walls. You can make trapezoidal corners by using different lengths and shrinking them as you build the walls. When the structure gains the required height, the logs are again laid around the entire perimeter, reinforcing the upper crown with metal brackets or spacers. The space between adjacent corners can be closed with a curly wooden lattice, forged lattice, or left as it is. Now it remains to mount the roof, and the gazebo will be ready.

Arbor made of timber and slats
To erect an open wooden frame-type gazebo, you will need:
- timber with a section of 80x80 mm;
- slats 20x40 mm;
- plumb line;
- screws and nails;
- hammer;
- screwdriver;
- antiseptic primer.
When installing the floor of the gazebo, the lower rail from the bar has already been laid. Now you need to install vertical supports and sheathe the walls of the building. For vertical supports, a dry flat bar of 80x80 mm is used. First, they mount the corner posts, fix them with temporary spacers and set them strictly vertically. The racks are nailed to the lower trim or fastened with metal plates and bolts. Intermediate supports are installed between the corner supports, at a distance of 1-1.25 m from each other.


When all vertical supports are installed, they should be secured with a top strapping. The same 80x80 mm timber is used as a strapping; it is laid on top of the corner posts, aligned horizontally and nailed. All elements of the upper trim must be in the same horizontal plane. At the end of the installation, temporary spacers are removed and the walls are sheathed with slats.


The slats can be stuffed horizontally, leaving gaps between them from 3 to 7 cm, make vertical shields out of them, and fasten them diagonally between the posts. But walls made of wooden lattices with diamond-shaped cells look best. For the manufacture of such gratings, the slats are stuffed at an angle of 45 degrees. At the same time, the gratings should not be continuous: it is recommended to leave free space above the doorway and in each wall in the form of an arch or a semicircular cutout.
Installation of the gazebo roof

The roof for the gazebo can be made single-pitched, gable, or in the form of a tent. The simplest option is a single-pitched roof, but a four-pitched hipped roof is most often found. For its arrangement, they take 4 beams with a section of 80x80 or 100x100 mm, knock them down on the ground so that they form a regular pyramid, and raise them up. It is recommended to use metal plates and bolts to attach the rafters to the top rail. Also, with the help of plates, the beams are fixed in the center of the roof.

To strengthen the rafter system, horizontal spacers are stuffed between the rafters from a bar of a smaller section. If the gazebo is very large and has a rectangular shape, it is better to mount a gable roof. To do this, triangular trusses are knocked down from 80x80 cm beams and installed on the upper harness. The distance between the trusses is 1 m, they are fastened with a tie-in into horizontal beams and fixed with spacers. On the upper edge, the trusses are connected by a ridge beam.
When rafter system installed, it is covered with a waterproofing film, 2 cm thick slats are stuffed over the film and the roofing is fixed. In order for the gazebo to blend harmoniously into the landscape, the roofing must be the same as on a residential building. After installing the roof, it remains to equip the internal space, connect the electricity, paint or varnish the walls.

Hexagonal gazebo, diagram
Video - Do-it-yourself wooden gazebos
Is there enough space on your summer cottage or local area for small architectural structures? Then use it for the construction of an open gazebo, where in summer time you can have a snack and relax in the shade, or celebrate an important event. If you do not have such experience, then for manufacturing it is better to take improvised materials from wood - beams, boards and logs, erecting walls of stone or brick is a more difficult task. But first you need to figure out how a wooden gazebo is built with your own hands, which is described in this article.
We select a gazebo project
The first step is choosing a design suitable for your summer cottage. If everything is calculated correctly from the very beginning, then nothing will have to be redone later, which means that the construction will be inexpensive. To do this, you need to give answers to the following questions:
- What area are you willing to allocate to make a gazebo? Sketch a detailed plan of the site and indicate on it not only the future structure, but also other planned and already existing objects - a garden, a vegetable garden, outdoor grill and even a swing for children. This will help determine the exact location of the building and its dimensions.
- How many guests and residents will be in the gazebo at the same time?
- What should be the design and decor of the new building, including the interior?
- What materials are available and how much more you need to buy.
Note. The dimensions of the open pavilion depend on the planned number of guests. To freely fit 2-3 people, a room of 2 x 2 m (including the table and benches) is enough, and for 10 guests you will already need a platform of 4 x 4 m.
For homeowners with no construction experience, a rectangular or square design is recommended, this is the easiest and cheapest option. Hexagonal and octagonal gazebos look much more beautiful, but they are also more difficult to build. The same applies to round structures, where during the assembly process it is necessary to provide for smooth turns of the walls. An example of an original hand-made gazebo is shown in the photo:

The main difficulty in the construction of hexagonal and round structures is the roofing. The budget option with a single-slope or gable roof th, with which square pavilions overlap. We'll have to make a hipped roof in the form of a tent or dome, shown in the photo below, and this complicates the task.

Reference. V landscape design unusual architectural forms are used that do not have a roof at all. These are pergolas - canopies, covered on top with grapes and other climbing plants. Roofing in such gazebos is a lathing of boards or timber, which is subsequently wrapped in a vine.

It looks like a pergola - a gazebo without a solid roof
As for building materials, it is better for beginners to build their first arbor from wood - boards, beams, OSB boards. Experienced people can take up the metal gazebo with polycarbonate roof shown in the picture. But you need to understand that metal, in particular pipes and profiles, will cost more than timber.

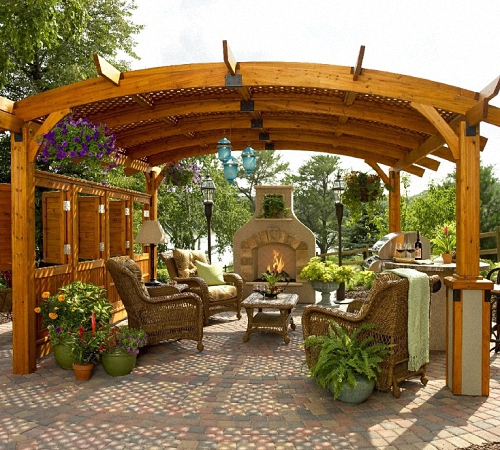
The interior design of the gazebo is at your discretion. But the arrangement of pieces of furniture and various fixtures must be thought out in advance so that there is enough space. The minimum set is a table and benches for vacationers, how to arrange them is shown in the photo. The interior can be supplemented with an oven with a barbecue grill, a fireplace and various furniture such as wicker chairs and cupboards.

How to make a simple gazebo
We present a rectangular structure measuring 2.2 x 3 m, assembled from boards using only two tools - a screwdriver and an electric jigsaw. To build a gazebo made of wood, shown in the diagram, you will need:
- board 150 x 40 mm - about 1 m³;
- sheets of ondulin or corrugated board - 10 pcs.;
- ridge fittings - 5 pcs.;
- galvanized self-tapping screw 4.2 x 75 mm - 450 pcs.

The idea behind this building is to apply the fast erection technique frame houses, when all the walls are assembled on the ground, and then put in a vertical position and connected to each other. Due to this, you can make a gazebo in literally one day, which is shown in the video at the end of the section. Next, we will consider the implementation of work in stages, starting with the construction of the foundation.
Preparation of the base
Before you build a simple garden gazebo for a summer residence, you need to clear the area, remove all interfering objects from it and level the ground. Since the structure is very light, the settlement of the soil under its weight will be minimal. Here, the columnar foundation will rather serve as an anchor so that the structure does not budge from strong gusts of wind.
Note. The video below shows that the master does not make the foundation for his structure at all, but only lays concrete tiles.

Cinder block base scheme
For the device of a columnar foundation, use the following step-by-step instructions:
- Mark the area and locate the 4 corner posts. Dig holes at the designated points for brick posts measuring 380 x 380 mm. The depth of mini-pits is 0.7-0.8 m.
- Tamp the bottom of the holes and fill in a sand cushion 10-15 cm thick. Prepare 4-5 buckets of M150 concrete and place them on the sand to form a platform.
- After the concrete mixture has hardened, lay out the columns with a cross section of one and a half bricks. Cinder blocks laid in pairs with bandaging are also suitable.
- Cover the walls of the posts with bitumen, then fill the remaining sinuses with soil. On top of the foundations, lay a waterproofing of 2 layers of roofing material.

For the subsequent fastening of the wooden frame, iron rods are vertically inserted inside the posts. There is another way - installation of beams on anchor bolts. A base of this type is also suitable for building a pavilion on an iron frame welded from round and shaped pipes.
An important point. If you plan to lay out a stove and bricks inside the gazebo, then a separate foundation is needed for it. How to build it correctly is described in.
Wall and roof construction
In short, your task is to twist 2 end walls, set them upright and connect them with beams. Step by step it looks like this:
- Make end wall frames as shown in the photo. For corner posts, use 2 boards each, between which the lower crossbar and rafters are attached with self-tapping screws. For rigidity, screw a small bridge between the planks that form the ridge of the roof.
- Place the frames in the design position and secure with struts. Connect them together with boards from below and from above.
- Cut out a floor log and secure it in the middle of the building between the two planks that connect the gables.
- Attach a railing at a height of 0.8-0.9 m, which will serve as additional rigidity. Tie them with uprights to the bottom board of the roof sheathing.
- Finally, form the roof frame from the longitudinally laid planks. Lay ondulin or profiled sheet on top and screw on the ridge elements.

Advice. It is not necessary to repeat the inclined structure of the walls, as the master does in the photo. For simplicity, make gables with upright posts, and then proceed in the same order.

Do not forget to soak all the wood with an antiseptic compound and let it dry before assembling the frame. This operation is mandatory if you want to extend the life of the structure. Priming and painting will be done at the end of the construction.

Floor arrangement and decoration
In this design, the floors are laid very simply: boards must be laid on 3 existing logs, aligned along one edge. Then screw them to the logs with self-tapping screws and cut off the ends sticking out on the other side. Leave a gap of about 1 mm between the floorboards so that they do not rub against each other and do not creak.
Advice. Before laying the floors, attach vertical posts to the central log, they will serve as supports for future benches.

When the floors are ready, it is worth making stationary benches from the same boards along the side walls. To do this, you need to install short racks in the corners (the middle one is already there) and connect them with crossbeams. The role of the backs will be played by the horizontal jumpers mounted earlier.
To design the resulting gazebo, you can give full free rein to your imagination. Instead of an unsightly ondulin, you can put reed mats on the roof, and decorate the side openings with decorative gratings. It does not hurt to bring lighting inside the arbor and paint it in the desired color or cover the wood with several layers of varnish.
Construction process on video
Construction of a hexagonal arbor
It is somewhat more difficult to build an arbor with six corners, although the order of work is preserved. For the construction, the following materials are usually used:
- timber 15 x 15 cm - on horizontal beams;
- timber 10 x 10 cm for racks;
- board 10 x 5 cm goes to the roofing device.

Foundation drawing with laid beams
To begin with, on the site plan, draw a sketch of the future structure - a regular hexagon. Enter it in the building area and locate the center of the structure. Now you can start marking in the yard.
Since hexagonal garden pavilions differ in shape, marking the site will take more time. To mark the installation points of the foundation posts and upright posts of the gazebo, find the center of the structure and drive a peg into the ground, referring to the drawing. Then tie a rope to it, whose length is equal to half the outer size of the pavilion, and fasten a stick at the end. You will get an impromptu compass, with which you draw a circle on the ground. By dividing it into 6 equal segments, you will determine the position of the supports.

- Lay out columnar foundations at the designated points, as described in the previous section.
- Putting roofing material on the foundation posts, attach beams from a bar to them, interconnected in half a tree. In the middle, install 3 intermediate logs (can be made of round timber) for laying the floors.
- Place 6 uprights and fix them to the corner beams. Connect the upper ends of the supports with planks and put up the railing, thereby tightening the frame of the gazebo.
- Assemble the rafter system. The base should be a hexagonal element hewn out of wood, the rafters coming from each corner and the middle of the face adjoin it (shown in the photo). Make the sheathing and install the roofing material of your choice.
- Install floors and wall finishing.

Note. The rafter system does not have to be assembled in place, at a height. The structure can be put together on the ground, and then lifted with helpers and attached to the racks.

The device of the rafter system
If desired, a winter garden can be made from a large hexagonal gazebo. To do this, you will need to glaze all the openings and provide for the installation of a stove with a chimney. The procedure for conducting construction work is shown in detail in the video:
Conclusion
Garden gazebos do not belong to capital structures, since they are lightweight and do not need massive foundations. Therefore, their construction does not take much time, provided that all materials are available. As you can see, in some cases, you can handle it alone. For the construction of more complex structures, for example, a Chinese-style gazebo or a domed roof, you definitely need to involve assistants.
Hello everyone!
If you started to build on your garden plot a beautiful and simple gazebo, but you don't know where to start, maybe this article will help you.
Before starting construction, you need to decide what your gazebo will look like. There are a lot of options for such designs. These are both closed gazebos, and open, square and polygonal, single or gable, hipped and spherical, small and large, with or without a stove, made of brick, wood or metal, glass or polycarbonate.
Option 1.
Option 2. 
Option 3. 
Option 4. 
Option 5. 
As you can see, there are a lot of different types of gazebos. Therefore, it is necessary to choose for yourself the most optimal option that would meet your needs and capabilities.
Below, we will look at how to build a simple do-it-yourself tree garden gazebo. For example, let's take another beautiful option:

Before starting construction, you will need to draw a sketch with all dimensions, taking into account the type of roof. Therefore, instead of a one-pitched one, you can make a gable or square one.


According to the sketch made, we purchase the required material in the required quantity.
When everything is ready, you can start building. Since the gazebo is stationary and rather bulky, it is necessary to make a foundation for it.
We start by marking the perimeter with pegs and a rope in the chosen place.

After that, we dig a hole 90 cm., Fill it with sand or stones and fill it with mortar.


In advance, while the concrete has not hardened, we install anchors to fasten the vertical posts. After the foundation is completely dry, we first fix the racks themselves.

Having installed the racks, we assemble the frame itself. We begin to make it from the bottom strapping. To do this, we use a wooden beam, laying it every 40-50 cm. After that, we install all the other frame racks, which should already hold the upper harness and the roof. The number of such racks depends on the size of the gazebo.


Once the frame is ready, you can sheathe the floor with a board. You can fasten it to the crate with both nails and self-tapping screws.

The next stage of construction is the installation of the roof. To do this, we first make the upper harness. The material for it will be a beam, which is bolted or nails attached to the supports. For greater strength, you can use the corner mount.


The roof is already made directly depending on the chosen shape. Basically it is one, two or four-pitched roof. If you decide to make a gable roof, then the installation of its rafters will be slightly different from that for a gable roof. The main rafters are attached in pairs, and for the strength of the structure, you can also add auxiliary ones, which are attached both to the upper strapping and to the main rafters.

After that, we sheathe the roof with the selected roofing material, as well as sew up the gazebo itself as provided in the sketch.


Do-it-yourself gazebo from scrap materials
Quite good gazebos are obtained not only from building materials, but also from scrap materials. The main thing is that there would be desire and imagination. And what is the material at hand. In general, we can say that this is all that is no longer good for anything. This is both construction waste and old window frames, plastic bottles and many other things that sometimes litter country cottage area... Of course, using such waste, you still cannot do without special building materials. However, a gazebo built in this way will be much more original, such as these


If there are a lot of unnecessary tree trunks on your site that you cannot get rid of in any way, then they can also go into business.


Products made from plastic bottles are quite original. This "good" is enough to build even a house out of them.

You can not bother with building materials at all, but use it for a gazebo climbing plants.

Finding a croaker and old dry logs, perhaps, will not be difficult. The gazebo made of this material looks quite good.

If there is a reservoir near you and a lot of reeds grow on it, then it can also be used to create a gazebo.

In general, there are many options, it would be, as they say, desire. Even old car, who will never go again, may also work.

A gazebo from a profile pipe for a summer residence (photos and drawings)
The metal structure, after the wooden one, is the most common. Usually, a profile pipe and polycarbonate are used for its construction. But you can also sheathe it with wood.

As with the construction of any other gazebo, you need to start with a blueprint. For a structure made of a profile pipe, this is also important because you indicate in the drawing the dimensions according to which you will subsequently have to cut the material.

A fairly simple and uncomplicated design of such a gazebo is a rectangular shape with dimensions of 2x3 m. It is not so cumbersome, and you can easily install a table and several chairs or benches in it.

The difference in the construction of a gazebo from shaped pipes in comparison with other materials lies in the set of the necessary tools. You will need to have a welding machine, a level, a grinder, drills with a drill and fasteners.
The foundation is not made solid, but holes are dug according to the number of supports. The hole will need to be dug to a depth of 60 centimeters. On the supports, you can use a profile of 80x80 mm and a wall thickness of 3 mm. Support heels must be welded to the uprights, which will increase the rigidity of the structure.

Crushed stone is poured into the dug holes, then racks are placed and poured with concrete. At the same time, it is necessary to check the verticality of the racks as the concrete hardens.
After the foundation has hardened, the lower strapping is made. For it, a profile of a smaller section is used than for the racks. It must be welded to the supports at a certain height above the ground level. A rafter system is also created from the profile. With a gable roof, it is welded at an angle of 15 degrees. For the convenience of fastening the roofing material, you can make a sheathing from the pipe in 45 cm increments.

 If you want to make more complex forms of gazebos, you need to be patient, as the process will be more time consuming.

But if you are determined to achieve the result, then no difficulties will stop you. And a gazebo created by your own hands will delight not only you, but also your guests.
A cozy family dinner in the open air, tea on weekends, chatting with friends or just being in nature - all these moments are associated with the gazebo. It is especially pleasing if this element of the exterior is made by hand. Check out the design and construction options different types gazebos and get valuable advice on how to build them.
Everyone who has a creative approach and imagination will be able to build a gazebo with their own hands. Initially, decide on the place of construction of the gazebo and prepare the site for work.
This is followed by the definition of the shape of the structure, the choice of materials for its manufacture, the creation of drawings. In relation to this, the foundation is laid, the frame is erected. The final stage is the finishing of the gazebo roof.

Choosing a place for the gazebo should be based on its functional features. If the gazebo will perform the function of receiving guests, noisy feasts, then build it near the house. The arrangement of a gazebo in the garden opens up new possibilities for admiring nature and enjoying passive relaxation.
A pleasant appearance opens from the gazebo, we recommend building it near flower beds, reservoirs, green spaces. Another important factor creating a quality gazebo is harmony with the environment. Finishing, material for the construction of walls - must fit into the landscape on the site.
DIY gazebo: photos, drawings:
Simplifies the process of constructing a gazebo - having a specific action plan and all the necessary tools. In the absence of work experience, choose simple forms buildings - rectangular, square. Decide in advance on the material for decorating the walls in the gazebo, the absence or presence of a wooden floor, the possibility of complementing the structure with a barbecue.
Do-it-yourself gazebo construction technology from wood
Wooden gazebos are most common. This is due to the ease of processing this material and the affordable cost. In addition, wooden structures have the following advantages:
- attractive appearance, harmony with the exterior, naturalness;
- the ability to combine with glass, metal, brick surfaces;
- long-term operation, with proper care and wood processing;
- environmental safety of the materials used;
- ease of installation work;
- the ability to create a design of any configuration and shape.

Before starting the construction of a wooden gazebo, consider the following processes:
1. To ensure maximum durability and strength of the structure, prepare a high-quality foundation for the gazebo and carefully treat the material with an antiseptic compound.
2. The functional features of the gazebo determine its size.
3. On initial stage works, the construction site is cleaned of vegetation and debris and leveled.
4. The design of the gazebo should be matched to the surroundings, use high quality building materials when performing construction work.
5. Create a correct and well-thought-out project, which describes to the smallest detail the entire action plan for building a gazebo with your own hands.
Before making a gazebo with your own hands, decide on the type of building being built:
- closed - has a permanent roof - is operated at any time of the year;
- open - suitable only for summer use, some options for such gazebos are covered with an awning or an arched roof made of pergolas is made.
The simplest in execution and convenient in everyday life is a rectangular version of a wooden gazebo with a gable roof.
DIY gazebo:

After drawing up an action plan, the process of determining consumables for the construction of a gazebo follows. In the process of work, prepare materials in the form of:
- sand, cement, crushed stone - for concrete mortar;
- piles;
- wood;
- bricks;
- reinforcing rods;
- wooden beam;
- metal corners;
- fasteners in the form of screws and nails;
- finishing material for the roof: polycarbonate, flexible tiles, slate, corrugated board.
To work with wood, you will need tools in the form:
- electric plane;
- special saw;
- a set of keys;
- grinding equipment;
- hammer and screwdriver.

Divide the work of erecting the gazebo into several stages, carefully approach the implementation of each of them.
1. Select a place to install the gazebo.
It is not recommended to build a structure in the lowlands, since under the influence of moisture that accumulates there, the gazebo will quickly begin to rot and collapse. When the gazebo is directly adjacent to the house, try to make it in the same design as the main structure. Make sure that a pleasant appearance to the exterior opens from the gazebo. In addition, we recommend installing the structure in places protected from wind loads, near walls or fences. Provide full access to the gazebo by creating a walkway to it.
2. Build a foundation for a wooden gazebo.
There are several types of foundations suitable for a gazebo. The choice of one or another option is determined by the total mass of the structure, the characteristics of the soil and the individual characteristics of the site.
The simplest, most convenient to manufacture and reliable is the columnar version. To create such a foundation, follow these steps:
- mark with a rope and a peg;
- clear the soil 5-10 cm from the top layer;
- make indentations 50 cm;
- lay sand, gravel, concrete on the base;
- lay roofing material to ensure waterproofing;
- build brick pillars that provide a small ventilation gap between the gazebo and the foundation;
- reinstall the roofing felt.

It is possible to build a shallow strip foundation or installation of piles. In the latter case, the work is carried out at maximum speed, it is enough to purchase ready-made screw piles and install them on pre-marked areas. At the same time, there is no need to wait for the time for the concrete solution to harden, as in the previous version. Therefore, with a limited time interval, we recommend staying on the pile version of the foundation.
There are several options for floor installation - with full contact with the walls or installation of walls on the base of the foundation. We recommend choosing the second option. If necessary, such a structure is quite simple to assemble. For the manufacture of the floor, use wood in the form of a bar with a section of 100x100 mm. Pre-treat the wood with a moisture resistant antiseptic and fire retardants. Boards are installed on logs from a bar.
4. Construction of the frame part is the next stage of work on a wooden gazebo.
The frame of the building, on the one hand, must protect the interior space from the wind, but on the other hand, it must be open. Building blank walls is a pointless process. For the construction of the walls, an edged board is used, fixed on the beams with nails. Initially, load-bearing supports are built from a bar, and then install boards, the evenness of the installation of which is checked by the level.

5. Internal and exterior decoration walls in the gazebo.
The simplest option is to decorate the walls with wooden planks. To improve the attractiveness of the gazebo - build window openings in it, wooden railings, use carvings, openwork overlays. Additionally, decorate the gazebo with curtains, fresh flowers, textile elements in the form of pillows and seat covers.
6. Installation of a roof in a wooden gazebo.
Select the roofing material for the gazebo in relation to the main residential building. There are many options for finishing the roof in the gazebo: slate, tiles, corrugated board, bituminous roofing, polycarbonate, metal.
After completion of construction, install the necessary furniture in the gazebo: table, chairs, sofas, armchairs. If necessary, add a brazier, however, keep in mind that when using a brazier, the wood is pre-treated with fire retardants - compounds that prevent combustion. It is possible to install electrical wiring in the gazebo, install lighting fixtures.
In order for the wooden gazebo to serve you as long as possible, follow the recommendations below for caring for the structure:
- before the beginning of winter, remove debris, tree leaves from the gazebo;
- on winter period cover the building with polyethylene film;
- periodically treat the structure with an antiseptic composition;
- all furniture and household items are taken out of the gazebo for the winter.

Do-it-yourself gazebo photos and original ideas
A wooden gazebo is a standard option, we suggest that you familiarize yourself with unusual and extraordinary options for the construction of gazebos.
1. A gazebo made of plastic bottles.
An excellent saving option when creating a gazebo. Bottles are used for both wall cladding and roofing. Plastic has good performance characteristics, excellent resistance to weather resistance. The use of bottles of different colors and their combination helps to create real masterpieces that are as cheap as possible.
2. A gazebo made from the trunk of an old tree.
If there are fruit trees on the plot that do not bear fruit. Saw them up and build a gazebo. The natural curves of the wood make the gazebo elegant and natural. First, remove the bark from the trees and open them with varnish. For the manufacture of the roof, in this case, shingles or reed mats are perfect. Walls made of vines will provide additional protection from the wind.
3. Living gazebo.
This option is distinguished by the most harmonious appearance with nature. For the manufacture of gazebos, only shrubs and trees planted in a special way are used. A metal profile is used to create the frame. The disadvantage of such a gazebo is the fact that it functions only from late spring to mid-autumn.

How to build a gazebo with your own hands: a variant of a polycarbonate gazebo
The polycarbonate gazebo has the following advantages:
- lightweight construction - the gazebo does not need an expensive foundation, it is possible to build a mobile gazebo, which is transferred from place to place;
- ease self-made- the material is easy to process, it is diverse color solutions long-term in operation;
- the possibility of combining with other materials in the form of glass, wood, metal.
Among the advantages of polycarbonate, we note:
- ease of cutting and processing;
- the ability to bend the material at a certain angle;
- ease of drilling;
- resistance to temperature extremes;
- operation in high humidity conditions;
- Fire safety;
- high mechanical strength;
- excellent light transmittance.
Diy gazebo drawings and dimensions:

Before starting work, decide on the type of construction and create a drawing. Next, level the area and make the markings. For a do-it-yourself gazebo, the dimensions are determined taking into account the functional load on the structure.
The need to build a foundation and its type depends on the weight of the structure, the complexity of its execution and the size of the gazebo.
Create a frame structure to hold the polycarbonate in place. There are several of its options:
1. Wood.
Among the advantages, we note: naturalness, affordable cost, ease of processing, excellent appearance. Among the disadvantages, we single out: the need for constant care, fragility, instability in front of weather influences.
2. Metal.
Advantages of the metal structure: mechanical strength, reliability, durability. Disadvantages: high cost, compared to wood, the need for additional anti-corrosion treatment.
3. Stone frame.
Materials are distinguished by naturalness, attractive appearance, long service life. Disadvantages of the design: the need to build a powerful foundation, high cost, duration of construction.
When choosing a light gazebo design, it is enough to install the supporting elements, without pouring the foundation. Otherwise, a strip, columnar or monolithic foundation is erected. The frame for polycarbonate must be strong, rigid and even. Self-tapping screws or nails are used to fix wooden elements. Metal structures connect welding machine or bolts. To create stone walls, stock up on cement mortar. All parts are interconnected in relation to the drawings. This is followed by the process of installing polycarbonate on the frame structure.
DIY gazebo video:

There are so many options for building gazebos in the country that you can choose the design that is ideal for your personal plot and will meet the requirements imposed on it is not difficult at all. The following describes how to make a gazebo-tent, a fungus and a rotunda with your own hands. In addition, you can learn how to build beautiful gazebos of other designs.


If you do not want to install a solid stationary gazebo on the site, you can limit yourself to a small one: build a light tent.


To erect a gazebo-tent with your own hands, in the corners of the site you like, you need to place four concrete discs or slabs, which will serve as the foundation of the structure. In each of them, install on a metal rod or tube made of aluminum or durable plastic, which at the top connect together using a clamp or wire. You have arcs-supports for the canopy.


As you can see in the photo, for a tent-gazebo in the country, you can use a dense colored fabric, oilcloth or thick film as a covering:


First fasten the material in the center - put on a new clamp over the connection of the arcs or wind the wire or twine, but this time through the roof fabric. Then pull the awning and tie it to the supports, and so that the fabric does not slip through the pipes, tighten the clamps in place of the ties. When making such a gazebo with your own hands, a district of two or three racks from the ground to the awning, you can pull a mosquito net (as an option - a coarse mesh, along which to let climbing plants), leaving a place for entry.


Under this gazebo-tent in the country, you can place a rocking chair, a table, light plastic chairs, a cot for a day's sleep - everything you need to relax in the fresh air. Such a design will successfully stand for the entire summer season, and it only needs to be disassembled with the onset of cold weather, and then only by removing the fabric awning.


How to build a beautiful mushroom gazebo for a summer residence with your own hands (with photo and video)


To protect from the sun and rain, you can make a summer cottage mushroom on the site with your own hands: the support of this small open building consists of two parts: the lower one is a metal pipe of 0150 mm and a length of 1.5 m, and the upper one is a wooden rack 2 m long.

Before you build such a gazebo in the country, you need to install a pipe. To do this, a hole 50 cm deep is dug in the designated place, a pipe is installed, covered with rubble, tamped and concreted. While the concrete hardens, you can make the fungus itself.


The lower end of the wooden rack is cut so that it fits snugly into the pipe to a depth of 50 cm. Then the roof frame is assembled at the upper end of the rack. Having measured 70 cm from its top, bars 15 x 15 cm and 5 cm thick are nailed on four sides. Slats 80 x 15 cm of the same thickness are attached to each of them from below, thus obtaining a cruciform lower part of the frame. In the manufacture of the ramp, four similar slats are used. They are marked out in place and cut from the ends to the "mustache". At the joints, gussets are nailed to increase strength.


Look at the photo - such a self-made gazebo can be sheathed with any suitable material (plywood, oilcloth, plastic):

The finished rack with a mushroom roof is inserted into the pipe and a bench is installed around it. Iron racks wooden bench can also be concreted into the ground. If desired, a small table is arranged around the central pillar of such a beautiful self-built gazebo. To do this, corners are welded to the post, on which a composite tabletop of two halves is placed with a cutout for the post in the center.
This video shows how to build a mushroom gazebo on a personal plot:
How easy it is to make a summer cottage rotunda with your own hands

It is very easy to make a cylindrical rotunda arbor: as practice shows, it is best to use pieces of reinforcing wire 0.8 mm for it, the lower ends of which must be vertically fixed in the bricks of the ring base, and the upper ends, bent towards the center and connected together, should form a kind of dome ... The strength of the structure is given by horizontal weaves from the same reinforcement. The entrance to the gazebo is through a vaulted opening.


To make such a simple gazebo with your own hands, you will need about 50 pieces. red solid brick and 310 running meters of reinforcing wire with a diameter of 8 mm.


Before you build a rotunda gazebo, you need to choose a suitable site and break the base. In the center of the future gazebo, a peg is driven into the ground and, tying twine or twine to it, two concentric circles with radii of 1.75 m and 1.9 m are marked on the ground.Then, the top layer of soil is removed from the resulting circular ditch to a depth of 15-20 cm , instead of which a layer of sand 10-15 cm thick is poured, watering and tamping it abundantly.


Having laid bricks on the prepared base with small intervals and poured and compacted sand in the gaps between them, they get the foundation of the foundation of the future gazebo. The bricks should lie horizontally with their top surfaces flush with the site.
Look at the photo - to build such a gazebo with your own hands, an 8-10 mm hole is drilled in the center of each brick to install reinforcing bars:


It is better to do this with an electric drill with a carbide drill. To prevent the bricks from splitting, first drill the holes with a thinner drill (03-4 mm), and then re-drill them to the required diameter.


When installing rods for a do-it-yourself gazebo, do not forget to skip 4 bricks - this will be the entrance to the gazebo. If you want to make the passage wider or narrower than 1 m, skip more or less bricks, assuming that the length of each is 250 mm.


After filling in the cement mortar in the holes of the pieces of reinforcing wire about 4 m long each, they are bent to the center of the gazebo at a height of 2-2.2 m. The shape of the dome of the gazebo will depend on the bending radius. The ends of the reinforcement brought together in the center are welded to the central ring of 0200 mm.

Then, when making a gazebo for a summer residence, they begin to form a central harness. Horizontal rows are spaced 275 mm apart. The intersections of the reinforcement rods are tacked by welding, having previously been fixed with clamps.
A ready-made garden gazebo, made by hand, is covered with a metal primer, for example, PF, and painted in a discreet color. In conclusion, climbing and climbing plants should be planted around the gazebo. By the end of the first summer season they will wrap around the frame and make it almost invisible and windproof, giving the impression of a weightless green dome. Even during the strongest summer heat, this gazebo will be cool and fresh, and the simple design of the gazebo, hidden by beautiful flowers and foliage, will delight guests.
Technology of construction and installation of a welded metal gazebo in the country (with photo)


Continuing the theme of metal buildings, learn how to build a gazebo with your own hands, the entire frame of which is welded from steel corners. Such a building may not look rich, but it is quite capable of decorating a modest plot of six acres and will allow you to fully relax after working in the garden.
For corner posts you need a corner of 75 x 75 mm, and for the rest of the frame elements - a corner of 50 x 50 mm. The fencing of a welded metal gazebo is finished with Euro lining, the table top is made of grooved boards.
Pay attention to the photo - the highlight of the swag arbor is the original roof:


To make the frame, you first need to mark the position of the corner posts, two posts of the doorway and the places where the table and benches are installed.
For the stability of a self-made welded gazebo, all racks should be concreted. To do this, make holes 75 cm deep with a mechanical drill 25 cm in diameter. For concreting, use a mixture of cement, sand and crushed stone of 20-40 mm fraction in a ratio of 1: 2: 1.5.
Observing the technology of building such a gazebo, when concreting, it is important to control the verticality of the racks, for which it is very convenient to use a level with magnets, which allow you to securely fix the tool on a rack from a steel corner, freeing your hands.
The pillars of the doorway of a welded gazebo for a summer residence differ from the corner ones - they are thinner. You can, of course, make a doorway from a thick corner or immediately concrete different corners, but it is better in the places where the opening will be, monolith the corner pieces 75 x 75 mm so that they protrude about 50 mm above the supports. To these protruding ends, the posts of the opening themselves are then welded from the corner of 50 x 50 mm. Such an entrance to the gazebo will look more elegant.


When the concrete at the base of the corner posts seizes, cut the corners with a grinder or a hacksaw for metal, which will become elements of the upper, middle and lower straps. Fasten by welding the steel corners of the upper harness around the perimeter of the arbor, trying to ensure the rectangularity of the resulting frame. After that, you need to weld the corners of the middle and lower strapping. Weld the corners 50 x 50 mm perpendicular to the sides of the upper strapping crosswise, and in the center of the resulting crosshair - a vertical stand, to the top of which 4 diagonal rafters are already attached. According to the technology for installing such a gazebo, the corners must be installed in such a way that the shelf of the corner is facing up.
To protect metal surfaces from corrosion, they are coated in two layers. oil paint(MA-115) black, letting the first layer dry well.


Roof manufacturing. For fastening sheathing elements and roof parts made of dense fiberboard to metal elements the frame of the gazebo, first attach wooden blocks with a section of 40 × 40 mm. For fastening, use screws 03.5 x 35 mm, which are screwed from the inside through the holes in the metal corners.
Triangular blanks of roof slopes are marked out according to a cardboard template. Using a saw with a fine-toothed straight tooth, cut thick fiberboard blanks. Attach the cut blanks to the bars screwed to the metal sloped ribs (corners) of the roof.
As you can see in the photo, the roof of the gazebo in the country house, erected with your own hands from a welded structure, is made of bituminous tiles:


The basis for the shingles on the roof of the gazebo is uncoated roofing material glued to the fiberboard using bitumen mastic. Tiles of shingles are also glued to bitumen mastic, and in the overlap areas they are nailed with small galvanized nails with a diameter of 0.5 x 20 mm with round heads. The tiles are glued, starting from the lower edge of the slope, overlapping the glued lower one with the upper row.
When building a gazebo in the country, the bars of the sheathing of the fence are applied to the corners of the frame from the outside, attracting them to the corner with screws from the inside. For cladding, it is best to use lining, pre-painted with two layers of paint. Profiled boards are nailed to the crate with galvanized nails 01.0 x 20 mm with small heads. Around the perimeter of the fence, handrails are nailed from cut bars with a section of 50 x 100 mm.
The handrails and the sheathing of the fence should be coated with three coats of durable colorless furniture varnish.
In the upper part of the fence, you can install green sliding trellises: cut them to the size of the openings and screw them to the slats stuffed over the handrails.
When preparing the base, you first need to select a layer of soil about 5 cm thick inside the gazebo, and then level the surface in a horizontal plane. Lay the crushed stone on top in a layer of 3 cm and tamp thoroughly. After that, fill in coarse river sand with a layer of 3 cm. Instead of sand, it is better to use the so-called flour (crushed industrial slag) with the addition of M400 cement (about 10% of the volume).
When building a gazebo in the country for paving the floor and making a blind area, you can use paving slabs 300 x 300 mm. Such a coating will go well with a tiled roof if the tiles are used in different colors and laid in a checkerboard pattern. For laying the tiles, use a rubber mallet and a level of 500 mm.
After styling paving slabs it must be spilled abundantly with water, and after drying, remove the remnants of flour or sand.
On the outside, along the perimeter of the gazebo, tiles are laid with a slope outward - they serve as a blind area. The water flowing from them during the rain falls into a nearby gutter and is discharged from the gazebo.
To build a welded gazebo in the country, follow the photos below:


Simple summer gazebo made of fabric for a summer residence with your own hands (with photo)


As mentioned earlier, many materials are suitable for creating gazebos. But there are often problems with their delivery to the summer cottage, and construction works usually do not end quickly.


Few people know that there is an easy, quick and simple way to erect structures such as gazebos, showers, verandas, toilets. Moreover, as building materials all you need is a piece of any cloth, epoxy, and four metal pipes or wooden poles for the supports. The technology of building a gazebo made of fabric for a summer residence is extremely simple.


Install four pillars (metal pipes, logs, etc.) in the selected place at the corners of the future building.
Apply parquet wax to a horizontal flat surface, such as a plywood board.


From any fabric, cut a piece to the size of the future wall panel, lay the fabric on the backboard and saturate it with epoxy, adding dye if necessary. For greater strength of the summer gazebo, a panel of 2-4 layers of fabric can be formed from fabric. Make the required number of panels for the walls and ceiling - they will be ready in a day. Attach the panels to the installed posts. Strong, durable, lightweight construction is ready!


Look at the photo - you can build such a simple gazebo with your own hands in an oriental style. To do this, do not flat roof, and an elegant dome: to the tops of the four upright pipes located at the corners of the building, attach a piece of any fabric so that it sags, and apply ( better method spraying) epoxy resin. The next day, remove the cloth, turn it over and fix it on the tops of the pipes.
Of course, if necessary, you can thicken the walls of the dome, making them two- or three-layer.
As you can see in the photo, it is not at all difficult to build such a gazebo:


Do-it-yourself construction of a prefabricated garden gazebo for a summer residence (with photo)

The offered openwork gazebo has a prefabricated structure. This makes it easy to transfer it from one place of the site to another, and at the end of the summer season it is easy to disassemble and store it in the utility room. For such a prefabricated gazebo for a summer residence, neither a foundation nor a floor is needed. All you need is four walls and a four-pitched light roof made of four trapezoidal panels that are hinged to the walls. The assembly is not difficult; it is enough to lay out the details on a flat area - and in a maximum of an hour the gazebo is ready. And after disassembly, the gazebo turns into four flat bags for easy storage.


The national team garden gazebo four walls completely identical in design. In this case, there are also four entrances - each wall is formed by a light frame made of strips with a section of 25 x 40 mm, a vertical bar-rack with a section of 40 x 40 mm divides the wall into two halves, one of which is barred, and the second is the entrance opening.


The lattice is assembled from slats 20 x 20 mm in a ready-made wall frame. In order for the lattice pitch to be the same, you need to mark the vertical bar of the wall and the middle bar into equal segments, setting them aside on the horizontal sections of the frame. First, one row of slats is nailed flush with the vertical bar and the middle bar, then along them - the second row, which will also be flush on the other side of the wall. Nails are driven not only at the ends of the rails, pulling them to the frame, but also into the crosshairs of the lattice, which will give the structure additional rigidity.

On two opposite frames, additional mounting beams with a section of 40 x 40 mm are nailed on the sides. Through them, furniture bolts and nuts are used to connect to the remaining two frames when assembling the gazebo. The bolt holes in these beams and the corresponding wall slats are drilled at exactly the same distances.


The easiest way to cut roof panels is from chipboard or MDF; in addition, their weight will add additional stability to the lightweight structure. To the horizontal sides of the panels, beveled strips are fixed on screws: the lower one for connecting on card hinges with the upper strips of the wall frames, the upper one for the central square made of the same material. To connect the panels to each other during assembly, use metal corners installed on their upper strips with holes for M5 fastening bolts with nuts.

Before assembling a gazebo for a summer residence with their own hands, the prepared sets of walls and roofs are thoroughly impregnated with linseed oil and, after drying, painted with oil paint from the outside and inside. Both monochromatic structural elements and painted in different colors (for example, color highlighting of the lattice part) will look good.


It is necessary to assemble the gazebo in packages: the finished wall is connected to the roof panel. Then, on a flat area, all four packages are laid crosswise, with the bases towards each other; the walls with the mounting rails must be on opposite sides.


If you now raise and dock two adjacent walls, you get the corner of the gazebo; you can pull it off with furniture bolts, and fix the raised roof panels at the top with bolts through the metal corners. In a similar way, the second corner of the gazebo is formed, after which they are connected to each other, and a central square-shaped panel is installed on top.
The video "Do-it-yourself gazebo" shows how to mount such a structure:


Arbor of light construction for giving with your own hands (with photo)

Making an elegant light gazebo with your own hands is not at all difficult. You will need floor and roof boards, frame bars, trellis strips, carpentry tools and some free time. Such a light summer cottage can decorate any garden plot.
As you can see in the photo, they begin to build a light gazebo for a summer residence with their own hands from the floor:


Chip a board from the boards and nail it to the 10 x 15 cm frame to create a flooring. Now make two side walls - in much the same way as in the previous design, attaching thin laths to the vertical support bars. Immediately attach a rafter to the upper ends of the supports in the half-wood, completing the wall frame from above. Screw the assembled frames for the gazebo of light construction with self-tapping screws to the sides of the flooring.


The back wall of a light gazebo for summer cottages can be made separately and added to the side walls and flooring. And you can make it even easier - screw the middle and upper girder to the rear pillars of the already installed sidewalls, and then sew up the wall with trellises.


There is no point in making a separate facade either. Screw the upper roof girder to the front supports and decorate the facade with trellises in any style, forming a door or leaving almost its entire area free.
Lay the roof out of boards and cover with roofing material, shingles or bituminous tiles. That's all the work.
Look at the options for lightweight do-it-yourself arbors:


DIY construction of a semicircular garden gazebo
What summer resident would not like to have a beautiful gazebo, even if the land in his possession is not enough? The proposed design of a garden semicircular gazebo may appeal to many. You can build such a gazebo with your own hands at no special cost.


First, you need to decide where to install the structure. Obviously, this depends not only on the orientation of the site to the cardinal points and its configuration, but also on what has already been built and planted on it. However, in any case, it is better if the gazebo is turned to face the west. During the day, when the sun shines from the south side, the shade under the canopy will be quite enough for a comfortable stay. And if you plant a spreading fruit tree on the south side of the gazebo, it will give additional shadow during the day. In the evening, it will be pleasant to enjoy the gentle evening rays of the setting sun.
The site for the future construction is prepared based on the dimensions of the gazebo, which can be adjusted if necessary. First, the sod is removed and a plank formwork is installed to fill the base of the gazebo - a concrete monolithic tape, into which the segments are embedded metal pipes with a diameter of 100 mm, used as sockets for the installation of support posts. Such a small (about 10 cm high) wall will reliably protect the site from grass, prevent decay of the racks and increase the strength of the structure. Not much cement is required for this, but the benefits are obvious.
The surface of the site, lined with concrete tiles, which can be purchased ready-made, looks good.
It is not at all difficult to make such tiles on your own, and there are many ways to do this. For example, the simplest of them is to make a square shape from boards 50 mm wide into four cells with sides of 300 mm. The finished frame is laid on a flat surface, and so that water does not leave the solution, the shield is covered with waterproofing, film, roofing felt or other similar material. Then the cells are reinforced using pieces of mesh or wire, and concrete is poured into the mold.
As shown in the photo, a semicircular gazebo can be decorated with fragments of colored ceramic tiles, which are sunk into the solution until it has set:


But for this you can only use the floor ceramic tiles, since ordinary tiles do not resist frost well and quickly crumble.
Finally, the site can be simply poured with concrete, and then laid out with a beautiful ceramic tile ornament.
The calculation of the amount of materials required for the construction of such a gazebo with your own hands can be done only by deciding on the size and shape of the semi-gazebo. You can use the various supplies available at hand. Steel pipes for the posts can be dispensed with by using rolled sheet metal sleeves as sockets.

For the rest, for the construction of a semicircular gazebo with your own hands, you need to stock up on the following materials (tentatively):
- cement grade M500 - 100 kg;
- river sand - 300 kg;
- concrete tiles 30 x 30 cm - 40-45 pcs.;
- timber 150 x 150 mm, length 2.2 m - 7 pcs.;
- bar 50 x 50 mm - 15-20 lin. m .;
- a bar of 40 × 40 mm with a selected quarter - 15-20 running meters. m;
- tongue-and-groove floorboard 40 x 150 mm - 20 linear m;
- edged board 25 x 150 mm - 10 rm. m;
- lining - 10m2;
- rail for grilles - 70 rm. m.
You will also need nails and screws of various lengths.
All this, in principle, is not difficult to bring to the dacha even in a passenger car, having previously cut the lengthy material to size.
Gazebo design. The gazebo is, in fact, a semicircular wall with a canopy, equipped with benches with backs. The load-bearing base of the structure is seven posts made of coniferous timber with a section of 150 x 150 mm, installed in the nests of a concrete tape.
The lower part of the wall is made of solid lining boards, stuffed with strapping bars, and the upper one consists of decorative lattices, which are an excellent basis for climbing plants. The strapping bars are connected to the uprights with a cut so that the lining paneling is flush with the load-bearing uprights.
In this case, the armrests installed on top of the shields cover the ends of the sheathing boards, while remaining in alignment with the uprights.


Decorative grilles. It is not difficult to make them. To do this, you need to collect from the bars with the selected quarter of the frame, and then stuff thin slats into the folds. The optimal section of the bar is from 40 x 40 mm to 50 x 50 mm. However, if you are confused by the operations of sampling a quarter, then you can make prefabricated bars by connecting together, for example, 20 x 20 mm bars and 20 x 40 mm slats.
The frequency and location of the lattice slats for building a gazebo in the country with your own hands can be different. The simplest option- two central diagonals and four lines in each sector, stuffed parallel to them.
The packing sequence is as follows. First, all the slats are fixed, parallel to one diagonal, and then with the second layer - transverse to them. Even window glazing beads can be used as slats - it will turn out beautifully.
The dimensions of the gratings depend, of course, on the dimensions of the structure. If their height is a matter of taste, then the width of the frames can be made slightly less (by 4-5 cm) than the size of the run between the racks. Using in the future (when mounting frames to racks) small cylinders, cut, for example, from an ordinary shovel handle, you can get a very interesting decorative effect - the lattices seem to hang in the air.
There is also nothing unusual in the device of the canopy. To ensure a slight slope of the canopy, the tops of the posts should be cut off at an angle. It is better to do this before installing the stands, as working on the ground is undoubtedly easier.
The adjacent racks at the top are fastened with two boards stuffed from the outside and inside of the structure. For this, it is advisable to use thicker boards (at least 25 mm), which will make it possible to equip a more durable and reliable canopy. On the ends of the boards of the upper strapping, pieces of lining are stuffed - and the simplest canopy ready.
The eaves boards stuffed on the ends of the roofing boards, which can be decorated with decorative carvings or highlighted in color to your liking, will add to the canopy.
The most important element on which the convenience of the structure depends is the benches. As a seat, you can use any fairly thick boards available at hand - ordinary planed or grooved flooring ("forty").
The optimal width of the seat is 30-34 cm.To do this, it is not at all necessary to look for whole wide boards, since the bench can be assembled from 2-3 pieces of narrow boards, located with a small gap, so that water does not stagnate at the joints, which can provoke wood decay.


Seats are mounted on supports of two types. Intermediate brackets are traditional brackets made from 50 x 50 mm bars and embedded in the racks. The two extreme supports are decorative. Each of them is made of two pieces of floorboard, fastened from the ends with bars of 50 x 50 mm, the top of which is also cut into the rack. Using a jigsaw, you can give the front faces of the supports any configuration and this additionally decorate the structure.
The seats of the benches can be made removable, which allows them to be stowed indoors at the end of the season, thereby extending their service life. To do this, when attaching the elements, it is enough to use self-tapping screws instead of nails.
The backs are well-planed and sanded boards, fixed on supporting racks. A comfortable angle of inclination of the backs is not difficult to achieve with the help of small triangular brackets cut from scraps of the same board.
Wooden elements of the structure should be treated with decorative impregnation of one or several shades. The gazebo in this case will be well preserved, and it will look elegant.
To make the rest corner more comfortable, it can be additionally landscaped. To do this, they dig a small groove around the perimeter of the structure, fill it with fertile soil and plant various climbing plants there - for example, maiden grapes, hops, ivy and the like.
Making a gazebo with a hipped roof for a summer residence with your own hands


This classic octagonal pavilion with semicircular arches, carved railing and wooden roof tiles is inspired by the Belvedere late XIX century. Such a tent gazebo for a summer residence will protect you from the scorching sun on a hot day, and from rain in bad weather. It is quite possible to implement it on a suburban area, since the project is distinguished by thoughtfulness and noble simplicity.
Structurally polygonal, including octagonal, buildings are more difficult to erect than rectangular ones. But the octagonal posts, cut from a square bar, give the pavilion respectability. The material and its section are chosen depending on the size of the structure and the taste of its creator.


Such a gazebo with a hipped roof can be erected on a concrete slab or a brick-paved site, or it can be built on a raised boardwalk, but in any case it must be installed on anchors embedded in concrete foundation posts.
The marking of the octagonal area for the gazebo begins with marking a square with a side of 365 cm.Then mark eight corners. The columns of the foundation for the racks are made square with a side of at least 40 cm and a depth of 30 cm. The pits for the foundation are poured with mortar and the bases of the racks are installed in them before the concrete sets. Great importance has the exact location of the base of the posts, since the offset thrust bearing will then follow you throughout the entire construction. To avoid mistakes, they make a cardboard template in the shape of the rack and mark the location of the racks on it, that is, they indicate the corners of the gazebo.
When making octagonal racks, cut lines are marked on all four sides of each beam. Then set the circular saw at an angle of 45 ° and cut off excess wood, thus forming an octagon. Cut marks are removed with a plane or grinder... The length of the posts should be 2.30 m.
The details of the upper harness are cut out of a bar with a section of 50 x 70 mm.
If, in the manufacture of arches, a connection in a groove and a ridge is used, then before starting the assembly of the gazebo, you need to select the grooves in the racks and in the bars of the upper trim. After that, the racks are installed in place and temporarily tied with braces. Then, from above, the bars of the upper strapping are nailed to them, and for greater strength of the connection, they are fastened with metal tie plates or corners.


Eight arches, being decorative details, also serve as load-bearing elements that give rigidity to the gazebo. Arches must be strong and securely connected to the uprights and top harness.
The braces are assembled from two wooden arches (boards 20 mm thick). They are glued and attached to a 12mm plywood rectangle. The hypotenuse of the plywood square is cut with a jigsaw in the shape of a wooden arch. The right angles of the plywood form a tongue that is inserted into the grooves selected in the uprights and beams of the upper strapping.
To make an arch, first cut one half of it out of plywood and use it as a template for making 15 other parts. Then curved parts are marked and cut out with a section of 20 x 60 mm. To do this, on a board with a section of 25 x 200 mm, using an arch template, draw bypass lines. Each half arch is made of two sections.


Waterproof glue is used to assemble the arches. First, the arches are assembled dry, adjusted and glued, after which all their parts are clamped with clamps. This "sandwich" is fastened on both sides with screws 50 mm long with a pitch of 15-20 cm and the clamps are removed. Remove excess glue with a damp cloth.
When installing arches, check how their halves mate with the openings and with each other. Adjust if necessary.


Then the arches are nailed to the frame. Drive nails at an angle through the plywood into the grooves selected in the uprights and beams. Then they fasten the arches with long screws through their wooden part to the posts and bars of the upper strapping. If it is difficult to choose the grooves in the racks and beams for some reason, then wooden glazing beads are nailed to the racks and bars of the upper strapping so that a groove is formed between them, into which the arch is installed. If necessary, fit all the wooden parts to each other.
When installing the roof, the rafters are made of boards with a section of 50 x 100 mm. This material is thick enough to hold the sheathing nails, and at the same time the boards are narrow enough for all the rafters to come together at the spire.
To make a spire, take a piece of timber with a section of 100 x 100 mm and a length of 400 mm, excluding the headrest. It can be carved as part of a spire, but is easier to make separately.


The first rafter is cut out as well, and then used as a template to make the remaining seven. A small chamfer is removed from the upper end of the rafters so that they do not interfere with each other at the spire. The ends of the rafter legs at the overhang are rounded off with a jigsaw, and then cleaned with a rasp or coarse sandpaper.
When assembling the roof, first, two rafters are fastened on opposite sides of the spire with long screws, the structure is raised onto the arbor, the spire is placed over the center of the arbor, and the cutouts in the rafters are above the posts. The first rafters are nailed to the upper harness, then the remaining rafters are installed one at a time. For strength, small corners are attached to both sides of each rafter.


Before laying, the boards of the sheathing "on the mustache" are cut down. Install 3-4 boards at a time, nail them with two nails from each end and adjust the ends. As you approach the top, holes are drilled for nails so as not to split the short boards of the sheathing.
Then roll roofing waterproofing from roofing felt or other suitable material is spread and the roofing tiles are laid. The edges of the roof slope are covered with planks with a section of 25 x 100 mm or special ridge tiles.
Under the railing in the racks, grooves are cut out with a depth of 15 mm and the railing is inserted into them from the outside. The fence is simple, made of railings and boards. In the latter, a decorative pattern is cut out with a jigsaw. Nail the railing with finishing nails, driving them at an angle.
All open joints, heads of nails and screws are putty and the surfaces of the gazebo parts that are not processed during assembly are sanded. Then one layer of primer and two layers of enamel are applied to them.
Look at a selection of photos "Building a gazebo with your own hands", which shows different options these garden structures:

