Step-by-step instructions for making a fence from a wooden stakenice. Wooden fence with your own hands: Making a beautiful wooden fence step by step What is sanitary trimming and when to spend it
I decided to make the facial fence, temporary. Since the house I build and build me (just dugged the pit), so I decided not to bother and chose wooden fence From the fenceboard with slots, such as a stakenik. Do not plan the gate, too, if you need to call, then you can unscrew the span and drive the technique. And because Fence with the slits, then the span will not be heavy.
So, we have a side of 36 meters long on which the budget wooden fence must be installed. Of the features of my site - there is an entry into the pit, in width of almost 4 meters, then one span will be 4 meters. You still need to install the gate - this is 1 meter. It remains 31 meters so that everything is divided into flights 3 meters, I had to make 2 spans 2 meters and 9 spans 3 meters. It turns out 12 posts of internal and 2 post external columns. I already had external poles, so we buy only 12 internal columns. Poles I took a length of 3 meters, tree larch. They are strong and reliable.
As a stable, I decided to use the boards 50x100 mm cross section. Total 72 meters (36 meters from above and below). And bought 1 cube of the fenceboard 25x100x2000 mm. Just the Cuba is enough for my fence in 36 meters long, as the fence will be like a stakenik.
First you need to place places for the wells for pillars. To do this, stretch the string from one edge to the second and the roulette measure the spans, set the pegs. I got such a sequence (left to right):
2 - 3 - 3 - 3 - 2 - 4 (pit) - 3 - 3 - 1 (gate) - 3 - 3 - 3 - 3
It is very convenient to such a scheme of marking with pegs, because After marking without any problems, you can drill a motobur in those places where the peg was. It turns out quite smoothly. Drill I took 200 mm in diameter and began to drill
Buuril the hole in a depth somewhere 90 cm - 1 meter. Differently. After that, installed pillars.
IMPORTANT - from the pillars it is necessary to remove the whole bark, since it is under the crust that there are all sorts of pests, like cores.
After installing the columns install stable. I put them so that the upper limit of the fenceboard was at an altitude of 40 cm, between the alpine (top and bottom) distance of 1 meter.
This is how it happened:
As I did at night (in the evening, so the photo is dark)
Here is a photo alive in a bright time 
The board is intricate, I bought an average quality, in some places with a review. And yet from the belt panel, and there is not always the perfect geometry. Therefore, it was decided to strict all the boards from 4 sides. Planed 2 days on woodworking machine

with 1 cube of the boards, approximately 1 cube sawdust (chips) 
And here are the most boards that overshadled 
Well, began to mount the boards on the fence. Selected 1 thin board (9 cm wide) and it was used as a limiter (width). Process:

All this case went slowly, the night was growing deeper and deeper :)
and here is the result: 
And so closer 
That's how the fence looks like a little daylight 
Then the laser level ran out the level and the next day pulled the string (twine) to exactly mark and then cut off. 
On this thread I draw a pencil line, then I will trim the fence on this line.
And cut

Circularly cut, and even a high fence ... the whole chips and sawdust fly in the face, very uncomfortable!
A wooden stakenik made on the sawmaker, as a rule, has a slightly large length, in order to after installation, it was possible to cut it on the fence. After installing the stake board on the fence, as described in the article "Installation of the fever of a stakenice", proceed to the markup, to circumcise the colt board.
Since fences are long, then a long bar, we cannot apply. For this purpose good fits laser levelBut if it is not, then you have to be content with the cord, for this it will fit the thick-side cord, or a small thickness of the wire.
To stretch the cord for a big length, it is not worth it, since it strongly saves it, it is best to fix it, spin on the extreme boards of the pavement. After you pull the cord, look visually as exactly it is stretched, if necessary, align it, move the swirling cord on the stakeboard boards.
For a more accurate markup, it is best to take a flat rail to the width of a flat rack and press it, focusing on the edges of the cord, two clamps or two screws, then you will not have errors, to the cord. Location on the board boards the upper level of trimming.
Cut the stakebook boards can be straight, space or with the edge. Recently, it became fashionable to trim the boards rounded. Crop the boards in this way can be used with an electrolovka. However, to use additional homemade focus to cut as a circulation, do not work out, since the pubsik hat will bend and leave the radius inside, since an angle of attack may probably be calculated for such a sawing. Therefore, draw roundness on the stake board and saw the jigsaw, holding his hand.
Direct trimming of the stake or on the SCOS, it is best to make a light circular saw or sharply sharpened by hand-hack. When sawing with a circular hand saw of a direct cut, it is best to apply as a stop of a rack fixed by clamps or screws. For a wave-like or curved slice of several boards or span, use the template. RVT auto
Learning cottage plot Usually begins with the designation of its borders. Many surround the estate with high deaf fences, but there is another way to get angry from the street - this is a live fence from cutting or freely growing shrubs!
Living hedges improve the microclimate of the site. The walls of shrubs will quite effectively protect the estate from the winds, but, being permeable to the air movement, will not create pressure drops and destructive for plants of air funnels, which are usually formed near solid fences. Roots of plants, in contrast to the foundations of fences, do not interfere with the outflow of groundwater. The thick high living hedges are well saved from noise, serve as a reliable barrier for dust and exhaust gases near lively highways. A dense wall of barbed plants is a practically an insurmountable obstacle for unauthorized persons trying to get to the fenced territory.
There are two types of alive hedges - molded and unformed. In the first case, the plants are regularly cut to give them a certain shape, in the second - they cost without haircuts, allowing seedlings to develop freely. The second option is less labor-intensive. A thick non-started hedge of 2 m high can be grown in 2-4 years, while on the creation of molded living hedges the same height will require at least 4-6 years. Alas, an unformed live fence occupies a lot of space (width can reach 4 m) and for small areas is contraindicated. The molded elevation is compact (not more than 1 m wide) and is suitable for any sections. Both hedges type in the first years after landing require trimming.
On a note
Landing the living hedge will cost much cheaper than the construction of a solid fence. In particular, if you choose plants that can be multiplied by yourself, and not to buy in the garden center.
When to plant?
Live hedge from deciduous plants grown in containers can be planted throughout the season - from spring to autumn.
Plants with an open root system, that is, those that were grown in the nursery in the soil, and then were dug for sale, landed only when they do not have leaves - either in October, when the leaves are already opled or in early springBefore swelling the kidney. On heavy and wet soils best time For landing - Spring.
Coniferous plants and evergreen deciduous shrubs are sensitive to drying, so these plants should be purchased with a closed root system and plant them with an undisturbed room. It is best to do this in September or in the spring - from the moment when the kidneys begin to swell, until the end of May.

How to plant?
For unformed alive hedges, as well as for light-loving and coniferous plants (Fir, Tui, Juniper) suitable planting seedlings in one row. But such a fence does not always form a dense veil. For living intensities, which will be intensively cut, as well as for those that need to form a solid barrier, it is recommended to land in two rows.

If you intend to plant the plants thick, it will be more convenient to dig away along the cord one or two ditches. In the single-row hedge of the plants plant, observing the same distances between the seedlings (about 20-50 cm), in the two-row - in a checker order. A part of the fruitless earth removed from the pit is removed. The rest is mixed with a compost or a smaller peat and return back, pouring along the entire ditch.
If the gaps between the plants should be large - 60-70 cm, it is better to plant them into separate pits, and not dig a ditch. At the same time, the pits should be so big that the roots freely lay in them and have not been bent up or sides.
Why do you need trim after landing?
The first trimming is made regardless of whether the elevation should be molded or not.
This procedure is very important, since it depends on it, plants are rooted or not, and how a live fence will look in the future, the first haircut stimulates the growth of new shoots and contributes to the development of the root system of plants. Plants planted in spring and dropping leaves for winter, cut off immediately after landing; And falling in the fall - leave for the winter uncircumcised, postponeing this procedure until the spring of next year. In the spring to stimulate branching, primarily cut the tops of the shoots. In general, the cutting depth depends on the type of plant and its condition, usually shrubs and deciduous rocks are cut by 30-40 cm from
On a note
Strut live hedge Regularly need not only so that it looks beautiful. Thanks to this procedure, the plant will be healthy, and the elevation is evenly thick and lush.
In order for a live fence to be healthy, thick and looked good, it must be regularly cut. The hedge consisting of deciduous plants dropping the leaves for the winter is cut off at least twice a year. The first time - at the turn of June and July: At this time, the shoots are cut to half of their length. The second trimming is performed at the end of August - the beginning of autumn, shortening all fresh shoots up to a length of 10 cm.

Unformed Livestore does not require regular cutting: enough to trim it only once a year - early in spring. At this time, the hedge is thinning, cutting out all old branches from the ground, and the young people are shortened on 2/3 of their lengths. The shape of the hedge from this will not change, but it will become thicker.
Live fence from coniferous plants in the process of growth is optional. But if plants weakly grow up, then once a year (in July - early August), they can be neatly trimmed, cutting off the tops of plants by 10 cm (side shoots shortening a little more).
How to cut an adult alive hedge?
The molded alive fertilization of deciduous plants, which reached the expected dimensions, is cut regularly, and if height is strong - even once a month. This will allow the hedge to maintain the correct geometric shape and look well-groomed.
The molded coniferous hedge is usually cut at least twice a year - preferably in July and early August. The exception is the living hedges of the ate, which can be cut only once a year, preferably late in spring when the plants will release young shoots.
Unformed live fence in regular haircut does not need. Colonum-shaped plants do not cut off at all. The exceptions are cases when they begin to delay below. Then it should be trim all the upper shoots and some side.
Hardery hedges useful once a few years (in spring until the advent of the kidneys) cut forward crowns of plants. Most of the old and thick shoots are removed, and the young curls on 2/3 of their lengths.

How to spend a haircut?
First set the level of the upper plane. It is easy to do with the help of a cord stretched between the stakes drove into the ground. Another option is to attach a long horizontal bar to vertical pegs. The upper part of the living hedge is cut horizontally, moving along the cord or plank. Moreover, for beginners, a plank is preferable because it can be used as a risk guide to cut with a sharp tool. Then take turns cut the side walls, removing all twigs that have grown for the installed line.
Our advice
Live hedge under intense haircut need to systematically fertilize with compost or multicomponent mineral fertilizers.
Best plants
Spirea
A fast-growing live elevation height of 1 -1.2 m can be obtained from Spiray. The shrub is easy to propagate with his own hands. The hedge is winter-hardy and drought-resistant, the shrub does not ill, it looks beautiful and in summer, and in the fall. However, it grows very much. To the shrub look neatly, it needs a regular haircut, the frequency of which depends on the variety. With an irregular haircut, the bottom of the bush is broken and looks sloppy.
Kizlin
A very favorable version of the green hedge, since the plant moves well with a haircut and "keeps the form." Shrub Sustainable K. unfavorable conditions Growing, well adapted to harsh climatic conditions. It is reluctant, so it is better not to count on a quick result. The kisystrix can be used in regular style gardens.
 Hedge from Kizilnik
 Tuya
For proper care Alive sweatings from the Tui save an attractive appearance round year. From the thu, you can create a high and extremely dense green wall. The tree is shadowfully, frost-resistant and not very demanding to humidity and soil. For a living hedge, it is better to choose the grade of the thuja of the pyramidal form, for example, the column varieties of Tui Western Brabant, Smaragd and Fastigiata.
Reprelectric
Powerful shrub forming a dense alive fence. It is easily dragging, quickly grow (40 cm in width and height per year). It is distinguished by unpretentious - frost-resistant, drought-resistant, can grow in shaded places, does not hurt. There are several spectacular varieties with leaves of various color - from golden to magenta. Shrub takes a lot of space, so you should not land it on little plot.

Snowberry
Perhaps the most unpretentious shrub for alive hedges in our climate. Suitable for creating low alive hedges (up to 1 m). It will feel good to feel even on a plot with a high standing ground. Diseases and pests are practically not damaged. Perfectly transfers trimming and molding haircut. Increased resistance to gas and smoke allows you to use a snowy year for separating parking from the front zones and recreation areas.
Barberry
It is perfect for the creation of impassable and uneasy hedge, only you need to choose tall varieties (so, Barbaris Ottavsky 'Superba' grows up to 3.5 m height). Many unpretentious varieties with beautiful foliage of different shades. One of the species - Barbaris Tunberg - blooms and fruits in a haircut. Barbarisa do not endure the overwhelming and stagnation of water.
Video: How to grow a live fence in the country?
Wooden stakenation fence. Instructions for manufacture
Stakenatnik is one of the most affordable and simple Materials For the fence, it is perfect for fencing small house or cottage. Wooden stakenik can be fencing not only the territory of your site around the perimeter, but also to distinguish the garden and the garden from the courtyard.

Use how the main fence is not recommended, because it is not very reliable and protects against penetration only conditionally, that is, practically does not fulfill its main function. Although it looks, despite the simplicity, very neatly and beautiful, especially if it is high-quality and competently installed.

To make the stakenik himself do not need to be a high-level master or possess superpowers, the most important thing in this business is to buy good racks, smoothly cut them and carefully nourish them, actually all.
Materials for making a fence from a wooden stakenist
So, for the manufacture of fence from a wooden stakenik, you will need materials designated below. There are many of them, however, to buy them will not be difficult in any construction store.
- Metal pipes. They will be used as risers. In general, for this purpose there may be any other products from the metal to which you can fasten the fence. Selecting the risers, remember that they will be poured with concrete at a depth of 40 centimeters. Depending on the height of your stakenik and pick the right risers. After concreting, they will stand, do not stagger, exactly like string. In principle, even inch pipes may come for stakenists.
- Wooden rails. They can be purchased at the finished form, simply pick up the desired size, and you can buy to order in the joinery shop. For a standard stakenik, two-meter lumps will come, they can be cut into a single one. For jumpers, the bars will fit a little thicker so that the fence does not swing. Bruks can even take the third grade, the main thing is to watch them not be rotten.

- Self-tapping screw or nails. Both options are suitable, but the nails are cheaper, and in the work more "noisy", and selflessness expensive, but more reliable. You decide.
- Cord for aligning staketing in one line.
- Sand, crushed stone and cement, which will be needed for concreting racks.
- Paint or decorative protective varnish, as well as a brush for painting a wooden stapper. Without paint or lacquer, wood will sit down and starts rot.
- The fastening screws required for fastening the transverse slats to the racks.
- Emery paper for cleaning the stakeholder circumcision places.
- Natural stone or red brick, desired to strengthen pillars.
- Acetone or solvent.
You will also need the following tools:
- Ax, hammer.
- Slick.
- Wooden hacksaw. It is recommended to take a high-value tooth, not quite large to accidentally do not spoil the wood. You can also use chainsaw if you have such an opportunity.
- Hammer and drill for mounting fence.
Electric planer, jigsaw. If you have a woodworking machine, then the disk saw and the electrical runt of you will not need.
- Circular Saw.
- Paint brush.
- Nail-holder, roulette.
- Construction level, shovel.
After you have prepared everything you need - materials and tools, you can move to the manufacture of a fence from a wooden stakenist.
Step-by-step instructions for making a fence from a wooden stakenice
Production and installation of this type of fence consists of several stages.
Stage 1. Preparation and installation of fence columns.
First you need to remove the bore with the logs and remove the bitch ax that sticks out the ax. So that the poles served as long as possible, part of the pillar that will be hidden under the ground, processed by bitumen. Another way to process wood, no less well-known and tested - this is burning. The surface of the pillar can be burned on the fire, and you can with a soldering lamp or gas burner. In any case, the essence does not change, the surface of the wood needs not just to shrink, but to bring to complete charring, only after that proceed to the processing of the next pillar. Please note that it is necessary to lower the part of the pillar (log), which was closer to the founding of the tree, because in this part the increased density of the wood. It is prohibited for processing to use runneroid, pergamine, film and other similar materials. When using them, the pillars will come into disrepair after three years. Also undesirable to concrete wooden poles - concrete leads to their rot.
I dug up with a depth of 70 centimeters depth, made a sandy pillow with a thickness of about 10 centimeters, and a layer of gravel is poured from above. Poles are installed in such pits and plated by broken bricks up to half the height, the in-depth parts fall asleep and tamper. At the same time, 15 centimeters are left for a clay castle. So that the pillars stood, exactly one line, the extreme pillars are fixed and one of the columns, located in the middle, the twine is stretched between them. Next carefully examines whether the twine is strained if yes, the remaining pillars can be installed on it, focusing on it. Do not install poles more often than every three meters.
Stage 2. Setting down.
Slores are processed on a woodworking machine. The length of the run is about six meters, so this part of the work should be carried out together. After the required number is fired, markup is made to prepare the grooves. On one post, two grooves are made, on top and bottom, in the depth of no more than thirty centimeters. Slepend to the grooves and are aligned with the construction level. When the stops are located exactly, they are attached to the pole with nails, scoring them at each point of attachment. The pillars' strapping is over, you can move on.
Stage 3. Fastening the stakeholder.
The boards that are intended for the stakeholder must be fed on both sides and from the ends, after that they are cut into a length of two meters. The first staketine is attached to the next, parallel is checked the location of the board, even it or not. Next, the following staketine is attached at a distance of three or four meters. Both upper end is driven through the nail and stretches the twine. After checking the horizontal, the stretched twine is moving to the stakeholder fastening, which remained. Here you need to consider the fact that the distance between the ground level and the lower end of the bar should not be less than 5 centimeters.
You can make the tips of the fence uneven, for example, in the form of an oval or semicircle, or give an even more unusual form.


To do this, hesitated on a sheet of plywood pattern and the markup line is applied on it. With the help of electric jigsaw, the stakenik is cut through this line. Ends that were circumcised are cleaned with sandpaper.

Stage 4. Painting of the finished fence.
Ready fence is painted oil paint Or reveals with lacquer protective decorative. The paint is applied with a tassel or via a pulverizer.
Wooden stakenik fence - do it yourself
The fence is a visiting card of a residential building. Of course, the fence requires a qualitative approach to its choice and installation. Good option There will be a fence from a wooden stakenik.


For the price it is very affordable, besides, you can make it yourself. This will require only one or two days and some of the materials and tools. However, the wooden fence from the stakeholder has many flaws. First, it requires constant care, and secondly, it does not fully protect against penetration. But, at the same time, it looks very beautiful and noble.

Fences from the stakenik can be done different waysThere are a great many of them.

Production of itself simple view We dismantled in this article. If you want something unusual, it is better to turn to professionals that can embody all your ideas into reality, and make your fence original and unique.
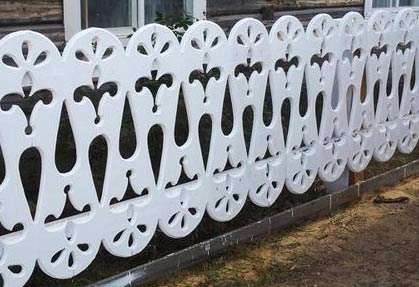
Most often private territory The man tries to exhaust as high as much as possible and, which has little to himself, even despite the attractiveness and beauty modern materials. But for those who want to be open to the world and people, carved fences made of wood can be an excellent option.
So it looks like a carved wooden stakenik
The original openwork fence, made with your own hands, will not leave anyone indifferent. The house for such a fence seems especially cozy and hospitable.
Light carved parisade is unlikely to become particularly reliable sewn for the site, rather, it protects the garden from random animals. However, excellent decorative qualities and the aesthetics of natural wood is difficult to challenge. Do not lose their relevance due to the following properties:

Types of techniques for creating a carved fence
To perform a carved fence at home, and even more so without experience, it is better to choose uncomplicated techniques and simple patterns. Some wood carving methods require specialized equipment that stands on weekly and requires certain knowledge and experience. Wooden carved fences do it best to do in the following technicians:
Geometric and lace equipment most often apply on boards or stakenik, which then become a web fence.
 Original fence pattern made in lace style
 Boards with contour patterns are prepared in advance and fix on the finished fence so as not to damage with nails or self-drawing volumetric drawing. Usually wooden parts made by contour thread techniques serve as additional decorative elements For the finished canvas of the fence.
Choosing wood
The most inexpensive basis for carved fence is a multilayer plywood. For plywood, it is best to use a pet with small teeth, the usual hacksaw of metal is suitable. The smaller the peeling teeth, the cleaner will be cut, and the extra grinding of the sections will not be required.
So that the carved fence looked more expensive and exquisite, the wood of valuable rocks should be used. Each variety of wood can be noted its features. For example, Klyona, ash and poplar kidney form a bird eye pattern. In the oak or beech there is a fine-closed pattern.
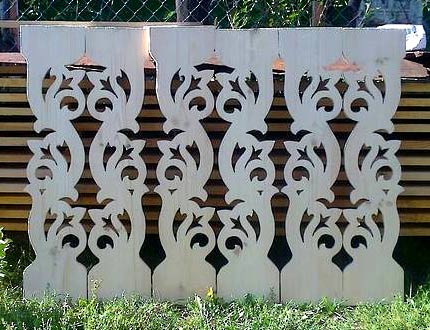 Ready for installation carved fence panels
 Due to the natural curves of the trunks, a particularly pronounced curvilinear pattern is present in a nut, ash, Karagach. It should also be borne in mind that to perform lace threads you can use Faneur and any varieties of wood, including very hard coniferous breeds. But the geometric and contour thread technique requires hardest wood varieties, so that the surface of the board is monophonic, smooth, without inclusions.
Wood carving process
Before applying a tree pattern, you need to carefully prepare the material. Initially, the tree surface is processed by the plane. Very dark wood before work can be toned. To give the surface of the shine, varnish is used.
The drawing applied should be clear and notable, for light wood, black or blue copy paper is used, for dark - green, yellow or red. The contour on the board can also be left, if it is strongly pressed through a paper stencil with a handle or pencil.
 Applying a pattern on the pattern cutting board
 Although it is possible to perform a thread on a tree with your own hands with an ordinary sharp knife, a lot of blanks will need to take a fence, so you need to take care of at least the most elementary devices:
- sandpaper wood processing or power tools with a special emery disk;
- knife cutter (to create pattern contours);
- straight and semicircular chisels of different sizes (used to cut the patterns on the tree);
- lobzik manual or electric (to create a fence with lace details).
The process of wood carving requires compliance with safety.
 Tools for wood thread
 Wooden stakenik or board must be reliably fix on a solid smooth surface or on a workbench using clips. It is unacceptable to keep the workpiece on the knees. When creating a contour drawing, the knife is held in one hand, and the second hand blade is sent by the intended pattern of the pattern. For rounded parts it is convenient to use special semicircular chisels.
For lace thread, it is enough to choose a relatively smooth board and, using a jigsaw, start cutting holes over the drawing applied.
The resulting patterns are not necessarily grinding and processing, and this is another big advantage of this technique for inexperienced masters.