Bas-relief gypsum floral on the wall - master classes. Creating a bas-relief on the wall with your own hands: master class
Observation bas-reliefs are used to decorate various types of products and structures. Today, such elements of the decor found use in a wide variety of spheres.
The use of bas-reliefs gives a fairly wide space for interior design. For example, you can create a separate panel in the form of a picture to decorate an empty wall.

Often bas-reliefs are used to decorate homemade fireplaces. Bas-relief in combination with the original backlit creates truly original picture - Thanks to the backlight, all convexity of the image will be visible even more clearly.
Bas reliefs are perfectly suitable for the design of various types of openings.

Unlike another popular version of interior design - decorative painting - bas-reliefs do not need additional color allocation.
In the absence of color isolation, the volumetric pattern will manifest themselves due to the game of light with competently equipped artificial lighting. Thus, the owner appears the ability to create accents on the decor elements in a specific time you need - just inclusion lighting.

In addition to purely decorative functions, bas-reliefs are perfectly coping with different kinds of functional tasks. For example, volume decoration allows you to level the irregularities of surfaces, decorate engineering communications, visually distorting space at the discretion of the owner, create smooth transitions between different functional zones.

The competent combination of bulk relief and decorative painting allows you to create truly original and incredible effects.
However, despite the many of its advantages, the bas-relief remains not such a popular option for decorating the premises. The essence of the problem is the high cost of arrangement of such volumetric elements.

Uncommonled people often make a mistake, believing that the bas-relief is a prefabricated design, cast from plaster. In fact, such decoration is manually shutdown and is essentially exclusive. Therefore, to arrange a beautiful basane image There will have to make a lot of effort, but with a great desire with all the events you can cope with yourself.

General Bas Accounting Guide
For the ownership of the bas-relief, you can use a wide variety of materials: plaster, plaster on a plaster basis, alabaster, clay, etc. beginners easier to work with plaster and plaster based on it.

First step
Collect from the rails and plywood box with low walls, more like a tray. According to its overall dimensions, the box must correspond to the size of the future plate of the relief - there will be a bas-relief.
Instead of a box, you can use other remedies, for example, a box of candy or a suitable frame, glued to the glass using adhesive tape.


Second Step
Ship the form of polyethylene. Roll into the film so that the folds are missing or they were as small as possible.
Third Step
Prepare the solution in accordance with the manufacturer's instructions and fill it into the form.
If you plan to create an ornament with a high relief, insert the wire into the stove for an additional reinforcement of the future composition.


Fourth Step
Leave a flooded mixture for the time of primary setting. This indicator is individual for different materials, specify in a separate order.


Fifth Step
Start creating a bas-relief. First, you need to apply the circuit of the created decorative ornament on the slab, and then start increasing the volume inside the decorated circuit from the newly prepared mixture.
Increase the volume of layers, allowing each layer a little hard.


It is convenient to work with the plaster - while the material is wet, it is possible to get rid of it from its excessive efforts with a knife, and the ornament itself can adjust the chisel and the cutters for wood processing.
In addition, not completely dried material is simply sandwiched. Perform the necessary processing of the solidary surface is much more difficult.


If you plan to create an in-depth image, you can solve the task with two methods.
- The background layer is increasing around the image, as a result of which the elements of the ornament are in some recess. At the end, the background plane is polished.
- Images are plunged by sampling a certain amount of the base material using the already acquaintances of the chisels and cutters.
Bas-relief on specific examples

In order for the process of creating a bas-relief to be more understandable, the procedure for arranging such a decor on specific examples should be considered. Your attention is offered two most popular options - "Lilies" and "Tulips". Having mastered the order of their arrangement, you can cope with the creation decorative bas-reliefs Almost any complexity.
"Lilies"

Bas-relief "Lily"
First step. Protection of the decorated base, placing the necessary space by the painting ribbon.
The second step. Cover the base with putty, let it dry and apply a primer. It is best to use paint-soil. This composition is notable for the fact that after drying, the particles are part of the mixture remain on the basis. Thanks to the roughness created, the subsequent layers of finishing are held as strong as possible. In the middle, the paint soil dries within 2-3 hours.
Third step. Using Kelma, apply the starting layer of Marseille wax to the surface. This material freezes quickly enough, on average for 3-4 hours at room temperature.

Fourth step. Begone the film and draw the bar-relief items. To do this, you need to fasten the working surface on top of its entire length and the width of a transparent polyethylene film. The lower edge, at the same time, does not need to be fixed - you should have the opportunity to flex it freely.

Fifth step. Take a marker on a polyethylene film. Sketch of future "lilies" - stems, leaves, buds.


Sixth step. After the complete completion of the sketch, proceed to applying Marseille wax under polyethylene film In accordance with the sketch. First, use Kelma to work, and then Mastikhin.


Marseille wax used has white color. In order for the decor to be created more noticeable, cover the finish with a suitable composition. For example, you can use water, slightly painted by the scroll. This kind of compositions can be applied only to the dried surface.
After the tinting, you will see, in what places the decoration material must be given the outlines of the stems, flowers, etc.
Your task is to make the planned bas-relief as realistic and appropriate sketch. You will have a lot of time for it, so you do not need to rush to finish everything as quickly as possible. Work carefully, thoughtfully and gradually.

Bas-relief "Lily" after final decoration
After giving the bas-relief of the necessary form, give the composition to frozen and proceed to apply the second layer decorative finish – acrylic paint desired color.
Prepare paint in accordance with the manufacturer's instructions. On average, such paints and varnish compositions dry 5-8 hours. Specify specific time in the description of the paint used.
In conclusion, you will remain the finishing layer of the finish - the outstand or other composition with similar properties. Armed with a wide brush, apply a double layer with a double layer on the entire area of \u200b\u200bthe decorated wall. The second layer can be applied only after drying the first. On average, it takes 1-3 hours. You must carefully try each element of the composition.
To give the composition of additional visual volume and expressiveness, apply white output on separate areas of the bas-relief.
"Tulips"

Preparation and directly work on the creation of "tulips" is performed by the scheme already familiar to you, namely:

Creating a bas-relief own hands It is quite complex, painstaking, lengthy and requiring tangible financial costs. However, with a competent approach, you can give the interior of your housing a unique view.
Good job!
Video - bas-relief on the wall do it yourself
His house wants to make beautiful and original. The most reliable way is unique homemade decorations. One of the very interesting ways is a bas-relief on the wall. This is a three-dimensional image of a plaster or any other similar material. Gypsum in pure form is used very rarely - it freezes too quickly without giving time to processing. Most often use gypsum plaster mixes. They go with additives that facilitate work. With them, you can make a bulk wall panel with your own hands even without experience.
Total Bas Account Creation Technology
To make a bas-relief on the wall, it is necessary to prepare it to start it: clean, align. Already on a flat and completely dry surface, you can start working. When you are going to make large bas-reliefs, it is advisable to climb the wall - for a better clutch of the composition with the wall.
Bas-relief on the wall can be of varying degrees of complexity. This is complicated. For beginners is clearly unasamed. But you know what can be done in perspective
For first experience, it is better to start with small products - type of medallions (round or square) with simple embossed images. As the basis for such products, it is best to take moisture-resistant. Under it can make a frame (from the profile, for example). In this form, the bulk composition can be outweigh from place to place. It is easier to master the basics of technology.

This is all the technology in general features. There are nuances on which it is worth stopping separately. The first concerns applying the starting layer of putty on the walls and transfer of the pattern. In more complex compositions, the bas-relief on the wall begins with the transfer of contours of the drawing. Do it with a pencil or chalk (if you know how to draw) or using the image printed in the desired size and the copier-plated software. Then those places on which we will apply putty are covered with soil (for better clutch), and then with the help of mastehins (small spatulas of different forms) we apply the first layer of material. Next, the sequence of actions is similar to the described.
Materials for creating bas-relief
The most common question among beginners: What putty is better to take for the manufacture of bas-relief? In principle, come on any finish gypsum spacure. Each wizard has its favorite brands and compositions. Here are a few that can be recommended:
- Knauf Uniflot. Very durable and plastic. From it you can form a deep relief - not fall off and without reinforcement. Failure: dear.
- Fugeen. Slightly less durable, it cuts a little worse. Much cheaper than Knauf Uniflot (almost three times). You can also make a relief without any problems.
- Pufas. This is a gypsum putty with cellulose fiber. Processing time - about 60 minutes, it is applied to a layer of any thickness, it is well cut, it is easily grinding.
- "Rotband" for the lower layers and the "tilt" for the upper.
- "Acryl Putz" (Poland). Finished acrylic putty. It is good because he is slowly "grasped", to study the parts of the hour and more (depends on the humidity in the room).
In addition, impregnation is needed. They are selected based on the starting characteristics of the material. There are compounds that strengthen the hearty materials, penetrating deep and binding particles of materials with each other. This is necessary, since the panel of gypsum weigh decently, create an additional load. Without prior preparation, they can fall off from fragile grounds. You can use the moisture-proof soil concentrate firm PUFAS. It is suitable for everyone mineral grounds, Including wood and wood plates. Aquastop moisture protection is suitable for bulk grounds.

In addition, these compositions are used:
- before starting work - to improve the clutch with the wall material (or base);
- for layer-by-layer processing - when creating a deep relief, when one layer of putty is applied to the already dried, imposed earlier;
- for finishing impregnation before painting - for leveling absorbing ability and that the paint lay down exactly, emphasizing the relief, and without being upgraded.
For layer-by-layer processing, primers are needed, which create an adhesive surface on the surface. In this case, you can put a new layer of putty even on the surface of the surface. For these purposes, the minor of the deep penetration of Ceresit and the impregnating PUFAS soil is suitable. They can also be used for finishing processing before painting.
Instruments
The tools for creating a bas-relief are needed for two types of work - for applying putty and to remove / cut off the extension solution. Therefore, the set of tools and fixtures is quite extensive. To apply putty or decorative paints, use:

These are all tools that may be needed. From the necessary: \u200b\u200bKelma, spatula, chisels. Mastichens are very comfortable, it is difficult without scalpels and a confectionery syringe. But stacks are a tool for perfectionists - for accurate improvement of the relief.
Making a bas-relief from plaster plaster: photo report
For the embossed picture on the wall, a maritime theme was chosen - with fish, octopus, algae. Great option for obtaining first experience! A light pattern that can be formulated gradually.

Preparatory work
The drawing with a pencil is transferred to a pre-aligned and projected surface. For the manufacture of a bas-relief, a gypsum stucco stitching / Sheetrock (with a smaller stamp) is used. During the dilution of the solution, a smaller amount of water is added: to take 0.5 liters of water to a kilogram of the mixture (instead of 0.6 on the recommendation). With such a kneel, the composition is harsh, but it is so better for making a relief image on the wall.

Immediately knead a small amount of solution: the gypsum plaster quickly loses elasticity (15-17 minutes) and you need to have all the volume not only to lay out on the wall, but also align and give the desired outlines. For the first time, knead grams of 300-400, lay out, attach some form. If in the process you will feel that you can cope with a large volume, knead more.

Little way, masticine is laid out the solution, filling the contour of algae, cut off excess, as far as possible
With such tactics - small portions of the solution - most of the time takes exactly to knead the putty. It is better to knead in the dishes with high boards - a bucket or a saucepan. However, of them, the frozen solution is hard to delete. If there is an old ball in the house, you can cut up the top and knead the putty in it. Even small particles are easily removed from such a container.
Put powder into the container, add clean cold water, quickly mix with a spatula, then bring the composition until uniformity, leave for 5 minutes, then mix again. There must be homogeneous thick pasta No lumps or heterogeneities. Exposure time and "setting" is indicated on packing with putty, if you use another composition, follow the manufacturer's recommendations.
Formation of small details
To begin with, it is easier to start with a shallow relief. When forming small parts, we take a small amount of solution on the celma, we apply to the desired place, trying to swing well to the clutch of the solution with the wall is good. If the wall is covered with a primer that improves the clutch (the surface is slightly rough and lipgy to the touch), there will be no problems. If the details are very small - such as the suckling of jellyfish - it is more convenient to put a masticine solution.

The bas-relief jellyfish from gypsum or acrylic putty make a slightly harder ...
Having a mixed portion of the solution on the wall, immediately proceed to equalizing and forming the relief. We work the edge of the Kelma, masticines, knives, rocks, scalpels - to all that is at hand and that can give the desired shape surface. If during the process it is already dried, but not yet modified, it can be mixed out of the sprayer and try to refine in a few minutes. When you achieve the desired degree of perfection, clean the tank for the knead from the residue and knead the new portion. Note: capacity should be absolutely clean. The slightest particles will leave scratches.
We form the main reliefs
In the manufacture of a bas-relief, which will be outside the wall will be no more than 2 cm, no reinforcing structures are required. With a greater thickness, in those places where the layer is planned 2 cm, screws are screwed. On them it will be possible to navigate when applying plaster, they will support the solution, without letting it crawl.

Fish and sink have a larger volume - in some places more than 2 cm. Here they screw the screws for reinforcement
In this bas-relief, the most speakers are fish and sink with pearls. In those places where a thick layer will be laid and screw the screws. Pearl roll separately, having blinded the ball and putting it on the self-tapping screw.

The thickest place is head
In places where the relief is assumed to be deep, it is possible to apply a solution at no one, but in several layers. At the same time, it is completely optional to smooth out. The more uneven the surface it turns out, the easier it will impose the following layer. When the required volume is achieved on a certain site (for example, a fish head), we begin work on small details - eyes, mustache, gills, etc.
When elapping small parts, not over 100-200 grams of solution - while cut, align, the solution is seized, therefore large portions are simply not needed.

After the drawing from the putty on the wall is ready, it is left for a couple of days until complete drying. Then you can start grinding - we take sandy paper with an average grain, process, achieving the desired smoothness. When the relief is ready, it is re-made fine-grained emery.

Two days and more, may dry elements with deep relief. Smaller - algae, waves, jellyfish - dry faster. With them and you can start. While they will bring them to mind, dry and thicker details. After the grinding is completely over, we remove dust with a thick brush. If desired, you can spend pressure. Next, covering decorative panel From the plaster in the primer of deep penetration.
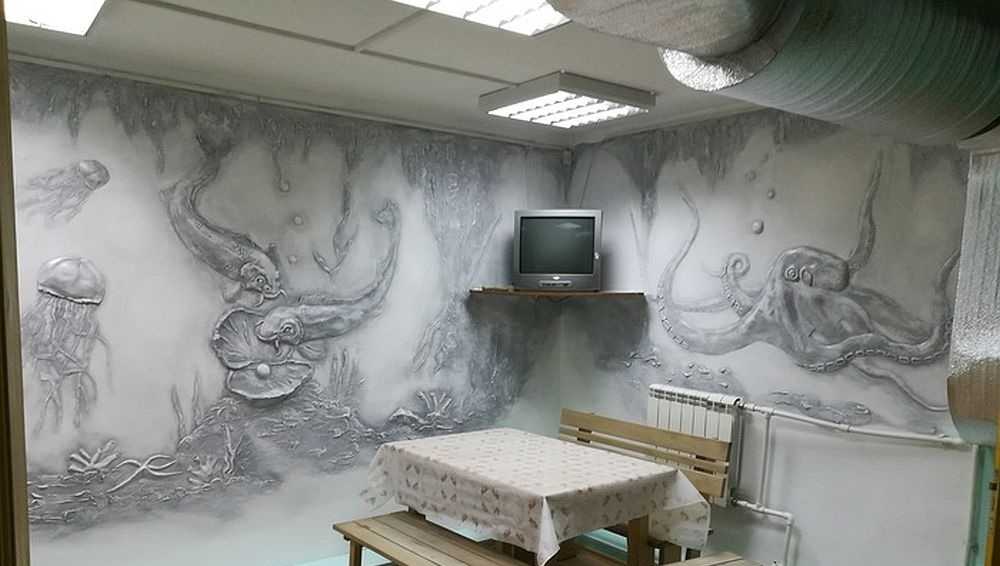
The last step of making a bas-relief on the wall - painting. The way of color everyone chooses himself. In this case, an ordinary water-emulsion was used (the primer was under the paint on water based). This can be considered that you made a bas-relief on the wall with your own hands. In this case, a large composition was obtained on two free adjacent walls.
One advice: the bas-relief on the wall looks better with specially designed illumination. So before leveling the wall, output the ends. After aligning and driving the surface, install those lamps with those lamps that will further highlight the embossed pattern. So with this light it will be necessary to grind the made you volumetric panel From the plastering mixture. Only in this case it will look good. Because if you work with a different lighting, when installing regular luminaires, you can detect a "nightmare and horror".
Bas-relief on the wall: photo ideas
Without experience it is very difficult to understand what and how can I do with the help of ordinary gypsum plaster. In fact, the volumetric paintings from the gypsum can be the most different themes, but the most common - flowers, trees and landscapes (urban, country). In this section, we collected a certain amount of the most diverse bas-reliefs on the wall. With their help, you can imagine the topic for art modeling on the walls. In fact, the process is similar to work with plasticine. 


The bas-relief is called the bulk relief on the wall surface - an ornament or pattern that performs above the plane. It helps to create an exclusive interior, because each work is unique, and it is impossible to repeat it.
The advantages of the bas-relief on the wall
Not a single type of finish is compared to bas-relief aesthetic. At first glance, he attracts attention to himself, looks unusual and interesting. The drawing can be created independently. The benefits of the bas-relief are:
- originality and effects of finishing;
- the ability to disguise the irregularities of the walls;
- the ability to act as a means of zoning the room.
Even more ideas to arrange the interior can be found at https://masterinterera.ru/

You can create a bas-relief in the interior with your own hands, and this is another advantage of such a type of wall finishing.

I do not want to glue the wallpaper, and the painting of the walls seems not enough interesting way Finishes - complement it with bas-relief, create which can be from various materials:
- plaster;
- plasterers;
- clay.

The base can be made of wood or metal - they are poured or processed by creating original compositions on the wall.


Types and topics of bas-relief
The bas-relief is called not every embossed pattern on the wall, but only the one, whose elements protrude from the surface not more than half. If more is the burner.

It looks original in the interior of a wooden bas-relief, if you pick it up in the style of the design of the room, the color suitable for the color of the furniture. In this case, it will harmoniously fit into a common style.

The ideas of bas-relief can be diverse. Depending on the style, it can be plant and animal motives, abstract elements or antique plots look aesthetic. The size, the plot and complexity will depend on:
- room volume;
- decoration style.

Often the three-dimensional image is made directly on the wall, but it is possible to install pre-cooked plates with a finished relief. We also recommend that finishing options for decorative panels on this site http://mirstrojka.ru/dekorativnye-paneli/


Bas-relief with your own hands
Many ordered the design of the walls with bulk drawings to specialists, however, knowing what to make bas-relief, you can perform work with your own hands.

For bas-relief based on putty, you will need:
- putty;
- glue;
- putty knife;
- cutter;
- acrylic paints;
- brushes;
- stained-iron contour.

At the first stage, a sketch of a future volumetric picture is transferred to the surface of the wall. It is transferred to paper, covered with a film and carry the contour to it. For this, the marker or felt-tip pen is suitable for erasing.

Preparation of the base is the second stage. It is necessary to apply an acrylic putty, fine-grained plaster is the basis of the future bas-relief. They need to be dissolved and give to dry, but not to the end. After 15 minutes, you can proceed to work - transfer the picture on the wall.

Secure the film on the wall with a painted tape, circle the drawing so that the image is imprinted into the wall. Simple ways Creation of bas-relief for beginners suggest the following actions:

On the contour on the wall they apply putty - one layer after another. The subsequent layers are applied only after the previous ones are dried.


Then, with the help of Masticheels, the image is cut through, swaying every item. The largest and most convex elements should be strengthened with self-draws. So the image will be durable.


When all the details are drawn, the panel is needed to dry well, handle emery paper. It is necessary to smooth all the roughness, corners, convex and concave elements. Work at this stage requires accuracy and caution.

Having made a finishing processing, the drawing is ground and painted. Use better water-emulsion paint. In order for the surface around the bulk drawing, it does not look unnaturally smooth, apply a small layer of plaster and treat it with a crumpled paper, polyethylene, so that the surface becomes rough.

Gypsum bas-relief with their own hands has several other manufacturing technology. It is better to use ready-made form for casting elements from a mixture of plaster and plow glue. Mass must be like plasticine.

Using ready-made shapes, you can cast separate elements Ornament, dry and glue the wall. Those details for which there are no forms, or they are too small for casting, you can manually cut out.

When the whole drawing is ready, with a white sealant close all the gaps. Further, as in the case of putty, the bas-relief is covered with primer and stain. You can apply paint, wax, add gilt.


Bas-relief in the interior
The bas-relief is well combined with many finishing materials:
- stucco;
- marble;
- skin;
- tree;
- mirrors.

Numerous bas-relief photos on a living room or ceiling wall, in arched openings, niches, in bedrooms different styles It is indicated that in classical, and in a stylized under the ancient interior of the room, he looks harmonious.

Simple on the form and drawing of the bas-relief will give the original view of the modern minimalist interior, and the classic is appropriate even in the Loft style.

Bas-relief will be appropriate in different premises:
- in the living room, using a bas-relief, you can recreate the interior of an old castle, palace, or, on the contrary, supplement the modern interior to them;
- in the bedroom original decision It will be the placement of a large panel above the headboard either in the whole wall;
- in the kitchen room, the volumetric panel is appropriate in the dining area or on kitchen apron. You can arrange so a whole wall or free niche;
- in the spacious bathroom, the bas-relief can be supplemented with marble walls.
- in a large hallway, the stucco can be made part of the wall, for a small room, the surround images are better not to use.

Small stucco elements can be supplemented by a one-photon wall if paintings, photographs, shelves with souvenirs, collections are placed on others. So it will not seem empty.


Volumetric vegetation pattern fills the space without overloading the interior.

The room can be transformed if you add decoration with multiple stucco elements on the walls or ceiling. Sometimes bas-relief can become a composite, organizing room center.

When creating a bas-relief, it is important to provide the correct backlight so that the volumetric image "has played" - this will achieve the maximum decorative effect.

Photo of bas-relief on the wall


We present to your attention the master - class on creating a bas-relief on the wall. Actually, on the idea of \u200b\u200bthe designer on the wall there will be a giant panel in a pirated subject, made in the technique of wall airbrushing (master - class for such painting, see). In the form of a bas-relief, that is, there will be only a decorative frame.
Creating a bas-relief on the wall. Step-by-step instruction
Start any work follows from the surface. For this, the panel of the wall I culled the grinding of deep penetration "Tex" on an acrylate basis, then leveled latex putty and put another layer of primer.Next, stated the width of the frame commensurately agreed by the customer sketch. Pre-wrapped with painting scotch tape (in order not to spoil) with wooden rivers, limited future "boards". Nailed them to the wall with nails. 
Then he drove nails into the space between the rails and pulled the fishing line - made reinforcement. At that time I did not have wire, but if you can use it.
To create a bas-relief, I used dry plaster mixes: "Volma-layer", "Volma-seam", "Fougühuller", "Rotband". "Rotband" showed itself. A mixture of it is simultaneously viscous, so as not to "crawl" and keep the shape, and sufficiently succumb to and plastic to give the final volume and shape, perfectly "cutting". "VOLMA" - more plastic, so flows, and "fugenfuller" quickly hardens and is very poorly processed. Having prepare the mixture, you need to take into account the lifetime of the resulting solution. For each composition it is different (see Packaging), and you need to have time not only to apply a mixture to the surface, but also give the volume and relief. For the creation of the relief of the "Old Tree" I used the old brush - Mop, acting intuitively, somewhere , somewhere inserted the "bitch" or left the surface without relief (where there will be a ribbon on the sketch). Completed the texture of knives (kitchen and stationery) and various prickly tools. 
 Ribbon samples found on the Internet and printed on a natural value. Then he moved to corrugated cardboard and carefully cut out. Received a sample and stencil. The sample at the place was naked on nails. Then put stencil and secured with nails, and the sample shot. Similarly made ribbons reinforcement. Imagined the solution and gradually began to choose in the locations of the beggars, giving the right volume and smoothness. The edge of the ribbon is out of the knife.


It is important here to have time to solidify the solution, because after - it's like a stone to cut. 


The bas-relief covered with a soil, which manifested defects, Saskapatleval, speckled and tagged again. And so as long as the result did not suit me. Then covered with the soil of Ticurilla "Odex", pre-coated in the most dark color. Then covered the "boards" of a dark brown alkyd enamel (ticurilla, gardore 10), diligently filling out all the pores and cracks of the "wood" and immediately removed the top layer with a rubber spatula, having laid the protrusions and reliefs of the texture. 

 If desired, it was possible to go through a semi-dry brush with a lighter tone, but I did not, satisfied with the result.