Pictures from alabaster. How to make your own bas-relief from decorative plaster
Volumetric images on the wall will be able to become original decoration interior. Unlike moldings (overhead elements of the decor), they are created only manually. Production of high-quality bas-relief - painstaking workBut with a big desire and the presence of at least the elementary skills of the modeling of it can be created independently. Beginner wizards can take advantage of the stencils.
Materials and tools
To create a bas-relief, you will need:sketch of the future image;
pencil, marker;
plastic sheets to create stencils;
Stencil for bas-relief
Malyary Scotch;
Coleler or paints for gypsum solutions (if the bas-relief is color);
painting brush;
Mastichens: steel or plastic blades used to create textural and embossed images;

Mastichens
Gypsum, plaster, clay, alabaster or other plastic material.

Mixing gypsum
Creating a sketch
Even if the work will be performed using stencils, it is necessary to make her sketch of a genuine value to check how the drawing will be combined with the rest of the decor. Perhaps it will have to be corrected - remove unnecessary or, on the contrary, add details to close some voids. Ready drawing is transferred on the traction or thin film.
Transferring an image to the film
Newbies are better not to use too voluminous images with multistage relief. It is quite original on the wall will look a large flower or a composition of several flowers, fruits or berries, branches with leaves, the simplest contours of animals, birds, etc.

The three-dimensional image may consist of several uncomplicated parts transferred to the wall using a stencil
Surface preparation
Bas-relief is performed on a predetermined and plastered surface. To increase clutch with plaster or plaster she nevertheless nevertheless. Indoor S. high humidity It is better to use antifungal composition.To the wall does not look perfectly smooth, you can apply the basis of acrylic putty or stengips. (fine-grained gypsum). To obtain a relief surface after applying a solution, the wall is processed with a roller or spatula with chaotic strokes. A rather original and convex pattern can be obtained even with a crumpled paper or film.

Obtaining a embossed surface with a confused film

Venetian plaster

Creating an uneven surface with a spatula
It looks very original bas-relief with backlit. In order not to damage the image and do not fall asleep its dust, the lamps for it are better to install in advance.

Three-dimensional image on the wall with illuminated

Baself lamp
Making bas-relief
1. To move sketch On the wall, it should be fixed on it a copy of it, and then attach a painted scotch with top with a drawing. Split places in the future are neatly rubbed.2. To transfer the sketch on the wall can also be in another way. To do this, it is applied a small layer of solution, the pattern is applied, and its outline is being worked with a masticine with a pointed end, matches or toothpicks.
3. If the bas-relief is volumetric, in the thictest places the image is better twisted selfless. They will perform the role of reinforcement, not giving the image to crumble.
4. Material for stencils Must be thick enough. Moreover, the bulk will be a bas-relief, the greater the thickness should have a stencil. It should be very careful to delete it so as not to damage the image. Damaged bas-relief can be corrected at any time.
Council. Remove small irregularities and flaws after complete drying of plaster or gypsum. To do this, on the edges of the picture you should walk in shallow sandpaper.
5. Convex images can be obtained by fastening on the walls. cardboard blanks Or pieces of foam, followed by a solution with a solution. It will keep stronger if the workpiece is pre-treated with primer.

Blank for bas-reliefs can be fixed on self-drawing
6. Additional strength to large elements of the image can be given using a conventional or gypsum bandage moistened in solution. You can buy it in any pharmacy.

Gypsum bandage
7. Plaster, gypsum or alabaster are bred by water according to the instructions. The solution is thoroughly mixed.
8. The solution is applied to the wall in several layers. Each subsequent layer should be performed after complete drying of the previous one.

Image applying with Mastichina
9. The convex details are rolled with their fingers, and then attached to the wall, slightly pressed and roll up.

Bas-relief grapes
10. The last layer of the image is better to do from the finish (fine) putty, easy to grind.
11. Locking of small lines and sealing the slots at the end of all works.
12. Subtle streaks on the leaves and colors can be applied using a medical syringe.
13. Ready drawing is covered with primer. Such an finish coating will not give plaster or gypsum.
Council. In order for the bas-relief, it does not crack when dried, it should be periodically wetted with a wet brush.

Registration of the entrance door
14. Coloring the image is the most different ways: how to add coller for acrylic paints directly into the solution and applying paints for gypsum solutions Using an artistic brush. Surplus paints are removed with a wet sponge.

Coloring image
Council. You can get thin flower transitions when applying paint to another wet bas-relief.

Finished image
Technique "Terra"
Work in this technique does not require special skills. Just stocking in advance dry branches, herbs, flowers or spikes. You can also use sand, cereal, noodles, small pebbles, etc.On probably pVA glue The wall (it should be divorced in the proportion of 1: 1) with the help of the same PVA, a composition of dry plants is pressed. After complete drying of the composition, the drawing is covered with glue several times, and then treated with acrylic paint or finishing putty.


Council. If you have not yet yellowed foliage and glycerin flowers, they can be conserved. In this case, on the wall you can create real color paintings from herbs and leaves. So that they do not appear, they are treated several times with PVA glue.

Bas-relief from sunflowers treated with glycerin
Reading time ≈ 3 minutes
Locked magazines and viewing television transmissions regarding the repair and design of the premises, notice that the masters of your business are increasingly used when decorating walls of residential premises wallpaper and paints. It is clear: any finishing material or an element purchased in the store, you risk meeting your friends or relatives. Hand-made miracle In principle, not reproducible and can serve as a guarantee of complete originality. But what to do if the services of high-class and creative decorate decorators do not afford. In this case, always, armed with enthusiasm and patience, you can try to fulfill the work itself.
How to make a room bas-relief on the wall do it yourself? Materials that will be needed for this do not relate to the category of cheap: very high-quality primers, putty are needed (NEONT LR +) is suitable, and wallpaper glue. First of all, these costs prevent the impact of the loss of difficult labor, which is to be.
Application of drawing

The wall intended for the application of the bas-relief is thoroughly cleaned from all old coatings, it is ground and sucked. The pre-selected image that will be placed in the room, you need to paint on the wall in the pencil. Do not stand the first time to try to portray a sophisticated bas-relief on the wall with your own hands. Flowers, stylized paradise birds, tropical vegetation will be more suitable for skills. If artistic abilities, not ahti, it is quite familiar with the familiar technique of an increase in drawing with cells. The picture and the walls of the wall are drawn into squares in which all the lines from the image are transferred in turn. Redrawing small details, you should remember the selected scale.
Establishment of relief

The wall is preparing with the help of metal and rubber spatulas, the surface of the pattern is covered with a polymer putty. To work, you, except for tools, you will need patience and a sense of measure. Fill the necessary sections with a plastic mass is not so difficult, it is much more difficult to give the material the necessary convexity and relief. After roughing the putty and giving it the right form, you must give the future bas-relief. The accompanying intermediate stages of work on the manufacture of bas-relief on the wall with their own hands (see video) will help to make an idea of \u200b\u200bhow roundness and depressions are formed. After grazing the putty mass, the forms are adjusted and smoothed by the same material.

After the final solidification of the bas-relief, it is necessary to carefully treat emery paper. For this, the average fraction (№ 200) and the smallest one will be suitable. It is clear that the major stacker is used to improve the shape of the applied bas-relief on the wall with their own hands, and small for grinding and giving the bas-relief of smoothness and gloss.
Completing the processing of bas-relief

After you have reached the desired image, the bas-relief is thoroughly cleaned from dust and processed by primer with a suitable brush. Next remains coloring. If there is no use of several colors, it is desirable to take a white water-level paint of two shades and brighter to cover the protruding elements requiring the selection and carrying the main stylistic load.
When viewing the TV shows or videos, many admires an unusual stucco, adorning the walls of various premises. Today, man-made bas-reliefs are no longer limited to the luxury category, and they can be found not only in historic buildings, theaters and chic mansions. Most apartments and private house owners successfully use this decor element in their own interiors.
Surface preparation - knead the solution and replenish the background
Any residential premises need individuality. In this regard, the bas-reliefs made by their own hands are distinguished by indisputable advantage: their sizes and shapes are not limited, the materials for their manufacture are sold in any construction store for a quite affordable price, and their manufacturer is a creative and very entertaining process.
First of all, choose the wall of the wall that we will decorate. Pay attention to its illumination, whether it will be natural light from the window or need an artificial illumination, because it is the game of light and shadow visually increase the volume and emphasize the texture of the image.
Now pick up sketches and determine the size of the image. Of course, the scene from the hunt or reproduction of famous Mikelangelo's webs in your living room would look great, but you can hardly get them into reality, so it's worth starting with small elements that include plant ornaments, geometric shapes, and even easier some Abstraction details.
To work, we will need:
- Latex gloves;
- Trowel;
- Putty knife;
- Wide flat brush;
- Palette knife;
- Food film.
Before starting work, the surface is sure to: remove the old coating from the wall site, align, if necessary, plastered and necessarily coated with a layer of primer for better clutch of materials. The wall is left until complete drying.
Made stucco from clay, alabastra, gypsum or plaster mixtures based on it. The recipe for the preparation of a gypsum solution is 1.5 kg of gypsum per 1 liter of water. For plasticity, a little PVA glue is added to it and everything is carefully mixed. From the resulting soft "test" it is easy to form a future bas-relief, and it should be started from the main background. This is usually surfaces with some texture. For example, several random brush strokes on a wet plaster or the motion of the painting roller will leave the original traces.
A good background for bas-relief will be, imitation of brick or stone masonry, small "sandy" pattern, left by a conventional sponge or the textured surface of deliberately coarse shockting. In case the bas-relief is not planned in the form of a panel, but as a separate protruding element, then the wall around it must be pre-cracking with painting tape to protect it from contamination.
Start to buy - create a sketch and give the volume
When our sculptural "canvas" is ready, you can carry the main drawing on it. In this case, a solution is needed, namely, 1 liter of water now take 2 kg of plaster. The finished mixture should not be disseminated by hand and to keep the form given to it.
In the stucco, the easiest to start with plant elements. Planning a grape vine, you need to place the location of the branch, the leaves on it and a large berry brush. Whether this image of a flower, a silhouette of a tree or part of the architectural column - is important to observe the scale of all elements of the image relative to each other. If you do not know how to draw, you can use trained stencils or make a drawing sketch on a transparent film by copying it, for example, from the monitor screen. To draw a tree, it is only worth highlighting a flashlight with a flashlight and the shadow obtained on the wall on the contour.
Next, we turn to the most complex and responsible stage - drawn out the sketch give volume. The mixture, which is designed for stucco, should be very plastic and do not harde it quickly, as it should be applied in several stages, giving each layer to dry. Given this, it is better to prepare small portions of the solution and immediately use them.
If it is assumed that the bas-reliefs from gypsum and putty will be voluminous, then their most speakers are recommended to additionally reinforce, screwing into the wall of the self-tapping screw or consolidating the usual gypsum bandage on it. Separate bulk figures can be created using cardboard and foam blanks, which are attached to the wall and are coated with a mixture.
It is possible to give the texture to plant elements using their natural analogs with a clear drawing of the residences - tightly attach to a mixture of grapes, maple or even liked indoor plant, Remove the spatula or ordinary knife surplus the shnotka around, forming a clear edge. Leave an item for several hours to dry and remove the remains of the leaves.
For similar "prints" or as a decorative element of the bas-relief, you can use other healthy items: burlap, shells, decorative stones and etc.
The convex parts can also be pulled out from the gypsum using the prepared shape of plasticine and liquid gypsum solution. Elements such as berries, protruding flower petals or tree branch, are best cut out by hand from alabaster (the solution is prepared, following the instructions on the package), and then attach to the wall, firmly pressing and failing on all sides.
"Free" Plaster - a simple method for obtaining decorative elements
Simple I. available way obtaining volumetric parts - "free" drying. It is usually used to create compositions from suiterate patterns created from paper wipes impregnated with plaster, as well as for forming floral and vegetable bas-reliefs. This method is available even for beginners, it is only worth choosing the materials and harmoniously combine them.
For the "free" drying, the architectural gypsum is best suited from which the liquid solution is prepared. For stirring, you can use a building or a conventional kitchen mixer or perform it with your hands. So, by 1 kg of gypsum take 0.7 liters of water. In order not to form lumps, it is the dry material that is added to the water, and not vice versa, and it is better gradually, in small portions, after mixing it thoroughly. In order for the solution to be more plastic, and the finished bas-reliefs did not crack, it is recommended to add a little PVA glue diluted with water. In the final version, the solution should be homogeneous and consistency to be close to liquid sour cream.
This composition dip the sprigs of plants, buds, elastic inflorescences of living or artificial colors, and also impregnate paper napkins. The resulting workpiece is laid on a flat surface, shining polyethylene filmAnd leave to dry. Flowers and paper elements need to be laid as they will be recorded in the interior. This will make it possible to form a flat base on every detail, which will then be attached to the wall. After a complete drying (not less than a day), the workpiece is again dip in the gypsum mixture and again lay in the same position for drying. Repeat such a procedure until the elements are formed by a layer of plaster in 1.5 mm thick.

Ready parts are attached to the wall using thick acrylic plaster or PVA glue. To finally fasten the finished composition and give it a monolithic appearance, the whole relief with the help of the brush is deceived by a thick plaster solution, paying particular attention to the places of connection of attached elements. You can learn the basics of sculptural craft today, just sitting at the monitor screen. In the network it is easy to find a suitable master class, with success to master the first lessons, and over time to take and for the paintings.
The best material for such a modeling is the gypsum mixture based on PVA glue. The weight should be elastic and thick, like soft plasticine. Now you can remember your kindergarten experience and try to make a cherry, flower or even a bee. No need to be upset if the subject of art did not work. You can use ready-made forms - to buy in the store for creativity or take a silicone form for baking or ordinary figures from the children's sandbox. In this case, the gypsum mixture of dense of sour cream is poured into the prepared form and leave until solidification. The resulting model is removed and glued onto the wall in a certain place of the composition.
Finishing - clean, paint, protect against moisture
At the end of the work, all the roughness should be smoothed on the resulting panel. To do this, it is best to use a small piece of fine-grained emery paper. Act neatly without excess pressure so as not to destroy the necessary texture elements. Sometimes after such treatment, other disadvantages appear - small cracks, irregularities or small holes, remaining from air bubbles. Now is the time to finally lift and fill.
The finished bas-relief on the wall is thoroughly cleaned from plaster dust and crumbs and necessarily processed by primer. Now you can proceed to decorative finish Images. Most often for this use acrylic paints and shade kickers. Drain the bas-relief in different colors, apply restrained two-color halftones or stop at a nine white color - to solve you, it all depends on the stylistic version of the panel and, of course, from your desire.
And at the end of the stucco, a protective coating of the type of hydropobizator, acrylic wax or varnish is applied. Especially important is such protection for bas-reliefs in rooms with high humidity, for example, in kitchens, in bathrooms, unheated corridors.
Bas-relief is a conditional volumetric pattern decorating internal and sometimes outer walls Houses or apartments. Unlike frescoes and sculptures, the bas-relief is made directly on the wall, so that he is much more organic fits into the interior or exterior of the house. In this article, we will tell you what tools, knowledge and skills are needed to create a bas-relief, as well as give detailed instructions To create such a scenery, which will allow you to independently decorate your home with various pictures.
What skills are needed to create a bas-relief
To create a bas-relief, the following skills will be required:
- paint;
- create bulk images;
- work with alabastric and gypsum solutions;
- create stencils and work with them;
- work with wire and create designs from it.
Any bas-relief is a partially bulk picture that should create a feeling of volumetric pattern. If these are leafy and flowers, then they should not be two-dimensional, but creating the illusion of volume. If it is a more complex image, then it should create the illusion of full volume. Therefore, without the ability to create volumetric images and beautifully draw better even and do not try to make bas-reliefs, because it will later have to eliminate the consequences of your creativity. Equally important and the ability to work with plaster and alabastral solutions, because it is necessary to clearly know the lifetime of the solution, the optimal parameters of the denotation for different work, Ability to mix with dyes.

After all, for creating a bas-relief, solutions are needed, which, although slightly, but differ in thickness. It is very important to create stencils, because without them it is very difficult to turn out the outlines of the future picture, especially if you do not have large artistic talents and high qualifications of Malar Plasterer. To create volumetric images with a thickness of over 10 mm, and with incorrect selection of thickness and viscosity of a solution of 5 mm, it is necessary to create a frame that will prevent cracking of plaster or alabastra.
Instruments
To work, you will need:
- painting brushes of various shapes and sizes, including maclove;
- mastichens; Sculptural stacks of different sizes;
- trowel;
- measured spoons;
- capacity for mixing putty;
- drill perforator with a set of drills on wood and concrete;
- screwdrivers flat and cross;
- passatia;
- clean rags;
- powerful light source;
- strong goats or forests;
- overalls, respirator and safety glasses.
Preparation of the Wall
The preparation of the wall includes two stages:
- Alignment;
- Primer.

During the alignment, you plaster with sand-cement with a wall, then align the gypsum or alabaste putty to give it the necessary evenness. If you want to make a bas-relief on wooden wall, you will have to first fix the reinforcing grid, then attach a shock. Be sure to use lighthouses (guides to help make the surface smooth). For primer, use acrylic, alabaste or gypsum compositions with a large sand content - this will create the necessary surface roughness and improve the adhesion of solutions to create a bas-relief. Use only those primers that are written that they are suitable for alabastric and clay compositions. It is very convenient to apply primer with a brush with a paincith with a large width. The ground surface of the wall, do not leave the flops, because after drying it will be difficult to clean, and the leaving the drums will negatively affect appearance Baself.

There are no clear recommendations for creating bas-reliefs, because each master uses the most convenient combination of action. Some create a bas-relief directly on the wall, others first cast its elements of their plaster or alabastra, then fit them into general design Pictures. Some make a pseudo-blank image with a thin layer of solution, others create completely volumetric patterns in 30 or more centimeters. It all depends on the qualifications, artistic taste and masters talent. Nevertheless, we will give one recommendation - to fill your hand and do not spoil the wall, create a bas-relief on a piece of plywood, chipboard or OSP, which, after completing the work, you can hang on the wall. If something goes wrong and you will turn the bas-relief, then take a new piece of plywood and will train on it.
Below we will describe several techniques that will help you create beautiful bas-reliefs:
- work with stencils;
- the use of sculpture stacks, cutters and loops;
- casting forms;
- fastening a wire frame to the wall;
- work with film.
Work with stencils

For a stencil, you can paint yourself and download from the Internet by printing on paper. After that, it is necessary to determine the material of the stencil and its thickness, as well as the manufacturer's method, so we recommend using ready-made stencils that can be purchased in stores selling goods for decor. Stencil is necessary to create contours of the future picture, after which you can use the desired volume with stacks with stacks. Working with a stencil does not cause difficulties - position it on the wall and secure in any way, then fill in thick plaster or alabastra. Remember, the greater the thickness of the stencil, the thick should be a solution. If you use too liquid solution, then after removing the stencil's stench, the bas-relief contours are lubricated, so it is preferably prefeed to read on the board so as not to re-prepare the wall.
Using sculptural stacks, cutters and loops

You can purchase these tools in the appropriate stores. If you are well developed spatial imagination and artistic skills, then you can effectively use these tools, not even being a professional sculptor. After all, with their help, the surplus of the solution is removed, giving a certain portion of the bas-relief. With the help of these tools, you can create any volumetric images, it all depends on your imagination, artistic taste and spatial imagination. These tools will not be superfluous and when creating bulk bas-reliefs, because with their help you can enhance the edges, giving each layer of the solution the necessary forms.
Form casting
The use of pre-cast forms greatly simplifies the creation of bulk compositions. For example, there are leaves in forms, which are then attached to the wall and create a barrel and tree branches. As a result, it turns out that the trunk and branches are part of the wall, and the leaves are located separately, which improves the visual perception of the bas-relief and the effect produced by it. In stores sell silicone and polyurethane forms of any size and drawings. To create a bas-relief, it is necessary not only to cast forms from gypsum or alabasra, but also to make them inside the reinforcing frame - this will prevent the cracking of the resulting detail and make it easier to the wall to the wall, because it will keep the item not only glue or putty, but also wire.

Some forms need to be lubricated with castor oil (it should be written in the instructions for form), other forms do not need such an operation. For filling in the form, it is necessary to use a much more liquid solution than to work directly on the wall. In most cases, the solution in thickness makes a similar liquid sour cream, which allows you to qualitatively fill out the form and ensure good durability. Metal carcass It is possible to insert both before and after the fill of the gypsum or alabastra, both methods provide the same strength, so it all depends on personal preferences.
Fastening a wire frame to the wall
The wire frame allows not only to mount heavy mounted decoration elements, but also to prevent cracking of plaster and alabasra with too thick (over 7-10 mm) layer, thereby the ability to create a big thickness shapes. The thickness of the wire depends on the place of its use and destination - for fastening the external decorative elements Use steel wire with a thickness of 2-3 mm. It has high strength and rigidity, so effectively holds outside design Before drying gypsum or alabaster coating. For the reinforcement of parts of a large thickness, it is possible to use a steel wire with a thickness of 0.7-2 mm, which has less rigidity and mass, so it is easier to work with it. For fastening the wire to the wall, it is convenient to use a dowel-nail dowel, for which a hole is drilled under a dowel with a perforator, then 1 turns of the wire and a dowel-nail clogged down to the plastic clip. If you are creating a wire to a wooden wall, then there is a different technology - 1 turns of the wire are wound on a car thread screw, after which it is screwed into the wall until it stops. If necessary (if you have to use a large-length-length / thickness, or the walls are made of solid wood) in the wall, the hole is drilled by a diameter of 2 times less than the diameter of the self-pressing, which makes it easier to screw it, but does not weaken fixing in the wall.
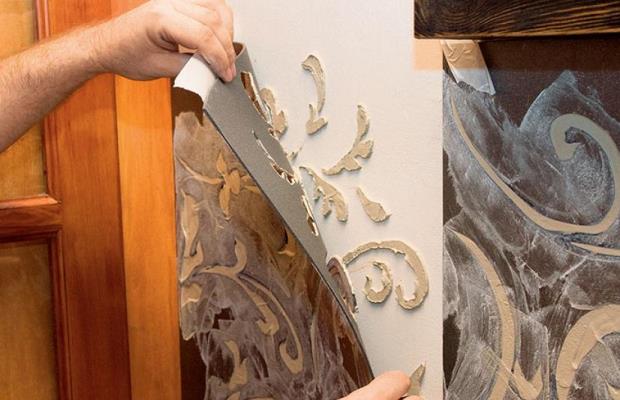
Work with film
The film is used to create pseudo-compound compositions on the asbestos and alabaste plaster layer of a small thickness. First, the marker is applied to the film with a marker on a scale of 1: 1, then a layer of plaster with a thickness of 3-6 mm is applied to the selected wall section of the wall and superimpose the film, orient the pattern in space. After that, the contours of the drawing with a handle and remove the film, and the drawing remains on the layer of plaster. Now you can remove the stacks superfluous using stacks, creating a selected pattern and giving it volume.
Gypsum and alabaster when entering the skin is overlooking it, so it is desirable to work in rubber gloves. In addition, be sure to use safety glasses, it is protecting you from getting plastering or putty in the eyes. Dosing a solution, pouring it into a stirring and stirring container, dress the respirator - it is not very convenient to work in it, but if you lose a solution or otherwise raise dust, it will protect your bronons and lungs from defeats.
To create a beautiful bas-relief, it is necessary to properly organize the workflow. The powerful source of light will help to detect the slightest shortcomings, so that you can easily fix them until the mixture is frozen.
If the defect will be detected after the mixture is frozen, it will be much more difficult to eliminate it, because the frozen plaster or alabaster will have to be processed not with stacks, loops or hooks, but sandpaper. You must learn "on the eye" to determine the amount of solution that can be recycled to frozen, otherwise you will constantly throw out the frozen surplus. The lifetime of the solution depends on its composition and is indicated on the package, the optimal ratio of the dry mixture and water is indicated, so correctly determine the amount of solution required for a particular operation, as well as adjust its delicate, changing the amount of water. A clear understanding of the required quantity and density of the solution comes only with experience, so first work on pieces of plywood or chipboard and do not worry if something does not work, with time you will learn.
Bas-relief is the type of decor in architecture. In French means "low relief". The convex image is highlighted over the wall half of its volume. Relief trim decorated buildings, starting with Paleolithic. Then these were rock paintings. Then art spread to the ancient East. Such sophistication could only afford the aristocrats. The founder of the baself of the bas-relief in the decor is considered an ancient Egypt. It was used to paint the tomb of pharaohs. IN Ancient Greece And Rome bas-relief decorated temples. In Soviet times, it was used in the decoration of buildings, structures, theaters, metro stations, monuments, etc.
Beautiful bas-relief in the interior

Bas-relief on the wall

Bas-relief with a tree in the interior
The bas-relief in the interior looks very sophisticated and original. The room creates a special charm. This is an excellent option for decor. empty wall, or masking of her uneven surface. In addition, the composition can be chosen under its own, individual taste. And recreate it, right on the wall, do it yourself.

Room design with bas-relief

Bas-relief in the interior of the bedroom
What is necessary for work
Basically, the material serves as plaster, plaster, clay, papier-mâché, polystyrene. It is also used a metal or wooden base that is poured or processed as it is conceived by the composition, and then mounted in the desired place on the wall.
Each bas-relief created by manually by the author, exclusive. Even the same drawing in different rooms Will look in different ways. The bas-relief is specifically created for a specific interior, so repeat the masterpiece will not work twice anyway. Such high uniqueness makes each decor only and unique.

Beautiful bas-relief with nature in the interior

Bas-relief with dandelions in the interior

Bas-relief in the interior
Basiaperfight images are used in many architectural styles, from Gothic to Modern. However, for Gothic - it is an integral element. On the temples of the image, not only decorative function was carried, but also showed biblical stories to illiterate, simple people Could see important events from the Holy Scriptures. Cost only to look at the main doors of the Milan Cathedral.
In Barochko basanery images served as an emphasis of luxury interior. Basically, plots from myths were recreated. The example of Petrovsky Baroque - Summer Palace in St. Petersburg.
The bas-relief in modern can be seen in the "Metropol" in Moscow. Today, this decor decorates apartments, offices, cafes, country houses etc. Bas-reliefs in the interior of the apartment in the niches decorated with illumination are particularly unique. Thus decorate the hallway, stairways, bedrooms. Various options Illumination, with point or hidden lamps focusing in the interior.
Basane finish in combination with wood, metal forging, glass, stone, leather, marble, etc., looks expensive and truly exclusive. Moreover, make a bas-relief can be done.

Bas-relief with nature in design

Beautiful bas-relief in design
Creating a bas-relief with your own hands
Work begins with the preparation of the wall. It is cleaned, soaked and dried. Then paint the selected image. The easiest way to manufacture a bas-relief on the wall with your own hands is vegetable prints. Today they are used quite often and make them easier.
Necessary materials:
- a solution of plaster, alabaster or other material, to choose from;
- wood cutters;
- stencil or film;
- paint, impregnation varnish;
- tile glue, self-tapping screws, nails, etc.
First you need to draw topic. Moreover, the application of the image also depends on the method of work. If it is a ready picture, which is then attached to the wall, there are some rules here.

Bedroom interior with bas-relief

Interior with bas-relief

Beautiful bas-relief in the interior
- Collect the frame with sides under the picture. For him are suitable materials.
- The resulting form is made with a film. The main thing is that there are no folds.
- Pour the finished mixture into the form.
- After the form can dry, negotiate the contour. Here is useful ready stencil.
If the bas-relief is decided to make originally on the wall, then it is cleaned and the soil is applied. On the dried wall draw the contour of the pattern. You can make a stencil in advance.
Next follows the creation of relief. If the picture is made separately, then after drying the form and designation of the contour, a new solution is prepared, which creates the size of the pattern. Work is done in layers in order to notice and remove flaws in time. If the bas-relief is created immediately on the wall, then first made by the draft layer, the desired zones are filled with a solution, unnecessary fragments are removed. Then everything should dry. And then complete the finish, bringing to aesthetic species.
There is a very easy way of embossed application, suitable for both options for work. Based on the drawing, forms are made for its relief areas. These forms are flooded with a mixture, and then ready-made pieces of drawing are attached to the wall or picture, the seams are smeared with plases and cleaned with sandpaper.

Bas-relief with flower in the interior

Bas-relief in the interior
How to attach a separately made picture
To do this, use tile glue. A large picture by weight can be attached, with the help of nails, screws, or deepening it into the wall. For this, they prepare a niche, and the image is inserted into it. All seams are calmly lubricated with a solution and rubbed out essay.
The finished wall-mounted bas-relief is thoroughly squeezed by sandpaper, clean all the depressions and seams from dust, soaked with a special brush and paint. Fits good water-emulsion paint.which covers all the protruding parts. It is better to take advantage of the usual sponge.

Basiel with a girl on the wall

Bas-relief in the interior

Beautiful bas-relief in the room
Gypsum shape do it yourself
Not all forms can be bought in the store. However, if the desired form is not found, it can be done by himself. For example, in the figure there is a bird or some animal. You can buy the desired statuette or toy, and put in a plywood box. Pour its contents with liquid silicone, which is sold in all building stores. After a day, after drying silicone, the box disassembled, the statuette is removed and that's it. The required form is ready. Alabast mixture is well poured into it. Moreover, silicone forms are not needed to lubricate, unlike children's octoys from plastic material. The latter should be lubricated with vegetable oil.
To prepare a mixture of alabastra takes: Gypsum - 2 parts, water - 1 part. The prepared mixture is poured into the forms and is waiting for a complete drying about a day.

Basiered with butterfly in the bedroom

Bas-relief with landscape
Bas-relief with lilies
Creating an image occurs in several stages.
- Plaster and primer is applied to the prepared surface. Great primer is perfectly suitable, as it creates roughness when drying, which helps hold the next layer.
- One layer of wax is applied.
- A transparent polyethylene film is fixed on the entire surface of the picture.
- A sketch of flowers is applied to the film.
- Under the film, a repeated layer of wax is applied in accordance with the sketch.
- Created bas-relief
- The surface is painted and cleaned.

Bas-relief with flowers in the bedroom

Bas-relief with waterfall

Beautiful bas-relief on the wall
Before sticking elements to the wall, it is better to decompose them on the floor and see what happened. So it does not have to remove and glue fragments several times, and the wall will not be fan of an excess layer of glue.
Antique figures in the image look only in the frame. For this, the picture frame is fixed on the wall, and its internal space is aligned with putty. Then the pedestal is attached, the statuette is glued on it, all the angles and cracks are appleed. The remaining elements of the decor are added, and completely all the picture is covered in several layers.
The bas-relief from the putty is done very simple. Images on the wall increases gradually, layers. And so that there are no cracks in the picture, the PVA glue should be added to the putty. 0.5 kg of putty - 1 tbsp. l. glue and 100 gr. water.

Trees in Borderef

Bas-relief with landscape
Such decor is sensitive to moisture, dust and tobacco smoke. Fresh bas-relief needs to be carefully protected. The varnish layer is updated depending on the amount of dust and light falling into the image. Wipe the bas-relief needed dry or slightly damp cloth. Well fit soft panicles. Over time, the gaps and cracks still become visible. It is enough to periodically smear and tint the discovered defects.
Video: Bas-relief in the interior
50 photos of bas-relief ideas in the interior of the apartment:


