Fastening plastic siding. How to mount siding? Montage of siding with your own hands - step by step instructions
If you decide to separate the walls of the house as a material as vinyl siding, installation, the instruction on the execution of which should be studied first, can be made with your own hands.
Vinyl siding is popular due to the affordable price and ease of installation. But first you need to familiarize yourself with the order of work and fastening technology.
Singing Installation Characteristics
Installation of vinyl siding includes several stages:
- Preparatory work, including the main measurements, the development of the panel installation scheme, the preparation of materials, fastening elements and the necessary tools.
- Installation of vinyl panels according to the instructions.
- Installation of sofite panels to ensure the ventilation of space under the roof.
- The final stage, which includes testing the quality of work performed and cleaning.

Materials:
- vinyl siding;
- bar for frame or CD profile;
- popular plate;
- external or internal angles;
- soft panel;
- initial profile;
- finish plank;
- N-profile connector;
- drain bar;
- J-profile.

Instruments:
- circular electric saw;
- hoven for metal;
- scissors for metal;
- knife cutter;
- pile transverse;
- passatia-perforator;
- passatia-firing;
- pliers;
- hammer with a nail-breeder;
- metal joinery hammer;
- screwdriver;
- awl;
- line;
- roulette;
- building level;
- rope;

Preparatory work on the installation of siding
So that Siding is regularly served for many years, it is necessary to mount it according to the instructions, making heat insulation that will save the walls from the freezing and penetration of moisture.All contacts of siding with brick, plaster, stone, concrete and space around the openings in the wall must be isolated.
If the facing by siding will be made for the new object under construction, the facade is recommended to bore first moisture-resistant OSB plates. For the facing of the facades of the built-into operation of the building with a wooden wall covering, it is necessary to replace all damaged and fasten the discharged boards. From the facade before the start of work, it is necessary to dismantle all the drains, sings, shutters, lighting devices, etc.
Installation of crates for siding
Siding installation begins with fastening the walls of the crate from smooth along the entire length of the bars 25x80-50x50 mm.
Under the horizontal siding bars are nailed vertically, vertical - horizontally. Brucks' fastening step - 30-40 cm. If the insulation will be laid under siding, then first of all perpendicular to the future crate under the siding attacks the lamp to lay the insulation with a step equal to the width of the insulation roll or mat. Around the perimeter of window and door openings Also you should nice bars.
After laying the insulation, it is protected by waterproofing film, fixed by the stapler to the crate. It is necessary to stretch it in the horizontal direction from the bottom of the wall. Each next row of films must overlap the previous 10 cm.

The crate to which the panels will be attached, you can do both from bars and from the CD profile. The metal profile is not amenable to atmospheric precipitation, so it is preferable to wooden bars that should be treated with an antiseptic.
Instructions for fastening horizontal siding
- Designation of the starting point. First you need to decide on the location of the first row of panels. If the rear is exploited, it can coincide with the old cladding. If the building is new, then the first row must overlap the top of the foundation. Vertical and horizontal control using a plumb and construction level.
- Installation of accessories - starting strip, exterior and internal angles, platbands. You need to start with them and then go to the fastening of profiles. First of all, you need to set the corners whose vertices should be below the eaves or sofit by 64 mm.
- Installing the initial panel. From how far the first panel is installed, the entire surface of the siding will depend on. Draw on the wall a flat line in the width of the starting panel. It will be a guide for fastening the starting profile. Neighboring panels must be attached to a distance from each other in 12 mm.
- Installing insulating elements on window and doorways. At this stage, install all the platbands, fits, coil strips and final lining. The final lining is preferably shy with each other at an angle of 45 ° - so the openings will look more neat.
- Installation of facing panels. This is the main stage, but all the most difficult is already behind. Fasten them should be low up, ranging from the starting plank. Insert the panel to the initial profile and secure nails. In this case, the panel should move a little. Barnat panels are needed with a 40.5 cm interval. Between the main siding and accessories, it is necessary to leave a gap of 6-12 mm. The panels should be attached to one on top of another by 1/2 from the above-mentioned mark. Do not do frequent overlaps, joints should not be too noticeable. At the end, secure the panel around the openings.
- Installing the upper edge. Installing profiles under it are needed in the same way as under the openings. Under the edge of the roof you need to mount only one-piece panels, it is not necessary to cut them. The final siding row is made using a J-profile or finishing overlay. In the top of the j-profiles you need to make holes with a diameter of 6 mm in a step of 60 cm to ensure the flow of water from the roof.

Mounting Siding: Summing up
So, clearly adhering to the above recommendations, strictly observing the priority of the work, you can perform the installation of vinyl siding with your own hands, putting a little effort. This will save on the work of professionals, and the result will delight for many years.
Siding panel - spectacular design of the facade of the house. Thanks to modern technologies, this finishing material can imitate almost any surface - stone, wood, brick. The popularity of such decorative panels is due to the low cost, as well as excellent qualitative characteristics. Conduct siding installation yourself. For this, no special skills will be required. It is enough to take advantage of the Siding Installation Instructions with your own hands for dummies.
The sequence of work when installing siding is almost always the same. Here are the main stages of the arrangement of the facade of the house with the help of this technology:
- Installation of decorative panels always begins with the installation of the starting profile. Later he will completely hide the first plate. If the starting profile is not fixed by level, then the subsequent panels will fall on the wall unevenTherefore, you constantly need to control the correctness of the installation.
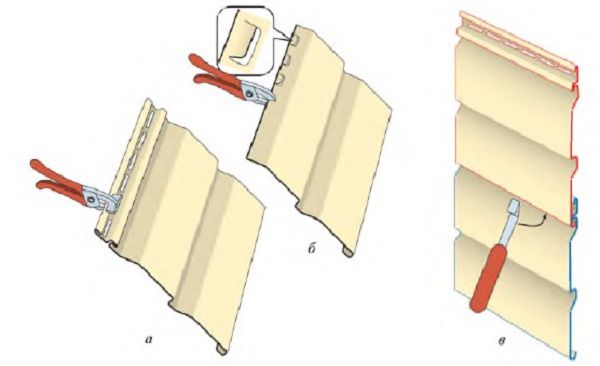
- Each siding plate is equipped with a special lock, with which it is fixed with the previous one. Perforation is provided at the top of the panel. It is through these holes that the plate is fixed.
- After the wall is fully assembled, it is necessary to complete the installation of the finish plank.
When mounting siding, you should consider the possible linear expansion and narrowing of the material due to temperature drops. In order to damage the panel when changing weather conditions, it is necessary to create temperature gaps. Vertical and angular slats siding should not be inserted tightly. Self-press / nail head, which is attached to the plate, should not press it strongly to the frame. The mounting of the panel should be carried out in the middle of the perforation hole, which will ensure its mobility when temperatures change.
Certain rules, at what temperature to install siding, no. It is desirable that the street is not lower than minus 10 degrees. But the size of the temperature gaps depends on the time of the year in which the installation is made. In the summer, the side gap should be about 10 mm, in the winter it should be increased to 12 mm.
Vinyl siding installation rules do it yourself
Installation of any siding begins with a frame assembly. It can be vertical or horizontal. Most often, the vertical frame is suitable for panels such as a shipboard or block house.
Arrangement of vertical carcass
First, at the corner of the house, a vertical line is carried out with the help of a building level and prepared plumbs. Along the line on both sides, holes for fastening of suspensions or mounting brackets are drilled in which a metal profile is installed. Next, the same guide is attached at the opposite corner of the wall and the construction cord is stretched between them. Holding to the specified level, the rest of the guides are fixed with a step of no more than 40-50 cm.
Around the windows and doors it is required to additionally install the frame from profiles. In these places there will be a missile plank or an offline. Additionally, the framework will be required in those places where in the future it is planned to install lighting lamps or a motor block of the split system.
Assembling panels

After the frame is completed, you can proceed to the process of the trim. Panels of different manufacturers have different designs of challenges and fixing locks. But the instructions for their connection usually comes complete to vinyl siding. However, exist general principles Fastening panels:
- corner profiles are attached strictly vertically;
- fix the siding panels start from the middle to the edges;
- when fastening the plates, the screws or screws do not twist until the very end.
Helpful advice! In order to get a gap between the self-tapping screw and the siding plate, it is twisted until it stops, and then unscrewed by one turn.
The assembly starts with the installation of starting and corner slats. They subsequently inserted ordinary vinyl panels. Since the angular planks are rather flexible, with their help you can equip both stupid and sharp corners. To get a stupid angle, the bar is slightly pressed, and for acute - compress.
For the docking of ordinary panels there is a special n-connector. It is necessary when the length of the plate is missing to completely block the wall. You can do without using this item. Then the plates screw the flashes.
Metal Siding Mounting Rules: Instructions

The principle of the cover of the facade with metal siding is the same as vinyl. For installation will be required:
- internal and outer angles;
- start rack;
- connecting profile;
- finish rake;
- platbands.
Mounting metal starting from the corner of the building. The first row of panels is attached to the launch rail. The following rows are recorded by the castle of the previous series. So gradually makes the cover of the whole wall. The top row is fixed with the finish rail.
Helpful advice! If during installation it is necessary to lengthen the corner strips, the upper part must be mounted on the bottom bracket 2-2.5 cm.
Installation instructions for base siding
For the installation of basement siding will also require the arrangement of the crate. It is performed by creating the same frame as for walls. If there is no coating from concrete or tile around the house, then the lower ends are not adjusted to the ground by about 7-10 cm. Additionally, before starting the installation of the base siding, it is necessary to check how lined the foundation. For this, the height of the base is measured throughout the perimeter. If the height is the same everywhere, then the starting profile can be used when cladding. But if there are significant differences, you will have to cut the first panel.
Usually the sides of the base panels are stepped, therefore, the protruding parts near the corners will have to cut. In the angular profile there should be a smooth edge. It is also necessary to match the size of the panels and their quantity with the long wall. The final plate should not be less than 20 cm. The last touch can be considered the fastening of the J-profile throughout the perimeter of the base. It is necessary to protect against moisture.
Photo Instructions for Siding Installation


23868 0
Construction of a private house implies not only his interior decoration, but also the covering of the outer part, that is, the facade. The most popular decision today is siding, that is, panels from different materials With lock and edge. It has a number of valuable advantages, excellent performance and attractive appearance. Siding can be smooth and glossy, mimic the structure of the tree or stone, so it will fit perfectly in any landscape. The most important thing is to choose the correct material and lay it on all the rules.

Depending on the material from which siding is made, it can be wooden, polyvinyl chloride (vinyl), acrylic, fibro-cement or metallic (steel, zinc, aluminum). All types of finishes are characterized by cost, durability, resistant to all sorts of damage and other characteristics.
| View of Siding | disadvantages | |
|---|---|---|
| Can reproduce any texture, effects looks, has a wide range of colors. The casing from this type of siding is resistant to negative factors (can be operated at temperatures from -50 to +50), it has a small weight and acceptable price | For high humidity and the sharp drop of temperature can be deformed, it is afraid of mechanical damage, has a relatively small operational period. |
| Resistance to burning in the sun and high temperatures (up to +85 degrees), excellent strength characteristics, chemical resistance, has no ability to fire | High price |
| The material is durable and durable, resistant to temperature differences, does not contribute to the reproduction of fungal disputes and malicious microorganisms | Low sound insulation, the ability to delay the coating from the metal base in the section of the section. Aluminum siding is subject to mechanical damage, after which it is no longer possible to return it to the initial view |
| High ecology, thermal insulation, variety of textures and patterns on the cut | Insufficient strength, short-life, ability to fire and deformation, complexity in care, high cost |
| The material is able to replace a natural stone, as it is made from cement, water, sand and cellulose. Resistant to atmospheric influences, not subject to corrosion, rotting, does not contribute to the development of fungus and mold, ease of operation | High price, difficulty in purchase (practically not distributed in Russia) |


If we are talking about color solutionsThe most common are pastel materials - they cost much cheaper than bright siding (this is due to the addition of expensive components that prevent the burnout of the finish in the sun).


We should say about the material from vinyl separately, as it is considered the most practical and inexpensive option for finishing the facade of any building. It is made of PVC panels and in a large assortment is presented in any specialized store or in the construction market. In addition, the vinyl panels are quite simple in the installation, so all the work can be performed independently.
Varieties and siding elements
In order not to make a mistake when choosing and installing siding, it is necessary to deal with varieties and challenges of the material. Depending on the design characteristics and installation features, siding is divided into several types.
Horizontal and vertical siding

Vinyl panels can be horizontal or vertical. The second type is less accustomed to the domestic consumer, since horizontal panels are used to finish the buildings in Russia.

To choose the right type of material, some structural differences between horizontal and vertical siding should be taken into account.
- Different geometry and configuration of elements. Theoretically, vertical siding can be mounted horizontally, but without appropriate experience and knowledge, it is quite difficult - the installation as a result may be incorrect, which will lead to water flow and other troubles.
- Lack of additional perforation. At the bottom of the horizontal panels there is a perforation, and the vertical it is missing.
Otherwise, siding varieties are practically no different from each other, as they are made from the same material, and also require compliance with certain rules when installing.


Wall panels
This type of material is designed for cladding vertical surfaces and, in turn, is divided into several types:

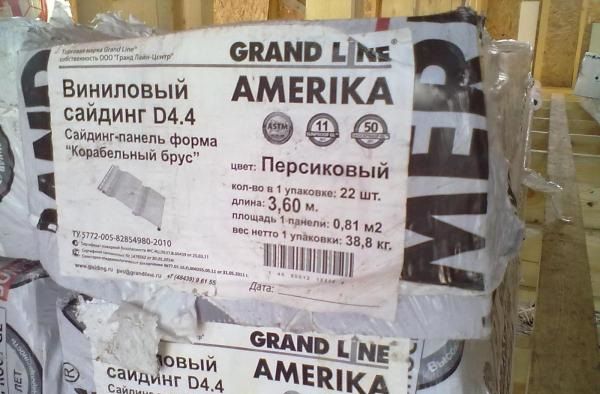
The main difference between the shipboard from the Christmas tree lies in the presence of a characteristic breakfast in the center of the panel, and the first type is most common in Europe and Russia, and the second - in the USA and Canada. Types of siding Latin letters T (triple Christmas tree), D (double) and s (single) are labeled. After the letter, there is a digit, which means the width of the panel - for example, the marking S 4.5 denotes the panel a single Christmas tree with a bending thickness of 4.5 inches (approximately 114 mm).
Congue siding is a material that is used to cover the lower part of the building. They are two times the thicker of ordinary facing panels, due to which they differ in high strength are not subject to deformation and all sorts of damage. At the same time, the mass of the panels is very small, that is, they will not need to additionally increase the foundation.


Soffit
Sofit on its essence is ceiling siding, which is used to close the protruding part of the roof and finishing the ceilings in attics and in the attic. Such panels not only give the building a perfect and finished look, but also protect the space under the roof of precipitation, insects, etc. Structurally, they are divided into two- and three-band, and in addition, are perforated, mixed and non-perforated.


Doborny elements
In order for siding facing is attractive, it is necessary to use not only panels, but also profiles and accessories that give it a complete view.

Such fair elements include:
- the starting profile is used to set the first row of panels from which the installation works begin;
- finish profile for row under the roof;
- the outer angle and the inner corner closes the edges of the facing panels laid by external and inner corners building;
- J-chamistry is used to facade the top of the facade and gives it a finished appearance;
- The J-profile is auxiliary accessory used in a set with J-Fame;
- The n-profile connects the panels in the middle of the wall, closes their edges and is used to implement all sorts of designer solutions;
- molding is a cross between the finishing and J-profile, and is necessary for attaching the vertical plating in the places of transition to sofam;
- a profile profile is applied to facing window and doorways;
- the tump acts on the role of drainage cornix;
- the platband is necessary for decorative finish door and window openings;
- sun is an auxiliary profile used in the complex with platbands;
- the sealing profile provides connections and jacks between the panels, and can also be replaced with a starting profile or vertical panels.


It should be noted that all the above accessories to the siding panels may differ in width, length and configuration, and these characteristics are unique not only for the production of a separate manufacturer, but also for each line of facing material.
The installation of siding panels is a fairly simple, but a painstaking and laborious task that requires not only accuracy and accuracy, but also strict compliance with the rules of installation.
General rules
The technology and sequence of installation of siding panels depends on the characteristics of the material and the surface, but there are several general points that should be remembered when performing work.
- The installation of siding can be carried out in three ways: on an aluminum surface, directly to the facade and the crate. The first method has one serious drawback - a high price, and mount siding directly on the walls of the building is possible only in cases where they are made of wood and have a sufficiently smooth surface. The easiest way to install panels is a preliminary trim of the facade of the crate, which will not only make the facing of smooth and neat, but also accelerate the performance.

- In the case of building buildings, all work on facing is carried out only when the structure fully gives shrinkage.
- Vinyl panels are recommended to be fixed exclusively to the factory holes - the material should not be punching, as it can badly affect its service life.

- Wooden elements are attached with galvanized hardware, otherwise the tree will quickly start rot.
- The newcomers are better to start mounting from the back of the facade so that by the time of the transition to the front of a person already developed certain experience and skills.
- The installation of siding panels is performed from the rear corner of the brass rows from top to bottom, which allows you to make joints between them less noticeable.
- Performing work, it is necessary to control the evenness of each third set series, otherwise all the others will also be with distortion.

- Highly important moment It is that under the influence of the temperature of the panel can be expanded and compressed - if the fastener is incorrectly calculated, the panels can later be deformed.
- Fasteners are clogged exclusively in the center of the factory hole. If it is impossible, you should neatly expand the hole with the perforator (you cannot score nails to the end of the hole, otherwise you can seriously damage the panel).

- Siding elements do not need to be trigged down tightly - they should move a little from side to side.

Error 2. installers screw the screws until it stops into perforation, it is impossible to do
- Attaching the panel to the frame, you do not need to put pressure on it up or down: the force is applied from the bottom up until the upper element connection snaps into the Lower Castle.
- In places of joints of facing panels with volunteers should be left a gap of 6-12 mm thick. If the work is carried out at low temperatures, the width of the gap should be at least 10-12 mm.


- Fasteners should be driven as soon as possible and straight so that the panels are not deformed and did not breed.
- If a crack appeared on the panel, it is better to replace it with another, since the crack will expand over time.
The process of mounting the siding panels consists of several stages, and they need to be performed in a certain sequence - only in this case, the result will fully comply with expectations.
Step-by-step instructions for siding
Siding installation begins with the calculation of the required amount of material. To do this, you can use special calculators on construction sites or a simple formula. The building should be divided into simple geometric shapes, measure their area and summarize the resulting numbers. In addition, it is necessary to compile a detailed scheme of the building of the building, where all the necessary profiles and accessories will be indicated, as well as their location. It should be remembered that about 10% of the total material will go to fit and trimming, and if the work is performed for the first time, some elements can be corrupted.


After buying siding, you can move to the main stages of work, and the first of them is the preparation of healthy tools and materials.
The first stage. Preparation of instruments and materials
Siding panels for mounting and materials for the manufacture of crates must be absolutely integer, without cracks, chips and flaws. If work is planned to be performed in winter, Siding should be given to "searcate" on the street at a temperature not lower than 15 degrees.


In addition, you will need to prepare fasteners (self-tapping screws, nails, brackets), which will be included in the material for at least 20 mm, and a number of tools needed for facing the building.
- Electric saw. To accelerate the cutting of siding, it is best to use an electric saw (manual or stationary), and the blade should be adjusted to the opposite step (when working with the wood tool is used as usual). If the installation is carried out in a cold, moving the blade is needed as slowly as possible.
- Scissors for cutting for metal. Polyvinyl chloride and other materials from which saidding panels are manufactured (especially for polyvinyl chloride) are quite simple in processing, and with the help of such a tool it is easy to give the necessary shape to the panels.
- Perforator. We are necessary for drilling holes for fastening elements.
- Punch. It is used for punching holes (so-called hooks) on the sides of the panels when installing siding in under the roof or under the openings.
- Tool to dismantle siding. It happens that when working with panels, disassembling one or more of them is necessary, so it is better to get a job in advance by the necessary tool, something like a hook.
In addition to the above, a hammer, a jigsik, level, roulette and a piece of chalk should be prepared to perform work, and the eyes should be better protected by special glasses.
Stage second. Surface preparation
High-quality preparation of walls is the key to the fact that the siding lifting will look neat and attractive. It is best to mount the panels on top of the moisture insulating material (to lay waterproofing is not necessary, but experts recommend protecting all the places where siding will come into contact with the walls of the building and holes). Before the start of work from the surface you need to dismantle old finish, as well as all elements that can interfere with installation: shutters, drainage gutters, etc., and the surface of the walls are cleaned of dirt and dust.
Stage Third. Production of crates

Before installing the crates, you should check the reliability of all elements of the building: for example, replace all discharged and broken boards. For the construction of a frame for siding, dry and straight bars of the corresponding sizes are taken (usually 4x6 cm) without signs of rot, stains or deformations, and they should be treated in advance with antiseptics and antipirens (substances that impede fire). A more reliable, but rather expensive solution is a galvanized profile that is mounted as well as a wooden frame.


If horizontal siding is used for cladding, the frames of the frame are attached vertically, and vice versa. The distance between them should be 30-40 cm (in regions with difficult weather conditions - about 20 cm). Additional rails are installed around the door and window openings, bottom and top of the facade, as well as where additional accessories will hang (for example, lanterns).
All items must be mounted exactly, checking them from time to time. Bold the elements of the crate can in any way, but optimal option are ordinary nails. If the frame is attached to concrete or brick, in the walls it is necessary to make holes in advance by the perforator. Places where siding will come into contact with building materials, It should be safely sealed to protect them from moisture and frost.
Stage fourth. Installation of panels
The most important stage of the facing of the building is the installation of panels for the crate. It should be used as much as possible and accurately, in compliance with the rules listed above. Actually, the algorithm for the installation of siding panels is as follows.

Step 1. Determine the point from which installation will begin. To do this, find a point in the bottom guide frame, retreat from it 50 mm, put the label and screw the screws slightly. Sequentially moving around the perimeter of the building, continuing to put marks and screw the screws. Also, they should be screwed down at the corners of the building.
Step 2. Stay between the angular marks of the Beachka, mark the seats of the place where the corner profiles will be installed (it is precisely the installation of them). Attail to put a profile and chalk to the corner of the carcass on the edges of the label, then attach it to the crate. In the same way, the remaining corner profiles, external and internal, and the mount must be started from the upper opening, from top to bottom.


Step 3.After the angular elements are installed, you can move to the installation of accessories on window and doorways: platbands, fed and final lining.

Step 4.Moving around the perimeter of the rope, make a 6 mm indentation from the edge of the angular profile and attach the starting profile, and then the first starting panel. If it is attached correctly, the rest of the siding will also fall as needed. Between the elements it is necessary to leave a centimeter gap to compensate for the possible temperature deformation of the vinyl. It should not be attached to the panels too densely - there should be a gap of a minimum of 1 mm between the Hat of the fastening element and the surface of the material. You should also pull the panel up, otherwise it can crack or deform.


Step 5.After attaching accessories, the installation of facing panels is made, which is running at the top, ranging from the starting. The panel is inserted into the first in the row and mounted to the frame of hardware, and they need to be driven, ranging from the center and moving towards the parties. At the height of the panel should be installed on each other: the lower lock of the upstream element is included in the Lower Castle Connection. Panels can be collected in the arbitrary height and width section, depending on designer solution. If the panel closes the opening of the window or doors, you must cut off the extra piece so that it gets up between the platband or another accessory.


Step 6.The last top row is installed only after the finish strip. It is necessary to nourished close to the roof, measure the distance between its bottom and the lock panel of the penultimate row. From the obtained numbers to take 1-2 mm for the gap. Take a whole panel, place it so that it enters between the J-profile and the bottom panel, cut the top with the lock.


Step 7.On the top of the prepared panel, create so-called hooks every 20 cm - make small cuts and bend them on the front side. Cropped detail insert into the bottom panel and slightly snap it in the lock connection.


In the photo - installation of the finish plank
Step 8. The final step is the facing of the frontal roofs. Works are performed as follows: the J-profile is fastened along the front of the frontone (if more than one element is required, you need to fix the second bracket by 2 cm).


Step 9.Measure the angle of inclination of the roof and cut the siding accordingly. Most likely, the last panel will have to be knit using the fastener. This is the only case when it is allowed to drive the nail or screw the screws directly through the panel.


On this, the installation of siding panels can be considered complete. If everything was done as needed, the result of work will be aesthetic, reliable and durable cladding.
It should be noted that vertical siding is mounted by a similar scheme. The only difference lies in the fact that the lamp for its installation should not be vertical, but horizontal.


Dismantling damaged panels
If the panel is damaged and it is necessary to put a new one in its place, the work is performed as follows.
- Take a hook for dismantling between two panels: damaged and the one that is above.
- Pick up the lock and pull the tool down along the edge to free up the damaged panel.
- To pull the fasteners with a nail - if they sit too hard, you can simply score them into the frames of the frame.
- Remove the panel, put a new one and secure with hardware.
- Using the same hook, start the top panel on the lock lad, and snap it.

Caring for siding panels
Caring for cladding from siding panels is much easier than caring for another facing. It takes from time to time to rinse from the hose, and to remove solar stains to use a soft brush or cloth. In order not to damage the material, you should not use abrasive domestic products and rigid remedies. In addition, you should not clean with chlorine bleachers, organic solvents, substances that contain acetone or are used to polish furniture. Pollution from its surface is well removed by water with a washing powder, as well as any cleaners on water based. If you need to remove the chewing gum from the panel, you can use the water and vinegar solution.

Types of vinyl siding for outdoor decorations step-by-step instruction Installation Finish Plank for Siding
Siding is one of the most inexpensive and practical materials for finishing the facade of the house. Installing such a cladding is fairly simple, even the starting builder can master the installation. The material is distinguished by strength and durability, it is not afraid of rain, frost, wind and sun. It will protect the walls of the house from mechanical damage and prevent their premature destruction.
Another argument in favor of the material under consideration is the freedom of the fantasy of the designer. Wall cladding can be performed in a variety of colors and textures. There is a huge number of options, some of them are designed to simulate natural stone, bricks, woods of various breeds.
Types of cladding siding
Siding is a special casing panel. Products for outdoor cladding usually have a form of lamella, but sometimes larger varieties are encountered. These elements are available in the form of quite large panels.
Siding himself can be performed from different materials:
- Plastic. Made on the basis of vinyl or acrylic polymer. Facade finish with material of this type - the most affordable option. The material is not subject to rotting, resistant to moisture. Plastic in this case does not crack and does not support burning. The disadvantages of the siding siding of this type can be attributed to low blow strength.
Vinyl siding - classic genre. Available, beautiful and easy.

- Metal. Galvanized iron or aluminum panels are distinguished by absolute fire safety. They are also characterized by high strength. But there are several drawbacks that can deliver inconvenience when installing and operating. Such minuses include increased weight, steel instability to corrosion. To prevent damage, it is better to choose aluminum models, but their price will be tangible above.

Metality is very durable and fideline. But you can only buy it from official vendors - fakes quickly rust

- Wood. The material is called "Planken" and is characterized by a high cost. Wood capripses and requires special attention and care during operation. But the benefits of such cladding of houses include an attractive appearance, good thermal insulation and sound insulation indicators.

Wooden siding - the most eco-friendly, spectacular and expensive option

- Fibrocement. Relatively the new kindwhich is only gaining popularity. The material belongs to the non-combustible group, is not subject to the appearance of mold and fungus. Also, moisture resistance, strength and durability can also be isolated from the positive characteristics. For mounting there are special attachments.

Fibrocement is not susceptible to burning and has a rich palette of textures, textures and colors

Outdoor finish Houses siding - it is easy, but painstakingly. Given the cost of services of professional workers, it will be much easier to fulfill these works with your own hands. This will require only learning technology and carefully view the manufacturer's recommendations for a specific finishing material.
Calculation of material and preparation
The technology of finishing the house siding for all its types is almost the same. To limit the house, you will need to prepare some work tools:
- universal hacksaw with slight teeth;
- scissors for cutting metal;
- screwdriver;
- passatia;
- a hammer;
- construction plumb;
- roulette;
- pencil.
 Full list required tool
 It is easier to perform work together. Start with the calculation of the material. This is necessary in order to immediately purchase the required amount and avoid additional transport and time costs during the work.
Calculate the amount of material can be approximately. For this, the area of \u200b\u200bthe outer walls, the base and cornices is calculated. To calculate the required number of panels, the result must be divided into one element area. In order to think over the location of the joints and more accurately calculate the amount, it is worth performing a sketch of the outer walls of the building. It is recommended to add 5-10% on trimming and various unforeseen expenses to the resulting quantity of siding.
 Calculation of the surface area for lining
 Wall decoration begins with surface preparation. It includes the following:
- purification from dirt and dust;
- removal of plants, dried lime;
- removal of the rejected plaster and other finishing materials;
- dismantling of drain pipes, window sills, various decorative elementswhich during the work may interfere.
Montage Karcasa
If the house is built of brick or light concrete, it is recommended to apply a lung metal profile crate. For a wooden or frame building, it is reasonable to choose a wooden frame.
Wooden crate makes 50x50 mm sizes. To the wall they can be mounted on nails or self-tapping screws. When mounting the wall siding, the crate is vertically. When finishing the base, both vertical and horizontal framework can be used.
 Frame rails are installed in 30-40 cm increments, as well as around the openings. At the very bottom of the rails should not be
 Primarily perform installation corner elements Frame. Their evenness is checked with the help level. To secure the frame racks, it is worth using nails with an anti-corrosion coating (zinc, aluminum). The distance between the framework depends on the type of siding. For metal panels, it will be 40 cm, and for vinyl - 30 cm. But this information should be clarified by the manufacturer.
Planning to insulate the facade?
In order for the house to save the ability to breathe, it is recommended to choose mineral wool. This is especially true for wooden buildings. The thickness of the thermal insulator is selected depending on the climatic region.
Warming at home mineral Vata. It implies the presence of a ventilation layer between cotton and siding. If the height of the crates is not enough to provide a gap of 1-3 cm, then provide for a counterclaim.
 Installation of insulation with a counterclaim to create a ventzazor
 On top of the insulation, with the help of a construction stapler, a hydraulic protection film is attached. The walls of the walls will breathe well if used modern parodiffusion windproof membranes. With insulation, it is worth exercising caution because the wrong choice of materials at this stage can lead to problems with the temperature indoor and ventilation.
How to work with siding
The finish begins with the installation of the starting profile. It is attached to the crate on galvanized nails or self-tapping screws. The second step will be the installation of angular elements and a connecting profile (if necessary). Door and window openings need to be elapsed by a special J-profile.
 Installation of start and angular profiles
 Installation of the first siding panel is performed on the starting bar. It snaps and fixed with self-draws (or nails). Build facing begin to bottom up. Panels are fixed with a puzzle system.
Attention! When installing plastic, wooden or fibro-cement panels, rigid fixation is not allowed. After proper installation, the element can be moved to the sides. Hard fixation is used only when installing metal siding.
 Installation of ordinary, connecting and end elements
 When working with plastic between the trim and the hat, the nail or self-press should be leaving a 20 millimeters gap. Dense fastening can damage the material when the moisture and temperature changes (plastic expands).


Facing the fronton in the vertical direction
Facade finish siding is quite simple. Plastic elements have special elongated holes for fasteners. Nails or screws are placed in the middle.


To complete the finish of the house siding, you must install the finishing bar at the top of the wall. The last panel is inserted into this bar below and snaps.

For the final completion of the finish, it is necessary to install all the front elements (eaves, window sills, pipes, etc.) in its place.
Discarded house siding is reliably protected from any weather phenomena!
Siding is one of the most popular materials for exterior decoration. The panels can have the most diverse color, which allows you to create a finish, as harmoniously fit into the surrounding landscape. At the same time, with the installation of the considered finishing material, you can cope yourself. Explore the instructions and proceed to work.
Siding is better not to do at air temperature less than -5 degrees. In cool weather, be careful: freezing, siding becomes rather fragile. Perform all manipulations on cutting and fixing the elements carefully, in such conditions, any non-accurate movement can lead to cracks.

Before starting the installation of the panel, it is necessary to leave on the street for several hours. So they are acclimatized and the required size (siding manufacturing material is exposed to temperature deformations).
Required calculations

Before you go to the store, calculate the desired amount of finishing panels and related materials.
Measure the following structural dimensions:
- length;
- height;
- dimensions of door and window openings;
- dimensions of other recesses and protrusions.
Calculate the total area of \u200b\u200bthe surface. To do this, calculate the total area of \u200b\u200bthe house, and then delete the total area of \u200b\u200ball elements that are not subject to cladding (double-glazed windows, door canvases, etc.) from the resulting value. Add to the estimated value of 7-10% of the stock.

Measure the area of \u200b\u200bone finishing element. In most cases, it is 1 m2, but just in case recheck. The same value can be prompting a specialized store consultant.
Divide the total area of \u200b\u200bthe facing surface on the panel area. So you will find the required number of finishing elements.
Additionally buy rails 40x60 mm. Of these, you will collect the crate.

Buy a variety of consumables - dowels, screws, etc. The number of consumables is calculated very simply: 400 mm rake leaves 1 fasteners.

Buy nails from aluminum or galvanized metal. A 300 mm finishing element will leave 1 nail.
Consumables also buy with a 5-10 percent stock.
Calculate the required number heat insulating material. To do this, divide the total area of \u200b\u200bthe facing surface on the plate area (sheet) of the heat-insulating material. So you will define the desired number of insulation slabs.

For thermal insulation, mineral wool insulation are traditionally applied. These materials are characterized by the most optimal properties and perfectly "get along" with siding.
Set for mounting
- A hammer.
- Building level.
- Yardstick.
- Hacksaw.
- Protective glasses.

For cutting material you need a hacksaw. Instead of manual hacksaw, you can use an electric circular saw. The disk must have thin teeth. In case of cutting of vinyl siding, set the saw on the rotation of the disk in the opposite direction. Siding from other materials cut into direct direction, since the reverse cutting in such situations is very dangerous.
Also for cutting cladding elements, you can use manual scissors for metal. With the help of this tool, you can cut the elements of a wide variety of forms and dimensions from siding. Scissors blade use about ¾ lengths - so cutting will be as accurate as possible.

Also siding can be cut with a sharp knife. To do this, first make the markup on the panel, then leave the knife on the panel a rather deep furrow, and then gently bend and gently break the panel. Repeat until the item burst through the line you left.
Immediately cut the panel with a knife through not recommended - you can spoil the finishing material.
The panel should begin to cut from the mounting part (top). Shedding in protective glasses.

Siding Installation Guide
After completing all the preliminary measures, proceed to the execution of the finish. Start with the preparation of the base.
Preparation of the foundation
First step. Remove all third-party items from the walls: drain pipes, shutters, all sorts of grilles and other removable items - all this should be removed.
The second step. Mock the crate. Due to the frame, the irregularities of the base will be leveled. In the case of installation without crate, siding is very quickly deformed.

In addition, if the insulation of the walls is scheduled, it will not be possible to do without the crate.
Collect the cake from wooden rails (timber). In case of arrangement of a warmed design, the elements of the crates are placed in a step of a pair of centimeters less than the width of the mineral width of the insulation. If siding is attached without heat insulation, frame racks fix with a 40-centimeter step. Reiki montit vertically.

Check out the evenness of fixing the crate. Swap and sagging correctly by adding wooden lines or increasing the frequency of fastening of the rails, if possible
Do not forget to fix rails around the door, window and other openings. Also, the frame elements must be present at the corners.

Third step. Actually in case of arrangement of a warmed facade. If insulation does not enter your plans, skip step.
Stick Reiki Clamps polyethylene film. To fix waterproofing, use a building stapler with brackets. On top of the waterproofing, lay the insulation in the cells. Heat insulating plates. Place tightly, without cracks. Heat insulation cover the vapor-permeable membrane film.
Everything is ready for the installation of panels. You just need to choose a suitable fastener.
Recommendations for choosing fasteners for fixing siding
For fastening the facing elements under consideration, you can use screws, stainless nails or special brackets.
Pick the fasteners of such a length so that they deepen into a wooden crate at least 2 cm. Screws and nails need to be inserted strictly to the center of the factory fasteners (present on the siding initially). Drive fasteners (screw) not to the end. The gap in 1 mm will be enough.

Also, the gaps need to leave between adjacent panels. Siding manufacturing material is exposed to temperature deformations. On average, with an increase in temperature, it expands to 0.5-1 cm. Therefore, the size of the gap should be approximated to 10 mm.
Without the presence of the mentioned gaps, the facing is simply deformed at the first warming.

Getting Started Siding. First are attached all additional items, and then the main panels.
First step
Install the removal starting from the corner of the structure. First, make an angular element to accommodate at the corners of the building. The following are focused with a 25-millimeter shin on the previous ones.
Second Step
Install the starting profile. It should be placed on 3-4 cm above the nail strip of the previously installed lowbow.


Third Step
Install special angular elements at the joints of the structure walls. The upper part of such squares should be placed on 2-4 mm below the eaves. Between the lower part of the angular elements and the starting profile, leave 3-6 mm gaps.

Fourth Step
Install the appropriate segments of the J-profile, and then mount the platbands and slopes around the perimeter of doors and windows.
In a J-profile near the top element, it is necessary to make cuts of about 2 cm long on both sides and bend them down the book. Water will be assigned on the bent items.
On the perimeter of the windows, lock the finish bar.
Fifth Step

Lock under the roofing cornice, the molding and the finish profile. Mentioned elements are attached to the wall.
Sixth Step

Start the installation of the main panels. Start from the initial profile. Be especially careful when installing the first siding panel - it must be fixed as soon as possible. Otherwise, all other decoration elements will also be fixed with distortion.

Insert the siding panel to the starting profile and snap the lock along its entire length. The top of the entry panel is adjacent to the crate on the factory holes. Perform the finishing of the entire scheduled surface: insert the lower part of the element into the lowerbox below, nourish the top to the crate.


Try not to pull the finish panel too much, otherwise you risk deforming the engagement. When installing, remember the necessary gaps.

Mounting siding ends in the finish profile. For such fixation, make "hooks" at the top of the cladding element.
Now you will have no problems with self-editing siding. Follow the recommendations received and everything will fail.
Good job!
Video - Siding Montage DIY Instructions