What can be made of aluminum paper. Alone from beer cans make a solar collector: step-by-step instruction
Today we will look at the way of smearing aluminum cans with a simple small smelting furnace at home. This time we use our high-tech rear yard and a bucket with gazirovka or beers. To make crafts from aluminum, or rather out of cans, let's start with the fact that we will get out of our, which has already been made earlier and a large bag of coal briquettes. They are usually used for barbecue. When several coals are distributed at the melting day, you can add a crucible made of steel fire extinguisher.
Just take a look at what they sell in this Chinese store.
If you put the crucible on the coal layer, will be melted faster. Now attach the steel tube through the air supply hole. This will ensure the temperature sufficient for smelting, but we still need to find a way to drive the air inside. For this, a household hairdryer is perfectly suitable, which can be bought at any store.

Connect a hairdryer with a piece of PVC tube using two clutches for three centimeters to attach the steel tube on one side, and on the other hand, make it easier to disconnect the hair dryer. The whole design is very easy to disassemble and put in 20 liter bucket.
The blower is under the desired angle, it will not hurt her so that it does not move. So you save the walls as possible and significantly increase the service life of the melting. Now, when the melting is ready, fill it with home coal. You can use the propane burner, because it heats everything very quickly. Coals are burning, so let's turn on the hairdryer at low power and send oxygen to coal so that it should warm everything. As you can see the cover made by us saves heat and the temperature grows. The crucible and holes in the center of the lid are precisely fitted.
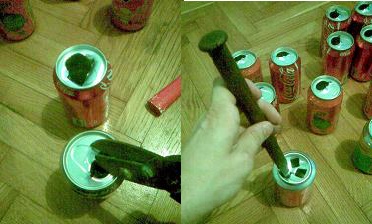
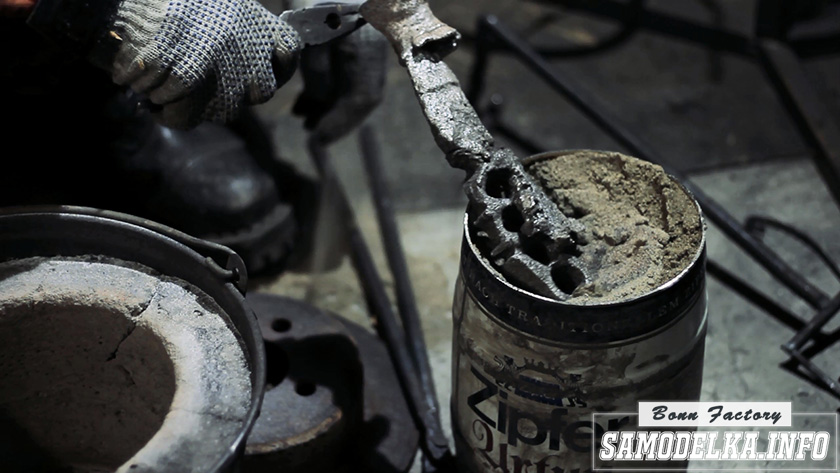
Now we take aluminum jars cooked for mirroring and steel tongs. After 10 minutes, the meld is extremely warmed. It can be seen that the steel crucible glows orange, it means that everything is ready. The crucible has 8 centimeters in diameter and therefore perfectly suitable for melting cans from under beverages and at a temperature of more than 500 degrees Celsius they melt in just a couple of seconds. We will bring the power of the melting to the complete to melt as quickly as possible. The device performance is an average of 10-12 cans per minute.
It's nice that banks can be dirty and painted, with gazing residues. It does not matter how we will see soon, the mini-melting absorbs everything in a row gives clean liquid aluminum at the exit. According to the experience of 35-45 cans enough for production of 450 grams of aluminum. If the banks first crush, then you can not even remove the cover, which means that during the melting it will oxide even less metal. After melting 50 cans, the crucible turns out to be complete, but inside a lot of waste that we do not need.
A good way to isolate aluminum - take a steel form. To start carefully pulling a crucible, making sure that the very securely captured it with steel tongs. Then very slowly proceed the melt into the steel shape. As you can see, the slag remains in the shade or act almost as a filter, without giving solid particles to leave it. Separating what we need, we can knock the crucible about the piece of cement and remove the slag. Cleaning a crucible, we can immediately use it again.
For fun, several more cans were melted to fill new form For cupcakes. The goal is to give a beautiful unusual ingots appearance. The shape of steel, but sometimes flashes fire. This burns the opponent coating. But it will be only for the first time. After a few minutes of the ingots begin to be able to harden, but they are still terribly hot so much that the paper from them instantly flashes. It will be good to stock bucket with water to cool them. Abandoned B. cold water Ingots are still hot to boil it instantly, but after about 10 seconds they are cooled and they can already be taken out.
We use the form for mini-cupcakes to make smaller bars. As a result, very cute little cupcakes turned out. The purpose of the ingots is to have a clean metal at the ready when you want to do something. Now, if necessary, you just need to throw a pair of ingots into a clean crucible. With such a configuration, the bars are spread over 5-10 minutes. When using ingots, we do not need to get rid of slags, except from the fine film of aluminum oxide, which means the crucible is full of ready-to-cast liquid aluminum.
Nallem aluminum in the sand, in which a special form is made, which burns, absorbing 900 grams of liquid metal. After 10 minutes, the metal is sufficiently solid to hook by its forceps. We can break the shape and pull out our casting. By reference at the beginning of the article you can see how the sword was distinguished in more detail.
When the work is completed, all the devices can be conveniently put in 20 liter bucket, and when the smelter cools, you can easily shake the ashes, holding the handle. Cleaning passes quickly and when you put inside the pot with a plant, the smelting furnace turns into the decor.
Well, now you know how to turn empty at home cans From under the soda in shiny metal mafins. They can simply proud and admire, but can be used to cast everything that will come to mind.
More and more people seek to optimize the costs of heating the premises, since prices for all types of coolants are constantly growing. Many are installed on their sites various systems operating from free natural sources: Sun, wind, etc. Surprisingly, quite capable aggregates can be made even from the cast, no one for the necessary materials, from the same aluminum cans from under beverages.
Use such systems is promising absolutely from all points of view, all are won: and you and society. You yourself (and most importantly with benefit) process waste, which means you do not need to spend money on their further recycling, and also significantly reduce the consumption of "purchased" fuels (gas, coal or electricity). At the same time, no harmful emissions occur, you do not pollute environment - beauty.
I am glad and what spent a little time, you get a permanent source of renewable energy, created by your own hands, in fact, from recycling. Are interested in?
The main thing is the idea and a clear plan
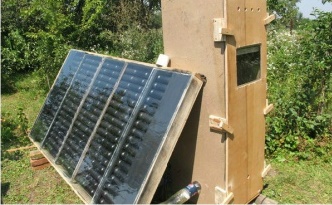
Solar panels from cans is perfect option For owners own house. Having installed on the wall or roof such a simple design, you can fully provide a warm one of the rooms. Such a collector will help you partially unload the boiler.
The main work of the entire system provides the principle of convection. The air in the launch panels per day heats up in the sun and, moving, effectively heats the nearby room. And most importantly - none of your friends guess, from which this "high-tech" solar battery is actually created.
It is also important that the whole design is obtained very easy, and this greatly simplifies its installation-disassembly at height. In addition, it does not increase the overall load on the roof, walls and overlaps.
It is logical that it is necessary to install the finished block on the solar side, and best at an angle of 35 degrees. Thanks to this placement, more solar rays will fall on the receiver, and therefore it will be warmer in the house.
Want to make your own hands such an eco-friendly solar collector from beer cans? Let's deal with.
Preparation
The main materials that will be needed for work: boards (or plywood, thickness 1 - 1.5 cm), organic glass (also suitable and colorless monolithic polycarbonate), sealant, any thermal insulation, corner and cutting metal.
Preparation of banks
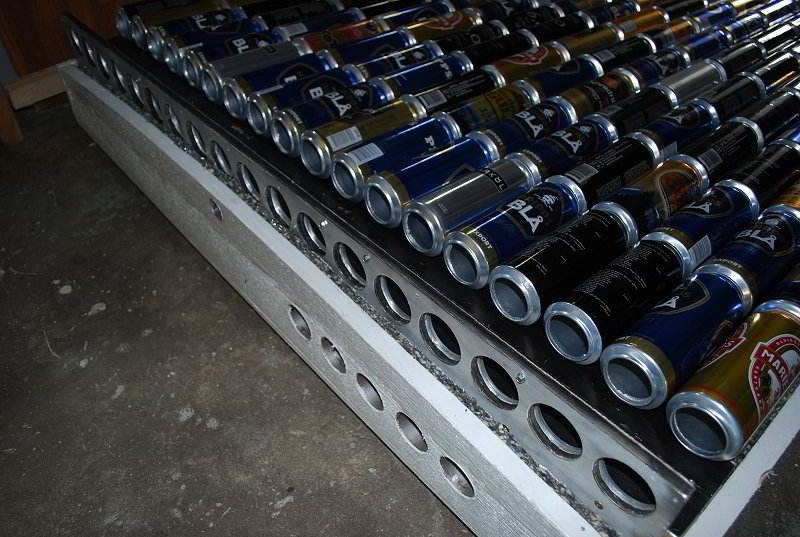
So, first you need to assemble the required amount of material. We will need aluminum beers from under beer (energy drinks, colas, etc.) to create a collector, the size of 240 × 126,5 cm You will need 234 aluminum cans standard size. Yes, quite a few - so we connect to the process of collecting all your friends. Of course, it is possible not to bother and use steel pipes, only their reduced thermal conductivity will significantly reduce the final temperature emanating from the collector. Well, by itself, on the pipes will have to spend greatly.
We take an empty can, with metal scissors, we expand the hole from the side of the "neck" - arbitrary cuts. You can also use a roller tin knife and walk along the edge, it also will help to frank sharp edges.
Holes in the bank
On the bottom of the cans of cases with a chisel several through holes. Through them will occur effectively air circulation.
You can arrange holes like this:
We draw your attention to that ugly jar must necessarily be present. The jet of air, facing them, create the effect of turbulence, which means even more accelerated and heated. That is what we need.
After finishing preparatory work It should be thoroughly rinsed the preparations obtained, since the finished design, heating, will make an indous smell. Additionally, degrease the place of gluing (neck and bottom), carefully dry the banks.
Holder of cans
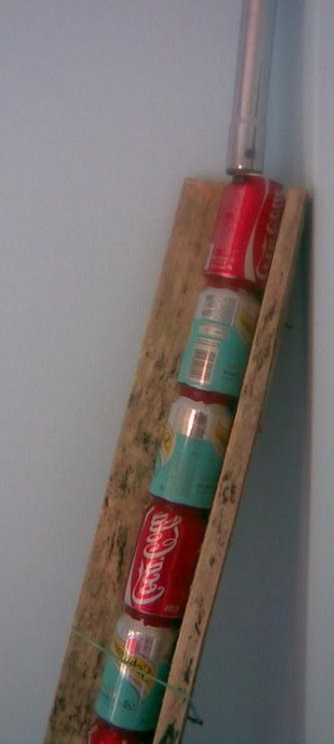
Before gluing the cans in long tubes, it is desirable to make a holder shape. It will fix the rimenitsa cans to the level until the sealant is growing thoroughly. To do this, it is enough to connect two boards, 2, 2 meters long, at right angles.
Now I am alternately cover with a heat-resistant sealant every jar, connecting the bottom with the next neck. You can also do the connection, only the work is very painful. We glue the tube consisting of 13 cans, and install it in the "form". Top neatly pressing something with something - for greater clutch. Total such "pipes" we will need to make 18 pieces.
Grab the design in several places plastic screeds, for the safety net, and leave it as it should be dry. Usually it takes no less than a day.
Ku
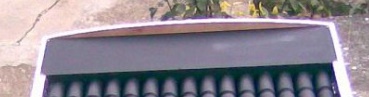
While the tubes dries out, proceed to the manufacture of a wooden box, in which, in fact, they will fit. As a frame, we will use the boards and Phaneur 1-1.5 cm thick.
Cut the material, given the following frame sizes: 240 × 126.5 cm. The upper and lower part of the future collector box is better to perform slightly rounded - on the front side where polycarbonate will be mounted. At the edges, the height should be 12 cm, closer to the center - to reach 16 cm.
Forecher Koroba
Thus, an arcuately attacked plexiglass or polycarbonate, and the role of focusing lens will also perform, enhance the light stream, which means increasing the temperature generated by the collector. To ensure maximum glass fit, make a small bevel in the side walls. Then the gaps, which means that the loss of heat will be minimal.

Color box
Secure the part of the box with metal corners, install the supporting bar in the center. For all the seams, pass the sealant so that then the heat does not go out.
Now proceed directly to the creation of a skeleton for a helium from cans. In a 126.5 × 12 cm plywood, we make holes - it will be the holder of the air intake. To create perfect smooth holes You will need a special crown on wood, with a diameter of 54 mm.
Attach two banks in a row to each other, circle "necks" each on the segment of plywood, and drill with the appropriate step. Such holes need to chop 18 pieces.
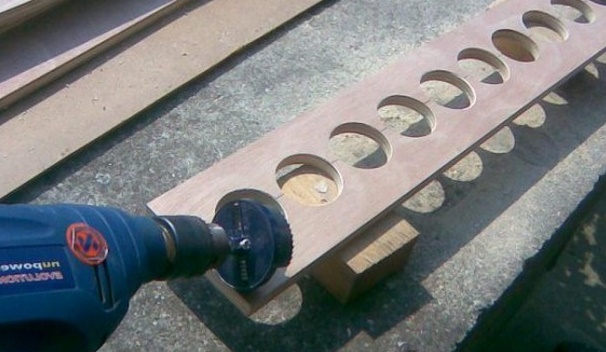
Plywood for holder
For a larger heat exchange, you can duplicate this bar with thin sheet aluminum. Thus, the upper and lower sheets are made. Do not forget to foresee through holes In the box, through which air exchange will be carried out between the room in the house and the helium.

Aluminum layer
Before laying cans, launch the bottom with a foil coating. Carefully install the tubes from cans, the place of the joint with a wooden plank. Treat a sealant and again let it fade.
Preparation for installation
To ensure the strength of the design, set the middle of the fastener backup. Screw two screws with a flat hat to it - the sheets of plexiglas or polycarbonate will be relying on them. Their height must correspond to the height of the rounded side planks of the box.

Fasteners

Comfortable bolts
Since when constant heating and cooling, condensate is often formed, it is necessary to provide small holes on the sides for ventilation. After all, not only the moisture destroys the frame, it also darkens the evaporation of the glass. As a result - less light hits banks, and heating occurs inefficiently. Also inside can raise the fungus, we do not think that you want to breathe air, abundant disputes.
Suppose holes with a bolt with a large plastic hat to be able to unscrew and twist them if necessary.
To increase the degree of light pulp panel, we recommend to paint the rows of cans into the black color. This can be quickly done using a spray spray with a spray gun. Use the matte paint, because the glossy will reflect the part of the heat obtained from the sun. Choose only heat-resistant paint, as even in winter cold heating can be substantial.
That's what should happen.

Painting cans
Leave again on drying.
Finally, the cereals came to mount polycarbonate sheets. We advise you to outline the location of the self-position and the ahead of drill holes on a flat surface. Since if you immediately blame them in the design, in advance, bending the arc, glass can burst. It is better not to hurry. When the glass is trimmed, do not twist the screws too much, again, due to the risk of damage.
Then you need to equip an incoming and outgoing blowing hole in the panel. It should be long - in the thickness of the wall at home. It can be done with his own hands from a metal-plastic pipe of a suitable diameter. Firmly press the adapter to the collector with a bolt with a bolt.

Blowing hole
For hanging on the wall, screw the fastener hooks to the back of the panel. They can also be made with their own hands from trimming sheet iron.
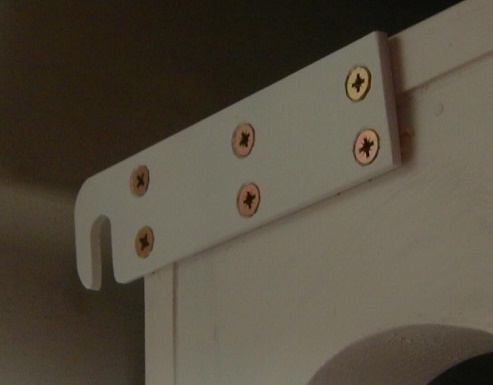
Fastening hooks

Design device
Cover all the external elements of the primer box with an antiseptic and enamel paint so that wood does not decompose under the action of microorganisms, water, light and temperatures.
Before hanging the finished panel on the wall (or roof) of the house should be drilled through holes in it. Through them will occur heat exchange between the panel and the indoor room at home. Schematically, the whole design looks like this:
To ensure intensive circulation inside the panel, you need to install the fan at the input. So the air will be faster through the system and, heating, climb up - towards the room. To speed up the injection of air, it is necessary to use a powerful fan, with a capacity of at least 200 m3 / h.
When creating structures, a much smaller size is quite possible to do with a cooler from a broken computer. True, the heat transfer of such a mini-installation will be small.
And how is she in work?
According to the measurements of people who have experienced such panels in work - on sunny days in winter, the temperature inside the collector reaches 60 to 70 ° C (even with a small minus on the street). Given the insignificant heat loss and the temperature drop in the distribution of heated air indoors, such a panel may well provide a comfortable 20 ° C in the room. It is clear that the heating is limited to the outside of the room, next to which it is installed.
Heating system
Such a panel can be used for autonomous heating of any cozpostrokek on a plot removed from the main building and communications. Just install it under a small angle near the construction, bring the connecting sleeve and warm up completely free
The only disadvantage of this installation is the dependence on the degree of insolation in the region. In winter, it is natural lower, so this system can be used for heating only during the daytime. And in the evening you still have to launch the boiler. But as an additional source of heat - it is quite effective.
Also, such a collector does not provide for the accumulation of heat, so in longer to keep the temperature, it is desirable to install plugs on the air intakes and close them overnight. IN summer timeWhen there is no need for heating, you need to shake the panel and keep the plugs constantly closed.
By the way, with the help of such "cells" you can warm the water, want to know how?
Wasy water
Along the similar principle you can make a water heater. They can also be used only during the daytime, because Water will heat up from the sun to a temperature, comfortable enough to wash. This will allow you to even unload the boiler or the boiler. You can also successfully apply such systems in places where there is no possibility to carry out gas or provide heaters with other fuel.
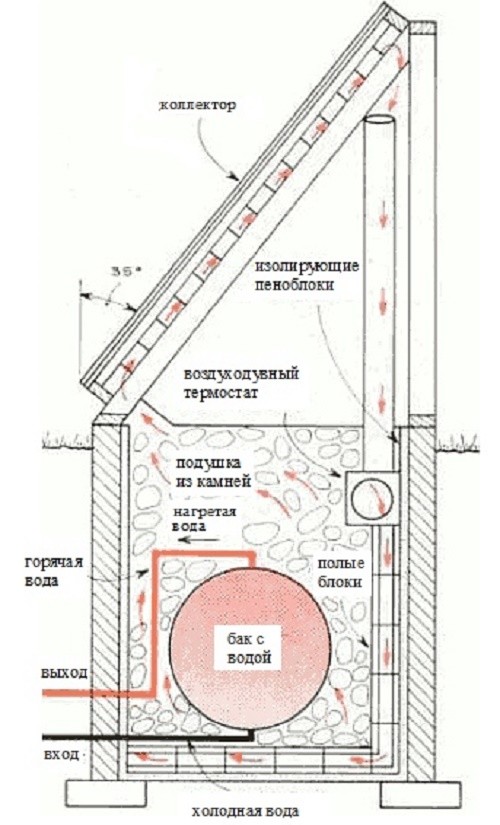
To do this, have to make a whole separate installation. Schematically, the design will look like this:
Wasy water
The figure shows the structure, with a total area of \u200b\u200bup to 5 m2. The core is made of wooden Bruschevtrimmed by plywood sheets. The collector panel is made up of 600 aluminum cans collected according to the method described above. It is tilted by 35 degrees from the vertical axis.
The lower part of the structure is located in a hole, a depth of 1.5 meters, with dimensions of 2.7 per 1.2 m. It is lined with hollow foam blocks and is carefully measured by a layer of expanded polystyrene. The water tank is placed inside, a capacity of 300 liters. Around it, as a drive and heat distributor, an overweight of small boulders is provided. On the ventilation channel on the left heated by the air flows down, and transmits heat to stones. This movement is intensified thanks to the built-in fan, with a capacity of at least 125 W.
Aluminum casting at home on the example of the manufacture of souvenir.
Hello!
Today I will tell you about my experience casting in the sand according to the model burned.
Why exactly this way deserves attention? Everything is very simple! Literally just! The fact is that there are many varieties of casting. And since we are talking about casting in the sand (land), then it will be considered its options.
Fully the process you can look at the video at the end of the article!
Casting in the sand is the most common casting method due to its simplicity and low cost. So you can easily cast something from aluminum at home or in. Still in modern world This is the prevailing technology. The key difference in all options is whether we have a disposable, burned in the process of fill, the model or we have some kind of master model, which is made of solid materials and cannot be destroyed.
The cheaper option is casting on the burned models, but provided that the model is not very complex and you can cut it out of foam (polyterol).
Casting on a non-inflated model requires some preparation of the mixture (I will tell about this in the following articles), and the casting on the model burned requires only dry sand.
The main disadvantage of casting in the sand is that the casting is obtained more rough and rough (the smaller sand, the better the casting will be) and requires mechanical processing.
And now directly about casting on the burned model.
We will need:
- forming capacity;
- sand;
- styrofoam;
- furnace with;
- tool for processing foam and finished casting.
First of all begin work from the template or drawing, I will tell on the example of a souvenir casting.
We prepare the template and cut it out. It is necessary in order to quickly transfer it to our foam. If you draw well, you can draw the item immediately on the foam, it is not fundamentally. After that, we need to cut our workpiece. This also takes up most of the time, as the work is painstaking, and the marriage is practical will not correct (you can cut a spoiled part and glue a piece of new foam and try to cut again).

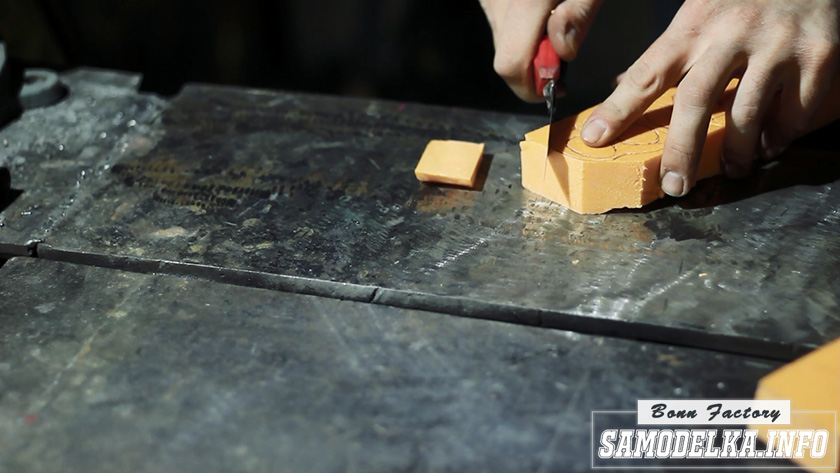
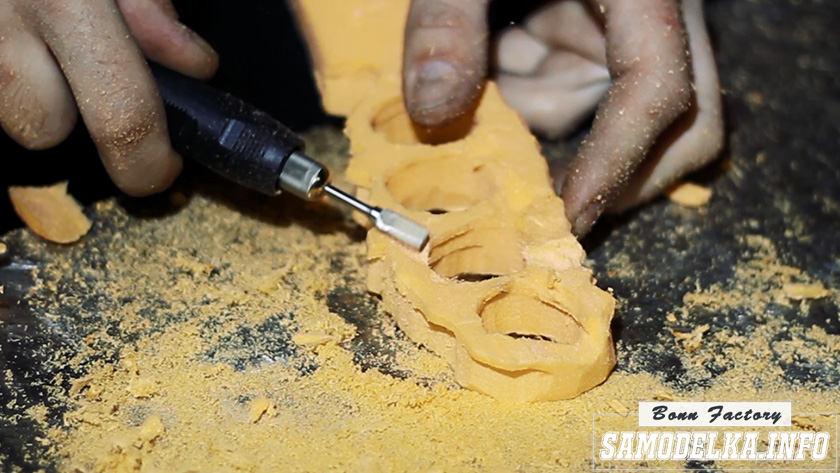
Then I took advantage of (engraved) and processed the edge more clearly, cut the holes and the product acquired a recognizable view. Here, by the way, I did not happen from the first time, since the cutter cuts the foam as a knife oil and ducks due to the twist further into depths, so be careful and do not overdo it. And then you have to start from the beginning that I had to do me!

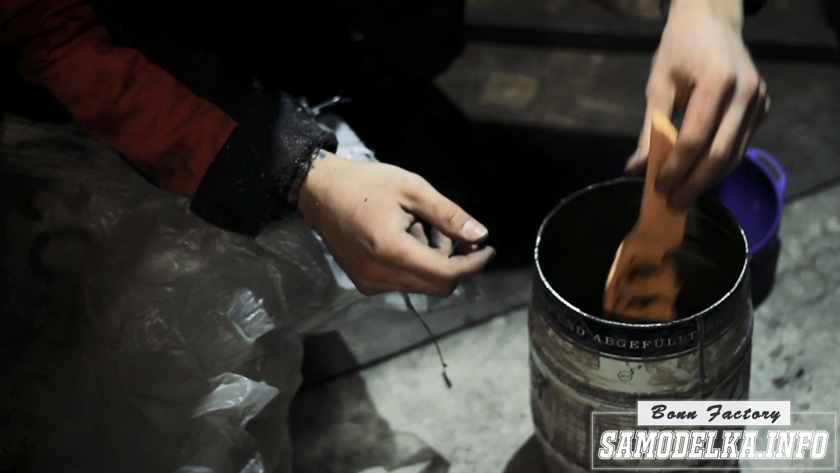
When the workpiece is ready, lay it aside and go beyond the sand. If necessary, ask for it and prepare for molding. We take a pre-prepared capacity (it doesn't matter what it, if only in it it would be possible to completely drown the item and fall asleep with sand). At first, we fall asleep a little sand on the bottom, so that the workpiece does not touch the shape, and after begin to plug the sand and periodically crush the box so that the sand evenly filled all the irregularities and holes.
I did not fit the most tail knife into the form, so I had to "increase" the form by another jar. I have already made a spike sand from wet sand, whatever he kept his funnel shape.

That's all! Preparation for casting is completed, it remains only to melt aluminum and pour it!
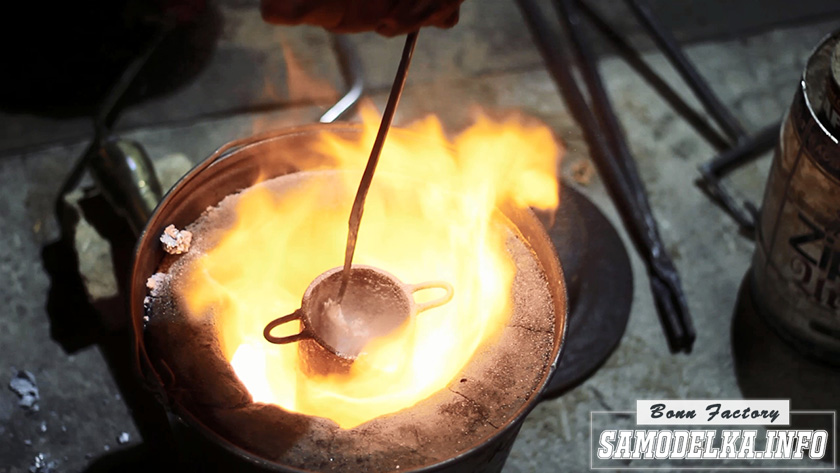
Aluminum melts at a temperature of 600 degrees, so we are also suitable for a simple fire.
And as a crucible metal bank. It is even canned for a single melting, just make sure that it is iron, and not the same aluminum otherwise, the bank will melt faster than metal and everything will be in your bonorable or will damage you at all. Be careful and follow the safety technique!
When aluminum melted, you can add a little boraner or a simpler version of soda and salt. This will help bring slags made of metal and make it more fluid. Therefore, we make a ball with soda and salt from foil and throw right in the molten metal, while it is good if you have a steel spoon, well, or on the edge of a wooden wand. Press the ball on the bottom of the melt and the melt starts a little bud. All rubbish that the surface surfaced need to be removed. It is also convenient to make a spoon or another metal thing like a spoon. After this procedure, the surface of the molten aluminum should be smooth and mirrored. Now you can pour metal into our shape!
Gently pour into the form. If you do it in a closed room, it is worth taking care of the hood. In general, when working with fire is very serious about it. When pouring, the foam will ignore and start burning. Get ready and attentive! Sing our casting with a margin. Whatever the extra metal in the sprue betrayed weights and there was a stock for a metal shrinkage. All this will improve its quality outcome.

After the fill, you need to wait a bit before removing the workpiece, the metal is needed to cool and grab. It is not necessary to wait for the day to fully cool, it is enough to 10-15 minutes.
During his casting, I noticed that I had a breath in the form of a thin layer. This is probably due to the fact that I am badly rast of sand and there is some kind of cavity in which the metal is stuck. But all this turned out to be corrected.
The external sides were treated with a grinder, and the internal border.
And so I got a souvenir from which I then made a spoon!
