Puppet house from the boxes with your own hands. How to make a house of cardboard with your own hands
When there are dolls in the house, but they have no housing, the child, sooner or later, will ask the mother's question: why? And be sure to find a lot of arguments in favor of what the problem needs to be eliminated. Solutions will be two: or buy it housing, or make a puppet lodge with your own hands. Buy, of course, easier. But everyone wants the child everything was exclusive. It remains only to understand how to build this exclusive house with your own hands from plywood, cardboard, paper or other material.
Dollhousemade with your own hands, pleases the child and give mom a reason for pride
First of all, it is necessary to determine the list of instruments and materials that will be involved in the manufacturing process. House, albeit puppet, but this is housing. We will react to the process with respect and begin the master class.
So, at hand should be:
- Plywood (7 millimeters).
- Electric jigsaw.
- Mounting tape.
- Glue.
- Cardboard corrugated (roof).
- Film-self-playing for designer research (floor).
- Beautiful wallpapers that will be placed walls.
- Several pencils (ordinary) rules, roulette.
After the work kit is assembled, you can start "construction".
- Initially, the plywood is cut into sheets in size indicated in the schemes represented in the master class.
- Not in a hurry, carefully you need to sequentially cut the windows, opening for doors.
- Face parts of cut parts should be glued with glue and mount the design, exactly as indicated in the diagram.
- You can progress, having to have small carnations of those details that can be knit. The house will be better fixed from this and gain reliability and greater stability.
- The next stage should be the manufacture of roof. After it is laid, a corrugated cardboard should be glued.
- Only designer works remain: you need to decorate the walls with wallpaper, and the floors are a beautiful ribbon - self-tier.
- Rooms are furnished with furniture and all sorts of useful things. Do not forget the TV - dolls too love to watch the series.
- The main action follows: the bowler of small friends of the child in their own toy house.
This simple master class clearly showed that there is nothing impossible when there is a desire to deliver the child joy to see his satisfied smile.
Gallery: Dollhouse with your own hands (25 photos)


How to make a house for dolls (video)
How to make a doll house from cardboard: scheme and process description
Cardboard - universal material. It seems to be designed to ensure that people do not spend money on expensive finished things, but could make something with their own hands. The case is the case with a toy house. All ideas on its manufacture will not fit into a huge book, but what to do is easily and quickly, it is worth considering below. Attach your girls so that they feel the moment of moment - they take part in the fate of their dolls. So you will give them a sense of responsibility.
In order to approve such small miracle For a child, you will need the following:
- durable cardboard (any box size, separate sheets);
- paints, pencils;
- color appliquancy paper, some trimming ribbons, something that will no longer be used, any other decor elements;
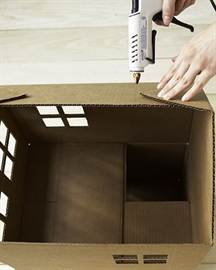
- pistol with glue;
- scotch, preferably - construction.

Cardboard - Universal Material
Next, it is necessary to determine the size of the doll housing, with the roof (removable it will be or stationary), how many rooms will be (they will be isolated). From the number of rooms and floors and need to be repelled.
Additionally, you can build a staircase between the floors.
Each room is either punishable by wallpaper (a piece of old wallpaper is always in the house), or give the will of the child's fantasy - let him decorate the walls with paints or pencils as he wants to see the world of his dolls. It remains to add any elements of the scenery, make the cribs (even if you are made of matchboxes). The main thing is to be visible - the house is suitable for the settlement and comfortable existence in it.
Dollhouse with your own hands out of the box: Master class for all
Of course, the options for toy dwellings as much as people who want to build them. The proposed model of doll housing from the boxes is interesting, first of all, its simplicity and the fact that it is easy to develop for transportation or any movement. For the manufacture do not need complex drawings.
The following will be required:
- big cardboard box;
- big scissors;
- scotch;
- elements of indoor decorations

For the manufacture do not need complex drawings
- Initially, it is necessary to trim the top of the box (the scheme clearly shows all the steps). All cut parts do not need to be thrown away - let it still be lit aside. Next, the end parts (seams) of the box must be glued with strong tape.
- Box turn over. Glue its elements where in the diagram is indicated by the yellow arrow. From what is circumcised and postponed to make a roof. Connect the roof joints with a tape, following the yellow arrows. Roof is ready. It is necessary to attach it to the sidewalls - walls.
- Cut the cardboard on yellow dashed lines in the diagram. Connect how the arrows indicate in the diagram.
- Remains interior decoration. It all depends on the preference of girls. For a start, you can simply lay a blanket, put the pillow and you can cope the housewarming of your Barbie.
How to make a doll room - forward fantasy!
To begin with, decide what should be in the room. It is quite enough essential items. Further, the child will figure out himself and everything will finish the way he wants.
- Bed I. bedding. . The simplest option is a few match boxes, interconnected and plated cloth. It will remain to sew a small pad and put on top of a small flap of tight fabric - the blanket is ready.
- TV is easy to make a small box or from the same matchboxes that are universal Material. The box is placed by one-photon application paper, and to stick the picture from the magazine or a suitable sticker on the front.
- The coffee table from tight paper in the room will find its place. You can glue several leaves on it - it will be magazines and newspapers.
- Chair, chair. They are also good to do from match boxes, covered fabric. The legs can be made round, gluing the bottom, for example, unnecessary beads.

To begin with, decide what should be in the room
Basic elements are ready. Leave the rest to the deposit to the child - let it fantasize and creates. This is his room and his world.
May there be light
For full compliance with the present house, light can be held in a puppet dwelling according to the following scheme:

- purchase or cross the wallpaper before assembly, those parts that are already specifically defined (walls, gender, ceiling) - so much more convenient;
- the floors can be sampled by a self-adhesive film "under the laminate" - then the full illusion of the parquet coating will be created;
- do not use cheap paints and glue, although you need not so much, but it is safer to buy products of a proven manufacturer.
Puppet lodge with her hands with mom (video)
In fact, the children's puppet house is not so long. Improvement of housing - the process endless. Here, everything, as in real life: the purchase of new items, repair and other "joy". As a result, everything is drawn into the process of arrangement, to the joy of the child. Do not doubt - children's joy will not cost anyone close.
Give or make a home for her dolls for her daughter - it's just the beginning. Next, this house will have to furnish. It is a bunch of toy furniture, techniques, accessories. On how to make furniture for dolls will be told in this article.
How to determine the size
Dolls, their houses and furnishings are reduced copies of us and our dwellings. And the most reliable way to make doll furniture with your own hands and not mistaken - measure the real items, reduce them several times, and then work with the obtained values.
Furniture for dolls - copies of our furniture
How much to reduce real sizes depends on how small or a great doll is, because they are from 7 cm to 60 cm or even higher. Accordingly, the furniture for them needs different sizes. To determine the number to which real dimensions should be divided, the average human growth in centimeters (170 cm) is divided to the height of the doll. We get some kind of number. Here on it and it will be necessary to divide the size of real furniture.
For example, the height of the doll is 15 cm. Calculate: 170 cm / 15 cm \u003d 11.3. That is the number and divide all the parameters of "human" furniture. It is still worth saying that it is 14-15 cm that is the most popular size among the doll population. Therefore, most of the finished furniture is made in a ratio of 1:12. It is possible for us to use existing dimensions at least in order to be oriented with the scale of the required parts and the number of materials.

Approximate dimensions of furniture for dolls
So, the most common sizes of dolls:
- doll-man 150 mm;
- doll-Woman - 140 mm;
- doll-child - 75-100 mm;
- toy baby - 65-75 mm.
If you need furniture for dolls of such sizes, its parameters will be such:

If you have more toys more / less, you can not adjust the dimensions. With a great difference, you will have to increase or decrease (and you can count on your own).
Doll Furniture made of match boxes
The easiest way to do furniture for dolls do it yourself from ordinary match boxes. They are glued with the help of PVA glue, creating certain structures, then glued with paper or cloth, self-adhesive film, etc. You can use wooden beads as legs, drawers for drawers from small butt on legs or from long beads.

Simple homemade doll furniture made of match boxes
From match boxes you can make chairs, table, chest of drawers, bed, bedside table. Another thing is that the furniture is obtained for very small dolls, no more than 10 cm high. Although, you can use a larger number of boxes, gluing them into blocks, and from these blocks to create furniture for dolls with a height of about 15 cm. Also, but to work with others Materials are not much more complicated, and they are more plastic and allow you to create products of more elegant forms.

Toy dressing table made of match boxes

Puppet writing desk with your own hands

Dining table and chairs made of match boxes for a puppet house

How to glue boxes

Several search techniques for finishing homemade toy comed machine boxes
It may be your first experience in making puppet furniture. Later it will be possible to take on something more serious.
Furniture for a doll house of cardboard
You can try your hand in the manufacture of furniture for dolls using cardboard. The material is inexpensive, affordable, it will be possible to try and mistake, redo. Cardboard usually connect with the help of PVA glue, you can use a glue gun or any universal glue that can glue cardboard, fabric, wood. Just making furniture for dolls with your hands from cardboard, you will also use these materials. If we talk about convenience, it is preferable to the adhesive gun - glitter quickly, it is convenient to work comfortably, the connection is reliable.

Without finishing doll furniture from cardboard looks not very good
To make furniture for dolls, you can use the usual packing cardboard. He is cheap, but the furniture from it turns out very tender. It is unlikely that the child is enough for a long time. But, as "first experience", this a good option. More reliable obtained products from cardboard for scrapbooking. It is a tight, uniform, has a different thickness (from 2 mm and more), may be with a textured surface, extruded by one-photon patterns, a pattern with one or both of both sides. The lack of such cardboard is to buy it, and some types of such cardboard are not too cheap.
Cardboard Bed for Dolls
This bed for dolls from cardboard is designed for a large doll - up to 50 cm of height. If necessary, all specified dimensions can be reduced.

You can make such a cardboard bed in a few minutes
This option can be made literally for 10-20 minutes. It does not need glue or other clamps. Details are kept due to grooves cut in cardboard. The width of the groove is equal to the thickness of the cardboard, the length of the slots and the size of the blanks are listed on the diagram.

Doll Bed Scheme
Green and yellow dots indicate the combined cuts. They are inserted alone in another, on what the assembly ends. If you like this model, it can be done from plywood.
Schemes for the manufacture of cardboard doll furniture
Basically, furniture for dolls from cardboard is glued. To make something openwork from this material or very complicated is unlikely to succeed, but the manufacture of simple models does not take much time. Having a diagram with dimensions, you can even do without explanation. Everything is so clear.

Chair for dolls

Such models can be done on the eye. Without "upholstery" they look unsightly, but after quite decent

Bed to do quite easily, but with lockers for the kitchen will have to fun

Door bedside table and open shelf - scheme one, different execution

Other model bedside tables for making cardboard or plywood

Toy table for dolls do it yourself for this scheme do not do a problem

Cardboard dolls
Furniture schemes for dolls can be used not only for making cardboard. They can be transferred to the paneur and cut with a jigsaw.
Cabinet for dolls of girlfriend
The toy cabinet can be made of plywood, paint or envelop wrapping paper or self-adhesive film. There, probably, the questions will not arise - everything is clear, and if there are questions, you can look at their solution in the "natural" closet. But you can make it from all inexpensive materials. Furniture for dolls with your own hands and good that the cost of it is very small.
From a cardboard box
The main task is to find a box of dense cardboard suitable size. Moreover, it will be easier to work if it is packaging - with rejuvenable edges. Such a bending part is the finished door. It will only be necessary to finish it - hang the mirror, attach the handle, etc.

One of the options for homemade furniture la dolls - wardrobe
What is needed for work
It will take good tape for work, better - on a paper basis, as it is then easier to glue the finish. If there is a glue gun or construction (a large stationery fit) stapler with brackets is also not bad. If, in addition to cardboard and paper, you will also use other materials, the glue is better to find the universal, which glue paper, cardboard, fabric, plastic. We still need scissors and a stationery knife, a ruler.

How to make a cabinet for a doll from a cardboard box
If the box found is too big, it can be reduced, cutting off unnecessary. So that the bends were smooth, take a ruler. We apply to the place of the future fold, several times we go along the lineup of a stupid solid object (with a snap or fork). After that, the cardboard bend will be easy.
Filling for a toy cabinet
From trimming or from another box, cut the shelves. They should be a little - by 5-8 mm - longer and wider inner cabinet space. Surplus bend so that sides are formed from all sides. In the corners, folds are formed, they are gently cut off. One of the parts bending 180 ° and glue to the shelf itself. This side of the shelf will "look into the world." Three other parts bend at an angle of 90 °, we wash the glue and the shelves insert into the closet. In the photo on the right you can see how the shelves are glued. But that the places of attachments do not get into the eyes, the sides are better to wrap down.

Make furniture for dolls with your own hands - it's no less pleasure than playing with her
In addition to the shelves, you can still make a crossbar for hangers. It can be made from bamboo speakers, for example, you can try to use a tube for juices, a wire, etc. Hangers can also be twisted from color wire or cut from bags from juice, from plastic bottles etc.
Finish - creative process
Next, it's a finish. You can paint the cardboard with watercolor or acrylic (better) paints, shove the wrapping paper, cloth, felt. You can simulate a mirror surface - to attach foil (food, for example). If you want to make a "plastic" surface, look for bottles from under the water of the desired color, cut off the neck and bottom, and the "body" use as a finishing material.

Finishing - the process is creative, but, first, use the materials simpler, softer, feel easier to work with them
Handles can be made of wire, from beads, long beads. For toy larger cabinets, you can find buttons or buttons. All this "beauty" adhesive after "washing" the cabinet.
Warding Doll Cabinet Newspapers
We need old newspapers, PVA glue with a tassel, a glue gun, a couple of wires or threads, wrapping paper for trim and paint.
From the newspapers twist the dense tubes, we wash them along the edge of the PVA and leave up to dry. Then the tubes can be glued together. For this operation better suitable Adhesive pistol. There are two ways: first collect large blocks, then chop them into fragments of the desired length or immediately cut the tubes of the desired length and glue immediately blanks in size. The second path is more painting, but the waste is less.

We collect planes from newspaper tubes
The finished walls of the cabinet should be copped with each other. To rigidly fix the angle of 90 ° better to use a thin wire. First, wash the joints with glue, then put the walls one to another. If the wires interfere, they can be removed after drying the glue.

Under the shelves glue holders
For the same technology, the bottom, the top, shelves are glued. Doors will need to do a little differently. So that they open up, two strips of about 1.5 cm wide from the scotch. On the edge of the door, the tape is sampled so that a little more than half hung in the air. With this free tape, we glue the door to the wall, but so that between the wall and the door there was a clearance of 2-3 mm (just tape). This will give the opportunity to close the doors. The glued door is fixed on the other side of the second scotch band.

Wire mounting
The second way to fasten the doors - on wire. Only this time it should be tough and thick enough. Cut a piece that is 2 cm longer than the height of the cabinet. Immediately on the wire on the one hand, we make a loop using 1 cm. The loop is bending at an angle of 90 ° to the wire. Make a hole in the bottom and roof, we skip the wire through the bottom, the loop remains downstairs. We wear the door on the wire using the extreme tube instead of hinges. Slightly flexing the wire, we produce it into the hole in the roof of the cabinet, bending the surplus, fixing the door. We repeat the same operation with another door. Please note the door to the tape is needed to finish the cabinet, and on the wire - it is possible after.

Ready cabinet for dolls from newspapers
There are some little things that need to say a few words. The legs and handles for the cabinet can also be made of paper tubes. Just twisted them from the paper that you finish the toy. Cutting it into a dense roller, the edge is glued with glue, then cut on the segments of the desired length and stick to the right places. Instead of the tubes there may be wooden sticks, beads, etc.
Puppet Bookcase or Lines Shelf
You can make furniture for dolls with your own hands from school wooden lines. They are good for those already processed, have the same width and thickness. In the stationery store you can find the desired size - more / less, wider / already - at will. For example, for the manufacture of a puppet bookcase, you need 6 lines of 15 cm long.

Make a toy bookshelf from wooden lines just
Still, you will need a jigsaw. If there is an electric - excellent, if not, is suitable and manual, as it is not too much work. We also need emery paper with small grain, glue (PVA or carpentry) and paint (acrylic or gouache).
From the line, cut segments: 4 pieces of 6 cm, one - 8 cm. The edges sand up to an even state, remove the markup and bar codes. Between the two line, we have the shelves (which are 6 cm), we leave the same distance from above the same distance - under the cover (segment of 8 cm). The joints are missing the PVA liner or carpentry, we connect and tighten with a painting tape, we leave for a day. When the glue is dry, we glue the latest item - the lid on top. Actually, the shelf itself is ready, it remains to paint it.

Other furniture items for dolls can be done from Linek
To obtain a smooth and bright color, the design is better covered with white, after drying it is already painted with the desired tint. Also made with your own hands, doll furniture can be decorated in the technique of decoupage.
Furniture for dolls: photo ideas
You can make furniture for dolls with your own hands from the most unexpected materials. How to use newspapers and wooden rules you have already seen. But you can make tables, chairs, chairs, sofas, beds, shelves, cabinets, etc. From sticks for ice cream.

It is better to start with a simple: table and chairs for dolls from sticks for ice cream

You can make chairs and sofas

Garden bench or sofa - depending on the finish

Almost the same designs with soft upholstery

Make such a checker for dolls \u003d this is the task more complicated

You can collect a crib
What is good for this material, you probably have already understood - it has rounded treated edges, the same in size and well-processed. If the sticks seem too rough, milk them to smoothness with the help of sandpaper with small grain.
From the clothespins, quite good chairs and chairs are obtained. They are disassembled on halves and are connected using joinery glue. Figure products are obtained by almost several dozen minutes.

This sofa can be collected from wooden clothespins

Armchair, table - also you can make clothespins

If you add a little holes, it turns out the openwork

Round table for dolls from clothespins to do quite easily

Original three-halves legs from clothespins

Rocking chair for dolls

Toy stools

Chairs with armrests for a puppet house
Almost always for the manufacture of doll furniture use wooden clothespins. But no one forbids to take plastic. It is also difficult to work with them just the difficulty in the fact that the wooden is easier to refine, changing the thickness of the form, etc. If the product is simple, refinement does not require, you can also take plastic. They are more diverse in shape and sizes, already painted, so there is less than one with them.
With an increase in skill, you can go to a more complex material - a fane or wood. The complexity is that the outtage and cutting of miniature parts requires filigree accuracy, perfection and takes away the mass of time. But you can do everything you wish.

Make furniture for dolls with your own hands you can do any size, style

Several models of plywood puppet chairs

Toy Crib for Bumblebee

For those who have the abyss of patience

Carved wooden doll crib

Corner writing desk for doll ....

Styles are different

Furniture for kitchen in a puppet house

Plywood Wardrobe Cabinet - Play Accuracy Very High

Kitchen cabinet with filling

Cot plywood for dolls

Toy kitchen tables do it yourself from plywood

Highchairs for playing dolls
Stores offer customers a wide range of all sorts of toys, including puppet houses. To get one of them dreams every girl, while parents can easily make a beautiful and durable house for dolls in just a few days. Moreover, the child will be able to take an active part in the process and express all his wishes about the size and design. To make a puppet lodge with your own hands from plywood, you will need a scheme that you can draw yourself or find it ready on the Internet.
Making a drawing of a puppet house from plywood with the size of all design elements
The toy house and plywood can not be built without a detailed drawing, on which the dimensions of all its parts will be applied. To do this, you must first determine the approximate dimensions of the future at home, and imagine what it will be forms.
Reduced or increasing the design, it should be remembered that all sizes should also be changed proportionally.

The house consists of such parts:
- Rear wall: has a pentagon shape. Its side sides are 76 cm, and the base is 106 cm. The upper side is an uneven triangle whose vertex is located at an altitude of 91 cm.
- Gender: It has a rectangular shape. Its dimensions 106x38 cm.
- Overlapping the second floor: a rectangle with dimensions of 104x36 cm.
- Side wall (2detali): It is a rectangle 36x76 cm.
- The inner wall on the right side: 25x50 cm rectangle.
- Interior wall on the left side: rectangle 25x43 cm.
- The left side of the roof: a rectangle of 76x39 cm.
- Right side of the roof: Rectangle with parameters 45x39 cm.
How to make a house for dolls with your own hands from plywood: step-by-step guide
Changing the parts with an electrolybiz or hacksaws need to be carefully treated with sandpaper with fine spraying, and then start assembling. At this stage, the windows of arbitrary sizes are cut and also carefully processed by sandpaper.

Making a house step by step:
- To the base, side walls are attached with the help of self-tapping and construction glue, and then overlapping the second floor and inner partitions.
- The roof is mounted.
- A decorative tile is pasted on the roof made of cardboard, colored paper or other materials.
- Next, the house is painted with paints (acrylic, gouache, watercolor);
- Rooms are flooded with wallpaper, cloth, film.
- Floors are covered with linoleum linoleum, laminate, carpet, felt.
- Furniture and interior items are disposed.
Near the house you can make a small kindergarten placed in a box in which trees cut from cardboard will grow.
If the parts were not very smoothly and the gap was formed between them, then it can be smeared with a putty on the tree, and then paint.
How to assemble a house of plywood for children with their own hands easy and fast
A small plywood house designed for games will have to do any child. After all, he will have his own personal space. Collect the most such design is easy, if you pre-make drawings, and cut the items.

What will be needed for work:
- Plywood sheets whose thickness is at least ten millimeters. The required amount is easy to determine by folding all the areas of future parts.
- Bar for frame size 40x40 or 50x50 mm.
- Plexiglas or plastic for windows.
- Canopies for doors.
- Finishing materials (wallpaper, non-toxic paint, putty).
From the bar and plywood are made blanks and squeaks sandpaper to full smoothness. The frame is collected from the bar, and plywood blanks are attached to it. Next, windows and doors are installed. Then the house can be painted outside and from the inside or wake up with wallpaper. Furniture is entered. From the remains of plywood you can make scenery and install them around the house. Children's game house is ready.
Fasteners must be hidden so that the child can not be injured.
We make a lock from plywood with their own hands: drawings and recommendations
Plywood is one of the easiest in the processing of materials, so it can be made from it not only simple houses, but also beautiful castles for princesses and knights. To do this, we need to be patient and carefully draw every detail of the future castle. Drawings are performed by analogy with drawings of a dollhouse, but towers, balconies and terraces are added to the details. On the thematic sites there are a lot of interesting models that are easy to build yourself.

Tools required for work:
- Pencil simple;
- Line (simple and figured);
- Electrolovik;
- Screwdriver or screwdriver;
- A hammer;
- Sandpaper;
- Tassels;
- Fastening elements.
For the fence of balconies, you can use sticks from ice cream.
Beautiful Furniture for Plywood Dolls: Drawings and Methods
From plywood you can make almost any furniture in a toy house: beds, tables, chairs, wardrobes, sofas, shelves. The furniture made in drawings is obtained quite large, so it will suit both for the Barbie doll and for the puffs.
Details of furniture can be glued or combined with self-drawers and furniture cloves. Plywood is mainly taken, about 4 mm thick.

What you need for the manufacture of furniture:
- Pencil and paper;
- Lobzik manual;
- Small sandpaper;
- Liquid nails or joinery glue;
- Paints and varnish.
When assembling small furniture, it is better to use glue, because the fasteners can damage the parts.
For all parts of the furniture, you must first draw and cut the pattern. Then climb it on plywood and pubesome cutting the design elements. The edges are squear. Details must be combined with each other, and then paint and cover with varnish or using a stapler to hammer with a cloth.
Making a house of plywood for dolls with your own hands (video instruction)
From plywood you can make durable and beautiful toys that will delight the child for a long time. If there are drawings, free time and the droplets of patience, it will not be difficult for even those who have no skills in this matter. And manifesting a fantasy you can create real masterpieces that will cause surprise and delight not only in the child, but also from others.
Puppet House - Dream of any girl. And it is such a toy that can become an original gift for your daughter. Of course, such a toy can be bought, but much cheaper will make it yourself. And if you do not plan to present a house as a surprise, you can work on it along with the child, engaging joint creativity. This article we will talk about how to make a house for dolls from girlfriend and without special costs.
Materials and tools
So how to make a house for Barbie with your own hands? First of all, determine the material for the frame. It can be plywood, cardboard boxes or old rack for books. Depending on the material selected, then the course of work is determined.
If you choose plywood sheets as the basis, it will be necessary to be stockpiled by a saw or jigsaw, you will also need a roulette, a pencil or a marker and a large line. For working with cardboard boxes, glue, scissors and a stationery knife are useful, and if you use a rack as a frame, you can only do with brush and paints.
Dodge with your hands from cardboard
Of course, a puppet house should be a multi-storey, it will tell you any girl! And therefore it takes a few for work cardboard boxes. So, in order to make a frame, all boxes fold on each other side sides and glue together. Next, this design must be saved by wallpaper and outline where there will be windows that are then cut with a ruler and a stationery knife. The openings are decorated with edging ribbons used during repair, or simply draw frames with paints. If the boxes are assessed under painting, then with the help of water-level paint, the toy can be given absolutely any color, both outside the house and inside.
How to make a Barbie home interesting and fashionable? Of course, having painted the room in pink color. It is this shade most comparable to this glamorous doll. Pink walls in combination with white ceiling, window Ramami. And some fur rug of tiger or leopard color on the floor will look very harmonious and stylish.

Plywood Barbie House
In order for the construction of the house is stronger, you need to use plywood sheets as material for the frame. For the connection of parts, the lumps, to which the elements of the house are nailed with small carnations. So, will you deal with how to make a house for Barbie with your own hands from plywood sheets?
Even before the start of work, it is necessary to make some calculations. First of all, the area of \u200b\u200bthe house is determined and the bottom cut out, then calculate the width and height of the walls. Such a house can also be a multi-storey. In this case, the walls are made high enough to attach overlaps to them. Using miniature canopies, the house can be made with an opening front wall and roof. In order to facilitate the work, windows, doors and other holes are cut on the blanks using the jigsaw. Only after all the elements of the future house are ready for assembly, they are connected together. First, two details of adjacent walls are naked to a bar, then they do the same with the remaining details, and after the bottom and the roof are fixed. If the house is a multi-storey, then the overlap layers are also naked to the assembly of parts and harvest another element, the same in size as the bottom of the house. In this detail you can make a hole for the design of the stairs.

Registration of a plywood house
After the frame is ready, it's time to do design design. As a finish, it is best to use the usual oil paint. Of course, it's not worth working in the house with her, it is better to do it on the street. As a result, you will get beautiful glossy surfaces. With the help of stencils on the house, you can draw various patterns in the form of flowers and butterflies, which will give a puppet house of sophistication and charm. Also, the frames and doorways should also be selected. In order for the house to look harmoniously, it is best to use no more than three colors in the finish, while you can play with shades.
How to make a house for Barbie with their own hands as glamorous as the doll itself? The details are very important here. For example, old earrings with numerous beads can be suspended under the ceiling as a chandelier, and the walls to make striped or decorate with ornaments in the form of hearts. Exactly decorative decoration Here will play a significant role.

House from the old shelving
If there is an old rack in the house, which has long been time to replace, you do not need to hurry to throw it away, because it can become an excellent toy! How to make a house for Barbie with your own hands from the old shelf? Yes, very simple!
First of all, the rack should be shortened, leaving the desired number of floors. From waste, you can make a scope roof that will immediately determine new life Old shelf. For a child, the realism of the toy is not always important, and therefore it will be enough to draw windows with paints, sprinkle on the walls of a small house pattern with the image of Barbie and furnish the rooms with puppet furniture.
Each little girl dreams of a large and beautiful doll house for Barbie. And every home cat dreams of his house from the cardboard, wherever he could leave, without sobering the hosts. Having learned to make houses from cardboard with your own hands, you can not only please your children and pets, but also to beautify the interior originally. This article shows the most requested schemes of houses from cardboard with their own hands with MK.


Necessary materials
Materials and tools do not require additional costs, everything needed in the farm of any family:
- carton boxes of different sizes;
- adhesive gun or super glue;
- knife and scissors;
- pencils, markers, markers;
- Watercolor paints, gouache;
- Sequins and other decorations for the decor.

Useful tips:
- when creating a box, it is better to use corrugated cardboard;
- Cardboard must only adults;
- For the stability of the product it is better to take cardboard pipes;
- In the house for children, it is advisable to make the door opening out. So there will be more space for games;
- Do not throw away small cardboard boxes.
Refuge for cat
Cardboard house for cats can be built with the whole family for a very small amount of time. The first thing to be done is to draw on the door and windows in templates.

Start to pick up the bottom of the box. Bend opposite sash, apply glue on them and on top to heat the remaining sash. Put them to each other until the glue is dry. At the top end of the box cut off two wide sash. Next, cut off from one left fold half and bend it. The same to do from the second whole sash. Secure them with glue in this position.

The next step is to create a roof. On the top of the second box, on a small sash, draw lines from the center of the vertex to the lower corners. Also done with the second sash. Then cut one big sash. On the first drawn line, cut off the edge, and the second beg. The same actions repeat with the second sash.

At the bottom of the second box, cut off wide sash, and from the first less cut off exactly half so that when gluing two boxes it was a hole. Glue boxes. Then take the first cut-off wide sash and glue it to the bottom of the second tier, to strengthen.
A roof will be made of the second box. To do this, cut a piece of 45 sizes to 115 centimeters. Bend it along the long side of the input. Lubricate the triangle glue of small flaps on the top of the second box and glue them to a wide sash. Apply glue from above and glue only the first side of the roof so that the cat can look out from under it.
House ready!

Dollhouse
This wonderful gift for children can be made independently from ordinary cardboard boxes.
The house will consist of two floors and two rooms. To start connecting the boxes among themselves. From the bottom, on the side and on the sides, stick more on the sheet of dense cardboard. Scotch and strengthen the design of the house and give glue to dry.
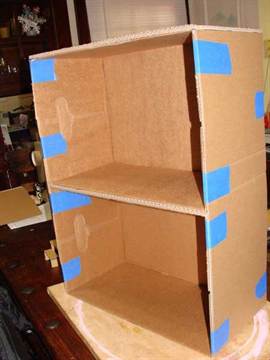
In order for the design to become more durable, strengthen the walls with a thin cardboard.

Next Stage - Room Decoration and external view Domika. Wall decorate appliques from colored paper, add mirrors, curtains on the windows, toy furniture. In order for the doll to "climb" to the second floor, the staircase will need a staircase that will consist of two parts.
From thin paper cut steps for the end of the staircase. This is done to cut out of cardboard. Pick up the desired width and height of the steps.

Carry out a couple of parts from a dense sheet of cardboard. It will take a pair of rectangles for steps and bottom.

Glue the side parts of the stairs and squeeze their hands so that they become more dense.