How to make candles at home? Decorative candles with their own hands: Learning to create beauty.
Candles from natural bee waxHaving initially purely utilitarian purposes and used as the simplest sources of lighting, in addition to the main function, other tasks (decorative, emotional, ritual) were performed, which made them indispensable in everyday life. Let's try to figure out how you can make candles from wax with your own hands at home, in what their advantages and differences from paraffin candles.
Golden-yellow candles, painted in natural tones contained in the wax particles of honey and pollen, made from a natural product without the use of any chemical dyes, artificial flavors, extraneous additives and impurities, are used in a variety of situations and for different purposes.
Church
When it comes to wax candles, the first thing that is remembered is the candles that are most often used in religious rituals, both in the church and at home. They are made only from natural raw materials from an apiary without any additives.
Economic
Their name speaks for itself. In shape, they are simple (usually elongated in the form of a cylinder), functional, well illuminate the room. They are used, most often when there is no electricity.

Decorative
This is the most common type of wax candles. They are used at home as a light source to create a romantic mood and a special atmosphere, as well as an interesting interior decoration. These candles are diverse in shape, dyes and flavors can be used in their manufacture.
Candles for traditional ceremonies, rituals and rituals
Dining Candles made using paints and flavors create a lunch effect of light muted lighting and are used as an additional decorative element.
Tea candles due to their compactness and lightness were originally designed to heal and maintain the required temperature in a special brewing kettle on festive table. Now they adore romantic and dreamy nature, which often use them to create a coziness and a special atmosphere indoors, at the table and even on the water (they are very lungs and well hold on the surface of the water).
What unites these types of candles? All of them can be manufactured from a natural product - extracted at the apiary. Nothing else is able to replace their ability to fill the house with a subtle honey aroma. And the process of spilling in the molds of golden liquid beeswax is akin to meditation, the completed point of placement in the center of each candle of thin wick.
See also: The use of bee wax in cosmetology
What is useful candles from bee wax?
What benefits, in addition to aesthetic pleasure, can give us wax candles?

Their subtle unobtrusive honey-flower flavor is provided by part of the bee particles of products produced by the apiaries. Such natural aromatherapy soothes and relaxes, creates a favorable atmosphere in the house.
Such candles burn very purely and longer than paraffin, without highlighting any harmful substances into the surrounding space. And with its functional task to cover the room perfectly coped.
Wax candles help to maintain and restore health, filling the house with aroma, capable of influencing microorganisms, due to the fact that the wax contains propolis residues, resins and other useful substances in the hive at the apiary. This feature allows you to use candles in folk medicine As a healing agent for stimulating the body's work, to improve mood.
Candles from wax give us not only the soothing and pacifying atmosphere, but also make air in our house cleaner, providing a healthier atmosphere. This is explained very simple. Burning, wax candles allocate negative ions that easily neutralize a positive charge contained in dust and polluting microparticles in the air.
By the way, this particular principle is used in the work of some air purifiers and water filters.
When burning wax candles, the content of dirty impurities in the air is reduced, and it becomes cleaner. The room creates a favorable atmosphere, which contributes to a more comfortable stay in it, people suffering from allergies, asthma.
There are confirmation that burning a pair of wax candles in the room for some time allowed allergy to it easier to carry a component that causes a constant allergic reaction (for example, the presence of a cat), and feel more comfortable asthmatics.

In addition, a pleasant sweet and light flavor of candles, consisting of 100% of pure natural wax without flavors, dyes and other additives, is completely not annoying.
Of course, high-quality candles made of wild waxes are expensive, but health care - for many argument more weighty. By purchasing ready-made candles from wax, you need to carefully study their composition. Sometimes, for a clean product, candles are given, which are only 50% consisting of beeswax and contain not completely safe paraffin.
Cons of paraffin candles
Conventional candles that we use most often are made from paraffin wax, which is a by-product of oil refining. According to its chemical qualities, this is a fairly ecologically unfriendly and high-tech product, which can pollute the air that we breathe in the house.
The technology of its production is such: paraffin is extracted in the process of oil refining from the lowest layer of the oil well. This black mass contains many toxins in its composition. Next, the raw materials are whiten and treated with benzene and other drugs containing carcinogenic substances. Further recycling in order to give the received waste attractive transportation, aroma and color is also carried out chemicals.
See also: How to overcall natural beeswax at home?
As a result, we, unsuspecting, we get a beautiful, completely innocently looking candle that contains dangerous toxins. Some of them are distinguished during its burning and are carcinogenic.
What is the danger of toxic exposure to paraffin candles?
Candles from paraffin with frequent and long-term use can cause certain health problems. Tiny particles of a harmful substance easily and imperceptibly fall into lungs, which can cause irritation of the respiratory tract and allergies.
As for dyes and aromatic substances, which are added to paraffin candles, they are also not always safe. During incineration, such a candle can be distinguished toxins, which are formed when the molecular structure of oils is changed when heated.
And these are not the only minuses of burning paraffin candles. Burning, they highlight toxic pairs and microscopic particles of soot, which over time are left on ceilings, walls, furniture and interior items. Dark spots, and also settle in human light.
How to protect yourself in this situation? Either without any special needs to use paraffin candles, or try learning how to make useful and safe candles alone.
We make candles from wax do it yourself
The manufacture of candles is an exciting occupation. For example, you can briefly distract from the deeds of pressing or make your own hands the original and useful gift for yourself or your loved ones.
Of course, at least at least a minimum of small secrets and various wisdoms, invented by cutiel masters (and many years have accumulated for many years), not achieve good result. But you still need to try. The process of mastering the art of manufacturing wax candles is simple and fascinated. And perhaps for someone can become a favorite activity.
To be guaranteed to get a clean product possessing healing propertiesFor the manufacture of candles, only natural beeswax will be required. It is best to acquire it from those who are directly engaged in beekeeping. That is, proven beekens that can offer the right beeswax (it may depend on the season, and on the amount of pollen contained).
So how to make candles from bee wax at home? Consider several ways.
Skating from footboards
For the manufacture of this method, the fragrant challenge is used. The footholds are slowly twisted and under the influence of heat of hands slowly form a planned candle shape of the required thickness. Even a novice master can cope with such a task.
For the manufacture, you will need a platform for the manufacturer, twine (cotton or jute) for the wick (you can use ready-made wick for candles), scissors and a candle-tablet for wetting wicking in molten paraffin for better burning.
In the fall and in winter it is especially pleasant to wrap in a warm plaid and, extinguishing the light and leaving only the candles, enjoy hot tea, watching snowflakes falling outside the window. And if you add coffee beans to homemade candles and a little vanilla, then your house will be filled with amazing "winter" flavors. In contrast to purchased in stores, they will not spread the caustic and cerebral chemical fragrance.
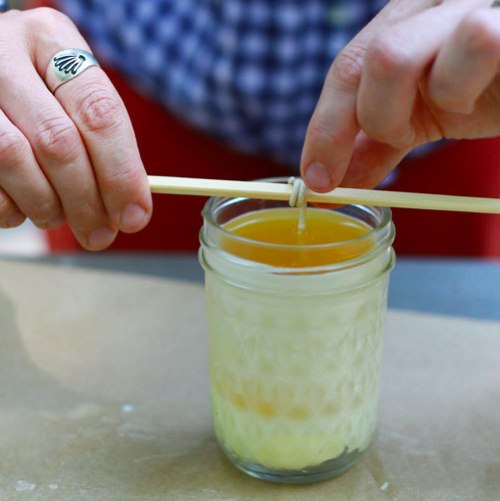
To make them, you will need:
- small jars or cups;
- wax for the candle (you can use old candles, molding and fill in them with a jar you like);
- wick;
- coffee beans;
- ground grains vanilla.

On the steam bath, melt the wax (you can also melt it in the microwave oven using a special container for this). At the bottom of your chosen jar or vases, glue your wick. Pour a little melted wax, and then add coffee beans and vanilla. Then fill in the jar to the edges. If desired, mix it with a wooden wand. Leave the workpiece to stick and then cut the extra end of the wick.

Master class number 2
By adding chips to the homemade candle from colored wax pencils, you can achieve a variety of color combinations and effects. In this lesson, we will tell about how to make a candle with a multicolored geometric pattern, but you can experiment and try to create your own unique pattern. If you want the colors smoothly passed one into another, just pour the next layer, without waiting until the first dry.

You will need:
- small glass cups (from transparent or matte glass), as well as dishes in which you will warm up the wax (and paper cups for ice cream are also suitable);
- wax;
- wax pencils;
- wick;
- wooden sticks for stirring.

1: Fill the cup with wax and put it in the microwave per 1 minute. Cap your hot wax to the bottom of the glass cup and secure the phytyl in it. Wait until it freezes.

2: Prepare wax pencils: To do this, remove the paper and cut them into small pieces. Fill one of the cups with wax, put a pencil pieces on top (one color!) And put in the microwave for 2 minutes, then mix so that a homogeneous mass is turned out.

3: Take glass cups, tilt them at an angle of about 30 0 (you can use the dryer for dishes as a support) and pour with colored wax (about 1/3). Leave for 20-30 minutes until the wax hardens. Turn the jars and fill the second layer, then wait again until it freezes. Before pouring the last layer, put jars vertically on the table. Before healing the candle, wait about an hour until it gets completely cool.

And ready!

Carved candle
Candles with such a drawing are ideal for creating a cozy atmosphere with cold and long autumn evenings. You will need:
- candle;
- paper;
- pencil;
Measure the circle of your candle and cut the appropriate sheet of paper. Draw a pattern that you would like to transfer to it.

Then wrap the paper sheet (outward pattern) and drive the drawing with the scalpel.


Then, using a knife, carefully remove the layers to make your drawing volumetric.

Gel candles with their own hands
Gel candles are very simple performed, and at the same time you can fill them with absolutely any decorative decorations for your taste: shells, colored pebbles or even beads and buttons.
You will need:
- jar, cup or glass candle;
- wick;
- gel wax;
- decorative decorations;
- dyes (you can use food dyes).
Step 1:Preheat wax. To do this, put a saucepan or any other container on the stove and warm up the gel on the weak heat until it is melted into a thick mass. Make sure that the temperature does not exceed 100 ° C.
Step 2:At the bottom of the cup or the jar you chose, stick your wick. Wait until the glue dries before pouring a hot gel.
Step 3:Add dye. To get a homogeneous color, add it until the gel is heated. If you want in it to form air bubbles, just mix it. And to make a multi-colored candle, just warm up a few portions, adding dyes of different colors to each of them.
Step 4:Spread the jewelry at the bottom of the jar or glade, then pour the gel layer. Wait until it dries, then put the second layer of jewelry and pour the gel again. Here are our gel candles:


Lesson number 5: Geometric Candle

To make such unusual candles, you will need:
- paraffin wax;
- wick;
- tara for warming up;
- wooden wand for mixing;
- scissors;
- line;
- pVA glue;
- newspaper (to protect the desktop from drops);
- candle stands;
- aromatic oil (optional);
- dense paper.
1: Print and cut the candle patterns. With the help of a blunt subject (for example, the reverse side of the noise), "sell" the bends (as shown in the picture).
Bend the template: on dotted lines, bend in the direction "To yourself", along the usual lines - "from ourselves." Fold the shape and glue the bottom and sides. After the glue is completely dry, make sure that all the joints are stuck (otherwise the wax can leak through the slots). If necessary, strengthen the seams with a tape.


2: At the bottom of the shape glue the wick. To secure it in a vertical state, wrap (or glue) the rope on the pencil and put it on the edges of the form.

Melt the wax on the steam bath, add dyes and / or aromatic oils. Then pour it into a cardboard form. Make sure that the phytyl remains in the middle of the candle.

After the candle cools, you may find that the middle is slightly "asslaved". Just add some more wax and wait until it cools.
3: After the wax fully solids, remove the paper. We recommend that you first put a candle in the refrigerator, then the paper will disappear easier. Cut the wick and the finger slightly round the edges of the candle.


Master Class No. 6
Floating candles look very romantic. You can also experiment with different colors and sizes.
You will need:
- wax;
- saucepancing;
- wick;
- wax pencils;
- old molds for baking;
- baking spray (to make it easier to remove ready-made candles from molds);
- aromatic oil (optional).
1: sprinkle every mold spray to baking - this will allow you subsequently easier to separate the candle from the mold. For each candle, take a segment of a wick length about 8 cm, and glue it to the bottom.

Melt wax, adding wax pencils chopped into it into it. For the manufacture of 6 candles you will need approximately 4 cups of wax and 20 droplets of aromatic oil (5 drops for each portion). To get such a coral color, take the wax pencils of red and orange.

2: After you melt the wax, fill it with each of the molds for baking about ¼. Note that the candles should be light so that they do not drown. When everything fully cools, pull out the candles from the molds, pulling the wick.

Lower them in water filled with water and burn.

Lesson number 7.
The lovers of the candle know that there are many ways to decorate them. We offer you a few ideas, how to react them, for example, for a festively covered New Year's table or romantic dinner in honor of Valentine's Day, or if you just want to diversify the interior of the mood.
Using us the technique, you can decorate a candle with any suitable pattern.
You will need:
- monophonic candle (preferably light color);
- white paper napkins;
- wax paper;
- scissors;
- printer;

Select the drawing you like, increase or decrease it to the desired size. On the usual sheet of A4 format, put the napkin slightly larger, start the corners and print an image on it. If your printer does not allow you to print on this paper, then you can draw a picture on a napkin or translate it through a copy.

Cut the image along the contour and mark the glue from the reverse side (for this it is best for the adhesive pencil), stick it to the candle. Then wipe the candle with wax paper. Take the hairdryer, turn it on and send the air jet to the image.

Under the influence of hot air, wax paper and the candle melted slightly, and the picture will stick to the candle.


Lesson number 8: Candles with autumn drawing
You will need:
- three candles of different sizes;
- plate or tray as a stand;
- decorative sand (natural or gold shade);
- paint markers;
- sequins.
On the largest candle with a brown marker, draw a tree, and from the bottom next to it there are several fallen leaves.

On two candles smaller drew twigs with leaves.

In order for such multi-colored leaflets to get such a slightly green paint, then orange and yellow. Without waiting, while the paint dries away with a toothpick or thin wooden sticks slightly mix the paint. Decorate the brillium candle.

While the paint dries, prepare a tray. Put the golden decorative sand, put the cones, leaves, twigs and berries and spread the candles. Our composition is ready:

Decorative Candle with Gradient Effect
You will need:
- candles;
- paraffin wax;
- wax pencils of different shades of one color (for example, orange);
- clean tin.

1: With wax pencils, remove the paper and cut them into small pieces. Fill the tin mug with half wax and put pieces of wax pencils on top. Put the mug into a saucepan, which fill with water so that it covers approximately 2/3 of the mugs. Press it, for example, with a lid and bring water to a boil. Wait until the wax is melted (about 15 minutes). Then mix well.

2: Put the container with molten wax on a flat surface, then take a candle and vertically lower it to a depth of 2.5-3 cm. Hold it in this position about 10 seconds, then lower the candle by 2.5-3 cm deeper. Wait another 10 seconds. Continue increasing deeper to immerse the candle in the wax until you reach the desired level. To get the last layer as thin and transparent as possible, lower the candle only for a moment, and then immediately pull out.

After about an hour, the wax will completely freeze and the candle can be lit or pack and present to anyone as a gift.

I hope you find an interesting idea for yourself and make a candle yourself!
I want to tell you how to make candles with your own hands at home. As sources of light, they are already not relevant, but are excellent in the role of decorative ornaments and original gifts. You will learn the most popular recipes that can be implemented even without artistic skills.
Create masterpieces on your own
Recipes for the manufacture of candles that are easy to implement without leaving home:
Recipe # 1: "Wax"

Wax candles possess very simple structure:

They are created from the following materials:
| Name | Purpose | Picture |
| Wax or paraffin | Creating directly the body of the product is made. For such materials, ordinary household candles can be used. |  |
| Thread of cotton or moulin | Creating a wick, which actually will emit warmly with light, slowly burning |  |
| Pan | Organization of water bath for melting wax or paraffin |  |
| Pure metal capacity, in the role of which the bucket is perfect | The content of wax or paraffin during their melting on the water bath |  |
| Molds from tin, glass or plastics | Giving shape to frozen wax or paraffin |  |
| Wood chopstick or ordinary pencil | Fixing Fitil |  |
For the first time I recommend to take someone to my assistants, since the melted wax will begin to grab after fifteen minutes after removing it from the mosflower. In fairness alone, you may not have time to fulfill all the necessary actions.
Now consider step by step performed tasks:
 |
Step number 1:
|
 |
Step number 2:
|
 |
Step number 3:
|
|
|
Step number 4:
|
 |
Step number 5:
|

It is better to use forms with smooth edges or disposable, which can be simply destroyed. Then you do not have to leave ready-made candles in them.

Recipe number 2: "Colored"
Color candle with their own hands at home is created almost also exactly, as well as the usual wax, with the exception of one additional ingredient: wax pencils.

They have a very large range of possible colors, which opens the enormous possibilities for the transformation of the appearance of the appearance of the candle of the self-made manufacture:
- So you can simply make a monophonic article by adding paraffin or wax a piece of a pencil that you like. It will also dissolve, paint yellowness in a more fun and interesting shade;

- If you throw several multi-colored pieces in a melting mass, then you will have a rainbow candle;
- Striped instances are most popular. In their manufacture, each portion of wax with a new color is filled after the complete sinking of the previous one. The process, of course, is delayed, but the result looks amazing.

If the form after the fill of each new layer is not directly putting on the table, but to install at an angle, then you can get more complex ornaments than Zebra.

Recipe number 3: "Aromatized"
It is not necessary to limit itself to the addition of non-ferrous wax pencils alone. At home you can also add a few drops of essential oil in front of it before pouring it. In this case, your candle will still be bolshing and even positively act on the body.
Here are examples of the effects of some essentials:
- Lavender and Bergamot helps to relax as much as possible, which is indispensable after a heavy working day;

- Lemon and Rosemary contribute to raising good mood and removing negative thoughts;

- Geranium, rose and lavender remove stress;

Recipe number 4: "Transparent gel"

Here in order to make a candle at home, a special candle gel is used instead of wax or paraffin.

This gives a very important visual effect - transparency, due to which adjustments to the manufacturer itself are also entered:
- If the form is used with concave edges, it must be transparent. Otherwise, the whole meaning of helium candle will be lost;

- The selected shape in front of the direct fill of the melted gel should be heated to eliminate the formation of bubbles in the structure of the product being manufactured;
- In the process of forming the body of the candle in its material immersed decorative elementswhich due to the transparency of the helium composition is frozen inside. And as decoration, everything will be prompted by your imagination. It looks amazing.

Recipe number 5: "Fruit"
Human ingenuity on the above does not stop that I wish you to prove with the demonstration of candle formulations using natural fruit fragments. To work, you will need the following materials:
Having collected everything you need, proceed to fulfillment tasks:
 |
Step number 1:
|
 |
Step number 2:
|
 |
Step number 3:
|
 |
Step number 4:
|
Only in no case put lemon forms in the refrigerator, since there the filling their wax can be frozen unevenly.

Recipe number 6: "Coffee"
In this case, the set of materials and the process itself is similar to the same manufacturer of a classic wax candle. But add more coffee beans To give a product of a special entourage.
And you can perform four methods:
- It is enough just to add grain coffee into the melted wax or paraffin, and you will already get the original drawing on the finished product;

- You can also bind the grain-ready candle by gluing them with the help of glue either by pressing not yet frozen fully material;

- The most simple version is the already frozen sample from the form, put in a large transparent container and fill the gap between the walls of coffee grains;

- If you want to bet on the fragrance, and not on appearance, add ground coffee to molten wax or paraffin. And then in the process of burning candles around the room there will be a pleasant coffee smell.

Recipe number 7: "With photos"

This is not a completely recipe for the manufacturer of the candle, since the entire initial process completely repeats the creation of a wax instance. But then, when he is completely freezing, you can proceed to apply photography on its walls. For this need:
| Picture | Name |
 |
Hardened candle from paraffin or wax |
 |
Calca |
 |
Paper sheet for printer |
 |
Wax paper |
 |
Scotch |
 |
Scissors |
 |
Printer |
 |
Fen |
Procedure looks like that:
 |
Step number 1:
|
 |
Step number 2:
|
 |
Step number 3:
|
 |
Step number 4:
|
Application of homemade candles
Summing up, I want to describe the applications of candles made a little more detail:
- Creating a romantic setting. Full electric lighting, of course, handmade candles at home will not be replaced, but here it is possible to bring romance to be excellent;
- Decoration of others. Several decorative candles of bizarre forms can be the most important attraction of your home;

- Interesting hobby. The manufacture of such ancient lighting devices is very exciting. And if a commercial vein is present in you, it can become more profitable;

- Aromatization of the room. If you make an aromatic candle, it will fill in a pleasant, and in some cases even a useful smell of any room in which you install it;

- Gift friends. Homemade candles can also be used as gift souvenirs. So enough to break his head over what to give, it's time to take care!

Products made with their own hands
The video in this article contains additional materials regarding the topic considered. In the comments, you can ask any questions you are interested in.
You will need
- - remnants of old candles;
- - knife;
- - pan;
- - metal mug;
- - wooden wand;
- - stove.
Instruction
Cut each candle grid for 2-3 parts and remove phytili. Grind paraffin residues with a knife and fold them into a metal circle.
Fill with a saucepan with water so that the fluid level is no more than the height of the circle with paraffin. Place the container with chopped residues of candles inside the dishes with water. Put a saucepan on the stove and heat the water on a weak heat until the paraffin in the circle becomes liquid.
To give a solemnity product, add the desired number of sparkling sparkle, beads, colored threads or dried colors into the circle. Then mix these elements with a wooden wand with a liquid base.
To give a future candle of another color, grind color wax chalk or make a mixture of a small amount oil paint. and gasoline at the rate of 1 g of dye per 100 g of molten candle residues. Pour the prepared paint into the melted paraffin.
In order for the product of the product in monophonic, mix the paint with paraffin thoroughly. If you want to get a candle decorated with colored divorces, do not mix the components in the circle.
In order to combine candles, the room was filled with a pleasant smell, add a few drops of lavender aromatic oil to liquid paraffin, vanilla or orange or pumped up a pinch of dry spirits. In no case, do not use rose oil to aromatize the product, as it gives it when burning nasty smell And soot.
For melting candles, do not use glass dishes, as such a material can easily crack. Do not allow water to fall into the molten base for the candle, because in this case the form of the finished product will be inhomogeneous. Do not attempt to use a microwave oven to intervene paraffin, as fire may occur.
Sources:
- My girlfriends. Decorating the house.
- Making beautiful candles with your own hands
Parafinotherapy - The procedure is quite common, and it can be carried out not only in the cabinets of physiotherapy or in cosmetic salons, but at home. According to the prescription, the specialist makes various applications on certain parts of the body, as well as cosmetic baths for the skin of the hands and stop. For effective and safe manipulations, it is important to correctly melt the paraffin and act according to the instructions received from the doctor or cosmetologist.
You will need
- - consultation with a doctor or cosmetologist;
- - paraffin;
- - knife;
- - Pan and bowl for water bath (options: steamer, baby food heater and glass jar, paraffin bath);
- - tray, medical oilcloth or a piece of flannel;
- - polyethylene film or packages;
- - terry socks and mittens, towels.
Instruction
Purchase high-quality raw materials for paraffin therapy. To create decorative and other targets that are not related to skin applications, suitable candles suitable with pre-remote phytyl. However, doctors do not recommend using similar products (especially flavored and painted) for skin applications with a tendency to allergic reactions. Paraffin is better in pharmacies - there it is offered by pieces on the weight (most preferred option); In the form of packaged chips or in the form of a set of paraffin plates. Such a product is also offered in online stores.
Paraffin can be properly under the action of steam; At the same time, water should not fall in the raw material - it may face burns. Make a bath: Heat the water in a saucepan and put a bowl from above with finely distant paraffin. You can prepare a substance in a double boiler or put a jar with pieces of raw materials into a baby food heater. At a temperature of 54 degrees, paraffin will start melting; At the same homogeneous mass, the process is completed.
Place in the form of wick. It can be made of several cotton threads, weeping them into a pigtail and impregnating paraffin. If you are going to melt ready-made candles, carefully remove the filtic from them. In addition, phytilites can be purchased along with other goods for needlework.
Do a small hole in the bottom of the form and insert wick into it. Put on the upper part of the shape of a pencil or a wand, fixing it exactly in the center, and tie to the resulting crossbar the upper part of the wick. For the manufacture of small candles, it is better to use short fitolis fixed in metal supports.
If you are going to decorate a candle with spices or shells, make a cardboard liner. Its diameter should be one and a half or two centimeters less than the diameter of the future candle. Insert the liner into the shape and fall asleep space between their walls. decorative material. The top of the wick in the manufacture of such a candle should be fixed so that you have the opportunity to remove the liner in the process of pouring the candlestone.
Mount paraffin or wax on a water bath. For coloring of the candle mass, add a dye into it or wax chalk in chips. Stir the mass to get a homogeneous color. If you want to make a multi-colored candle, divide the melt into pieces and color each in your color.
Fill the molten mass in the prepared form. If you make a candle in a form with a liner, gradually remove it so that the melt filled the gaps between the individual fragments of the decor, but the items used to finish did not have time to shift to the center. When casting a multi-colored candle, pour a lot of one color, let it cool it slightly and pour the next portion.
Give the shape to cool when room temperature For five to six hours. Gently cut down the excess part of the wick and remove the finished candle. If the form is poorly separated, place it half an hour in the freezer.
This post-instruction for those who prefer really smelling candles of the chemistry, which is sold in our stores. Of course, there are manufacturers who add truly natural oils to their products, but these candles are very silent. So if you have a desire to tinker a little and try yourself in the manufacture of candles, there are patience in stock and, of course, free time, this post is just for you.
Ingredients
I will try to give you as a brief and understandable instruction for the manufacture of aromatic candles.
You will need:
- wax or paraffin (you can use old candles);
- essential oils on your choice;
- lace;
- scissors;
- Small glass jars in which candles will be poured;
- heat-resistant dishes for wax swimming;
- a special thermometer for measuring the temperature of the molten wax (optional);
- thin wooden wand;
- roulette or ruler;
— cutting board;
- Nut for holding cord.
Manufacture
1. Mute and dry the containers in which you are going to pour candles. It can be small glass jars, high glasses of different shapes, ceramic or porcelain cups.
2. Ship the work surface with baking paper. Since the wax will be soft, he can stick to the table, and it will be difficult to remove it enough.
3. We break the wax bar or an old candle on small pieces - so they will spread faster.
4. Now you need to prepare a wick for a candle - make a "seed". Thanks to this, the wick will coincide with the color with the candle, burn slowly, and it will be easier to install it. So first need to melt wax! Sill a small amount of small pieces of wax or paraffin in a bowl and put it on a water bath. When the wax is mocked, put the wick there for 20-30 seconds you need. Then remove from the bowl with a tweezers and put on baking paper. Watch out the wick, align it and ride a little on the table, as if you make a sausage from plasticine. Leave to dry minutes for 10.
5. After the wick dries, thread it through a nut that will help keep his lower end at the bottom of the candle. It can be found either in stores for needlework, or borrow from tea candles.

© photo.
6. Repeat wax again, add the remaining pieces and melt there. Then add a few drops of your favorite essential oil. You can make mono odors, and you can try mixtures. For example, a few drops of cedar oil, a pair of droplets of eucalyptus and three drops of citrus essential oil. Well, stir the wax with a wooden spatula.
7. Remove the wax from the fire. Place about 1/4 wax in heat-resistant dishes.
8. Fill some wax into the prepared candlesticks, watching the wick all the time in the middle. Leave wake minutes for 20-25 minutes. This will help hold the wick in the middle when the candle will be poured to the end.
9. Heat the remaining wax, break it into the heat-resistant dishes and fill the candles to the end.
10. Carefully screw the remaining top of the wick to the wooden stick so that the tension was not very strong. Otherwise, you can pull the nut from the bottom and you have to redo it again. Secure the wick on the stick and put it on the edges of the candlestick so that the wick remained in the center of the candle.
© photo.
11. When the candle completely cools, cut the wick so that a small tail of about 5 mm remains above the surface.
Cut the tail of the wick every time after using the candle. This is especially true of candles with glass candlesticks that can burst from overheating if the wick will be too long.