Bas-relief in detail learning to create. Bas-relief gypsum floral on the wall - master classes
New-fashioned interiors tend to idealize their appearance, and quite often, within the framework of such an improvement, not even new decor ideas can be seen. So let's say, the bas-relief on the wall was relevant in the Paleolithic era, and let him be fulfilled rather rudely, yet it did not prevent him from cheering through the century to walk to our time in his impeccable appearance. And in this review, the site "Decorol" intends to present incredibly beautiful wall bas-reliefs, specially created in the interiors of houses.


The bas-relief is one of the popular varieties of the so-called "convex" volumetric relief, which represents an image that protrudes over the flat surface is not exceeding its half of the volume.


Advantages of bas-reliefs for walls.
- It looks fresh and interesting.
- Gives the room a unique charm.
- You can come up with an individual composition.
- It takes an empty wall.
- May act as masking of the irregularities of the walls.
- It is capable of visually zoning the room.
- The work does not necessarily have a master if there is a desire, you can cope on your own.


Components and manufacture of bas-relief on the wall.
Bas-relief can be made of various materials, most often used gypsum, clay, plaster, as well as a metal or wooden base that can be pouring or processed to its taste, depending on the planned composition.
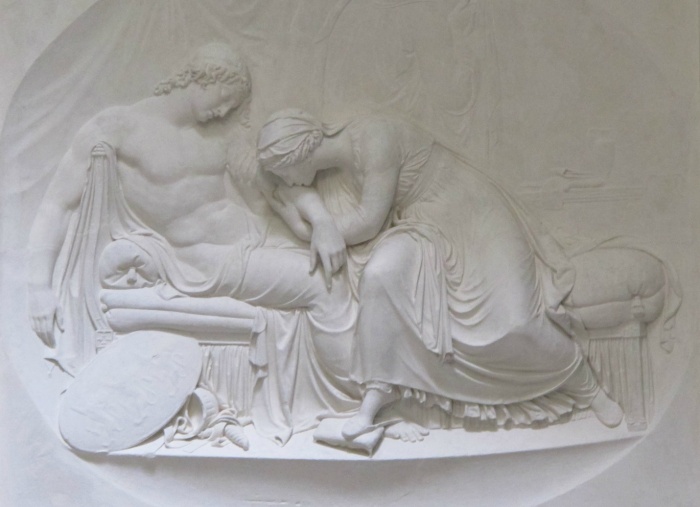
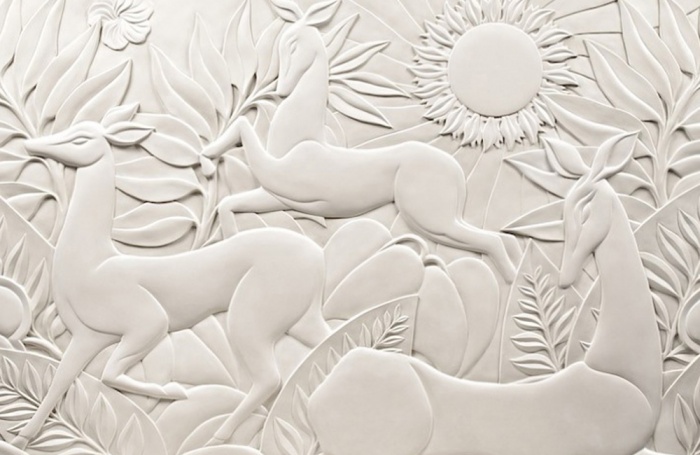
The composition of the bas-relief itself is most often based on certain printing, among which plant patterns, animals, geometric shapes, abstraction, people, persons, in particular, antique characters are most in demand. As for the size and complexity of such a pattern, it all depends on the preferences of a person, someone wants to decorate the entire wall with a modest "vine", but the other person wants to arrange a small zone over the TV in an intricultuous style.
Often, special plates are used to recreate the interior bas-relief, which are then mounted in the desired wall. But the bas-relief of handmade is not at all rare and exclusive, people still ordered such work from specialists or try to bring the idea of \u200b\u200bthemselves.
Considered decorative element It is quite possible to make yourself, you need to stock number of special elements, you will need: putty, glue, spatula, paint on acrylic basis, brushes with different tips, pencil, acrylic stained-in circuit, cutter, rails.


Preparation for work.
On the initial stage It is important to properly prepare the basis, in our case the wall. It must be completely cleaned from the previous coatings, leave only a layer of putty, then carefully immersorate and suck carefully.
On the wall you need to draw the desired image. The masters advise at the initial stage not to be sought in difficult bas-reliefs, but to stop the choice on plant prints that are much easier. Then you need to mix plaster, plaster or cement-sand mixture According to the attached instructions. Well, then we recommend to explore the video below:
Bas-relief in the interior - use options.
- To begin with, it should be noted that this decor gets perfectly with the most various materials that can meet in modern interior. It can be safely produced in rooms of abundant glass surfaces, chrome elements, marble, leather, suede, stone, brick, mirrors, wood, etc.
- It is important to understand that such a wall decor will not be able to remain unnoticed, which means all the attention he will focus on himself, thus the furniture and other elements may not be slightly lost.
- The bas-relief you can decorate not only the walls, but also the ceiling, the area of \u200b\u200bkitchen apron and even the end parts of the fireplace portals.
- It is not rarely a bas-relief is made in wall niches, arched openings, which, by the way, in the correct illumination, look at the present magic.
- The bas-relief of impressive size will harmoniously look in the large area of \u200b\u200bthe room, while small compositions will fit perfectly into small rooms.


More photo examples of various bas-reliefs on the walls.
To enlarge images, click on the pictures.
The usual walls painted or wallpapers in the interior look too beaten. Therefore, many people seek to focus on the walls with paintings and other decorative techniques. One of the most unusual and complex types of finishes is a bas-relief. Wall reliefs are not so many ways to finish as a full-fledged work of art. With this reception, you can recreate plot reliefs on the wall, portraits of family members or favorite ethnic motives.
Often bas-reliefs use indoors with a fireplace or a stove. In this case, the bulk element may not have a plot or ideological promise, it is created as a visual framing of the focus. Also bas-reliefs look at the area of \u200b\u200bdoor and window openings. When finishing such objects, it is necessary to correctly select the view and size of the pattern. The innovation among the bulk decor is reliefs with illumination. With it, it is possible to make patterns and plots of finishing volumes.
FEATURES Reliefs
Unlike mosaic and wall mural, relief can be monochrome. Often, bulk bas-reliefs are performed using 2-4 shades of one color. In the bas-reliefs, the main expressive unit is precisely the volume that it is necessary to emphasize it only to choose and set competent lighting. The light does not have to be artificial, so in the ancient Greek and the ancient Egyptian reliefs, natural sunny and moonlight could strive to transform the contours of the panel. Therefore, the bas-relief is recommended to be placed indoors with an expressive day upper light.
Many believe that the bas-relief is inaccessible for most kind of decor. If you have basic artistic skills, you will quite be able to create a volumetric relief personally. To create a bas-relief with your own hands follow the instructions described below.
Creating a bas-relief with your own hands
People night not colliding with finishing works, It is believed that the bas-relief is a decor, cast in the gypsum. However, in fact, the volumetric figures are applied directly on the wall, which makes each object in unique. Even if the relief uses one source sketch, the final works will fall different. To reproduce on the wall, even a simple panel need to have at least the basic modeling skills. However, with a clear leading instructions, even a newcomer will be able to create a simple relief.

Selection of material
Before starting work, you must select the material for the panel. Most often for such works use:
- stucco;
- alabaster;
- gypsum;
- clay
Experienced masters are created own recipes Working makeup. It is recommended to begin the creation of a bas-relief from clay or with gypsum plaster.
Creating a basis
When the material is selected, the basis of creating the basis on which the contour will appear future work. To apply a mass, you need to create a flat wooden box with low sides: for the bottom you can use Phaneur, and for sides of flat rails. The size of the box should block the size of the future work slightly. As a form, you can use the finished rigid box or plastic container.

The bottom of the box will rip the polyethylene film so that it does not have wrinkles and folds. When the shape is wrapped in the film - proceed to kneading the mixture. The composition of all substances is individual, depending on the manufacturer, so when preparing, follow the instructions specified on the package. Ready poured into the form. If you want to create a large bas-relief or burner - reinforce the composition in the box. After filling the mixture, the drawer needs to be returned to occur in the primary drying of the gypsum.
Bas-relief extension
After drying the composition in the form, you can proceed to the manufacture of panels. It is important to remember that the outline of the future drawing is filled with fresh mixture. The bas-relief is increasing gradually by adding each layer of mass. In this case, each subsequent level is applied when the previous one is dried. The contours of the picture are applied to the ground using stack and polyethylene. The film is dried on the panel and pour the layer contour, then it is filled with a mass. When the layer dries out, the contour of the new and so until the end of the entire volume is completed.

The optimal material for building the volume of the bas-relief is plaster. The material is very plastic in the raw state. Its compliance allows you to add layers and remove the surplus without prejudice to the overall contour. During the work, you can constantly adjust the bas-relief. Another plus material is that it can be performed and raised to the final drying.

If the creation of the bas-relief went not according to plan, you can cut off the bas-relief sector and make it anew. The elimination of the volume defect is performed in two ways:
- The cutter is cut off a small volume sector, after which the place is rehabilitated again. Metal carpentry cutters and chisels are used to work.
- Around the failed sector build up the material to the material so that the defect is lower.
The methods described above can not only remove the surplus, but also create in-depth reliefs. You can also create certain effects on the bas-relief to create cutters, but deep slots are not recommended.
Creating a panel without base
Very often, vegetable motives are used as a motive for bas-reliefs, for example, flowers. Lily and tulips are considered the most popular (see an example of such a bas-relief in the photo). These plants look very effectively and recognizable, but with it very easy to create even a novice master.
Often, simple reliefs are applied immediately on the wall, without assembling the base. In this case, it is important to protect furniture and walls from getting plaster. For this use polyethylene film and greater scotch.

To create a bas-relief on such technology, the contour of the sketch is applied to the wall. The base is covered with putty and wait for drying. When the layer is dry - it is ground. As a primer, it is recommended to use paint-soil, it contributes to good relief adhesion with the surface. Drying of the composition takes 3-4 hours (depending on the thickness of the layer).
Marse wax is applied to the primer. The material works very quickly, which makes it optimal to create the basis. Wax, most often, has white color. After frozen, the shape can be covered with tinting or colored acrylic paints. Marseille wax is applied from 3 to 10 layers (depending on the complexity of the figure). The material dries quickly, so the relief can be done during the day. Mastichery and blades are used as working tools, you can buy them at any artistic store.

How to make bas-relief on the wall yourselfBy avoiding common mistakes. Easy master class for beginners On the example of my work - a colorful relief with the time of year in the kitchen.
Do not stand the first time to try to portray complicated bas-reliefIf you are novice. If you have not had experience decorating walls panels and reliefit's best to take Finished spacure(in the bucket), my choice - SheetroSK (Log). This mixture is vinyl-based Does not give microcracks and easily bulk. You can find analogs cheaper, most importantly - avoid dry mixes at the first experiments.
To create a bas-relief, we will also need a primer, a spatula, a flat synthetic brush (I have No. 10), abrasive sponges or skins with rigidity of 100 and 800/1000, acrylic paints.
Do not get enough toolFor a start, you quite have enough average spatula and one brush!
So, I will immediately write the procedure for the action that we are coming:
For this relief, I used ready shone Sheetrosk. and a little bit plasters Rodband. As the basis. The plaster is needed in order to reduce the number of layers of putty.
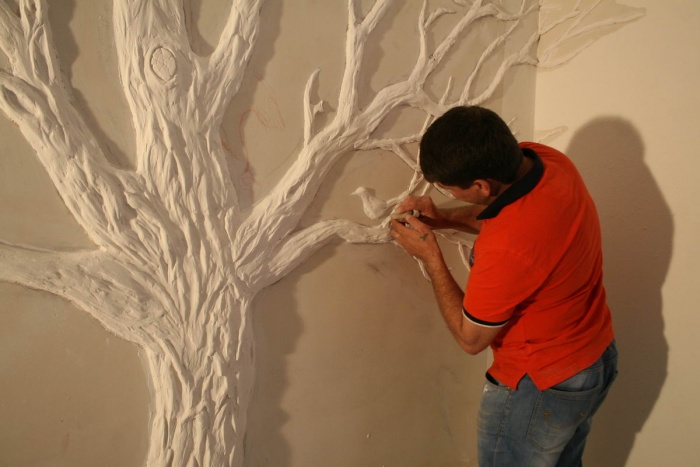
The first sketch was approved by the Customer - the column will be conceded by the Ryabina branch, on the wall with souvenir plates from different cities, it was decided to grow a tree with inclusions that repeat patterns of some plates. The drawing combined in Photoshop (as was able))).

As always, started with an outline. It is preferable to use Solid pencilSo that there are no fat traces on the wall in case of errors. If you are not sure that you can transfer the hand drawing - use the traction and copy paper, securing them on the wall with paper scotch or pins.
The surface under the relief is necessary treat primer (universal or strengthening). The places where the big bas-relief was assumed, I missed the concrete contact (it remained from the previous project). It is not necessary to do this, but it will not be superfluous.
The next paragraph beginner should:

On the second day I sketched the basis of the future relief of the Rotband Plaster. I repeat, I wave it a little curly than indicated in the recommendations on the package - by 1 kg of dry mix layer 0.5 cold clean water. More about how to work with plaster and why you need you can read in the master class on the bas-relief.
Do not forget that water is poured into a dry mix, and not the opposite (remember how to knead the dough).
The next day was devoted to applying putty. I recommend you try Flat synthetic brush. With it, it is easily filled with slits in the plaster and in general the volume is easier to form.
The putty latch is plastic, long time does not dry (the process of application can be stretched to an hour). Recommended volume 2mm, but if you violate this rule - the relief can crack. Cracks easily smeared with the same composition.
(In order to save time and strength, I used the plaster for the formation of the main volume, and also violated the recommendations, bringing shell putty up to 5-7mm.) The trunk of a tree, I intentionally damaged a thick layer, a wide spatula, dried, the surface was largely cracked, began to remind a bark. Then I strengthened the effect - on the edges of the crack put a new layer.


Another day went on a thorough grinding and primer surface.
The final stage was the painting of the relief ready acrylic colocuers With a small addition of ordinary colors for more rich colors.
Beginners can use both artistic acrylic paints and building kokes. The easiest way to work in black and white or monochrome color. The most effectively looks like reliefs, simultaneously allocated and color and illumination.
I prefer not to lacquer the bas-relief, because even the matte varnishes give glare. But this property can be used by highlighting the items on your work (water, shiny and glossy elements).
Photo of the finished bas-relief "Seasons" you can see
Successes and decisiveness to you!
The bas-relief is called the bulk relief on the wall surface - an ornament or pattern that performs above the plane. It helps to create an exclusive interior, because each work is unique, and it is impossible to repeat it.
The advantages of the bas-relief on the wall
Not a single type of finish is compared to bas-relief aesthetic. At first glance, he attracts attention to himself, looks unusual and interesting. The drawing can be created independently. The benefits of the bas-relief are:
- originality and effects of finishing;
- the ability to disguise the irregularities of the walls;
- the ability to act as a means of zoning the room.
Even more ideas to arrange the interior can be found at https://masterinterera.ru/

You can create a bas-relief in the interior with your own hands, and this is another advantage of such a type of wall finishing.

I do not want to glue the wallpaper, and the painting of the walls seems not enough interesting way Finishes - complement it with bas-relief, create which can be from various materials:
- plaster;
- plasterers;
- clay.

The base can be made of wood or metal - they are poured or processed by creating original compositions on the wall.


Types and topics of bas-relief
The bas-relief is called not every embossed pattern on the wall, but only the one, whose elements protrude from the surface not more than half. If more is the burner.

It looks original in the interior of a wooden bas-relief, if you pick it up in the style of the design of the room, the color suitable for the color of the furniture. In this case, it will harmoniously fit into a common style.

The ideas of bas-relief can be diverse. Depending on the style, it can be plant and animal motives, abstract elements or antique plots look aesthetic. The size, the plot and complexity will depend on:
- room volume;
- decoration style.

Often the three-dimensional image is made directly on the wall, but it is possible to install pre-cooked plates with a finished relief. We also recommend that finishing options for decorative panels on this site http://mirstrojka.ru/dekorativnye-paneli/


Bas-relief with your own hands
Many ordered the design of the walls with bulk drawings to specialists, however, knowing what to make bas-relief, you can perform work with your own hands.

For bas-relief based on putty, you will need:
- putty;
- glue;
- putty knife;
- cutter;
- acrylic paints;
- brushes;
- stained-iron contour.

At the first stage, a sketch of a future volumetric picture is transferred to the surface of the wall. It is transferred to paper, covered with a film and carry the contour to it. For this, the marker or felt-tip pen is suitable for erasing.

Preparation of the base is the second stage. It is necessary to apply an acrylic putty, fine-grained plaster is the basis of the future bas-relief. They need to be dissolved and give to dry, but not to the end. After 15 minutes, you can proceed to work - transfer the picture on the wall.

Secure the film on the wall with a painted tape, circle the drawing so that the image is imprinted into the wall. Simple ways Creation of bas-relief for beginners suggest the following actions:

On the contour on the wall they apply putty - one layer after another. The subsequent layers are applied only after the previous ones are dried.


Then, with the help of Masticheels, the image is cut through, swaying every item. The largest and most convex elements should be strengthened with self-draws. So the image will be durable.


When all the details are drawn, the panel is needed to dry well, handle emery paper. It is necessary to smooth all the roughness, corners, convex and concave elements. Work at this stage requires accuracy and caution.

Having made a finishing processing, the drawing is ground and painted. Use better water-free paint. In order for the surface around the bulk drawing, it does not look unnaturally smooth, apply a small layer of plaster and treat it with a crumpled paper, polyethylene, so that the surface becomes rough.

Gypsum bas-relief with their own hands has several other manufacturing technology. It is better to use ready-made form for casting elements from a mixture of plaster and plow glue. Mass must be like plasticine.

Using ready-made shapes, you can cast separate elements Ornament, dry and glue the wall. Those details for which there are no forms, or they are too small for casting, you can manually cut out.

When the whole drawing is ready, with a white sealant close all the gaps. Further, as in the case of putty, the bas-relief is covered with primer and stain. You can apply paint, wax, add gilt.


Bas-relief in the interior
The bas-relief is well combined with many finishing materials:
- stucco;
- marble;
- skin;
- tree;
- mirrors.

Numerous bas-relief photos on a living room or ceiling wall, in arched openings, niches, in bedrooms different styles It is indicated that in classical, and in a stylized under the ancient interior of the room, he looks harmonious.

Simple on the form and drawing of the bas-relief will give the original view of the modern minimalist interior, and the classic is appropriate even in the Loft style.

Bas-relief will be appropriate in different premises:
- in the living room, using a bas-relief, you can recreate the interior of an old castle, palace, or, on the contrary, supplement the modern interior to them;
- in the bedroom original decision It will be the placement of a large panel above the headboard either in the whole wall;
- indoors in the kitchen volumetric panel appropriate in the dining area or on kitchen apron. You can arrange so a whole wall or free niche;
- in the spacious bathroom, the bas-relief can be supplemented with marble walls.
- in a large hallway, the stucco can be made part of the wall, for a small room, the surround images are better not to use.

Small stucco elements can be supplemented by a one-photon wall if paintings, photographs, shelves with souvenirs, collections are placed on others. So it will not seem empty.


Volumetric vegetation pattern fills the space without overloading the interior.

The room can be transformed if you add decoration with multiple stucco elements on the walls or ceiling. Sometimes bas-relief can become a composite, organizing room center.

When creating a bas-relief, it is important to provide the correct backlight so that the volumetric image "has played" - this will achieve the maximum decorative effect.

Photo of bas-relief on the wall


Immediately make a reservation: step-by-step technologies And the complete list of all components will be listed below, in the relevant section.
First we will list only the main thing that you need to have:
- Alabaster;
- PVA glue;
- Finish putty;
- Water.
This is the basis of the foundation, but the auxiliary materials are already dependent on the type of drawings, with what we discern here and now.
The most solid bas-reliefs extend from alabastern mass, filled into forms.
Depending on the type of the latter, you can get absolutely any configuration of the convex pattern: fruits, flowers, seashells and even classic capitals.
The main thing here is to just find a suitable form, And the rest is just little things. Pour the gypsum at all is easy.
Here are about such elements of the decor can be made for some hour. This is maritime themes, and you are free to choose anything, to your taste.

These shells are poured with ordinary childish puzzles For sand and attached to sheets of plasterboard. And the frame framing is made by ready-made foam baguettes, which are usually attached to the ceiling butt and walls.
It seems, nothing complicated. Gypsum is fully in construction stores. But where to take a good form?
Here you will have to upset you, the choice is not so great: it is not necessary to find a little visually fitting the sample, you need to still, so that the material has respected the heating of the gypsum during the frost.

Yes, yes, he warms up strongly and expands! Therefore, forms for the manufacture of soap, let's not suit. They just burst and that's it, since they are made too thin plastic, not the best quality.
It is necessary that something is approved, like the same plastic mouths, and even better - silicone for baking. No metamorphosis of the material is not scared, since it is designed for large heating and stretching.

And most importantly, the finished product is much easier to remove from it than from something harsh.
With this type of bas-relief, we have a superficially understood, and we will give you a detailed description of the process below, in the appropriate subhead. There you will find a complete list essential materials and devices for each of the types of paintings with your own hands.
But besides casting, there is other versions.
For example, bas-relief from ready-made gypsum statuettes! It looks like this picture is extremely expensive, but its ultimate price cannot but rejoice.

Particularly beautifully looks at Panels with various Greek characters myths, such as Aphrodite or small angels.

If you take these ladies from the gypsum, not marble, then such a purchase does not hit the pocket. But it is not all the options!
You can make a very cute composition using ordinary flowers from matter whose species in souvenir stores do not find. In addition, you can use cones and other suitable forms. It will look like this:
The bas-relief of the gypsum can be made removable, as a conventional picture, and can be monolithic, as one whole with a wall, as you have already seen on the top figure with seashells.
And if you know how to draw, then it will not work for you to make a volumetric drawing straight from the putty, without using any auxiliary means and forms. But for this you need to have an artistic taste and the most elementary smelting skills. This is what can happen:
Or even so, but for this you need to be a master.

Here, in fact, all methods available to almost everyone. And now let's go to the specific And begin to finally do, and not dream!
We make a form for filling gypsum
If for all sorts of different seashells, fruits and bugs, you can find it and make it no sense, then for some parts, like grape berries, it is easier to make the basis yourself than trying to find it.
Of course, they can not cast them, but roll out of the shtlock, but it will look somewhat worse, as this material is more porous when drying.
In general, with a certain skill, you can make any form, using ready-made figurines. We bought one, and then poured at least ten! And you want to give them, you want to make a panel ...
Well, let's proceed. If we are talking about casting the berries of grapes, then you need to pre-roll out of the thick putty mass mixed with PVA glue, in proportion:
- Finish putty - 0.5 kg;
- PVA glue - 1 tbsp;
- Water is 100 grams.
We mix thick ground, pouring water gradually. Since its number we gave about, because it can differ significantly in use with different species shtquelkes.
After we knew, tack the grape and put it dry about a day. It should not burst, since the mass with the addition of PVA becomes rather resistant to cracking.
By the way, on the same top picture with seashells, you can see the wall at the bottom of the decorative smears in the technique. So they need to do so such a mixture, based on PVA.
Well, the grape dried? Let's make a form. We will need it for this:
- 0.5 liter of silicone;
- Box of plywood;
- Self-tapping screw;
- Brush.
Liquid silicone is sold in construction stores, and you can pick up a box any, you will lay in her grape and pour it with a silicone mixture.
The main thing is that it can be easily disassembled, and then collect on the self-tapping screw again, and the cutters smeared with a mixture of silicone. It is necessary in order that you then could easily damage, pull out the finished shape. If there was no suitable box, you can collect it from plywood sheets.
We will show you step-by-step photos On the example of the fill of the figurines, and you can already put there anywhere. It is important to understand the sequence, and that's it. And the amount of silicone can be different. The grape requires 100 grams, and on the owl, shown below, already 1 liter.
So:

And now let's go to the most interesting, formation of figures from Alebasra do it yourself.
How to make alabaster mixture for bas-reliefs
If you use silicone molds, you do not need to lubricate them. But if you pour the gypsum into the plastic oracle, then you need to make it a pretty lubricate it with sunflower oil.
Make a mixture for filling so:
- 2 pieces of gypsum
- 1 part of water
Powder suck in water gradually, constantly stirring, not allowing the formation of lumps.
It is not necessary too intensively to interfere, there is no point, you will only leash the substance with oxygen and the finished figure can be covered with bubbles.
Then pour it into the selected shape, in the clove with its edge. And relax, about a day.
In general, gypsum grabbing much earlier. But the longer the figure is like a form in shape, it will be stronger and the chance to damage it, getting, will be zero.
Confirm on the wall of the bas-relief
Now the finished composition must be fixed on the wall or on a piece of plasterboard, if you want to make a removable bas-relief. In any case, they are attached equally. You can attach them using a liquid silicone or a simple splock.
The main thing here is what: to smear the gap between the wall (plasterboard) and the figure, so that this is a single conglomerate. It is also possible to do it with a putty.
If there are any irregularities, they need to carefully remove the abrasive ribbon. And then you cover the finished picture water-emulsion paint A couple of layers.
Pure white compositions are best looking at the same background, it is a classic option. But you can paint in any color, but then, on the top of the white paint layer.
Basiered Basin Form
But here we will list everything that you may need for this type of panel:
- Alebaster mixture
- Forms
- The base from the drywall (if it is assumed for your idea)
- Shp Slica (or silicone glue)
- Water-emulsion paint
How to make alabaster mixture, we have already written above, therefore, we will not repeat, we will better give you some important recommendations regarding the process.
If you have come up with any song, then do not hurry to immediately glue the elements on the wall.
It is better to first lay them out on the floor and see if they look good. After all, several times to remove and glue the blanks again, they will get dirty and the stratum of paint will then need more.
In addition to the elements poured in the forms, you can add to your composition. various materials. Suppose if you make a picture with seashells, you can stick to the wall of ordinary crushed stone and paint it with white. By this you give the volume and the picture will look much more interesting.
Bas-relief from ready-made statuettes
You will need:
- Picture frame;
- Profile;
- Self-tapping screw;
- Plasterboard;
- Putty;
- Silicone glue;
- Statuette;
- Decorative elements to choose from;
- Water-emulsion paint.
Panel with antique figures must be done in some framework. Just do not hang it on the wall, it will look ugly. What can you do?
You can fix straight on the wall picture frame, the inside to compriment to the plaqua with it, forming a single whole, then attach the pedestal for the statue (for this it is convenient to use the profile, covered with drywall), which also put off.
Then put the statuette for the glue and go through all the slots again, so that the view turned out to be cast. On the space in the frame, you can add various items: pebbles, seashells, columns (they can be bought in the departments of petrootters, there are many different decorations for aquariums in the form of locks and other suitable beauty style).
And then just cover all the paint, including frame. If necessary, not even two, and three layers. It's nice that this bas-relief looks with your own hands is simply amazing, but in fact, for beginners it is a completely satisfied task.
Bas-relief - Picture of the shtlock
You will need:
- Machine mixture on PVA;
- Water-emulsion paint;
- Artistic talent.
And here everything is already in your hands, and, in the literal sense of the word. There is no special technique that can be given and each will perform, even having a skill.
The only thing we can say is that it is necessary to do the bas-relief with your own hands from the putty.
If you immediately put a big piece on the wall, it will simply won't stay. The drawing form gradually, increasing as drying. And of course, use the PVA-based mixture recipe.
Ready panels cover paint and you can call guests that boast!
Rag-colored bas-relief
You will need:
- Fabrics from fabric or fir cones
- Liquid alabaster mixture
- Glue silicone
- Water-emulsion paint
Alebaster mixture must be made a little juicy than for filling figures. In her, you do the workpiece and leave them to dry. When they are dried, they dip the second time, so that the figure acquired a homogeneous and monolithic color.
Then you secure them on the wall with glue, and paint them easier from the cannon, matte paint. Since they are quite fluffy and mess around with a brush is not very convenient in this case.
Such colors are not too obliging to stick to a strictly defined interior style. For example, if you do Aphrodite, then you need to duplicate columns or Greek fresco somewhere.
And in this case, everything will be harmonized: bas-reliefs, any pictures on the walls, what kind of design kitchen furniture, photo within, etc.
In conclusion: how to care for bas-reliefs
How much do not bother the PVA, homemade bas-relief, sooner or later, begins to lose sight. The gaps between it and the wall are formed and this is normal. You only need to occasionally shock the gaps and tint these places.
That's it! How to make a bas-relief with your own hands from the gypsum you know and it's small: start acting.