Adjusting the pressure switch of the pumping station whirlwind. Repair pumping station do it yourself
The water pressure relay for the pump is one of the main parts in the well content supply system. Adjustment occurs with standard relay commands, which is located on the pipeline. It has two modes of operation: to enable the system and its shutdown. This equipment helps to quickly fill the tank and keep a stable pressure level. It is for this reason that most household owners connect this mechanism. We will talk about all its features further in the article.
This small device can optimize your autonomous water supply system. Pump and accumulative capacity, for example, will not cope with such purposes. For the relay it is quite real, due to the presence of a hydroaccumulator that collects water, closes the pipeline and adjusts the pressure level in the system. The correct connection of this installation will allow you to avoid the need to constantly observe the state of the pressure.
Attention! Relay connection prolongs life cycle Your pump. As you can see, it is a very profitable purchase.
Basic concepts
The pressure switch for the pump makes it possible to automatically turn on and off the water supply system, which supplies water into the container from the well. Specialists allocated a number of such concepts:
- Turning on the system (RVCC) - Turn off all pressure supplements, and hence the water. It is usually configured as follows: 1, 5 bar.
- Shutdown pressure (Pillet) - The relay opens and turns off the pump. Productive settings - 2.5-3 bar.
- Pressure drop (ΔP) - This value is formed by calculating the difference between the lower and top indicator. Production settings - 5 bar.
The water battery is constructively constructed a container that has an inserted tank "pear", which via car nipple gains air.
Attention! There is such a pattern that the higher the pressure in its system, the stronger the water supply flow head.
A little differently functions a membrane hydroaccumulator, since its container is divided into two parts, but the principle of operation does not change.
The principle of checking the level of magnitude

After you bought the installation, you need to check its pressure, which according to the standard should be 1.5 atmospheres. It is worth considering that during transportation air could be confused in space - this is a common thing. Recommend the test with the help of a car or electronic pressure gauge.
Attention! Many models are complemented by a plastic pressure gauge, but they are not reliable in practice.
So, for the diagnosis of the magnitude, it is necessary to remove the cap from the hydroaccumulator, which covers nipple. Now it is necessary to connect the selected computing device and write data. For full functioning, 1.5 bar is enough, and for household needs - 1 bar.
Tip! Do not patch the tank in the system because the well water can not be enough, and the device will suffer damage.
Mechanism of the control sensor

The mechanism of action of the water pressure relay for the pump is to fix and register a spring pressure group in water. When they reach the minimum value, the contact is closed, which is responsible for the inclusion of the mechanism. With a maximum value, on the contrary, the contact opens, and the system is turned off.
The relay registers the movable spring-spring water pressure in the system.
This installation has mechanisms, the main task that is adjustable and adjust the water supply level. Also additional components can be a button of dry start, connectors, display indication, etc.
Place for installation

Pressure switch for pump is recommended to mount the hydroaccumulator removal. This is the place where the turbulence and flow racing are leveled. Some models cannot operate at temperatures below 4 degrees or with moisture level above 70%, so it must be checked in a technical passport.
Mandatory for the relay there is the presence of such elements in front of it in the system:
- Mechanical cleaning filter;
- Pump and pipeline;
- Input valve;
- Filter of fine cleaning;
- Check valve;
- Release to drain water supply.
To date, some models have inclusion in the design of the fitting, filters and check valve. Therefore, for these devices is possible installation in a block with a pump. If the water pressure relay for the pump has a water protection scheme, then it can be mounted even in the well.
Attention! All nuances for choosing a place for relays depend on the model and technical requirements for it.
Work parameters

Before installing the relay, you must already have a pump setting and a hydroaccumulator, as well as determine the necessary settings for work:
- Indication of maximum possible pressure for installation;
- The minimum reading that is necessary to shut down;
- Pressure value in the aircraft accumulator air chamber.
Important! You can learn the minimum pressure by adding a 0.2 atmosphere to the pressure of the water battery air chamber. If this is not the case, then the system is faster.
The electronic pressure relay is of such species:
- Power, which organizes the inclusions of power contacts on the pumping unit;
- Managing, which gives a signal on the power control compartment.
Attention! It is necessary to immediately determine the maximum power input for this model relay and adjust it.
Design features and configuration

This mechanism is a fairly simple design, which consists of an instrument, fitting and groups of terminals for connecting to electric cables. Adjusting the pressure data is carried out by springs that have threaded recorders.
There is such a pattern that the more power falls on the springs, the higher the pressure to turn on the relay. The principle of this: when we squeeze the springs, we increase the value of the magnitude of our pressure.
Attention! Setting the pressure relay according to the standard has such a value: the minimum indicator is 1.5 bar, and the maximum is 3 bar.
Despite this, from time to time the mechanism needs adjustment.
Relay adjustment

Adjusting this device is a very important process that allows you to return the apparatus to a full and optimal production. There are such nuances of this process:
- In most cases, the relay is equipped with two springs of various diameters;
- The large diameter of the spring is designed to control and stabilize the levels of indicators;
- Spring task with a smaller diameter - to determine the differential levels;
- The clip of the large spring increases the highest and lowest value of the magnitude;
- The clamp of a small spring adds superiority over the minimum maximum indicator.
Relay connection to system

To connect a relay to the system, this instruction can help you. The order of consistent actions:
- The installation process of equipment is carried out according to the scheme or adjacent instructions;
- Install the tee in the right place on the pipeline, to it attach a fitting on the diameter to the device relay;
- With the help of fum-ribbon or hemp rope, we carry out the sealing of the threaded connection;
Important! In the standard set, only nuts go to the relay, so you need to independently acquire a connection similar to an American or with your own hands to rotate the device on the tee.
- With a cable with a suitable cross section for power, you make the connection of the electrical system;
- We establish terminals that should have inscriptions for purpose. If they are not, then it will be not difficult to determine according to the scheme.
- If there is a terminal "Earth", then it is necessary to mount the grounding cable.

To choose the most optimal option For your pump, you need to adhere to such small recommendations:
- Choose a device that is intended for household work. The pressure level should not exceed 4 bars, since the standard optimal range varies from 1.4 to 2.8 bar.
- It is worth considering that the higher the differential between the maximum and minimum level, the greater the amount of water in the tank and thereby reduce the inclusion frequency of the pump to work.
- Prefer the models of famous trademarks, since there is a huge amount of fakes, which can negatively affect the functionality of the entire system.
- The installation of a pressure gauge on the pipeline will be positive - it will make it possible to observe the pressure level and thereby protect the system from unexpected situations.
Now you know all the working nuances of the relay device and the rules of operation!
For a stable supply of water with the necessary pressure values, it is not enough to just buy a pumping station. Equipment for autonomous water supply must still be configured, run and competently operated.
Admit, not all of us are familiar with the intricacies of the setup. And the prospect to spoil the devices in incorrect actions does not too much implies, agree?
You will learn about the causes of pressure drop and familiarize yourself with the methods of eliminating. Graphic and photo applications will explain how to correctly configure the pumping system.
Finished, equipped with a manufacturer, the pumping station is a mechanism for forced water supply. The limit is simple.
The pump shakes water into an elastic container located inside. When filled with water, it is stretched and presses on that part of the hydraulic panel, which is filled with air or gas. Pressure, reaching a certain level, cause the pump to turn off.
During the water fence, the pressure in the system falls, and at a certain point, when the owner is reached by the owner of the values, the pump starts working again.
For shutdown and turning on the device corresponds to the relay, control of the pressure level is carried out using a pressure gauge.
Violations in the work of household pumping station can cause breakdowns of sanitary equipment
Causes of equipment troubleshooting
Statistics of problems in the work of household pumping stations says that most often problems occur due to violation of the integrity of the hydroaccumulator tank, pipeline, water or air leakage, as well as due to different contaminants in the system.
The need for interference in its work may arise due to many reasons:
- Sand and various substances dissolved in water can cause corrosion, lead to malfunctions and reduced equipment performance. To prevent clogging device, it is necessary to use purifying water.
- The reduction in air pressure in the station becomes the cause of frequent response of the pump and its premature wear. It is recommended from time to time to measure air pressure and adjust it if necessary.
- The lack of tightness of the joints of the suction pipeline is the reason that the engine does not turn off, but can not pump fluid.
- Incorrect adjustment of the pressure of the pumping station can also cause inconvenience and even breakdowns in the system.
To extend the service life of the station it is recommended to periodically conduct an audit. Any adjustment work should be started with a disconnection from the power supply and drain of water.

You should periodically check the energy consumption and maximum pressure. Increased energy consumption signals friction in the pump. If no pressure dropped out of the leakage system, then the equipment is worn out
Correction of error in work
Before proceeding with more serious intervention in the work of the equipment, it is necessary to take the simplest measures - to clean the filters, eliminate leaks. If they did not give results, then proceed to further steps, trying to reveal the root cause.
The next thing to do is to configure the pressure in the hydroaccumulator tank and.
Gallery of images


The smaller the air is injected into the system, the more water it is capable of accumulating. The water pressure will be strong with a bothered tank, and are increasingly weakened when water fence.
If such differences are comfortable for the consumer, then you can leave pressure on the smallest permissible level, but not less than 1 bar. A smaller value can lead to friction of stuffed pear water on the walls of the tank and its damage.
To establish a strong water pressure in the water supply system, it is necessary to fix the air pressure within about 1.5 bar. So, the difference in pressure with a filled and empty tank will be less noticeable, providing a smooth and strong flow of water.
Using a relay for pressure adjustment
The system is responsible for automating the system that controls the pumping station by performing the power on and disconnecting the device. It also protects the system from creating excessive pressure.

Pressure relay controls the switching on / off when the user-defined operating pressure is reached by the user. The performance of the pressure relay is controlled by a pressure gauge
# 1: Pressure Sensor Operation Principle
The main element of the relay is a group of contacts that is fixed on a metal base and is responsible for turning on and off the device.
Nearby there are two springs of different sizes to adjust the pressure inside the system. The membrane cover is mounted below to the metallic base, under which the membrane itself is placed and the metal piston. From above, everything is closed with a plastic cap.

Products of different manufacturers and the principle of its action are practically identical, differ only in minor details
In the process of operation of the operating device, several stages can be distinguished:
- When the crane is turned on, water goes to a plumbing point from the filled tank. At the same time, the pressure present in the system is gradually starting to fall, and the membrane ceases to put pressure on the piston. Contacts are closed, the pump turns on.
- The pump works, swinging water to the consumer, and when all the cranes are turned off, fills the tank with water.
- With a gradual filling of the tank of the hydroaccumulator, the pressure is increased, and it begins to act on the membrane, and the pressure on the piston. As a result, the contacts are opened, and the pump operation stops.
From how the relay is configured, the inclusion frequency, water pressure, and even the time of the equipment service depends. With incorrectly set parameters, the pump will not work at all or will work continuously.

Piston Pressure Relay and Sensitive Metal Plate, reacting to the pressure generated membrane, hidden under the case - access to them is completely closed
# 2: Adjustment and calculation of the required pressure
The new device already has the factory relay settings, but, nevertheless, it is better to check them. Getting Started with the setup, you need to find out the values \u200b\u200brecommended by the manufacturer to set the permissible pressure threshold (for closing and opening the contacts).
In the event of a breakdown of the pumping station, due to improper adjustment, the manufacturer has the full right to refuse its warranty obligations.
Calculation of permissible pressure, when the device is turned on-off, the manufacturer conducts the intended features of operation. They are taken into account in the development of operating parameters for different models pumping stations.
The inclusion value is equal to the amount:
- The required pressure at the highest point of the plumbing system, where water is selected;
- The difference between the height of the upper point of the water selection and the pump;
- Losses in water pressure pipe.
The shutdown index is calculated as follows: the shutdown pressure is plusing one and take one and a half bar. In this case, it is impossible to allow that the pressure pressure exceeds the maximum allowable pressure, which occurs on the pipeline outlet area from the pump.

It is often an error affecting the operation of the pumping station, is not consideration of the entire amount of horizontal and vertical sites, as well as hydraulic losses during water transportation to water removal points
Before changing the settings, you must fix the previous indicators using a pressure gauge. Turning on the pump, write pressure values \u200b\u200bat the time of shutdown and on.
This will help determine which way to carry out adjustment - towards a decrease or increase.

It must be remembered that any change in the installed pressure threshold in the relay requires the corresponding changes in the air compartment of the hydroaccumulator
Next steps have the following sequence:
- Disconnect the power station, descend the water and open the cover with a spanner relay.
- Pressing the pump is adjusted by rotating the nut, which keeps the large spring (P). Spinning it in the direction of the clockwise direction, the springs are achieved and the installation of the required power pressure is achieved. In various models of the device, permissible indicators can vary from 1.1 to 2.2 bar.
- The rotation of a small nut (ΔP) in the direction of the clockwise direction can be increased the gap between the disconnection pressure and turning on the device, which is usually 1 bar. Thus, the pressure off fails to be fixed on the values \u200b\u200bin the range from 2.2 bar to 3.3 bar.
An important nuance is that the small spring does not regulate the shutdown threshold, as some mistakenly understand.
It specifies the delta between the values \u200b\u200bof the station's inclusion, and its disconnection. That is, a completely loose spring will not create a difference - the delta will be zero and the inclusion and turning values \u200b\u200bwill be the same. But, the more tighten it, the greater the difference between them.

The small spring of the pressure relay is more sensitive, and it is necessary to squeeze it extremely carefully
Check the correctness of the indicators exhibited by the pressure gauge. If failed to achieve the required values \u200b\u200bfrom the first attempt, the adjustment continues.
# 4: Selection of non-standard pressure values
You can set another level of pressure in the device other than manufacturer's recommendations by setting up equipment for individual user requests. Increasing the range when turning on-shutdown, achieve rarely triggering the station.
This makes the device service for a long time, but imparts an uneven water to the water. Reducing the difference, achieve a stable pressure, but so the pump will work more often.
Conclusions and useful video on the topic
How to adjust the station pressure will demonstrate the video:
A video about what to do if the station often works:
Conducting independent adjustment The pumping station must be borne in mind that sometimes changing factory recommendations may worsen the operation of the water supply system. Pump, hoses, plumbing devices - all have limit pressure values, the violation of which will lead to damage. Therefore, before proceeding with independent actions, it is better to ask for advice from an experienced specialist.
Imagine that in order to obtain water in the country, you can simply open the crane. What do not need buckets to fill the containers for elementary hygienic procedures, cooking, cleaning. To do this, you just need to install pumping equipment with a pressure sensor, but before you understand it with its device, agree?
Our article in subtle details will introduce you to a pressure switch for the pumping station. You will learn how the device works, how it activates and stops pumping. We describe in detail in demand options for pressure sensors and ways to adjust them.
The material lists technological nuances and relay setup methods. The above information is perfect useful schemes, photos and video applications.
Small in size The device refers to the group of automation serving pumping equipment. Its functionality is possible only in a bundle with a hydroaccumulator.
Despite its small sizes, the relay performs a number of important functions:
- allows all devices to function in a given mode;
- sensitively reacts to changing the on / off thresholds;
- activates and stops the operation of the pump when critical values \u200b\u200breaches.
Simply put, it regulates the automatic process of pumping water in independent water supply schemes with membrane tank. Adjustment is performed during switching of electrical circuits when two pressure parameters accepted as the upper and lower limit are achieved in the system.


Construction and principle of operation
The relay for adjusting the pressure has a simple collapsible design, thanks to which the user can configure the operation of the hydroaccumulator, to narrow or expand the parameters.
Internal parts are built in a solid plastic case, reminiscent of a box incorrect form. It has a smooth surface and only 3 outdoor working elements: two coupling clamps for electrocabilities that are running from the network and pump, and a metal nozzle ¼, ½, 1 inch for connecting to the system. The carving on the nozzle can be outdoor and internal.
To remove the body of the device, it is necessary to arm a flat screwdriver and leisurely and carefully unscrew the recessed screw, located above the axis of a large spring
Inside there is a base to which the working elements are attached: large and small springs with adjusting nuts, contacts for connecting, membrane and a plate, changing its position depending on the increase / decrease in pressure parameters in the system.
Gallery of images


Contacts of two electrical chains closed when the limit pressure parameters are reached, are under springs that are fixed on the metal plate. When the pressure rises, the hydraulic membrane is deformed, the pressure inside the pear increases, the mass of water presses on the plate. That, in turn, begins to affect the large spring.
When compressing the spring, the contact that feeds the voltage is triggered and opens. As a result, the pumping station is turned off. With a decrease in pressure (usually it is in the range of 1.4 - 1.6 bar) plate rises in the original position and the contacts are closed again - the motor begins to work and produce water pods.
When buying a new pumping station, it is recommended to test equipment to make sure that all components are performed. Verification of operational qualities The relay occurs in the sequence set out below. As an example, the Haitun PC-19 model.
Gallery of images


Alarm with "dry progress"
The mechanical indication models and control panel do not, however, they can be equipped with a forced switching button. It is needed to make function.
Relay selection criteria for pump
There are many universal models that are sold separately from pumping stations and can be used to assemble the system with their own hands. By purchasing a relay or automation unit, it is necessary to rely on the characteristics of the device. They can be found in technical documentation.
It is important that the relay capabilities coincide according to the characteristics with the possibilities of the rest of the equipment.

Before buying an automatic or relay block, carefully examine the technical data of the model. In most cases, they are standard: nominal pressure from 1.5 atm., Maximum - 3 atm.
It should be repelled from the nominal pressure, but the upper limit of the working pressure is also important. It is necessary to take into account the electrical indicators and the maximum water temperature. The required parameter is the IP class, denoting dust and moisture protection: the higher the value, the better.
The dimensions of the connecting thread are indicated in inches: for example, ¼ inches or 1 inches. They must coincide with the size of the connecting fitting. The dimensions and the mass of the instruments themselves are about the same and are secondary characteristics.
It should also be remembered that there are built-in and remote models. Most of the existing devices are universal: they can connect directly to or mounted on the pipe.
Electronic relays have the same functions as mechanical: they are responsible for the supply of water and protect the pump mechanism from dry stroke. They are more capricious than simple models, and persistently react to suspended particles in water. To protect the device, a mesh filter mud is installed before the connection location.

In essence, the electronic device is an automatic unit with a convenient display and buttons system that gives you the ability to adjust without disassembling the device.
One of the differences from the traditional model is to delay the pump disconnection. If, with an increase in pressure, the mechanical device works quickly, then the electronic analogue turns off the equipment only after 10-15 seconds. This is due to a careful attitude to the technique: the less often the pump will turn on, the longer it will last.
Some shooting models, as well as automation blocks work without a hydroaccumulator, but their functionality is limited simple use. Suppose they are perfectly suitable for watering the garden or pumping fluid from one tank to another, but in the water supply system at home does not apply.
Wherein specifications The devices are the same as in traditional relays: the factory setting of 1.5 atm., Tripping threshold - 3 atm., Maximum value - 10 atm.
Causes to perform individual configuration
The collapsible design of the device and the instruction on the setting came up with no vain. The factory parameters are rare when comply with the requirements of the water supply system, as well as the volume of the hydroaccumulator.

Before the procedure for correcting the relay, it is necessary to make sure that the hydroaccumulator is able to work and the exhaust operation of the water supply system in the house, otherwise you can incorrect operating parameters
With the help of the setting, you can not only "fit" the upper and lower limit for optimal values, but also make the operation of the equipment more gentle - for example, reduce the number of inclusions / turn off the pump. To do this, it is enough to increase the range between the working pressures - the delta.
You can encounter with the incorrect setting of the factory model. If the delta was incorrectly coordinated and made too small, the pump will be constantly turned on and off, responding to a minimum increase in parameters.
Manipulating springs, you can achieve a change in the pump shutdown threshold, as well as adjust the volume of water in the hydroaccumulatory tank. It is believed that the more Delta, the greater the volume of fluid in the tank. For example, at a Delta of 2 atm. The tank is filled with water by 50%, at Delta 1 atm. - by 25%.

To achieve a Delta of 2 atm., It is necessary to establish the lower pressure value, for example, by 1.8 atm., And upper by 3.8 atm., Changing the position of small and large springs
First remember general rules Adjustments:
- to increase the top border of the triggering, that is, increase the pressure of the shutdown, the nut on the large spring should be tightened; To reduce the "ceiling" - weaken it;
- to increase the difference between two pressure indicators, tighten the nut on a small spring, to reduce the delta weaken it;
- the movement of the nut clockwise is an increase in parameters, against - reduction;
- to configure, you need to connect a pressure gauge that shows the initial and changed parameters;
- before adjustment, it is necessary to clean the filters, fill the tank with water and make sure that the entire pumping equipment is working.
All adjustment actions are carried out only after testing the system and detecting low performance or explicit errors in operation. It also happens that the station ceases to work due to a clogging that scored a filter or one of the narrow nozzles. On our site there is another article where the process of adjusting the pressure relay is described in more detail - go to familiarize yourself with the material.
Practical examples of relay settings
We analyze cases when the pressure relay is really needed. This usually happens when you buy a new device or when frequent pump shutdown occurs.
Also, the setup will be required if you have used a used device with knocked parameters.
Connecting a new device
At this stage, it should be checked how correctly the factory settings are correct, and if necessary, make some changes to the work of the pump.
Gallery of images


The pump stopped off
In this case, forcibly turn off the pumping equipment and act in the following order:
- We make inclusion, and wait when the pressure reaches the maximum mark - suppose 3.7 atm.
- Turn off the equipment and lower the pressure by descending water - for example, up to 3.1 atm.
- Slightly tighten the nut on a small spring, increasing the difference between the differential.
- Check how the disconnection pressure has changed and test the system.
- Configure the optimal option by pulling up and loosening nuts on both springs.
If the reason was in the wrong initial setup, it can be solved without buying a new relay. It is recommended regularly, once in 1-2 months, check the operation of the pressure switch and, if necessary, adjust the on / off limits.
Situations that do not require adjustment
The reasons when the pump does not turn off or does not turn on, there may be a set - from a blockage in communications to the failure of the engine. Therefore, before you start disassembling the relay, you should make sure that the rest of the pumping station is working properly.
If everything is in order with the other devices, the problem is in automation. Go to the inspection of the pressure relay. Turn off it from the fitting and wires, remove the lid and check the two critical points: the thin connections of the connection to the system and the contact block.
Gallery of images


If the cleansing measures did not help, and the adjustment of the springs was also in vain, most likely, the relay is not subject to further operation and should be replaced with a new one.
Suppose you hit the old, but the acting device. Its adjustment occurs in the same order as the configuration of the new relay. Before starting work, make sure the integrity of the device, disassemble it and check if all the contacts and springs in their places.
Conclusions and useful video on the topic
Practical videos will help you better understand how to adjust the new pressure switch relay, if the parameters for some reason do not suit you. You will also learn what is the difference between the dry movement.
Professional tips on proper adjustment:
Comparative characteristics of two types of relay:
To correct the operation of the pressure relay, specialists are usually not invited, as it is a simple procedure that occupies a little time. You can leave the factory settings, but even the minimum adjustment will help extend the operation of the pump and the hydraulicock, and also optimizes the operation of the station.
Pressure relay is a key element in automating the pump or pumping station, it gives a signal to turn on and off the pump. Depending on the manufacturer and model, factory settings may differ, but, as a rule, the lower threshold of the pump is tuned to the pressure of 1.4-1.8 bar, and the shutdown threshold is 2.5-3 bar. But sometimes such installation threshold installations are insufficient for normal operation of sanitary devices, so it is necessary to adjust the water pressure relay for the pump , to pick up individual parameters for its inclusion and shutdown.
Design and principle of operation
Before you start setting up the relay, you need to figure it out in the design and principle of its work. The design of the relay is quite simple and is the contacts spring-loaded plate on which water pressure is applied.

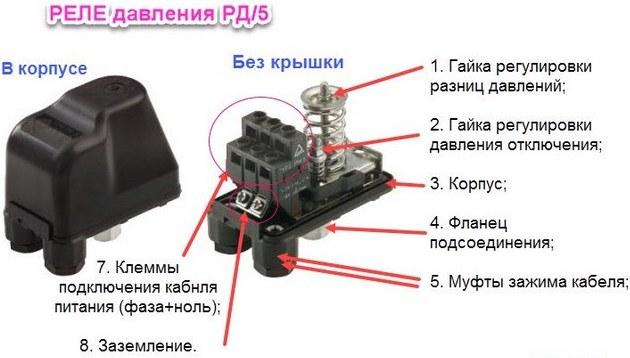
- Case.
- Contact group for connecting the pump.
- Terminals for connecting to the power supply.
- Ground terminals.
- Nut for connecting the relay to the water supply.
- Pressure differential adjustment spring.
- Spring minimum pressure adjustment.
- The node where the piston and the membrane is located.
On a metal base, a metal platform is fixed in one end, which can rise and descend under the action of the piston. The piston is driven by water pressure. The platform has two springs (6.7), a large spring (7) counteracts the power of the piston (water) thereby balancing it. The small spring (7) does not come into effect immediately, and after the platform rises to a certain height, and as soon as the platform touch the smaller spring, the piston starts to counteract the strength of both springs and countering the piston strength will increase, from this point on the platform needs to rise quite a bit, To contact the contacts, and the pump turned off. For the opening and closure of contacts corresponds to a small hinge with a spring. As soon as the platform rises above this hinge, the contacts bounce down and the electrical circuit opens, as soon as the effect of the piston force (water) is weakening, the platform is lowered down and the contacts are closed.
The large spring is responsible for turning on the pump, that is, behind the lower pressure limit, and with a small spring, the moment of disconnecting the pump is adjusted, or rather, the difference between the inclusion and disconnection is set.
Setting

Based on the principle of the operation of the relay, its setting is to change the rigidity between the platform to which the water pressure and contacts are applied. The adjustment is carried out by changing the rigidity of the spring, which is either compressed or weakened by adjusting nuts. Before adjustment, you need to fix the indicators of the pressure gauge during the inclusion and disconnection of the pump. Next, turn off the relay from the network, and remove the housing cover. Using a wrench, unscrewing or spinning nuts to configure the desired parameters:
- if you only need to change the lower inclusion threshold (increase or decrease), then you need to press or release the nut on the spring (7);
- to increase or decrease the upper border of the pump, you need to screw or unscrew the nut on the spring (6), when twisting - we raise the border of the shutdown of the NAO, and when unscrewed, on the contrary, we lower, increasing the difference between turning on and disconnection;
- if you need to change two parameters at once, the lower boundary is adjusted first, using a spring (7), and then we specify the difference with the spring (6);
All changes must be monitored by a pressure gauge. It is worth considering that changing the pressure difference, we reduce or increase the duration of the pump operation, and this will be displayed on a change in the water supply network. If the pressure difference is small, the pressure on the network will be "smooth" without visible drops, but the number of inclusions of the pump will increase, which may affect its service life.

By adjusting, it must be remembered that the upper pressure should not be higher than the maximum pressure, which can create a pump (it can be viewed in the passport characteristics of the pump). The upper pressure should not exceed more than 80% of the maximum allowable pressure for a specific model, and these parameters are specified in the instructions for the relay. Also before setting, you need to check the air pressure in the pear of the hydraulician - it should be less than the lower threshold of the pump on 0.2 bar. Another requirement for adjustment is the pressure difference and shutdown pressure difference, it must be in the range of 1-1.5 bar. By changing the parameters, you can not twist the nuts until it stops, it may lead to the fact that the relay will stop working at all.
Video
In this video, it is shown how to adjust the pressure relay for the pump:
Included with a pumping station, the owner of the house or cottage receives the water pressure relay for the pump. It allows you to fill the hydrobic automatically, eliminating the owners from unnecessary trouble, but requires the very attentive relationship. The fact is that this key is necessary, firstly, to connect correctly, and secondly, to adjust the needs for the specific house and its water supply system. Negregate these important moments It can lead to a breakdown of the entire pumping station, as well as to a decrease in the timing of its operation. Before connecting and configuring equipment, it is necessary to understand the principles of the device and the hydroaccumulator.
Appointment, device and principle of work
The relay is the main element for adjusting the water supply in the pumping system. Thanks to it, it is turned on and off the entire pump equipment system.
This node in the water supply system is responsible for water pressure. Thanks to the relay, there is a balance between the large supply and weak.
The relay is arranged on the principle of opening the contact group when changing water pressure. It is directly connected to the pump using the output contacts. The diagram below shows the main nodes of the water supply relay relay.
Water pressure relay scheme
Two network contacts serve to electrically start the device. Using the pump contact group, turn on and off the relay. Two nuts are located on the top of the device. They are designed to adjust the pressure supply. Each nut is responsible for the power of water pressure in the system. When regulating the relay, you should always remember that the device shutdown should be triggered with an average water supply pressure in the pump. The nut setting of the differential regulates water supply between large and low pressure.
Using the relay automatically adjusts the inclusion and disconnection of the device that feeds the water into the hydraulic panel. At the same time, experts use a number of concepts such as:
- Pressure pressure or lower pressure (RVCC), in which the relay contacts are for submersible or borehole pump Close, the device turns on and water begins to flow into the tank. Standard manufacturer settings - 1.5 bar.
- Turning off or lower pressure (pylon), at which the contacts of the device are open and the pump is turned off. Standard manufacturer settings - 2.5-3 bar.
- Pressure drop (ΔP) is the difference of previous two indicators.
- The maximum allowable shutdown indicator at which the pumping station can be disabled. Standard manufacturer settings - 5 bar.
The hydroaccumulator is a tank in which an additional rubber capacity is integrated, called "pear". In this "pear" through the most ordinary car nipple pumped some air. The higher the pressure in the "pear", the stronger it puts on the water accumulated in the tank, pushing it into the plumbing system. Thus, water is provided, sufficient for comfortable use.
Membrane hydroaccumulators are somewhat different ways, but their principle of operation is about the same. The tank is separated into two parts of a special membrane, on one side of which water is located, on the other - the air that presses on the water, etc.
Relay classification
The relay is two species on the principle of operation - mechanical and automatic. When buying this mechanism, you need to consider which functions this device must perform.
In addition, automatic relays, though easier in operation, but less durable than mechanical. Therefore, most buyers stop in the mechanical version.
In addition, the relays are sold as embedded inside the pumping station or separately from it. Therefore, it is possible according to individual characteristics to find a relay that will improve the work of all equipment.
Mechanical type
- Mechanical Square pressure switch with dry running protection. The pressure generated by this device is from 1.3 to 5 bar. The required strength of the current for efficient operation of the relay is 10 A.
- Cristal pressure relay. The current strength necessary for the operation of this device, 16 A. The permissible pressure limit in the plumbing system is 4.5 bar.
Electronic
Electronic relays are more susceptible to breakdowns due to the fact that when the water is supplied in it, different small particles appear, which are out of order equipment. To this not happen, a special filter is installed at the input of the feed, which purifies water and does not prevent the device breakage. The electronic device is better mechanically in that it does not allow the pumping station idle.
The electronic relay after pressing the button to turn off the water supply is open for another 16 seconds. This feature is necessary in order for the device for a longer time.
Electronic relay is easier to install and configure. To reconfigure it, the entire system does not need to be disassembled, you need to simply configure on the electronic scoreboard using the appropriate buttons the necessary parameters.
- PS-15A pressure switch with dry running. This electronic device operates in the pressure range from 1 to 5 bar. The current is 12 A. Besides the listed characteristics, the device has built-in factory settings and complete protection from dry stroke.
- Press switch PS-2-15. It has factory settings and protection against dry stroke. Possible pressure limit in a water supply system 5.6 bar, current 10 A.
Installation and Relay Connection: Instruction
To install the relay, you first need to make a mechanical assembly of the entire system, then you should connect these devices to the electrical network.
Electrical part
According to this scheme, connect to the terminals L1 and L2 electric wires to a common network. To connect the pump terminals, and connect ground to the appropriate terminals.
Wires need to be connected to a special terminal
Then perform the operations of the connected electrical and mechanical part of this connection below.
After connecting the mechanical part you need to connect the electrician
But such a connection system does not save the pumping station from the dry stroke mode. Therefore, you should install the pump in the correct position, i.e., an order of magnitude above the back valve.
The system connected by this principle will work in protected mode.
This is a slightly different option to install a home unit. But if the entire installation is carried out in accordance with this scheme, the pump will operate in protected mode, that is, the pump operation will be excluded without water receipt.
This principle of operation of the pumping station will save the entire plumbing system from rapid wear and a complete failure.
It is necessary to follow all the rules and instructions for connecting pumping equipment. First of all, it is necessary to determine the required water pressure and on the basis of this indicator to select the relay.
- From the shield, a cable with a solid residential cross section of at least 2.5 square meters. mm or PVS 3x1.5. Parameters depend on the characteristics of the pump and can be seamless.
Pressure relay connects to two systems: electrical and mechanical
- Wires start in special inputs on the back of the case. Inside there is a terminal block with contacts: grounding - the conductors from the shield and the pump are connected; Line terminals - the phase and zero wire from the shield is connected to them; Terminals for the same wires from the pump.
Inside there is a terminal block
- Move the wires and fix in terminals.
Press the wires in the terminals
- Close the relay cover. Installation is complete, if necessary, spend adjustment.
Close the relay with a lid and lock the bolts
Video: How to install pressure controller
Verification of pressure in the water supply system with a pressure gauge
Immediately after purchasing a pumping station, check the indicators that are specified in the hydraulic manner. This indicator usually is 1.5 atmosphere. However, in the process of storing and transporting leakage from the tank of the air, the phenomenon is completely ordinary.
To check, it is recommended to use a car pressure gauge with as a graduated scale as possible to ensure measurement accuracy. Some models of pumping stations are equipped with plastic pressure gauges, but practice has shown that they are unreliable and accurate pressure indicators in the hydraulician do not give. Another option is electronic pressure gauges, the testimony of which largely depend on the level of charge battery and the surround. Given the high cost of electronic pressure gauges and extremely unreliable Chinese plastic products, experts recommend choosing an ordinary mechanical car pressure gauge enclosed in a metal case.
To configure the pump pressure switch, it is best to use a mechanical pressure gauge
To check the pressure in the hydroaccumulator, it is necessary to remove the decorative cap, under which the nipple is broken, connect to it a pressure gauge and remove the testimony. The less pressure, the greater the stock of the water can be created in it. To create a sufficiently large water pressure, the pressure of 1.5 atm is considered an acceptable indicator. But one atmosphere is quite enough to ensure household need a small home.
At high pressure, the pump is turned on more often, which means it is flawed faster, but the water pressure in the system is created about the same as in the urban water supply system. This allows, for example, to use a hydromassage shower. At low pressure, the pump is wears less, but the maximum comfort that can afford - the usual bath, filled hot waterBut not charms a jacuzzi.
Please note that experts do not advise excessively pumping the hydrobacom or reduce the pressure to the indicator of less than one atmosphere. This can lead to insufficient water supply in the hydroaccumulator, or damage to the rubber "pear".
After these nuances are clarified, the air in the hydraulicum is either pumped up, or it is pushing it until the desired indicator is reached.
How to properly adjust (with a hydroaccumulator)
Before setting up the relay, you must remove the cover under which there are two springs with nuts: large and small. Turning a large nut is regulated by the lower pressure in the hydroaccumulator (P). Rotating a small nut, exhibit the pressure difference (ΔP). The point of reference is considered the position of a large spring, with which the lower pressure limit is exhibited.
Before starting the pressure relay setting for the pump, you must remove the top cover from the device, which hides a large and small springs
After the required air parameter is achieved in the hydroaccumulator, the tank should be connected to the system and include, observing the testimony of the water gauge. Note that in the technical documentation for each pump indicators of the pressure of the worker and the limit, as well as permissible norm Water consumption. It is not allowed to exceed these values \u200b\u200bwhen setting up the relay. If during the operation of the system, the operating pressure of the hydroaccumulator or the limit value of the pump is reached, it is necessary to disable the pump manually. The limit pressure is considered to be achieved at the moment when the pressure ceases to grow.
Fortunately, the usual household models of pumps are not as powerful to download the tank to the limit values. Most often, the difference between the installed indicators of the pressure and shutdown pressure is 1-2 atmospheres, which fully ensures optimal use of technology.
After the water pressure gauge shows the required lower pressure, the pump should be turned off. Next, the adjustment is made in this way:
- Carefully rotate the small nut (ΔP) until the mechanism starts working.
- Open water to completely free the system from the water.
- When the relay turns on, the value of the lower indicator will be reached. Please note that the pressure on the pump must be approximately 0.1-0.3 atmospheres higher than the pressure testimony in an empty hydrobacker. It is a prevention of "pear" from premature damage.
- Now you need to rotate a large nut (P) to set the lower pressure limit.
- After that, the pump again includes and expect when the indicator in the system will rise to the desired level.
- It remains to adjust the low nut (ΔP), after which the hydroaccumulator can be considered configured.
Chart adjustment
Here is a scheme that is suitable for most devices:
Adjusting the pressure relay for the pump is carried out with the help of two nuts: large and small. You need to handle them very carefully not to damage the device.
Video: How to adjust the relay for the pump
In addition to the primary setting when the relay is connected to the pump, the home owner must periodically check the system operation and adjust the settings. Not less than once every three months, experts recommend completely draining water from a hydraulician and check the air pressure by pumping the required quantity or waging excess.