Construction of a sewer for a bath. Sewerage for a bath: we mount the system with our own hands Sewer pipes for a bath how to install
The modern Russian bath is somewhat different from similar buildings erected in the last century. Now almost every steam room uses a full-fledged drainage system that ensures the removal of dirty water from the washing room. This has the best effect on the service life of wooden and concrete floors, and also reduces the risk of mold and mildew. Making a drain is not as difficult as it might seem.
Drainage system in the washing room
Washing room in a bath with a wooden leaky floor
Traditionally, a Russian bath consists of two rooms - a dressing room and a steam room, combined with a washing room. The layout of modern analogues of Russian baths is represented by such premises as:
- the waiting area;
- washing room;
- steam room.
The first room does not need a drain. The technology of the drainage device in the washing and steam baths depends on the type of floor in a particular room.
Usually, the floor in the bath is of several types:

With the exception of the pouring floor, the inside of the drainage system is represented by a ladder for collecting water and a drain pipe. The outer part of the sewer, depending on the size of the building, the type of soil, the depth of freezing of the soil, may have a different appearance.
For a small bath, operated once a week, a simple drainage with a small drain pit located under the floor structure or in close proximity to the building is sufficient. For a bath designed for a large family, which can be heated once or twice a week, a more complex sewerage system with a drainage drain well will be required.
Waste water disposal method
The design of the drainage system for draining waste water from the washing and steam room is selected taking into account the type of soil on which the building is erected and the intensity of use of the bath. Each of the designs has its own characteristics, advantages and disadvantages.
Pit under the bath
Pit under the bath with a stone for draining water
A shallow hole dug under the floor of a washing room. 2/3 of the pit is filled with filtering components - crushed stone, slag, water-bearing sand. Such a natural filter retains large particles, purifying water, which is then absorbed into the lower layers of the soil.
The advantages of this system include:
- does not require the use of a piping system;
- simplicity of device, cleaning and maintenance.
The main disadvantage of drainage in the form of a pit is that it can only be used for baths on a columnar foundation located on sandy soil types. With frequent use of the bath, oversaturation of the soil with moisture may occur - the water will not have time to spread through the soil, which will lead to its stagnation inside the pit.
Drain well
Drain well from concrete goods and a plastic septic tank
The outer part of the drainage system is made in the form of a pipeline and a sealed reservoir filled with waste water coming from the bath. For the device of the tank, well rings, a plastic or metal septic tank are used.
As it fills with waste water, the tank is cleaned. To do this, water is pumped out with the help of a sewage truck and transported to a treatment plant, or the septic tank is filled with biological products that filter the water, after which it is discharged through a special pipe to the lower layers of the soil, where it is gradually absorbed.
Among the advantages of a drain well are:
- simplicity of the device on a site of any size;
- the well does not require periodic cleaning;
- relatively low cost.
For the proper functioning of the drainage system, the septic tank must be located below the level of the bath. This will ensure a natural and unhindered flow of waste water. A free access must be organized to the location of the septic tank, otherwise the sewer truck with a large tank will not be able to drive to the required distance to pull the water intake hose.
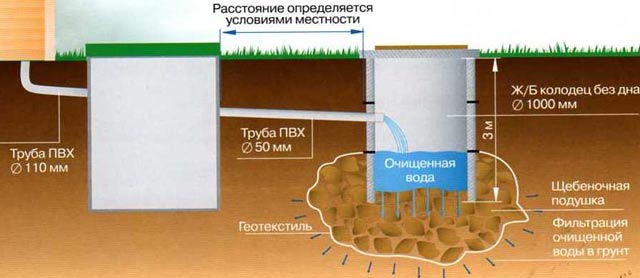
filtration well
3-well filtration tank system
It is a well filled with finely crushed stone, finely crushed brick or slag. Waste water discharged from the washing room and steam bath enters the well and passes through the filter material.
As a result, a small layer of silt and a large number of beneficial bacteria that purify the water are formed. After gradual purification, the water leaves naturally or is used for household needs for watering and irrigating the soil.
Among the disadvantages, it can be noted that the filter layer, with frequent use of the bath, quickly becomes dirty and needs to be replaced. This is a very time-consuming process, since crushed stone or slag will have to be removed manually. Despite this, this technology is optimal for draining baths designed for a family of 4-6 people.
Ground filtration
Ground filtration on the example of a closed boiler and distribution pipes
Drainage system, consisting of a closed septic tank, where waste water accumulates, and sewer pipes through which water is drained after it has been cleaned. Pipes are mounted over the area of a small area - this ensures a uniform flow and absorption of water.
The benefits of ground filtration include:
- complete autonomy;
- the possibility of water intake from several points;
- high degree of purification.
Compared to other methods of wastewater disposal, ground filtration requires the use of a large area of the site on which water will be absorbed. Installation work is best carried out at the construction stage of the bath, when the area adjacent to it has not yet been equipped.
For installation, you will need to dig a sufficiently large pit for the installation of a septic tank, which obliges the use of large construction equipment and special equipment.
Preparing for the installation of a drainage system
The design and installation of the bath drainage system takes place in conjunction with the installation of the floor. It is optimal if the work will be carried out in the warm season, when the soil is the driest. This will allow you to test the performance of the drain and, if necessary, make adjustments.
Designing the interior of the drainage system
Construction of a concrete floor with a drain in the bath
The design of the internal part of the drainage system takes place taking into account the rules that apply to the sewerage device in residential premises. If necessary, a ventilation riser is erected or a shut-off valve is installed. For example, the installation of a riser is mandatory when organizing a drain from several rooms at once.
The general layout of a concrete floor with a drain consists of the following:

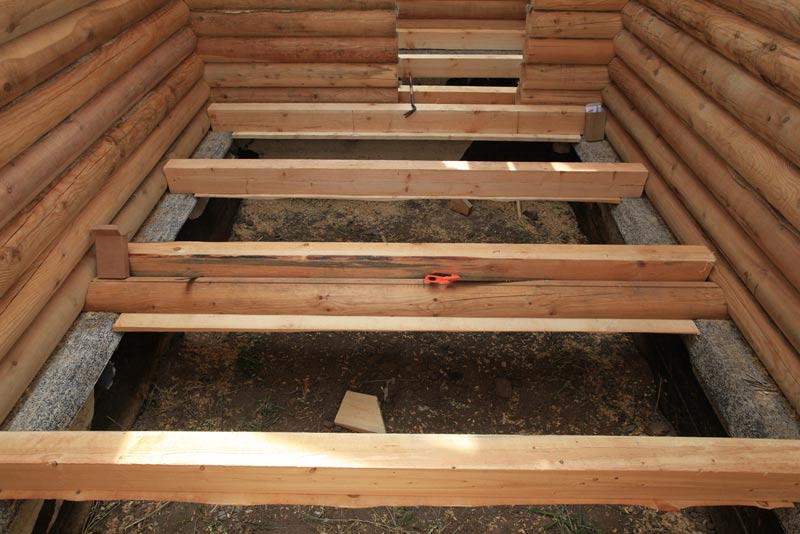
The arrangement of a wooden floor depends on its design, but in general it has a similar appearance. A drain pipe with a branch pipe is placed in the center of the room at the lowest point of the floor. For natural drainage, the sewer pipe is mounted with a certain slope. When installing a drainage system in the washing room of a bathhouse and a steam room in one pipe, the drain chute should be located between the rooms under the floor structure.
Design of the external section of the drainage system
The general scheme of the sewerage device of various types in the bath
The calculation and design of the external section of the sewerage system is carried out taking into account the size of the bath, the frequency of its operation, the type of soil and the design of the water intake. As mentioned above, the filter well is optimal for private use. The design is designed to purify a large volume of water, sufficient for a family of up to 6 people to visit the bathhouse.
It is optimal if the design of the well is done by professionals. This will allow you to choose the required size of the tank for receiving water, without overpaying for useless volume.
Drainage systems based on a septic tank are available in a ready-made version. Their volume is calculated depending on the number of people visiting the bath at the same time in a short period of time. For a family of 7 people, a tank with a capacity of 1.5 m 3 / day is enough.
Related video: sewerage planning in the bath
Polypropylene pipes for sewerage
For the installation of a drainage system in the bath, modern high-strength plastic pipes of the required diameter are used. The average service life of the product, subject to the installation technology, is 50 years.
Depending on the requirement, pipes made of materials such as:
- PVC - polyvinyl chloride;
- PVCH - chlorinated polyvinyl chloride;
- PP - polypropylene;
- HDPE - low pressure polyethylene.
Pipes made of PVC, PP and HDPE are not afraid of moisture and are not subject to corrosion. Thanks to the intuitive fastening, they are easy to mount. Most manufacturers of plastic pipes have a wide range of products, which allows you to choose products of the desired length, diameter and shape.
Polyvinyl chloride pipes for laying communications in the ground
The use of cast iron pipes is impractical - they are expensive, difficult to deliver to the work site and difficult to install, although the products are highly durable and reliable.
Asbestos-cement pipes are also not the best choice for a bath drain. In addition to low strength, they have a rough inner surface, which does not have the best effect on the natural flow of water. This is especially noticeable for highways longer than 10 m.
The cross section of the drain pipe is selected taking into account the water intake points in the bath. For a typical bath with a steam room and a washing room, a pipe with a diameter of 11 cm is sufficient. For small baths with a single drain, a pipe with a diameter of no more than 7 cm is allowed.
Calculation of the required material
Polypropylene pipe and tee for drain gasket
The amount of material required to install a drainage system is selected according to a previously drawn up project. For example, for the device of the inner part of the drain with a size of 5 × 5 m, you will need:
- drain drain with direct outlet 105×105/50 mm;
- socket pipe PP Ø50, length 500 mm;
- straight pipe PP Ø50, length 1000 mm;
- straight pipe PP Ø50, length 2000 mm;
- coupling adapter 50–110 mm;
- withdrawal of PP 45 o.
If necessary, a polypropylene outlet at 90 o is used. The length of the pipe for connecting the drain can vary from 500–1000 mm depending on the height of the floor. If necessary, the pipe is cut. A product with a length of 2000 mm is used as a drain pipe. When laying external communications, PVC pipes up to 3000 mm long are used.
Necessary tool for the job
For digging trenches and a water intake, you need a comfortable shovel
For installation work, you will need the following tool:
- bayonet and shovel;
- bubble level;
- construction knife;
- grinder with a disk for metal / concrete;
- container for sand / gravel.
For excavation to a depth of more than 2 m, it is better to use special equipment. This will speed up the work process. If all the work will be done manually, then you need to take care of safety.
Digging a well should be done only with the help of a partner who will ensure that the earth showered from the walls of the well shaft does not overwhelm the worker. All work is carried out on a safety rope. The performer must be equipped with thick overalls and personal protective equipment in the form of a helmet, goggles and gloves.
Step-by-step guide to creating a drain in the bath with your own hands
The laying of the drain pipe and the installation of the drain ladder should be carried out simultaneously with the arrangement of the floor. If it is planned to pour a concrete floor in the bath, then further work on laying a drainage system should be performed only after the primary polymerization of concrete (at least 7 days).
Installation of the internal part of the drainage system
Scheme of supplying a drain pipe to various points of water intake
To supply a drain pipe, you will need to perform the following work:
- To lay plastic pipes, you will need to dig a trench 50–60 cm deep. The depth is calculated based on the level of the soil located outside the area of \u200b\u200bthe building. With a plinth height of 30–50 cm, the trench depth should be at least 80–110 cm.
Two options for trenches for entering the drain pipe
- The route of the trench is determined by the project and depends on the entry point of the drain. Excavation begins from the most distant point from the point of entry of the drain pipe. For example, in the schematic diagram below, excavation occurs from point A to point B.
- When digging a trench, a minimum slope is observed: 2 cm per 1 m. In this case, the slope continues to be respected.
The slope on the ground is observed along the route of the pipeline
- If the bath is erected on a strip foundation, then a hole should be made in the selected place for the inlet of the drain pipe. For this, a perforator and a grinder with a disc for concrete are used.
- Vertical and horizontal pipe sections are being installed. In places where the installation of the ladder is planned, a horizontal pipe up to 2 m long is installed. The connection to the horizontal pipe is made through a 90 ° elbow.
After checking the quality of the pipe connection and observing the slope, the trench is backfilled
- If several ladders will be located on one horizontal section of the pipeline, then a tee of the required diameter is used for connection. For example, in the diagram above, this element is highlighted in bright color.
- For insulation of the drain pipe, a shell based on polyurethane foam is used. The thickness of the heat insulator depends on the depth of soil freezing. For central Russia - at least 10 mm with a laying depth of 70–90 cm.
After insulation, the angle of inclination is checked. To do this, 5–10 liters of water are drained alternately into each vertical section of the pipe. If everything is in order and the joints of the pipes do not leak, then the trench is backfilled with previously removed soil.
Installation of a closed septic tank
Scheme of the water intake device in the form of a closed septic tank
As a closed septic tank, you can use both finished products from the manufacturer, and do-it-yourself structures made from improvised materials. If the amount of wastewater discharged at a time does not exceed 300 liters, and the total weekly volume is 700 liters, then the septic tank can be made from old car tires.
The water absorption area for a septic tank is calculated based on the fact that sandy soil can absorb no more than 100 l / m 2 per day, mixed soil - no more than 50 l / m 2, and loamy soil - no more than 20 l / m 2 per day. Based on this, the height and area of the base of the tank is calculated.
Preparation of the mine for laying old tires
The technology for installing a septic tank consists of the following steps:

Before immuring, checks the performance of the septic tank. To do this, 50-100 liters are drained through the pipes. water. If the water leaves over time, then you can install a ventilation pipe and fill up the septic tank.
Installation of a drain well
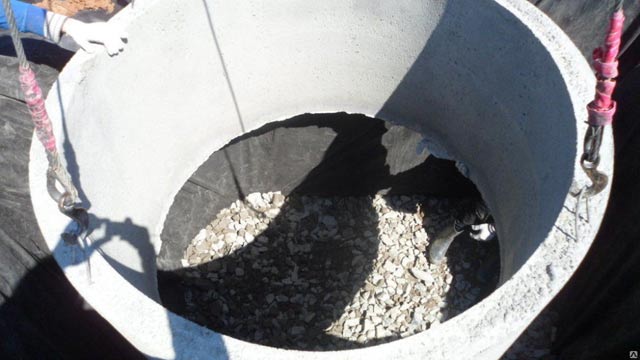
For the installation of a drain well, a metal or plastic tank, reinforced concrete well rings, red brick or stone can be used. The material is selected taking into account the depth of the structure. It is optimal if it is possible to install a reinforced concrete block of the desired diameter.
Preparation of a well shaft for the installation of reinforced concrete rings
To equip the well, you will need to do the following:
- The location of the well is chosen taking into account that an entrance for a truck must be provided to it. It is desirable that the well is located in a lowland. This will allow not to remove a large amount of soil to create a natural flow of water.
- Digging a hole measuring 1.5 × 1.5 m is carried out using special equipment. If ordering an excavator is problematic, then you will have to dig a well shaft manually. In the process of work, safety precautions are observed. To simplify the process, you can dig a square-shaped hole.
A square-shaped well shaft can be lined with old brick
- At the bottom of the shaft, a 15 cm layer of fine-grained sand is poured and carefully compacted. After that, a concrete mix based on M500 cement is prepared. The bottom of the mine is being filled. If possible, round-shaped reinforced concrete products can be laid at the bottom of the well. This will allow not to wait for the polymerization of concrete and continue the work.
- The walls of the mine are being lined with red bricks. To reduce costs, you can use old and chipped bricks. A solution of clay and sand is used as a binder mixture. A drain pipe is connected to the well at the top. After facing, the surface of the well is treated with bituminous mastic.
The filter well made of reinforced concrete rings is covered with a concrete cover after the drain pipe has been inserted.
- As a cover, you can use ready-made reinforced concrete products for well shafts. With self-production, you will need to set up the formwork from improvised means with an overlap of 30 cm in length and width. In the center of the formwork, it is necessary to install the sides to create a round hole.
- The first layer of concrete mixture 5–7 cm thick is poured. After the first layer has set, a reinforcing mesh of reinforcement bars with a cross section of 6–8 mm is laid on its surface. Then the next layer of the same thickness is poured.
After the concrete slab dries, the shaft is closed with a metal hatch. Before backfilling, the slab is treated with bituminous mastic and covered with polyethylene 200 microns thick.
Installation of a soil filtration system
To install a drainage system with a soil filtration method, you will need to make or purchase a ready-made septic tank of the required volume. The distribution of water over the site will occur through a pipeline system based on polypropylene products with a cross section of 110 mm.
Preparation of the pit and installation of an elongated water intake
For the manufacture of a drainage system with ground filtration, you will need:
- In the immediate vicinity of the drain pipe leaving the bath, a site is marked for the installation of a septic tank. The size of the site should be 30–50 cm larger than the water intake structure itself. A trench 80–110 cm deep should follow the marked area, observing the slope.
Preparation of trenches for laying the pipeline for the soil filtration system
- Digging a pit for the installation of a septic tank. When installing, be careful not to damage the water inlet. After installing the tank in the ground, a drain pipe is connected, taking into account the thickness of the soil freezing.
- To prepare the drains in the PP pipe, it is necessary to drill through holes with a diameter of 110 mm in increments of 10 cm. An electric drill with 8, 10 and 12 mm drills is used for this. The pipe is divided into three equal parts. In each of the parts, holes of the same diameter are drilled from smaller to larger.
Preparation and laying of distribution pipes in trenches
- Preparation of trenches for laying distribution pipes. The length of the trench is not more than 25 m. The width of the trench is 50–100 cm. The step between adjacent pipes is at least 1.5 m. The depth of occurrence is from 1.5 m.
- After preparing the trenches, compliance with a slope of 1.5–2 o is checked. Further, a layer of sifted sand and gravel 10 cm thick each is poured into the bottom of the trenches. After that, geotextiles are laid on the crushed stone with an overlap on the walls of the trench.
Backfilling the trench after checking the pipeline for operability
- Pipes are being laid. After laying, the pipe is wrapped in geotextile and covered with a 10 cm layer of gravel. At the end of each pipe, a 90 ° outlet and a pipe 50–70 cm long are mounted. A protective valve with holes is put on the end of the vertical pipe and the trenches are backfilled.
During operation, preventive cleaning of the drain pipe should be carried out. To do this, both special plumbing fixtures and pipe cleaners are used, which can be purchased at any hardware store.
With frequent use of the bath, you should periodically check the fullness of the container and empty it as necessary. Especially, this applies to spring and autumn, when the earth is overflowing with moisture and water is absorbed into the lower layers of the soil with less intensity.
Ground filtration systems should be serviced every 12-15 years. To do this, it is necessary to completely replace the sand and gravel pad and the bottom layer of earth in each of the trenches.
The construction of a bath on your own site can be made from different materials and using different technologies, however, a sewerage device in a bath is necessary for any method of construction. Understanding how to make a sewer in a bath with your own hands will greatly contribute to both financial savings and its comfortable further use.
Existing options for the construction of sewerage in the bath

 Designing a water drain in a bath
 The correct technical structure and drainage of wastewater, performed in compliance with the basic rules, will ensure long-term use of the bath without the need for frequent maintenance of internal communication systems.
Starting on your own site, and considering suitable projects, you must immediately work out how to properly make a sewer in a bath. This is primarily due to the fact that the laying of the wastewater disposal system, with any method of its organization, is carried out at the stage. 
Sewerage in the bath can be organized in two ways:
- Pressure type with the installation of pumping equipment for special purposes, providing the selection of sewage. This method is good to use when arranging bath rooms below the soil level, for example, in the basement.
- Non-pressure flow, in which wastewater is discharged due to the slope of the laid pipelines and is the most generally applicable.
 Scheme of the design of a free-flow drain in the bath
 When designing a bath sewer communication, it is necessary to take into account the arrangement of the following components:
- or a place of accumulation and processing of wastewater;
- pipeline both external and internal;
- drain devices in the washing rooms (ladders, gutters);
- odor removal system (ventilation outlet, siphons).
Criteria for choosing a sewer system
When designing a sewer system in a bath, it is necessary to take into account several main points on which the choice of its most optimal device depends.
 Bath outlet options
Construction of a sewage storage tank
The collection and processing of wastewater is one of the main activities of the entire range of works on the construction of a bath sewer in the absence of nearby centralized sewer systems. In this case, it is necessary to equip a container in which effluents will be collected on their own. This can be done in several ways, depending on the technical features of the construction and the availability of financial opportunities.
 The process of installing a septic tank for a bath
 Schematic diagrams of the device of wells can be the following:
Depending on the choice of the concept, it is necessary to select the material for manufacturing. The following options are possible:
- plastic containers, for example, eurocubes or other containers of the appropriate volume and composition;
- prefabricated concrete rings;
- pouring a concrete box directly on the ground;
- , laid in a checkerboard pattern with drainage gaps.
 An example of finishing a drainage well with brick

After the material and the scheme of the device are selected, it is necessary to choose the optimal place for construction and ensure the correct preparation of the pit for deepening or the device of the tank.
 Design and design of a drainage well

In this case, the following rules must be observed.

After earthworks have been completed to prepare the pit, its bottom and edges must be smeared with a clay composition to avoid shedding of the edges, and the sand cushion and drainage layer should be backfilled if necessary.
 Drawing and names of the elements of the drainage well
In this case, it is necessary to take into account:
When arranging drainage tanks, it is also necessary to provide for the presence, which will contribute to the efficient processing of waste and exclude an unpleasant odor.
Features of laying sewer pipes
The most relevant material for organizing wastewater disposal today is plastic pipes, which, due to their properties, have replaced pipes made of cast iron, metal and asbestos concrete. They have a long service life, wear-resistant, easy to work with during installation, and also have a low cost.
To connect pipes, appropriate docking modules or fittings are provided, which have a variety of configurations to perform complex joints and piping.
 An example of laying sewer pipes in a bath

Laying of external sewage pipes is carried out in prepared trenches, prepared taking into account the following features:
 An example of a manhole device
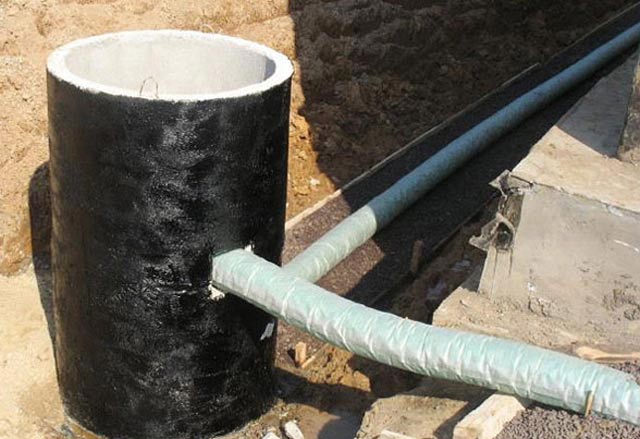

Docking of the pipeline to the sewer well is carried out by tie-in methods with sealing of the joint.
The pipeline is connected to the bath itself through by installing the pipe in the technological holes and sealing the connection point with cement mortar. The video shows the process of laying sewer pipes.
Arrangement of internal sewer outlets
The laying of pipes for equipping the sewerage of internal premises depends on the planned method of arranging the floor, the functional purpose of the premises and the number of drain points.
In small baths, water is supposed to be drained directly from the washing room.. Other options involve the removal of waste from several points, including a toilet and additional water supply points, for example, a shower, a washbasin.
 An example of a sewer outlet in a bath
All this must be taken into account when planning a bath, to ensure the necessary technological conclusions.
The material for covering the floor is also of no small importance for how the drain in the bath will be organized.
 Examples of design and installation of ladders in the bath

Work on laying internal pipelines is carried out in the following sequence.

After completing all the steps for laying out the pipes, they are poured with concrete mortar, taking into account the following points:
- the height of concrete above the pipes must be at least 10 cm;
- it is necessary to ensure the slope of the concrete base in accordance with the planned type of floor covering.
The final stage of the sewage device inside the bath is laying the floor covering.
 The process of laying the floor in the bath
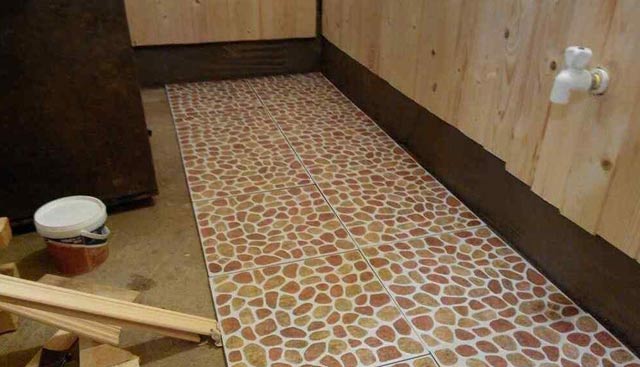


Gone are the unprepossessing bath buildings with an arbitrary runoff of dirty water into "nowhere" or the nearest body of water. Today, sewerage in the bath is not a luxury, but a necessity. Not only the norms of ethics and aesthetics, but also the requirements of laws aimed at ensuring the ecological safety of the environment are pushing for the installation of a high-quality sewage disposal system.
The first step to the improvement of the bath is to assess the condition of the soil on the site, determine the optimal depth of pipe laying and resolve the issue of the location of the septic tank. The easiest way is for those homeowners who were directly involved in the construction of the bath or built (built) it on their own. For them, the type of soil, its freezing point (TPG) and the level of groundwater occurrence (GWL) are not a secret.

Without knowledge of these indicators, it is impossible to build a trouble-free sewer system. For those who have purchased a plot with a bathhouse built on it, you will need to perform a set of simple observations and calculations.
To determine the type of soil, you can conduct an express study that does not require special knowledge and is based on visual inspection and tactile sensations. For this purpose, a hole is dug 25-30 cm below the TPG at the proposed pipe-laying site. Information on the depth of soil freezing in a given area can be obtained from neighbors, from reference books, and on specialized Internet resources.
| Regions | Depth of soil freezing, cm |
|---|---|
| Vorkuta, Surgut, Nizhnevartovsk, Salekhard | 240 |
| Omsk, Novosibirsk | 220 |
| Tobolsk, Petropavlovsk | 210 |
| Kurgan, Kustanay | 200 |
| Yekaterinburg, Chelyabinsk, Perm | 190 |
| Syktyvkar, Ufa, Aktyubinsk, Orenburg | 180 |
| Kirov, Izhevsk, Kazan, Ulyanovsk | 170 |
| Samara, Uralsk | 160 |
| Vologda, Kostroma, Penza, Saratov | 150 |
| Voronezh, Perm, Moscow, St. Petersburg, Novgorod, Ryazan, Tambov, Tula, Yaroslavl | 140 |
| Volgograd, Kursk, Smolensk | 120 |
| Pskov, Astrakhan | 110 |
| Belgorod, Kursk, Kaliningrad | 100 |
| Rostov | 90 |
| Krasnodar | 80 |
| Nalchik, Stavropol | 60 |

It is important to take a soil sample exactly at the bottom of the pit, since sewer pipes will be laid at this level. After that, the soil sample is carefully examined visually, rubbed between the palms, rolled into a tourniquet.


And evaluate the results according to the table.

If it turns out that the soil is clay or loam, you should know that these categories of soils are classified as strongly heaving. In this case, the pipes will need to be laid on a sand "pillow" by analogy with "floating" foundations. The sand will act as a shock absorber during seasonal soil movements and the integrity of the underground part of the sewer system will not be violated.


After the safe depth of the pipeline is clarified, the issue with the location of the septic tank (filtration well) is resolved. The wastewater collection point must be separated from the water intake point by at least 15 m and located no closer than 7 m from the foundation of the bath.


Choosing the type of sewer system
For the improvement of the bath, it is possible to use three types of individual sewage:
- non-pressure;
- pressure;
- connected to a centralized city drainage system or to an existing sewerage system of a private house.
Non-pressure system

The non-pressure method of draining wastewater is otherwise called gravity. This is the simplest and least expensive type of sewer for a bath. Its main advantage: energy independence. The installation of a non-pressure system requires careful observance of the slope of the pipes (1-1.5 cm per 1 linear meter) and is impossible with a complex terrain.

To transport wastewater, pipes of a larger diameter are required than with a pressure system. The straightness of the line is highly desirable. If the pipeline scheme includes turning points, manholes are equipped in these places. This rule is relevant for any type of sewer system.

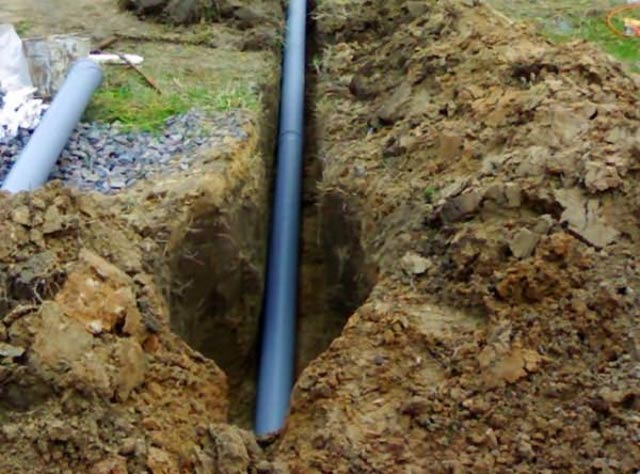
 Non-pressure sewerage - PP pipes

pressure system

The pressurized sewerage system provides for the forced transportation of wastewater, which is provided by a pump or pumping station. The equipment can be installed both indoors and outdoors. A pressure sewer system for a bath is built if, for some reason, it is impossible to make a non-pressure one. Features of this type of sewerage:
- pressure is more expensive than non-pressure;
- volatile;
- requires insulation of equipment in the winter.

 Pressure sewer - pumps

Mortise sewerage system
A less time-consuming, but most troublesome way is to connect to a centralized sewer network. This method is not possible for all bath owners. Therefore, it does not make sense to consider it in all details.

More often, the connection of the drain system to the septic tank already on the site is used. However, in this case, you will also have to choose the type of drainage system (pressure or non-pressure).

We design a sewerage scheme for a bath
A single sewer system for greater ease of design is divided into two types: internal and external. The first includes communications inside the premises, the second - outside the building. Having familiarized yourself with the basic principles of constructing a circuit, it is easy to develop it yourself.
Design stages
- It is necessary to draw a plan of the bath, taking into account the thickness of the walls and partitions of the building. For this purpose, graph paper is best, but you can use a regular checkered sheet.


- Indicate dimensions, mark the installation locations of plumbing fixtures or drain points.
- Determine the location of the output of the main pipe.
- If a toilet is provided in the bath, the need to install a vent pipe is taken into account.


- Plumbing fixtures are connected to the main pipe along the most convenient and short trajectory, striving for the minimum number of line turns.
- Sum up the length of communications, taking into account the release of the outer wall of the bath.
- They proceed to the construction of a drawing of an external sewage system.
External network design rules:
- at the junction of the external and internal sewerage, an inspection hatch is provided;
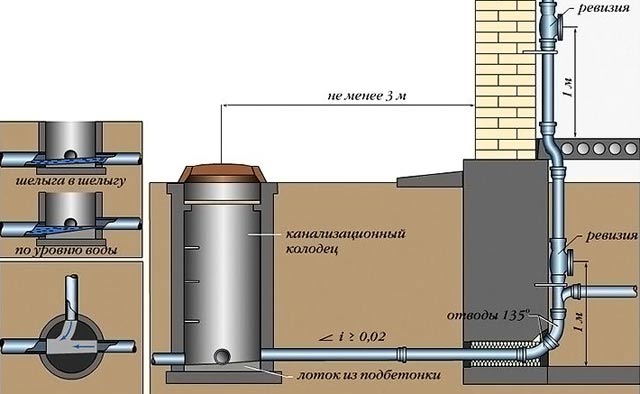
- according to SNiP, manholes are arranged at the turning points of the main, at the points of connection of a separate side branch of the pipeline, every 15-35 m of a straight line with a pipe diameter of 100-150 mm;
- according to SNiP, the slope of the external sewage system with a pipe diameter of 110-150 mm is 0.01 (1 cm per 1 meter);
- the first revision well should be no closer than 3 m and no further than 12 m from the bath;
- if the site has a large slope and a toilet bowl is provided in the room, a multi-stage sewerage system with overflow wells is arranged.


Water seal options
A water seal is the most important element of the sewer system, the purpose of which is to cut off unpleasant odors coming from a septic tank (drain hole). Simply put, this is a water plug that is in the pipe even if the bath is not used. An example of the simplest water seal is a U-shaped siphon. In the line of plastic pipes, a water plug is arranged using three shaped elements: bends.

 Water seal - example
The difficulty is that with a rare use of the sewer system, the water in the water seal tends to evaporate. In this case, experts recommend installing a dry shutter. It is a simple plastic or metal structure, equipped with a spring and a damper (membrane) that blocks the exit from the pipe. When water enters the system, the damper leans back under its pressure, and after passing through the flow, it again takes its place.

 Dry water seal - scheme
Craftsmen make unique home-made valve systems for bath drains. If you wish, you can use one of the following options.
| System description | Illustration |
|---|---|
| A plastic funnel with a diameter slightly larger than the cross section of the pipe, and an outlet with a diameter of 3 cm, is installed in a vertical position in the rupture of the sewer pipe. A plastic ball (for ping-pong or others) is placed in the funnel of such a size that it blocks the narrow exit. When water enters the pipe, the ball floats. |
|
| To install a dry shutter of a plastic sewer with a pipe diameter of 50 mm, you will need a 50/110 adapter, which needs to be slightly modified: cut off at an angle and fix a circle of thick rubber on it. After that, the structure is installed at the outlet of the pipe in a septic tank or drain pit. |
|


Water seal prices
water trap for sewerage
Which pipes to choose
In fact, the choice of pipes for sewerage is not so great.
| Type of pipes | Description |
|---|---|
| It is irrational to use cast iron in our time: they are expensive, heavy and inconvenient to install. Ceramic are ideal in every respect, but also have a high cost. |
| Asbestos-cement - the cheapest of all possible, but often disappointing with their defects. In addition, when installing a non-pressure sewer system, products with smooth and even walls are required. And asbestos-cement ones have a rough, often dotted with depressions, inner surface. |
| The best choice is plastic pipes that are resistant to all types of destructive influences. These products are excellent for the installation of internal and external sewerage, are malleable in processing, are available with and without a socket. The warranty period for plastic pipes is 50 years. For long products, shaped elements (fittings) are proposed, with the help of which the installation of the sewer system is carried out. |


- PVC (polyvinyl chloride);
- PVCC (chlorinated polyvinyl chloride);
- PP (polypropylene);
- HDPE (low pressure polyethylene);
- polyethylene corrugated.
Any of these products can be safely used in a sewerage device. The diameter of the main line is chosen based on the expected intensity of operation of the building and the number of drain points. For an average bath with a steam room, a washing room and a toilet, when installing a gravity drain system, pipes with a cross section of 100-110 mm are required. If the toilet is not provided, a diameter of 50 mm is sufficient. Sanitary equipment is connected to the main line with pipes with a cross section of 50 mm.
Prices for plastic pipes for sewerage
plastic pipe for sewer system
Installation of the internal sewerage system of the bath
It is necessary to start sewerage at the construction stage of the bath. But it is also possible to equip a ready-made, long-term exploited building. The scope of work and their sequence in both cases are different, so each of the options must be considered separately.

Installation of sewerage at the construction stage of the bath
To perform the work, a previously drawn up plan (scheme) of the sewer system will be required. In order to accurately find the connection points for plumbing elements (ladders, showers, toilet bowls, sinks, etc.), they start marking after the foundation has been erected. In places where the main highway is laid, trenches of the appropriate width and depth are dug.
Important: The bottom of each ditch is leveled taking into account the required slope towards the septic tank.


Then proceed to the laying of pipes. Experts advise starting the installation of the sewer system with the installation of the main pipe and large (nodal) elements, to which side branches of a smaller diameter are subsequently brought.

In places where plumbing is connected, vertical pipes are installed. To prevent foreign objects from entering the network, each outlet is closed with a plug. Mount the ventilation stack.

In regions with a cold climate, pipe insulation is performed. For this purpose, fibrous materials (mineral wool and its analogues), polystyrene half-cylinders, foamed polyethylene are used. If desired, you can pre-wrap the pipes with noise-absorbing material, which will significantly reduce the volume of sounds emitted by the operating system.

Lay geotextiles.

Form a sand cushion.

Installation of internal sewerage in the room
If the bath has been in operation for more than a year, it is also possible to arrange a dirty water drainage system in it. To do this, you need to draw up a diagram and open the floor in the right places. Installation of pipes is carried out at the level of the foundation, in one of the walls of which a hole is drilled to output the main line.


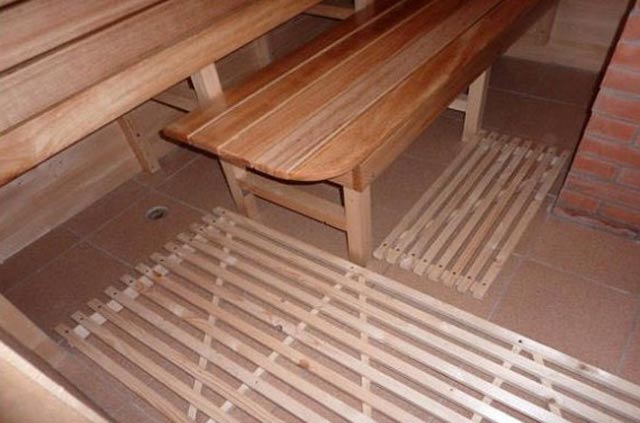
Drains are installed in the washing and steam rooms. In the performance of work adhere to the following rules:
- the ladder must be level with the floor;
- gaps are closed with moisture-resistant grouts;
- tiles are laid after installing the ladder.
Prices for the drain
sewer drain
Bath external sewerage device
The main element of the external sewage disposal system is a septic tank. If there is no toilet in the bath, there is no need to buy a factory product or equip a well with multi-level filtration of wastewater on your own. Enough to dig a drainage hole. But it is relevant only for soils with a high level of moisture permeability (stony, sandy, sandy loam).
Video - Do-it-yourself drain pit
Installation of sewerage with a drainage pit
- according to the scheme, the site is marked: they find the location of the waste collection point, determine the route for laying the highway;
- dig a hole 1-1.5 m deep below the TPG;
- a 20-30 cm layer of sand and gravel is poured at the bottom;
- to prevent crumbling of soil walls, a metal container or a column of large diameter car tires can be installed in the pit. A more solid construction is a frame built of bricks.

Start laying the highway. They dig a trench with a depth below the TPG and form a slope towards the drainage pit. Pipes are laid and the compliance of the slope with the requirements of SNiP is checked.
Manholes are arranged at the turning points of the pipeline. In order to prevent freezing of pipes in these places in cold weather, it is necessary to carry out insulation and close the openings with double covers.

The place where the pipe enters the drainage pit is sealed with cement mortar or mounting foam.

The mains are insulated in any convenient way: by wrapping pipes with mineral wool or by laying foam.

Line insulation
In areas with clay soil for waste disposal, it is recommended to install a pit located under the floor of the bath. The presence of this sink does not relieve the owner from the need to install an external pipeline that transports water outside the premises. The pit serves as an auxiliary structure for the smooth operation of the sewer system.

A square-shaped hole is dug under the floor with a rib length of at least half a meter and a depth of 1-1.5 m. At a height of 10-15 cm from the floor level, a pipe is installed connecting the pit to the external sewage system. Observe a slope of 1 cm per 1 linear meter towards the water outlet. The bottom and walls of the pit are concreted.

Basic moments
The owner of the bath must remember that each stage of the sewerage device requires careful observance of the requirements for it. The reliability of the system is ensured by a properly designed scheme and exact compliance of the pipe slope with the norms of SNiP. The comfort of staying in the bath is guaranteed by the presence of a hydro or dry shutter.
Do not neglect the device of the ventilation system, as it forms an optimal air exchange and contributes to the weathering of moisture after bath procedures. This will help prevent the formation of fungus and mold. For regions with a cold climate, it is extremely important to perform high-quality work on the insulation of the sewer system.
Video - Do-it-yourself sewerage device in the bath
Video - Draining water in a bath with a water seal system
Video - Drain from the bath. Scheme
Water seal is a specially created water stopper that protects the premises from the unpleasant "aroma" of the sewer. Water accumulates in the curved section of the pipe, completely blocking the diameter. Thus, water does not allow bad smell to enter the room.
When to use a water seal in a bath
It is necessary to use such a design for sewerage if water is drained into a common water supply system. In the event that the liquid is drained into a pit outside the bath, there will be no bad smell. If the bath sewerage was connected to a common system, then ready-made siphons (as for a washbasin or bathroom) of any type can be used. Metal or plastic corrugated hose or bottle type valves are commercially available. In rare cases, there are cast-iron hydraulic seals, but they have not been produced for several years. In fact, such a device is two glasses inserted one into the other. After the floors are filled in the bath, the top of the water seal should be in a small recess to completely drain the liquid.
This device has two main advantages:
- it should be as a sump;
- even if water freezes inside it, it must not be damaged.
We make a water seal ourselves
Pretty easy to do it yourself. To do this, you need to take a piece of pipe of the required diameter and bend it in the form of the letter "U" and weld it to the pipe after the drain funnel (usually its height is 50-70 mm). This is best done when laying the foundation and arranging the floor, but if the bath is already ready, and an unpleasant smell overshadows your stay in it, then you can install it later.
If the sewer pipes are accessible, and the foundation of the building is columnar, then this will greatly facilitate the work. You can weld the necessary piece of pipe to the drain pipe under the bath. In the event that there is no access to the pipes, then it will need to be organized: dismantle part of the floor if it is made of wood, or saw it with a grinder if it is concrete. After that, a pipe with a bend is attached to the sewer by welding or a coupling.
It must also be taken into account that water can evaporate, and if you do not use the sewer for a long time, after 40-50 days it will completely dry out, and gases will freely enter the room.
What is a dry water seal?
Also, this design can be dry. There is no water in it, and dry materials are used as a damper. This option, as you understand, is not able to freeze, while it can be of several types:
it is a membrane held by a spring if there is no water. When liquid enters, the spring power is not enough to hold it, the damper rises, and the liquid drains. An object of a certain shape (often a large diameter ball) closes the air passage. When liquid enters, the object floats, opening the drain. In more complex models, the molecular memory of the material is used.
You can make a simple dry water seal for a bath with your own hands, there is nothing complicated about it. It is necessary to choose a plastic ball, a little larger than the drain pipe. When there is no water, such a ball will block the access of air from the sewer. As soon as the liquid flows, the drain will be released. This type of system can also work in winter, even if the ball freezes to the drain, a little boiling water can literally melt the ice in a matter of minutes, and the system will work fine.
Water lock in the bath
A water seal is a specially created water plug that protects the room from the unpleasant "aroma" of the sewer.
Bath water seal
A water trap is a specially designed water plug that prevents sewer "aromas" from entering the room. Water accumulates in the curved section of the pipe, completely blocking the diameter. Thus, water does not allow odors to penetrate into the room.

The principle of organizing a water seal for sewerage
When to use a water seal in a bath
In the bath, it is necessary to use a water seal for the sewer if the water is drained into the general drainage system. If the water drains outside the bath into a pit, from where it is absorbed, there can be no smell in this case.
If the bath sewer is connected to a common system, you can use ready-made siphons (as for a bathroom or washbasin) of any design. There are commercially available plastic or metal bottle-type closures or corrugated hose.

Sewer bottle water trap
Sometimes you can still find a cast-iron water seal, but their production was stopped several years ago, and they are found mainly in old houses.

It looks like a water seal for a plastic sewer
CENTER AQUAPA water traps are available for sale, which are inserted into a plastic pipe with a diameter of 55 mm or 110 mm.

Water trap CENTER AQUAPA inserted into a pipe with a diameter of 110 mm
In fact, a water seal is two glasses inserted one into the other.

Upper and lower parts of the CENTER AQUAPA water trap
After pouring the floors in the bath, the top of the water seal should be in a small recess to completely drain the water.

The upper part of the water seal is at the level of the lowest point
This water seal has two advantages:
- It additionally performs the role of a sump;
- Even if water freezes in the water seal, it will not be damaged.
How to make a water seal with your own hands
It is quite easy to make a water seal with your own hands. To do this, a piece of pipe of a suitable diameter must be bent in the shape of the letter “U” and welded (connected with couplings) to the pipe after the drain funnel (the height of the water seal is usually 50-70 mm). It is desirable to do this during the laying of the foundation and the arrangement of the floors, but if the bath is already functioning and the smell interferes, you can try to eliminate this trouble.
If the foundation is columnar and sewer pipes are available, this makes things easier. Under the bath, you can weld the desired piece of pipe to the drain pipe. If there is no access to the pipes, you will have to organize it: disassemble part of the floor if it is wooden, or cut it out with a “grinder” if it is concrete. After that, connect the pipe with a bend to the sewer using couplings or welding.
It should be noted that water from any water seal evaporates. And if you do not use the sewer for a long time, after 40-50 days it will dry completely, and the gases from the sewer will freely enter the room.
What is a dry water seal
There is another option for a water seal - dry. There is no water in it, and various materials are used as a damper. As you understand, such a water seal does not freeze. There are several types of dry water seals for sewage:
- This is a membrane that is held by a spring if there is no water. When water enters, the spring power is not enough to hold it, the damper rises and the water drains.

It looks like a drain with a dry water seal to the sewer
- A shaped object (usually a ball larger than a diameter pipe) blocks the air passage. As soon as water enters, the object floats, opening the drain.
- More technologically sophisticated models that use the molecular memory of materials.
For a bath, an elementary dry water seal can be made with your own hands, as it is quite simple. You need to pick up a plastic ball a little larger than the drain pipe. Put it on a pipe, and make some kind of chamber within which it will be located. When there is no water, the ball blocks the access of air from the sewer. When water enters, it floats (within the chamber) and releases the drain. Such a system is functional even in winter conditions.: even if the ball freezes to the drain, a little hot water will melt the ice in a matter of minutes, and the system will function normally.
Water seal for sewerage for a bath - types and features of self-production
There are various types of water seals for a bath, so you need to make the right choice. Sometimes it is better to use a water seal, and sometimes dry.
Water seal for sewerage in the bath
 Any rural option, when the water from the bath just goes outside, into the gap between the boards, has its own difficulties. And if there is a main or autonomous sewer on the site, then another task arises - to get rid of the penetration of gases from the sewer into the bath. There is a simple solution - to put a water seal.
What is a water seal
They are of two types:
U-shaped (knee) water seal
 From the picture it is absolutely clear that this is a simple device similar to a hookah, in contrast to it does not allow air to pass through, creating a water plug. And what happens in the hookah is called the failure of the water seal.
Pipe diameter and connection method can only affect the performance of such a device, the main thing that is required of him is tightness, and its lower point must be at least 50 mm lower than the drain pipe.
Any improvised materials are suitable for a water seal, but we must not forget that in the event that access to it is closed, reliability and the possibility of cleaning are of decisive importance.
The second figure shows how water, having evaporated from the cork (and this will definitely happen in 40-50 days), opens up the possibility for air to enter from the sewer.
So you need to either periodically fill it with water, or use a different type of water seal, or hermetically drown it for a long absence.
Bottle water seal
 From this figure it is clear that another design solution did not change the function of this device - to create a water plug. Another name for such a thing is a siphon.
It is also clear that the pipe connection must be airtight. Such a water seal is also a sump.
The lower part of a conventional washing bottle siphon can be unscrewed for cleaning, and if a homemade shutter of this type is used, for example, in the floor, then the upper part must be collapsible.
Dry seals
The most pressing issue for a bath with a drain into the sewer is not so much the choice of the design of the ladder as the laying of the line itself. Any ready-made version of the ladder from the store, including the “dry” one, contains a water seal with a water column of 30 mm or more, so with regular use of the bath, there will be no problems with the drying of the water plug. And those who know that the bath will not be in use for a long time can simply drown out the drain.
For those who want to forget and not remember the dried-up siphon, there are so-called dry ladders.
There are two types of dry water trap.
float type
 It is best to consider a specific example, for example, the Austrian HL 310 NPr.
Vertical drain. The upper element is cut to the desired size from 12 to 70 mm and embedded in the screed.
The polyethylene housing is designed for wastewater temperatures up to 85 degrees. The installation procedure for different cases is described in the passport.
The float, in case of drying water, simply falls and closes the pipe. The height of the valve water column is 50 mm (complies with Austrian city regulations).
The principle of operation is clearly visible in the picture.
In the working position, the water raises and holds the float at the same level and the system works as one of the options for a water seal. If the bath is not used for a long time, the water from the shutter evaporates, and the float closes the drain hole before the water has completely evaporated.
Craftsmen came up with an option that can work no worse than a factory one. The main difference from this scheme is that such a float in the form of an inverted glass is fixed so that its bottom is higher than the drain hole by more than the diameter of the drain pipe. And the hole itself closes a light ball with a diameter larger than the drain one - it acts as a float.
pendulum type
 In the photo, a specific example is a dry seal for drains 100 mm in the neck - Viega 583255.
Below, at the shutter, two curtains are visible, suspended at an angle to the vertical - this is the pendulum shutter. The curtains are closed due to their own weight, and the water opens them when draining. The height of the water column of the water seal is 32 mm - it is quite enough for a country bath. In Germany itself, which is declared as a manufacturing country, when designing a sewerage system in city houses, it is assumed that plumbing fixtures in apartments have a water seal height of 50-60 mm, but not 32!
If the force of gravity that closes the curtains is replaced by the force of a spring, then get different options for the spring type of dry valves, with more options.
Of course, all of the listed valves contain some kind of siphon.
There is another type of dry shutters, for which sometimes too abstruse names are invented, such as the cellular memory of the material. Usually they are a stocking made of flattened rubber, which begins to pass water under a slight pressure. It is unlikely that this is of interest for a country bath.
Skilled owners, even with very limited funds, can easily reproduce, and, possibly, improve any type of water seal.
Floor and sewer
 With the laying of the sewer route, there is much more trouble than directly with the drain from the bath, but it is better to do it, the neater the better.
Even if the floor in the bath is covered with wooden bars, then anyway, it is better to make a screed along the beacons with a slight uniform slope to the ladder, and lay a tile on it. The final trimming of the drain extension can be done when it is known exactly at what height the tile will approach the drain point. If the work is done very carefully, then even with a minimal slope there will be no puddles.
Providing access, with the possibility of replacing all elements, is too much luxury for an ordinary bath. Therefore, do not avoid work that may seem superfluous, for example, the depth of the sewerage should not be less than the freezing depth. To insulate the floor under a 20 cm screed with a layer of expanded clay with greasy cement mortar is by no means overkill. A dry ladder is also not a panacea - dirt that has entered the shutter can prevent it from closing tightly. At the end of the season, it does not hurt to rinse the removable elements. Buying a dry water seal in a store or making it yourself - this issue is not necessarily associated with financial difficulties.
Dry water trap for sewage in a bath: factory and home-made options
Types of water seals. What is the difference between a dry water seal and a wet one. Is it possible to make a dry water trap for sewage in a bath on your own.
We start building a bath
Creating a drain hole
Building a bath is not a difficult process. Integral elements of this room are a stove, a steam room and a drain pit. Before starting masonry work, close attention should be paid to creating a future drain for proper water flow. It is necessary to make this design in such a way that the pit is in operation for a long period of time, and the water flow flows freely. At the same time, the drain should not emit sharp and unpleasant odors, as well as create obstacles in the area.

Before building a bath, it is necessary to draw up a plan with the detailed dimensions of all rooms.
For construction work, we need the following tools:
- concrete mixer;
- 2 shovels - bayonet and shovel;
- several buckets (up to 5 pieces);
- trowel;
- pick;
- ladder;
- building level;
- roulette;
- tamper;
- pliers.
The location of the sewage pit may vary. It can be placed inside the bath under the floor, where the sink will be located, and outside the foundation of the building. When the drain pit is intended for temporary use, it can be made small and placed behind the bath. For periodic cleaning, cover it with a lid or leave it open.
The creation of a temporary pit for draining, in most cases, is carried out on land plots consisting of clay-type soils.

Schematic device of the drain.
The “rough” floor is covered with a 20-cm layer of expanded clay, which helps to increase the service life of the concrete floor, levels the temperature difference in winter and prevents the pit from freezing in the cold period of time. The area of the entire floor is reinforced with trimmings of corners, thick wire or pipes that are attached to the lid of the pit. The pouring of the concrete solution is carried out with the presence of slopes directed from the walls to the drain.
Creating a drain hole

As drain pipes, you can use products made of metal, asbestos or plastic. Plastic pipes are more preferable because of the low price and ease of installation.
Building a bath is not a difficult process. Integral elements of this room are a stove, a steam room and a drain pit. Before starting masonry work, close attention should be paid to creating a future drain for proper water flow. It is necessary to make this design in such a way that the pit is in operation for a long period of time, and the water flow flows freely. At the same time, the drain should not emit sharp and unpleasant odors, as well as create obstacles in the area.
The location of the sewage pit may vary. It can be placed inside the bath under the floor, where the sink will be located, and outside the foundation of the building. When the drain pit is intended for temporary use, it can be made small and placed behind the bath. For periodic cleaning, cover it with a lid or leave it open. The creation of a temporary pit for draining, in most cases, is carried out on land plots consisting of clay-type soils.
In the event that it is planned to create a permanent drain, the pit should be placed in the central part of the bath. Its dimensions should be as follows: length and width - up to 0.5 m, depth - up to 1.5 m. The walls of the drain pit are poured with a 20-centimeter layer of concrete mortar, which is reinforced with a metal mesh and compacted with small stones or pieces of brick.

Scheme of a drain pit from old tires.
After concreting the walls, the pit is covered with wooden boards soaked in a used mixture of diesel oil. To cover the pit, you can use formwork boards, removing them after the poured mortar has solidified. A concrete cover is poured over the boards, the thickness of which is approximately 10 cm. The cover is pre-reinforced with wire. To strengthen the walls of the pit, you can use concrete or metal rings (half rings). The main thing is that during the implementation of this process, the entire structure is firmly strengthened and does not fail.
A drain hole should be made for the pit cover. In this case, it must be connected to a water seal. In turn, the water lock is located in the most convenient and accessible place of the bath. In terms of technological features, the creation of a drain pit is somewhat reminiscent of a septic tank, but in much smaller volumes and sizes.
The main design solution to prevent unpleasant odors
The water lock prevents the penetration of unpleasant odors from the drain hole into the inside of the bath, which contributes to a comfortable stay in the room. The shutter is made of metal and installed before the floor is poured or concreted in a small recess into which a plate made of durable tin is inserted (it is better to use stainless steel or non-ferrous metal). The bottom of the plate should be approximately 5-10 mm below the outlet drain pipe. A water lock is usually made at the lowest point in the middle of the room. The entire surface is reinforced with metal wire and lining.
Water lock for baths and drains: the process of creation and location
A water seal for a bath prevents the penetration of unpleasant odors from the drain pit into the interior of the room, which contributes to a comfortable stay in it.
Sewerage in the bath do-it-yourself scheme
Gone are the unprepossessing bath buildings with an arbitrary runoff of dirty water into "nowhere" or the nearest body of water. Today, sewerage in the bath is not a luxury, but a necessity. Not only the norms of ethics and aesthetics, but also the requirements of laws aimed at ensuring the ecological safety of the environment are pushing for the installation of a high-quality sewage disposal system.

Do-it-yourself sewerage for a bath
The first step to the improvement of the bath is to assess the condition of the soil on the site, determine the optimal depth of pipe laying and resolve the issue of the location of the septic tank. The easiest way is for those homeowners who were directly involved in the construction of the bath or built (built) it on their own. For them, the type of soil, its freezing point (TPG) and the level of groundwater occurrence (GWL) are not a secret.

Did you build a bath with your own hands? So you should already have data on soil geology
Without knowledge of these indicators, it is impossible to build a trouble-free sewer system. For those who have purchased a plot with a bathhouse built on it, you will need to perform a set of simple observations and calculations.
Independent study of the geology of the site
To determine the type of soil, you can conduct an express study that does not require special knowledge and is based on visual inspection and tactile sensations. For this purpose, a hole is dug 25-30 cm below the TPG at the proposed pipe-laying site. Information on the depth of soil freezing in a given area can be obtained from neighbors, from reference books, and on specialized Internet resources.

Soil freezing depth
It is important to take a soil sample exactly at the bottom of the pit, since sewer pipes will be laid at this level. After that, the soil sample is carefully examined visually, rubbed between the palms, rolled into a tourniquet.
And evaluate the results according to the table.

Methods for determining soils
If it turns out that the soil is clay or loam, you should know that these categories of soils are classified as strongly heaving. In this case, the pipes will need to be laid on a sand "pillow" by analogy with "floating" foundations. The sand will act as a shock absorber during seasonal soil movements and the integrity of the underground part of the sewer system will not be violated.
After the safe depth of the pipeline is clarified, the issue with the location of the septic tank (filtration well) is resolved. The wastewater collection point must be separated from the water intake point by at least 15 m and located no closer than 7 m from the foundation of the bath.
Choosing the type of sewer system
For the improvement of the bath, it is possible to use three types of individual sewage:
- non-pressure;
- pressure;
- connected to a centralized city drainage system or to an existing sewerage system of a private house.
Non-pressure system

The non-pressure method of draining wastewater is otherwise called gravity. This is the simplest and least expensive type of sewer for a bath. Its main advantage: energy independence. The installation of a non-pressure system requires careful observance of the slope of the pipes (1-1.5 cm per 1 linear meter) and is impossible with a complex terrain.

To transport wastewater, pipes of a larger diameter are required than with a pressure system. The straightness of the line is highly desirable. If the pipeline scheme includes turning points, manholes are equipped in these places. This rule is relevant for any type of sewer system.
 Installation of non-pressure sewer pipes
  Lookout well
pressure system

General scheme of pressure sewerage
The pressurized sewerage system provides for the forced transportation of wastewater, which is provided by a pump or pumping station. The equipment can be installed both indoors and outdoors. A pressure sewer system for a bath is built if, for some reason, it is impossible to make a non-pressure one. Features of this type of sewerage:
- pressure is more expensive than non-pressure;
- volatile;
- requires insulation of equipment in the winter.
 Pressure sewer with fecal pump
  Pressure sewer pipe
Mortise sewerage system
A less time-consuming, but most troublesome way is to connect to a centralized sewer network. This method is not possible for all bath owners. Therefore, it does not make sense to consider it in all details.

Connection to a centralized sewer network
More often, the connection of the drain system to the septic tank already on the site is used. However, in this case, you will also have to choose the type of drainage system (pressure or non-pressure).

Connection to a septic tank
We design a sewerage scheme for a bath
A single sewer system for greater ease of design is divided into two types: internal and external. The first includes communications inside the premises, the second - outside the building. Having familiarized yourself with the basic principles of constructing a circuit, it is easy to develop it yourself.
Design stages
- It is necessary to draw a plan of the bath, taking into account the thickness of the walls and partitions of the building. For this purpose, graph paper is best, but you can use a regular checkered sheet.
External network design rules:
- at the junction of the external and internal sewerage, an inspection hatch is provided;
- according to SNiP, manholes are arranged at the turning points of the main, at the points of connection of a separate side branch of the pipeline, every 15-35 m of a straight line with a pipe diameter of 100-150 mm;
- according to SNiP, the slope of the external sewage system with a pipe diameter of 110-150 mm is 0.01 (1 cm per 1 meter);
- the first revision well should be no closer than 3 m and no further than 12 m from the bath;
- if the site has a large slope and a toilet bowl is provided in the room, a multi-stage sewerage system with overflow wells is arranged.
 Approximate scheme of the internal sewerage of the bath
Water seal options
A water seal is the most important element of the sewer system, the purpose of which is to cut off unpleasant odors coming from a septic tank (drain hole). Simply put, this is a water plug that is in the pipe even if the bath is not used. An example of the simplest water seal is a U-shaped siphon. In the line of plastic pipes, a water plug is arranged using three shaped elements: bends.
The difficulty is that with a rare use of the sewer system, the water in the water seal tends to evaporate. In this case, experts recommend installing a dry shutter. It is a simple plastic or metal structure, equipped with a spring and a damper (membrane) that blocks the exit from the pipe. When water enters the system, the damper leans back under its pressure, and after passing through the flow, it again takes its place.
Craftsmen make unique home-made valve systems for bath drains. If you wish, you can use one of the following options.

Funnel and ball closure. An example for clarity


Dry shutter in sewer pit
Which pipes to choose
In fact, the choice of pipes for sewerage is not so great.

Pig-iron pipes for sewerage


- PVC (polyvinyl chloride);
- PVCC (chlorinated polyvinyl chloride);
- PP (polypropylene);
- HDPE (low pressure polyethylene);
- polyethylene corrugated.
Any of these products can be safely used in a sewerage device. The diameter of the main line is chosen based on the expected intensity of operation of the building and the number of drain points. For an average bath with a steam room, a washing room and a toilet, when installing a gravity drain system, pipes with a cross section of 100-110 mm are required. If the toilet is not provided, a diameter of 50 mm is sufficient. Sanitary equipment is connected to the main line with pipes with a cross section of 50 mm.
Installation of the internal sewerage system of the bath
It is necessary to start sewerage at the construction stage of the bath. But it is also possible to equip a ready-made, long-term exploited building. The scope of work and their sequence in both cases are different, so each of the options must be considered separately.

Pipes for the internal sewerage of the bath
Installation of sewerage at the construction stage of the bath
To perform the work, a previously drawn up plan (scheme) of the sewer system will be required. In order to accurately find the connection points for plumbing elements (ladders, showers, toilet bowls, sinks, etc.), they start marking after the foundation has been erected. In places where the main highway is laid, trenches of the appropriate width and depth are dug.
Important: The bottom of each ditch is leveled taking into account the required slope towards the septic tank.
Then proceed to the laying of pipes. Experts advise starting the installation of the sewer system with the installation of the main pipe and large (nodal) elements, to which side branches of a smaller diameter are subsequently brought.

Sewer system installation
In places where plumbing is connected, vertical pipes are installed. To prevent foreign objects from entering the network, each outlet is closed with a plug. Mount the ventilation stack.

At the connection points of plumbing, vertical pipes with plugs are installed.
In regions with a cold climate, pipe insulation is performed. For this purpose, fibrous materials (mineral wool and its analogues), polystyrene half-cylinders, foamed polyethylene are used. If desired, you can pre-wrap the pipes with noise-absorbing material, which will significantly reduce the volume of sounds emitted by the operating system.


Form a sand cushion.

Installation of internal sewerage in the room
If the bath has been in operation for more than a year, it is also possible to arrange a dirty water drainage system in it. To do this, you need to draw up a diagram and open the floor in the right places. Installation of pipes is carried out at the level of the foundation, in one of the walls of which a hole is drilled to output the main line.
Drains are installed in the washing and steam rooms. In the performance of work adhere to the following rules:
- the ladder must be level with the floor;
- gaps are closed with moisture-resistant grouts;
- tiles are laid after installing the ladder.
Bath external sewerage device
The main element of the external sewage disposal system is a septic tank. If there is no toilet in the bath, there is no need to buy a factory product or equip a well with multi-level filtration of wastewater on your own. Enough to dig a drainage hole. But it is relevant only for soils with a high level of moisture permeability (stony, sandy, sandy loam).
Video - Do-it-yourself drain pit
Installation of sewerage with a drainage pit
- according to the scheme, the site is marked: they find the location of the waste collection point, determine the route for laying the highway;
- dig a hole 1-1.5 m deep below the TPG;
- a 20-30 cm layer of sand and gravel is poured at the bottom;
- to prevent crumbling of soil walls, a metal container or a column of large diameter car tires can be installed in the pit. A more solid construction is a frame built of bricks.

Start laying the highway. They dig a trench with a depth below the TPG and form a slope towards the drainage pit. Pipes are laid and the compliance of the slope with the requirements of SNiP is checked.
Manholes are arranged at the turning points of the pipeline. In order to prevent freezing of pipes in these places in cold weather, it is necessary to carry out insulation and close the openings with double covers.

The place where the pipe enters the drainage pit is sealed with cement mortar or mounting foam.

The mains are insulated in any convenient way: by wrapping pipes with mineral wool or by laying foam.

Sewerage with a pit
In areas with clay soil for waste disposal, it is recommended to install a pit located under the floor of the bath. The presence of this sink does not relieve the owner from the need to install an external pipeline that transports water outside the premises. The pit serves as an auxiliary structure for the smooth operation of the sewer system.

Sewerage with a pit
A square-shaped hole is dug under the floor with a rib length of at least half a meter and a depth of 1-1.5 m. At a height of 10-15 cm from the floor level, a pipe is installed connecting the pit to the external sewage system. Observe a slope of 1 cm per 1 linear meter towards the water outlet. The bottom and walls of the pit are concreted.

Basic moments
The owner of the bath must remember that each stage of the sewerage device requires careful observance of the requirements for it. The reliability of the system is ensured by a properly designed scheme and exact compliance of the pipe slope with the norms of SNiP. The comfort of staying in the bath is guaranteed by the presence of a hydro or dry shutter.
Do not neglect the device of the ventilation system, as it forms an optimal air exchange and contributes to the weathering of moisture after bath procedures. This will help prevent the formation of fungus and mold. For regions with a cold climate, it is extremely important to perform high-quality work on the insulation of the sewer system.
Sewerage in the bath do-it-yourself scheme and step-by-step instructions!
Learn how to install external and internal sewerage. The choice of pipes, installation options, do-it-yourself sewerage in the bath, scheme, photo + video.