Brick ovens for a bath drawings with orders. Brick oven for a bath: varieties and safety of projects, pros and cons, masonry step by step Stone stoves with a bath tank
Self-construction of a bath stove is not the easiest, but quite feasible undertaking that requires thorough preparation and a thoughtful approach. After reviewing the information below, you will learn about the important nuances of designing a sauna stove, as well as consider the key stages in the construction of a brick structure.
The sauna stove can have different dimensions, selected mainly in accordance with the area of the serviced premises. Most often, furnaces are built with a base measuring 890x1020 mm (3.5x4 bricks) or 1020x1290 mm (4x5 bricks) and a height without taking into account the chimney 168 cm or 210 cm, respectively. The second option is better suited for steam rooms with increased ceiling height.
The most preferred option for a brick oven for a bath is a model with a water circuit (tank for heating water). It does not make sense to bring many projects - they are almost identical, only the location of the tank for heating water changes. The most popular options are the bottom-tank brick oven and the top-mounted brick sauna stove.
The following images show diagrams of a brick oven with a lower water tank.

Schemes of a brick oven with a lower water tank

Schemes of a brick oven with a lower placement of a water tank (ordering)
The following images clearly demonstrate the design of a brick stove for a bath with a tank at the top.


Making the project safe: the basics
Before proceeding with the study of further information on the arrangement of the sauna stove, you need to consider and remember the key safety provisions, the violation of which can lead to extremely adverse consequences.
Traditionally, the stove is built near the wall opposite to the shelves in the steam room. The design of the furnace must be created so that between the heating parts of the finished unit and everything that supports combustion, a minimum distance of 30-40 cm is observed. If special protection is provided, for example, from asbestos cardboard, this figure can be reduced to 15-20 cm.

 The use of a heat insulator in the construction of a furnace - an example

Prices for asbestos cardboard
asbestos cardboard
There must be a gap between the chimney and the floor/roof elements that are in contact with it, which is subsequently filled with refractory material. Most often, asbestos is used for protection. From above, said gap with insulation is closed with a steel curly plate.


For additional protection, the floor area in front of the furnace firebox is covered with a metal sheet about 10 mm thick. It will protect the floor material from fire in case coals fall out of the firebox.


The standard option for placing the stove in the bath space is shown in the following image. Here you can also see the order of organization of the water circuit, which can be taken as a basis if the supply of warm water is provided by the furnace unit, as well as the features of connecting and removing the chimney.
What is the oven made of?
A set for self-construction of a brick sauna stove includes the following items:
- brick;
- clay for the preparation of masonry mortar (you will also need sand);
- a container for preparing a solution;
- tools for marking (pencil, rope, square, tape measure, etc.) and masonry (trowel, pick, mallet, etc.);
- insulation materials (roofing material, asbestos);
- elements for the manufacture of a water tank and a chimney (if their self-assembly is planned, but it is much more profitable in terms of time and labor costs to purchase ready-made units).
The issue of choosing a brick for masonry deserves special attention. The strength of this material, first of all, should be higher than ordinary white or red bricks. The ideal option is fireclay bricks with the highest refractory properties.
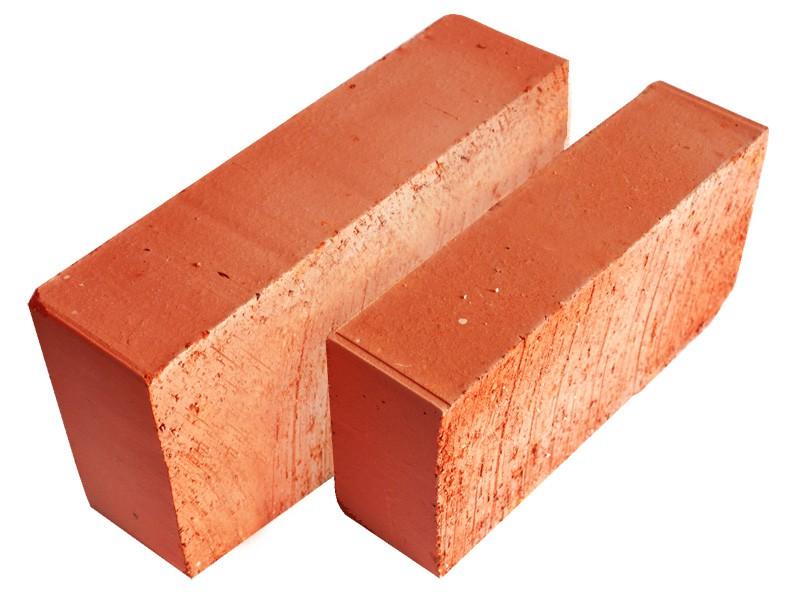

In terms of key performance characteristics, a brick based on fireclay clay is noticeably superior to its closest "brothers", but it costs much more. In view of this, in order to keep the total costs for the construction of a bath stove within reasonable limits, fireclay bricks are used for laying areas that are subject to the most intense heat.
Prices for fireclay bricks
fireclay brick

In places warming up to more modest indicators, it is advisable to use a solid red brick, designed to perform the work in question.
For example, external walls, chimneys, various decorative elements, etc. can be laid out from such bricks.

Important! You can distinguish solid ceramic bricks by marking in the form of the letter "M" and the accompanying numbers indicating the value of the maximum load per 1 cm2. For laying a brick oven, you should use a material grade of at least M-150.
You can distinguish a real high-quality stove brick by 3 key features.

Video - Choosing a brick for laying the oven
What mortar to use for masonry?
The laying of brick sauna stoves is traditionally performed on clay mortar. It is best if a kind of clay is used for its preparation, which is the basis of the brick used, i.e. red or chamotte. In this case, brick and masonry will give the same thermal expansion during the heating process, which will ensure the longest possible life of the finished building.
Helpful advice! It has been established that the thinner the masonry joint is made, the higher the quality of the furnace will be as a result. However, consideration of this issue also needs to be approached wisely: ideal masonry is obtained with a joint thickness of 0.5 cm. Reducing the value below the mentioned indicator will contribute to a noticeable decrease in the service life of the furnace.
In addition to clay, sand is included in the composition of the solution. It must first be sieved so that material with grains of sand no larger than 1-1.5 mm eventually goes into the solution. The millimeter value is the most preferred. It is also important that the sand does not have silt inclusions and is of a uniform color. For sifting, use sieves of the appropriate fractions.
Separate requirements are also imposed on water, which is also used in the process of preparing masonry mortar. First of all, it must be clean, contain the minimum possible amount of mineral inclusions, and not have a musty smell. It takes about 15-20 liters of water to lay 100 bricks.

Before preparing the solution, the clay must be placed in any suitable container (for example, a large basin), crushed and poured with clean water in such an amount that the result is the most homogeneous mass, not too thick and not very liquid. Thoroughly mix the solution, kneading the resulting lumps. Leave the mixture of clay and water for a day, then strain, and rub the resulting lumps through a sieve.
Sand is added to the prepared solution last. On average, a liter can of sand is added to a bucket of water, but this moment must be carefully controlled, because. the amount of river sand in the solution directly affects the fat content of the latter. In addition, the required amount of sand may vary depending on the initial fat content of the clay. If the masonry mixture is too greasy, the stove may simply collapse during operation. A lean (non-greasy) mortar will not allow achieving the desired quality of adhesion of bricks, as a result of which the scenario already considered will be repeated.
There are several simple ways to determine the fat content of clay in artisanal conditions.

Take 500 g of clay and mix it with water. Mixing is best done by hand, until a mixture is obtained that has a uniform consistency and does not stick to the hands.
Important! For laying a sauna stove, you can only use a solution of medium fat content.
Roll the mixture prepared earlier into a ball the size of a small apple. Lay the molded product on any flat, hard surface and gently press down on it with a plank. Press down slowly enough to fix the formation of cracks.
If the clay ball has disintegrated without cracking, the clay is non-greasy. The appearance of a half-diameter crack indicates that the clay is too oily. In the case of a solution of normal fat content, the crack will take approximately 0.2 of the diameter of the clay ball.


Preparation of furnace mortar - tips
Video - Preparation of a mortar for laying a furnace
The sequence of construction of the sauna stove
Regardless of the chosen configuration of the brick sauna stove, the procedure for its construction remains identical for all situations: from the foundation to the arrangement of the chimney and finishing. In the following table, you can find important information about each stage of the event in question.
Table. The procedure for the construction of a sauna stove
| Stage of work | Description |
|---|---|
| There are several types of foundations for a sauna stove. You are offered the most optimal and popular option. Do the following: - mark the site for the future foundation by driving in pegs in the corners and around the perimeter of the base to be equipped, and pulling a rope between them to make it easier to navigate. Select the site dimensions in accordance with the design dimensions of the furnace base; - dig a pit with a depth of about 60 cm. At the same time, expand the lower 10-15 cm in relation to the main part of the pit by 5-10 cm in each direction. After concreting, such a platform from below will provide a higher resistance of the entire structure to ground movements; - fill the lower expanded part of the pit with sand and compact it, spilling it with water for better compaction; - pour a 10-centimeter layer of gravel or broken brick over the sand and tamp it down as well; - mount the formwork along the contours of the pit. To assemble it, use wooden boards and screws; - lay the reinforcing mesh in the pit. For its assembly, it is optimal to use steel rods with a diameter of 1-1.2 cm. The rods are tied into a mesh with cells of 15x15 cm. At the intersections, the reinforcement is fastened with knitting wire or special modern clamps, which is more convenient. Between the walls of the pit and the reinforcing mesh, an approximately 5-centimeter gap is maintained. A similar gap must be maintained between the bottom of the pit and the reinforcing mesh. The most convenient way to do this is with the help of special clamps-stands; - pour a concrete mortar into the pit, prepared from 1 share of cement (from M400), 3 shares of clean sand, 4-5 shares of gravel and water in an amount corresponding to about half the mass of cement. The concrete is poured in an even layer to such a height that the pouring does not reach the ground surface by about 150 mm. Be sure to align the “top” of the fill with a level; - let the filling stand for 3-5 days (preferably 7-10) to gain strength and dismantle the formwork. Fill the resulting voids with compacted fine gravel; - cover the hardened concrete platform with molten bitumen and lay a layer of roofing material on top, carefully leveling it and pressing it to the binder. Then repeat the procedure again. The resulting two-layer waterproofing will provide reliable protection of the brick oven from ground moisture. The previously mentioned 15 cm gap between the upper edge of the foundation and the ground surface will be leveled by means of a starting solid row of bricks. |
| Detailed recommendations for this stage were given earlier. |
| The laying of the bath stove is carried out in accordance with the previously prepared order - the main component of the project of the unit in question. The step-by-step procedure for building a brick oven will be discussed further in the corresponding section. The arrangement of additional elements (in this case, it is a chimney, since it will be proposed to make the water tank built-in) depends on the specifics of a particular project and is considered individually in each case. |
| A fully laid out oven cannot be immediately put into permanent operation: the device must be given time to dry. During the drying period, the doors and windows in the room should be open - the stove will dry faster. After 4-5 days after the completion of the laying of the furnace, it can be started to heat with small chips for a maximum of 10-15 minutes daily. The furnace is performed 1 time per day. Escaping condensation indicates that the unit is not yet completely dry. |
| At the request of the owner, finishing can be done. There are enough options. The most popular are the following: - tiling (clinker, majolica, terracotta or marble). One of the more popular options. Differs in rather low cost and simplicity of implementation; - brick cladding; - stone finishing. Well suited porcelain stoneware, granite, marble or serpentine; - plastering. The primordially Russian method, which is concurrently the most elementary and budgetary; - tiling. A labor-intensive finishing method that allows you to get truly unique design compositions. |


Video - Construction of a sauna stove
Sauna stove project: step by step ordering
As an example, the procedure for erecting a furnace equipped with a built-in water tank will be considered. The dimensions of the structure at the base are quite impressive - 1020x1290 mm (corresponding to laying 4x5 bricks), height - 2100 mm. At will, the owner can change the dimensions in accordance with the conditions and characteristics of the equipped steam room. The design image of the erected structure is presented below.

An oven with the indicated design dimensions will allow to provide temperature indicators at the level of about 45-50 degrees in the process of washing and up to 100 degrees and above during soaring in a space of up to 10-14 m2. One firebox of such a furnace will be enough for up to 10-12 visitors to comfortably take a steam bath and wash thoroughly. The volume of the built-in tank (in the diagram shown on the edge on the right) is about 180 liters.
To improve the quality of heating and placement of stones above the fuel chamber of the furnace, pipes are laid in the amount of 6 pieces (visible next to the water tank) with a diameter of 50 mm. The length of pipes to be laid specifically for this project is 1050 mm. The installed pipes become very hot during the operation of the furnace and continue to transfer thermal energy for some time even after the completion of the furnace.
Above the stones is a double door. Through the opening it closes, water succumbs to the laid cobblestones, due to which steam is formed.
We proceed directly to the study of the design order.
Table. Ordering a brick sauna stove
| Stage of work | Description |
|---|---|
| As noted, it becomes continuous and does not have any significant features. The scheme of directly laying bricks is shown in the image. |
| At this stage, the formation of the ash chamber begins (dimensions and location are shown in the image) and the corresponding door is installed (highlighted in red in the diagram). Important! The dimensions of the hole intended for installing the door must exceed the dimensions of the mounted frame on each side by 5 mm. Fixing this, as well as other doors in the oven, is done as follows: - the asbestos cord is inserted into the prepared hole and smeared with masonry mortar. A cord with a diameter of 0.5 cm will suffice; - on 4 sides, the door frame is equipped with lobes - wire, previously twisted from 3-4 rods 10-12 cm long. 10-centimeter wire cuts with a diameter of about 0.5 cm are attached to the ends; - the prepared structure is inserted into the hole along the masonry and fixed with mortar. The wire embedded in the masonry provides reliable and high-quality fixation of the door. |
| The laying of the ash chamber continues. |
| From refractory bricks (yellow in the diagram), the base of the firebox is laid out and 2 grates are installed. The installation of gratings is carried out in grooves specially cut for this. |
| The formation of the fuel chamber itself begins. The chamber is completely lined with refractory bricks. |
| The fuel chamber door is installed. |
| The laying of the fuel chamber continues. |
| Actions are similar to the 7th row. |
| The combustion chamber door is closed. |
| Quarters of refractory bricks are laid at each of the side walls. Openings are formed between the bricks, the dimensions of which should allow the pipes mentioned earlier to be laid. At the same stage, in the places indicated on the diagram, a place is being prepared for installing a water tank. |
| On the same row, the previously mentioned pipes are laid in the gaps between the quarters of refractory bricks. Holes around pipes are easiest to seal with basalt cardboard. |
| Also on the 10th row, a water tank is being installed. |
| In this and the following images, the water tank is not shown to better show the features of the masonry, although the tank should be present. Previously laid pipes are covered with ordinary (not fireclay) bricks. |
| The furnace array rises higher. |
| Similar to the previous one. |
| Similar to the previous one. |
| Similar to the previous one. |
| Similar to the previous one. |
| Similar to the previous one. |
| Similar to the previous one. |
| Similar to the previous one. This image shows the water tank. The allocated space above the pipes is filled with cobblestone. |
| 2 strips of steel are placed above the water tank (placement and dimensional ratio can be estimated on the diagram) so that it can be covered with bricks. |
| The water tank is closed. The designated space is left free. In the future, water will succumb to the cobblestones through this opening. |
| The construction of the furnace array continues, similarly to the previous row. |
| Similar to the previous one. |
| Similar to the previous one. |
| Similar to the previous one. |
| Laying is carried out similarly to the previous row. The diagram is shown with a door installed for an opening through which water will flow. In general, the installation of this door had to be done earlier - when laying the row marked with red lines. The door was not shown in the diagram in order to better understand the principle of masonry. To cover the door, 2 steel strips are laid on top - the technique is already familiar to you from the previous stages of the work. |
| The door is closed. Preparations for shutting down the furnace begin. The area to be covered is large enough. To successfully cope with this stage of work, it will be necessary to lay 2 steel strips. The thickness of the strips is quite large - about 1 cm. For their laying, recesses are cut out in the bricks (marked in the diagram). Under the strips, it is desirable to put gaskets made of basalt cardboard. |
| The mentioned strips are laid with 1-2 mm gaps (marked in the diagram), due to which the thermal expansion of the metal during the operation of the furnace will be compensated. |
| The oven is closed. At this stage, you need to leave a hole for installing a chimney pipe (marked in the image). A seat is made on the hole for installing a smoke damper, which is also seen in the diagram. |
| At the same stage, the smoke damper is installed. |
| Furnace floor construction is in progress. |
| Similar to the previous one. |
| The formation of a chimney pipe begins. |
| Pipe formation continues. Further, laying is carried out in a similar sequence until the pipe is brought to the design height (determined individually, in accordance with the characteristics of a particular room). |


The laying is completed. The principle of operation of such a furnace is extremely simple: when fuel is burned, hot gases heat the walls of the furnace and a water boiler installed inside the structure, pass through the laid pipes and stone filling placed on top of them, and then go into the chimney.


Video - Brick sauna stoves projects
The size of a brick oven for a bath depends primarily on the area of \u200b\u200bthe steam room, and the number of people who will regularly bathe is also taken into account. Whether the sauna is seasonal or not, it will be used for heating and cooking, or just for heating the steam room.
Projects of brick ovens for a bath
It is very rare to find a ready-made brick oven project that is 100% satisfied. We have to refine and redo the finished order. In this case, make the necessary adjustments, drawing in detail each row of bricks, and show the corrected order to the specialist.
Even if even minor changes have been made, consultation is highly desirable. The stove in the bath should be safe, so the opinion of a competent specialist is very important.
When adjusting the project, you need to remember several features of laying brick ovens:
- The firebox in heaters is usually made of a large size, and to ensure a normal combustion process, it is necessary to ensure a good air flow. Therefore, the blower and the blower door should also have a decent size.
- To ensure a good flow of air into the fuel chamber, it is better to lay the grates along the blower channel. But finding a grate of the required size is often problematic, therefore it is often necessary to install several smaller grates across the blower.
- If the heater is located above the firebox, the height of the firebox must be at least 55cm. The best option is 8 or 9 rows of bricks. In this case, they will heat up to high temperatures. Reducing the height of the firebox will not lead to faster heating, but to a decrease in the temperature of the stones and the accumulation of soot between them.
- If wooden structures are not protected by refractory materials, then the distance to the brick oven cannot be less than 30 cm.
- Before laying bricks on a clay-sand mortar (information on the mortar is available in the article), lay them dry according to the plan, starting from one of the corners, select bricks of a suitable size so that the width of the joints does not exceed 5mm. And only then lay on the solution.
- After laying each row, it is checked for verticality and horizontality using a building level. The accuracy of observance of angles can be checked by installed plumb lines. Correct even the smallest deviations.
- When installing the doors, the masonry starts from it, fixing it tightly. All doors in those places where they are adjacent to the bricks are pre-wrapped with asbestos cord or asbestos strip. They are fixed in place with wire or steel strips fixed in the seams. For a more rigid fixation, grooves are cut in the bricks under the wire.
- Particular attention should be paid to the passage of the pipe from the brick oven through the ceiling, roof or wall. In this place, the pipe must be insulated with basalt wool or other heat insulators that tolerate high temperatures.
The video shows how the ash and furnace doors can be fixed, as well as the process of preparing the clay solution.
Here is a project for a sauna stove, in which a tank for heating water is adjacent to the heater and is additionally heated by heat transfer from the chimney. This oven is small and easy to manufacture.

The capacity for the heater 530x510x500 mm in size is made of steel 8-10 mm thick, the water tank is made of a pipe with a diameter of 40 cm (capacity is about 50 liters). The support for the heater is a frame welded from the corners (the corner is taken 50x50 mm), a sliding support is made for the water tank.
Kamenka has a cover through which stones are laid and water gives in. In order for the stones to be heated to higher temperatures, the lid is closed, and if it is necessary to lower their temperature, they are opened. After installation on the frame, the heater is lined with bricks placed on edge.
Here is also a small brick stove for a bath with a closed heater and a water tank located on the side.

The ordering for this furnace is simple and does not require much time and materials.
Ordering the stove for a bath
This oven is not very small. A continuous oven designed by Anatoly Zabolotny can heat a steam room for 4 people. It is possible to load stones into a closed heater only after the final drying of the stove.

Continuous stoves can be fired while people are in the steam room - they are designed in such a way that combustion products do not enter the room.
The main attractive feature of this furnace is the possibility of organizing ventilation / drying of the underground space. Why use a regular corrugated hose.

For the laying of this furnace, 700 pieces of oven bricks, 40 pieces of fireclay, about 30 buckets of sand, 15 buckets of clay (12 liter bucket) are needed. 2 pieces of oven doors, blower doors and cleaning doors. It also requires 2 grates and 2 valves, and a metal corner 30x30, cut into pieces of 50cm (9 pieces) and 35cm (2 pieces). You will also need a panel with one burner and a cabinet for stones.

The cabinet for stones is made of stainless steel - only it can withstand temperatures up to 800 ° C, to which stones can heat up in this furnace. To make the heater more rigid, additional stiffeners are welded onto the side surfaces.

It is necessary to lay this oven from the base-zero row, in which the formation of the ventilation duct begins. Strictly follow the layout of the bricks, checking the verticality and horizontality of each row and tracking the correct angles.
The damper is installed in the 3rd row. Immediately, the formation of ash pans of two independent fireboxes begins and doors are installed on them. In the next 4th, the damper is blocked by a transversely located channel for cleaning soot. In the same row, a door is installed on it.
The closing of the blower doors takes place in the 5th. Jumpers are immediately installed for the transition to the formation of the buttocks. The thickness of the metal for jumpers is 3 mm. In the next row, the shaft is divided, for which two grates are installed. The furnace shaft is laid out with fireclay bricks using a special mortar. Under the grates, a recess is cut in the bricks in such a way that there is a gap for the thermal expansion of the grates (6-10 mm on each side). Independent chimney channels immediately begin, for which metal strips are also laid.
In the 7th row, fireclay bricks are installed on a spoon (sideways), firebox doors are installed, chimney channels do not change. Firebox doors are installed at the same time. The 8th row is similar to the previous one, we cover the doors. In the next, they are covered with metal strips, on which the floor bricks will rest.
In the 10th, the doors are closed on top with bricks, for which they are filed, if necessary, depending on the shape. After the completion of the 11th row, a slab platform is laid over one shaft, and on the other, fireclay bricks are laid only along the short sides of the furnace. After installing the stone container, there will be chimney channels.
In the 12th row, a metal box for stones is installed, one of the chimney channels is laid. The next two rows are unchanged, and only in the 15th they mount a door for cleaning soot. Further, in the 16th, two metal lintels are added above the main shaft.
In the 17th, the chimney shaft is again divided into two channels (as in the 5th), and two metal bridges are fixed above the slab, which will serve as the basis for the bricks of the next row. The next two are unchanged, and only in the 18th a chimney door is added, and in the 19th jumpers are installed on the other side of the furnace, which will serve as the basis for its final overlap and the formation of the furnace roof.
21 row is similar to 12, but there are chimney channels. The next two rows are the narrowing of the fuel shafts, and in the 24th shaft, where the stone container is installed, it is completely blocked.

This small brick oven for a bath is very simple and economical. It is suitable for small steam rooms.

The order for her is very simple. It has a relatively small weight, and, subject to a sufficient thickness of the log and compliance with fire safety measures, it can be folded without a foundation.

In fact, there are probably as many stove projects as there are baths - each owner tries to make the most of the available space, so changes and adjustments are practically necessary. If you have at least a little experience with bricks and mortars, you can easily fold a brick oven with your own hands. But if you are not confident in your abilities, then you should think about inviting an experienced stove-maker, at least as a consultant. This can save you a lot of money: refurbishing the stove and fixing the flaws often cost much more than laying the stove in a new way.
In many cases, it is easier to install a metal furnace (for example) and.
Despite the high characteristics of metal sauna stoves, experienced stove-makers still prefer brick buildings. It's all about the special atmosphere, which is characteristic only of stoves made of brick - here there is soft warmth, and hot, but quite pleasant steam, and a wide range of other advantages.
Among other things, it is worth noting the very good visual qualities of such equipment. In this article, we will talk about how to make brick ovens for a bath with your own hands.
Classification of stoves for a bath
Wood-burning brick stoves for a bath are equipped according to one of the following schemes:
- Black oven. The effectiveness of this design has been tested for centuries - such stoves have long been used in villages. Due to the absence of a chimney, the maximum saturated steam and aroma is achieved. The problem is that each time you need to wait until the fuel burns out to the end.
- Gray oven. Such a brick sauna stove is equipped with a chimney, and immediately there are advantages in the form of greater efficiency and speed of heating the bath. The disadvantage is the same - a considerable amount of soot remains on the stones, and you have to wait until the firewood burns out completely.
- Oven "in white". The advantages of such stoves are obvious - the complete absence of pollution in the room and very good heat retention. True, there is a minus - it can take up to 12 hours to warm up such an oven, which significantly reduces the usability of this equipment. It's all about heating the stones due to the metal floor slab, which naturally slows down the heating. You need to understand how to lay stones in a sauna stove in order to create optimal conditions.
- Stove with hob. For a bath, such equipment is very suitable. In this design, there is a tank mounted on a cast-iron stove, as well as bath stones. The plates are not completely covered, which somewhat speeds up the heating of the room. The tank is closed on three sides with brick walls, due to which it is possible to maintain a high temperature of the water. In the traditional design, the tank is placed on top of the firebox, and the stones are stacked above the chimney, but sometimes the stones with the tank are arranged in a different order.

It is always necessary to choose the type of stove for a bath on an individual basis. To understand the issue, it is worth reading a couple of articles on how to choose a stove for a bath, see photos of various designs, and only then draw conclusions.
The choice of brick for the stove in the bath
When equipping a brick sauna stove with your own hands, you often have to face a lack of budget, and in this case, the sauna stove is made of ordinary brick. This is what causes various problems.
The fact is that a standard brick has dimensions of 25x12x65 mm, and ordinary bricks often differ from the standard. As a result, the masonry seams may not match by a whole centimeter. When building a house, such tolerances may be present, but when laying the stove in the bath, they should not be.

To avoid this problem, you can slightly reduce the length of the middle brick, which fits on the side of the square. Because of this, the dimensions of a standard oven will decrease to 74x74 cm, but the width of the seams will be no more than 5 mm.
Ordering a brick oven
The projects of brick ovens for a bath can be very diverse, and the selection of a good scheme is an individual matter. What can be said for sure is that you can equip the stove with your own hands even without much experience, if you strictly follow the chosen order throughout the work.
A typical brick sauna stove scheme includes the following steps:
- Arrangement of the base;
- Creation of sand-clay mixture;
- Start of laying;
- Water tank installation;
- Installation of a grate;
- Laying the fifth row;
- Fixing the furnace door;
- Laying the top rows.

When performing each stage, there will certainly be some nuances, so you should pay more attention to all the details before putting the stove in the bath.
Foundation arrangement
Regardless of which order of the brick oven for the bath was chosen, the first step is to create a waterproofing layer over the reinforced concrete foundation - this will ensure that it is kept cold at any time of the year. The foundation itself must be strong enough, and it must be 10 cm larger than all the dimensions of the sauna stove.
In the lower part, a little space is necessarily left and a hole in the front is an undercook, in which all the necessary equipment will be located. From above, this structure is covered with a brick vault, supplemented with bars, concrete floors or metal.

Over this entire structure, flooring is arranged. It will require roofing material, the total area of \u200b\u200bwhich corresponds to the area of \u200b\u200bbricks laid on the foundation. Two pieces of roofing material separate the foundation and the first row of bricks, and the rest of the material must be laid between the intermediate brick row and the furnace. It is the intermediate row that will compensate for minor defects made during the creation of the foundation.
Next, a brick is prepared for equipping a protective wall of five rows, due to which the ignition of the wooden elements in the bath will be prevented. When arranging this screen, the use of ordinary cement mortar is quite acceptable.

Accuracy of laying is achieved using a pre-hung plumb line. The main thing is to hang it so that its sharp part is above the first row. The plumb line will remain in this position until the laying of the brick sauna stove is completed.
Creation of sand-clay composition
The next step after preparing the base is mixing clay and sand. It would seem why such a composition is needed if there is cement, but the answer is obvious - the cement mortar is completely incapable of withstanding high temperatures. That is why all projects of a brick stove stove for a bath require a sand-clay composition.
The best clay for laying a stove in a bath can be obtained at a depth of about half a meter. Naturally, the material must be thoroughly cleaned and soaked before use for several days. For soaking, you can make a small groove next to the bath. It is necessary to prepare not only clay, but also sand - it must be cleaned of various impurities and carefully sifted so that there is no debris in the masonry seams.

The clay is kneaded directly in front of the slave. For experienced stove-makers, a special “oar” is used for these purposes, which is excellent for these purposes. Next, water is added to the clay, and all this is well mixed to a state of sour cream. Moistened sand is added to clay mixed with water.
To determine the quality of the resulting solution, a dry and clean stick is lowered into it, and the result is determined by the following features:
- If a layer of the mixture with a thickness of less than 1 mm is stuck on the stick, clay must be added;
- If the thickness of the adhering layer exceeds 3 mm, sand is added;
- If 2 mm of the mixture sticks to the stick, then the solution is suitable for work.

You need to knead the solution in small portions - it hardens very quickly and loses its qualities. In addition, a do-it-yourself brick sauna stove is laid slowly, and this is another argument in favor of mixing the solution as needed.
Start laying the stove
Having prepared the materials for the solution and the necessary tools, you can get to work. Regarding the tools, you will need a carefully prescribed order, pliers, a square, a broom with a scoop and an emery wheel for processing bricks.
The first row of masonry should have a cleaning door, the fastening of which should be under the bricks. Rarely does anyone talk about the material for fastening the door, considering this point obvious. As a result, preference is given to galvanized wire with a diameter of 3 mm - this is the most reliable and practical option.

So that the wire does not interfere with further work, small grooves are cut in the bricks for it. The same rule applies to the cleaning door, because its height is slightly higher than the thickness of the brick, so it will have to be cut so that the whole structure can fall into place. All remaining gaps are subsequently filled with mortar.
Tank installation and grate installation
Having completed the previous steps, you can move on to installing the tank, if it is needed at all. There is nothing special in this process, and the only caveat is that the tank can be purchased ready-made or welded on your own. The last option, of course, will take more time.
As for the installation of the grille, nothing unexpected happens here either. Of the problems, one can note the lack of height of the two bricks installed in the blower, which are slightly below the top of the fourth row of ordering. To compensate, it will be necessary to cut two plates from new bricks so that they clearly fit together with the mortar and the grate on the same level as the one laid out next to it.

It is also important that the grate does not reach the walls of the firebox a little, otherwise, when it is heated, thermal expansion will occur, and the brick stove for the sauna heater will be deformed. To prevent this phenomenon, an adjustment of the brickwork is required.
Fifth row laying
If a brick oven for a bath should be with a tank, then at this stage there will be a slight difficulty. Two bricks located at the smoke channel near the rear wall may have serious gaps between them due to non-standard sizes. Solving the problem by covering the holes with clay will not work - it will disappear after a while.
However, there is a solution - both bricks are shifted by 3 cm to the blower so that the gap between them is minimal. The third brick must be replaced with two pieces so that the gaps between them are extremely reduced. As a result, by moving the leftmost bar 1.5 cm forward, you can completely eliminate all unnecessary gaps.

After fitting, the stove door and water tank are wrapped with two layers of asbestos cord at the junction with the brickwork to prevent accidental damage.
Installing the furnace door and laying the upper rows
The firebox door is fastened with ordinary galvanized wire, with the only difference being that three pieces of material are required for one hole. The sealing and fitting of bricks is carried out in the same way as in the case of installing cleaning doors.
If you continue laying already on the sixth row, the old problem will again interfere - ordinary bricks rarely meet the standards that are taken into account when designing sauna stoves. Because of these seemingly imperceptible defects, serious problems arise during installation.
To avoid them, you have to cut the bricks into separate pieces and fit them properly - only this will eliminate all unnecessary holes in the masonry.
At least, when laying the eighth row, you will not have to adjust individual bricks. Having completed the laying on the ninth row, you can start installing the slab, the edges of which should go on the bricks for at least a couple of centimeters. It remains only to install the chimney, but this process requires a detailed description, so it is worth reading the corresponding article.
Conclusion
Before you start laying the stove in the bath, you need to study the various orders of brick bath stoves and choose the most suitable one. Following the chosen order during work and observing all the subtleties, you can create an effective stove that will provide coziness and comfort in the steam room.
What to be a bath - mainly depends on the furnace standing in it. According to tradition, a Russian bath should have a brick stove, which replaced the older stone stove. And many owners of baths under construction or built a long time ago are trying to put one in their place - after all, this is a thing that has been tested for centuries. But how to assess the scale of the effort, time and finances associated with the construction of a brick oven for a bath?
We want to help you - read and consider whether you can handle it yourself or still look for a professional, or is it easier to abandon this idea in favor of a metal stove lined with bricks, which, with skillful handling, can produce the same conditions as a brick ?
Listen to article
Brick sauna stoves: history
The historical moment is also important: understanding how the Russian banya develops can point to the most essential thing in it.
Here the first stoves were simply made of stone, they didn’t even put it on the mortar - a pile of stones over a fire, roughly speaking. AND there was no pipe- the smoke spread throughout the hut (yes, the bathhouse was made right in the hut, there were no courtyard buildings, it also heated) and flowed through the windows and doors. Until the 15th century, such baths were the most common in Rus'.

Brick sauna stove
The first innovation was still a pipe, but made wooden, it often caused a fire (the reason is simple - the tree ignites at a temperature lower than that of furnace gases at the outlet of the furnace).
Next, they invented something between a “white” and “black” oven - for this, they put something like hoods(cap, on top of which there was a chimney). But this is not yet a brick oven.
The revolution, as expected, was made by Peter I - firstly, he took out a dozen stoves from Holland together with the craftsmen, secondly, he forbade the construction of stoves in the capitals, which were heated “in a black way”. But in the end it turned out the same thing as with potatoes - a brick one took root, it became like a native.
We hope you have noticed the main thing - the Russian banya was originally heated by intermittent stoves with flowing heaters, which lacked only the stone insulation of the hearth and the chimney pipe. And when the brick one came, she solved all these problems at once. Features of the choice of stoves for saunas are presented in.
Advantages and disadvantages
Being a progress for its time, brick sauna stoves, of course, had significant advantages, but this does not mean that they were completely devoid of disadvantages.
Among the latter - spalling of mortar. It's an inevitability that can only be cured embroidery And filling the seams with new mortar. The owner needs to constantly monitor the condition of his stove.
Skillful unhurried ignition will get rid of cracks in the chimney, which are the result of sudden temperature changes in winter.

Another concern for the owner will be monitoring the amount of soot in the chimney. But such duties cannot be avoided by the owner of an iron stove. With one “but”: there is practically no smoke circulation in iron, and if there is, then it is purely nominal. And brick ones are often made with one form or another smoke circulation. And it also needs to be cleaned. For this, special cleaning doors are provided.
However main disadvantage the majority still considers not the listed, but the period of time that passes between the start of kindling and the start of bath procedures. After all 4-5 hours is the average time needed to prepare a bath. So for those who come for a day, this may not be an option.
Wood consumption should also be taken into account. In winter, you will have to spend four dozen firewood on one fire, in summer - three. Some customers prefer to choose not to deal with the calculation and purchase of fuel.
By the way! Just in case, we remind you that a freshly built stove must first be dried - this is done by repeated fireboxes with a small amount of firewood. That is, immediately the new furnace is not heated at full capacity- it will deteriorate from this, go cracks. First, moisture is expelled from the entire array.
As for virtues, then they are obvious: the comfortable atmosphere of a Russian bath is a low temperature (60 degrees) and high humidity created by steam obtained from an overheated closed heater. Brick bath stoves do the best job of maintaining the right temperature inside and outside the stove.
Types of brick ovens for a bath
Interesting topic, extensive. There are a lot of designs that form different brick ovens for a bath. Some are easier, others are more difficult. Some provide registers for heating water, in others - space for a tank. Eat bell-shaped ovens and canal, there are more familiar types heater - deaf and flowing. In addition, there are different smoke circulation systems of channel furnaces - vertical and horizontal.
So, it is clear that registers and tanks are additional devices, and first we need to understand the necessary elements. These include:
- blew;
- grate;
- firebox;
- heater;
- smoke circulation.
The first major division can be made by heaters. Stones in some ovens separated from the fire only by a grate, which does not interfere with their contact in any way, in others it is equipped for stones sealed box, the bottom of which separates the stones and the flame, being an intermediary in the transfer of heat.
The first stone is called flowing". This is the heiress of the black ovens. Today they are called "batch ovens". Indeed - how to pour water into such a heater and not pour fire? Impossible. Therefore, we must wait until the firewood completely burns out. That's when you can open the door and give water to get steam.


Plus flow heater is that the stones heat up faster and to a higher temperature. Minus- this has a bad effect on their lifespan in the heater.
Closed or deaf heater allows pour water directly during the heating of the furnace which makes it popular. Because they are independent processes. You have to pay for this convenience by the fact that the stones heat up more slowly, not as hot as in a flowing one, but still their temperature is enough to get good steam.
Another way of dividing furnaces is this: they are channel and cap. Of the latter, it gained wide popularity Kuznetsov oven. The difference between them is what exactly is the "engine" of the combustion products inside the furnace: the channel furnace works exclusively on draft. And in the hood, the products of combustion move freely, but at the same time, the newcomers push their predecessors along the passages prepared for them by the engineer.
On a note! There are a lot of varieties of both channel and bell-type furnaces. The final choice of the option suitable for your case usually depends on the stove maker, or rather, on how many different stoves he has built in his life.
A simple brick oven for a bath
But simplicity is a relative concept. In the absence of experience, any will be difficult, and if there is, any will be able to.

A simple brick oven for a bath with a closed heater
Based on the number of details and stages, including preparatory ones, then in our opinion the simplest will be the same metal stove in brick cladding- it’s not a fact that she will need a powerful foundation, it’s easy to build a casing yourself, masonry errors will not be so critical, and the result will please both the quality of heat and steam. So think carefully about what you are willing to go.
How to ensure security
Standard fire safety regulations require that a pre-furnace sheet be placed in front of the firebox. not less than half a meter in length, and the distance to the nearest wall was from the furnace at least one and a half meters.

Brick oven for the Russian bath. Before the firebox there should be a pre-furnace sheet (marked with an arrow)

Brick sauna stove must not be connected to the wall. Leave a gap between them. He needs it first due to thermal expansion of the furnace– Rigid connections may cause cracks. And so its surface does not heat up to the ignition temperature of wood.
However, a brick stove for a bath is still a fire hazard. It's all about cracks that appear over time both in the furnace itself and in the chimney, and can cause sparks to be released. The only way to fight is prevention. The cracked seams are cleaned and sealed with a new solution.
Bath stoves made of bricks: a sequence of work
As we promised, you will be able to estimate your capabilities by getting acquainted with the stages of building a stove into a brick bath.
Foundation
A brick oven in a bath must have a foundation. There are no options: the stove in a brick bath will have to be placed on a separate foundation. Many believe that the case can be dispensed with shallow foundation, however, this is not always the case. You need to focus on what you did for the bath as a whole. After all, it all depends on the bearing capacity of the soil. With a weight of several tons, the brick mass will exert significant pressure on the ground, and it usually sags unevenly, which causes the structure to skew and break - a wall or a furnace.
Advice! Read in the relevant section of the site. There you will find not only theory, but also numerous practical recommendations for building a suitable foundation.
Main - do not forget that it is impossible to combine the foundations of the bath and the stove into a single structure. Between them it is customary to leave a gap of at least 5 cm.
Brick stove for a bath: solution
IMPORTANT! Do not put any cement in the mortar for masonry, this must be remembered.
There are two ingredients left: clay and sand. And both are different in composition or caliber of particles. The sand is sieved through 1.5 mm sieve. As for clay, there are two options: either dig it up on your own site, or buy a bag in a store. In the first case you have to dig deeper than half a meter, because it is from this mark that something that can be useful to you begins.

Rule! It is recommended to use the same type of clay for the mortar as in the brick, that is, red or fireclay. The reason is that homogeneous materials have the same thermal expansion, and this is good under conditions of strong heating - they expanded equally, contracted equally, no stresses and deformations.
For masonry, the most important clay parameter will be that oily she or skinny. These are rather conventional names. You can understand what you are dealing with only by drying a lump of clay and looking at the result. Skinny clay tends to crumble when it dries. Fat behaves differently: visually, the lump becomes smaller in size and cracks appear on it.
Note! When mixed with sand, the fat content of clay changes, sand reduces it. That is why the exact proportion does not exist, it is the result of the selection of specific ingredients. The selection is carried out in the form of the following experiment: make several samples of clay and sand mixtures, mark the shares and let them dry. If the dried cake crumbles - there is an excess of sand, if it cracks - an excess of clay. Optima is a homogeneous, not cracked or crumbled sample.
Sand before kneading is not only sieved through a fine sieve, but also washed.
By the way! Some solution recipes contain ... table salt in small quantities.
The brick itself - brands, types
When planning a brick bath, the choice of the most basic building material plays an important role. We recommend watching a video in which the stove-maker tells what can be found on sale, which is better in his opinion.
Video
On our own, we add that a good selection criterion is sound when hitting a brick. There are no defects if the sound is sonorous and metallic. Any deafness is a sign of cracks.
We have already mentioned red refractory and fireclay bricks. In addition to them, suitable for ovens clinker and alumina heat-resistant. More expensive than all fireclay. It is used only for laying out the furnace core of the furnace. The rest of the listed ones go to the laying of its walls.
brand(number) stands for density. stove-makers use from 150 to 250. The higher the density, the higher the heat capacity, the longer you wait for the steam room to heat up.
Frost resistance material does not matter indoors, but it is worth paying attention to when you make a chimney.
uniform color is a good sign. Heterogeneous speaks of uneven firing and, as a result, different strength of brick sections.
Geometry- also not the last criterion when choosing. The right one is easier to work with.
Oven in a brick bath: are there any alternatives
Finally, let's still consider what can replace a brick oven in a bath.
Sauna stone oven
We will not advise you to build the walls of the furnace from real stone, but Overlaying an iron stove with slabs of some pretty stone is not a bad idea. Such a stove will cost less than a brick one, but not so much cheaper. The advantage is that it will take up less space, it will be easier to maintain it. In essence, this is an alternative to a brick casing, which, by the way, is also very good for creating a suitable stove for a Russian bath.

Sauna stone oven
Stone casings are sold for a variety of stove models, and when it comes to homemade, you can always make a casing to order.
Metal stove + brick chimney
We somehow bypassed in this article the question of how to be a chimney. It is clear that most people will not put an ordinary sandwich over a brick stove (although there are such). Such an oven is supposed brick chimney, with fluff and proper cutting of floors.
However, heavy and durable a brick chimney can also be placed on an ordinary metal bake in particular, which is also not bad. More precisely, connect to a brick pipe. In other words, the chimney is a separate story. Look at the photo, what could be its implementation in the mentioned bundle:


***
So, the decision is yours - there are no ideal stoves in nature, but there are those that suit us. We wish you to find just such, to solve certain problems.
Where can I buy
It is possible to find and purchase a stove by looking at the range of our website.
In contact with


In modern suburban life, a bath is an important component of a harmonious existence and respect for one's health. The opportunity to take a steam bath in your own bath is a pleasure that is difficult to refuse, and which is completely dependent on the stove.
Already a thousand years ago, different peoples had differences between baths and ways of taking bath procedures. A few centuries ago, the most common Russian banya was a black banya (kurnaya), made of stone or clay. Brick was then an expensive material - it was made by hand and only very wealthy people could afford it. A massive brick oven began to appear with the development of industrial methods for the production (and cheaper) of this material.

The stove-heater is the heart of the Russian bath Source fr.aviarydecor.com
Sauna stoves: features and specifications
Bath helps to get rid of negative emotions and is often associated with healthy relaxation, good spirits and a cozy atmosphere. The stove is the heart of the bath; comfort, steam quality and safety depend on its characteristics. It is not so easy to choose the main bath attribute, there are too many selection criteria and requirements for it. And if the owner decides to build a bathhouse, he will have to deal with several questions: decide on the material and design of the stove, think over its size and type of fuel.
Today, few people except professional stove-makers know that the method of construction and the principle of operation of a sauna stove differs from the functioning of the stove on which food is cooked. The brick sauna stove is a continuation of the traditions of the ancestors, which has the following features:
Design. The main parts are: a firebox, a chimney, a grate (a place for fuel) and an ashpit (a chamber where ash accumulates).

Sauna stove with original design Source pinterest.com
Characteristic. Kamenka, a container for stones, which can be closed and open. Stones are used as a heat accumulator, increasing the time of bath procedures.
Weight. It can reach 1000-1200 kg (depending on the size of the stove). For such a massive structure, a reliable foundation is equipped.
Fuel. Wood is used for the firebox, but the stove can run on both electricity and gas.
Brick bath stoves are determined by two main parameters:
Dimensions. The size depends on the area of \u200b\u200bthe premises that are planned to be heated. Most often there are furnaces with a base area of 3.5x4 bricks (890x1020 mm) or 4x5 bricks (1020x1290 mm). If you do not take into account the chimney, the height of the structure is 1680 mm (or 2100 mm if the ceiling of the steam room is high).
Design. The owners prefer to install a model with a water circuit, which is a tank for heating water. The tank can have an upper (near the chimney) or lower (near the firebox) location.

The heater was left in the steam room, the firebox was moved to the dressing room Source sdelaikamin.ru
Advantages and disadvantages of a brick oven
No matter how profitable and easy to use metal stoves, the owners, wise with worldly experience, prefer proven brick structures. Brick sauna stove has the following advantages:
Heat capacity. The stove is able to retain heat for 6-8 hours and heat several rooms (depending on location).
Energy independence. A wood-burning stove is ideal if there is no gasification, but there are power outages.
Savings in operation. No need to run a gas pipe or pull the wiring, and then pay the bills. Firewood will cost much less (especially if you harvest it yourself).
Comfort. These ovens produce rich but not scalding (light) steam and mild heat. The atmosphere of the steam room does not make it difficult to breathe and is ideal for those who like to bathe often and with taste.

Compact brick construction Source tproekt.com
Environmental friendliness. Both the brick from which the stove is built and firewood are environmentally friendly materials that are safe for health.
Design. There are real masterpieces of kiln art with stunning architecture and decoration.
fire safety. Provided with design features that fully comply with SP 7.13130-2013.
Brick ovens lose to other designs due to shortcomings:
Difficulties in execution. The masonry process has nuances, and finding a competent stove maker is not easy.
Size. A large stove eats up precious steam room area.
Price. Brick pleasure is not cheap: it is necessary to equip the foundation, purchase high-quality bricks and pay for the services of a master.
Time. The oven is heated, and the steam room warms up for a long time.
Care. Systematic cleaning of the ash pan and periodic cleaning of the chimney is required.

A brick oven radiates soft heat, the most comfortable for a person Source tutknow.ru
On our website you can get acquainted with the most from the construction companies presented at the exhibition of houses "Low-Rise Country".
Project Security
A brick sauna stove needs proper insulation from wooden surfaces - a rule, the violation of which sometimes ends in a fire. For bath procedures to be safe, several conditions must be met:
Foundation. You need a reliable foundation, which is equipped according to certain rules.
Chimney. The pipe passes through the ceiling, floor elements and roof. When arranging the chimney, it is necessary not only to protect the adjacent surfaces from heating, but also to maintain the tightness of the steam room. The pipe is separated from all elements of the building by a gap filled with a layer of refractory material.
Furnace location. The general rule is that wooden walls must be protected from heat. Therefore, there are minimum permitted distances: between the side surfaces of the furnace and walls - 50 cm, between the furnace door and the opposite wall - 150 cm.
Insulation. The wall behind the stove is protected by brickwork and metal sheets. A metal sheet (10 mm thick) is laid on the floor in front of the firebox, a protective measure against coals flying out of the flame.

The floor in front of the firebox is insulated with a brick layer Source kvartal-club.com.ua
Furnace materials: what and how much
A brick is suitable for masonry, capable of withstanding repeated temperature changes. There are two fairly strong, refractory bricks:
fireclay brick. Heat-resistant material of creamy-yellowish color, withstanding heating up to 1400°C, without loss of strength. Such a brick accumulates heat without harm to itself and at the same time has a large thermal inertia (it slowly heats up and cools down). It surpasses other varieties in terms of parameters, but it also costs more, which is why it is used mainly for laying out a firebox (it will take 20-30 pieces).
Solid red brick marked M (at least M150). The body, chimney and decorative elements are laid out from it. For a modest design, 250-280 bricks may be enough, for a large project, 800 (or even 1000) ceramic bricks will be needed.

This fireclay brick will withstand application temperatures up to 1350 ° C (ShB marking) Source nsk.zoon.ru
bath construction and design service
In addition to bricks, other materials and tools will be needed:
masonry mortar. Consists only of clay and sand. It does not use cement, which crumbles when heated and eventually causes the destruction of the masonry.
Furnace casting. Cast-iron doors, steel containers for water and stones, a grate (grate), a view (stove damper) are used.
heat insulator. Any material that can withstand temperatures up to 1200°C is suitable - for example, basalt wool in thin sheets.
Tools. You will need trowels, a tape measure and a building level.
Video description
About the stove with a firebox in the rest room in the following video:
Kamenka - a feature of the stove for the Russian bath
The main attribute of the bath is often classified according to the method of heating:
The first stoves appeared that were heated in black. They did not have a chimney, and while the logs were burning, the smoke would collect in the room and blacken the walls with soot. After that, the smoke was released through the window, and in order to take a steam bath, you had to wait until the firewood completely burned out. Heat and steam were obtained from heated stones lying in the hearth, the prototype of the heater.
Furnaces that are heated in gray or white have a chimney and a heater in their design. Bath in gray(with an open heater) warms up faster, but soot also accumulates on the stones, and this means that you have to wait for the firewood to burn out completely.
In the bath in white the stove is equipped with a closed heater. It does not pollute the walls of the steam room, does not burn oxygen and diligently saves heat for a long time. If the steam comes out of an open heater hard, burning, then here it remains comfortable, soft, even if the thermometer shows 100 ° C.

Bath in a black, with an open heater Source pechnoy.guru
On our site you can find contacts of construction companies that offer the service of installing fireplaces and stoves. You can directly communicate with representatives by visiting the exhibition of houses "Low-Rise Country".
It is convenient to divide stoves for a bath according to the method of heating:
periodic action. Here the stones are on the grate above the flame, they have maximum contact with it. Water can be poured onto the stones only after the firewood has burned out (otherwise you risk flooding the flame). The stove has to be heated periodically.
Permanent (continuous) action. The stones are in a closed heater (an insulated metal container), which is heated by fire. Heat transfer suffers a little, but it is allowed to pour water and heat all the time (permanently), and soot remains inside and does not pollute the steam room. The stove is heated when there are people in the room; its design prevents combustion products from entering the steam room.
The design of the stove is responsible for generating that very famous “light steam”, the optimal temperature (70 ° C) and humidity (60%). This task is best handled by stoves with a closed (internal) heater.
Video description
About the water tank oven in the following video:
Of course, a stove with a pile of stones on top looks much more spectacular and produces excellent steam. In fact, an open heater is more suitable for a Finnish bath, with its high temperature and dry air (Finns pour little water). High temperatures and high humidity can cause heart problems in an unprepared person. The main benefit of an open heater (as well as a metal stove) is the rapid heating of the room.
The construction of a brick sauna stove: a sequence of work
Each brick stove for a bath is a product of piece production. Regardless of which configuration is chosen, the stove is built in the prescribed manner, from the foundation to the chimney and finishes. The main task is to ensure that it does not smoke and effectively heats the steam room.
Planning
The design of the stove (size and configuration features) is selected in advance, simultaneously with the drafting of the bath. After choosing a project, an order is drawn up - a plan that shows the layout of bricks separately for each layer (row).

An example of ordering (scheme) of a brick oven with a lower water tank Source banya-expert.com
Foundation
Even a modest-sized stove weighs about 800 kg; the weight of a solid structure for a large steam room easily goes over a ton. It is clear that such a unit must rest on a solid foundation, for which certain requirements are imposed:
Place for oven it is better to choose before construction begins, otherwise you will have to cut the load-bearing beams and floor logs to equip the base and the truss system in order to bring out the pipe.
The furnace foundation is more practical to do unrelated to the base of the bath; this will help secure the structure if it suddenly begins to shrink. The bases must not touch, even if the stove is to be placed near an outside wall. In this case, a gap is made between the bases (at least 5 cm), which is filled with thermal insulation.
Foundations for baths and stoves laid at the same depth, but not less than the depth of soil freezing (in the European part of Russia, the value is 70-80 cm). If the soil is dense, 40-50 cm is enough.
The right foundation looks like like an inverted trapezoid- the lower base (in the pit) matches the size of the stove (for example, 90x95 cm), the upper one is made 10-12 cm larger on all sides (it turns out no less than 100x105 cm).

Foundation scheme for a brick sauna stove Source banyabest.ru
Solution preparation
The tradition involves laying on a clay-sand mixture, without the use of cement, which does not tolerate high temperatures. In order to improve the quality of masonry, the following preparations are made:
Clay before use soak for a day. The best quality is obtained when using red or fireclay clay - then the thermal expansion of materials will coincide.
The sand is sieved to remove impurities and make the mixture homogeneous.
The quality and service life of the stove depends on the thickness of the masonry joint. The ideal value is 0.5 cm; increasing or decreasing this value reduces the life.
Video description
About the detailed process of laying the heater in the following video:
masonry
When the clay solution is ready, start laying. It is recommended to start with the construction of a brick wall that protects the adjacent wall from critical heat. The laying of stoves for a bath is carried out in compliance with the following rules:
Stock up before starting work printed order.
bricks fit according to plan; casting is inserted as needed.
Experienced bakers prefer lay each row first "dry", without solution. Such a preliminary fitting significantly improves the process and avoids hard-to-fix mistakes. The method makes it possible to accurately select the bricks and try on the casting.
Formation of the first row. An important stage on which the geometry of the furnace depends. At the end of the row, check the corners.
Hull laying. The second row (and subsequent ones) is laid with an offset, so that each seam falls in the middle of the brick from the previous row. Such a checkerboard pattern ensures the reliability of the design.

Fireclay bricks are used for laying the furnace part. Source tproekt.com
Furnace masonry. For it, refractory (fireclay) bricks are used and a special solution is prepared on fireclay clay (you can buy ready-made). The furnace is built simultaneously with the walls of the body (with which it is not connected) and smoke channels. To increase the combustion temperature (reduce thermal conductivity), a layer of heat-resistant thermal insulation is sometimes laid in the gap.
When laying bricks check with the diagram so as not to miss the details - the formation of a blower chamber, a place for a door and a grate, laying a chimney channel and building a chimney pipe (including a valve).
During work, you must regularly check the thickness of the seams, as well as the verticality of the walls; this will protect the oven from distortions and cracks.

Elegant cast-iron furnace door Source msk-kamin.ru
water tank
Most often, a water tank is planned in the project - this is convenient and economical. The place for its installation is chosen so that it can absorb the maximum amount of heat. The tank can be mounted or built-in, depending on the size of the stove, and is installed next to the chimney.
The volume of the tank is calculated on the basis that a supply of 20-25 liters of hot water is required per adult. If the bath is planned for use by a company, it would be more practical to install a tank with a volume of 100 liters or more. To prevent the water from turning yellow, choose a stainless steel container.
Drying the oven
After the oven is finished, it is allowed to dry for 2-4 days (the size affects the time). Then, in a gentle mode, a test furnace is carried out - the furnace is heated with chips and straw, which additionally dries the structure. Several such preliminary fires may be required - until the damper ceases to remain wet from the night.

The furnace door is fixed with wire laid in the masonry seam Source tproekt.com
About Kuznetsov's sauna stove
A team led by Igor Viktorovich Kuznetsov developed a fundamentally new furnace design with a two-tiered hood - a chamber in which heating takes place (in the lower bell) and separation of the movement of hot and cold gases (in the upper one). Hot gases are retained in the furnace, which significantly increases the heat transfer of the structure.
Kuznetsov's brick oven can maintain a suitable temperature regime not only in the steam room, but also in the washing room and in the rest room. High efficiency, economical fuel consumption and a minimum amount of soot during combustion contribute to the popularity of the design.

Fragment of masonry brick oven Source bazar.bg
Brick oven: lining features
Brick stoves are suitable for cladding like no other, since brick and cladding have an approximately equal coefficient of thermal expansion, which cannot be said about a metal structure. The brick oven heats up gradually, and the lining has time to warm up evenly. The most popular facing materials are:
Clinker tiles. Clinker is characterized by high refractoriness and heat capacity, it does not deform over time and gives a cozy look to the steam room. During production, dyes and chamotte clay are mixed into clinker.
Terracotta. Pressed unglazed clay that has been fired. The tile has a characteristic red-brown color and excellent strength indicators.

The fashion for tiles spread in the 17th and 18th centuries and has remained in demand to this day. Source forumhouse.ru
Majolica. Tiled material obtained by pressing; an improved version of terracotta. A colored pattern is applied to the tile and covered with glaze.
Tile(a type of tile). A special box-shaped tile, often handmade, decorated with a sophisticated pattern and filled with glaze, was originally invented for lining stoves. The tiles have a special design of the back side and are fastened with special metal pins into the seams, simultaneously with the stove masonry.