Descending devices. Descendants and belay devices
Overview of descenders and belay devices
The main purpose of the descender is to fully control the descent on a fixed rope. The main function of the belay device is to provide reliable insurance. A controlled descent is achieved thanks to the adjustable friction force of the rope in the devices. In this regard, trigger devices are divided into:
- with backstop
- without backstop
Devices with backstop
All devices of this type are used only on a single rope.
Self-locking trigger device

For working with a rope with a diameter of 9 to 12 mm. Designed not only for descent, but also for insurance and ascent. Doesn't twist the rope. The brake is fixed automatically when the handle is released. Can be attached to the rope without snapping out of the harness thanks to the spring clip. The descent is controlled by holding the free end of the rope.
Pros:
2. Doesn't twist the rope
3. It is possible to climb the rope without changing the position of the device.
4. The ability to hover at the required height without using additional devices.
Minuses:
2. Large lifting friction force.
3. Weight/dimensions
4. Not suitable for insurance
5. Not suitable for double rope work
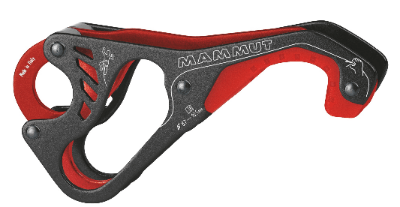
Self-locking descender Anti-Panic

For working with a rope with a diameter of 9-13 mm. Equipped with anti-panic system
It completely eliminates the possibility of a fall in the event of a panic, so it is perfect for rescue work, emergency evacuation and loss of control of the rope. The dual automatic brake system is activated not only when the handle is fully released, but also when you try to grab the device. When you press the handle, you have full control over the descent. Doesn't twist rope. The maximum length of the descent - 100 m
Pros:
1. Full control of the speed of descent.
2. Doesn't twist the rope
3. If you lose control of the rope, the system is completely blocked and stops.
Minuses:
1. Does not work on icy, dirty, wet ropes.
2. Weight/dimensions
3. Not suitable for double rope work
Examples of devices with an anti-panic system
Trigger belay device GriGri (Gri Gri)

For working with a rope with a diameter of 8.9 to 11 mm. Thanks to the automatic locking, the device is excellent for organizing insurance. It is light weight and very compact. The most popular belay device in rock climbing. A very simple belay technique: two hands are on the rope. Blocking: In the process of stopping the fall, the belayer holds the free end of the rope, the cam turns and grabs the rope, increasing the degree of blocking until the rope slippage is completely stopped. Smooth rope etching, full sense of control when descending and belaying. It is very convenient that the usage diagram of Gris Gris is engraved on the device itself.
Pros:
1. Doesn't twist the rope.
2. The ability to hover at the required height without using additional devices.
3. Very simple but reliable insurance.
Minuses:
1. Not suitable for double rope work
2. Requires care
3. Price
Self-locking descender I "D

Equipped with anti-panic system.
For working with a rope with a diameter of 10-11.5mm.
Thanks to the anti-panic mechanism, automatic blocking occurs and the descent stops. It is difficult to make a mistake if the rope is threaded incorrectly, since the device has a special stopper.
The handle has multiple functions: control the speed of the descent by holding the free end of the rope, lock/unlock the device, fix the position on the rope at any point during the descent.
Improved glide of the device along the rope due to the shape of the stopper. The rotary eccentric easily picks up the slack in the rope. Perfect for pulling the chain hoist and for a short climb up the rope.
Pros:
1. Automatic lock.
2. The ability to hover at the required height without using additional devices.
3. Protection against incorrect threading of the rope.
4. Excellent rope glide
Minuses:
1. Not suitable for double rope work
2. Requires care
3. Price
Trigger "Grid"
 A very popular descender for promalp and cavers. Perfect for long vertical descents. Does not "twist" the rope due to its design. Allows you to hover at a height when descending without using your hands. There is an opinion that the use of a lattice wears out the rope much less than similar devices.
Pros:
1. Easy to use.
2. The device is very durable and reliable.
3. Minimum care required
4. Does not twist the rope.
5. It is comfortable to work on two ropes.
6. Possibility of hovering during descent
Minuses:
1. Large dimensions.
2. There is no possibility to use for insurance
Devices without a backstop include
Descender belay device eight

The figure eight is the most common device for organizing belay and descent in mountaineering and sports tourism. Usually, this is a solid metal part, in the form of the number "eight". There are UIAA requirements for the descender belay device, in which, according to the standard, the eight must withstand a load of 2500 kg
There are a large number of types of eights. There are with horns / mustaches / fangs for fixing the rope on these "growths". Such devices are used in mountaineering, mountain tourism. There are lightweight eights without unnecessary "growths". They are used, as a rule, in sports tourism.
Pros:
1. Simple but very durable device
2. Low price
3. Light Weight
Minuses:
1. The rope is twisted.
2. There is no possibility of fixing the rope if there are no horns.
3. When belaying, you need to be very careful.
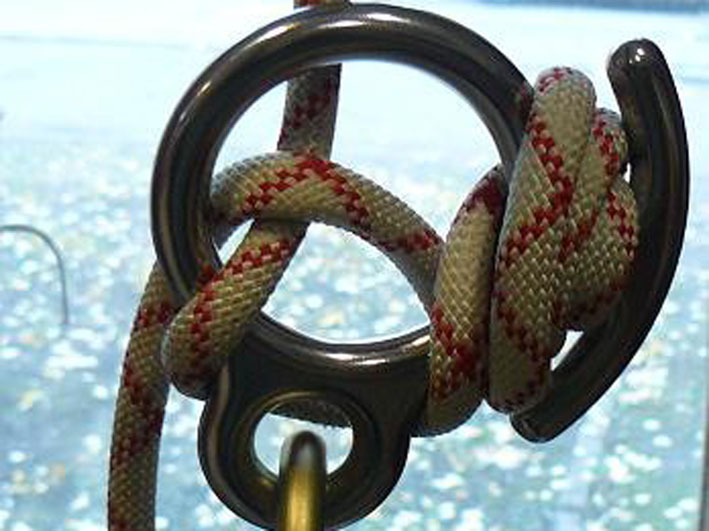
Descender Basket

Can be used on both single and double rope. It is light weight but high strength. Convenient to use. Thanks to the design of the basket, you can easily and quickly thread the rope. But it should be borne in mind that with a very fast descent, the rope may heat up. Now on the market there is a wide selection of “basket” type descenders, which differ in price and functionality.
For many centuries, people have climbed peaks and crossed passes for military, religious, commercial and scientific purposes. Starting from the 18th century, mountaineering in Europe began to develop as a sport, methods of belaying and descending with a rope began to be developed. The simplest ways of braking the rope for insurance were: through a rocky ledge with a loop of rope and a carabiner, in the snow - through the lower back, an ice ax. But such methods were not suitable for steep and sheer slopes. And for descending steep and difficult sections, a different method of descent was used: the rope was wrapped around the body or tucked into a carabiner, thereby increasing its friction, thanks to which it was possible to descend in a controlled manner.
In 1912, the German climber Hans Dülfer first used the method of rappelling, sitting on it without special descenders. This method made it possible to descend much faster than descending by climbing through the terrain, but at the same time it caused discomfort and required constant control. Therefore, in the USSR, they necessarily secured themselves with a grasping knot (Prusik, Marshara, etc.). Now a rappel is called a descent along a fixed rope with the help of belay and descenders.
Depending on how the rope is located on the human body, braking will also be appropriate:


- a - descent in a sports gymnastic way (on slopes of medium steepness);
- b - descent on steep slopes with a safety net with a grasping knot;
- c - descent with braking, by the Dyulfer method (through the thigh) with a safety net with a grasping knot.


To assemble such a system, it is desirable to use carabiners of the same shape, the latches of the carabiners should look in different directions.
 |
.jpg) |
 |
 |
 |
 |
Pros:
- collected from improvised means;
- you can work on a single and double rope;
- does not twist the rope;
- works with ropes of different diameters;
- quite easily can be locked and unlocked under
load by one person.
Minuses:
- such a design, especially assembled with a hammer or ice ax, requires constant monitoring;
- long enough to assemble and disassemble;
- It only works in one direction - downhill.
Node UIAA (UIAA)
One of the ways to knit a UIAA knot is shown:
The UIAA knot is the simplest, most reliable means of descending and belaying.
Pros:
- to use it, you need a minimum of equipment (a safety system, a carabiner, preferably an HMS, since it was designed for this knot, and a rope);
- works on ropes of any diameter;
- quickly and easily assembled, disassembled;
- easily locks and unlocks under load if necessary to stop the descent. To block the UIAA, the Munter-Mule knot is used - it allows you to untie it without jerking under load;
- works in both directions - if necessary, switch from descent to ascent
no additional manipulations are required: the knot is easily turned over and
moves to the top belay position.
Minuses:
- the rope and carabiner wear out quickly. When descending on a wet rope, especially where there is a lot of sand, the carabiner “saw through” a few millimeters for a pair of rappels;
- twists the rope;
- a large pear-shaped (HMS) carabiner with a clutch is required for optimal knot operation. On carabiners of a different shape, the knot works worse;
- when descending, the carabiner heats up, which can lead to melting of the rope.
Belay devices
Most incidents in the mountains occur not at the time of the assault, but on the descent. Climbers lost their comrades in simple, banal situations. This was the impetus for the creation of descenders.
With the introduction of synthetic climbing ropes, devices were invented that combine the methods and functions of belay and descenders, called "belay devices" (belay and descenders).
The belay device is a structure fixed with the help of connecting elements (carabiners) on the belay system or terrain (at the station), through which the belay rope passes, going from the insurer to the leader. Also, as mentioned above, these devices are also used for rappelling. In this regard, they are often called "triggers", "triggers". It must be remembered that descenders designed only for rappelling (for example, "eight") cannot be used for belaying.
Safety devices can be divided into two large groups:
1. Devices with manual rope lock (EN 15151-2 "mechanical").
In such devices, the blocking of the rope is carried out due to the friction of the rope against the device and the muscular strength of the hand.
2. Devices with auxiliary rope lock (EN 15151-1 "semi-automatic").
In such devices, the primary blocking of the rope course is carried out with the help of mechanical or structural parts of the device, and then - the muscular strength of the hand.
As a rule, to work with a modern belay device (with the exception of semi-automatic ones), you will need an HMS carabiner, that is, pear-shaped. In this case, the carabiner bar must be thick enough (about 10-12 mm) so that the bending radius of the rope is large enough, and the carabiner must be made of aluminum alloy or steel. Titanium carabiners are absolutely unsuitable for belaying because of the extremely low thermal conductivity - a carabiner heated by friction can damage the rope.
Many designs were invented, some of which were successful, but forgotten, and some became classic. Next, we will talk about the most famous of them.
Sticht washer
The Sticht washer has two slots for working with one or two ropes. Works on ropes with a diameter of 8 to 12 mm. When working with ropes of small diameters, it holds well even on an icy rope.
This device leads its pedigree from a link in an ordinary marine chain (as a variant of such a brake - a carabiner brake). Fritz Sticht suggested using a simple metal plate with slots for braking.

Photo from the Vkontakte group "Alpinist's Library"
The rope is threaded into the slot with a loop into which a carabiner is snapped (or two for strong braking). Braking occurs due to the friction of the rope on the carabiner and the edge of the slot, and also depends on the angle of coverage of the Shticht Washer by the rope. In the high braking mode (with two carabiners), the Shticht Puck surpasses the degree of braking of modern "glasses" with wedge-shaped slots, and becomes indispensable when working on thin ropes.
Cons - the rope is not fixed. When unfastening the rope, you can lose the puck if you do not secure it separately. And one more thing: there are no different options for threading the rope, i.e. there is no way to increase or decrease friction without additional carabiners or other tricks. Also, after the load, the device “sticks” to the rope, which makes it difficult to issue it, so a spring was attached to it over time. Later, when a safety cable was added to the design, the need for a spring disappeared.
"Basket", "glass", Reverso
Modern versions of belay devices, working on the principle of the Sticht Washer, have many names in everyday life: “basket”, “glass”, “reverso”, “bast basket”.
Reverso (Verso version without additional rings) is one of the company's most popular belay devices, its name has already become a household word for such devices.
Devices without moving parts
Now belay and descenders have begun to appear, which do not have mechanical moving elements, but block the rope when loaded due to design features.

 |
 |
 |
 |
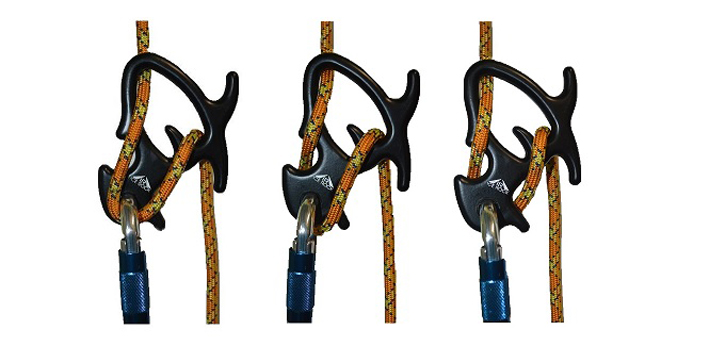
- A — we issue a rope;
- b — choose a rope;
- V — the device self-locks, helping to stop the stall. In this case, it is necessary to load the free end of the rope coming out of the descender. Under no circumstances should the free end of the rope be released!!!
- G — descent with the ability to control the speed of descent.
pros
- The device itself is blocked in the event of a breakdown, which allows you to insure a person.
- Very simple design.
- Less weight compared to "semi-automatic" devices.
Minuses
- Works with one rope, which does not allow it to be used in mountaineering.

Mammut Smart 2.0 works in a similar way, the pros and cons are the same.
The Mammut Smart Alpine is designed for two ropes and can be used in auto block mode. This device is suitable for use in both climbing and mountaineering.
pros
- Can be used in auto block mode.
- There are no mechanical parts, which makes it easy to operate.
- Not subject to panic reflexes when used.
"Eight"
Devices of the "eight" type were developed for descent. Due to design features, such as "horns" or slots in the device itself, it is possible to thread the rope in the device in different ways, which allows you to change the coefficient of friction.
Minuses
- Not suitable for insurance, because. with a deep stall, effective holding friction is insufficient.
- It is not possible to control two ropes separately, because ropes run together.
- The rope is strongly twisted due to the presence of kinks in several planes.
Classic descender of the "lattice" type with removable crossbars. The design makes it easy to remove and install them on the rope, adjusting the friction force depending on changing conditions (weight of the rope, user, etc.). Compact and lightweight device.
- Thanks to the removable crossbars, the device can be easily installed on a rope.
- Adjustable to the required load.
- The device is friction-protected to protect the rope.
- Does not twist the rope when descending.
Semi-automatic descenders and belay devices with self-locking function
Descenders are designed to provide a controlled, smooth descent, while belay devices are designed to provide both bottom and top belays, and they also increase the safety of the belay by helping to stop a fall.
One of the first semi-automatic descenders was the Petzl Stop. It traces its history back to a descender designed for cavers by Bruno Dressler, manufactured and later modified by Fernand Petzel (founder of Petzl), and subsequently used in mountaineering.
The device was a steel plate, bent in the middle, and fixed inside two rollers. The rope tucked into the device was bent in the shape of the letter S, and the friction created in the device made it possible to control the speed of descent, as well as to stop by simply pulling on the free end of the rope emerging from the device with one hand. It allowed descending on a rope (fixed at the bottom or at an intermediate point) without twisting it, which was especially important for cavers. Not afraid of dirt.
The modern version of this device already has two independent aluminum plates. With a slot at the top roller and a special plastic clip in the hole for attaching the carabiner to the belay system, which allows you to open the device and quickly thread / retrieve the rope. Also, two fixed steel rollers can be replaced with new ones as they wear out. This significantly increases the resource of the device, because. Cavers almost always work with dirty and wet rope, which wears down devices very quickly, especially aluminum ones.
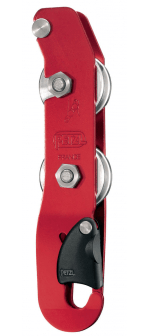
today - one of the most popular devices among speleologists. Its main structural elements are the same as those of it, but it has a movable asymmetrical lower roller merged with the handle. Due to this, if you release the handle during the descent, the roller (cam) warps and presses the rope against the upper roller, thereby stopping the descent.

pros:
- Doesn't spin the rope.
- Replaceable rollers, which increases the resource of the device.
- Descent control.
- The rope is refueled without pulling the device from the belay system.
- When the handle is released, it stops the descent, but it is possible to disable this mode using a carabiner.

- You can use a rope clamp or a grasping knot to climb the rope.
Minuses
- For sports mountaineering today it is heavy and bulky.
- It poisons the rope (therefore, if you need to hang during the descent and let go, the free end must be blocked with a knot).
 |
 |
.

Also one of the first semi-automatic belay devices created by Petzl in 1992. It was very compact and had a movable cam that, when loaded (when falling or jerking), gripped the rope, increasing the degree of blockage until the rope slipped completely.
There was a handle to unlock the device. By clicking on it, throwing the outgoing rope and pressing it against a special cheek (which created additional friction), it was possible to smoothly begin the descent. On the descent, speed control was carried out by the hand holding the free end of the rope.
Despite the automatic blocking, it was impossible to let go of the free end of the rope, i.e. a situation could arise when the cam was not blocked, and for help it was necessary to pull the free end of the rope. For example, this could happen due to the high friction of the rope in the guy lines / on the terrain / due to smooth sliding along an inclined surface.
A similar design and technique of working with the device remained on subsequent models of the device.
Important: the device requires familiarization with the instructions and practice!

pros
- When dashing, they are blocked, which allows almost no effort to stop the fall (a lighter belayer can comfortably belay a heavy leader).
- Using this device and a rope clamp (jumar) or a grasping knot, one can very effectively climb a short distance along a rope in an unsupported space.
Minuses
- There is no way to work with two ropes.
- The device is structurally susceptible to panic reflexes. They appear when, during the descent, the belayer presses the lever too hard - the speed of the descent increases sharply, and the person reflexively presses the lever even more strongly, completely removing the blockage to the device. Structurally, this was eliminated only on the latest GRIGRI + model. The panic reflex can be eliminated by using the device correctly: before starting the descent, throw the rope over the cheek, increasing friction, and press on the handle not with the whole palm, but with several fingers.

- Also, when belaying, in order to quickly release the rope and not violate the rule of constant control, the free end of the rope must be held in such a way that the free end is in the palm of your hand, and the thumbs of your right hand press the locking cam.


The state-of-the-art GRIGRI 2 is a compact and ultra-light semi-automatic device designed for comfortable handling of thinner ropes, with single ropes from 8.9 to 11 mm in diameter (ideal for ropes from 9.4 to 10.3 mm). Only 170 g, 25% smaller and 20% lighter than the previous GRIGRI version.
The pros and cons are the same as the previous model.

GRIGRI + is the latest version in the family of one of the most popular belay devices, which has a switch between the top and bottom belay and an anti-panic function, which made it possible to eliminate the disadvantages of previous models.
|
|
 |


.
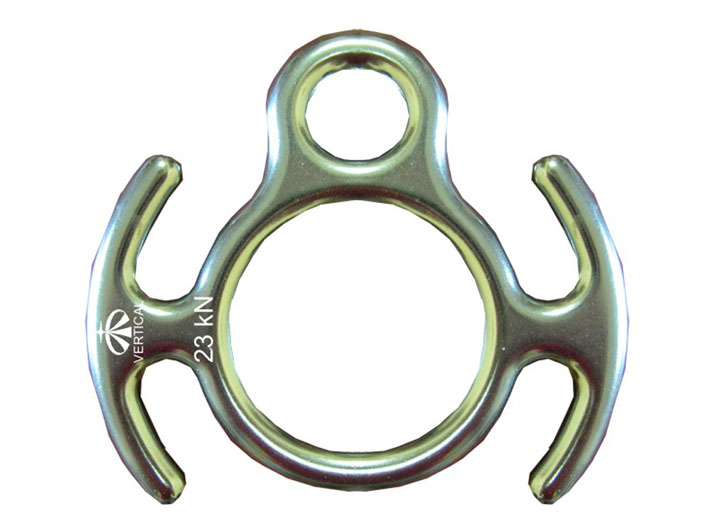
Kashevnik devices
Due to the lack of special devices for sale, enthusiasts in the USSR made handicraft triggers. One of these craftsmen was Boris Lazarevich Kashevnik, the author of a number of devices for rappelling and belaying, for example, "Insects-3".

A— bookmark one rope for insurance and descent; b– laying two ropes for belay and descent; V- the maximum distance from the carabiner to the body of the plate (braking force is less); G- the minimum distance from the carabiner to the body of the plate (the braking force is greater); d- fixing the rope; e- use of the device as a shock absorber.
The presence of round and oval holes allows you to change the distance from the carabiner to the plate and thereby choose the optimal braking force depending on the specific conditions.
Certification and marking of descenders and belay devices
In the USSR, a lot of equipment was created handicraft. Many really successful devices were invented, but they often led to injuries, because they were made from improvised materials that had not undergone proper processing, and tests were often carried out by the same enthusiasts “in the field”.
For modern equipment, norms and standards have been developed that specify the technical requirements for the minimum breaking load, materials used, test methods for descenders, marking, and type of devices.
In Russia, descenders and belay-rappel devices are not included in the “Unified list of products subject to mandatory certification”, there is no technical regulation (standard for “SPORT” devices), therefore everyone uses the European standards EN 15151-1 and EN 15151-2.
Standards EN 15151-1 and EN 15151-2

Standard EN 15151-2: Devices with manual rope lock
- Type 1: for descenders without friction adjustment function.
- Type 2: for belaying and descending without friction adjustment function.
- Type 3: for descenders with friction adjustment function.
- Type 4: for belaying and descending with friction adjustment function.
Standard EN 15151-1: with auxiliary rope lock
- Type 5: for descent with an auxiliary rope lock (“semi-automatic”), without a blocking element in case of panic (“anti-panic”).
- Type 6: for belaying and descending with an auxiliary rope lock (“semi-automatic”), without a blocking element in case of panic (“anti-panic”). For example, .
- Type 7: for descending with a blocking element in the event of a panic ("anti-panic").
- Type 8: for belaying and descending with a blocking element in case of panic (“anti-panic”). For example, .
For industrial devices used in work at height or rescue operations, there are standards. The standards developed for rope access techniques for descenders are called EN 341 Personal fall arrest equipment. Descending Devices” and EN12841 “Rope Positioning Devices”. Such devices can be used as components in positioning and holding systems.
Marking
.jpg)
- Manufacturer.
- Device name.
- Rope installation direction:
- The working end of the rope.
- The free end of the rope.
- corresponding standard.
- UIAA quality label (International Union of Mountaineering Associations).
- Acceptable rope types and diameters.
- Serial number: product batch number and year of manufacture (the picture shows the decoding of the Petzl number, each brand in the product passport indicates how the serial number is decoded).

- You must read the instructions before use.
- An organization that controls production.
The sequence in which the information is indicated is different for each brand.
The figure eight is usually the first descender that climbers master, it is simple as an ax and reliable as a crowbar. In addition, the figure eight can be used both for insurance and as a ring, in general, which is enough for imagination. Let's talk about her.
Varieties
Now there are a huge number of eights of different functionality on the market, some of these descenders are no longer similar to the “8”.
All eights can be divided into two groups, with and without horns. The horned figure eight is convenient where you need to hang and free both hands, the hornless ones are simply lighter and are considered more athletic.

Modern versions of this descender also offer different ways to thread the rope into them for different speeds of descent and for show-offs.
There is a variety of eights with a rectangular large hole, this is necessary to eliminate the twist of the rope during the descent. It was because of the strong twist that eights were banned for use by cavers during the descent.
There is a variety called "Nine". It has a more advanced locking method, but it is not clear how to safely use it during the descent. After all, for this you need to loosen the free end of the rope going to the hand. How?? Only if you pull yourself up with one hand on a rope that goes up. If you know how to safely block it, write in the comments. But, in addition to the new blocking scheme, this “nine” also has classic horns, although they are short, but you can use them. I think it is well suited for promalp, where long hangs are needed.

There is a figure eight from Petzl with a special overlay to take it with your hands when it is very hot. This is strange and incomprehensible. Let me explain, when descending, the figure eight heats up so much that it can burn your hand .. But for some reason the manufacturer didn’t think about the rope, but if it melts, then at best you will hang on the insurance, and at worst, I think it’s clear .. Personally I control the heating during the descent, and if the figure eight for the hand is hot, then I reduce the pace a little.

There is also a figure eight called "Petal", this is an interesting variety. It is very compact and has one horn and notches at the top to block the rope.

Application
When it comes to descending, there are several ways to thread the rope into a figure eight.
First way- through the neck of the figure eight, without snapping the rope into the carabiner. With this method, the friction of the rope is higher, and hence the speed of descent is lower. It is also easier to hold the free end of the rope. The downside is that for such a rope filling, you need to snap off the figure eight from the carabiner.
Second way- through a carabiner and a larger hole of the figure eight, with this method the highest speed of descent and the smallest twist of the rope are achieved.

There is another way, but you should never use it. Look at the photo below. Once again, do not use this method, I am talking about it only so that you know that it exists and that it cannot be used. This is life threatening, you can just lose the rope and continue almost free flight.

Other methods require non-standard figure-eight configurations, and they are not particularly needed.
The best way to descend is the second one, it is the fastest, there is no risk of losing the figure eight and rope twist is minimal.
figure eight horns
Separately, it is worth mentioning the use of the horns of the figure eight. They come from two sides (such a figure eight is called "Invar") and from one side. Needed to block the rope in order to hang and free both hands. Many simply wind the free end of the rope around the horns, but this is also not safe. That's right - after winding, additionally throw the free end through the chassis, look at the photo.
Double horns can be used for blocking when descending on a double rope and for zigzag descending.
Descent in a zigzag is when two ropes, 1-2 meters apart from each other, are simultaneously passed through a figure-eight with double horns. When descending, one rope is blocked by the horn, and the other is released a little, then the ropes are changed. This method of descent can be useful for promalp.
Alternative ways to use the figure eight
In addition to using the figure eight for its intended purpose, it also has other possibilities. For example, a figure eight can be used instead of a ring. If carabiners are snapped into it from both sides, then in some cases it can replace the quickdraw. Paired with a jumar, the figure eight can also be used to lift. However, for lifting, it is better to replace it with some kind of grasping knot. It is the figure eight, due to the absence of moving and shock-sensitive parts on it, that is best attached to a rope instead of a load for throwing onto a branch or somewhere else. And of course, the figure eight is used to insure a partner, because if he falls, it will be enough just to hold the rope.
Original taken from mr_aug V
Original taken from survivalpanda in Vertical training for beginners. Likbez. Theory and practice of entry level
In this article I will try, to the best of my understanding, to explain the basics of mountain training in the most simple way for absolute beginners in the subject.
I will tell you about the terms and the simplest techniques of descent and ascent that everyone can master.
Just a few months ago, in order to collect this information, I had to climb the Internet for a rather long time, so I decided to systematize and present it as simply as possible, I think it will be useful.
The article turned out to be big, but you can’t throw out the words from the song. She wrote for a long time. Right in parallel with writing, I experienced or mastered something new and included it in the article.
Also, I do not rule out some mistakes that I could well have made.
Warning: it is better to do such things under the supervision of professionals. Otherwise, you can very easily get killed or injured.

So. It all started with the great bang. All mountain training, according to my classification, is divided into two types of organization of movement on a rope. This is an upward movement i.e. ascent and downward movement i.e. descent.
Now we will slowly begin to disassemble each item of equipment and the term that may meet on the thorny path of a beginner who wants to get a little familiar with this topic.
The first thing we need is rope.

Without a rope, we won’t climb anywhere and then we won’t go down from there.
Two types of ropes are used in mountaineering: static(static - slang) and dynamic(dynamics - slang). They are characterized by dynamic qualities, namely the ability to elongate under load.
The main property of dynamic ropes is the ability to absorb the jerk that occurs when a climber falls (we will talk about the fall factor below). Therefore, dynamics is very often used for belaying climbing. For lower insurance, it is generally required.
For a simple descent and ascent on a rope, a beginner will only need to purchase a static rope. A bay of 50 meters is enough for everything and still remains. The budget option would be to purchase domestic rope (Kolomna, Dzerzhinsk, etc.).
Standard diameters used in mountaineering are 9-11 mm (in promalp - 10-12). The more, the stronger and heavier the rope. The more it slows down in the descender.
I advise you to stop at the golden mean - 10 mm.
And if we touched the ropes, then we can not ignore repsnur(repic, repchik - slang). This is an auxiliary static rope with a diameter of 3-8mm. It has a bunch of applications, ranging from the organization of self-insurance and ending with the manufacture of shoelaces.
In general, the paracord was not lying around.

I use a 5mm cord, a skein of which is almost always in my backpack.
With the ropes sort of figured out.
From the ropes we smoothly pass to the knots.
There are a lot of different knots and you can learn them endlessly. I will focus only on some of the most in my opinion demanded.
First it eight, we can say - this is the main node that can be used in almost any case. Very reliable knot, practically does not weaken the rope.
The figure eight is used for bindings, both to an individual safety system (ISS) and to a support. For connecting and lengthening ropes, in general, for almost everything.
You need to learn how to knit a figure eight loop.
Bowline- a very common knot for tying and creating loops. Less reliable than the figure eight, but knits faster. A control node is required. Not absolutely reliable. Tie a better eight.
You need to know at least one grasping knot. Then we will insure ourselves.
Well, knot UIAA(UIAA), needed for emergency descents and descents with a minimum of equipment.


Note! The free end of the rope should exit from the side opposite the carabiner sleeve.

Have you bought a rope, mastered the knots, now you can climb and descend?
In principle, yes, you can, like in the good old days, rappel without any equipment.
To rappel - to descend with a rappel. Many people think that this is any descent, but it is not. Dylfer is a descending technique named after the inventor.
So, it is possible to go down in this way, but it is not safe and inconvenient.
For convenience and safety, it has long been invented Individual Harness Systems(ISS, system, gazebo, suspended).
They serve to distribute the load on the body when hanging and falling and do not let you fall.
Systems are full And waist.
I use a belt system. If desired, it can be turned into a full one by buying special straps.
For beginners, I would recommend a regular ISS without shoulders.
If you need a budget option, then the domestic company Vento. In any case, you should not take systems consisting only of slings. In the people they are affectionately called "egg cutters". If there is enough money, then it is better not to be stingy and take something from the famous brands Petzl, Black Diamod, etc.
The following photo shows the main elements of the safety system:
Leg loops
Waist girth
Safety ring (green)
Loops for hanging equipment - they are not cargo, in no case should you insure and hang on them.


Dealt with insurance systems.
Now we need combine rope with ISS. You can do this in two ways. Knot and through a carabiner.
The knot is still the same figure eight, but I will talk about carbines a little lower.
The carabiner is fastened into the central safety loop. This is a strong recommendation of all manufacturers.
Very often they are taught to fasten into the belt loop and the leg loop at the same time - this is a mistake. increases the chance that the carabiner will warp and it will be loaded laterally. At the same time, only a knot can be attached to both loops.
Do not believe me, then read the instructions for your ISS.

Now let's move on to carbines.
So what are carbines.
Firstly, they are sleeved and non-sleeved.
Their difference is that the clutched ones are equipped with a special clutch that prevents the carbine from opening spontaneously.
Couplings There are threaded, bayonet and automatic.
With automatic it is convenient to manipulate with one hand, but their reliability leaves much to be desired. I recommend using carabiners with threaded sockets. And most importantly, always make sure that the carbine is muffled.


Also, carbines differ in shape and are: oval, trapezoidal, triangular, pear-shaped, etc.
Oval carabiners are the most versatile and inexpensive.
Trapezoidal with a similar weight have greater strength than oval.
Triangular and pear-shaped carabiners have increased rope clearance. They are more convenient to fasten and use the UIAA knot.


Carabiners are made from different materials. These are steel, aluminum alloys and titanium.
Steel carabiners are heavy and very strong, aluminum carabiners are much lighter. Titanium ones are quite rare and I did not communicate with them.
Now for strength.
Each carbine is equipped with this marking. It means that the carbine from the photo in the muffled state will withstand a load of 22 kN (2.2 tons) in the longitudinal direction. 8 kN if the latch is open and 8 kN in the transverse direction.

You see how important it is to lock the carabiners and make sure they are positioned properly.
Note! The clutch of the carabiner should always "look" at you. This way you will see if the carabiner has accidentally disengaged.
If it is possible that the load will be applied from several sides, so-called rapids are used. These are steel carabiners that do not have a folding latch, but only a threaded coupling.
I would advise a beginner to buy 3-4 carbines of various shapes with threaded couplings. Production material - optional.
Let's move on to Descenders(SU, trigger).
The main principle of operation of all control systems is the creation of rope friction in the mechanism. As a result, you can control the descent with very little effort.
SU happen manual And automatic.
In manual landing stages, the speed of descent and braking depend only on the way the rope is threaded and on the force with which a person pulls the rope below the landing stage.
Automatic descenders have a special mechanism. We pull the handle - we go down. We release the handle - we hang. In this case, the free end of the rope must still be controlled.
In this article, I will only talk about hand-held devices. for a beginner who does not plan to engage in industrial alp, automatic devices are completely redundant.
And I will tell you about two types of triggers - this is a figure-eight and a Shikht puck.
SU eight- This is one of the most classic devices. Looks like this.

The horn is needed to fix the rope, there are eights and without horns.
The disadvantage is that the figure eight twists the rope. This means that after several descents, the rope will be full of "lambs" that will then have to be untangled.
The advantages include several options for refueling the rope.
There are two of them. Through the carabiner (the speed of descent is higher) and through the neck of the figure eight.


Well, at any time, the horned figure eight can be blocked by winding the rope around the horn.

Another, more modern version of the figure eight is the Petzl piranha. It has even more ways to fasten and adjust the speed of descent. More about this trigger device will be in a separate review.

By the way, take a look at the non-Petselevsky carbine. When it's decoupled, the red anodizing strip is visible - a great idea in my opinion.

The second type of manual SU is washer charge. They are: glass, basket, reverse, etc.

Works great with single and double rope. They don't spin it. In general, I recommend starting with just such a descent.
Threading the rope is carried out as follows. A loop is created that is threaded into a slot on the device. The free end of the rope is directed towards the SU jaws.

A carabiner is fastened inside the loop.
Note! The cable is not a loaded part and serves only for transportation.
Let's say the stars align. You have bought a coil of rope, ISS, carabiners and a belay device.
Good, still needed helmet. But I leave it on your conscience.
Although even a banal construction helmet will not hurt.
I use ballistic helmets, which doesn't always elicit a healthy response.

Will not be redundant knee pads. Otherwise, bruising on the knees cannot be avoided.
Just as important are good gloves. When descending quickly, the rope rubs and burns your palm, you can instinctively release the rope from your hands from pain, which can be fatal.
Now we take all this and go to an impromptu climbing wall.
Do not forget to call a friend with you who will carry out insurance. Haven't forgotten? Well done!
Our climbing wall will be a small wall from which you can go down. In the photo, for example, a retaining wall.

For the first workouts, the lower the better.
Now we put on a harness. Tighten and check all buckles. Ask a friend to check again.

The first step is to fasten the rope. In mountaineering, it is customary to fasten either to one unconditionally reliable point, or to two less reliable ones. These anchor points are called stations.
We will be attached to a living tree. This is a pretty safe anchor point.
We are tied to the tree with the same blessed eight, well, or bowline without forgetting the control knot.
There is another option to buy quickdraw from a 120 cm long sling and using a carabiner to create just such a station.

Using a semi-grasping knot reduces strength by 50 percent, but the "choke" ( semi-grasping knot) allows you to gain a foothold higher.
We'll do it like this.

Well, in general, such braces from the sling are very useful in the household. You have to take a couple.

The station was created. First of all, we secure ourselves to it with a mustache of self-insurance. If you do not know what it is, then you can play it safe with a repic, as I am in the photo.

And since we are talking, I will say a few words about lanyard mustache.
These are segments of a sling or dynamic rope, which are attached to the system at one end and to the insurance point at the other.
There are industrial production and self-linked.
Purchased looks like this.

Self bound so. A figure-eight mustache knot is attached to the system.
The first mustache, as a rule, has a standard length - 55 cm. It mainly serves to attach to surrounding objects, such as the station that we made in the previous step.

A jumar is usually attached to the second mustache. Its length should be such that, hanging on this mustache, you reach the latch of the jumar (how the jumar looks like, where it has a latch and what it is in general, I will tell you a little lower).
At the free ends of the self-insurance mustache, knots are knitted into which carabiners are fastened. I use a semi-grapevine with three turns. If you do not know how to such a node, use the figure eight.
Now let's go back to the beginning of the "cycle". We found support. They created a station on it, snapped a self-insurance. Happened? Well done!
Now, at the end of the rope on which we will descend, we knit a figure eight and snap it into the carabiner, which was hung at the station.

At the other end of the rope, we also knit a knot and drop the bay into the "chasm".
This knot ensures that even if the rope does not reach the bottom, you will simply stop and not fall over the end.
Even if you think that the rope has reached the bottom, you still need to make sure of it. Ask a friend downstairs.
If the rope passes over the edge of the wall and rubs against it, then it is worth putting on it tread. This is a strip of dense material (basin, a piece of a fire hose, etc.) with Velcro. Wraps around the rope and protects against abrasion.
If the protector is not worn, then a couple of times this picture is obtained. Agree, it's not.

We thread the rope into the descender (I hope you didn’t forget it below). Pull the free end up and take out the slack.

Now, if you pull the free end of the rope, then you will not be able to fall.
At this stage, you can click the mustache of the lanyard from the station.

By the way, your insurance will be based on the same principle. An insurer should stand below, and it is desirable that this is not your worst enemy, who is already rubbing his sweaty palms in anticipation of your fall.
The spotter must be ready to pull on the free end of the rope.
He should not be distracted from insurance by pretty climbers or talking on a cell phone. All his attention should be focused on you.

We start the hand with the rope under the ass, while the rope will be additionally controlled on the thigh.
With our backs we go to the edge, slowly giving out the rope by slightly relaxing the palm.
Resting with our feet, we hang out the fifth point so that the legs are at a right angle to the wall. The back is straight and parallel to the wall.

We make the first descent slowly, in steps. We rearrange our legs and slowly give out the rope until we touch the ground.
Congratulations, the first descent is completed!
In the future, the descents can be complicated at will.
From the insurer, you can and should go to self-insurance(and also, for maximum security, both of these options can be combined).
Just for this, we learned the grasping knot.
The knot is usually knitted either above the SA or below. What is the difference?
If we knit a grasping knot above the SU, then in case of a breakdown, we hang on it. The descender becomes unloaded.
To continue the descent, we need to loosen the knot and load the descender again. In order to loosen the knot, we need to rise a little. To do this, we need a clamp (I will talk about them later) or tie a stirrup on a rope.
In general, the task is not very trivial.
An easier option is to knit a grasping knot below the SU. In the photo, an autoblock unit is used.
In this case, during a fall, we remain hanging on the knot, while the trigger remains loaded.

We only need to grab the rope between the SU and the knot, thus we will unload the knot, it will be possible to loosen it and continue the descent.
It seems like a good method, but it also has drawbacks. If the reason for the breakdown is in the destruction of the SS, then we will be turned upside down, which is very unpleasant. Although this probability is quite small, it should not be neglected.
Read more about securing a self-insurance below the SU in a very sensible article:
Everything, the descent is mastered. You can not stop there, but continue training, for example, master the elements of assault mountaineering, which basically consists of spectacular descents.
Even if you stop after having mastered only the basics, you have already acquired skills that, in certain circumstances, such as a fire in a stairwell, can save your life.
All about the descent.
Now it's time to touch climb on a rope, but first I’ll talk a little about clamps.
clamp- a device that moves freely along the rope, but when a load occurs, the device is fixed by clamping the rope, hence the name.
Rope climbing requires two ascenders or one ascender + auto belay device.
The most common clamp is jumar. This is a clip with a handle that is comfortable to hold. The most convenient tool for lifting (hence the term zhumarit, means to climb). It is advisable to have at least one.
Zhumars are left and right, under any hand.

The principle of operation of the jumar is quite simple. It is based on clamping the rope with a spring-loaded cam with spikes.

We put an open jumar on a rope and snap it into place. Up, it slides freely along the rope, and when loaded, it is fixed. A loaded jumar cannot be removed.


For more security, you can click the carabiner like this.

A pedal is fastened to the handle of the jumar. All the same, the strongest muscles in a person are in the legs.
The pedal should be of such length that when standing in it with a fully extended leg, the jumar is at chest level.
Let the jumar be our first clamp. The second clamp can also be a jumar, but already under the left hand.
The rise on two jumars is done as follows.
We get up on the pedal of the left jumar. We push the right jumar up the rope as much as possible, while bending the right leg at the knee. We make a push with the right foot - "we rise to the step." Then we push the left jumar, etc.
With the mustache of self-insurance, it is better to insure both jumars.
Instead of the second jumar, you can (and even need to) take crawl. This is a clamp that is very similar to a jumar with a sawn off handle. It hangs on the chest. In the case of using with a waist ISS, it is necessary to additionally hang a special rope around the neck.

The principle of lifting on a pair of jumar + crawl.
I will show this method in a separate video.
We depend on the crawl. We push the jumar as high as possible, bending the leg with the pedal put on at the knee. Pull up on the pedal. The rope itself passes through the crawl. Then we hover on the crawl and push the jumar further.
At the same time, you can hold on to the jumar with both hands, and pass both legs into the stirrup of the jumar.
Climbing with jumar + front crawl is the fastest and easiest to learn.
There is an option to do without jumar.
For example, using the crawl + pantin scheme.
pantin- this is the same crawl, only attached to the boot. The lifting principle is the same.
But I would advise at least one jumar, but buy it. In addition to lifting on it, you can also insure, although it is not recommended.
The second type of clamps that I highlight are safety clamps.
As you ascend, the belay ascender rides alongside you on the second rope, or above you if there is only one rope.
They ride up freely, and when they fall, they block and prevent you from falling. The most famous representatives: various drops, shants, backups and asaps.
I also want to mention various mini-clamps. They are capable of performing functions similar to large ones, although they are less reliable and convenient. Their undeniable advantage is their small weight and size.
As a result, one or two such clamps can always be kept on the harness. You can read more about them in the review.


In general terms, everything is on the rise.
Now about the unpleasant, namely about breakdowns. And more specifically about the jerk factor.
A newcomer entering any forum in the discussion of any iron sees this term almost immediately.
Its essence is very simple to understand.
"jerk factor" is the ratio of the height of the fall to the length of the rope that stops it.
A rather rough indicator by which it is easy to determine whether this piece of iron will fall apart during a jerk or not.
I strongly recommend avoiding falls with a factor greater than one.
Quite simply: if we have secured something (a quickdraw, a belay device on the second rope, etc.), the belay point should not be below the belt.
That's all. Thank you for your attention!
I present to your attention the first article and a whole series devoted to mountain training in the survivalist's arsenal.
The first article is devoted to equipment, as well as descent technique. The descenders "bast" and "eight" and some moments of self-insurance will be considered.
Because I am self-taught, I may make some mistakes, which I hope will be pointed out to me in the comments. But do not forget about constructive and friendly communication, without stooping to a banal srach.
I apologize for the quality of the photo, there was practically no light, it was filmed with a flash. Some things had to be done at home.
Let's start with the equipment list.
We will need:
Suspension system.
I use Petzl Corax, but you can get by with a more budget-friendly Vento.
Descending device. I use a vent basket and a horned figure eight.
Approximately three locking carbines per person.
Two pieces of rope 25m and 10m. I use 10mm diameter static
Gloves so as not to burn your hands.
The photo also includes knee pads and elbow pads.
The boots were never used. Instead, I climbed Lowa Zephyr.
Set for two people, me and my wife.

All this, including a thermos with tea, was put away in a trunk.

Now I will tell about each element in more detail.
Suspension system.
Petzl is still a brand with a worldwide reputation, which is why I bought it. I don't have much experience, but overall I like it. Wide, comfortable waistband and leg loops. Large range and very easy adjustments. Lots of hanging points for accessories. In short, a great choice.
Rope - domestic static 10mm diameter. In order to attach to the anchor point, you need to learn the figure-eight knot. It is simple, but very strong and practically does not weaken the rope. The order of knitting in the photo.

The tied knot looks like this.

Next, a carabiner is fastened into the loop. With this carabiner, you can attach to various hooks, embedded parts, lugs, anchors, etc., but this is not very safe, because. fasteners may be rusty and not very reliable.

The most reliable fastening is for monolithic objects, reinforced concrete. supports, large channels and I-beams, then with the help of a carbine a sliding loop is made, with the help of which the fastening takes place.

The rope is hung out, the hanging one is put on. Next we fasten the trigger.
I have seen two types of carabiner fastening into the system. In the central ring or simultaneously in the loops of the waist and leg loops. Petzl explicitly states that the carabiner must be clipped into the ring.
So far I have used the Ventovsky basket and the horned figure eight. I'll start with the bow.
Its advantages:
- does not twist the rope.
- convenient to use.
- can be used as an automatically blocking insurance (but more on that another time)
The cable on this SS can only be used for transportation, it cannot be loaded.

For use on a rope, make a loop and thread it through the DR so that the free end of the rope passes through the jaws of the device.

By pulling the free end of the rope up, we select the slack.
We start a hand with a free end behind the back, pulling the rope. Everything can be posted. The descent is made by slightly relaxing the hand with the rope.

The figure-eight descender works in a similar way, but it twists the rope, which is not convenient on long descents.
There are two ways to attach the rope to the figure eight.
The first is through a carbine.
This method creates less friction, resulting in a higher descent speed.
The second way is through the neck of the SU. More friction and less speed.

Similarly, we choose a basket of slack and wind up a hand with a stretched rope behind our back.

A feature of the horned figure eight is that you can fix the rope on it and free your hands.
Some moments of self-insurance.
There is always some chance that you will let go of the rope from your hand, and the SU will immediately release the entire rope and you will fall. To avoid this, there are various ways of insurance and self-insurance.
I'm using the "autoblock" node. It knits as follows.
For this knot, I use a standard 60cm quickdraw.

We fix the guy with a semi-grasping knot (noose) on the leg girth, hang a carbine next to it.

We wrap the quickdraw 4-6 times around the rope.

Then we snap it onto the carabiner. All. The node is ready.

In the event of a breakdown, you will hang on this knot and not fall. At the same time, the hand must be kept between the SU and the autoblock while adjusting the speed of descent.
Now to practice.
First. We get up on the "windowsill" from where we will go out, select the slack of the rope and pull it.
As a result, the fifth point is displayed.