Phased construction of a country house. Do-it-yourself garden house: how to build inexpensively? Prices for various types of timber
If you have recently purchased a summer cottage, then the issue of building a small country house is very relevant for you. You can store household items, expensive tools in it, as well as create a small lounge and kitchen. In this article we will look at how to make construction of a country house inexpensively with your own hands, and also find out which materials you can save a lot on.
Construction of a country house inexpensively with your own hands
Of course, like any construction, it also needs to start with calculating the budget. How much money are you willing to spend on this project? If enough, then you can think about building a brick house. Otherwise, it is recommended to use borrowed frame house technology. The advantages of this method are obvious - saving money, as well as the efficiency of the work performed. In just a couple of weeks your house will be ready for use.

Stages of construction of a country house:
Creating a project. If you do not want to contact a specialized agency, then you can create your own project that will be convenient for you personally. The main thing that you have to do in any case is to show your finished project to professionals in order to avoid possible problems in the future. As for the area of the future home, it all depends on your personal preferences and capabilities. 40 sq.m. is quite enough.
Purchase of building materials. What materials are needed to build a country house with your own hands? Today the market offers a huge variety of high-quality, efficient and durable materials that are suitable for any construction:
- Log or beam. Wood will be needed in any case. Depending on the quality of the raw materials, the cost of the timber will fluctuate. Carefully inspect the material; it is important that it is thoroughly dried.
- Brick or cinder block. They have low cost, durability and reliability. Although building a house using these materials will not greatly affect costs, be prepared to spend a significant amount on subsequent wall finishing.
- SIP panels. High-quality, modern materials that not only save your money, but also time. A house made from SIP panels is warm, dry and comfortable.

Important! If you want to save money on materials, study the market thoroughly. You will be able to find high-quality raw materials at a big discount. You should not focus on branded companies, since they are the ones who mark up more than 50% on the price.

Where to start building a country house on a summer cottage?
The most important element of any country house is the foundation. The service life of the structure, its reliability and strength depend on it. Of course, the foundation should not be neglected, since any mistake or wrong action will immediately result in cracks and splits in the walls. Before digging a trench for the foundation, carefully calculate the weight of future materials - walls, roofing, sheathing, insulation and finishing. All this adds kilograms. Typically, the depth of the foundation of a house should be at least 1 m. After pouring, it must be left for a month to compact and dry.
Immediately after the foundation, you can begin building the frame and installing the roof truss system. It is also worth considering high-quality sewerage. If there is a central sewer system, then you should buy a septic tank with outlets to the irrigation fields.
So, is it possible to build a country house? inexpensively with your own hands? Certainly. The main thing is to plan and not rush to buy materials from the first person you meet.
See also video:
DIY garden cottage
Do-it-yourself summer houses for relaxation

Most summer residents live outside the city only in the summer and do not need expensive permanent homes. They want a roof over their heads and living space large enough to accommodate family members.
How to build a house with your own hands?
An optimal economic pension is best suited for this purpose.
Advantages of summer cottages
 House boards are popular due to the following advantages:
- High level of construction - 2-6 weeks
- Low cost - from 3 to 8 thousand rubles per square meter. m versus 18 thousand rubles. per square meter. m for houses with brick walls
- Low weight, allowing the use of cheap, shallow foundations
- Resistance to freezing forces
- The ability to manufacture parts at the factory, which improves the quality of construction and simplifies assembly
- No shrinkage
- Wide range of architectural solutions
- Ability to warm up and adapt at home for life
Panel house design
 The house consists of a wooden or metal frame covered with panels.
The metal frame is made of a rectangular cross-section, and the wooden frame is made of a rod. For external coatings:
- Lamels
- OSB panels
- Profiled film
- Moisture resistant plates
- Asbestos cement slabs
- toilet
The inner leather is made of moisture-resistant materials.
If the house is to be lived in all year round, the walls are lined with insulation.
Construction of panel houses
Construction companies offer services for the construction of turnkey panel holiday homes or a set of parts for their own construction. The first option frees the builder from most of the problems, while the other allows you to build a house for your dacha and save money.
Project selection
 A quality project is the basis for success in building a house.
Serious companies that produce panel houses and key building kits offer dozens of standard models and offer custom design services.
Individual projects are quite expensive, so they are rarely used for economy-class houses.
Creating a standard project allows you to save on design and a wide selection of already prepared architectural solutions - choose the desired design and location of the house.
foundations
 Under the light panel house, spacers and notches are used with columns and strips and screw pilots.
- Small hidden pillars reduce costs and shorten construction time.
Columns are installed at intervals of 1.5 to 3 meters under external walls and columns, at the corners of the building and in places where internal walls connect to external walls. They are made from logs, concrete, red brick, bentonite and base blocks. The depth of the coating is up to 40 cm, the cross-section should exceed the thickness of the walls. To increase stability, the columns are connected to wooden or reinforced concrete beams
- Countertops do not allow for a warm basement.
If the design is included in the design, a shallow recessed base underlay is applied under the exterior walls and a foundation base is provided under the interior walls. The depth of coverage and width of the tape are the same as for pillars. The belt is made from concrete, quarries or foundation blocks
- On weak floors it is based on screwdrivers.
Using them allows the house to rest on solid ground that is deeper than the surface. Helicopter bases can be built in 1 to 2 days without the use of heavy equipment
frame
 The panel of a prefabricated house can be made from a kit made in a factory or from purchased materials, in-house or from a contractor.
Turnkey construction of a house eliminates most of the problems for the developer, with the exception of monitoring the execution of construction work - it is impossible to check the quality of the frame assembly on its surface.
To self-assemble the frame from factory parts, you must follow the instructions and wiring diagram included with the kit.
The work resembles a design meeting and is entirely possible for a developer with experience in construction.
The cheapest, but most worrisome option is to build the lumber itself. Depending on the size and number of floors of the house, the frame is made of a rod 100x100 - 150x150 mm or 50 mm thick.
 The frame is installed in the following order:
- At the top of the base there is waterproofing of the roofing material
- For the foundation using built-in parts and anchor bolts to attach the frame (thresholds) - beams, it is located at the edge of the house and under the prairie
- Place logs and give rough soil.
Fits on the edges of the base or beam beam
- Install vertical skeleton posts - first on the corners and then on the walls of the 0.6 m shelf, installed on the cutout, sawn in the bottom panel, securing the clamp and nails and securing the first temporary and then permanent remainder.
At the same time, they constantly control their verticality and position in the same plane. The corner posts are made of sticks and you can use the same 50mm width edge plate for intermediate use
- In the upper places the top tape works. Framed door and window openings
All wooden structures must be impregnated with antiseptic compounds.
Overlapping and covering
Wooden columns are placed on the top frame of the frame and secured using structural clamps.
Width 3-4 meters - plate size 50x150 mm with a large range - 100x150-150x150 mm. The beam is 0.6 m. In this case, 1.8 m wide screens (modules) are used to cover the ceiling.
 Rafting clusters are made on the floor on a panel 50x120-50x150 m.
First install the outer rafts, and then the intermediate elements that control the position of the rafters in one plane. Then make a box and close the roof. Roofing materials for a home should be light, for example:
- Bituminous shingles
- Metal panel
- Profiled film
- Bituminous slate
Wall coverings
The width of the screens should be equal to the degree of installation of the frame rails and the length to the height of the walls.
Security guards are on offer at the workplace in the following order:
- Plates assembled
- On the frame there was a polyethylene film as a vapor barrier
- Guide the inner frame frame
- Frame facing, heater inserted inside
- Wind resistant protective membrane
- Get outer skin
 The coat should be compressed over the frame by half the width of the frame frame to hide them.
The perimeter protection frame is covered with a heater and is tightly inserted between the frame frames. Application is done using nails. When using sheet material, it may be without a frame. The cutting blades are attached directly to the frame and the heater is inserted between the posts.
As can be seen from the description, the construction of a country house with a team of two or three people of average qualification.
Using factory modules significantly speeds up assembly. In just a few weeks after you start installing the frame, you can move into your cottage and enjoy the outdoors.
Videos on weekends
Simple holiday home
How to insulate a plate with your own hands in front of a path
Country houses made of foam blocks: building a house over the summer

Country houses made of foam blocks are lightweight and fireproof.
Thanks to the large dimensions of the blocks and precise dimensions, construction is carried out at high speed. It is quite possible to build a house over the summer.
The use of foam blocks in the construction of various structures guarantees heat conservation and fast pace of work. A country house made of this material will cost more than one made of wood, but less than one made of brick.
What are the benefits of foam blocks?

- They have a precise geometric shape and the dimensions are well maintained.
Therefore, they can be installed quickly
- Moisture resistant
- Inexpensive
- Strength increases over time
- They have very low thermal conductivity.
According to this indicator, it is one of the best materials for construction.
- They have a small specific gravity. Therefore, they are manufactured in fairly large sizes, which has a positive effect on the speed of wall construction
- Easy to handle
But there are also disadvantages
- Cannot bear heavy loads
- Slowly gaining strength.
In this case, shrinkage occurs.
DIY country house 6x6. Photo report. Part 1
And as a result, cracks may occur.
Use high-quality autoclaved foam concrete - it is less susceptible to shrinkage.
For the construction of one-story country houses, the strength of foam concrete is quite sufficient. In this case, it is necessary to strengthen the upper load-bearing row with reinforcement.
Foundation
Usually, when building a country house, a shallow strip foundation is used.
It can be done in different ways. 
- From prefabricated blocks laid without connection, freely
- Made from blocks, with reinforced belts installed above and below the blocks
- Made from rigidly connected reinforced concrete blocks
- Made from monolithic reinforced concrete
The choice of method is made depending on the properties of the soil.
The reinforced tape option is suitable for both subsidence and highly heaving soils. The width of the tape is made to exceed the thickness of the walls by 10-20 cm. Laying depth is up to 60 cm.
Base – within 40 cm.
On heaving soils, it is necessary to install a cushion made of non-freezing material.
Construction of the foundation
 Stages of making a strip reinforced foundation with shallow depth.
- Marking
- Development of trenches.
If the soil does not crumble, trenches are made the width of the foundation. Their walls will act as formwork
- Filling a 30-centimeter sand and gravel bed in layers, compacting each layer.
The thickness of each layer is 10 cm
- Laying waterproofing material on the bottom and walls of the trench
- Installation of formwork under the above-ground part of the foundation (basement)
- Installation of fittings
- Pouring concrete
Foundation quality conditions
To build a quality foundation, the following conditions must be met. 
- The correct proportions of components in the concrete mixture
- There should be no air bubbles (voids) in the concrete.
To achieve this, use a vibrator or bayonet the concrete with a metal rod.
- There should be no interruptions during filling
After pouring, until the concrete hardens, it requires maintenance. It must be protected from the sun and watered in hot weather. Insulate in cold weather.
Rolled waterproofing material is laid on top of the foundation.
The overlap of stripes must be at least 15 cm.
Wall masonry
Before you start building walls, you need to check the horizontalness of the foundation. The permissible height difference is 3 cm.
If necessary, leveling should be done with cement mortar.
The upper plane of the blocks laid in the wall must be horizontal. That is, not only the edges running along the wall must be horizontal, but also those across them.
Horizontal control is carried out using a level. The position of the block is adjusted if necessary with a rubber hammer.
First row
 The laying of the first row must be done with extreme precision - the accuracy of the construction of the entire house depends on this.
- Find the highest point of the foundation using a level.
The first block is laid in the corner closest to this point
- Then blocks are installed in all other corners
- A mooring cord is stretched between the corner blocks along the outer edge of the wall.
The first row is filled in using it
- If any unevenness in the masonry is formed, they are eliminated with a plane or sanding board. Dirt and dust are removed with a brush
Reinforcement
The reinforcement is laid on foam blocks after filling the first row, and then after laying every fourth row.
A smoothly curved rod is placed in the corners. 
- Using a grinder, grooves of 4x4 cm are made at a distance of at least 6 cm from the edge of the block
- The grooves are cleaned of dust and moistened with water.
- Cement mortar is placed in the groove to half the depth
- A rod moistened with water is laid
- The recess is completely filled with solution
A monolithic belt is made at the floor level.
It connects load-bearing walls along the entire perimeter and gives spatial rigidity to the entire structure.
For laying foam blocks the following can be used: 
- Cement-sand mortar
- Cement-sand mortar with added lime
- Adhesive for wall blocks
The solution with lime does not set so quickly and has good plasticity.
The glue allows you to make thin seams.
It has a fairly liquid consistency and does not set for a long time.
Block cutting
Usually a row cannot be laid using only whole blocks. You have to supplement it with chopped ones.
You can cut blocks with a hand hacksaw. The cutting line is drawn with a pencil on two adjacent sides to ensure an accurate cut. The cut surface is leveled with a sanding board or plane. A smooth surface is necessary to ensure good adhesion between the solution and the block.
Load-bearing walls
 After laying the first row, you need to wait 1-2 hours until the solution sets.
Then the wall masonry continues.
- Corner blocks are laid and leveled
- The mooring is being stretched
- The row is filled with foam blocks
- Irregularities are removed with a plane or sanding board
The ligation sutures should be at least 10 cm.
The minimum length of the outer blocks (corner, opening) is 11.5 cm.
Internal load-bearing walls are connected to external ones by bandaging.
Partitions
- The junction of the partition is indicated on the load-bearing wall
- At this point, flexible connections (anchors) made of stainless steel are inserted into the seam. One end is in the load-bearing wall, the other is in the seam of the partition
- Anchors are secured with nails
Anchors are inserted into the load-bearing wall through a row.
It is allowed not to secure them with nails, but simply press them into the solution.
Door and window openings
 You can buy factory-made lintels for ceilings, or they can be made from homemade hollow foam blocks, having a P-shaped cross-section.
- Mark the locations of the cuts on the foam block
- Having cut through the grooves, chop off the inner part with a construction hammer
- Hollow blocks in the shape of an inverted letter U are laid over the opening on wooden supports.
These can be boards or beams. The supports can be nailed to the side walls of the opening
- 12-16 mm reinforcement is placed inside the cavity and concrete is poured. The supports remain until the concrete hardens.
You can lay foam blocks over the opening and on metal corners.
Roof
Wooden beams are usually used to construct floors in a foam block house.
The type of roof, its design and shape may vary. Its construction is not much different from this type of work when constructing houses using other building materials.
Exterior decoration
Although foam concrete does not penetrate to a great depth when exposed to moisture, the surface layer absorbs it quite well.
So if the walls are not covered with exterior decoration, they darken and begin to collapse.
 The following can be used as exterior finishing for walls made of foam blocks:
- Hinged cladding installed with a gap (siding, decorative panels, house siding with imitation timber)
- Decorative plaster
- Composite panels
- Natural and artificial stone
- Painting with silicone paints
The construction of a country house from foam blocks is relatively inexpensive, and construction occurs quickly.
If you have some construction skills, it is quite possible to make such a house with your own hands.
Video about how to build a house from foam blocks

When building a house on a summer cottage, everyone wants to build one that will be comfortable to live in.
But coziness and comfort depend on the internal layout of the house. First of all.
And the layout itself depends on the size of the building, the number of people in the family, and the presence of small children. It also depends on whether you plan to live in the country only in the summer, or whether you want to come here all year round. There are some things you should definitely consider when deciding how to layout your home.
Layout of a one-story country house
Even a small house should have at least three rooms:
 The kitchen can be positioned so that the entrance to the house is through it.
In this case, the kitchen room will also serve as a vestibule, which traps cold air if you come to the dacha in winter.
During cooking, the air in the kitchen heats up noticeably, which is also good for heating the house. This option is much better than building a cramped vestibule.
If you want to make a canopy, you can make it out of glass. Using profiles, double glazed windows and glass doors.
If you use your dacha all year round, you need to provide additional heating.
For example, you can plan a country house with a stove in the kitchen, the back wall of which opens into the next room.
This stove will heat two rooms at once. Well, you can install an electric heater in the bedroom. There are many economical modern models.
It should be taken into account that the house heats up much faster if good quality double-glazed windows are installed on the windows. It should be noted that the warmth in the house does not depend on the size of the windows, but on how well they are glazed. The best option is high-quality plastic windows with several panes.
If a country house made of laminated veneer lumber contains one room and a kitchen, then the living room is divided by a partition.
A bed is installed behind the partition. This house is suitable for a family of two.
If there is one more room in the house, albeit a small one, then it is quite possible to arrange a nursery there.
And the dacha will already accommodate a family of four.
These tips are also suitable for those who already have a small garden house. But many people want to increase the number of rooms and are thinking about building a second floor.
Features of the construction of the second floor
Many people think that a great option for increasing living space would be to arrange a second floor.
But you first need to find out how strong the foundation under the house is. It is likely that it will not be able to support the additional weight. You need to find out about this in advance, and not after cracks begin to appear in the walls and the house begins to collapse.
In addition to this, there are some other features. They must be taken into account before building the second floor.
 If there is enough free space on the dacha plot, then it is always better to build a spacious one-story house.
It costs less, and living in a one-story house is more pleasant.
No need to climb stairs. This is especially important if there are elderly people in the house. After all, stairs in two-story dachas are usually steep. They are easier to build than flat ones. In addition, it is much more difficult to heat a two-story house than a one-story house.
If you are building a second floor, there is no need to make concrete floors. It's easier to make them from wood. The house will be warmer. It is best to lift the stairs from the kitchen if it is located immediately outside the front door.
Heat will not escape to the second floor from the living room.
On the second floor there are usually one or two bedrooms. It is best to keep bedrooms small to make them easier to heat. After all, living in a country house, a person enters the bedroom only to sleep.
But, it must be repeated that if the area of the plot allows, then it is better to build a more spacious one-story house instead of the second floor.
Construction of a terrace
 Since people spend almost all their time outside in the summer, a covered terrace needs to be added to the house.
It can be located on the entrance side, then the terrace will also play the role of a porch. It needs to be provided with a good roof that will protect it from bad weather and the hot sun. It is also necessary to provide for the fastening of mosquito nets.
Some tips were given on how to make your country house more comfortable.
10 steps on how to build a country house over the summer
If a person plans to build a dacha from scratch, then he can plan it the way his heart desires. But not everything is as simple as it might seem. Below are the most common mistakes that people make when thinking about what kind of house to build on their summer cottage.
Of course, everyone’s tastes differ, but still, we will talk about those things that help reduce construction costs and increase comfort.
Mistakes when planning a country house
The house is too big
There is no need to build a house too big.
Thick walls in the house
Walls that are too thick require a more powerful foundation, and therefore extra costs.
Modern technologies make it possible to build lightweight houses, for example, frame houses, or from timber. Good insulation solves all heating difficulties, and the choice of high-quality material and qualified builders makes the house very durable.
Construction of a basement or ground floor
There is no need to create a large basement or basement floor unnecessarily.
These premises require high-quality waterproofing, insulation, ventilation and heating. For all this you need to hire specialists. Additional costs for building materials are required. Very significant. Also, do not build a base that is too high. This also increases costs.
If you plan to build a fireplace in the house, then you need to build it in the middle so that the heat from it spreads to adjacent rooms.
A fireplace built against an outer wall is completely irrational.
It seems that all things are very simple. But if you avoid these mistakes when planning your house, you can significantly save on building materials and construction time.
Video example of planning a country house using a special program
Posted on: 4-2-2016

For summer residents who are just about to build their first small house, my selection of 15 photos of country house design ideas will be very helpful. I must say, there is something to learn here and something to be surprised by, but what can I say - it’s better to see for yourself!
I draw your attention to the fact that there are no diagrams or plans here.
All material is provided for inspiration only. But, an experienced builder, if you show him a picture of a structure you like, he can easily build, if not exactly the same, then close to the original.
The first house simply captivated me with its canopy with a pointed roof. If it weren’t for this roof shape, it would have been just an ordinary country house! Agree, such a canopy roof, supported by slender wooden columns, gave the whole house sophistication and elegance!
A beautiful country house, to say the least!

And in this miniature house I really liked the turret at the very top. In terms of area, it is like a temporary shed, but the beautiful decoration of the walls, windows, tiles on the roof and this turret make it almost a palace!
By the way, flower boxes mounted under the window greatly improve the appearance of the facade, no matter how small it is!

This house is just very cute, especially the lattice windows and door.

This country house caused a storm of delight among my whole family.
I showed it to them, saying that we would build the same one for ourselves at the dacha. And a miniature terrace, and dormer windows on the roof! Just a peek. A miniature copy of a beautiful country mansion!

There is a lot of light in this house.
Choosing a garden house and its phased construction
because it has very large windows. But even in cloudy weather it is light and gives you a feeling of greater unity with nature! The pediment of this house is designed in an unusual way - it is decorated with two balusters.

And in this house there is a second light under the roof. Since there are no windows on one side, something like dormer windows are made under the roof itself.
True, from the photo it is clear that the owners use it as a workshop, but for newly-minted summer residents it could also serve as a shelter at night and from the rain.

A small wooden house with a canopy across the entire width of the roof.
A good solution - here you have a patio terrace, the wall of the house will protect you from the wind, and the roof canopy will protect you from rain and sun.

This little white house is just a fairy tale!
Elegant, romantic, with a pergola attached to it, it invites you to settle in and not know any grief! Still, white color adds sophistication to any building, even a very small one.

This interesting asymmetrical house has a frame structure and is lined with wood.
The originality of this building lies not only in its unusual roof, but also in the glazing of two walls, forming a “transparent corner” at the exit.

This house is simply attractive and well built.

The blue house under a tiled roof with white curtains looks very attractive.
It feels like the house has a caring owner!

And this bright house in front of a small pond made me feel tender. It is so small and so harmonious with its blue door and windows with tulle curtains that I wanted to sit down in front of it, dip my feet in the pond and daydream for an hour or two.

This house is made of wood, although it is low, it is very nice.

Well, the last house in the series of 15 best is a house with a trapezoidal canopy.
Beautiful, elegant, tastefully decorated - what else can you say! And there is a terrace next to it - there is a place to admire the stars in the evening!
Ideas for small cozy country houses

We could stop here, but there are so many ideas for small houses that I always want to look for something and share my finds with you.
Let me remind you that in America and Canada, the hobby of designing and creating houses on wheels of unusual shapes is very common. These are real residential buildings. I will continue to introduce you to interesting ideas for such houses. After all, if we exclude the wheels, then such houses will look great on our plots! Here is an overview video from the creators of this wonderful house.
There is no translation, but everything is clear.
My construction and life in the country
I would like to tell my story when we decided to live in the country and start all over again. In general, it so happened that our apartments did not exist, and in recent years we lived in rented apartments. And so life within the walls of others and frequent trips brought us - I wanted my own, peace and stability. But the way we live is not rich and can't buy anything, you decide to buy a Dacha (4sotki) and then another, we left the pages very cheap.
These sites are the same, we prepared that they were forced to leave all the bushes and trees from their homes, and yet they had the resources that I introduced sandstone and sand into the future of our home.
But after a few days we decided to give them a chance to defeat the house in the village, and then I brought the plate and two evenings (as I worked during the day), the house was almost ready. It looked like a trailer, but we were not aware of the beauty, it was already the end of September and cold and winter would soon be upon us. Below is a photo of creating a time zone
Construction of a cottage in the country - the beginning
 He built it twice - he wanted it faster, but it got dark early, so he took a battery and a lamp with him. So, this house was looking for another night - it was not yet dark.
It worked like a screwdriver and wire, the design was very simple, so everything was done very quickly.
Cabin construction in the country
 I then brought in some foam and the house was insulated with 10cm thick foam and foam sealed all the seams between the foam and all the openings.
He made the front door. And the interior, while there were bare slab walls. The next day he brought 200 pieces. red brick and it took two nights to build the brick. A photograph of the furnace design has not survived.
Construction of holiday homes
 House dimensions 6.3 * 3m.
interior space 6*2.7, common living room 16.2 square meters, which had to accommodate four adults (me, mom and my two sisters) in the country, electricity, and this is what I thought about in advance. I made a wind generator, I installed a small battery and bought a 12/220 volt converter. The power of such a power plant was very small, because the wind turbine was small and was an irregular dean, also very low. But sometimes one energy-saving light bulb is enough.
All in all, it was a painful start, but a week into this construction, we moved into this period. The transfer took place on October 2, the same day as my sister’s birthday.
In the fall the woods were ready for the winter and a porch was added to the house.
The house is insulated externally with a vapor barrier, covered with film and internal shiny insulation. As a result, in the first winter we found out.
Winter in the country
 In winter we were already at home with wind power for every 150 watts, there was enough electricity for lights and sometimes on TV, just as the wind was very weak and there was not enough battery power, but I saved everything for improvement, including the power plant.
I described everything about the plant in the section “My little adventures”,
Therefore, winter lived in such spartan conditions. My sister and I worked, paid in the spring, having accepted a loan 3 years ago, and at the beginning of the summer a new loan appeared, which spent the money on small items and bought a Chinese engine (110ss) to kill a tree, I went to him for a trailer trailer.
We bought a chain saw and two solar panels. up to 100 watts, so they were buying new batteries for the power plant until March.
In the summer, the porch was covered with luminous insulation to keep it cool in the sun, and solar panels were installed on the wall.
Even the lights on the street and in the house repeated the wiring.
Solar panels
 In the summer, the wood was prepared for the entire year, and the motorcycle made 35 trips from nearby forest stands.
So I bought corrugated cardboard, wood, cement, and I put a new corrugated panel fence on the front.
Wood collection
 At the same time, I poured a concrete pad under the base of the future of our house.
There was no swimming under the foundation, it simply grew and leveled the surface and spilled a 40 cm wide strip around the perimeter of the house.
How to build a house in Dachau: characteristics and construction phases
The thickness of the concrete is 10-15 cm. Below the photo are parts of the concrete. This is how we lived in the fall, photo after the rain, there was a bit of a mess outside as I searched and twisted the jars under the winter potatoes.
Life in the country

Life in the country
 In addition, 11 meters were excavated in Dachau, I dug it myself, I was in a hurry for almost a month and poured concrete with concrete, but I finished it.
So, the tile broke through. He dug a basement on the site of the future house, filled the basement with concrete, and then made a hatch into the roof. Small details were done on details, but I will not list all the little things, only the important ones. I wrote about the break here - Well, with my job 2.
Fine
 This year, at the beginning of spring, I took 7 plate cubes, bought ruins and cement and started with the main overflow.
The bottom part of the photo is the preparation of the irrigation panels. Last year the center of the concrete base under the furnace was flooded.
Foundation formwork
 After installing the panel panels around the perimeter, he reinforced with a 10mm cast in two threads.
Then I invested in concrete and ended up like this.
Filling the foundation
 The panel was attached with 6mm hex pins and once ejected it was easy to remove and remove the shell.
Filling the foundation
 Then build the wall frame. The dimensions of the house are 6.30 * 10.80 m. The skeleton was placed alone, sometimes the truth helped the sister give or save something. All this has turned him into screws that pull themselves. bottom and top, then he used a homemade galvanized sheet metal plate.

DIY decorated house

DIY decorated house

DIY decorated house

DIY decorated house
 Currently, the money for further construction has been completed.
Now you need to make money from corrugated cardboard and place a frame around the roof.
Continuation - second part of the frame
Millions of summer residents are added to the army of garden house builders every year. After all, the question arises: where to live in the summer, how to arrange a dacha, and where to store tools? You can, of course, build a big house, or even better - build a family estate! But if you only have a few acres at your disposal, then why not build a small garden house with your own hands. In addition, construction will not take a lot of time and money, and there is no need to bring in “heavy artillery”.
Garden house project
Before building a garden house, you need to take care of a set of design documentation. But first, decide for what purpose you want to build such a structure, and what functions the house should perform. The main purpose of a garden house is for temporary residence in the summer and off-season, as well as infrequent visits in the winter. But, despite all this, at any time it should be warm, dry, light, cozy and comfortable. And it should smell nice!
In hot summer weather, the house should be cool. In early autumn and spring in wet weather it should be quite warm here. In frosty weather, the garden house should be heated quickly and to comfortable temperatures if you plan to visit it. From the standpoint of operation, as a capital structure, a house should not require daily maintenance or too burdensome preparation for winter and back.
The house should have electricity and drinking water all year round (well, at least in the summer). It should be possible to shelter quite a lot of people for several days, for example, in the event of the arrival of unexpected guests or relatives. It is better when all the rooms are multifunctional: depending on the time of year, the room can be used as a bedroom in summer and in winter as a storage area for things, household items, and garden furniture.

The design of a garden house, first of all, must contain floor plans and an indication of the overall dimensions of all rooms. Separately, drawings of structural units where the walls meet the floor and ceiling, roof and floor supports must be submitted. It is necessary to have a vertical section of the building, where all the main marks are indicated: the bottom of the foundation, the level of the ceiling and the finished floor.
Another item on the list of the house design is the diagrams of communication networks - electrical, water supply, gasification and gas supply, indicating the points of connection to the main lines. Complete all drawings to scale, maintaining proportions. It is best to indicate linear dimensions in millimeters.
The garden house project is crowned with an explanatory note, which contains characteristics of the developed solutions, the building materials used and their required quantity. Such detailed information will allow you to save on the construction procedure of a garden house, thanks to the optimization of the choice of materials.
Space planning
So, summer residents usually build small garden houses, which have general dimensions along the base of the building - approximately 6 by 7 meters. Although the area that will be occupied by the house is slightly less than the product of these numbers, since the shape of the base will not be perfectly rectangular - each of the corners seems to be cut out.
Determine the location where you want to build your garden house. Please note that it is not recommended to locate the building in low-lying areas where water accumulates. It is better to choose the highest point of the plot of land. It is optimal to place the house in the northwestern or northern part of the site, but no closer than three meters from its border. Remember that the building site should not be shaded by anything.

For a small plot of land, a small one-story house is quite suitable, which can be used for living in the summer, storing garden supplies and placing a summer kitchen. One-story houses with an attic are characterized by increased convenience, since the attic can be converted into a place for storing garden belongings. In one-story houses that have a terrace or enclosed veranda, you can even place a full-fledged dining room.
If you have chosen a two-story house, then the attic, which has a T-shaped floor and the joints of the ceiling and walls that are sloping at an angle, will best serve as the second floor. On the ground floor, according to the garden house scheme, a kitchen is usually equipped; there are huge windows in it so that there is always light. Next comes a common heated room, which is most often a passage room; a staircase is often installed here to the second floor.
Of course, it is customary to arrange a bedroom in a garden house for the cold autumn-spring season. Separately, consider the need to create a guest room, bath and carpentry workshop in the house. In the attic you can recreate a billiard room, an office or a summer bedroom. Since there are large windows and a lot of light here, you can create a haven for growing seedlings of vegetables or flowers. In winter, it is customary to store birch brooms and dry herbs here.

From an architectural point of view, there are no special frills or frills in the standard drawings of garden houses, except for the attic. Speaking about the layout of the building, I would like to emphasize that there is no particular need to collect absolutely all non-residential and residential premises under one roof. If there is a gazebo near the house, which is used for eating, then there is no need to equip a dining room. The same applies to the bathtub if there is an outdoor shower on the site. There is absolutely no need to make a toilet in the house. But if you plan to come to your dacha in winter, it is advisable to arrange all these rooms in a house.
But the most useless and inconvenient element of a garden house is the balcony. There will be nothing from it except constant problems with clearing snow. Going out onto the balcony, which is raised 3 meters above the ground, you will not see amazing landscapes, but only unattractive outbuildings on your neighbors’ summer cottages.

You can argue about the veranda with its own roof. If it is open, then in winter there will be snowdrifts, in autumn there will be puddles from rain and dampness, in the summer there will be flies, and in the evening there will be mosquitoes. But if the veranda is closed, with large windows, it will completely protect you from bad weather and allow you to relax in the summer and drink tea, hiding from the scorching sun. But if the veranda faces the sunny side, it will be stuffy in the heat.
If you decide to arrange a cellar or basement under the garden house, then you need to worry about heating the garden house. Otherwise, the room will freeze in winter to the ambient temperature, and this will do little to improve thermal protection. Remember that the basement can be flooded with spring waters with all the consequences.
Construction materials and tools
Brick, foam or gas blocks can be used as materials for the construction of garden houses. You can speed up construction if you choose the latter option. But the main material for load-bearing structures is pine timber, which has a square cross-section with a square side of approximately 100 millimeters. One of the 4 sides of the timber, which will form the outer surface of the wall, must be planed. Bevel the edges of the timber. Other elements of the house (beams, ceilings, ceilings, floors, rafters, doors, windows) can be made from pine lumber.
Remember that all material must undergo a short preliminary drying. It is important that the level of dryness of the material is the same, so that the constructed garden house will not experience shrinkage or deformation when the wood dries. The lining for finishing walls and ceilings must have the same dryness as the wall material.

In addition to wood, industrial and improvised insulation materials, nails, asbestos cement sheets, antiseptic impregnations, nails, roofing felt, plaster, paints, adhesives, polyurethane foam, wallpaper, and floor slats will be used. But if you want to learn how to build a garden house exclusively from environmentally friendly materials, you don’t have to use materials from this list, with the exception of asbestos cement sheets.
A garden house can be easily erected from timber, slats and boards, as well as from doors and ready-made windows. In the process, you will need the following tools: a miter saw and a hand-held circular saw, a hammer, a cordless drill, a pencil, a ruler, a corner, a marking cord, adhesive tape and a flat brush.
Garden house construction technology
The modular design principle can make construction very simple. First, the foundation is laid, wall elements are built on it, then a rafter system is created, the roof is laid, windows and a door are installed. The facade of the house can be supplemented with a canopy, under which it is good to relax in the summer.
Laying the foundation
In many ways, the strength of the garden building will be determined by the reliability of the foundation for the house. The depth of the foundation is determined depending on the type of soil, the depth of freezing of the ground and the groundwater level. It is customary to lay the foundation below the freezing depth, which varies within fairly wide limits.
If the groundwater level is located during the period of soil freezing below the calculated freezing mark by more than two meters, as well as in coarse, rocky soils and gravelly sands, laying the foundation will not depend on the depth of freezing. The most suitable bases for foundations are peat bogs, silty sands with clay, silty soils, and wet clay soils, which require a cushion of laid sand layer 15 to 20 centimeters thick, watered with water and then compacted.
Under heavy walls when building a concrete, stone or brick garden house, a strip foundation is laid along the entire perimeter. Under wooden walls or with a significant freezing depth - columnar. For the foundation you can usually use natural stone, rubble concrete or concrete. Below the waterproofing layer, it is recommended to use concrete M 120 - 150, clay brick M 75 - 100, cement mortar M 25 - 50.

In the basement part, be sure to install waterproofing, which is located at a height of 15 - 50 centimeters from the ground. For dry soil, perform waterproofing as a cement-sand screed 2 - 3 centimeters thick; for wet soils, lay 2 - 3 layers of roofing material or roofing felt over the screed. Sometimes roll materials are glued onto a dry screed using hot mastic.
If there is a basement in the house, two waterproofing belts are usually created - in the base and foundation. The basement waterproofing must be located below the floor beams. Holes of 15 by 25 centimeters need to be made in the cage or base for ventilation of the underground. Cover these openings with rodent-proof mesh.
Around the base, arrange a blind area - a strip that is at least 70 centimeters wide, protrudes beyond the overhang of the cornice and slopes away from the walls of the building. Make the blind area from compacted clay, removing the top plant layer of soil. It is recommended to embed a layer of gravel or crushed stone into the clay, and then cover it with fine-grained asphalt 3 - 5 centimeters thick or concrete.
Walling
First of all, place rough timber on the surface of the foundation in one row along the perimeter, which creates the contours of the walls of the house and is fastened together with nails. Between the concrete foundation and this lower row of timber, it is customary to lay waterproofing, for which strips of roofing material are used, as shown in the photo of garden houses.
The basis of the frame, as a rule, consists of 4 pillars, which are dug into the corners of the perimeter. They need to be dug securely into the ground, having first wrapped their lower part with roofing felt. After erecting the pillars, attach them to the rough beam from below, and attach them from above using temporary braces, previously plumbed vertically. Long nails can be used to fasten frame elements together.

Now that the frame has become rigid, it should be finished on the inside and outside. Place cut pieces of timber between the edges of the corners in advance, nail them to each other with 150 mm nails, if the thickness of the timber reaches 100 millimeters, the nail will go through the upper beam and touch the middle of the lower one. A layer of flax tow should be laid between the beams. Constantly check that the walls are plumb and vertical.
Door frames are usually installed immediately, window frames are installed after reaching a certain height. The boxes, fixed in the required place and aligned vertically, will additionally act as vertical guides, in addition to the corners that align the timber being laid.
Floor and ceilings
The beams of the first floor in a wooden garden house are laid on the plane of the strip foundation. A subfloor made of ordinary edged planed boards, which will certainly decrease in size after drying, or slab, is laid on top of the beams. This causes cracks to form. Therefore, it is recommended to lay a clean floor made from dried slats the following summer. A clay screed is made on this floor and insulation is placed.
In this case, the subfloor can be thinned and covered with a layer of roofing felt. It is recommended to use mineral wool materials as thermal insulation materials. The top of the insulation is covered with a second layer of roofing felt. Then a cement-sand screed, which is 2 centimeters thick, is laid over the insulation. As a coating, you can use a dark antiseptic impregnation.
Ceiling beams made of timber simultaneously serve as a frame, which is necessary for the floor of the second and ceiling of the first floor. This covering is made from planed edged boards. The space between the ceiling and floor must be filled with large sawdust and small shavings, which are required for heat and sound insulation. After this, the ceiling is sheathed with clapboard simultaneously with the procedure for sheathing the walls, and after drying, the floor of the second floor is covered from above with a floor lath.
The floor lath is placed perpendicular to the subfloor. In this case, they use the process of forcibly compressing several boards at a time with the help of two wedges, which are driven in between a temporarily reinforced support bar and the edge of the floor. This technique allows you to minimize the gaps in the floor that form when the slats finally dry.
The area of the floor that is directly adjacent to the fireplace or stone stove should be made from ceramic floor tiles, as in the photo of a DIY garden house. Lay a sheet of moisture-resistant drywall on the subfloor and stick tiles on top. The thickness of the floor lath turns out to be almost equal to the total thickness of the tiles and drywall, so the floor surface in the garden house will be even.
Roof installation
Attic floors should be done in a similar way. Beams of such floors will rest at their ends on load-bearing walls. Beams in the most common designs are cut into the top frame. Nests are made in walls made of stone and brick, the back wall of which is covered with layers of tarred felt. In places where the beams are supported, it is necessary to lay two layers of roofing felt or roofing felt.
The roof of a garden house will consist of a roof (outer covering) and rafters - inclined supporting beams on which decking or sheathing is placed. For small garden buildings, the simplest roofs should be used - single and double slope. Their slope will depend on local climatic conditions and roofing material. The more precipitation there is in a given area, the steeper the roof slope needs to be when building a garden house with your own hands.

When roofing from corrugated asbestos-cement sheets, the roof slope is 1:3, if flat asbestos-cement tiles and tiles are used - 1:2, if you take sheet steel -1:3.7. The system of rafters that support the roof is a rather complex structure; its manufacture requires professional qualifications. The easiest to create are inclined rafters.
The rafter legs in this design are cut into the upper frame of the walls or into the mauerlat, which is laid around the perimeter at the top of the wall, at an acute angle. Make sure that the cross-section of the mauerlat beam is at least 100 by 100 millimeters. On top of the rafters, install a sheathing of poles and boards, which are nailed staggered or closely parallel to the ridge of the roof of the house.

The sheathing on the roof overhangs forms a continuous flooring. The most rational option for garden houses is a roof made of corrugated asbestos cement sheets. Nail the roofing sheets to the sheathing, made of bars and laid in increments of 530 millimeters. Asbestos-cement sheets are laid so that in the horizontal direction their edges overlap by the size of a wave. The sheet that lies above should be allowed to overlap the underlying one in the vertical direction by approximately 100 - 140 millimeters.
Under asbestos-cement sheets with a slight roof slope, roofing felt sheets should be overlapped parallel to the ridge. Each side of the sheet is secured with 3 - 4 nails or screws. The ridge and other breaks in the roof must be covered with special shaped parts.
The final stage
The veranda must be placed closer to the entrance to the house. A passage to living rooms is often arranged through this room. You can build a veranda built-in or as an extension. It will be good if they open onto a recreation area or garden. The veranda should not be turned towards the street if the garden house is located too close to the border of the site and the street. The veranda is best oriented to the south, southwest or southeast.
Make the main surface of the walls in the form of glazed stained glass windows. The most impressive look in the interior is the glazing of two walls, which are adjacent and separated by a narrow corner post. The minimum distance between the floor and the glazed area is 30 - 40 centimeters. Under the ceiling, leave a small section of the wall blank for curtain rods. Curtains on the veranda are hung to the full height of the room, and light blinds can also be used to protect from the sun.
After you have built the garden house yourself, install the door and window blocks. These structures must be made from high quality wood, the moisture content of which for door frames is no more than 12% and for windows, window sill boards and balcony doors is close to 18%. It is generally customary to use single and separate bindings for garden houses. Windows are usually made of pine.

Most often, standard windows are used in garden construction. In rooms on the first floor it is recommended to install double glazed windows. In some cases, it is possible to install windows of a special design - sliding and lifting windows. If you make these structures yourself, then remember that the front surfaces of wooden products, which are intended for finishing with varnish or oil paint, as well as the sides that mate with each other, need to be cleanly planed, sealing all wood defects with glue plugs.
After this, you can begin the final stage of building a garden house made of wood - the production of architectural details. Frontal and hemming boards of cornices and gables, door and window frames, porch pillars and fencing boards... For these elements, the material left over from the construction of a garden house will not be suitable; only selected building material will be needed.
So you know how to make a garden house on a plot of land! After its construction, you can safely begin insulating and finishing the garden house, as well as constructing a fireplace stove or hob. But more on that in the next articles!
Each of us dreams of a quiet and cozy country house, where we can escape from the bustle of the city and just relax. Modern construction technologies allow you to purchase a garden house ready-made or build it yourself. In this article we will tell you how much it costs to build a garden house, what documents are needed to put it into operation and whether it is possible to do without them.
Budget option for a country house made of plywood
Garden house projects made from plywood take less time to build than houses made from timber. Due to the use of large sheets of plywood for cladding the structure, they are fastened much faster than wood. If you know all the processes and have the necessary materials, plywood garden houses can be built in a week. In general, plywood is the simplest and most inexpensive material. In order to facilitate the construction process, experts suggest the following stages of construction. So, how to build a garden house from plywood:
- foundation support devices;
- construction of the frame;
- erection of vertical rafter supports;
- upper and lower skin;
- creating a subfloor using boards 20 cm thick or more;
- external cladding of the house with plywood; ordinary screws are used as fasteners;
- The interior cladding of the house involves the use of plywood, plasterboard, chipboard or fiberboard;
- for a comfortable stay inside the room, it is worth insulating it: a layer of mineral insulation is laid between the layers of cladding;
- installation of a finished floor using laminate boards or linoleum;
- covering the rafters with plywood;
- covering plywood with roofing felt.
Important! You can move around the frame only after the concrete has completely hardened.
To give an attractive appearance, you can use external cladding made of siding or wooden lining. Windows in the house can be installed from wood or any other material. The video shows how you can build a garden house with your own hands
Construction of a house from timber
The project of a garden house made of timber involves the use of simple or profiled timber. Country houses can be built from this material either with the help of specialists or independently. The plan of a house made of timber allows you to build various structures. For example, you can make a log house with a veranda or terrace. Before building a house, you need to decide on the type of foundation. As a rule, for houses made of timber, a columnar or strip type of foundation is used. When designing a small dacha, the best option would be a columnar foundation; for large houses with an attic it is better to use a strip foundation. The construction of the foundation begins with laying concrete slabs on a compacted layer of sand, and lowering it 15 cm into the ground. When the foundation is ready, a layer of roofing felt waterproofing is laid on it. Next, the frame is constructed and laid on the base supports. Then we install vertical supports. The photo shows the frame of a garden house made of timber

If you like houses with a veranda, the lower logs are extended to the required length and installed on additional supports. To install the floor, you can use a thick board. When the floor is ready, the timber walls are laid. Dowels are used to secure the connections; a new crown is laid after the insulation layer. Insulation is necessary for each layer; jute or tow can be used as a material. Next we arrange the roof. To do this, we install rafters and braces. After everything is covered with roofing felt, finishing work on the floor covering is carried out. As a rule, linoleum or board is used as a covering. The next stage of construction will be the installation of windows and doors. The outside of your home can be made more attractive with siding or clapboard. A house built from timber is quite cheap and warm.
Garden house layout and cost
Construction of a summer house involves the presence of a small and simple building on a garden plot. As a rule, such houses are built in a small area, with one or two rooms, a kitchen, a bathroom, and a stove (if such are provided for in the building design). The photo shows standard projects of suburban structures:
If you decide to build a garden house with your own hands, we recommend choosing a small house measuring 4x6 or 6x6. The photo shows a cottage measuring 6x6

If you like space, you can take a 6x8 house project. The photo shows a project for a two-story garden house measuring 6x8

Such projects can rightfully be considered comfortable, cozy and roomy enough for temporary living by the whole family. But how much it costs to build a garden house will depend on the materials chosen and the use of additional force. The average cost of an ordinary country house will cost:
- installing the foundation on your own will cost $150, and with the involvement of specialists - $250;
- interior decoration will cost $700;
- a house with a frame, ready-made partitions, windows and doors can cost from 3,000 to 4,000 thousand dollars;
Paperwork

When construction is completed, you need to think about the documents. Any building must legally stand on a plot of land, regardless of whether it was built by a gardening partnership or you yourself. To obtain the right to property, the following documents are required:
- obtain a construction passport for land development. Such a document is issued by local architecture;
- submit an application to the architectural and construction inspection notifying the start of construction;
- carry out a technical inventory of the building; such work is performed by professional appraisers who have special permission to carry out such work;
- submit a declaration of commissioning of the property;
- assign the building its own postal address (addresses are assigned to residential and country buildings);
- pay a contribution for infrastructure development, as a rule, such contributions are made either by a partnership or by the owner of the house individually;
- obtain a certificate of ownership of the building from the state registration service.
Of course, for a gardening partnership such documents are prepared faster; the number of participants in the gardening society plays a role here. In addition to the documents described above, there are also requirements for the construction itself. The most expensive and difficult thing is to obtain a construction passport, because... There are quite a large number of norms and building rules governing development conditions. Common construction requirements include:
- the distance from your house to the neighboring one should be 0.8 m;
- the distance to the border of your site should be 1 m;
- distance to the street - 3 m;
- the distance of the house to utilities and networks is 3 m.
Expert advice! Do not agree to “fake documents”; this will only complicate the situation and lead to unnecessary waste.
As you can see, the construction of country houses is considered simple and accessible to everyone. To realize your dream, you need to draw up documents and choose a building project.
Our step by step instructions We will divide the construction of a frame house into several stages:
It is worth noting that each stage of building a frame house deserves a separate article, in addition to everything, if you describe all possible options for foundations, roofs, etc., you can get a whole book. In this regard, to improve readability, some steps in construction are described in detail in separate articles, but here - only what concerns the features specifically frame house.
Step No. 1: Preparatory work for the construction of a frame house
Preparatory work for the construction of any house is the same and includes:
- Site preparation
- House marking
Site preparation
First, you need to clear the area of vegetation, if not all, then at least the place where the house will be built. This will greatly facilitate the marking and allow you to make it more accurately.
If the construction site has a large slope, then, depending on the type of foundation and desire, it can be pre-leveled using special equipment.
Attention! Do not neglect this procedure, spending 1-2 hours on clearing, in the future you will make your work much easier, and measurements in the grass may be subject to a large error.
House marking
 Marking is a very important stage, because the layout and evenness of the corners of the walls depends on it. If the marking is inaccurate, it will be very difficult to correct this error in the next stages.
Marking the foundation of a frame house, as well as any other, as a rule, includes preliminary placement of pegs (all external walls are marked), as well as marking all internal walls.
If you want to learn how to correctly mark the foundation for a house with your own hands, and so that all the walls and corners are level and correspond to the project, I advise you to read my article about this. Given the large amount of information, it had to be submitted separately.
Step No. 2: Do-it-yourself foundation for a frame house
The great advantage of a frame house is that almost any type of foundation is suitable for its construction. The only limitation is the type of soil on the site and your capabilities.
It is worth saying that laying the foundation for a frame house with your own hands deserves separate topics of discussion and is included in separate articles. Moreover, there are several types of suitable foundations, and it’s up to you to decide which one to choose.
Here I will tell you in a nutshell about suitable foundations for a frame house, and in what cases each of them is used, and also give links to their detailed description.
 The most common type of foundation for a frame house is a pile-screw foundation. This is practically the simplest and cheapest option for such a house, especially since installing a pile-screw foundation is not difficult even with your own hands.
Such a foundation is suitable for almost any soil, except rocky ones. Particularly suitable for swampy soils, where compact soils are located deep and other types require huge costs.
In general, all the pros and cons of pile-screw foundations are discussed in another topic that will help you decide on the choice of support for your home.
Shallow strip foundation
 Shallow strip foundations are also used quite often for construction. This is due to the relatively low cost of laying it, as well as the possibility of using concrete floors in the house.
Such a foundation, due to its relative fragility, requires strict adherence to laying technology.
As a rule, a shallow strip foundation is used in good soils, and is strictly contraindicated in soils with very high groundwater levels and swampy soils.
Slab foundation for a frame house
 Recently, slab foundations have become increasingly popular for building a frame house with your own hands. Despite its considerable cost, it has obvious advantages, such as versatility, reliability, durability, and it can also be used as a subfloor in the house and not spend money on it separately.
Often, instead of a classic monolithic slab, a slab foundation with stiffeners is used. This allows you to save a little on laying, and also strengthens the entire structure as a whole.
Step No. 3: Installing the floor of a frame house with your own hands
The floors in a frame house are not much different from the floors of other types of houses and can be wooden or concrete. The choice depends entirely on the type of foundation, capabilities and desires. 
In this step-by-step instructions, we will look in detail only at the wooden floor, concrete - in a nutshell, since it is used less often, and it is not possible to fit everything into one article.
Concrete floor installation
 It is worth noting that a concrete floor in a frame house is installed in cases of a slab foundation or a strip foundation. With a slab, everything is clear - the slab itself will be the floor of the first floor.
But if the foundation is strip, the concrete floor is made of lightweight concrete, such as expanded clay concrete, for example.
Wooden floor installation
Let's look at the construction of a wooden floor using the example of a pile-screw foundation. For the tape, in principle, everything is done in exactly the same way, with the exception of the lower trim, which can be made of thinner timber. But first things first.
Tying the foundation of a frame house
The installation of a wooden floor begins with tying the foundation. As a rule, the piping is made from timber 150x150 or 150x200, depending on the thickness of the wall and the distance between the piles. The greater the distance, the thicker the timber should be to avoid sagging. 
The strapping is necessary, firstly, in order to give rigidity to the foundation, secondly, to evenly distribute the load on the foundation, and thirdly, it will serve as a support for the future floor of the frame house.
In order to easily carry out the tying process with your own hands, we will divide it into several stages:
- The timber is laid out along the perimeter of the foundation, the length of the walls and diagonals are checked. At this stage, the final and accurate marking of the walls is carried out, according to the project. By the way, don’t forget about waterproofing, which we put under the harness in the form of roofing material.

- The next step is to outline the joining points of the timber; they should be located on the pile, since these will be the weakest points that should not “hang”. This applies to houses whose walls are longer than the length of the purchased beams.

- The timber is joined with an overlap of 20-30cm, as shown in the photo. To do this, so-called “locks” are cut out from the end.

- The corners fit almost exactly the same way. This is clearly visible in the photo.

- The beam is attached to the foundation using bolts or studs. To do this, it is necessary to drill holes both in the head of the foundation and in the beam itself. For ease of further installation, protruding parts - bolt heads or nuts with studs - must be deepened. The joints are additionally punched with nails measuring 150 mm or 200 mm, depending on the size of the timber.

- Once the perimeter is ready, we move on to the final step - tying the foundation under the internal walls of the frame house. This beam, to the already installed external one, is attached in the same way. For reinforcement, you can additionally use fastening metal corners.

When the piping of the foundation of the frame house is ready, we proceed to the next stage of our instructions - the construction of the floor frame.
Floor frame in the house
It is worth noting that already at this stage it is advisable to provide for all communications entering the house, such as water and sewerage. Electricity and gas can be supplied later, but if you plan everything in advance, there will be much fewer problems later.
The next step is to install the joists on top of the trim. If the distance between the supports is about 4 meters, then it would be better to use timber measuring 100x200mm or 100x150mm. You can use a 50x200mm or 50x150mm board, sewing them together in twos. 
If the distance is less than 3 meters, you can use a board measuring 50x150mm or better 50x200mm.
Installation of logs is a simple stage in assembling a frame house, but there are some nuances that must be covered in these instructions:

Do-it-yourself waterproofing and insulation of the floor of a frame house

It is worth noting that waterproofing, as well as vapor barrier, must be installed with an overlap, according to the instructions for the material, while preventing moisture from entering the insulation, both from the outside and from the inside. And the insulation itself is laid tightly, without gaps.
So we have looked at the instructions for installing the floor of a frame house, now it’s time to start working on the walls.
Step No. 4: Construction of the walls of a frame house
Our next step instructions I will be installing the walls myself. Just like with the floor, we will fasten all the boards and beams with nails and (or) mounting metal corners; some fastenings can be made with studs.
It is worth noting that almost the entire frame is assembled from boards measuring 50x150mm or 50x200mm, depending on the required wall thickness and the required insulation thickness. 
Some people think that it would be better to install timber in the corners of a frame house, but this is not entirely correct, and I’ll tell you why a little later, during the installation process.
So, let's start assembling the frame of the walls of the future house.
For better understanding and assimilation, we will divide our instructions for installing the walls of a frame house into several stages:
- Assembling the walls of a frame house. Windows and doors
- Installation and fastening of walls vertically on site
Assembling the walls of a frame house with your own hands. Windows and doors
We will assemble the walls on the already finished floor of the frame house; this is the most convenient option. But we must take into account that in this case, it is necessary that all dimensions be accurate so that the walls do not turn out to be longer or shorter than the already installed floor.
To make it clear what I'm talking about, first look at sectional wall of a frame house , and then I will tell you everything in order.

Now let’s look at step by step how to assemble all the walls of a frame house with your own hands:
- First of all, we need to decide on the ceiling height in the house. Let's assume that the height of the rough ceiling will be 280cm. This means that the vertical posts of the frame walls should be 280-15 = 265cm. The diagram shows where the 15 cm came from.

- The distance between the racks, as a rule, is selected based on the width of the insulation sheet, as a rule, its width is 60 cm. If the insulation is on a cotton basis, then the distance is made less by 2 cm, for a tighter contact.

- The top and bottom boards of the wall are laid out on the floor and the places where the vertical posts will be nailed are marked. Then the racks themselves are laid out and pierced with 120-150mm nails. You can additionally fasten them with corners.

- It is worth noting that each wall will be smaller in wall thickness than the length of the floor. This is clearly visible in the diagram.

- If the length of the wall is greater than the length of the board, then the wall is assembled from several parts. This is also done in cases where there are few helpers, because the entire assembled wall will have a lot of weight.

- As a rule, to add rigidity to the entire structure, jumpers are mounted between the racks. There are no strict rules on the number and frequency of installation, it all depends on the length and height of the walls, but usually they are installed one or two per space between the racks. The second option is better and is visible in the photo; in the case when they are made one at a time, they are mounted in a checkerboard pattern (one at the bottom, the next at the top). This can be done later, when the walls are installed. Most often, jumpers are made with the expectation that they will serve as a joint for plywood or osb boards, depending on further work.

- Window and door openings in the wall of a frame house are arranged as shown in the diagram.

- This is what it looks like “live”.

The most common mistake when assembling the walls of a frame house is that many people forget to take into account the thickness of the board when calculating, thus the wall is not as long as we would like.
Putting the walls in place


It is worth noting that when assembling walls, it is necessary to use a cord, pulling it from one corner to another, otherwise the corners will be even, but the walls will not.
Top trim and structural reinforcement
So, the frame of the walls has been assembled, now you need to make the top frame from the same board as the walls.
The top trim is necessary, first of all, for stronger adhesion of the corners, and will also give unity to all parts of the frame walls and distribute the load between them. 
To do this, it is necessary to pierce the board with 120-150mm nails over the walls, along the entire perimeter, including the internal load-bearing ones, so that all joints are covered with an overlap of at least 25-30 cm. Except for the corners, where the overlap will be equal to the thickness of the wall. 
The next step in our instructions will be to strengthen the entire structure as a whole. There are several options, the most common is reinforcement using plywood or OSB board. 
As a rule, having pierced one side along the entire perimeter (internal or external) with sheets of OSB boards, the frame of the house already becomes very rigid.
Internal partitions of a frame house
The construction of internal partitions is almost no different from the construction of external walls, except that they have more lenient requirements in terms of thickness and insulation. 
- Internal partitions, unlike external walls, can be made thinner. Everything will depend on preferences and comfort in terms of sound insulation.
- The insulation inside the partitions will serve primarily as a sound-absorbing material rather than as thermal insulation.
- Internal partitions can be insulated without waterproofing and vapor barrier materials.
These are all the main differences between internal walls and external ones, otherwise they are arranged in exactly the same way.
Step No. 5: Roof of a frame house
The roof of a frame house is practically no different from the roof of other houses, be it concrete, brick or any other. I’ll even say more that installing a roof for a frame house will be less labor-intensive than, for example, for a block or brick house, because its fastening to the walls will be much simpler. 
It is worth noting that building a roof is a very responsible process, but if you do not have a complex house layout, then you can easily do it yourself.
Building the roof of any house, including a frame one, is a very large topic with many nuances. Firstly, there are many types of roofs, and it is not possible to describe everything in detail in one article. Well, secondly, in order not to confuse you, I will probably move this topic to a separate article.
Step No. 6: Insulating the frame house
Now we have come to the final stage of building a frame house - its insulation. Everything needs to be insulated - floor, walls and ceiling.
You can read more about insulating a frame house with your own hands in another step-by-step instruction; here we will discuss only general points.
When choosing insulation for the walls of a frame house, it is necessary to take into account not only the characteristics of the insulation itself, but also the characteristics of wood, with which not all types of insulation will interact well.
Here is a short instruction on how to insulate a frame house with your own hands:
- Outside, over the OSB sheets, a special waterproofing membrane is stretched. Which side should be in the instructions for it.
- From the inside of the house, between the studs, insulation is laid in several layers, depending on the requirements for the house and the thickness of the wall. Each layer is laid overlapping the joint of the previous one to avoid cold bridges.
- Floor insulation occurs in the same way.
- It is better to insulate the ceiling from the attic by first filling a vapor barrier film from below onto the ceiling beams and hemming them with boards or plywood.
- After laying the insulation, it is necessary to fill a vapor barrier film over it; it will protect the insulation from moisture from the inside.
- Depending on the needs and further finishing work, sheathing material is placed on the walls on top of the film - boards or slats, but most often - OSB sheets, on top of which, in the future, finishing is carried out.
As you have already seen, there was a lot of text. But, I believe, all stages of construction were described in detail here DIY frame house, despite the fact that some points were included in separate topics, but this is only for your convenience.
I hope that by following these step-by-step instructions, you will be able to acquire a warm, cozy and reliable home without much difficulty and at minimal cost.
The dacha is an outlet, a favorite hobby for people living in the city. The construction of garden houses is not only a technological process, but also a special ritual for which they carefully prepare.
 Project of a finished frame garden house with a veranda
 More often than not, a house needs to be placed on a limited area, so compactness, convenience, and a thoughtful approach to all details play a significant role when choosing a project.
Based on an analysis of customer wishes for country houses, designers have developed many standard projects. The line includes inexpensive options just like change houses. , for placement on small, frame, panel buildings.
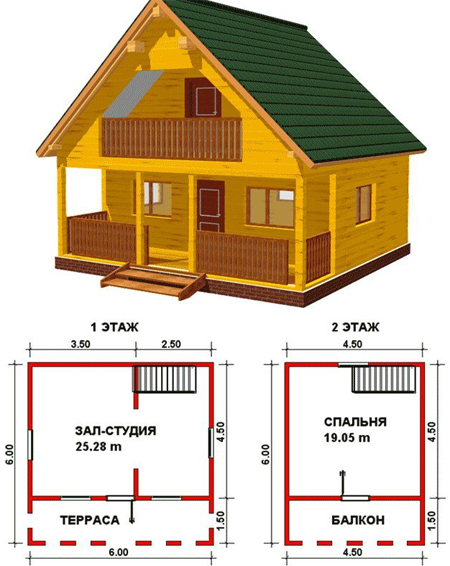 Project and layout of the first floor and attic of a typical wooden building for a summer cottage
 For suburban garden areas with a larger area, cottage projects from 100 to 200 sq. m., including attic type.
But before choosing a project and adapting it to the site, you need to take into account the legal norms for the construction of country houses. Formally, permission to build a garden house in a partnership with the intended use is not required. But if you need to register a building, get an address, that is, transfer it to individual housing construction status, difficulties will arise.
 Sample application form for obtaining permission to build a garden building
 Read also
Projects of private houses from SIP panels
 An example of converting a summer residential building into a gazebo
 The choice of material is significantly influenced by the style of the future home. National Russian ethnic motifs attract wood and timber. Frames are given different stylistic colors through external finishing. Using savage stone-look tiles and timber impregnated with dark stain, they introduce country style motifs.
Construction of a frame and panel house
The high speed of construction and good performance of frame buildings have made them popular.
Their main advantages:
The supporting structure of the frame garden building is made of wood.
Construction sequence
They start by preparing the site. It is leveled, cleared of debris, and plants are uprooted. Then they make a bedding out of sand and crushed stone and compact it.
They install the foundation and lower covering of the house. , roofing felt will do. Install vertical posts, starting from the corners of the building.
They are secured with an upper strap. The structure is reinforced with bevels.
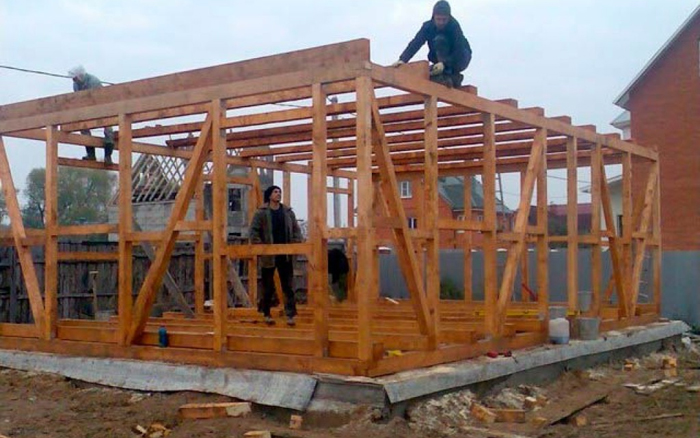 The process of assembling a frame for panel garden housing
 Then install it step by step:

The last stage is assembly and.
All wooden elements of the frame structure are made only from dry wood (within 12% humidity). 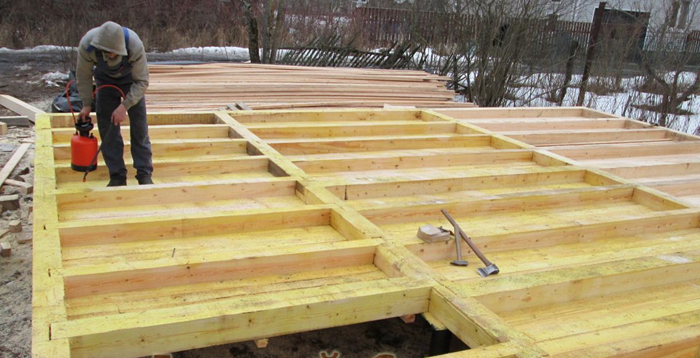
They are impregnated with agents that prevent the penetration of moisture, antiseptics.
Construction of a house from timber
Somewhat more expensive. Their advantage is that they do not require additional external finishing. Timber is an environmentally friendly material.
There are three types of timber:

The installation diagram and sequence are similar. The installation of the walls is different. Numbered beams are elements of a wooden house constructor. Wall crowns are laid out from them sequentially. They are connected to each other by wooden fasteners (dowels). In parallel with the assembly of the outer walls, the inner walls are assembled by inserting the partition elements into the grooves of the outer structures.
 Scheme for connecting timber using dowels