How to fill a cartridge with paint. Computer help
It's time to refuel
It's no secret that the vast majority of home printers today are inkjet printing devices. And no wonder: the cheapest inkjet printer costs 3 times less than the cheapest laser printer. True, there is one “but” here. The cost of inkjet printing is significantly higher. And the cartridges run out very quickly; you won’t have time to look back. But they cost In general, you can’t save up any money. What to do? Do you really have to buy a laser printer?
In fact, not everything is so bad: it is possible to significantly reduce the cost of maintaining a printer. To do this, you just have to learn how to refill the cartridges yourself. Here's an example. A branded cartridge for my HP DeskJet 640 printer costs about $30 (printing cost, therefore, 4 cents per page), and a compatible third-party cartridge costs just over $20 (3 cents per page). A bit expensive, isn't it? But if you refill an empty cartridge yourself, the cost of printing one page can be only 0.1(!) cents. Of course, there is a risk: refueling is not possible every time. But “those who don’t take risks don’t drink champagne.” True, if you decide to refill your cartridge, you should know that the print quality will almost certainly be worse than if you use a “branded” one.
So, what do you need to refill a cartridge? There may be several options here. The first is a special gas station. This refueling method is the easiest. You insert the cartridge inside the machine, fill it with ink and press the button. That's it, nothing more is required from you. True, this is not without its drawbacks. Firstly, the price of a gas station is high ($150200). And secondly, the machines can only refill a certain type of cartridge. In general, this method is perhaps only suitable for organizations.
The second option is a special kit, which includes a device for creating a hole, a syringe with a nozzle for refilling and a cartridge holder. All this allows you to achieve good results for just $10. There are also cheaper kits - in them you will find an awl or screw cutter, a syringe with ink and a rubber or plastic stopper. By the way, when purchasing a set, be sure to check whether it contains instructions for refueling. If this option seems too expensive to you, then just buy ink, take an ordinary awl, tape and a medical syringe. However, for the first time it is still better to use the kit.
Before practice, it is useful to study a little theory. Let's figure out what a cartridge is. Basically, the print unit of any inkjet printer consists of three main parts. Firstly, there is a reservoir filled with ink and a capillary system that supplies it to the head nozzles. This design is implemented differently in different models. For example, in some cartridges the ink tank is filled with a special absorbent sponge (something like foam rubber). In other models, ink is held in the reservoir due to the difference between internal and external pressure. Well, in some cartridges this happens due to a special bag filled with air.
Head - the second part of the printing unit. At the same time, in some inkjet printers the head is on the cartridge and changes along with it (for example, in HP printers). For other models, it remains in the printer, and only the reservoir is changed. 
In addition, each cartridge is equipped with its own chip that controls the ink supply. In principle, it is he who implements the printing process. If the chip fails, it will no longer be possible to restore the cartridge.
All this is not very difficult, but for refueling to be successful, you need to know such things. In addition, to get a good result, you need to choose the right ink. The fact is that there are many different inks for inkjet printers. In the vast majority of cases, dye-based inks are used (the coloring substances in such inks are soluble in water). Less common are quick-drying inks (they are not washed off with water, but dissolve in an alkaline environment, for example, in saliva). It is even rarer to see pigment ink (the pigment does not dissolve in either water or alkaline media).
In addition, inks are divided into three types based on functional properties: regular, high-resolution and non-standard. The first type of ink uses a simple dye without any additives, so they are the cheapest. True, the print quality in this case leaves much to be desired. High-resolution ink is a completely different matter: the result is visible even on plain paper. This ink practically does not smear on it, which allows us to truly speak of high resolution.
Non-standard inks stand a little apart. Finding them is much more difficult, and they are used mainly by professionals. This type includes, firstly, ink for printing on photographic paper (and sometimes certain inks require specific photographic paper), and secondly, inks with a non-standard color scheme.
What ink is best to choose for home refilling? The answer to this question is quite simple. Go to any computer company and see what kind of ink they have that is suitable for your cartridge. The brand of ink must be indicated on each refill kit. Just check the documentation to see if it fits your cartridge.
But don’t get your hopes up; it’s unlikely that you’ll find any ink other than standard ones. Although there are high-resolution waterproof inks and even inks for photo paper on sale, you will have to run around to find them.
In general, the problem of choosing ink should be taken very seriously. When you come to the store, try to take only branded paint. Moreover, it is not at all necessary for an HP printer to take HP ink; it is enough to take “almost branded” ink, for example, from LG, which produces compatible cartridges and refill kits for almost all printers. It’s another matter if in a store they tell you: “I don’t know which company, but it will work for your printer.” Should you trust a company that is afraid to write the name on its products? Well, if you still took a chance and bought this “something”, then be prepared for unstable, bleeding ink and incomprehensible colors (of course, not always, but in more than half of the cases).
Well, now that we have acquired the necessary theoretical knowledge and selected the ink, we can proceed directly to the refill itself. This process is quite different for cartridges from different manufacturers. So let's take a closer look at it.
Refilling Epson cartridges
Epson replacement cartridges are simply a reservoir filled with ink. The head and mechanism that provides printing are located in the printer and cannot be replaced. More precisely, they are subject to it if they fail, but this will have to cost an amount reaching 75% of the cost of a new printer. And what’s most interesting is that the Epson printing unit “flies” most often precisely because of the use of counterfeit cartridges or home refilling with bad ink, and the warranty in case of such breakdowns is invalid. So if you are the owner of an Epson printer, you better think ten times before you decide to refill! However, the process itself is very simple.
The most important thing is not to remove the cartridge from the printer for more than a minute: otherwise the print head will dry out and you will have to struggle with cleaning it. And this, believe me, will not lead to anything good. The way out of this situation is quite simple and not very pleasant: you will have to purchase another cartridge - take out the empty one, immediately insert the full one.
The refueling procedure itself, as I already said, is extremely simple, and it is the same for color and black models. The only difference is that in color cartridges you need to refill from 3 to 5 different compartments (according to the number of colors). This is done as follows.
As soon as you remove the cartridge from the printer, immediately seal the exit hole with a previously prepared piece of tape. Further actions depend on the cartridge model. If the tank has holes (they should be sealed with film) on the lid, then you are lucky, otherwise you will have to drill them yourself. Having sorted out the holes, insert the syringe needle to the bottom of the cartridge and slowly pump in ink. That's all. All that remains is to seal the filling holes (be careful not to accidentally seal the ventilation holes).
Refilling HP cartridges

In cartridges from this company, the print head is combined with a reservoir. This is a big advantage, because if refilling fails, the cartridge is simply thrown away and a new one is purchased, and the printer will not be damaged. HP color and black print cartridges are designed differently.
The first ones, like the Epson models, have a reservoir with a sponge, and they are refilled in a similar way. First, we seal all the holes except those located on the top cover. It is through them that we insert the syringe needle and slowly (when refilling almost any cartridges, ink must be injected slowly) we pump in the ink. Then you need to wait for some time until the ink dissolves on the sponge.
The process of refilling a color cartridge for HP DeskJet 400/500/600 is a little more complicated. First you need to remove the top cover (this is not as easy as it seems at first glance). Under it you will find 3 holes for different colors. We seal two of them, and pump new paint into the third using a syringe. Then we glue the other two, and so on. At the end, remove all the tape and return the top cover to its place. You can secure it with the same tape.
Now let's deal with black cartridges. In HP DeskJet 400/500/600 models, pressure inside the tank is created by special air bags. Remember this, because if such a bag is damaged, all the ink will leak out and the cartridge will have to be thrown away. In older models, the difference between external and internal pressure is used, and therefore such a problem cannot arise.
For younger models, the refueling process is as follows. First, tape all the ventilation holes on the bottom and lid of the cartridge with tape. Then we drill a hole in the corner of the cartridge (by the way, some models may have a ready-made hole; in this case, you just need to push a special ball inside to close it). Next, use a syringe to pump in ink. After this, tightly seal the hole with tape (or, if you use a special kit, plug it with a plug). This is where the greatest number of mistakes are made. The hole must be closed very tightly. Otherwise, the cartridge will leak, and this often happens when it is already inserted into the printer. Believe me, it is very unpleasant. 
That's all. Peel off the tape from the ventilation holes. Now all that remains is to pump some air into the upper technological hole. Be careful not to get it dirty, as this will cause ink to drip from the head nozzles. Pumping air should be stopped when ink stops flowing from the excess pressure release hole, which is located at the bottom of the cartridge (usually 2-3 cubes are enough). By the way, for some cartridges (for example, for HP 51645A), you do not need to pump in air, but rather pump it out. For this purpose, the refill kits have a special suction cup. We take this simple device, press it, place it against the nozzles of the print head and release the pressure. As a result, excess air is pumped out of the cartridge. Pumping must be done before ink appears from the nozzles.
Refilling is much easier using a special cartridge holder. In this case, you will no longer need to seal the ventilation holes; they will be covered with a holder (all except the top one). Simply drill a hole for refilling, then fill the cartridge, and then pump some air into the top vent and seal the refill hole. That's it - you can remove the finished cartridge.
With black cartridges of older models, everything is much simpler. It is enough to separate the film covering the special hole near the nozzles and push the plug ball inside. Then pour ink inside and seal the hole tightly with tape. Now all that remains is to turn the cartridge over and wait until the excess ink flows out.
Refilling Canon cartridges
This company has met the needs of home gas station lovers. In its latest printer models, you can change only the ink tank (like Epson) or both the ink tank and the print head (like HP). This allows you not to be afraid to refill cartridges (if refilling fails, the cartridge is simply thrown away and a new one is purchased) and, at the same time, minimizes the cost of purchasing branded ink (replacing a Canon cartridge is cheaper than replacing an HP cartridge, since you can only buy an ink tank) .
Canon cartridges hold the ink inside the reservoir using a sponge, so they don't need a complete seal. BC-20 type cartridges are refilled through the side vent. To do this, you need to widen the hole a little, insert a needle into it and pump in ink. That's all. By the way, do not forget that you cannot seal this hole.
Cartridges like BC-21 and BCI-21 are a little more difficult to refill. First you need to seal the outlet holes with tape. Then cut off the top cover with a knife. Underneath you will find the filling holes. Pump ink into each one at a time, plunging the needle all the way to the middle of the cartridge (not all the way!). Just don't mix up the colors; the filling hole of each color is located exactly above the outlet hole of the same color. Now all that remains is to secure the lid in place by wrapping it with tape. The most important thing is not to accidentally seal the ventilation holes.
By the way, there is another way to refill these types of cartridges. At the bottom of each cartridge there is a special fiber membrane. It is enough to slowly drip ink onto it, which will be absorbed. However, with this method of refilling, you can put too much ink into the cartridge, and it will spill out through the ventilation holes. This will not harm the cartridge, but you will, of course, get dirty.
Refilling Lexmark cartridges

The reservoirs of these cartridges are combined with the print heads. The ink is held inside by the sponge. The process of refilling Lexmark cartridges is similar to the process of refilling Canon cartridges and is just as safe for the printer; if it fails, the cartridge is thrown away and a new one is purchased. In the refilling process, you first need to widen the ventilation hole, then insert the syringe needle into it to the middle and slowly pump ink. For color cartridges, you need to remove the top cover and use a syringe to inject paint into the three compartments. Then attach the cover in place and that’s it.
conclusions
As you can see, refilling an inkjet printer cartridge is not as difficult as it might seem. The main thing is to be careful and follow safety rules. I think you understand that inkjet printer ink has amazing coloring power. Therefore, it is best to carry out the entire refueling process in the bathroom. God protects those who are taken care of, as you know.
And finally, I want to warn you that not every refill will be successful: usually the cartridge is enough for 23 refills, but sometimes it can run out after the first one. However, don't be upset. Remember, a little practice, and you will look without fear at the slowly creeping up numbers on the price tags of branded cartridges.
What to do when the printer suddenly stops printing at the most inopportune moment? That's right - you need to replace the cartridge. But now on sale there is a large, I would say, even too large selection of a wide variety of cartridges for almost all known printer models. You can purchase an original cartridge, which is quite expensive, but the quality of its work will be guaranteed by the printer manufacturer. In addition to them, there are also refurbished ones, that is, used ones, but refilled, most often in semi-handicraft conditions, which are significantly cheaper than the original ones. Between them, both in quality and price, are the so-called compatible cartridges produced by third companies. Or maybe you should try to refill the old cartridge yourself, breathing new life into it, and in the meantime, saving a certain amount for your home budget? It is no secret that all printer manufacturers, without exception, wanting to capture the largest possible share of the market, sell their products at a price not too different from the cost price, and “make up” the lost profit on consistently expensive consumables. At the same time, all of them, with amazing unanimity, promise all sorts of troubles (and, first of all, a significant decrease in print quality) to all those who do not want to follow their insistent recommendations to use only original consumables.
There is no doubt - quality is important, but if there is no money, then we choose what we can afford: the price difference between the original cartridge and a bottle of ink reaches ten times (this price ratio is also true for laser printers).
Inkjet printers
At home, printers became widespread only after the advent of inkjet printing technology, which made it possible, compared to dot-matrix printers, to radically improve print quality and, at the same time, significantly reduce noise and increase print speed. But most importantly, it became possible to print in color, and with high quality. Most models of inkjet printers are just simple mechanisms for drawing paper and positioning the ink cartridge, which is the concentration of all the technological “highlights” that determine the capabilities of this printer. This “division of labor” has led to the fact that the cost of a cartridge, in the cheapest models, reaches half the total cost of the printer. So, with intensive use, when cartridges are changed almost one after another, the total cost of ownership of an inkjet printer is rapidly approaching the corresponding indicator for an expensive laser printer. What to do? Is it really worth shelling out money for a laser printer? Not necessarily, but to dramatically reduce the cost of maintaining an inkjet printer, you will have to master the process of refilling cartridges. Believe me, this is not as scary as it seems, but only about the decrease in print quality after refilling - here, unfortunately, manufacturers are very often right. So it is recommended to refill only black cartridges - after all, the quality requirements for black-and-white printing, mostly texts, are not nearly as high as for color printing, and even more so for photo printing.
However, before moving on to the practical part of our story, it would be nice to refresh your memory on some theoretical information about inkjet printing. So:
Ink cartridge device
The print unit of any inkjet printer consists of two main parts. First, there is a reservoir (or inkwell) filled with ink, and a capillary system that supplies ink from the reservoir to the nozzles, from where the ink is “shot” onto the paper. In some black cartridges and in almost all color cartridges, the ink tank is filled with a special absorbent sponge (such as foam rubber). These cartridges are best suited for refilling. In other models, ink is held in the reservoir due to the difference between internal and external pressure. Well, in some cartridges this happens due to a special bag filled with air.
The head is the most important part of the printing unit. Moreover, in some printers the head and ink tank form a single, non-separable unit (for example, cartridges for HP, Lexmark printers). For other models, it remains in the printer, and only the ink tanks are changed. There can also be two options here, for example, in Epson printers the head is an integral part of the printer design, while in most Canon models the head is made removable. Recently, with the help of Epson, many cartridges began to be equipped with built-in chips that control ink consumption. One of the most important (from the manufacturers' point of view) functions of such chips is to combat the reuse of the same cartridges, since they remember the zero ink level in the reservoir and block the reuse of such cartridges. But the need for invention is cunning, such protection did not last long, and now in many file archives on the Internet you can find “breaker” programs for various models of overly “intelligent” cartridges.
The ink used in different cartridges also varies. Moreover, according to manufacturers, each printer model requires its own, strictly defined type of ink. But such care (after all, there is no universal ink suitable for all occasions) is only true in relation to original cartridges and inks. Nowadays, ink is often sold (mostly in large containers), which, according to sellers, is suitable for different models of printers and even different manufacturers. Such inks belong to the group of simple (standard) inks, and they are suitable for printing with low resolutions, that is, mainly simple text. Occasionally you can find special ink for high-resolution printing, but they are quite expensive, and refilled cartridges (and even in home-made conditions) are not suitable for high-quality printing by definition.
When refilling a cartridge with ink from an unknown or known but different manufacturer, it is recommended to thoroughly rinse the cartridge first. For washing, you can use distilled water or special washing liquids that do not contain alkali. In cases where the type of ink does not change during refilling, on the contrary, it is recommended to refill the cartridge without waiting for it to be empty.
The refilling process itself is quite different for cartridges from different manufacturers. However, if you don’t want refilling cartridges to bring you additional headaches instead of the expected cost savings, don’t forget about a few general rules:
Before refilling the cartridge, you should pay attention to its integrity, the absence of cracks on the body and, for models combined with a print head, on the conductive flexible board with electrical contacts. Sometimes there are low-quality inks that can corrode the copper on this board.
It is best to refill immediately after the ink in the cartridge runs out, otherwise the ink remaining in the nozzles may dry out and the cartridge will have to undergo a lengthy cleaning process, which does not always lead to a positive result.
When refilling any cartridges, ink must be injected SLOWLY to avoid the formation of air bubbles.
Well, now, having dealt with the general points, we can safely move on to considering the specifics of the process of refilling cartridges from different manufacturers.
Refilling Epson cartridges
Epson replacement cartridges are just regular ink containers, without any mechanism to ensure printing. The print head of the printer is not removable and has the same lifespan as the printer, and therefore it should not be replaced during the entire period of its operation. If for some reason you suddenly want to replace it in a service workshop, the cost of the work will be comparable to the cost of a new printer. And according to all-knowing statistics, the Epson printing unit most often fails precisely because of the drying of ink residues in the channels, the use of counterfeit cartridges, or their refilling with low-quality ink. In all of the above cases, the company disclaims warranty obligations, therefore, having decided to refilling, you need to clearly understand all the possible consequences of such a step.The process of refilling a cartridge itself is extremely simple.
Immediately after removing the cartridge from the printer, you must seal the exit hole with a previously prepared piece of tape. After this, if the reservoir has holes (they should be sealed with film) on the lid, insert the syringe needle to the bottom of the cartridge and slowly pump in ink. If there are no holes, you will have to make them yourself. When completing the refueling operation, you will need to remember to seal the filling hole and release the exit hole.
But the most important thing to always remember is that you cannot remove the cartridge from the printer for more than a minute, otherwise the print head will dry out irrevocably, with all the ensuing consequences. One of the solutions in such a situation could be a spare cartridge - take one out, immediately insert the other, and everything is in order.
Refilling Hewlett Packard cartridges
In cartridges from this company, the print head is combined with a reservoir. This design makes the cartridges more expensive compared to Epson, but there are certain advantages. And the main thing is that in case of unsuccessful refilling, the damaged cartridge is simply replaced with a new one, and no damage will be caused to the printer itself.
HP color and black print cartridges are designed differently. The former, like models from Epson, have a foam filled reservoir, and they are refilled in a similar way. To refill the 51625 cartridge (for DeskJet 4xx/5xx printer), you need to remove the top cover (this is not as easy as it seems at first glance). Under it you will find 3 holes for filling ink of different colors. We seal two of them, and pump new paint into the third using a syringe. Then we seal the next two, and so on, until all the inkwells are filled. After that, we remove everything that we pasted and return the top cover to its place. You can secure it with “Moment” or even simple tape.
Now let's deal with black cartridges. In the most popular models for older entry-level HP printers, the DeskJet 4xx/5xx (cartridge model 51626) and the more modern DeskJet 6xx (model 51629), vacuum is created by special internal air bags, if damaged, the ink will leak out and the cartridge will have to be thrown away. Refilling such cartridges is the most labor-intensive. First, you need to seal all the ventilation holes on both the top and bottom of the cartridge with tape. Then we drill a filling hole in the corner of the cartridge (by the way, on some cartridges it may already be present, in this case you just need to push the ball inside that closes it). Next, use a syringe to pump in ink. After this, tightly seal the filling hole with tape (or, if you are using a filling kit, with a special plug). This is where the greatest number of mistakes are made. The hole must be closed hermetically, otherwise ink may leak from the cartridge, and this may not happen immediately, but only when it is already inserted into the printer. After this, remove the tape from the ventilation holes. Now all that remains is to pump some air into the technological hole located in the middle of the upper part of the cartridge. You need to be especially careful here, as this will cause ink to come out of the head nozzles. Pumping air should continue until ink stops flowing out of the excess pressure release hole, which is located at the bottom of the cartridge (usually 2-3 cubes of air are enough).
Refilling is much easier using a special cartridge holder included in many refill kits. In this case, there is no longer any need to seal the ventilation holes - they will be covered with a holder (all except the top one). Simply drill a hole for refilling, then fill the cartridge, and then pump some air into the top ventilation hole and seal the refill hole. That's it - you can remove the finished cartridge.
With black cartridges of older models (51645 for HP DeskJet 7xx/8xx/9xx/11xx) everything is much simpler. It is enough to separate the film covering the special hole near the nozzles and push the plug ball inside. Then pour ink inside and seal the hole tightly with tape. Now all that remains is to turn the cartridge over and wait until the excess ink flows out.
Refilling Canon cartridges
Cartridges for Canon printers are most suitable for those who like to refill at home and are quite easy to refill, and the number of refills is limited only by the degree of wear of the foam filler of the ink tank. The latest models of Canon printers use a print head with removable ink tanks (like Epson), but, however, the head itself is easily removable and replacing it does not present any problems. This allows you not to be afraid to refill ink tanks (if refilling fails, the cartridge is simply thrown out and a new one is purchased) and, at the same time, if the print head is damaged, replacing it will cost about the same as purchasing a new cartridge for HP printers.
The widely used black BC-20 cartridges are refilled through the side vent. To do this, you need to expand it a little, insert a needle into it and pump in ink. That's all. By the way, do not forget that you cannot seal this hole - Canon cartridges do not need complete sealing.
BC-21 type cartridges are a little more difficult to refill. First you need to seal the outlet holes with tape. Then carefully remove the top cover. There are filling holes underneath. Pump ink into each one at a time, plunging the needle all the way to the middle of the cartridge (not all the way!). Just don't mix up the colors - the filling hole of each color is located exactly above the outlet hole of the same color. Now all that remains is to return the lid to its place by wrapping it with tape. The most important thing is not to accidentally seal the ventilation holes.
By the way, there is another way to refill these types of cartridges. At the bottom of each cartridge there is a special fiber membrane. It is enough to slowly drip ink onto it, which will be absorbed. However, with this refilling method, you can put too much ink into the cartridge, and it will protrude through the ventilation holes. This will not harm the cartridge, but it can get pretty dirty.
Refilling Lexmark cartridges
Lexmark printer cartridges are structurally similar to HP cartridges and have ink tanks combined with print heads. The ink in the reservoir is retained by the spongy filling of its internal volume. The process of refilling Lexmark cartridges is similar to the process of refilling Canon cartridges and is just as safe for the printer - if it fails, the cartridge is thrown away and a new one is purchased. During the refilling process, first, you need to slightly widen the ventilation hole, then insert the syringe needle into it to the middle and slowly pump ink. For color cartridges, you need to carefully separate the top cover and use a syringe to inject paint sequentially into all three compartments. Then attach the cover in place: that’s it.
Laser printers
Probably the main advantage of a laser printer is its high print quality along with quite acceptable performance for most needs. As for the cost, prices for junior printer models are close to the $200 mark, which makes them quite affordable for home use. However, many inexpensive models go on sale with cartridges that have a reduced resource compared to standard ones. Therefore, after a certain time, when the toner runs out, the printer owner will be faced with a dilemma: buy a new cartridge or refill the old one. Naturally, the first option is the simplest and most obvious, but the price of a new cartridge varies for different models from 50 to 100 dollars, and not everyone can afford to buy it at the very moment when it runs out. And those who want to save money will have to master the difficult science of refilling cartridges themselves. In this case, you will only have to fork out money for a tube with toner. However, labor costs will be significantly higher than in the case of refilling cartridges for inkjet printers, and the risk of damaging a complex and fragile device such as a laser cartridge is quite high.
The main differences in the design of cartridges for laser printers from different manufacturers are whether the selenium photoconductor is included in the kit of the cartridge itself (such models include all Hewlett Packard printers, the manufacturer whose products are most widespread in Russia) or is located in a separate special “drum” cartridge". In the second case, refilling the cartridge with toner usually does not cause any problems, but in the first:
If you still decide to refill such a cartridge yourself, you can do this in two ways. The first of them, the classic one, involves completely disassembling the cartridge, removing the selenium photodrum and pouring toner into the hopper. However, complete disassembly of the cartridge requires considerable metalworking skills; in addition, there is a certain probability of damage to the surface or exposure of the photodrum, which will inevitably lead to either a significant deterioration in print quality, or, sometimes, to loss of cartridge performance, and in the most “clinical” cases - to failure of the printer itself.
However, there is another, simpler way to add toner to the cartridge, eliminating the possibility of damage to the internal elements. To implement it, you need to carefully make a hole in the toner hopper and pour fresh toner through it using a funnel. After which the hole must be sealed with tape.
The hole can be made in a variety of ways, for example:
1. Burn with a soldering iron;
2. Carefully cut with a sharp scalpel;
3. Drill with a drill with a diameter of 8 - 10 mm.
If methods 2 or 3 are used, you will need to remember to shake out the chips from the hopper along with the remnants of the old toner. In any case, you should not penetrate too deeply into the housing, so as not to damage the structural elements located inside (the hole must be made at the maximum distance from the magnetic shaft). As a disadvantage of this method of refilling a cartridge, we can note the impossibility of cleaning the photodrum and emptying the settling hopper, so the number of refills in this way should not be more than 2-3 in a row.
And what do we have left?
As you can see, refilling a cartridge for a printer, especially an inkjet one, is not as difficult as it might seem at first glance. The main thing is not to rush and follow basic safety rules. There is no need to explain to anyone that the toner for laser printers is very fine and therefore volatile, and the ink for an inkjet printer is washed off with great difficulty. Therefore, it is best to carry out the entire refueling process not in a living room, but, for example, in the bathroom.
Among all the inkjet printer manufacturers reviewed, Canon printers have a traditionally loyal attitude to refilling, and Epson models, especially the latest ones, equipped with “smart” cartridges, have the same traditionally negative attitude. Hewlett Packard and Lexmark printers occupy a middle position in this “ranking”, and while Lexmark cartridges are easier to refill, Hewlett Packard products, regardless of the type of printer - laser or inkjet, are distinguished by an exhaustive range of any accessories for them, including the widest choosing ink (or toner) for refilling.
And finally, I want to warn you that not every refill can be successful: on average, a cartridge lasts for 3-5 refills, but sometimes it can “die” even after the first one. However, don’t be upset - those who don’t take risks don’t have money left for champagne!
|
However, we have not yet touched upon the issue of the cost of owning a printer. Let's face it: replacing a set of cartridges is not a cheap pleasure and, often, can be comparable to the cost of the printer itself.
Manufacturers of printers and MFPs receive most of their profits from the sale of consumables: ink, cartridges... This explains the high cost of original cartridges.
The above applies, of course, to printers. Canon …
These printers provide the highest print quality, But, have one very significant drawback (like printers from other manufacturers: HP, EPSON): original cartridges for them are quite expensive.
What to do if you want to print images and photos with the best qualityCanon , but without spending money on ink?
There is an exit! You can refill the cartridges yourself!
One of the reasons why I recommend Canon printers is because their cartridges are easy to refill yourself. In this case, you do not need to resort to various technical tricks so that the printer can work normally with refilled cartridges.
Everything is elementary simple: you fill the cartridges with ink in a certain way, insert them back into the printer, if necessary, respond to the printer’s request and quietly print further! As many as you like! At the same time, the print quality remains the same as with original cartridges.
I myself have been using Canon printers for several years in a row and always refill them myself.
- Firstly: I don't overpay for original cartridges.
- Secondly: this allows me to print in huge quantities without worrying about the cost of the prints, which is actually very, very low.
Expensiveness and quality are no longer synonymous!
So, let's go!
Ink
The first thing we need is to purchase ink with which we will refill the cartridges. I buy ink from the online store www.bestprint.org. There is a large selection of inks for various printer models, including Canon.
If you walk around the store and do some calculations, you get the following picture:
A set of original cartridges (5 pieces, 600 rubles each on average) will cost 1,500 rubles. Ink in a 200 ml container from Ink-Mate (Korea) costs 670 rubles - this is the total cost of a set of bottles (5 pieces) with ink (enough for about 10 refills). The store also offers German OCP ink in 500 ml containers (enough for more than 25 refills). A set (5 bottles of 500 ml) costs 960-1150 rubles.
The benefits of self-refueling are obvious...
Let's go back to the store. For example, now I use a Canon IP4600 printer at home and these are the inks compatible with this model: http://www.bestprint.org/product_info.php?products_id=135
You, if you have a different Canon printer model, need to go through the list and select the ink that matches your model: http://www.bestprint.org/index.php?cat=27. Just open each item in the catalog and see if this or that ink set is suitable for your model. Choose the one that suits you and order.
If anyone is confused by the question regarding the specified online store, then on my own behalf I want to say that withBestPrint.org I've never had any problems. Everything is done quickly, efficiently, the goods arrive in the best possible condition. In a word, feel free to place your order.
On average, an order takes 2 weeks to reach the recipient.
After you receive the ink containers, you can proceed to the next step. We will consider the refilling process using the example of Canon PIXMA IP4300.
Preparing for refueling
Prepare 5 syringes (one syringe for one color). It is advisable to sign them so as not to confuse them during subsequent refills ( Under no circumstances should you mix different inks!):
Please note that Canon printers have two black colors (pictured below, the first two cartridges from left to right):
(the order of cartridges may vary depending on the model)

The PGBK cartridge (the largest) is pigment-based, not water-based, like all other cartridges.
For reference: ink types.
- Pigment-based ink is a suspension of microparticles in solution.
- Water-based ink is a dye dissolved in a liquid (medium).
Almost all types of ink use water as a medium.
Water-based inks (dissolved dye) are easier and cheaper to produce. This factor has largely contributed to their widespread distribution. However, ink based on dye dissolved in a medium has the disadvantages of being absorbed into the paper and causing some blurriness.
But pigment inks aren't perfect either: despite their slightly better fade resistance, the suspension of particles makes the nozzles (tiny holes in the print head) more prone to clogging.
A slight blurriness, upon closer examination, is sometimes noticeable when printing text (i.e., on a contrast print - sharp transitions from black to white). Therefore, Canon uses two blacks: pigment - used only when printing text (to make it clear and as resistant to various influences as possible): and aqueous (the second black and all color) - used only when printing images and photos.
Let's return to the refueling process:
So, these two black colors cannot be mixed in any way, therefore, do not confuse those two syringes with two black colors.
By the way, containers with black ink are also marked. One of them is labeled "pigment". This is the ink for PGBK cartridge:


Everything with syringes and the correspondence of each syringe to exactly one color - we figured it out.
The next step is to put several sheets of paper on the table in case the table is not smeared during the filling process, turn on the printer, and lift the top cover:

We wait a few seconds until the printer extends the print head with cartridges to us:

You can start with any cartridge. I'll start with yellow. Press the latch and lift the cartridge up:

Place it sideways on sheets of paper. Now we will need to make a hole at the top right side of the cartridge. The hole can be made using a thick needle; it can be heated beforehand so that it passes through the plastic body of the cartridge more easily:

The hole needs to be made here:

Don't make it too big, just enough for the syringe needle to fit in. If, after piercing with a hot needle, there are irregularities and protrusions of plastic around the hole, carefully trim them with a sharp knife so that the hole is more or less even.
Now open the container with the corresponding color, fill the syringe full of ink, place the cartridge ABOVE the open container (in case ink starts dripping from below), insert the syringe needle into the hole made and begin to slowly pump ink into the cartridge:

When the ink level rises to the hole made, remove the syringe (if there is ink left in it, then you can pour it back into the bottle).
Now you need to hold the cartridge over the ink container and seal the hole with tape:

After this, lightly squeeze the cartridge over the ink container to remove drops from the bottom hole of the cartridge:

All! The refueling procedure is completed.
All that remains is to insert the refilled cartridge into the printer:

... and press it from above until it clicks:

In the same way, you need to refill all existing cartridges.
After this, close the printer cover and... you can print!
P.S. The printer will not indicate that the cartridge is full. The chip in each cartridge is designed for one-time use only. Therefore, after refilling, the printer will still display that the cartridge is empty.
At some point, when the printer “decides” that the cartridge is completely empty, it will give you a warning window that you need to replace the cartridge right now or continue printing and turn off the ink level display.
If you ever see this warning, simply follow the instructions in the message on how to turn off your ink levels. To do this, you will need to press the “continue printing” button for a few seconds. She looks like this:
Old Canon models:

New models (pictured - Canon IP4600):

The printer will then immediately resume printing and turn off the ink level sensor.
It will issue such a warning for each cartridge in turn. When it turns off the level sensors in all cartridges in this way, such a warning will no longer be issued.
Be careful!
Check the ink levels in the cartridges yourself from time to time!
To do this, with the printer turned on, open the top cover, take out the cartridges one by one and see how much ink is in them. If they start to run out, carry out the same refueling procedure. The only difference is that during subsequent refills you no longer need to make a hole in the cartridge. This only needs to be done during the first refueling.
That's all about the procedure for refilling a Canon printer! As you can see, it's quite simple.
When purchasing printers, not everyone knows that only a demo cartridge is built into the device.
It has a small supply of ink, runs out quickly, and the owner of the new equipment goes to the store for another printing device.
This piece of office equipment costs quite a lot, and with frequent use, replacements are not uncommon and can hit your pocket hard.
The main income of inkjet printer manufacturers is not the sale of the printing devices themselves, but rather revenue from the constant replacement of expensive parts.
Types of printers
Read also: Our TOP 15: The best laser printers for the home | Current rating 2018 + Reviews
There are several types of printing devices, and each of them periodically requires cartridge replacement.
Depending on the printer requirements and budget, people choose from the options provided:
- Jet.
- Matrix.
- Laser.
Let's try to understand the main differences between them.
Jet printer
Inkjet devices have earned their popularity due to the possibility of color printing and the low price of the device, however, they require refilling the cartridge, which can be difficult to do at home, especially if the owner of the printer is far from technology. But everything can be learned.
Laser printer
This device prints using lasers. There are color and black and white units.
A fairly economical device in which one toner replacement lasts for a much longer period than the previous two options.
Refilling an inkjet printer cartridge
Read also: TOP 10 Best laser MFPs for your home in 2018 | +Reviews
Most often, it is the inkjet printer that requires replacement or refilling, so we will understand the nuances of performing this procedure using the example of products from different companies.
It is not difficult to make sure that there is no paint, because this will be indicated by the device’s reluctance to print. Before this, the pictures will fade with each print.
To replace toner at home you will need a few simple tools:
- Syringes with needles, one for each color.
- Cotton pads.
- Ink.
- Cartridge without ink.
- Gloves for those who are afraid of getting dirty.
These things are used when replacing the ink of any inkjet cartridge. All this can be easily purchased at the store, and empty paint containers are available by default.

Refilling should be done immediately after finishing the paint, and it is better to do it shortly before the device fails. Otherwise, the device will not resume its operation, and when refilled it will not function if it has been stored empty for some time.
HP Printers
Read also: [Instructions] How to connect a printer to a computer on Windows 10 and Mac OS
As a rule, refilling HP cartridges at home can be successfully completed 1 to 5 times. Black and white can be refilled up to 8 times.
The electronic parts of the device cannot withstand more. During the paint replacement process, special refill kits are used. They come in black and colored.
Instructions:
1 First of all, you should remove all possible contamination from the print head. To do this, use a napkin moistened with purified liquid.
2 The print head should be at the bottom. In this position, the device is placed on a napkin.
3 The sticker hiding the filling chambers must be removed from the cover.
4 When drawing paint into a syringe, you must strictly monitor the presence of air and foam in it; this is unacceptable.
5 When pumping ink into the chamber, the needle should be as deep as possible, but no more than 3 cm, inside the filling hole of the corresponding color. Don't be afraid if the needle is tight; resistance when pushing the needle is quite normal for such cartridges.
6 Ink should be injected until excess appears on the surface of the device. This action will have to be performed slowly, no faster than 4 ml/min.
You can rinse the needle and syringe with distilled water and use them with a different color, but it is much safer to prepare syringes for each color separately.
7 After excess ink appears around the puncture site with a needle, do not be afraid to remove it. This will have to be done, because there is a risk of mixing colors.
8 This operation must be carried out with all flowers,
.
9 After finishing the work, you need to seal the upper part with tape. Each filling hole must be tightly closed. In this case, the tape will replace the sticker that was already removed at the very beginning.
10 The tape above each filling hole is pierced with a needle.
11 Use a dry cloth or cotton pad to clean the print head and contact lens.
12 After installing the cartridge into the printer, you should perform an initial check. Instructions for doing this should be in the printer instructions.
HP 121, 122 and 650 black cartridges have a larger chamber. Due to its design, it can create problems when performing work.

The filter that separates the air space and the special filler, which is refilled, can easily be filled with air, which eliminates contact between the ink and the print head.
This causes the printer to malfunction.
This problem can be solved by pumping air out of the newly filled device.
For this purpose, refueling platforms are used. But a simple shake will help for a while.
The paint container will have to be positioned with the nozzles down and shaken like a thermometer.
Another measure to help solve the problem is to “fill” the camera with ink.
To do this, use a thin needle to pierce the filter and after that the ink can flow freely to the head.
Canon
Read also: The computer does not see the printer: What should I do?
When refilling a Canon cartridge at home, in addition to the equipment already mentioned, you will also need an awl. You can also use a drill or a thin screwdriver.
All work comes down to performing simple six steps:

Each model requires its own volume of dye:
- PG-440 requires 8 to 10 ml of ink.
- To replace paint in PG-440XL, you need to prepare 15 - 20 ml.
- Each color of the CL-441 model is refilled with 3-4 ml. ink.
- CL-441XL already asks for 6-8 ml. ink of each color.
- As can be seen from this list, no one knows the exact amount of ink to restore the operation of a printing device. You will have to find out this in practice. Filling ink is done slowly and carefully, with the needle immersed 2-3 cm into the refill reservoir.
When refueling, the needle must be placed in the refueling chamber until it stops. It is almost impossible to say anything inside the device, so restoring the functionality of office equipment is not a very complicated process and every printer owner who values his money and time can do it.
- Excess ink will begin to flow out. This is completely normal and if this happens, you should simply pump out 2 ml. ink and clean the surface from their traces with a napkin.
- After finishing the work, replace the removed sticker with transparent tape and pierce it with a thin needle over each of the holes for paint.
After the work is completed, the printing device will start working again, but before printing you will still have to check it in accordance with the instructions for the device.
Canon pixma
Read also: [Instructions] How to set up a router: TP-Link, D-Link and other brands | 2019
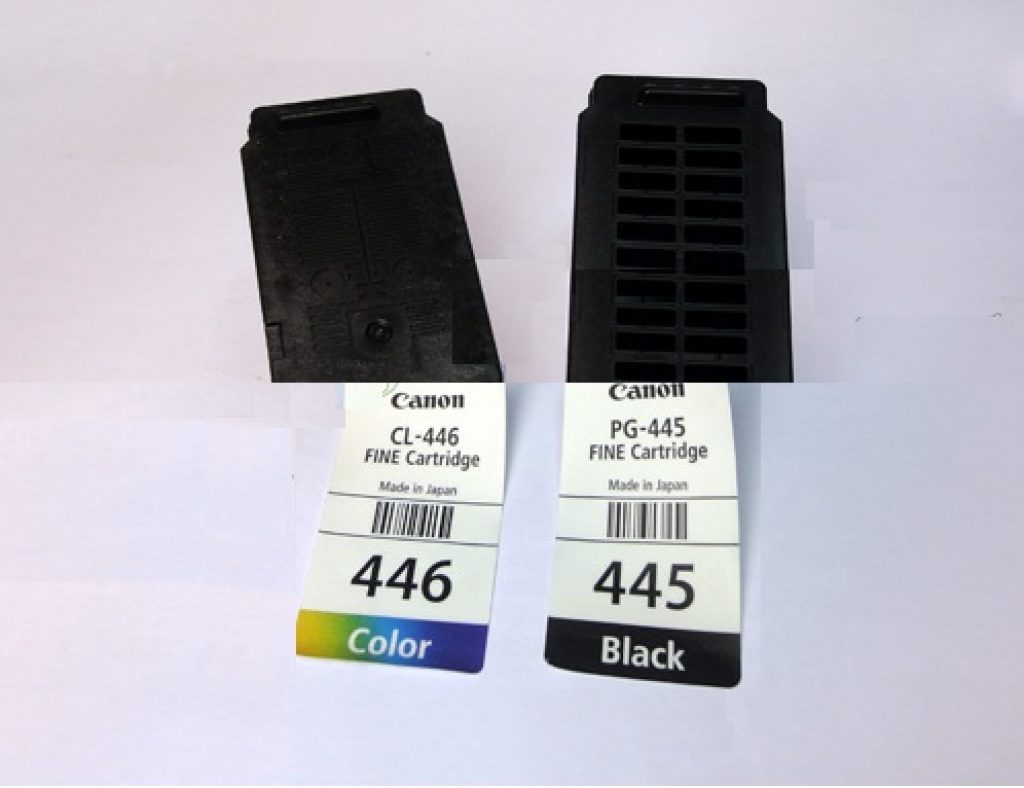
In Canon pixma printers, two types of cartridges are responsible for printing: PG-445 and CL-446.
Instructions for refilling Canon pixma cartridges at home involve using a small awl to widen the air intake hole.
1 First of all, the sticker indicating the model is removed from the case.
2 You can see the filling holes under the sticker. Due to the design features of the PG-445 model, the ink volume is greatly reduced and amounts to about 60% of the total volume of the ink tank. The entire volume is used in models marked with the XL prefix. It is not difficult to guess that they cost much more.
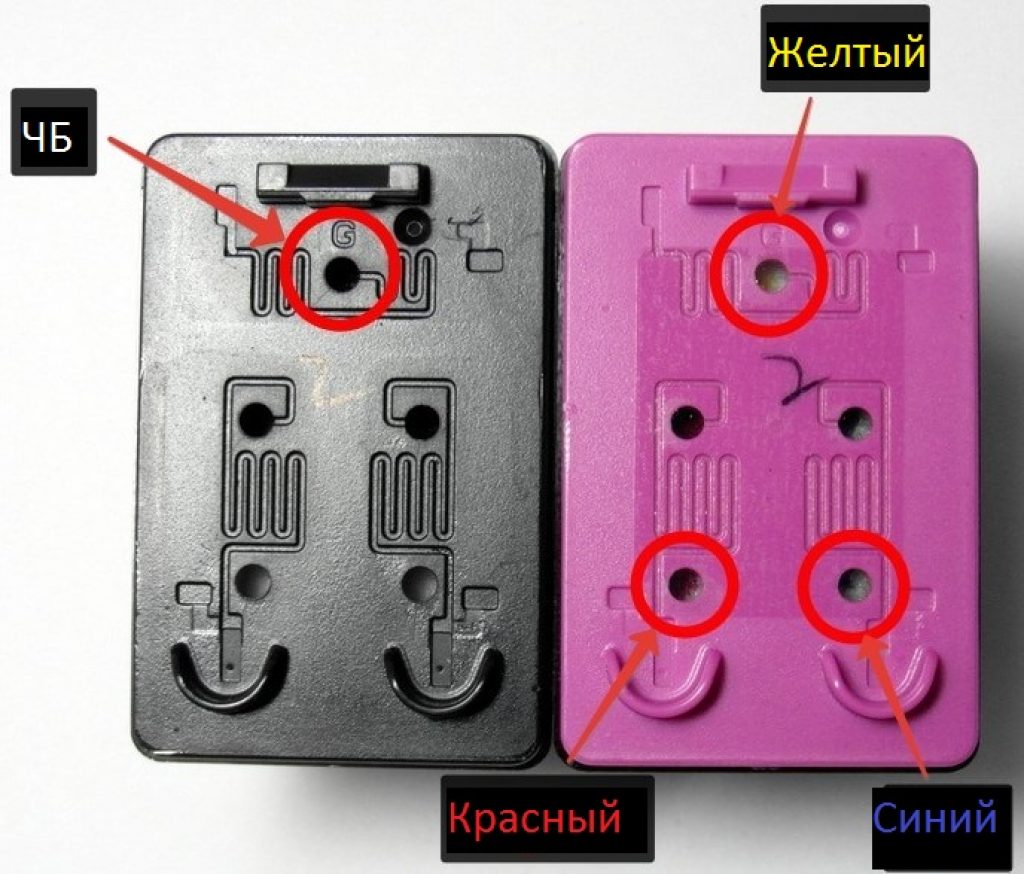
3 In the color cartridge you can see three holes corresponding to three colors: top - red, bottom left - blue, bottom right - yellow.
To perform paint replacement, these holes must be enlarged. The size of each of them should be two times larger than the size of the syringe needle used to pump ink. This is important to ensure that air escapes from the filling chamber.
It is very convenient to widen the holes using a heated awl of a suitable diameter.
4 In a black device, the location of the air intakes is not so obvious. It is in the middle cell. If you place the paint container vertically, it will be a cell in the left column.
5 Since it is almost impossible to guess the exact amount of ink required for refilling, you should pump it into refill capsules until a drop of ink appears on the surface. After this, you must immediately pump out 1.5 ml of ink from the filling chamber.
6 After refilling with each color, the device can be wiped with a napkin and completely remove excess ink.
7 After refueling, the holes will have to be sealed with adhesive tape, and above each air intake it will have to be pierced with a thin needle.
After this, the cartridge is placed in the device and verified in accordance with the Canon pixma operating instructions.
Lexmark
Read also:[Instructions] Calibrating the screen on a laptop or monitor for a PC running Windows 10
Self-refilling the Lexmark cartridge will allow the printer owner to quickly return the equipment to working condition and save money on the purchase of a new expensive device.
If the prudent owner of office equipment takes care of purchasing ink in advance, then it will be possible to return the important device to working condition at any time of the day or night.
To do this you will have to perform a few simple steps:
![]()
- Screwdriver
- Gloves
- New toner
The work must be performed according to the instructions:

After this, the printer is ready for use, but before printing it must be checked according to the instructions.
Instructions
Despite the differences in the design of cartridges of different models and manufacturers, the general principles of refilling remain the same. Before you start refueling, lay a newspaper on the table and prepare a dry cloth for wiping. cartridge from spilled toner.
Refueling cartridge laser printer includes not only refilling the toner, but also cleaning the garbage compartment - lint from paper, dust, and a certain amount of toner get into it. But if your cartridge is being refilled for the first time, then the garbage compartment does not need to be cleaned during the first refill.
Remove the cartridge and place it on the table. The protective curtain covering the photosensitive drum is sometimes removed, but with careful work this is not possible. Take pliers and carefully pull out the bushings that secure the photosensitive drum. Carefully remember the disassembly order. Then slightly move the spring-loaded halves apart cartridge, slide the curtain and remove the photosensitive drum by the gear. Wrap it in clean cotton cloth and place it in a dark place - the drum should not be kept in the light.
To clean the waste bin, you must separate the spring-loaded halves cartridge. They are connected by two pins. Sometimes these pins can be filled with plastic, in which case small plastic protrusions are visible in their place, which must be carefully cut off so that the pins can be grabbed with small wire cutters or pliers. In some cases, the pins can be knocked inward cartridge, then, after separating the halves, remove.
When disassembling the cartridge, do not touch the surfaces of the rollers with your fingers; only grasp the ends of the axles. The waste bin is located in the half cartridge with a handle. To remove debris, you need to remove the rubber roller (it is located under the removed light-sensitive drum), then unscrew the screws securing the squeegee - a metal plate with a soft plastic transparent strip attached to it. After removing the squeegee, carefully shake out the contents of the garbage bin onto a sheet of newspaper through the resulting gap, roll up the newspaper and throw it in the trash. Collect the parts of this half cartridge in reverse order.
The toner hopper is in the second half cartridge. There is a cross screw at one of the ends of this half - unscrew it, remove the cover, while holding the tone shaft so that it does not fall out. It covers the gap through which the toner is supplied. Under the removed cover, look for a plastic plug. Open it, there is a hole underneath for refilling toner.
When adding toner, never fill the hopper completely, otherwise the cartridge may be damaged. Always leave at least some free space. It is quite enough to pour a standard bottle of toner into an empty bin. Reinsert the plug and reassemble the cartridge in reverse order.