Interior design of a bathhouse, how to create comfort inside. Interior design of a bathhouse: arrangement options Arrangement of a wooden bathhouse inside
It's good to live in a private house. On your own land you can build a huge garage, a bathhouse, or an entire water park. But what about the owners of simple apartments? Of course, it’s impossible to build a water park and a garage in such conditions, but it’s easy to build a bathhouse. Moreover, all the necessary stages of work can be easily done with your own hands.
Any construction work begins with planning and procurement of materials. The finished bath should have as little weight as possible, so only sheet lining is suitable for finishing the structure.

In addition to the lining, you will need to buy timber for the frame, galvanized screws to assemble all the elements into a single system, mineral wool insulation, foil, wires, a switch, a lighting fixture and, of course, a heating device.


Determine the required amount of materials yourself, taking into account the size of the future bathhouse. When determining the optimal size, keep in mind that one person needs at least 1 m2 of free space to spend time comfortably in the steam room.
After purchasing everything you need, proceed to arranging the floor.
Arranging a bath floor
The best place for arranging a bathhouse is the junction of three walls. If it is not possible to build a steam room there, choose a place near a load-bearing wall, but not an external wall.
Start installing the floor. This stage is performed before the frame is erected. You can make a plank or tiled floor.

First step. Remove any existing trim, if any, and carefully level the base.
Second step. Install the support rails. Boards will be attached to them. The bathhouse in the apartment will have a small area, so there are no special requirements for the spacing of the sheathing. You can install slats at a distance of, for example, 60-80 cm.
Third step. Attach 4-5 cm thick boards to the sheathing. Use self-tapping screws for fastening.
Wood must not be coated with any paints or varnishes.
Tiled floor
First step. Remove the existing floor covering and level the surface using a screed or, if there are no significant differences in height, with a self-leveling mixture. Pre-install low formwork according to the dimensions of the future floor. Let the fill dry and remove the formwork.
Second step. Lay the elements of the electric heated floor and pour the screed on top of them. The laying scheme, as well as the optimal thickness of the screed layer, is given in the manufacturer's instructions.
Third step. Place your preferred tile on the dry screed. There are no specific requirements for tiles. To attach tiles, it is best to use adhesive specially developed for this purpose.

Proceed to assembling the frame. It will consist of vertical posts and horizontal crossbars. Strapping with horizontal bars is performed in 5 levels:

First step. Install vertical supports. Place them in the corners of the future paired room. The height of each rack is up to 190-210 cm. To make racks, use durable wooden boards or bars.
It is important that in the future locations of benches the bars or boards are thicker than in other places in the structure.
Use dowels to secure the posts to the floor. The racks are attached to the walls with several nails without heads. Check the vertical installation of the racks using a level or plumb line. The walls in apartments are often uneven, so you will most likely have to spend additional time adjusting the frame elements.

Second step. Secure the horizontal strapping elements in accordance with the previously given recommendations. You can use screws for fastening.

Third step. Attach mineral wool insulation to the frame. Carefully place the mineral wool into the cells of the frame. If possible, secure the insulation with nails or screws. Cover the insulation with foil. Use tape or pushpins to secure the foil.

Aluminum foil will create the effect of a thermos in the sauna, helping to maintain maximum heat inside the room.
During the construction of the frame, do not forget to leave an opening for installing the door. At the same stage, install the door frame - just secure it between adjacent posts using screws. It is better to remove the door leaf before finishing work is completed.
Ceiling frame structure

Installing the ceiling of an apartment bathhouse is done in one simple step: you simply tie the upper ends of the vertical support posts with wooden boards. At this point the frame is ready. Instead of boards, you can use a sheet of drywall. Next, the lining will be attached to this base.
If you wish, you can leave the “original” ceiling completely, but it is unlikely to fit into the interior of the finished bathhouse.
Before the final decorative finishing begins, decide on the issue of electrical wiring in your apartment sauna. In a good way, at this stage you need to enlist the support of a professional electrician.
In general, you need to bring out the wires to install an outlet, a switch and a couple of low-power lamps.
Route the wires along the outside of the support frame. The electrical cable must run through a special protective sleeve. The latter is fixed to the frame elements.
The lamps are connected strictly in parallel. The phase for the lighting equipment will be provided by the heater, and you need to extend the power and lighting wires directly to the heater through metal hoses.
Finishing work

Lining is traditionally used to cover apartment saunas.
First step. Cover the ceiling. Start attaching the sheets to the previously prepared base from the side of the front door. Use hidden nails for fastening. You can make them yourself by first biting off the heads of simple nails using the appropriate tool.
Nails must be driven in at a slight angle. Fix the lining to each frame board.
Second step. Prepare the lining for finishing the walls by preparing holes in the appropriate places for the outlet of electrical wires. The diameter of such holes must correspond to the diameter of the metal hoses. Pass the metal hoses through the holes and begin fixing the lining.
Third step. Cover the frame of the walls with clapboard. Fastening is carried out in exactly the same way as in the case of finishing the ceiling.
Do not bring the bottom boards to the floor by about 2 cm - this will create the necessary ventilation hole.
Installation of benches and doors

The height of the ceiling in an apartment bathhouse, as already noted, will not exceed 190-210 cm. If the ceiling is higher, a “pipe effect” will be created in the steam room: the draft will increase, drafts will appear, and the heating efficiency will decrease.
In such conditions, it is possible to comfortably place only 2 benches. Place the top one at a distance of about 1 m from the ceiling of the steam room. Make the lower bench at a height of 60-70 cm from the floor. Additionally, install a step under the lower bench at a height of 20-25 cm from the floor for greater convenience.
First step. Prepare the material for the bench frame. For this, a beam with a cross section of 4x8 or 5x10 cm is optimal.
Second step. Proceed to assembling the frame. First, attach the main horizontal bar to the wall opposite the entrance to the bathhouse. Use screws for fastening.
Third step. Attach the side beams to the walls and connect them with the front horizontal beam.
Fourth step. For greater structural stability, install several vertical support posts along the length of the bench.
Fifth step. Assemble the frame for the second bench in the same way. Tighten the frames together with screws.
Sixth step. Finish the benches with clapboard. Attach the sheets with secret nails to each crossbar and frame post.
Finally, all you have to do is install the door leaf. The best option for a bathhouse in an apartment is a door made of glass, possibly tinted.
Buy a door that opens outward. There should be no “serious” locks in the door design for your own safety. The permissible maximum is weak magnetic or roller latches.

Selection of heating equipment
Traditionally, so-called saunas are used to heat apartment baths. electric heaters. Select the appropriate power of the equipment. For example, to heat a bathhouse with a volume of about 9 cm, an electric heater with a power of about 12-14 kW will be sufficient. Start from this.
It is also important to determine the optimal weight of the stones. To warm up 1 m3 of space you will need 5-5.5 kg of stones.

Also, special infrared emitters are well suited for apartment baths. They warm up the steam room as quickly as possible and have a beneficial effect on human health.

Even those who refuse to visit a traditional steam room due to high blood pressure will be able to take a steam bath with an infrared heater. Moreover, IR units are more economical compared to the mentioned electric heaters and do not require the use of stones.

It is best to install the heating device after all finishing work has been completed. Fasteners and installation instructions are supplied as standard. Install according to the manufacturer's recommendations.
The optimal place for placing equipment is opposite the benches at a height of about 200 mm from the floor surface.

At this point, the arrangement of your own bathhouse in the apartment can be considered complete. Follow the instructions, and very soon you will be able to enjoy bath treatments right at home.
Good luck!
Video - Do-it-yourself finishing of the bathhouse inside
The issue of interior decoration of the bathhouse should be taken most seriously. Even though the room may look rather unremarkable, there are a few important aspects to be aware of when it comes to decorating.
Of course, such a room should easily withstand high temperatures. In the bathhouse, the air temperature can reach 120 degrees Celsius. Thus, it is necessary to carry out all construction work responsibly, as well as select materials that are suitable in quality and scope of use.
At the same time, finishing materials must “breathe”, otherwise moisture will accumulate in the bathhouse, which also negatively affects the condition of the entire room. On sale you can find many interesting options for finishing materials that can be freely used during the construction of a bathhouse.
In this article we will dwell in detail on each issue related to the decoration of bath rooms. Moreover, we will carefully analyze all the materials that are used in this process.
Materials for interior decoration of baths
Many experts in the construction industry have recognized that the best finishing material that is currently available in stores is lining (or cladding panels). Despite the general simplicity of the material, it is truly capable of “breathing,” but at the same time the lining perfectly maintains the optimal temperature inside the room. Lining is especially effective when combined with heat-insulating materials.
Another positive side of classic lining is its ease of installation. Accordingly, for these works there is no need to attract specialists, who usually require a lot of money. Even a beginner can cope with all the tasks, but first you should study in detail all the intricacies of the process.
You can easily finish all the walls and ceiling with lining. As a result, we will get an excellent bathhouse suitable for a parka. In this case, the material will not lose its initial properties. However, periodic maintenance of wood is still necessary, otherwise you may encounter numerous problems (cracking, deterioration of thermal insulation).
It is important to know that varnishes and stains cannot be used as protective coatings for cladding panels. Practice shows that these materials have a detrimental effect on human health. We are talking about those cases when the finishing material is exposed to high temperatures.
Choosing wood for finishing a bath
First of all, you need to know that the quality of the finish directly depends on the quality of the wood. When purchasing lining, you need to pay attention to the condition of the material. If there are any nicks, scratches or other damage, it is better not to even look in the direction of such cladding panels. Gradually they will deteriorate and eventually the lining will have to be replaced.
In addition, the surface of the lining should not be wet. This suggests that the production technology of this material was violated. If the lining still has a little moisture, you should dry the wood.
In such construction work, lining made of deciduous trees is often used. As a result, we will have a high-quality finish that will not heat up along with the entire room, but at the same time the wood will retain heat in the bathhouse when necessary. At the same time, you will still have to monitor the condition of the material so that it does not become unusable for various reasons.
Linden panels are often chosen as finishing. This is an excellent wood, but gradually the surface of such panels begins to darken. After some time, the appearance of the material will not create the most pleasant atmosphere. To avoid this characteristic change in wood, the surface should be treated with special coatings. They are often sold in hardware stores. In this situation, the linden material will always have the same attractive shade. Linden is also good because it heats up very slowly, and for a bath this is a very important aspect.
Birch is used quite rarely as a finishing material. The point is that birch often dries out greatly, so after some time it loses its original appearance. This cannot be done without protective coatings.
Builders sometimes call aspen the best finishing wood species. It is most optimal to use aspen lining as a finishing material for the ceiling. With the right approach, this type of wood becomes incredibly strong and durable. Of course, such results are achieved by pre-treatment, as well as proper drying. If everything is done correctly, then aspen can be freely used as a ceiling covering. Many builders claim that aspen is often such a strong wood that it is almost impossible to hammer a nail into it. Accordingly, it will also not be possible to damage the tree.

The process of arranging walls
Let us dwell on the finishing of the floor and walls of the bathhouse in more detail. As we have already said, in the vast majority of cases, lining is used as a finishing material. Accordingly, the finishing process consists of several stages, which are given below.
- At the very beginning, a full-fledged project is drawn up. If all is well, then in the end we will be able to approximately estimate the required volumes of finishing material. To do this, you need to measure the dimensions of all the necessary surfaces and make basic calculations.
- Next, the lining is selected. You need to keep in mind that there are many options for this material on sale, so you should take into account the dimensions of the panels even during the calculations of the project. At the same time, the dimensions of the lining should be well combined with the dimensions of the bath room.
- Now on the surface where the lining will be located, the vapor barrier is attached. This is necessary in order to retain steam and prevent it from entering the already equipped thermal insulation. The vapor barrier is attached to the surfaces using construction tape. No damage to the material or gaps between the insulation strips should be allowed.
- Next, the sheathing is installed, on the basis of which the lining will be fastened. Accordingly, wooden blocks are attached around the entire perimeter that can withstand the weight of the finish. Clamps are used directly to fasten the lining. They will not only allow you to quickly install the finishing material, but also just as quickly dismantle it if there is such a need in the future.
- Well, at the very end, the final processing of the wood finish occurs. The essence of this stage of work is that you can often find untreated wood on sale. To obtain the highest quality result, the final processing occurs after installation of the lining, since the wood can be damaged during fastening. After the lining has been placed on the walls, you can easily apply all the necessary protective layers. This is not only convenient, but also most effective: each panel is visible, and the lighting source will allow you to clearly view the entire surface.

On the Internet you can find a lot of finishing options that can be used in various rooms. This gives you some freedom of choice, allowing you to create your own original bathhouse. Of course, when choosing options, you should assume that the bathhouse has a number of features that you should pay attention to when choosing the type of wood, as well as construction resources.
At the same time, based on the selected wood, you can create some other objects inside the bathhouse. For example, these could be shelves, tables or chairs. Accordingly, in such conditions we can create a unified style of the room, which everyone will definitely be delighted with. It is also worth understanding that you cannot save on a bathhouse. This is the room that should have a warm atmosphere and comfort, despite the fact that people only come to the bathhouse to take a steam bath.
Features of floor finishing
Floor finishing is an equally important aspect that you should pay special attention to. The thing is that a high-quality surface should provide an even more comfortable atmosphere, which will emphasize the quality and durability of the entire bath room.
However, the process of finishing the floor itself can be quite simple. Considering the fact that at the floor level we have a relatively low temperature, wood, tiles, and many other materials can be used here. Of course, it is advisable to make sure that all components of the room combine well, because a bathhouse is a special space.
It should be noted right away that the floor surface created on the basis of tiles has some features. If the temperature in the bathhouse rises too high, you can get a little burned by touching the tiles. This happens extremely rarely, but such cases do happen. Accordingly, if you like to steam at too high temperatures, it is better not to use tiles. But at the same time, this finishing material will be a good choice if there is high humidity in the bathhouse (or simply water may get on the floor). This is not uncommon in a bathhouse; many people also like to douse themselves with water directly from a bucket. Accordingly, a huge amount of water ends up on the floor.
Wood, which can also be used as a floor covering, is not very suitable for the above scenario. Under the influence of water (or moisture), the wood will gradually deteriorate and darken. After some time, the surface will become too loose and unreliable. However, wooden flooring has many advantages. The point is that wood will never overheat; it is a natural building material that bathhouse visitors will enjoy feeling on their feet.
As for the fact that wood gradually becomes unusable when used in a bathhouse, this issue can be approached wisely. Often, wooden panels used for flooring are carefully sanded and also treated with protective compounds. Of course, this will not make wood an almost eternal option for finishing the floor, but it will significantly extend its service life. At the same time, you need to keep in mind that the wood needs to be constantly looked after, since at a certain point the process of wood rotting may begin too quickly.
If the choice is made in favor of tiles, then you just need to periodically maintain it. This does not take much time, the surface will look attractive, despite the combination with wooden walls and ceiling. If you are concerned that the surface of the tile may be too hot, you should keep in mind that some kind of fabric-based material can be placed on top of the tile. Accordingly, the woven product can be easily replaced (while spending only a little money), and the high temperature of the tiles will not in any way affect the visitors of the bathhouse.

Materials that cannot be used for finishing a bath room
Many people who really want to become owners of their own bathhouse do everything possible to make their dream come true. In such conditions, owners can save on the most important things, which can later cause a lot of harm. Of course, the most important thing is the choice of finishing materials.
Often, this process uses those building materials that were mentioned earlier in this material.
However, sometimes, due to savings, people use completely unsuitable finishing products. Linoleum and plastic are the worst materials that can be used in a bathhouse. Under such conditions, plastic and linoleum will begin to rapidly deteriorate, while quite possibly releasing unsafe substances (this primarily applies to plastic).
In any case, when choosing materials in construction stores, it still makes sense to ask consultants all your questions. This will definitely avoid many problems.
Having free space on a plot of land, you can build a strong and very functional bathhouse. Moreover, the last factor is due to the competent design of premises, their decoration and furniture. Regardless of the size of the building, rooms such as a steam room and an entrance hall with a wardrobe should be equipped inside.

But such an economical option can hardly be called quite comfortable, therefore, among the recommended rooms for design, decoration and equipment with all the necessary equipment, the following can be distinguished:
- shower, washing or washing room. Basic hygiene procedures in the form of taking a shower will be performed here. The room can be equipped with a small font and a waterfall bucket for dousing;

- separate bathroom. There is no need to talk about the purpose of this room. It is especially important to allocate a room for a toilet in two-story bathhouses with a kitchen and sleeping area;

- recreation area with dining area. This room is intended for relaxation after steaming and drinking tea. The area can be supplemented with a fireplace, a seating area and other furniture and decorations;
- kitchen area. Relevant for large bathhouses, where large groups often relax. The kitchen area can be small and consist of an electric stove, kettle and microwave oven. Sometimes the kitchen is supplemented with a herbal bar, equipped with a counter with high chairs and a cabinet for storing packages with elite varieties of tea and medicinal herbs;

- pantry. A small room with shelves and cabinets should be allocated for storing bath sheets, towels, hats, shoes, etc. It is also worth storing household cleaning chemicals here so as not to clutter the shower with them;
- sleeping area. For example, you can allocate the second floor for a separate bedroom. It will be pleasant for visiting guests to settle down here if there is not enough space in the house;
- boiler room for boiler equipment;

- billiard room;
- solarium;
- pool;

- laundry. It is recommended to design it next to the shower room for ease of installation of water supply and sewerage wiring. The laundry room can be equipped with a washing machine, drying cabinet or a regular floor/wall dryer, ironing board for bath linen;
- veranda or terrace;

- a small vestibule (relevant for baths that are used all year round).

Depending on the available budget, you can equip only some of the proposed premises, for example, a bathroom, shower and relaxation area. If you plan to build a truly luxurious health complex, and it’s not difficult to shell out a “tidy sum” for comfort, you should think about including all the above-mentioned premises in the estimate.
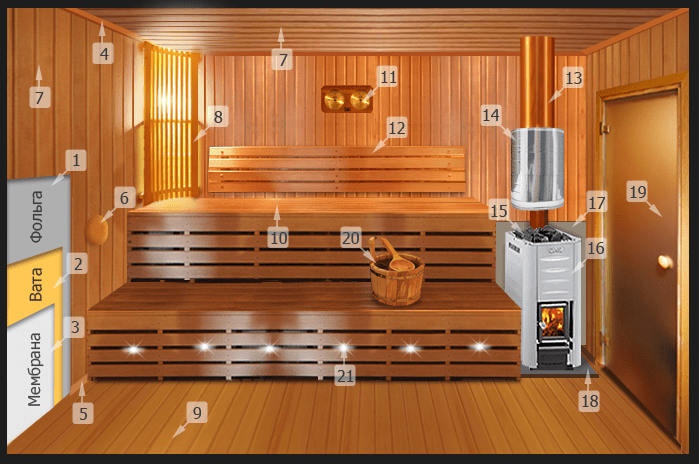
Arranging a steam room. 1 – foil. 2-insulation. 3-membrane. 4-ceiling plinth made of wood. 5-floor wooden plinth. 6-vent valve. 7-ceiling made of wooden lining. 8-light. 9-floor made of wood. 10-shelf 11-thermometer and hygrometer. 12-back shelf. 13-chimney. 14-water tank. 15-heater. 16-stove sauna. 17-protective screen. 18-non-flammable base under the stove. 19-door to the steam room. 20-bath accessories. 21-light therapy or LED lighting.
It is customary to arrange a steam room on the first floor of a building. The entrance to the steam room can be from the shower or dressing room. The door to the steam room is installed from tempered glass or wood, strictly without metal decorations, inserts and fittings (except for hinges), because the metal can heat up and burn the visitor. For one steamer, it is customary to allocate 1-2 meters of square footage of the room. The oven will take about another meter. Accordingly, the comfortable dimensions of the steam room are 3-5 sq.m. You should not make a steam room that is too large with high ceilings - it will take a lot of time and fuel to warm up the room, and the air will be dried out from the hot stove.


Video - Optimal sizes of baths and steam rooms
The ceiling height is set from 2.2 to 2.6 m, depending on the height of the bathhouse owners and the height of the shelves, which in turn can be 1-3 tiers. The shelves themselves are made so that it is comfortable to sit and lie on them, and a steamer with a broom can stand nearby and perform bath procedures. The top shelf is made the widest, and the recommended height of each tier is 35 cm. It is better to sew up the space under the shelves to reduce fuel consumption for heating the unused area of the room.


It is advisable to make shelves from deciduous wood; the use of cedar/larch is acceptable. Wood can be combined, but it must be of good quality - dry, without knots, resin pockets, traces of rot and mold, carefully sanded. For convenience, it is worth purchasing or making your own headrests from aspen or linden, as well as a tub and a bucket with a long handle. You definitely need to hang a bath thermometer with a hygrometer in the steam room to regulate the degree of heating and air humidity.
 In the photo - a dial thermohygrometer and an hourglass

The lighting in the bathhouse is rarely bright. Basically, ceiling and wall lamps are covered with wooden shades/shades so that a soft twilight reigns in the steam room. Additionally, diode tape can be used for color therapy, as well as optical fiber to create the effect of a starry sky.


The stove is usually located closer to the door. Moreover, the heater can be made of brick or made of steel (wood-burning, electric).
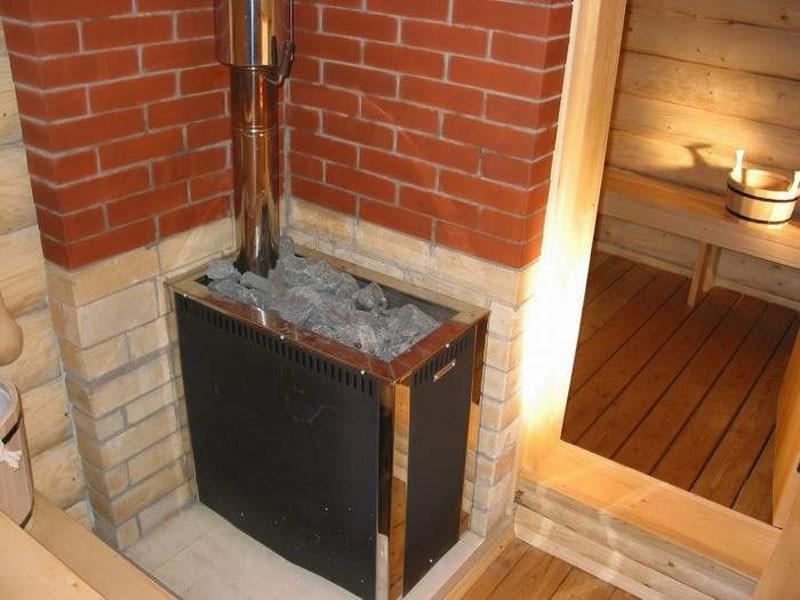 Sauna stove at the entrance to the steam room
 Sauna heater installed on ceramic tiles
When installing a stove, it is extremely important to properly insulate the wall, floor, and ceiling at the point of contact with the exhaust chimney. The stove is placed at a distance of at least 10-15 cm from the wall, if the firebox door opens into the steam room, if the sauna stove is located simultaneously in two adjacent rooms and the firebox door leads into the dressing room, a recess is cut in the interior partition, its dimensions exceeding the dimensions of the stove by 10 -15 cm on each side of heating surfaces. Insulation is made using asbestos cardboard, brick, ceramic tiles, stainless steel sheets.

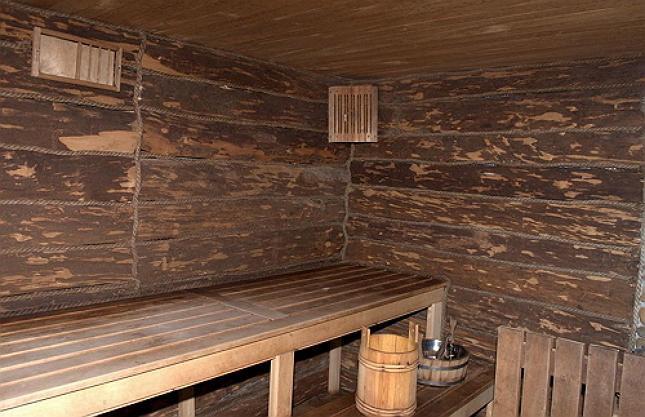
Separately, it is worth considering options for finishing the walls, ceiling and floor. In addition to the standard lining and wooden floor, there are several interesting ideas.
Table. Steam room wall decoration
| Material | Advantages | Peculiarities | Installation method |
|---|---|---|---|
| Salt crystals or blocks for halotherapy in your own bath/sauna | They have a pronounced therapeutic effect on the body as a whole, the respiratory system and the skin in particular. | Salt crystals are installed in dry steam saunas. Maximum evaporation of microelements occurs at 60 degrees, but already at 75 degrees the blocks turn into a salt solution. Salt bricks should not be allowed to come into contact with water, because... salt dissolves in it. | Salt crystals are used to make spectacular rectangular wall inserts; it is also possible to decorate one or more walls from floor to ceiling. Cladding with salt blocks is combined with diode or other lighting; to fix the masonry, a two-component quick-setting adhesive is used (hardening time from 10 minutes). |
| Wild stone or decorative brick | The uniqueness of the interior, the unusual combination of stone and wooden surfaces. Improved fire safety. When using medicinal types of stone, for example, soapstone or jadeite, there is an additional healing effect. | Stone can be used to cover both part of the wall behind the stove and the entire wall behind the heating device. Sometimes stones are attached instead of baseboards to the floor and ceiling. It is worth remembering that the stones in the sauna get very hot, so you should not allow them even to come into accidental contact with the skin of visitors to the steam room. | If a wooden wall is faced with stone, you will need to attach construction waterproofing paper to it (overlaps on all sides of 4-8 cm). A painting mesh should be secured on top of the waterproofing layer with galvanized staples or nails (fastening spacing vertically is up to 15 cm, horizontally - up to 40 cm, at the corners the mesh is laid in two layers). The mesh is plastered, and after 1-1.5 layers of plaster have dried, facing stones are laid on a cement-sand mortar. It is recommended to first lay out the stones on the floor and number them for convenience. It is better not to use stones that are too heavy for cladding. |
| Ceramic tiles, porcelain tiles, polished natural stone tiles | Fire safety, aesthetics, interior decoration of the steam room, durability. | All of these tiles are laid on the wall behind the stove (all or only part of the wall). Tiles with a thickness of more than 10 mm are installed using metal fasteners and pouring cement-sand mortar/glue/mastic into the seams. | The tiles are fixed to the plastered surface of the walls. To fix tiles, highly specialized adhesives are used; for marble, latex or polyurethane based (waterless) compounds are used. The laying is carried out from the bottom up, the seams are laid with crosses or wedges to maintain the same thickness. |
| Cork moisture resistant coating | Suitable for both additional insulation of walls and their finishing. | Plates are used with a thickness of 20-40 mm. | Installation of slabs on the wall is carried out using specialized adhesive for cork coverings. It is permissible to use cork plinths for arranging a steam room. |
Table. Materials for arranging flooring in a steam room
| Material | Advantages | Peculiarities |
|---|---|---|
| Beautiful, durable, looks noble. | Quite cold, it is advisable to install heated floor systems under a porcelain stoneware covering. Must be non-slip. The seams are treated with moisture-resistant grout to prevent the spread of mold and mildew. | |
| Shock absorbent, warm to the touch, goes well with wooden surfaces. Not slippery. | Suitable for installation in a steam room, because the floor temperature rarely exceeds 30-40 degrees. | |
| Wooden boards and wood mats | Such coatings can be laid on concrete or porcelain stoneware. | Treatment with moisture-proof impregnations and periodic air drying are required. |
Note! It is unacceptable to use any plastic, rubber coverings, linoleum, PVC tiles and panels for arranging a steam room. Finishing materials and furniture should not emit chemical odor or resin when heated.
The ceiling in a Russian bathhouse has long been made of timber, lining, and boards. It is wooden surfaces that withstand high temperatures well, fill the bathhouse with a pleasant aroma and do not contribute to the accumulation of condensation - wood tends to “breathe”.
There is no point in painting the ceiling, covering it with plywood, chipboard, or plastering - high humidity and temperature will quickly ruin such a finish. In Turkish baths, mosaics are often used to decorate the ceiling, but it is worth remembering that the humidity and temperature in hammams are much lower than in Finnish and Russian steam rooms. It is possible to use Thermocork cork covering 100 mm thick, specially designed for bathhouse ceilings (cost 3900-4000 rubles per 1 sq.m.).

It is advisable to equip the steam room with one window. A particularly eccentric option is a full-wall panoramic blind window. Such a window allows you to admire nature from your own steam room, while the mirror coating on the outside will prevent the curious from looking inside. But remember that the larger the window, the greater the heat loss.
The most common option is an opening single-leaf window 60x60 cm or 40x60 cm. The window is not placed on the wall behind the stove or sun loungers. The height from the floor to the bottom sash cannot be less than 170 cm - this is the height that implies effective ventilation of the room (natural air circulation). The frame can be made of wood or high-quality plastic that can withstand temperatures up to 120 degrees.


Sometimes glass blocks are inserted instead of a window. They allow you to save on lighting the steam room during the day.
Arranging a shower or washing room
The shower room can be organized as a separate room or adjacent to the steam room, for example, separated only by a glass damper or a partition made of glass blocks. A cabin can be installed here or a shower tray with a drain for water drainage can be arranged. If you plan to have a large number of visitors, it is recommended to install two or three showers.
Directly in the shower room, in addition to the shower itself, there should be a bench, a mirror, as well as hooks and non-hazardous shelves for toiletries.
Often the washing room is equipped with a dousing bucket and a bathtub made of acrylic or cast iron. Fonts are also installed in the washing room, especially if there is not enough space to arrange a full-fledged swimming pool.
The temperature in the shower should be higher than in the dressing room, but significantly lower than in the steam room.
Hot water supply is organized by connecting to a central water supply, installing a boiler or installing a heat exchanger and a remote water tank (from 80 to 120 liters).
Water disposal is organized into a central sewer system, a septic tank or a drainage well. A drain ladder is installed in the shower room (the floor is poured or laid with a slope towards the drain funnel), from which waste liquid is discharged through a pipe with a diameter of 110 mm. One person needs about 50 liters of water to take a shower; accordingly, using this figure, you can calculate the volume of a septic tank or storage cesspool for a bathhouse. By the way, treatment and storage installations should not be located near the walls of the bathhouse or in the underground - an unpleasant odor will penetrate into the room. It is recommended to install a local installation 5-10 m from the walls of the bathhouse.
Coating options for wall, floor and ceiling cladding are shown in the following table.
Table. Arranging a shower in a bathhouse
| Material | Peculiarities | Example of finishing, photo |
|---|---|---|
| Wood | Showers adjacent to the steam room are often decorated with wood so as not to disturb the overall style of the premises. Wood does not tolerate constant humidity well - fungus develops and rot appears. It is worth considering the possibility of installing a shower tray or cabin in order to minimize the effect of moisture on the material of the walls and floors, as well as regularly dry the boards and treat them with antiseptics. | |
| Wood Ceramic tiles, porcelain tiles, mosaics | These materials are most appropriate in a shower room, but it is important to choose products with a non-slip surface, and seal the seams with compounds that prevent mold. It is recommended to place wooden or rubber mats on tiled floors. | |
| PVC panels | This material can be used for finishing walls and ceilings only in showers that are not adjacent to the steam room. Plastic does not tolerate high temperatures, but it is not afraid of high humidity. The panels are quite easy to install and clean, but the strength of the material leaves much to be desired. | |
| Natural stone | This solution is not to everyone’s liking due to the extraordinary nature of the interior and the coldness of the coating. However, the stone tolerates high humidity well and is quite suitable for cladding shower walls. |
Video - Example of finishing a shower with ceramic tiles
Don't forget about ventilation in the shower. There should be a hood with an electric fan under the ceiling. For natural ventilation, it is worth placing a small opening window closer to the ceiling, this is especially true for wooden baths and showers finished with timber or clapboard.
Advice! To ensure less heat escapes from the shower room, it is recommended to install a threshold at the entrance to the room, and also install a door of small height (from the standard 2.37 m, 2.07 m, 2 m and 1.87 m, the smallest is selected, and this value should be reduced further by 10 cm). The justified width of the doorway is 75-80 cm.
Bathroom
The bathroom can be a separate room or combined with a shower room. In the first case, in addition to the toilet or dry closet, it is recommended to install a washbasin with a mirror, a cabinet, a shelf, and a paper holder in the room. The finishing of a separate bathroom can be absolutely anything, from classic tiling and plastic panels to cork, linoleum, and a combination of various materials.


Ventilation in the toilet is very important. According to the rules, a toilet room with 1 toilet should receive up to 50 cubic meters of fresh air every hour.
Often a heating radiator is installed in the toilet to make it comfortable during the cold season. It is also worth placing a boiler here so as not to spoil the interior of the washing room.
If you plan to install a toilet in the shower room, it is worth installing two forced hoods. One will prevent moisture from accumulating under the ceiling, the second will ventilate the space above the toilet.

The finishing of the shower room and toilet is done in the same style; for convenience, the toilet is installed in the far corner of the washing room and is fenced off with a partition, curtain, or screen. It is unacceptable to use materials similar to linoleum in the shower and toilet. Standard finishing options include tiles, lining, mosaic, stone, plastic, etc.
Water can only be drained from the toilet into a local treatment facility or central sewer system. If leaky floors are installed in the bathhouse, a separate sewer network must be provided for the toilet (or an independent mobile dry toilet, for example, of a composting or liquid type, is installed).

Of course, each private developer designs a bathhouse based on his own capabilities and preferences, but it’s worth familiarizing yourself with federal regulations prescribing the rules for arranging baths in general and restrooms in particular:
- SanPiN 983-72, 2.1.2.2645-10 and 42-128-4690-88;
- SNiP 30-02-97;
- SNiP 31-05-2003;
- and to organize a shower and toilet for a disabled person, it is worth paying attention to the second edition of the manual on integrated environmental design for persons with disabilities (dated 1997, prepared by the Moscow Committee for Architecture).
Files for download:
Plumbing sizes
Dressing room and wardrobe
The dressing room is the last room that must be on the first floor. This room can be large and spacious or very tiny. In any case, there must be an entrance to the shower from the dressing room. The finishing of dressing rooms is most often made of wood to emphasize the style of the bathhouse. It is advisable to arrange furniture made of wood.
The recommended air temperature in the dressing room is 26-28 degrees. Ventilation can be natural, for which opening windows are installed, which in turn are a source of additional light during the daytime. Artificial lighting should be sufficiently saturated (chandelier and wall sconces), but not harsh.
The dressing room can be combined with a dressing room if the entire bathhouse is small. In this case, you should follow the following recommendations:
The height of the ceiling should exceed the height of the person, taking into account raised hands. Optimal – 2.4-2.6 m;
- the number of seats, hooks and shelves for clothes should correspond to the expected number of bathhouse visitors;
- the floor in the dressing room and dressing room should be warm and non-slip so that it is comfortable to walk barefoot. For example, you can install a “warm floor” or lay a carpet;
- it is worth providing one or more electrical outlets;
- It is recommended to equip the dressing room with a mirror.
By the way, the dressing room can be combined with the kitchen area by installing a corner kitchen set with household appliances. If you plan to not only brew tea in the kitchen, but also fully prepare food, you need to install a separate hood, and also plan to lay water and sewer pipes to connect the sink.
Advice! You should not install kitchen cabinets under the stairs so that dust from the steps does not fall on the dishes.
Video - Dressing area design
Second floor
In the photo - a cozy bedroom in the attic of the bathhouse
Everyone decides for themselves how to arrange the second floor. Whether there will be a bedroom, a billiard room, a solarium or a simple storage room upstairs depends on the size of the bathhouse and the budget of its owner. However, we strongly recommend installing a safe staircase with wide steps between floors, and adding a small balcony to the residential floor.
Arrange the bathhouse so that you feel cozy and comfortable in it.
Video - Bathhouse project with billiards
Video - Construction of a bathhouse with a plunge pool


Table of contents:
Building a good bathhouse for a Russian person has always been no less important than building a house and starting a family. From time immemorial, our steam room has been revered as an almost sacred place. The most important moments of life were associated with her: weddings and the birth of children, holidays and recovery from illnesses.
How to properly arrange a real Russian steam room? What should be the layout of the bathhouse and its interior decoration?
Where is the best place to place a steam room?
And first of all, you need to plan the place where the steam room will be located. Fire safety technology dictates the construction of a bathhouse on a site separate from the main buildings. Whatever the building site you choose, the distance from it to the house and outbuildings should not be less than 15 meters.
The most suitable site would be the shore of a lake, pond or river. If there are no natural reservoirs near your property, then an artificial one will do. You can, for example, dig a small pond or build a pool - in the bathhouse itself or next to it. If finances do not allow you to include such a reservoir in the project, then you can get by with a font or shower.
When thinking about the layout of a Russian bathhouse, the type of soil plays a significant role. The most important stage of construction—the construction of the foundation—depends on it. This is easiest to do on sandy soils. A log house of a wooden Russian steam room, even if you plan to equip it with an attic, can be placed on a shallow strip foundation. Other types of soils are subject to seasonal changes.
When frost sets in, the soil freezes and swells, and in the spring it returns to its normal position. The structure, if appropriate measures are not taken, will become deformed.
Choosing the right foundation
When laying the foundation, please note that the depth of soil freezing in Russia is not the same. The depth of the foundation depends on this parameter. It is recommended to make the base part of the foundation at least 50 cm above the soil level.
The finishing of the base can be done with cement mortar, having a proportion of 1 part of cement to three parts of filler.
When constructing foundations, different building materials are used. The strength and reliability of your bathhouse and its cladding will depend entirely on their quality and correct choice.
Monolithic reinforced concrete, iron brick, concrete blocks can be used as a material for the foundation of a massive bathhouse made of piece materials, as well as a two-story one or with an attic. When constructing a small log, lumber, or frame bathhouse, you can build a strip foundation from rubble stone, rubble concrete, or a pile foundation.
Internal layout of the bathhouse
 The wooden steam room is warm and dry. Condensation does not accumulate on the walls and interior lining of such a bath. Air passes through the pores of the log house without hindrance, and the bathhouse “breathes.” This ensures ventilation of the cladding and regulates the humidity in the steam room itself and the attic, if there is one.
And if you use coniferous types of wood to build walls, you will enjoy the resin aroma every time you steam.
The choice of wood varieties for the construction and finishing of a bathhouse is very diverse:
- From deciduous trees - linden, oak, aspen, ash
- To conifers - pine, cedar, larch
The main thing is that the wood is straight, seasoned, without many knots and resin pockets.
To prevent steam from your bathhouse from escaping through cracks in the walls, you need to caulk them, as well as insulate and vapor barrier the ceilings and roof slopes.
The walls should be caulked only with natural materials. Caulking should not be impregnated with chemical compounds. Otherwise, you will inhale quite unpleasant odors during bath procedures.
Nowadays natural and technological materials are produced for sealing the crowns of log houses - jute insulation. Be very careful when choosing them. To work, you need to purchase interventional material from primary jute fibers, and not cheap fakes.
The most effective method for insulating bathhouse ceilings is to use basalt wool or fiberglass. Thermal insulation is placed on top of a vapor barrier layer made of a special foil film. There should be a gap of at least 1 cm between the film and the ceiling cladding.
When planning your attic, provide a window for ventilation. It will need to be closed before heating the heater.
The decoration of the premises and the layout of the bathhouse inside should be optimal not only for bathing procedures, but also for quality and healthy relaxation. Therefore, in addition to the steam room, consider the arrangement and appropriate attributes for the vestibule and dressing room. Each of these bathhouses has its own purpose. The vestibule, which is located near the entrance, prevents cold air from entering from the street in winter. The dressing room is universal in all respects.
Design a window in it, think about the location of the table, benches or loungers, and choose the appropriate finish. As a result, you will get a comfortable room in which after the steam room you can rest, relax, and drink tea. And if you chose the layout of the bathhouse with an attic, then the relaxation room can be moved upstairs.
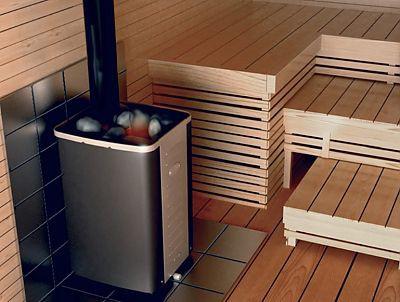
The steam room is the heart of the Russian bath. Therefore, its internal space must be made practical and comfortable. The heater in the bathhouse is installed so that the stove not only provides heat in the steam room, but also heats other rooms. The shelves must be mounted along a blank wall and in several tiers. Wash benches should run along the wall opposite the stove.
When installing a steam room, it is also necessary to consider the design of the doors. A small one and a half meter door and a high thirty centimeter threshold will retain steam and heat in the bathhouse for a long time. If at the same time all the internal doors are brought into the vestibule room, then the steam will not escape into the dressing room, and the removed clothes will remain dry.
The main thing to remember when installing steam room doors is that they must open outward.
The steam room in the bathhouse is the main room. It is in it that the stove, sunbeds and other interior details are located, which are necessary for the correct organization of the process of receiving procedures.
That is why the question of how to arrange a bathhouse inside should be considered separately, paying attention to even the most insignificant details.
Steam room interior design
First of all, it should be noted that when arranging all items, you need to focus not on design qualities and beauty, but on functionality and convenience. Fire safety considerations should also be followed to prevent fires.

Bake
- This device is the main one in this room. It is this that creates and maintains the required temperature, which means that special attention is paid to its installation.
- First of all, it must be said that the seat for the furnace must be made at the stage of manufacturing the foundation. This is due to the fact that the device requires a strong and reliable base.
- The standard arrangement of a steam room in a bath assumes that the stove will be located in the corner farthest from the front door. This is necessary in order to reduce heat loss when visiting the room.


- Professional craftsmen advise installing protective screens immediately. Their function is to protect wooden surfaces from infrared radiation.
- This screen is made from brick or natural stone. However, professional bath attendants advise using factory-made products with a reflective surface, which will redirect the radiation to the center of the room, increasing the heating level.


- If the design of a sauna stove requires a water tank, then it should be installed in such a way that there is easy access to the tank.
- Taking into account all these features, the internal arrangement of the steam room begins with the stove.
Advice!
Quite often, factory-made products are sold together with protective screens and detailed instructions for quality installation.
These instructions must be followed carefully as they were designed specifically for these models.


Insulation
- This type of work can also be classified as landscaping. This is due to the fact that it is thanks to it that it is possible to reduce energy costs for heating and increase the thermal capacity of the room.
- To finish the walls and ceiling of the bathhouse, wooden materials are used, which are usually fixed to the lathing. This makes it possible to install almost any insulation.


- To ensure that the room retains heat well, the installation instructions recommend using a material that has a layer with a reflective surface. Thanks to it, infrared radiation is redirected into the room, which makes it possible to increase the heating level.
- It is worth noting that to organize joints you should use special tape with the same reflective surface. As a result, the insulation should create a complete seal.


Interior items
- When creating a steam room with your own hands, you need to properly think through the placement of all interior items. This is especially important if the room is small in size.
- Considering that the stove is installed at a certain distance from the bathhouse door, a sunbed with multi-level shelves should be placed on the opposite wall.


- Some craftsmen prefer to make two or three levels of shelves in the steam room. This will save space and at the same time make it possible to get a complete and functional interior.
- When creating sun loungers and shelves, it is necessary to focus on the personal preferences of users and their dimensions. However, it is worth remembering that there are standard solutions that have proven their effectiveness over the years of use and can always be adapted to specific technical conditions.
- Many bathhouse attendants strongly advise installing a special thermometer in the room. Its price is not very high, but it is thanks to it that you can control the heating level.


- This device should be installed next to the front door. This place can be considered the coldest and all readings should be taken with this feature in mind.


Conclusion
In the video presented in this article you will find additional information on this topic. Also, based on the test outlined above, you can understand that arranging a steam room in a bathhouse requires strict adherence to all instructions in order to obtain an interior with maximum functionality, which is very important for this room.
The article will be useful to those who plan to independently complete the interior decoration of bath rooms. Detailed step-by-step instructions with photos will help you perform cladding and cladding efficiently and in compliance with construction technologies.


Features of finishing of bath rooms
A classic Russian bathhouse necessarily contains such rooms as:
- steam room;
- washing;
- vestibule (locker room).
If the area allows, modern buildings will be equipped with a separate recreation room, a billiard room, a swimming pool, a veranda, a barbecue area and even a full kitchen.


Despite fashion trends, the basic requirements for a bath remain unchanged:
- the steam room requires persistent hot steam,
- in the washing room there are non-slip floors and the possibility of convenient bathing procedures,
- In general, the premises have a comfortable microclimate and an aesthetically pleasing environment.
The functionality of bath rooms largely depends on the correct finishing. Even if your structure is built from rounded logs, and the walls from the inside look beautiful and aesthetically pleasing, it is recommended to carry out interior finishing of the bathhouse, as this will significantly extend its service life.


Each room has a number of features that must be taken into account when choosing materials and cladding methods.
Steam room
When decorating a steam room, the following nuances must be taken into account:
- sudden temperature changes, the upper limit of which can reach 120˚C;
- the presence of hot steam emitted in a powerful and concentrated stream;
- high humidity.


A universal cladding option for a steam room is a cladding board, which must have the following properties:
- do not absorb moisture;
- have a low heat capacity, therefore, do not heat up from high temperatures and contribute to the rapid heating of the steam room;
- have a pleasant color and smell, and do not release resin when heated;
- protect walls from rot and mold, help purify the air.

Of all the variety of linings, panels made of linden, aspen, cedar or African abashi wood are suitable for use in a steam room. When choosing a cladding material, pay attention to the quality of the wood - well-dried and hewn, without knots or nicks on the surface, it will serve reliably for many years.

The lining in the steam room is not treated with varnish, paint or antiseptic. These substances are toxic and, when heated, can negate all the benefits of bath procedures.
Before covering, the walls and ceiling are insulated. The cheapest material for these purposes is mineral wool, which is what is most often used for finishing. Often, insulation such as basalt wool is used. It is more durable, as it is not subject to damage from high temperatures. However, cork agglomerate is considered the best insulation for baths. It is anti-allergenic, not susceptible to rotting, burning and fungus.
The floor in the steam room is made warm, non-slippery and pleasant for walking with bare feet.
Video - Interior of the steam room
Wash room
In the washing department, you usually not only rinse your body; here you can relax after a hot steam room, have a relaxing massage, or apply products to care for your face, body, or hair. The convenience of the premises for carrying out various procedures must be taken care of already at the stage of construction and subsequent finishing.


The washing room is faced with either ceramic tiles or wood. Moreover, if deciduous varieties of lining were used in the steam room, then in the washing room they give preference to coniferous species - larch, spruce or pine. The resin they contain has moisture-repellent properties and protects materials from rotting.
Particular attention is paid to the floor; it should not be slippery or cold. It is preferable to fill the base in the washing room with concrete, on which tiles are laid. Although a wooden floor option is also possible.

To prevent slipping on a wet surface, it is recommended to lay the flooring on the tiles in the form of removable wooden logs. They should be dried after completing the bath procedures.


Tambour, locker room, rest room
Along with the washing room and steam room, high air humidity is maintained in the remaining bath rooms. Here you can use both deciduous and coniferous wood for decoration. The following materials are also used:

A combination of different types of finishes, for example, wooden lining, tiles and natural stone, is common in such rooms.
Video - Rest room in the bathhouse
Ceiling decoration in the bathhouse
During operation, the ceiling is exposed to the aggressive effects of hot steam and high humidity. It is important to protect the floors with vapor and heat insulation to prevent damage to the materials. Aluminum foil or a construction membrane is often used for these purposes. They are equally effective at ensuring they are sealed.


For vapor barrier, do not use foil with cotton wool glued on it. It is much thinner and less convenient when carrying out cladding work. Also, do not use foil with polypropylene foam attached. It is toxic when heated, so it is not suitable for use in bath rooms.


It is important to carefully seal all joints with aluminum tape. If during the process of attaching the material you inadvertently damaged it, immediately seal this place, then you may forget to do this and the vapor barrier will be damaged.

In the steam room you need to lay out a hole for the pipe. It is equipped with a box made of thin stainless steel sheet, which is filled with expanded clay.


The ceiling above the stove is additionally insulated with a steel sheet, which protects the wood from excessive heat.

Step-by-step instructions for installing lining on the ceiling
Step 1. Slats with a cross-section of 2*4 cm are sewn onto the ceiling with a lathing pitch of 40-45 cm. In the places where the frame is attached, it is necessary to provide gaps for ventilation of at least 10 mm.

Step 2. The slats are placed horizontally on the walls, the direction is perpendicular to the lining.
Step 3. Wooden panels begin to be attached from one of the walls. The groove of the first plank is directed outward and the tenon of the next one is driven into it. It can be the other way around, there is no fundamental difference.


On a note! When installing, use pads and a mallet to avoid damaging the material.
Step 4. The planks can be fixed with special clamps; they are attached to the rail with nails or screws. But the simplest and most convenient way is to use a construction stapler. It reliably fixes the lining and significantly reduces installation time.


Step 5. Gaps from the walls of 2-2.5 cm are left on the sides. This provides additional ventilation and prevents deformation of the finishing material. The gaps are subsequently hidden by the baseboard.
The first and final panels are nailed with nails with a small head. They are hammered in at an angle, the head is completely driven into the wood using a hammer.


It is important to ensure the verticality of the slats, which is checked after installing each panel using a level. Instead, you can use a simple construction meter. In this case, you measure the distance from the wall to the edge of the installed panels on one side and the other.
If there is a discrepancy in measurements, the lining is carefully tapped to the required level. To do this, use a small piece of the same panel, which is inserted into the groove and a mallet (or hammer).
The panels are also trimmed in the following way: a wooden overlay is fixed, under which a pointed sliver is carefully hammered.


The walls in the steam room are decorated with wood. In other rooms you can use tiles or stone.
Wall decoration with clapboard
The basic technique for installing wooden panels on walls is no different from attaching them to the ceiling.
Step 1. We fill a thick beam horizontally along the entire perimeter - every 80-100 cm.


Step 2. We install mineral wool insulation. We cut the insulation to the required sizes with a sharp knife. We lay it between the beams without compacting it.

Step 3. We lay a vapor barrier and carefully seal all joints with aluminum tape.


Note! Carefully monitor the quality of insulation in the corners.
Step 4. To provide a ventilation gap, we stuff the spacer strip. Sheathing is always performed at an angle of 90 degrees to the lining strips. Thus, if you plan to place the panels vertically, the sheathing is nailed horizontally.
First, frame vertical slats are installed at the corners of the wall, the accuracy of their fastening is controlled by a plumb line. To evenly arrange the horizontal slats, you can pull the cords at the top and bottom of the frame slats, that is, near the floor and above the ceiling.
The next strip is inserted after 40-50 cm, and then the remaining strips are attached around the perimeter, with the same step. Constantly check the evenness of the installation with a level or plumb line.
Step 5. Doors and windows are lined with separate bars.
Step 6. Let's start attaching the panels.


When covering walls in bath rooms, it is recommended to mount the lining vertically, starting from one of the corners. This will ensure that moisture quickly drains onto the floor, without trapping it in the grooves of the panels.
If you decide to do horizontal finishing, then lay the boards with the tongue facing up so that moisture does not accumulate in the grooves. With this option, start fastening the boards from the ceiling, and not from the floor. The lathing is nailed vertically.
Wooden panels are fastened using clamps, regular nails, or a construction stapler. When using nails or self-tapping screws, they should be inserted at an angle of 45 degrees, with the head completely buried in the wood.
Be sure to leave 2-3 cm gaps when attaching the lining from the ceiling and floor for ventilation.
Often the lining has to be trimmed. For these purposes, use a saw with small teeth or an electric jigsaw.


Before attaching the last batten, it is cut to the required size and attached to the sheathing. On the first panel of the next wall, the ridge is cut off and installed flush against the last batten of the first wall. Corner trimming requires special precision. The main thing here is to determine the required angle and draw a cut line before sawing. Adjacent corners of the panels must fit end to end, without gaps.
Video - Finishing a bathhouse with clapboard
Insulating the oven from the wall
Special attention must be paid to insulating the stove from the wall. For these purposes, you can use one of the following options:
- stainless steel - attached directly to the wall behind the stove;
- mineralite - heat-resistant boards made in Finland, consisting of cement, mineral fillers and reinforcing fiber. 2 sheets are attached if the stove is located in close proximity to the wall. When the stove is located at a distance of more than 40 cm, it is sufficient to use one sheet of mineralite.;
- heat-resistant kaolin clay tiles, for example, from the Russian company Terracotta;
- profile iron is the most cost-effective insulation option;
- red solid brick - laid between the wall and the stove to the base of the pipe. If desired, you can insulate the entire space up to the ceiling.


Wall tiling
Often the walls in the washing department or in rest rooms are finished with moisture-resistant ceramic tiles. It is made from environmentally friendly, non-toxic materials that are safe for health when heated, do not absorb moisture and give a beautiful and modern look to the room.
Step-by-step instructions for laying tiles on walls in a bathhouse include the preparatory stage and cladding.
1) Preparation
If the walls are brick or cinder block, then they are cleaned of dirt and dust, rough plastering is done, and unevenness is leveled with mortar.
Wooden walls are covered with waterproofing material - roofing felt or roofing felt. It is nailed down with a construction stapler, and a fine mesh net is sewn on top. The preparatory work is completed by applying cement mortar, which completely covers the metal mesh.
A perfectly even wooden beam is nailed at the floor level, from which the final finishing will begin. You can use a metal UD profile, which is mounted level along the wall.

To control vertical rows, use a regular plumb line or laser level.
2) Laying tiles
To attach the tiles, you can use either a self-prepared solution of cement and sand (in a ratio of 1/5) or ready-made glue. It is more convenient to use industrial glue intended for baths; it can withstand large temperature changes and high humidity.

Before starting work, the tiles are immersed in a container of water and left until all the air comes out of it. This will provide better adhesion to the solution.


Start facing from below, from the attached level.
It is important to lay out the first row perfectly evenly, since the quality of all subsequent cladding will depend on it.
Using a notched trowel, apply the adhesive to the back of the tile or directly to the wall. The tile is pressed against the wall, the glue should protrude slightly beyond its edges. To ensure that the square sits perfectly straight, align it with a rubber hammer.


Keep an eye on the gap between the rows of tiles; it should be the same along the entire length and height. To do this, when adjacent rows are laid out, plastic crosses are placed in the gaps in the corners of the tiles.


After 2 days the glue will dry completely and you can remove the level.


The gaps between the rows are filled with grout, which matches the color of the cladding. It dries in 11-12 hours.
The final stage is cleaning the walls from grout residues and other contaminants. The tiles are thoroughly washed and wiped dry.


Tiles create a lot of space for creative expression. It can be laid out in even rows, offset or diagonally. For beginners, the simplest and fastest option is recommended, when the squares are located exactly on top of each other.
The running drawing looks like this.


Laying tiles in a “running” pattern
Facing diagonally.


To create complex combinations of tiles of different colors, it is recommended to first lay out a pattern on the floor, then outline a diagram on the wall, and only then proceed with finishing.
Video - The principle of laying tiles
Wall cladding with terracotta flagstone
Heat-resistant terracotta tiles are a popular solution in bath rooms. It is moisture-resistant and durable, can withstand high temperatures and allows you to create an original and beautiful wall design.

The technology for laying it is somewhat different from facing conventional thin ceramic tiles. Terracotta is a heavier material and requires special glue or mastic.


Below are step-by-step instructions for tiling with terracotta flagstone.

- Apply mastic to the flagstone in a thick, thick layer. More adhesive is required than when laying lighter tiles.
- Press it against the wall and level it.


- We install the remaining slabs.
- For even joints, we lay pieces of drywall between the slabs.


- When laying parallel rows, do not forget to check the horizon with a level.
- After 10 hours, the seams can be filled. To do this, we use a special wide-joint heat-resistant grout. We dilute it with water and beat with a construction mixer until it has a homogeneous consistency. Properly prepared mass resembles thick sour cream.
- We free the structure from the plasterboard squares.
- Fill a construction gun with grout. We cut the nose of the gun at an angle of 60 degrees, the hole should be 8-10 mm.
- Fill the gaps between the slabs with grout. The squeezed-out mass should not go beyond the level of the cladding, nor should it fall on the front side of the slabs.


Be careful when handling the gun. If mastic does get on the decorative surface, do not try to wipe it off immediately. Wait 2 hours, then scrape off the dried compound without rubbing it.
- The grout is distributed along the seam in any direction convenient for you. You can first go through the horizontal joints, then along the vertical ones, or vice versa.
- After 2 hours we begin decorative stitching. This will give a finished, finished look to the cladding.


- For jointing, you can use a simple screwdriver with a working surface width of 7-8 mm or a rigid wire ring.
- Finally, put on clean gloves and run your index finger along all the seams.


Video - Terracotta tiles in the bathhouse
Bathroom floor finishing
If the floor is made of wood, then it does not require any additional finishing.


Start facing from the corner. Unlike wall decoration, an ideal horizon is not created on the floor, i.e. the tile is located at a slight slope towards the drain hole.
Before applying the solution, mark the location of the squares on the floor using a level.

Finishing a bathhouse yourself takes a lot of effort and time. It is necessary to solve a number of important problems - what material to choose, how to attach it correctly, how to ensure safety during operation and create a cozy and harmonious atmosphere in the premises. The recommendations and step-by-step instructions given in the article will help you cope with the task and, after completing all the work, enjoy a good and complete rest during bath procedures.


Video - How to lay tiles on a wooden floor in a bathhouse
Bathhouse design inside

Cozy and high-quality finishing of the bathhouse inside is the dream of almost every Russian person who knows a lot about this matter. And for such pleasure, neither money nor time is spared. In order for the interior decoration of the bathhouse to be done with high quality, before starting work it is important to know the basic rules of finishing, because a bathhouse is built not for beauty, but primarily for health, in order to fully feel the effect of a hot broom on the body person.
If we are talking about a Russian bathhouse, then the material from which the structure itself is built does not matter - the steam room must be made exclusively of wood. Traditions, covenants and, so to speak, the “Russian spirit” require this. This can be substantiated by the following scientific facts:
Wood is one of the most environmentally friendly materials; it is the most pleasant and useful for humans;
Wood has low thermal conductivity, as a result of which the likelihood of getting burned is extremely low;
However, wood is characterized by the ability to distribute heat evenly throughout its entire volume, which affects the rate of heating of the steam room;
If the wood for interior decoration has been processed correctly, continuous air exchange occurs - and then the bathhouse does not require additional ventilation, unless, of course, it is built entirely of wood;
A tree, when the temperature rises, releases substances that affect the health and relaxation of a person;
And in general, the texture of the wood itself is already a decoration, and no additional painting is required.
Interior of the bathhouse inside photo:


The choice of materials for the interior decoration of the bath.

One of the main stages of interior work can rightfully be considered the choice of finishing material. Its quality must meet the following criteria:
Be resistant to hot air, water ingress and increased air humidity.
Be hygienic.
Completely free of toxins that could be released in the heat.
Should not cause allergies or burns upon contact with human skin!
Be strong and durable.
Be decorative and please the eye with your flowers.
There is an opinion that it is best to build a Russian bathhouse and decorate it entirely from wood: the smell of fresh wood, together with the aroma of birch brooms, merge and give an atmosphere of comfort and bliss.
Important: special attention should be paid when finishing the washing area.
Since coniferous materials are absolutely not suitable for decorating a steam room (besides, pine is known to get very hot, and touching it during procedures may not be very pleasant), they are completely suitable for a rest room and dressing room. The temperature in them is not so high that the needles begin to secrete resins, but its aroma will not only delight your soul, but also bring a healing effect to the body. In principle, a variety of materials can be used in the washing room: drywall, river pebbles, PVC, moisture-resistant fiberboard. But of course it would be more expedient to use tiles. Considering the fact that tiles become very slippery when water gets on them, it is recommended to cover the floor with a wooden sieve, which could be dried at any time after taking water procedures.
Steam room finishing

If we are talking about a real Russian steam bath, with its heat and steam, then according to tradition, its interior decoration is made only from hardwood (birch, aspen, poplar, linden, etc.).
Attention: Ash has a very beautiful decorative effect - a beautiful core. Bath attendants love this material for its beauty, strength, durability and durability. Also, one can note an exotic but very expensive material such as African oak abashi. Many experts in paired traditions are willing to pay even less money to maintain their reputation.
The original species to which we are accustomed is linden. Its honey aroma creates even more comfort in the steam room. Nevertheless, aspen is resistant to high humidity and, as a result, does not rot.
Deciduous trees have the main feature - they are slightly susceptible to splitting and rotting, and do not heat up to the point where you can get burned. The use of pine, despite the cheapness of this material, is excluded due to its property of releasing resin at high temperatures. You should also not consider oak - when heated, it becomes very slippery, which can lead to unwanted injuries, but we came for pleasure. If in the dressing room, for finishing work, it is allowed to work with non-natural materials, then the steam room must be made only of wood, as well as handles and doors.
The floor of the steam bath is made either using sanded boards or covered with tiles. The finishing of the place where the stove will be installed must be made of non-combustible materials - brick, tile.
Important: in order to retain hot air inside well, the floor in the steam room should be approximately 10 - 20 cm deep. above the antechamber floor. I lay the boards on the joists as closely as possible to each other, and fasten them with wood screws. In the steam room, it is still recommended to use tiles to finish the floor. Because whatever one may say, over time moisture spoils the boards. Just like in the washing room, a wooden grate or shield should be placed on the floor in the steam room to prevent injuries on the wet floor.
Shelves and benches
An essential advantage of a good steam room is its comfortable, well-reinforced, non-creaking or wobbly shelves and sunbeds. Shelves can be mounted in two, or even three tiers.
Important: for comfortable sitting, the location of the top shelf under the ceiling should not be less than one meter.
Shelves need to be made in different sizes:
Lower – up to about 30cm;
Average – 60cm;
The upper one is around 1m.

Important: An important part of finishing bath furniture is the impregnation of sanded wood with special agents that protect against rotting. These impregnations are performed exclusively on the basis of organic components. Such products include wax or oil, as well as aqualak, which has recently become increasingly popular. It was created with a specific task - impregnation of wood for finishing work in saunas, baths and similar premises. Penetrating deeply into the material, these impregnations provide protection from moisture, high temperatures, all sorts of different microorganisms and all that other stuff. Naturally, the use of protection of this type, along with its advantages, such as increasing the durability of the bath interior and furniture, is steadily accompanied by disadvantages - a decrease in the beneficial effect of wood. Be that as it may, benches (shelves) in any case need to be treated with such means to ensure maximum comfort when exposed parts of the body come into contact with wood. Well, there is no need to impregnate the ceilings and walls.
In addition, the edges of the benches should be rounded, and the screws and nails should be set deep into the wood. Also, an effective point for ventilation and long service life of shelves is the way they are made in lattice form.


Finishing the dressing room
The recommended material for finishing work in the dressing room is pine panels. They heat up slightly and do not emit any harmful resins. When exposed to low temperatures, there will be a pleasant, slightly perceptible pine smell on the panels in the waiting room. Before performing installation work on the slabs, the wall must be insulated. For this, it is recommended to use polystyrene foam or mineral wool (as we know, these materials retain heat very well). The ceiling of the dressing room can also be finished with pine slabs, and the floor with sanded boards well secured to the joists.
Restroom


But the finishing of the bathhouse inside does not end there. After all, we still need somewhere to rest after such significant, albeit pleasant, stress on the body. When planning the bathhouse, we certainly did not forget about the relaxation room. In principle, it can be finished with any desired materials, but it looks more aesthetically pleasing when its finishing is consistent with the general style of the entire interior of the bathhouse.
Decorating a wooden bathhouse inside
There are a number of rules to ensure the desired microclimate and durability of your wooden bath:
The interior cladding should be made using vertical arrangement of boards, being very close to each other;
No need to paint them to prevent the release of harmful substances;
To avoid rotting of the floors in the near future, no need to insulate the floor, since it will be constantly exposed to moisture;
Another secret to effective heat preservation is using small windows in the bathhouse;
To create a state of relaxation, they use dim lighting;
Russian bathhouse, like interior of a Russian bathhouse inside- this is not a simple bathhouse with a steam room, it is a folk tradition, its color, so to speak, is in the decoration and interior wood trim.
We make baths at home: we convert the room into a steam room ourselves
In the west, within the city limits, a bathhouse in the basement of a house has already become quite normal, because the land there is expensive, and it is only enough to build a small house and a small plot of land.
According to statistics, in Finland, half of residential buildings have a sauna. And if it is not in the apartment, then there is definitely a common sauna in the basement of the house.


For the same reason, to save space, projects of such houses are also made in Russia. In this article we will tell you the advantages and disadvantages of this option, and the technology for its construction.
Pros and cons of a home bath


Bathhouse in the house: pros and cons:
- The bathhouse can be made in the house or separately as an extension. It is much more convenient and economical. You will save on building a foundation, roof, walls, and laying communications. You will not take up extra space and effectively use the basement or basement space.
- Possibility to connect a heated floor circuit to the washing room from a common boiler.
- It is more difficult to drain water in the basement. To do this, you will need to make a depression in the floor (a container) to collect water and pump it out from there using a drainage pump with a float into the general sewer system.
- If the sauna ventilation system is poor, moisture will accumulate and mold and mildew will form.
- Increased humidity and fire hazard are created. Therefore, it will be necessary to install a forced ventilation system, air dehumidifiers in front of it and a fire protection system.
- If you build separate bath houses, you will be able to use the second floor at the same time as the steam room, making it a guest house.
- Basically, a sauna inside a house is made with an electric stove, since wood stoves create an increased fire hazard. Therefore, lovers of a classic steam room may not like the option with dry steam from an electric furnace. If you want to get a traditional Russian steam room, then it is better to build it separately together with a brick heater or think about a good hood.
Arrangement of a bathhouse in the house
This example will tell you how a bathhouse was built in the basement of a private house, which causes additional difficulties with ventilation and water drainage.
Room insulation


As you already understand, remodeling a house will require special attention to issues of heat and waterproofing, as well as arranging a good hood, especially if your choice is a wood stove.
- First of all, a wooden frame is made to cover the walls and ceiling of the bathhouse. The volume of the steam room itself needs to be made as small as possible in order to buy a stove of lower power. Therefore, they try to make the ceiling 190-210 cm high, and the size of the steam room is convenient for the location of a recumbent shelf.
Note!
At the place where the shelves and stove are attached, you need to reinforce the frame with mortgages in advance.
- The walls and floor are insulated with mineral wool 10 cm thick, and on the ceiling you need to use a thickness of at least 20 cm. Two layers of insulation on the ceiling are laid in a perpendicular direction. Using thermal insulation will allow you to use the stove with much less power, and the heat will not escape outside.


- You can also use mineral wool with built-in waterproofing, such as ISOTEC KIM-AL or Isover KT 40-AL.
Note!
It is prohibited to use polystyrene foam and other flammable insulation materials for thermal insulation of a bathhouse.
- After this, you need to carefully and hermetically seal the vapor barrier made of thick polyethylene. It is attached to the frame with a stapler, the joints are coated with a special paste and taped. If desired, polyethylene can be replaced with another vapor barrier, aluminum foil or heat-reflective insulation.

Steam room finishing
- Tiles are laid on the floor of the steam room and the seams are grouted. To make it easier to clean the floor, you can make your own grating from sanded bars.

- Before attaching the sheathing over the film, slats are placed on the walls and ceiling to create a ventilation gap.
- Then the lining of the bathhouse is nailed from 10-12 mm clapboard. It is attached to pins every 25-30 cm, the cap is hidden by the next bar. Before installation, do not forget to keep the lining for at least a day in the same room so that it adapts to constant humidity.

- The photo shows a bathhouse in a brick house measuring 1.5 * 1.9 * 2.1 m with red cedar lining. All joints must be covered with decorative molding.


- We install the upper and lower shelves. To provide easy access to the space below, the bottom shelf can be made removable or retractable.


- To install the shelves, self-tapping screws with a special coating are used, which protects them from rust. To avoid accidentally touching their hot caps, you need to drown them about half the board. For this, a drill with a cutter was used.


- Then we install a wooden or glass door and trim; it should open outward. For beauty, we line the inside of the wooden door with the same material as the walls. It should not have locks, and the handles should be made of wood.


Note!
Wiring is done before installing the casing.
You can only use special wires that can withstand temperatures above 170 degrees.
- We install a waterproof and heat-resistant 12/24 V lamp through a transformer and cover it on top with a wooden grid.


Ventilation device
Ventilation can be done by force or naturally. To do this, you need to provide a supply ventilation hole under or above the stove (see photo).

The hood is usually mounted as low as possible relative to the stove so that it does not draw hot steam from above. Most often it is placed under the shelves.
An optional drying hole is installed on the ceiling above the door, which is closed during heating and sauna use. It can also be dried by simply opening the door after use.
If it is not possible to install a hood in the steam room itself, a gap of 10-15 cm is left under the door or an adjustable window is made at the bottom, and the hood occurs through the ventilation in the adjacent room. A bathhouse in the basement of a house is usually made with forced ventilation.
Furnace installation
All that remains is to install the stove, and the sauna house will be ready for use.


- In this example, a 6 kW electric heater was used. The price for an electric heater of similar power starts from 7 thousand rubles.
- When installing, you must follow all the manufacturer’s recommendations regarding clearances from flammable materials, and if necessary, install a thermal shield on the walls behind the stove. The oven must be connected to grounding.
- The stove is mounted through the casing to the frame posts and to the floor using special fasteners included in the kit.
- It is better to make a wooden fence around the stove so as not to accidentally fall and touch the hot walls.
- Electric heating elements are completely covered with stones. They should be large in size, and not laid very tightly, without effort.,
Chimney installation
If a home bath is made with a wood-burning stove, its pipe can go either through the ceilings and roof, or go vertically upward from the outside.
The main thing is to follow all fire safety rules.


- For the chimney, sandwich pipes are used or ordinary stainless steel pipes are insulated.
- Insulation must be done indoors to increase draft and protect against fire. For insulation, 5 cm mineral wool with waterproofing is suitable.
- The open pipe should be 30 cm away from combustible materials, or 15 cm if it is thermally insulated.
- Condensate drainage must be provided at the bottom of the chimney. The top of the pipe should be covered by a deflector to protect against backdraft and fire from sparks.
- The place where the pipe passes through the wall/floor is covered with a metal nozzle of at least 30*30, and the voids are filled with fireproof material, such as expanded clay.
Conclusion
Of course, it is best to plan for the presence of a bathhouse at the stage of building a house, and think in advance about the optimal position of all communications. A good alternative to refurbishing the premises is to buy a ready-made booth, but such options will cost more than 100 thousand rubles.
Finally, you can watch the video in this article, which shows instructions on how to make a bath at home.