Arrangement of a wooden bathhouse inside. How to arrange a small bathhouse
Arranging a bathhouse requires careful selection of materials for construction. Decorating the inside of the room is especially important, because the comfort of use depends on it. This task can be achieved using a variety of materials and finishing options, each of which has its own characteristics.
Interior decoration of the bath: purpose and features
The classic Russian bath includes three main rooms: a steam room, a washing room and a vestibule. Additionally, there may be a recreation room, a billiard room and other rooms. In any case, interior decoration is necessary, which not only creates comfort, but is also needed to create an optimal atmosphere and preserve heat.
The bathhouse building can be built from timber or another type of wood. This material is accessible, in demand and effective. Log structures for summer use do not require complex finishing. A bathhouse in a log house should have well-caulked lower rims; the inside walls do not require additional materials. This is due to the fact that wood is able to “breathe”, removing moisture and steam outside. The use of synthetic insulation will disrupt this process. However, thermal insulation is necessary for a winter bath; clapboard finishing is appropriate. Log walls look aesthetically pleasing even without additional finishing.
The construction of foam blocks is reliable, can be used at any time of the year, but requires interior finishing. In steam rooms, lining is almost always used, under which layers of hydro- and thermal insulation are placed. In the rest room and locker room, it is appropriate to use ceramic tiles, PVC panels, and lining. Walls made of foam blocks are pre-treated with antiseptic compounds. The floor is often finished with ceramic tiles with an anti-slip surface, which ensures comfort.
Brick is rarely used for the construction of baths, but such structures are reliable, very durable, and environmentally friendly. Brick structures do not require external finishing, but inside you can use porcelain tiles for the floor, ceramic tiles, and lining. In the locker room, the walls are often lined with PVC panels, but they are not suitable for the steam room due to the high temperature in the room.
Wooden lining made of larch is a universal solution for interior decoration of a bathhouse. This material is affordable, practical and durable. If a more reliable coating of walls or floors is required, then use porcelain stoneware or ceramic tiles. A bathhouse made of any building material requires interior finishing that will provide comfort, aesthetics and protect the main walls from moisture.
Interior finishing options
All rooms of the bathhouse are exposed to high humidity, which requires careful selection of material for interior decoration. There are several main options, each of which has certain properties. The advantages, disadvantages, purpose and operating features must be taken into account when choosing an option for the interior decoration of a bathhouse from any material.
Table: advantages and disadvantages of materials
| Material | Advantages | Flaws | Optimal application |
| Wood paneling | Eco-friendly, nice texture, possibility of combination with other materials, variety of wood species | Difficult installation and maintenance operation, fragility, fire hazard | For walls in any bathhouse, built from any material |
| Ceramic tile, porcelain stoneware | Strength and reliability, resistance to mechanical and chemical influences, wide selection, durability, environmental friendliness, fire safety | It's important to follow the rules installation, high cost, uncomfortable texture | In any bathhouse for finishing the floor, walls, firebox |
| PVC panels | Affordable price, variety of colors, easy installation, simple maintenance during use | Fragility, low resistance to high temperatures, fragility | For changing rooms, rest rooms, showers |
Photo gallery: clapboard finishing options
Log walls make the bathhouse cozy and do not require additional finishing  The combination of lining and ceramic tiles is a practical solution
  All surfaces inside the steam room can be finished with clapboard
  The lining is easy to install both on the ceiling and on the walls
  Clapboard finishing is convenient for a small steam room
  Lining easily combines with stone and tiles
  It’s easy to decorate a relaxation room luxuriously
Selecting the type of finish
The interior decoration of the bath not only performs an aesthetic function, but also provides comfort and an optimal atmosphere in the premises. Therefore, materials for arranging a steam room, shower, relaxation room or other space must meet the following requirements:
- environmental friendliness, non-toxicity, safety for human health when heating the material;
- resistance to mechanical and temperature loads;
- easy maintenance during operation;
- simple installation technology.
Popular materials such as wood and ceramic tiles meet these requirements. They are easily combined with each other, allowing you to create a comfortable and safe environment inside any bathhouse.
When choosing a material, its purpose is taken into account. Tiles are appropriate for the floor and walls, and the ceiling is decorated with planed boards and clapboard. This combination is optimal for a shower room, and in a steam room, often all surfaces are made of wood. This allows you to create comfort and a spectacular atmosphere of a Russian bath. For drier rooms, suspended ceilings are suitable, but you should not make plasterboard structures. This is due to high humidity in all rooms of the bathhouse, and drywall is not resistant to moisture.
Wood and lining made from different types of wood are popular materials for interior decoration of a bathhouse. This is due to the fact that wood is available, environmentally friendly, and the installation of elements does not require special preparation. The optimal types of wood for a bathhouse are larch, aspen, abashi, and alder. They are durable, resistant to humidity and temperature changes.
Preparation: calculating the working area
Before starting work, you should calculate the area of surfaces that need finishing. Lining is used for walls and ceilings, and the floor is made of boards. For high-quality finishing, high-quality wood with the lowest resin content is required. Therefore, pine is rarely a material for landscaping, as it emits resin.
The finishing of each room consists of several stages. First, the installation of the floor covering is carried out, which is a flooring made of boards with a thickness of 50 mm. The elements are laid on logs 300 mm high, which are installed on a sand cushion arranged on the ground. After this, calculate the area of the walls and ceiling, which they plan to finish with clapboard. To do this, you need to calculate the area of each wall and ceiling and add up the data obtained.
Selection and calculation of material
Larch lining is the optimal solution for finishing a steam room or washing room. Under the influence of time and humidity, its wood becomes harder, which makes the decoration of the premises durable. When choosing a lining, you should pay attention to the following features:
- lining for finishing a steam room or washing room must be marked “Class Extra” or “Class A”. This material is devoid of large knots, has a uniform structure, and a smooth surface;
- wooden elements should not show signs of rotting, cracks, or deformation. Smooth and dense lining is easy to install and looks aesthetically pleasing;
- For finishing you need not only lining, but also steam and heat insulating materials. Finishing is carried out only after installation of these layers;
- The thickness of the board must be at least 12.5 mm, a tenon of 8 mm corresponds to the depth of the groove. Material humidity - no more than 12%;
- high-quality material has a flat, smooth surface.
It is also important to correctly calculate the amount of material. Lining is often calculated in square meters. In this case, its quantity is equal to the area of the working surfaces. This figure needs to be increased by 5%, since damage to the material is possible during operation, so the lining is purchased with a reserve.
For work you need bars or thin slats. If the thermal insulation of the bathhouse was carried out outside, then only the installation of vapor barrier and finishing is carried out inside. Therefore, you need to purchase a vapor barrier film that will provide comfort indoors. Otherwise, insulation is carried out from the inside and you will need insulation, a waterproofing film and bars for the sheathing.
Video: how to choose lining
Tools and Supplies
Construction and arrangement of any facility requires the use of reliable tools. The quality of fastening materials is of particular importance when constructing a bathhouse, because the durability of the finish depends on this.
List of tools and consumables:
- construction stapler with staples;
- roulette;
- pencil;
- building level;
- nails;
- self-tapping screws with anti-corrosion coating;
- screwdriver;
- hammer;
- hacksaw.
Tools need to be prepared in advance, and fasteners must be purchased with a reserve. This makes it possible to securely fix all materials and elements.
Step-by-step instructions for interior finishing of a bath
Wall finishing is carried out after installation of heat and vapor barrier. To do this, you need to attach vertical or horizontal bars to the wall, the distance between which is equal to the width of the insulation used. A waterproofing film is secured over the racks with staples, and then the insulation is also fixed to the staples or glue. After this, a vapor barrier layer is attached, which protects the supporting structures from condensation.
Plating the walls of a bathhouse from the inside involves the following steps:
- Slats are attached on top of the vapor barrier film, the distance between which should be 50 cm. A gap of 3 cm should be left between the vertical slats of the frame and the ceiling and the same distance on the floor side. This is necessary for the structure to shrink.
- The slats are attached to a wooden surface without internal insulation with self-tapping screws, and to a brick base - with dowels. In this case, it is important to control the verticality of the slats using a plumb line, and check the plane with cords stretched between the outer bars. Clamps are installed on the back side of the lining board, then the panel is secured to the sheathing using nails.
- Next, the canvas is assembled from the lining, inserting one element into the groove of the other. A clamp is attached to the back wall of each panel, with which the lining is fixed to the sheathing. You can also fix the parts simply with nails, deepening their heads into the wood. The step between the fasteners is about 60 cm. It is important to connect the parts tightly, but leave a gap of about 2 mm, since wood swells from moisture.
Lathing when covering walls with clapboard is necessary for walls made of any materials. The bars allow you to create a ventilation gap, and the vapor barrier film ensures the removal of moisture. This preserves the quality of the load-bearing structures and the appearance of the finish. The ceiling is sheathed with clapboard using the same technology, having previously fixed a vapor barrier film.
Video: preparing the ceiling for clapboard cladding
Finishing a bathhouse with clapboard is a popular arrangement method. At the same time, wood is successfully combined with ceramic tiles and stone. Therefore, the interior decoration of the bathhouse can be varied, but it is important to choose the installation technology of the appropriate material.
It's good to live in a private house. On your own land you can build a huge garage, a bathhouse, or an entire water park. But what about the owners of simple apartments? Of course, it’s impossible to build a water park and a garage in such conditions, but it’s easy to build a bathhouse. Moreover, all the necessary stages of work can be easily done with your own hands.
Any construction work begins with planning and procurement of materials. The finished bath should have as little weight as possible, so only sheet lining is suitable for finishing the structure.

In addition to the lining, you will need to buy timber for the frame, galvanized screws to assemble all the elements into a single system, mineral wool insulation, foil, wires, a switch, a lighting fixture and, of course, a heating device.


Determine the required amount of materials yourself, taking into account the size of the future bathhouse. When determining the optimal size, keep in mind that one person needs at least 1 m2 of free space to spend time comfortably in the steam room.
After purchasing everything you need, proceed to arranging the floor.
Arranging a bath floor
The best place for arranging a bathhouse is the junction of three walls. If it is not possible to build a steam room there, choose a place near a load-bearing wall, but not an external wall.
Start installing the floor. This stage is performed before the frame is erected. You can make a plank or tiled floor.

First step. Remove any existing trim, if any, and carefully level the base.
Second step. Install the support rails. Boards will be attached to them. The bathhouse in the apartment will have a small area, so there are no special requirements for the spacing of the sheathing. You can install slats at a distance of, for example, 60-80 cm.
Third step. Attach 4-5 cm thick boards to the sheathing. Use self-tapping screws for fastening.
Wood must not be coated with any paints or varnishes.
Tiled floor
First step. Remove the existing floor covering and level the surface using a screed or, if there are no significant differences in height, with a self-leveling mixture. Pre-install low formwork according to the dimensions of the future floor. Let the fill dry and remove the formwork.
Second step. Lay the elements of the electric heated floor and pour the screed on top of them. The laying scheme, as well as the optimal thickness of the screed layer, is given in the manufacturer's instructions.
Third step. Place your preferred tile on the dry screed. There are no specific requirements for tiles. To attach tiles, it is best to use adhesive specially developed for this purpose.

Proceed to assembling the frame. It will consist of vertical posts and horizontal crossbars. Strapping with horizontal bars is performed in 5 levels:

First step. Install vertical supports. Place them in the corners of the future paired room. The height of each rack is up to 190-210 cm. To make racks, use durable wooden boards or bars.
It is important that in the future locations of benches the bars or boards are thicker than in other places in the structure.
Use dowels to secure the posts to the floor. The racks are attached to the walls with several nails without heads. Check the vertical installation of the racks using a level or plumb line. The walls in apartments are often uneven, so you will most likely have to spend additional time adjusting the frame elements.

Second step. Secure the horizontal strapping elements in accordance with the previously given recommendations. You can use screws for fastening.

Third step. Attach mineral wool insulation to the frame. Carefully place the mineral wool into the cells of the frame. If possible, secure the insulation with nails or screws. Cover the insulation with foil. Use tape or pushpins to secure the foil.

Aluminum foil will create the effect of a thermos in the sauna, helping to maintain maximum heat inside the room.
During the construction of the frame, do not forget to leave an opening for installing the door. At the same stage, install the door frame - just secure it between adjacent posts using screws. It is better to remove the door leaf before finishing work is completed.
Ceiling frame structure

Installing the ceiling of an apartment bathhouse is done in one simple step: you simply tie the upper ends of the vertical support posts with wooden boards. At this point the frame is ready. Instead of boards, you can use a sheet of drywall. Next, the lining will be attached to this base.
If you wish, you can leave the “original” ceiling completely, but it is unlikely to fit into the interior of the finished bathhouse.
Before the final decorative finishing begins, decide on the issue of electrical wiring in your apartment sauna. In a good way, at this stage you need to enlist the support of a professional electrician.
In general, you need to bring out the wires to install an outlet, a switch and a couple of low-power lamps.
Route the wires along the outside of the support frame. The electrical cable must run through a special protective sleeve. The latter is fixed to the frame elements.
The lamps are connected strictly in parallel. The phase for the lighting equipment will be provided by the heater, and you need to extend the power and lighting wires directly to the heater through metal hoses.
Finishing work

Lining is traditionally used to cover apartment saunas.
First step. Cover the ceiling. Start attaching the sheets to the previously prepared base from the side of the front door. Use hidden nails for fastening. You can make them yourself by first biting off the heads of simple nails using the appropriate tool.
Nails must be driven in at a slight angle. Fix the lining to each frame board.
Second step. Prepare the lining for finishing the walls by preparing holes in the appropriate places for the outlet of electrical wires. The diameter of such holes must correspond to the diameter of the metal hoses. Pass the metal hoses through the holes and begin fixing the lining.
Third step. Cover the frame of the walls with clapboard. Fastening is carried out in exactly the same way as in the case of finishing the ceiling.
Do not bring the bottom boards to the floor by about 2 cm - this will create the necessary ventilation hole.
Installation of benches and doors

The height of the ceiling in an apartment bathhouse, as already noted, will not exceed 190-210 cm. If the ceiling is higher, a “pipe effect” will be created in the steam room: the draft will increase, drafts will appear, and the heating efficiency will decrease.
In such conditions, it is possible to comfortably place only 2 benches. Place the top one at a distance of about 1 m from the ceiling of the steam room. Make the lower bench at a height of 60-70 cm from the floor. Additionally, install a step under the lower bench at a height of 20-25 cm from the floor for greater convenience.
First step. Prepare the material for the bench frame. For this, a beam with a cross section of 4x8 or 5x10 cm is optimal.
Second step. Proceed to assembling the frame. First, attach the main horizontal bar to the wall opposite the entrance to the bathhouse. Use screws for fastening.
Third step. Attach the side beams to the walls and connect them with the front horizontal beam.
Fourth step. For greater structural stability, install several vertical support posts along the length of the bench.
Fifth step. Assemble the frame for the second bench in the same way. Tighten the frames together with screws.
Sixth step. Finish the benches with clapboard. Attach the sheets with secret nails to each crossbar and frame post.
Finally, all you have to do is install the door leaf. The best option for a bathhouse in an apartment is a door made of glass, possibly tinted.
Buy a door that opens outward. There should be no “serious” locks in the door design for your own safety. The permissible maximum is weak magnetic or roller latches.

Selection of heating equipment
Traditionally, so-called saunas are used to heat apartment baths. electric heaters. Select the appropriate power of the equipment. For example, to heat a bathhouse with a volume of about 9 cm, an electric heater with a power of about 12-14 kW will be sufficient. Start from this.
It is also important to determine the optimal weight of the stones. To warm up 1 m3 of space you will need 5-5.5 kg of stones.

Also, special infrared emitters are well suited for apartment baths. They warm up the steam room as quickly as possible and have a beneficial effect on human health.

Even those who refuse to visit a traditional steam room due to high blood pressure will be able to take a steam bath with an infrared heater. Moreover, IR units are more economical compared to the mentioned electric heaters and do not require the use of stones.

It is best to install the heating device after all finishing work has been completed. Fasteners and installation instructions are supplied as standard. Install according to the manufacturer's recommendations.
The optimal place for placing equipment is opposite the benches at a height of about 200 mm from the floor surface.

At this point, the arrangement of your own bathhouse in the apartment can be considered complete. Follow the instructions, and very soon you will be able to enjoy bath treatments right at home.
Good luck!
Video - Do-it-yourself finishing of the bathhouse inside
Having set out to build a bathhouse with your own hands, you should study each stage of construction in detail. A qualified approach when choosing a site, a competent project and compliance with recommendations at all stages of arranging a bathhouse will ensure a worthy result of the invested work.
Rules for determining the location for construction
A skillfully selected location for construction guarantees convenient operating conditions in the future. Experts recommend considering the following recommendations:
- Despite the benefits in terms of consumption of building materials, adding a bathhouse to the main residence creates an increased risk of fire.
- Avoid being close to a body of water - this may cause flooding of the building.
- The back of the yard is the optimally convenient place to locate a bathhouse.
- The construction of a bathhouse is necessarily accompanied by the arrangement of communications, including a drainage system, and effective ventilation.
- Avoid areas near roads.
- Construction on the south side of the site will help ensure maximum heating of the bathhouse by the sun's rays. Protection from gusts of wind is an additional bonus of a winning solution when arranging.
- Construction away from the line of contact between the plots will help eliminate disagreements with neighbors.
- In order not to provoke contamination of drinking water sources, the site for the construction of a bathhouse is selected at a distance of about 20 m from a well or borehole.

Any construction event is not complete without preliminary planning. The following drawings of baths will help you choose a suitable project.


The minimum dimensions of the building are determined based on the predicted number of simultaneous vacationers in a paired establishment. The acceptable area per visitor is 5 m 2 of the total bath space; a company of four people will need 20 m 2. A standard bath includes the construction of a steam room, a dressing room and a washing room. If desired, other premises are also arranged. To ensure that your own bathhouse brings only positive emotions, consider the following nuances when designing and constructing:
- The rational height of the rooms is from 2.0 to 2.2 m. Lower ceilings will create inconvenience for vacationers; a high room will require additional coolant costs and increase the warm-up time.
- Arrangement of window openings facing west helps to prolong natural light. They usually take a steam bath at the end of the day; watching the sunset in between visits to the steam room is the best way to relax.
- It is better to plan the doors on the south side, this will reduce the hassle of clearing the entrance from snow.
Advice! The window and door openings of the bathhouse are made small. The optimal door dimensions are 70x180 cm, provided that a high threshold is installed. Some inconveniences at the entrance are compensated by a significant reduction in heat losses.
- The criteria for choosing materials for construction are their light weight along with high energy-saving ability.
- The purchase of high-quality equipment and competent installation of communications contributes to safe operating conditions for the bathhouse.
- Avoid using resinous wood to decorate the inside of the bathhouse.
After determining the optimal dimensions and other construction nuances, we proceed to the preparation of the following drawings:
- general design of the bathhouse;
- plan of each room;
- foundation arrangement option;
- roof construction diagram;
- method of fastening the timber;
- floor and ceiling installation option;
- design of a sauna stove and features of its installation.
Comment! When choosing ready-made construction projects, take into account the type of soil and climatic conditions of the region in which you plan to build a bathhouse.
Having design skills, you can draw up your own bathhouse plan. Ordering drawings from a specialized company is another option for preparing for future construction.


Indicative list of materials
Construction of a bathhouse will require the availability of materials, the volume of which depends on the chosen project. Here is an indicative list necessary for arranging a bathhouse:
- Beam with a section of 15/15 cm.
- Board for floor installation. An edged board 4 m long and measuring 15/5 cm is ideal for these purposes.
- The ceiling surface is covered with clapboard 2 cm thick, the width of which is 10 cm.
- It is recommended to use similar materials for decorative finishing inside the bathhouse.
- Proper construction involves the formation of steam, hydro and thermal insulation. For these purposes, a vapor barrier film, penofol or polyethylene film is purchased as waterproofing; mineral wool is perfect for insulating the ceiling surface.
- Asbestos sheets will provide protection for bathhouse surfaces from high temperatures. Installation is carried out on the walls and ceiling near the stove, as well as in the chimney area.
- Depending on the chosen method of foundation construction, you will need components for concrete mortar and materials for forming a columnar structure.
- The finishing coating of a bathhouse roof is often focused on finishing the main building or accompanying buildings in order to create an overall harmony of the site.
- Insulation for inter-crown seams. When building a bathhouse, jute, tow, moss or flax felt are suitable for these purposes.
Advice! It is better to start building a bathhouse in the spring, this will allow the wood to settle during the subsequent six-month break. Cement is purchased immediately before the start of the construction process so that it does not lose its qualities.

Main stages of arrangement
The labor-intensive construction process is unlikely to be completed without the involvement of diverse specialists. Work begins with the arrangement of the selected area for the bathhouse, freeing the soil from debris, roots and other elements that impede construction.
Laying the foundation
There are three main options for building a foundation for a bathhouse:
- Columnar. The most popular option when constructing a bathhouse from timber. Let’s take a closer look at the rules for its arrangement.
- Pile-screw. Refers to a type of columnar foundation. The characteristic features of its construction are the speed of the process and low material costs.
- Tape. It is used for the construction of bathhouses in rare cases due to its high cost and labor intensity. The significant weight of the building or problematic soil are the main reasons for choosing a strip foundation.

If we are building a bathhouse on swampy soil, it will save the structure from premature destruction, but be prepared for a serious investment of money and effort.
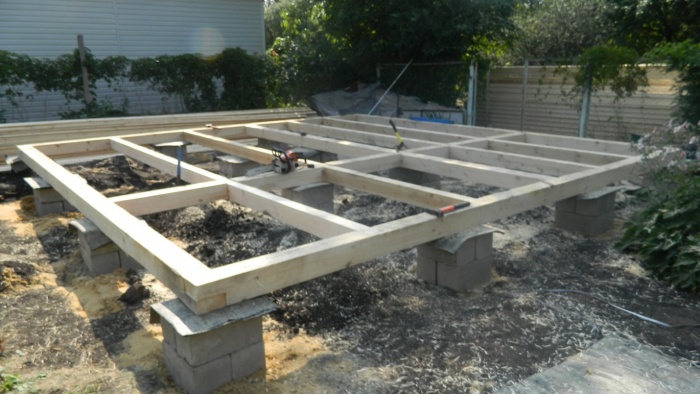
The process of constructing a columnar base support for a bathhouse includes the following steps:
- Prepare recesses for supports. The gap between the pillars is determined based on the total load on the columnar structure, taking into account the characteristics of the soil. The corners of the bathhouse and the intersections of the walls are mandatory installation points for the pillars.
- The approximate depth of the holes is 1.0-1.5 m. The value varies based on the level of soil freezing.
- At the bottom of each recess, a cushion of sand and crushed stone is arranged in a layer of 10-15 cm.
- The next stage of building a foundation for a bathhouse is the installation of asbestos pipes with strict adherence to the vertical level.
- Metal rods are placed inside the supports for the purpose of reinforcement, which are filled with concrete mixture in three stages.
- The space around the pipes is also filled with concrete solution.
- After several days, construction continues by forming a half-brick wall between the bathhouse supports.
Construction of walls and roof
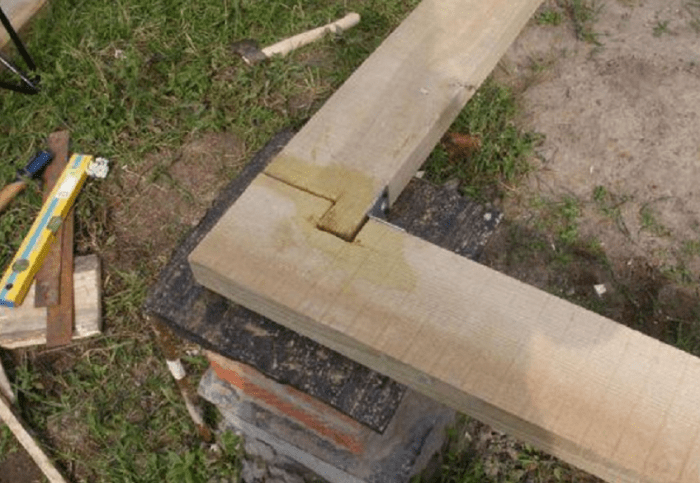
After installing waterproofing on the foundation in the form of 2-3 layers of roofing material, they proceed to the construction of the walls of the bathhouse. For construction, timber with a cross section of 15/15 cm is traditionally chosen. The first crown made must be checked in all respects.
Advice! It is optimal when the first crown is at least 30 cm from the ground surface.
The arrangement of walls is most often carried out using the “paw” method. If the quality of the timber is in doubt, the rows of bathhouse walls are connected with dowels. This method of construction will prevent the wood material from shifting and twisting. Installation of wedges is carried out using the bricklaying method: piercing through 2-3 rows, skipping one. It is optimal when the gap between adjacent dowels does not exceed half a meter. The arrangement of the walls of the bathhouse is accompanied by laying insulation between the beams. During the construction process, do not forget to leave window and door openings.

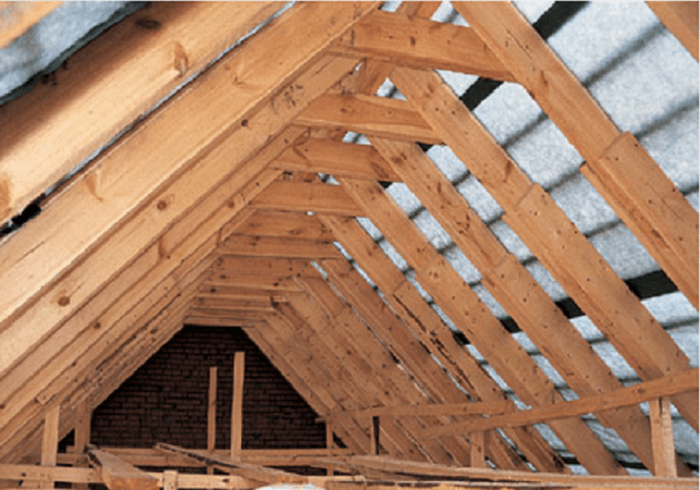
After completing the arrangement of the walls of the bathhouse, the rafters are fixed taking into account the features of the selected roof configuration:
- The construction of a pitched roof involves fixing the rafters with two external supports. The second arrangement option is to secure the roof of the bathhouse with external and internal supports.
- When installing a gable roof system, the lower edges of the rafters rest firmly on the walls of the bathhouse, the upper edges of the elements form the roof ridge.

Installation of rafters to the last crown of the bathhouse walls is carried out with brackets. After arranging the rafters, they proceed to fixing the sheathing. The construction of a bathhouse with your own hands at all stages is accompanied by the laying of insulating layers that prevent heat loss, penetration of steam and moisture, which provokes premature deterioration of the base material. This rule also applies to the arrangement of the roof. After fixing the insulation, vapor and waterproofing, they proceed to the installation of the decorative roof covering.
At the next stage of construction, they are installing window frames and doors.
Installation of communications
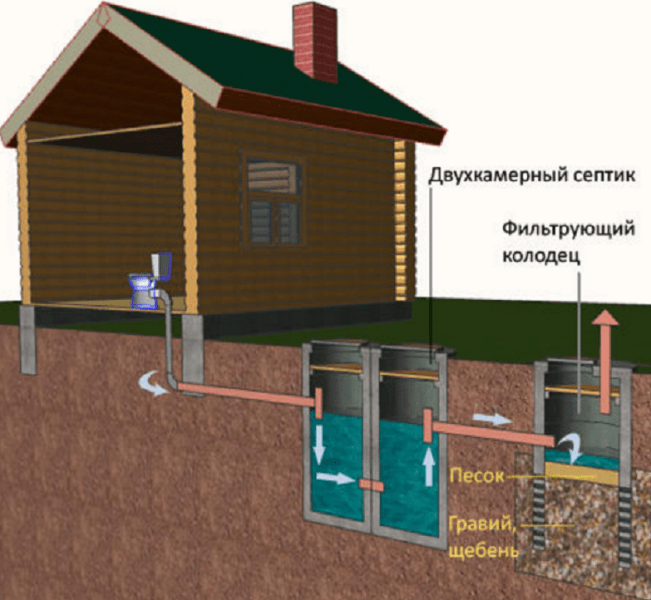
Then they move on to arranging communications. The formation of a drainage system begins at the stage of foundation construction. For this purpose, a drainage well or pit is being constructed outside the building, which is connected to the bathhouse by a pipe. Be sure to provide a slope in the drainage system to prevent sewer waste from stagnating. How to make a proper drainage system is shown in the following diagram:

After the formation of the sewerage system, they proceed to arranging the floor. When building a bathhouse, there are two common options for installing the floor surface: using concrete or wood. The first option is more durable, but labor and material costs for construction increase significantly. In addition, installing a concrete floor in a bathhouse significantly increases the weight of the entire structure. In this case, the surface is covered with tiles.
When installing a wooden floor, it is made to leak. The construction technology is as follows:
- The logs are being installed.
- Boards are fixed onto the logs with a small gap.
- To drain wastewater, you can make a compact hatch, which is covered with a grate.
- The floor is installed with a slope, allowing moisture to accumulate in the hatch.
The construction of a wooden floor in a bathhouse is shown in the photo below:


Comment! Thorough ventilation of the room after each visit will extend the life of wooden floors.
Next steps for arranging a bathhouse
- installation of insulating materials on the surface of walls;
- construction of a water pipeline;
- supplying electricity.
Steam room equipment
One of the most important stages of construction is equipping the steam room with a stove. The location of its installation is planned in advance. The lightweight structure of a bathhouse made of timber is unlikely to withstand a heavy brick stove with a massive chimney. In this case, an additional foundation is required. Usually they resort to the option of mounting a metal model. Protection of adjacent surfaces with screens that reflect high-temperature radiation is a mandatory condition of construction. An approximate diagram of the arrangement of a furnace in a steam room is presented below:

The construction of convenient shelves does not present any particular difficulties: first, the support frame is installed, then boards are nailed onto the installed support. The caps of fasteners are carefully recessed to avoid burns.

Conclusion
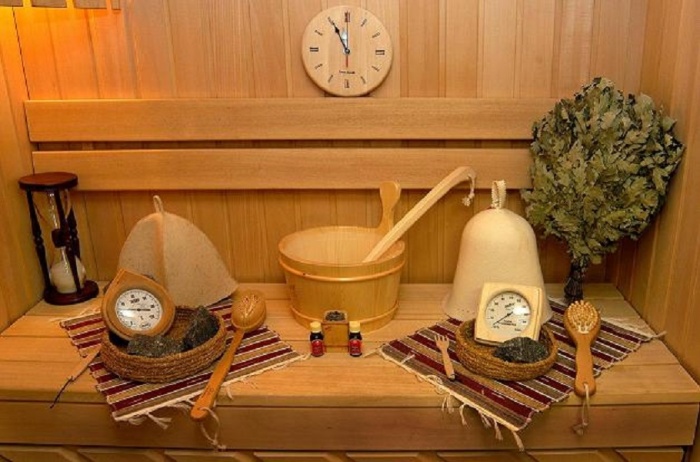
The final finishing touch is filling the bathhouse with all kinds of accessories. Brooms, tubs, buckets, grates - all the wooden surroundings contribute to the formation of the traditional atmosphere of a Russian steam room.
Despite the labor-intensive construction process, the resulting result will be the pride of the owner and the joy of all invited visitors.
I would like to give some good advice on building and arranging a bathhouse on a summer cottage. After all, a lot depends on how correctly the foundation is laid and selected, right down to the design of the porch - how long the bathhouse will serve its owners, whether it will not become damp, whether it will become a special place of attraction for prying eyes from the street, and so on.
Tip 1. The most important thing is that the bathhouse does not get damp and is well ventilated after use. To do this, initially during its construction you need to choose the right type of foundation. The bathhouse does not require a solid foundation, which is needed for a country house or country cottage. You can use a pile foundation in its construction. Concrete piles should only be placed in this case on a wider “cushion” than usual. Piles should be placed on every half meter of the bathhouse perimeter.
Tip 2. Place stones between the foundation piles or cover them with a decorative lattice. A pile foundation is also very suitable in that place on a summer cottage where the terrain is uneven.

Tip 3. In the space between the foundation piles of the bathhouse, you can store firewood for it, as well as many household belongings, such as watering hoses. There is never damp there, but there is a “roof” and cover from the wind and snow drifts. The pile foundation also protects the bathhouse itself well from dampness.
Tip 4. In the place where the washing compartment of the bathhouse is planned, you should dig a hole. It is not necessary to do more. Literally a meter deep. Fill it with small crushed stone.

Tip 5. To ensure that water flows into this prepared hole, the following methods can be used. For example, do not insulate the floor in the bathhouse and install floor boards with a slight, almost imperceptible slope to allow water to flow through it into the pit. In this case, the water outlet should be made directly above the hole itself. But in winter, in such a bath there will be a slight blowing under your feet. Another option is boards raised at the edges and fixed to the crossbar. This way they will lie on the floor in the shape of a bow, but not too curved. That is, the water should flow towards the center of the washing room. And the slope will not be felt too strongly in this option, and it will not be slippery. And the third, most convenient and simplest option is to make several round polished holes in smooth boards and the water will flow out through them. The remaining moisture that has not gone away after everyone has washed in the bathhouse should be collected with a mop and sponge.

Tip 6. Make an entrance to the steam room, if it is provided for in your bathhouse design, through the washing area. And one last thing. To prevent excessive dampness in the bathhouse, after use, simply open all its doors – from the steam room or soaking room, and support them with something from the outside. In this case, the bathhouse will dry out in thirty minutes. And of course, do not forget, especially in cold weather, to blot off any remaining moisture from the floor with a mop and a dry cloth or sponge.
Tip 7. In order not to arouse the curiosity of neighbors and those who will pass by your site along the country street by improper arrangement of the bathhouse, the bathhouse should initially be correctly oriented and planned on the area. Place the bathhouse in the depths of the plot, with its front part looking at the pond in which you are going to take a dip when leaving it, or place it “looking” into the forest, at the trees around the dacha. That is, so that its entrance is not visible from everywhere.

Tip 8. Cut very small windows in the bathhouse, on its upper part. It would be nice to put opaque heat-resistant frosted glass on the windows.
Tip 9. Place a bench on the sauna porch. You can relax on it the next time you leave the bathhouse, sit covered with a towel. On the bathhouse porch, in order to avoid dampness, you should also not fit the boards tightly. Then they will not rot and will dry quickly.

***
And one last thing. I would like to remind you of the main stages of building a bathhouse on a summer cottage, which must be carried out in the following mandatory order: laying the foundation, erecting walls, interfloor ceilings (if the bathhouse is planned to have two floors), erecting a roof, insulating the walls and floors in the bathhouse, finishing the bathhouse outside, installation of a stove, chimney, construction of flooring, doors, windows, installation of a bench in the dressing room and a table, shelves inside the bathhouse, if necessary, a shower compartment or font. Have fun after visiting your own Russian bathhouse.
If you have already completed the construction of the bathhouse, then it is time to decide what its interior decoration will be like. It is worth noting that the design should not only be functional, but also beautiful, and, more importantly, durable. Considering this circumstance, you should find out what is the best way to line the interior of the bathhouse, starting from the ceiling and ending with the floor. Finishing work should be taken seriously, because your comfortable stay will depend on its quality.
Material selection
Nowadays there is a huge amount of building materials on sale that you can use to decorate different rooms with your own hands. It is best to stick to wooden materials. Why? It’s simple, because wood is a natural material that meets sanitary and hygienic requirements for finishing rooms with high humidity and temperature.
When carrying out internal cladding, the main role is played by the choice of material for the ceiling and walls of the bathhouse. You don’t have to limit yourself to just one type of tree. Combinations of different types of wood will look more harmonious. In addition, it is worth considering the individual properties of this environmentally friendly natural material. Unlike its synthetic analogues, wood does not emit harmful substances during the heating process. It has excellent characteristics, is a durable material, retains heat and has a low coefficient of thermal expansion. In the old days in Rus', only certain types of wood were used for interior decoration of baths. These included cedar, linden and larch. Today, many experts have begun to recommend the use of abashi wood. It has excellent properties and is ideal for interior decoration. A significant drawback of the material is its high cost, so not everyone can afford such a luxury.
To save money, you can use more inexpensive varieties for finishing work in the dressing room and rest room. There are no high temperatures here, so pine is quite suitable here. The texture of the material is attractive, pine is very easy to process and is relatively inexpensive. It is impossible to use pine in a steam room because when the wood is heated, resin is released from it, which causes a lot of inconvenience. Most often, as practice shows, washing and steam rooms are lined with larch and linden. These types of wood retain color well and do not heat up much as temperatures rise. If you touch such covering, you will not get burned.
It is also important to think about how to make shelves in the bathhouse. They are needed so that you can arrange all the necessary supplies and accessories. If the bathhouse is small in size, then do not clutter it with a large number of these items, because this way, you will only increase the possibility of injury when taking procedures in the bathhouse.
- Cedar resistant to moisture and heat. When heated, wood releases the aromas of essential oils, which are so beneficial for the human body. But if you decide to choose this material, then pay attention to possible resin leaks.
- Abashi native to the West African tropics. The material has low thermal conductivity and practically does not heat up at high temperatures. The shade is a pleasant yellowish. The texture is not bright, homogeneous.
- Linden when heated, as most masters know, it releases essential oils that have a pleasant subtle aroma that has a beneficial effect on humans. Linden does not darken even over time. It is often used to decorate washing rooms and steam rooms.
- Larch perfectly tolerates extreme changes in temperature and humidity present in the steam room and washing room. It features a rich color palette and natural shine. If you need to sheathe the ceiling, then edged or tongue-and-groove larch boards are best suited for this. If you choose pine needles for this purpose, then there is a high probability that when heated, resin will be released from it, which, when dripping from the ceiling, will burn the skin.
- Aspen does not rot, is not susceptible to fermentation fungi and mold. This type of wood has a positive effect on health: it relieves discomfort in the joints and headaches. It is most often used to decorate the ceiling in a bathhouse.

Note! Wood for interior cladding cannot be coated with varnishes or paints. Otherwise, when heated, the chemical coatings will evaporate, poisoning the air.
Decoration of walls and ceilings in the steam room
For a steam room, you shouldn’t skimp; here, the finishing of the bath inside should be done from the highest quality wood, because this is where the temperatures and humidity are highest. As a rule, the steam room is upholstered with clapboard. The boards are fastened with hidden nails. Carrying out vapor barrier work on the steam room is necessary to retain steam and heat in this room. This is done using modern materials that are widely available on sale. It can be glassine or foil, and jute and cotton wool are most often used as insulation. It is possible to replace these standard materials with a combined analogue, for example, foamed polypropylene covered with foil. It combines vapor barrier and thermal insulation properties. Another option: foil penofol. With its help, you can seal a room, and the material is convenient and practical for installation.

Note! The lining should not be adjacent to the layer of foil with insulation. There must be an air gap between them. This is usually achieved due to the fact that the lining is mounted on a timber sheathing installed in advance.
The lathing is mounted on the walls parallel to the floor. The distance between the slats is approximately 50 cm. All work must be done level to ensure a perfectly level structure. After the frame is ready, it should be coated with an antiseptic. The lining also needs to be processed, this is done before its installation begins. Laying the lining begins from the corner. Not only nails, but also clamps and staples can be used as fasteners.

The material used for wall decoration is also used for ceiling upholstery. It is worth noting that the maximum temperature is under the ceiling, so the lining for it should be made of rock that contains the least amount of resin. Otherwise, as mentioned above in the article, the dripping resins will burn people. Pine and spruce cannot be used for the steam room. They can be used to upholster a dressing room, for example.
Floor arrangement. Wood or tile?

The temperature at floor level very rarely exceeds 30° C, which means that such floors can remain clay, earthen and concrete. The main thing is to organize a quick outflow of water from the bathhouse. For safety of movement, it is necessary to cover the subfloor with planks, fiber matting, or a safety cork covering. Sanded boards and tiles can also be used for this purpose.
Note! If we compare the properties of tiles and boards, then the first material is, of course, more durable than the second. The tiles are not afraid of high humidity. In addition, a wooden floor will look dirty as it is difficult to clean.

The technology for finishing wood floors is very simple. First, you should lay the logs, and then install the wooden boards. The logs are laid on brick pillars mounted on a concrete or sand base. The size of these logs can be 20x20 or 25x25 cm. The laying step can be close to one meter, because the floor will not be subject to heavy loads. For the floor, edged or tongue-and-groove boards can be used. In order for heat to be retained in the steam room, the flooring in it must be at least 15 cm above the floor level in the washing room. The thickness of the floorboards is approximately 30 cm. Both boards and logs must first be treated with an antiseptic drug, which will prevent proliferation of mold and mildew.
Note! Wooden floors are appropriate in rest rooms and locker rooms. However, it is better to lay tiles in the washing room and steam room, because wood will quickly deteriorate.

To lay tiles, you must first screed the floor. The surface should be as smooth as possible. The tiles are laid with a special glue. Moisture-resistant grout is used to process the seams. This will protect the tiles from mold. However, on such a floor you will still need to put low wooden boards or gratings, which should be taken outside after the bath procedures so that they dry. This is necessary to prevent anyone from slipping. The floor should be made with a slight slope for drainage. In this case, excess moisture will not stagnate.
Finishing the washing room
The modern washing compartment is a shower stall, which is equipped with several shelves for storing small items. To equip the washing room, moisture-resistant finishing materials should be used, for example, tiles, self-leveling flooring and tiles. They are durable and strong. To prevent sauna visitors from slipping on the tiles, rubber mats or wooden slatted stands should be used in the washing room.

If you are one of the admirers of the classic Russian bath, then the washing room can be decorated with wood that has undergone special treatment. The temperatures here are not as high as in a steam room. Therefore, coniferous wood can be used for the washing room and dressing room.
You can carry out the interior finishing yourself, without the help of specialists. After you make the ceilings, floors and walls, you will also need to make furniture for the bath and think about the lighting. And then proceed to the bath procedures, enjoy the ablutions, enjoying the holiday with family and friends. If you have any other thoughts or questions on this topic, please write comments on this article. The specialists working on the site will be able to pay attention to you and answer all your questions.
Video
See how they line the inside of a bathhouse with unedged boards - an inexpensive but nice option:
Photo

![]()


