How to build a shed: choosing a location, materials and layout, installation stages, price comparison. When time is running out: how to quickly make a shed from boards without a foundation with your own hands Options for country sheds
Anyone who has at least once directly dealt with construction issues and delved into all the details knows very well that the stage of erecting the foundation of any structure is the most expensive. But that's not all. In some situations, installing a foundation is either impossible, or undesirable, or unjustified from an economic point of view.
For example, in a small garden plot, where there is a high risk of damage to part of the root system of vegetation and it is difficult to carry out excavation work, given the density of plantings. In such cases, the best option is to erect a temporary lightweight structure directly on the ground. Let's figure out how to make a shed from boards without a foundation in your country house or local area with your own hands.
On many thematic sites, in addition to the advantages of this engineering solution (high speed of construction, reduced costs), significant disadvantages are also noted - the fragility of the structure and the low level of thermal insulation.
The author himself is a summer resident with extensive experience, and categorically disagrees with this. The reasoning is quite clear. Firstly, if the installation is done correctly, the shed will last for many years. Secondly, the quality of insulation is also a controversial issue, since such buildings are intended mainly for storing household equipment and improvised materials, therefore, the microclimate inside them does not play a special role.
And making a bedding under the bottom of the barn, for example, from expanded clay, is not difficult. Well, it’s not difficult to determine how and what exactly to additionally cover the inside of the house to increase the temperature.
How to make a shed is probably not the most important thing that interests the reader. Moreover, the building material has already been determined - board. But “without a foundation” and “with your own hands” is somewhat unusual, although quite simple. This is what the author will focus on, based on personal experience in the construction of such a structure.
All areas are different, and that says it all. But you still have to take something into account.
- The segment of the territory on which the plank shed is supposed to be built should not be at risk of flooding. Since it has no foundation, excessive soil moisture will lead to rapid destruction of the building. Therefore, for construction you should select (if possible) the highest “patch” on the site.
- It is advisable that the barn be exposed to the sun most of the day. In this case, there is a guarantee that even if water accumulates near it, it will quickly evaporate, and the earth will dry out well. And moisture ingress is inevitable, especially if irrigation is done not by soil, but by sprinkling. By the way, many summer residents practice exactly this technique, fortunately, there are many inexpensive plastic “turntables” on sale.
- When choosing a location, you should also take into account the perspective. Summer residents who not only know what crop rotation is, but also practice this growing technology, understand what we are talking about. When changing the order of planting garden crops or redeveloping a plot, the barn should not be a hindrance to the gardener.

How to make a shed base
Still, any building, including a barn, by definition must have one. The reader has two simple options to choose from. High speed of installation and minimum costs for the shed are guaranteed.
Option #1
An often mentioned way to build a shed is on pallets. It is unlikely that such a technology deserves attention, given that such a base (made of wood) will rot quite quickly. With an expectation of 1 - 2 years, this is a good option, but this is more suitable for temporary structures that are installed on sites, for example, by builders and installers. This is not the best solution for the private sector.
Option No. 2
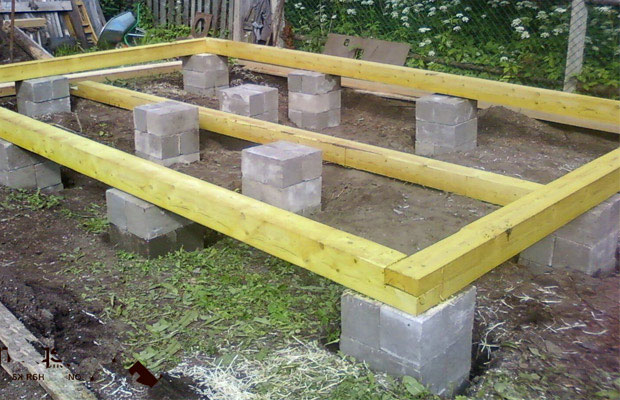
On supports. Someone will object that this is already a columnar type foundation. This is not entirely true - there are similarities, but small. The fundamental difference is in the depth of installation of the supports. For a small-sized wooden shed, they are dug in 50±10 cm. This is quite enough for the base to withstand a not so significant load.

After installing the posts, they are aligned on all planes, securely fixed in place, after which they are tied. The supporting frame is the foundation on which the shed will be built. It turns out that you won’t have to do any excavation work on the site (except for digging 4-6 holes) or preparing concrete mortar in large volumes. In fact, the barn is made without a foundation.
The advantage of this solution is not only the speed of construction of the foundation and the minimal cost of materials. Since timber, that is, wood, is used for strapping, it will not be difficult to install the frame posts on it with your own hands. Yes, and the barn can be slightly raised above the ground, even the structure can be leveled if the site is downhill.
Calculator for calculating the quantity and volume of lumber
What to consider during construction
It is advisable to start work directly when all preparatory measures have been completed. Since the supports (you can use fragments of timber or logs) will be in the ground, you should choose a method for processing them to protect them from rotting. The concept of “do-it-yourself” often implies that the owner makes do with improvised materials and not purchased materials and means.
The author recommends thorough (at least 2 times) impregnation with waste engine oil. Additionally, it is advisable to coat all edges of the blanks used as posts (except for the top cut) with tar (molten, of course). There is virtually no financial investment, and the durability of the foundation is ensured.
A barn built using this technology has been standing on the author’s property for 12 years now. And there are not even indirect signs that repairs need to be done. By the way, the timber used for strapping should also be impregnated with mining.
Procedure for installing the base of the shed
Nothing complicated for those who are familiar with the technology of foundation construction.
- Marking the area for the barn.
- Digging holes. You need to try to ensure that their diameter is only slightly larger than the cross-section of the support.
- Bottom seal. It is advisable to load a little clay (but always oily) into each hole, and then compact this layer. It will protect the hole from penetration of liquid into it from below. Considering that the tree for the supports is coated with tar, this will be enough. The specificity of this method of constructing a shed excludes the possibility of using other insulating materials (film, roofing felt), since they cannot be correctly laid (and straightened) in small holes.
- Next is a layer of river sand or ASG.
- Installation of supports and alignment of each vertically and horizontally.
- Loading small gravel, broken bricks, etc. into the holes, compacting this mass.
- Filling holes with cement mortar. It must be made of a sufficiently liquid consistency so that it penetrates as deeply as possible.

Drawing of a barn made of boards without a foundation
After hardening of the artificial stone obtained in this way, you can tie the posts under the barn, that is, mount the support frame.
This technology is more suitable for areas that are uneven. Or if for some reason the shed needs to be raised higher above the ground.
Option #3
On the "sleepers". If the space allocated for the shed is fairly level, then this is the most convenient way to quickly build a shed. It is used (a log is not suitable in this case), which is laid horizontally. In order to make a small shed, 2 blanks arranged in parallel are enough. Under a larger structure (in width), it is advisable to mount a third one, the location for which is selected in the center.

Timber processing is carried out only by impregnation. Since the products placed on the ground are also the foundation on which the frame of the shed will be erected, the tree should not be coated with tar.
- Tracing the territory consists of marking the contour of the barn along the perimeter and determining the places where it is necessary to dig shallow (10 cm is enough) trenches. Timber will be laid in them.
- Preparation is identical to the method described above - soil compaction, clay, and so on.
- The bottom of each mini-trench is lined with P/E film, since the wood was not protected with tar. It makes no sense to use such a popular waterproofing material among summer residents as roofing felt. Within 3 years it will rot and the fungus will begin to destroy the wood.
- After laying the beam, it should be fixed to prevent horizontal displacement. There are two ways. An easier one is to drive pieces of reinforcement into the sides of the products, at the end parts. If a massive beam is chosen, and the barn is large in size, then 2–3 (depending on the length) through holes are drilled in each workpiece along the center line. Pins are also driven into them.
- The final stage is fastening the timber. All workpieces are connected with staples, metal plates, and corners. That's all - the strength and immobility of the base is ensured.
By the way, it is not necessary to dig trenches. You need to focus on your capabilities and local conditions. It is enough to fill the area with fine gravel, compact this layer well, and then lay the support beam on it.

There are a number of other methods for building a shed without a foundation. What they have in common is the presence of a support frame. The difference is in the columns on which it is installed.
There are also several options - reinforced concrete products, metal supports with plates, bricks and so on. The author did not consider other technologies for only one reason - the complexity of the connections. The supporting frame is made of wood, the posts are made of other materials. You can articulate it with your own hands, but why complicate your life by looking for a hammer drill, concrete drills, large metal drills or anything else.

How to build a shed
No detailed explanations are required for this stage of work. The technology of frame construction has long been known and is described in detail on many sites, in every detail. In principle, the author has nothing to add. The photographs clearly explain everything.
Frame installation
For a light shed, a beam with a side of 10 or even 5 cm (depending on the dimensions) is sufficient. For example, do this.

Installation of trusses (front and rear)
If the front pillars are made higher, then you can do without them. In this case, the roof will be pitched. It's easier to build.

Covering the frame with boards
Do it yourself - nothing complicated.
You just need to take into account that nails often go sideways and can also split the wood. It is better to fix all elements with self-tapping screws or self-tapping screws, with preliminary drilling of the channels.

The reader will determine for himself how to cover the roof and cover the shed outside and inside. You can do this.

If you show your imagination, an originally designed barn will become a real decoration of your summer cottage.
When settling in a summer cottage, the first thing they do is build a utility block from various materials and different sizes. In many cases, this is just a change house or temporary shelter until a permanent structure is built, but some people strive to create amenities almost like in an apartment.
Options for utility room - choose for your needs
Building a utility block with your own hands after purchasing a plot is the next task for its owner. Why do it on your own, because you can buy a change house or order construction? There are several reasons why many people prefer to build themselves. Firstly, the financial issue: after purchasing a plot, not everyone will have the money to purchase a utility unit or pay for construction by contractors.
Secondly, many cabins available for sale often cause dissatisfaction with those who bought them because their service life is too short. And thirdly, if you have construction experience and leftover material, you can build a utility block yourself, not of a standard type, but based on your needs. It will last a long time economically, and the experience gained during its construction will be useful in the future.
Having bought several acres, summer residents strive to immediately build a reliable utility unit for various purposes:
- as housing until the house is built, in order to later remodel it for other needs;
- outbuilding for equipment and other property;
- as a dressing room, pantry, bathroom, summer kitchen;
- as sheds for rabbits, poultry, and livestock.
The utility block is a universal room; everyone can adapt it to their needs. If the owners spend a lot of time working on the land at their summer cottage, then they will think about a rest room, about a bed in it to spend the night. A small compact structure can look like a simple barn or a house from a fairy tale. It all depends on the needs, capabilities, and priorities of the owner.
Materials and projects - what and what to build from
Construction begins with the foundation and ends with the roof. There is no particular choice in materials here. The foundation is made strip or columnar. For tape you need sand, cement, crushed stone or concrete blocks. Columnar is made of brick or stone. Recently, asbestos-cement pipes have been used, which are filled with concrete. The utility block is usually covered with inexpensive material: slate or corrugated sheeting.
The construction of walls often confronts a summer resident with the problem of choosing a material. One should proceed from several factors: cost, labor intensity, thermal protection, if they are going to live in the utility block in the winter. Cheap material will save money, and lightweight material (panels, aerated concrete) will allow you to build a cheaper foundation. Large blocks, panels, sip panels, boards, and corrugated wall sheeting will significantly speed up construction.
To build a utility block, one of the simplest schemes is increasingly used - frame.
Having sorted out the material, we decide on the purpose and, accordingly, the dimensions, and make drawings. The smallest storage shed, which can also serve as a temporary shelter, has dimensions of 3.5 x 2.5 m. If we expect to have a warehouse, a room separated by a partition, or a corner for cooking in the utility unit, we will need dimensions of 4.5 x 3.0 m. In both cases, it is impossible to find a place for a bathroom; you will have to install a toilet and shower in the yard. A 6×3 utility block will allow you to place everything you need for living with minimal amenities.

Frame project 6×3 – how much material is needed
Let's look at how to build a 6x3 m utility block, how much and what material will be needed. We focus on one option, because it is impossible to consider all the diversity. If the dimensions of your frame structure differ, it is easy to calculate the amount of material by increasing or decreasing it.
When starting construction, we make sure to draw a drawing as best we can, and based on it, we draw up a list of materials. You shouldn’t rush into this; it’s better to think it through carefully until you find the ideal option.
You will need bars 100×100 mm:
- for lower and upper frames 6 m long - 6 pieces, three-meter ones - 8;
- for vertical supports – 2.4 m – 11 pieces;
- 2 pieces of 6.6 m each for rafters;
- plus horizontal bars on doors and windows.

Boards needed:
- 20 pieces 25×150 mm for the floor, the same number for the ceiling or replace with another material (plywood, fiberboard, etc.);
- for the sheathing – 7 pcs. 25×100 6 m long;
- for windshields the same 2 pieces, but 3.6 m long;
- for fastening rafters – 50×100×3600 – 6 pieces.
If we are making a metal frame for a building, we focus on the length of the lumber. We calculate the amount of material for the foundation and covering based on the size of the building. If the foundation is strip, you will need quite a lot of sand, cement, and crushed stone. The columnar one will cost much less; for a frame utility block it is a good option.
We begin construction - foundation and lower trim
We make a columnar foundation from asbestos-cement pipes with a diameter of 150 mm. First, we mark the place for the foundation: remove the turf and a layer of earth to the depth of a spade bayonet. Fill it with 10 cm of sand and tamp it down well. At the place where the pipes are installed, we dig holes 1.2 m deep, fill the bottom with sand, and tamp them. We place pipes of the required length into the holes.
Using a building level, we check the verticality, horizontality and correct location around the perimeter of the building. We fix the position by filling the space between the poles and the ground with sand. We fill the pipes inside with concrete or cement-sand mortar. First, fill it to a third of the length, lift it slightly so that the solution goes into the hole and forms a solid base at the bottom. We fill the pipes to the top, compacting the concrete so that cavities do not form. In the center of each pipe we place an anchor to secure the frame frame.
While the foundation takes several weeks to gain strength, we prepare the frame. We make a rectangle from 10x10 cm beams, fastening the corners into half a tree, fixing it with nails and self-tapping screws. To strengthen the frame, we install logs across it inside. We treat the wood for the frame, as well as for the entire structure, with antiseptics or twice hot drying oil. At the top of each column we lay roofing material for waterproofing. Place the frame on the anchors and tap lightly to mark the locations for the holes. We drill holes, install the lower trim on the foundation, securing it with nuts on the anchors.
Continuation of work - erecting a frame, assembling rafters and roofing
We begin assembling the frame from the ends, fastening the building materials to the lower frame using metal corners. To strengthen the fixation, you can install diagonal struts from beams or temporarily fasten them with a board using self-tapping screws. We assemble the front part of the frame, installing the vertical posts, then the rear. The distance between the posts is 1.8 m. We strengthen the frame with diagonal struts made of beams.

Don’t forget about windows and doors, creating openings in the places where they are installed. The size of the doorway is 2x0.85 m. We install crossbars for the windows: the lower horizontal at a height of 80 cm from the frame, the upper - 1 m from the bottom. If we plan to arrange several sections inside, we install partitions. We finally fasten the frame racks at the top with beams.
We make the roof depending on the method of assembling the frame. If the building has front and back sides of different heights, we install rafters on the longitudinal beams of the walls and attach the sheathing to them. If the walls are the same height, we assemble the rafters on the ground, and then install the finished ones on top. We create the necessary slope by raising the front part by 50 cm. But you should keep in mind that one person will not be able to lift them, so if there is no assistant, we assemble them at the top.
We cover the roof, lay the floor, sheathe the walls
Immediately after assembling the frame, we cover the roof. The list of available roofing materials is large, so we make the sheathing for large sheets sparse, and for rolled material - continuous. Before laying the floor, it is advisable to insulate the subfloor: fill the openings between the pillars with any material, fasten them with cement mortar, and fill the inside with expanded clay. We lay the floor from the boards along the joists.
We cover the walls, starting from the front wall, going from bottom to top. The material can be different: boards, lining, siding, corrugated sheets, etc. We insulate with glass wool; it is not advisable to use polystyrene foam - mice adore it. from the inside, we make partitions, install windows, hang doors - the utility block is ready and, undoubtedly, will become a decoration of the land plot.
A barn on a country plot is vital. Otherwise, you will have to store gardening tools and equipment in the house itself. Naturally, this will not contribute to comfortable living. A barn is a simple, lightweight structure. Making it with your own hands is quite possible for most skilled men.
Why do you need a frame shed?
An outbuilding in the form of a barn on a country plot is vital. It is intended for storing gardening and gardening equipment, ranging from a simple shovel or hoe to a walk-behind tractor, watering pump and other expensive equipment. In addition, storing pesticides, fertilizers or a small supply of gasoline in other rooms is simply unsafe.
Thanks to the frame shed, it will be possible to store all garden tools
Advantages of frame construction
The main advantage of a frame structure is its rapid erection and low labor intensity of construction. The benefits are as follows:
- Possibility of using second or third grade lumber.
- Ease of design.
- The ability to quickly move to another place, if provided for by the design of the building. To do this, the support frame is made with a small protrusion and an undercut at an angle of 45 degrees, forming something like runners.
- Fast construction.
If we talk about the shortcomings of structures of this kind, they arise only in connection with design or execution errors.
A frame shed is built quickly and easily
Preparation for construction, design and calculations
Preparation for building a shed consists of the following activities:
- Determining the location. Since this building is intended for storing items and materials needed for use in the garden, the shed should be placed in an area adjacent to the front garden. To save space, it is better to build it closer to the boundary. The rules state that the shed should not be located closer than one meter to the neighboring plot.
- It is better to choose the dimensions of the building in terms of the rational use of materials. So, the optimal size option would be 6x4 meters. In this case, the length corresponds to the dimensions of the standard length of lumber - 6 meters, and the width assumes a two-meter long waste, which can be used for racks on the low (rear) side of the building. For the front part, you can cut the timber in half and take it completely onto the racks.
- Thus, the main dimensions of the barn with a pitched roof, the angle of inclination of which will be about 14 degrees, have been determined. This is an ideal building option in terms of rational use of materials.
- The distance between the frame posts should be no more than one and a half meters. At the extreme openings, jibs must be installed to counteract wind loads. The size of the timber for them should be the same as the size of the supporting support posts. If a beam of 100x100 millimeters is used, then the jib can be made from a beam of 50x100. A total of 8 such parts will be needed.
- The upper frame frame must be made of timber of the same size as the lower one, in our case it is 100x100 mm.
- For rafters, you can use 50x150 mm timber, installed vertically in width.
- External wall cladding should be made from any waterproof sheet material: plywood, OSB boards, plasterboard. A common material for walls is unedged board. The board must be sanded before installation.
Let's look at the supporting structure. The barn does not need a massive foundation. It can be installed on small concrete blocks, using them in the corners and in the middle of the walls. However, in areas with high wind loads, it is better to use screw anchors. This is a miniature version of a screw pile. It is enough to install them at a distance of two meters from each other, the total need for such parts will be 8 pieces.
If you use the frame diagram, you can make a durable shed with your own hands
Preparing the shed installation site
The site for this building is prepared as follows:
- It is necessary to free up space from the fertile layer, which will require removing the soil to a depth of 30 centimeters. Carefully level and compact the surface.
- After this, it is necessary to arrange a drainage layer by pouring sand 12–15 centimeters thick into the recess. Fill the rest with medium grade gravel and compact the entire surface.
Thus, the likelihood of stagnant water under the shed is reduced, which will easily drain through the drainage.
Calculation of material requirements
The amount of materials needed to build a shed can be conveniently calculated in tabular form.
Table: example of calculating materials for building a shed
| Name | Purpose | Quantity (pcs) | Size(cm) | Standard data (pcs/m3) | Notes |
| Anchor | Support structure | 6 | |||
| Pine beam 100x100 Total by type of material: | Bottom strap length Bottom trim width Upper harness by lenght Upper strap width Rear stand Rear stand Front pillar Doorway | 2 2 2 2 4 1 5 1 11 | 600 400 600 400 200 200 300 90s 200 600 | 16,6 | From segments From a segment Total requirement 0.7 cubic meters |
| Beam 100x50 Total by type of material: | Additional sheathing in openings Ukosiny Window openings 60x20 cm | 24 8 2 2 11 | 150 300 160 600 | 33 | Total requirement 0.33 cubic meters |
| The board is not edged Total by type of material: | External cladding overlapping the rear wall Same for the front wall Same for the side walls | 48 48 32 56 | 200 300 300 600 | 28 | Total requirement 2.0 cubic meters |
| Beam 50x150 mm | Translations | 7 | 400 | 22 | Remaining 7 pieces x200 mm Total requirement 0.33 cubic meters |
In addition to the above, you will need a plastic film for moisture protection. With a width of three meters, it requires 20 linear meters for the outer protective layer and the same amount for the inner one. Depending on price indicators, it can be replaced with roofing felt.
The final roof covering is taken for the simplest of financial reasons. Regular slate or fiberglass, galvanized or painted corrugated sheeting will do. When calculating the need, you need to take into account overhangs with a width of 0.3–0.5 meters.
It is better to make the interior decoration from sheet material. Leftovers from finishing the house will also come in handy.
Thermal insulation in an unheated barn room has the opposite meaning. In hot weather, it is important to maintain the temperature from overheating in the sun. In such a situation, without thermal insulation, it will be very uncomfortable to be in it. It is also important to perform high-quality waterproofing of the walls.
A frame shed can also be built on poles
Tools for building a shed
For such a simple structure, the need for tools is small.
Table: Tools for building a shed
Step-by-step instructions for building a frame shed
To build a shed you need to perform a series of sequential steps:
How to make a foundation
To build a shed you do not need a strong foundation. Often it is simply installed on brick stands. This directly depends on the nature of the soil at the location. If the subsoil layer consists of clay or heavy loam, this can lead to significant soil movements, as a result of which the structure can be warped, damaging the walls and jamming the doors. In such a situation, you need a fairly deep foundation, the supporting part of which will be below the freezing level of the soil.
The following types of support bases meet these conditions:
- Pile-screw. Screw piles are screwed into the ground to the required depth, their upper ends must be aligned horizontally along a stretched cord. Then the heads are installed on them to secure the support beam. In addition to the quality of the soil, this choice can be made when building a barn on a slope.
- Columnar. For the device, you need to dig (or drill) holes below the freezing level of the soil. At the bottom, make drainage from sand (12–15 centimeters) and gravel in approximately the same layer, compact the backfill. Reinforcement is made with a frame of steel rods in the amount of 4–6 pieces vertically, fastened with cross members. The reinforcement support must be assembled on the surface and immersed in the pit. Install formwork of the required height on top of the ground. Concrete is poured into the ground. After seven days, the formwork can be removed and work can continue.
It makes no sense to consider other foundation designs. They are heavier and more expensive to construct: strip, grillage and other types of support bases, and they are inappropriate for a structure weighing several hundred kilograms.
Photo gallery: types of lightweight foundations for lightweight buildings
 A columnar foundation with a concrete grillage serves as a reliable support
  Lightweight foundation on piles will withstand loads on unfavorable soils
  A pile-screw foundation with a wooden grillage for installing a shed does not require excavation work
  Strip foundation - a lightweight option for installing a light structure
Frame structure
The base for the shed is ready for further installation when the timber frame is installed and secured over the supports. It should represent a regular rectangle, the diagonals of which are equal to each other. The check is carried out by measuring with a long tape measure or cord.
Frame assembly:
- Installation of floor joists. A timber measuring 50x150 mm is used. The distance between the logs should be 75 cm. Each of them cuts into the strapping beam to a depth of 50 mm. The corresponding insert is also performed. It needs to be secured with a nail in the middle and two corners to the body of the strapping beam.
- Installation of corner posts. Three-meter high racks are installed on the front wall, and two-meter high ones on the rear wall. The distance between them is 1.5 meters. Corner posts are placed vertically with plumb control. They need to be fixed with temporary jibs, check the verticality again and secure them to the harness with two corners and two flat plates each. Fastening is done with self-tapping screws.
- A cord is stretched between the corner posts and the rest are installed at the specified distance along it. Fastening is done with angles and plates.
- Installation of the top trim made of 100x100 mm timber. For inclined beams, the supports are cut with the required slope.
- Installation of transfers for roofing made of 50x150 mm timber. When connecting parts, a cut-in is made on the support beams. The transfers are fastened with screws or M12 studs with wide washers, two screws per joint.
- Jib fastening. They need to be placed from the top of the corner posts to the bottom trim. The material for them is a 50x100 mm block. Fastening is done with self-tapping screws.
- Lathing on the walls. It is made from a 50x100 mm bar. The parts are placed in openings formed by racks at a distance of a meter from each other, parallel to the frames. Fastening is done using flat plates with self-tapping screws.
As an option, you can consider making a shed frame from a profile pipe measuring 60x60x3 mm. The dimensions of the building are the same; the distance from the base of the lower frame to the top should be two meters.
The profile pipe for the frame will ensure long-term operation of the shed
The work is performed in the following order:
- Preparation of parts: racks and sheathing. Metal cutting is done with a grinder. In addition to pipe parts, you need to prepare metal corners that are installed at each pipe connection. The size of a triangular part made of steel 3 mm thick is 200x200 mm.
- The frame is welded by electric welding with angle control. The face welds are cleaned and the reinforcement is removed.
- Before further assembly, the metal frame is treated with a primer and then coated with metal paint.
- With a metal base, sheet materials are used for wall cladding: flat slate, fiberglass, OSB boards or moisture-resistant plywood.
- Moisture protection in this option is necessary. The film is pre-fixed with construction tape.
- Translations and logs are made from the same timber as for a wooden frame.
Video: building a metal frame for a barn
Floor and wall cladding
Further work on a wooden or steel frame is carried out almost identically:
- Wall covering. It can be made using various sheet materials. For economic reasons, we will opt for unedged boards. Before filling the boards onto the posts and sheathing, it is necessary to install a moisture barrier made of 200 micron thick polyethylene film or roofing felt. You can fasten it with a construction stapler to metal brackets.
Unedged boards are perfect for finishing the walls of a barn.
- Cover the back wall with boards in two-meter long sections, that is, three parts each. Fill the first row of boards, on top of which install the second, bridging the gaps. Similarly, sheath the front wall with boards three meters long, as well as the sides of the barn. Trimming the end of the side walls should be done in place after finishing the wall cladding.
- Before laying the roof, install a ceiling covering, which is best made from sheet material. First, make an internal sheathing from a board 25 mm thick, then stretch the moisture protection film, and attach the facing material to it with self-tapping screws.
For the ceiling in a barn it is better to use sheet material
- The ceiling insulation should be covered with any slab or roll material. A popular solution is to use expanded clay with a fraction of 5–10 millimeters. Fill it up between transfers and level it out. Install moisture protection on top, then finish the roof.
- To insulate the walls of the shed, you can lay one layer of insulation from the inside.
- Then sew the support strips along the bottom of the lag plane, and arrange a sheathing of 25 mm thick edged boards on them.
- Install moisture protection.
- Insulate the floor in the same way as the ceiling.
- Lay the floor covering over the joists. First you need to make a subfloor. You can use edged or unedged boards for it. A finishing coating is placed on top of the finished floor. In operating conditions of the barn, it is better to lay the floor with flat slate or cement-bonded particle board.
The subfloor in the barn is made of boards
- The last thing to do is cover the walls from the inside with any sheet material.
Calculation of the need for insulating materials
Thermal insulation of the floor is made with expanded clay. It is advisable to use a fraction of 5–10 millimeters. To insulate walls, it is better to take rolled or slab materials, using leftovers from building a house.
How much expanded clay do you need?
The volume of this bulk material is determined by the area of the backfill and the thickness of the layer. The floor area is: 6 x 4 = 24 square meters, the backfill layer taking into account the layer thickness of 0.1 meters will be 24 x 0.1 = 2.4 cubic meters For the ceiling you will need the following amount: 24 x 1.16 = 28 meters, 2, 4 + 2.8 = 5.2 cubic meters. The coefficient of 1.16 takes into account the angle of inclination of the side walls.
How much slab or roll insulation is needed?
The need for this material is determined by the area of the walls:
- The front wall has an area of 6 x 2 = 12 square meters.
- The total surface of the side walls will be: 4 x 2.5 x 2 = 20 sq. m.
- Front wall area: 3 x 8 = 18 sq. m.
Thus, the total area of insulation for covering the walls will be: 12 + 20 + 18 = 50 sq. m.
Photo gallery: finishing work of the barn
 Sheathing the walls of a barn with planks is inexpensive and lasts a long time.
  Glass wool reliably maintains the temperature in the barn
  Laying OSB boards on the floor is a practical option for a barn
  Material with low thermal conductivity will protect the shed from overheating in the summer
  Plywood is an excellent material for finishing the ceiling in a barn
All wooden parts must be treated with fire-resistant impregnation and antiseptic. Otherwise, the barn will not last long.
Video: building a shed with a pitched roof yourself
The apparent simplicity of construction should not have a relaxing effect on the owner of the site. One way or another, you need to take into account the characteristics of the soil. If the movements lead to the structure being skewed, the door may jam or the window frames may break. And also the slightest inaccuracy or error in the choice of materials for construction will lead to the loss of incurred costs.
The barn is an integral outbuilding on a summer cottage. A well-designed shed can last more than ten years. Plus, you can save big if you build your shed yourself. The first step in order to begin its construction is to draw a future design for the dacha, and specifically indicate the location on it. In most cases, its location will depend on the characteristics of your territory.
Where to build a shed
When choosing a location, keep in mind that the barn will be located in one place for a long time. Therefore, think carefully about where the optimal place for it will be. It is extremely important that it fits harmoniously into the overall landscape of the site. Based on the location of other buildings, for example, a bathhouse, a garage. The choice of location will depend on what material it will be made of and what its external decoration will be. Great freedom is given in this matter. The most important thing is that it can fully meet its main purpose.
From timber

First of all, you need to make a project, because a barn is a small house. You can do it yourself. In the project you indicate the overall size, the material used and its quantity, the presence of a roof and its shape, the presence of partitions, etc.
Next you need to decide on the type of foundation. For such a shed, the foundation can be of different types, since the walls made of logs do not crack. To a greater extent, the choice of foundation type will depend on the availability of groundwater, the depth of freezing, as well as on the basic characteristics of a particular soil.

The most popular type of foundation that most builders choose is a columnar foundation. Why? The reason is very simple. To make it you will need a minimum amount of building materials. Moreover, it is quite possible to make a columnar foundation yourself. To make it, you need sand, crushed stone, cement and reinforcement. The formwork for the base can be made from roofing felt, twisting it into the shape of a pipe. This option will be the cheapest and simplest.

So, now let’s look at the sequence of work on making a columnar foundation for a barn made of timber:
- The first step is to determine the location of the pillars, and first it is important to remove the plant layer of soil; up to 25-30 cm will be enough.
- It is extremely important to have a post at each corner of the shed, with a gap of 1500-3000 mm between them.
- Based on the level of soil freezing, a well is made using a garden drill.
- Afterwards, a sand cushion must be made at the bottom of the pit, with a layer of 200 mm.
- When the well is prepared, previously prepared roofing material is placed into it, which will act as formwork.
- A manufactured frame made of reinforcement is inserted into it. The length of the fittings can be placed 3-4 pieces. All that remains is to make concrete and pour it into the well.
- After complete drying, the columnar foundation is ready.

Before you start building walls, you need to lay the strapping crown. First lay roofing material on the finished columns. Preferably in several layers, this way you will make waterproofing. Afterwards, antiseptic-impregnated beams are laid on them around the entire perimeter. At each corner, the beams are connected using a dowel. Before laying the next row of beams, it is necessary to put insulation, for example, tow or jute.
Note! So that the future barn can be easily sheathed with siding, as well as additionally insulated, the beams must be connected “in a paw” in the corners.
Using dowels, connect the crowns. To do this, several holes are made in each crown every three beams. A 3-4Ø mm “stick” is inserted into the holes made. To prevent cracks from appearing during the shrinkage process, their length may be less than the depth of the drilled hole.

When the height of the walls matches your project, all that remains is to lay the beams and lay the ceiling on them. The roof shape can be pitched. To do this, immediately raise one side of the barn higher than the other. If you want to make an attic or hayloft, then you can make this rise from the base of the roof slab higher.
From corrugated sheets

Construction begins with laying the foundation. Before pouring the foundation, it is necessary to clear the area of fertile soil and go deep to a depth of 500 mm. Then a cushion is made evenly over the entire plane, for example, from gravel and sand. Next, a small layer of crushed stone is poured evenly, which must be compacted. Reinforcement is laid for the connection, and then solid concrete is poured.

After the concrete has dried, the future floor is prepared. To do this, concrete blocks are placed along the entire perimeter. Using a level, make sure that the top points of the blocks are at the same level. Afterwards, a frame is placed on these blocks, which is the base of the floor. When the frame is ready, made of beams, additional crossbars are laid every 300-400 mm. The finished frame must be secured using corners and self-tapping screws. What to make the floor from will be discussed below.
When the base of the floor is ready, you can begin making a frame for installing corrugated sheets. Based on the planned height of the barn, vertical posts are prepared. Also take care of the horizontal bars. They will be needed to give the structure greater rigidity. After the frame is made, the corrugated sheeting begins to be fastened. It is fastened with self-tapping screws. As a rule, you will have an average of six self-tapping screws per square meter. The sheets must be overlapped by 20 cm.
At the initial stage of work, the walls can be insulated from the inside. As for the interior decoration of the walls, it can be made in a variety of styles, this will be discussed further.

Well, the last stage of work is the construction of the roof of the barn. The first thing you need to decide is what kind of it it will be, single-pitch or gable. If it is single-pitch, then this is the easiest and fastest option. But if you want to make an attic space, then it is better to make a gable roof. You can also use corrugated sheeting on the roof. However, unlike walls, it is better to use polyester-coated corrugated sheeting on the roof. This will create additional protection against corrosion, as well as give a more attractive appearance. The sheets are installed on the sheathing using self-tapping screws with a rubber gasket. It is also laid with an overlap of 200 mm. The roof can be insulated if necessary.
From foam blocks

If you want to build a massive and durable shed, then foam block is the ideal option. For such a shed, a strip foundation is best suited.

It is done in 6 stages:
- The first step is to thoroughly clean the surface of the fertile layer. Afterwards the trench is marked. Its width can reach up to 500 mm. It is extremely important to maintain right angles.
- A trench is dug to a depth of one meter.
- Its bottom is filled with sand up to a thickness of 400 mm, and then watered and compacted.
- The next step will be the construction of formwork from boards. Its height should be measured from the ground at approximately 200 mm.
- Using reinforcement and wire, a reinforcement cage is made.
- The entire strip is filled with concrete in one step.
After pouring, the finished foundation is left covered with film for several days so that it dries completely. If the air temperature is too high, water the base moderately with water every day.
After it has completely hardened, you can begin building the walls. Before you start laying foam blocks, a layer of waterproofing is laid on the base of the strip foundation. To build blocks, you can use a cement mixture with sand.
Note! If you use special glue for masonry, the seams will be small and neat.
For dressing, each row is laid with an offset of exactly half the block. It is necessary to start laying from any corner of the barn. A corner block is most often used for this purpose. When building walls, it is important to use a building level. They check the verticality of the walls. If you don’t do this, you will have to spend money to buy building material that can be used to level the walls both outside and inside. To cut blocks, you can use a special hacksaw. Due to the fact that the foam block has the correct geometric shape, as well as the same dimensions, you can build a shed quickly and, most importantly, with high quality.
When the walls are ready, you need to start making the roof. This does not require large investments. You can make a pitched roof by covering it with regular slate. A guide beam is installed along the entire perimeter of the walls. Floor beams 100x150 mm are placed between it, at a distance of one meter.
The rafters are supported by vertical posts. To distribute the load most effectively, the rack can be placed in the middle of the rafters. Overlapping slate is laid on the manufactured frame. The slate is secured with nails. All that remains is finishing work.
Made of brick

As for brick, it is the most popular building material used to build a shed. This is due to the fact that it has many advantages. For example, it is durable, durable, and practical to use.

It should be noted that, both for foam blocks and bricks, a strip foundation would be an ideal option. How to make it was discussed above. Let's consider why such a solid foundation is needed. First of all, it is excellent in cases where the soil is moist. Such a foundation can withstand additional load. For example, you can build an attic space. Moreover, some people decide to simply make a flat roof over the barn, and place a gazebo on it. This will be a great place to relax. There is also the option of installing a fruit dryer or simply making an arch for grapes. All this will be possible thanks to a strip foundation that can withstand heavy loads.
One of the important works is the forcing of walls. To do this, waterproofing is done first. When laying, half a brick of sand-lime brick will be enough. Based on weather conditions, the solution is prepared according to technology.
Note! You should not rush to remove the walls at once. You can remove the walls in three passes. This is done to prevent the wall from floating.
When laying bricks, it is important to do the jointing immediately while the mortar is fresh. During construction, ventilation is immediately installed. This is important, since air will not stagnate inside, and the room will dry well.
When the last row is ready, it is advisable to fill the armored belt. It will securely hold the entire structure around the entire perimeter. Afterwards the roof is installed. As in the case of a shed made of foam blocks, the roof is made in the same way. The only thing is the choice of roofing material, as well as the type of roof. There is a wide variety of roof coverings, the most important thing is to achieve high quality work, namely good water drainage and tightness. This way your shed will last for many years. As for finishing work, this will be discussed further.

Thanks to the developments of technologists and engineers, it is possible to decorate your summer cottage in an original way with all kinds of designs made from prefabricated plastic panels. When assembling them, no special construction skills are required. Their assembly is carried out according to the principle of a children's construction set. Plastic can be used to make a variety of shed sizes and shapes. The most important thing is that you can build it yourself.
This technology is based on a metal frame. As for the walls, floor and roof, they are made of frost-resistant plastic. The roof ridge is made of transparent plastic. Thanks to this, even during the daytime you can work inside it without artificial light. Thanks to the equipped floor, the barn is completely protected from groundwater. Accordingly, it will always be dry, and thanks to well-designed ventilation the air will be fresh. As for the winter season, the entire structure can withstand a lot of snow perfectly.
One of its significant advantages is its assembly time. Even if you have no experience, on average it will take you three hours to assemble the structure. The convenience lies in the fact that a plastic shed can be moved from place to place at any time. Moreover, a plastic shed does not require ongoing repairs. With careful use, the service life can be up to thirty years.

Regardless of the chosen construction method, it is necessary to choose the location of doors and windows in advance. As for the doors, you can buy them ready-made or make them yourself.

To make a door, first take its dimensions. The first step is to assemble the door frame. As for the canvas frame itself, it can be made from 50x50 mm boards, and a board is placed on top of it, the thickness of which can be 100 mm. To prevent them from interfering with opening and closing, make sure that the boards do not protrude beyond the frame. To increase the rigidity of the doors, “Z” shaped strips are placed on the reverse side. Afterwards, the hinges are installed and the canvas is hung on the already installed frame. Afterwards all that remains is to embed the lock and screw on the door handle.
In most cases, a shed is used to store household tools, so you can do without natural lighting. If you want to install windows, then you need to prepare openings for them during the manufacturing process of the walls.
Reliable floor

If your shed has a temporary purpose, then the soil will act as the floor. In some cases, the ground can be evenly covered with boards, having first leveled it.
If you have built a columnar foundation, then boards 100 mm wide are laid on the installed logs. They are nailed to the joists using nails.
Make sure to nail the boards without any gaps, as over time they can dry out and these gaps will form on their own.
If a continuous foundation is made, according to the strip principle, then a waterproofing layer is laid on the surface. Afterwards the logs are laid. At the very end, a wooden board is laid, which is equal to the total floor area.
External and internal finishing

As for the exterior finishing, everything will depend on what material you chose to build the shed. If it is timber, then simply varnish it. If the walls of the barn are made of brick or foam block, then finishing is simply necessary. There are many options. For example, plastering walls along lighthouses. Afterwards, the plaster can be painted, covered with tiles or decorative stone. Some resort to simple solutions that involve the use of plastic panels. A wooden frame is made for them, and then the panels are quickly installed, groove to groove.
Video
If you don’t want to build a shed yourself, then you can buy a change house or utility block for your dacha. You can choose both budget options and expensive cabins with shower and toilet.
No matter how much space there is in a country house, a personal plot cannot do without such a necessary outbuilding as a barn.
If you don’t yet have experience in self-building, but the owner knows how to use tools, he can easily build a shed at his dacha with his own hands, following the instructions.

If the barn will be located next to the house, and it is important that it looks aesthetically pleasing, it is better to use the same materials from which the house is built. To reduce the cost of construction, you can decorate the barn with siding - it can be different, and imitates any materials - wood, brick, stone of different textures.
How to make a shed quickly and inexpensively
Following step-by-step instructions on how to make a shed yourself, you can build it in the shortest possible time, while spending very little money.

One of the simplest, fastest and cheapest options is a frame shed. The frame itself can be made of wood or metal, the outside is sheathed with suitable material, a roof is installed - and the comfortable outbuilding is ready for use.

If the barn is made of wood, then the frame can be made of timber. But it is more convenient, reliable and durable to make a frame from profiled pipes with a rectangular or square cross-section - a profile with a round cross-section is more difficult to join and weld.

There are also ready-made metal frames on sale, which are assembled using self-tapping screws, and at the factory you can order a structure according to your own drawing.

As practice shows, assembly of both metal and wooden sheds usually takes only a few days. The photo shows sheds on frames - what they are like, and how beautifully they can be finished.
What should the foundation be like?
Sheds on frames are lightweight buildings, so the foundation for them is made lightweight. Most often, several posts, screw piles or a concrete block are enough - one or several, depending on the area of the barn.

If the soil on the land plot is complex, the foundation can be a shallow strip foundation made of special monolithic blocks.

A reinforced strip foundation will withstand even bricks and building blocks as walls - the building will be reliable and will not crack on soil that is prone to swelling, since the movement of the structure will occur along with the foundation.

The choice of foundation type depends on the soil on the site, the area of the barn, the material from which it is built, as well as the financial capabilities of the owners of the site. But it’s easier, faster and cheaper to build a shed on a frame without a foundation.
Frame lean-to shed without foundation
Frame sheds can be built without a foundation at all. There are two options. In one case, the racks treated against rotting are buried 60-80 cm, concreted, and then the lower frame is attached to them, on which the floor is laid on the joists. It is worth noting that this method is only suitable for building a small area.

On soils that absorb and drain water well, you can also build a shed without a foundation this way: the area for construction is marked out in such a way that the area on which the shed will stand is 0.5 m wider on each side than the area of the building itself .

The turf is removed from the soil and a sand and gravel backfill is made, which must be thoroughly compacted. A strapping beam is laid on the prepared site, and floor joists treated with an antiseptic are attached to it - the joists will be in direct contact with the ground, so treatment with an antiseptic is required.

As soon as the logs for the future floor are laid on the site, the floor itself is made. It can be made of planks, from sheets of moisture-resistant plywood or from oriented strand board (OSB). In this case, the recommended thickness of materials:

- for boards – 20 mm;
- for plywood and OSB – 13-15 mm.
When the site for the building is ready, you can begin building the shed.
Note!


When building a frame barn with a pitched roof, the roof should be installed correctly - its angle should be such that snow easily rolls off it.

Practice shows that the optimal angle of inclination is achieved when the height of one wall is 3 m, and the opposite one is 2.4 m. It is a good idea to cover the roof with ondulin - this roofing material is also called Euro slate.

Ondulin is much more attractive in appearance than slate, it has a wave-like shape, and its color can be different, this allows you to make the roof of the barn beautiful, cheerful, truly country-like.

Having started assembling the frame, first the racks of each wall are mounted into the floor one by one. If not boards are chosen for cladding, but ready-made slabs - made of wood, metal or other material, the cladding can be installed on the frame of each wall in advance, on the ground, and the wall can be fixed to the floor in finished form. As an option, the walls can be sheathed with OSB 9.5 mm thick.

There is an alternative technology - Balloon. With this method, installation is carried out gradually - corner frame racks are immediately attached to the frame or the blocks themselves as the racks are installed in height. A rope is stretched between them at each new height level, along which the next racks are then placed.
Note!


When constructing window and door openings, it should be taken into account that the load on the frame is greater here, so it is necessary to strengthen the frame in those places where the window and door sashes will be attached. For this purpose, the openings are equipped not only with corner posts, but also with reinforced posts.
Erection of the roof
Since the roof of the barn will be single-pitched, the rafter system is simple: rafter boards, the length of which to provide an overhang (as a rule, it is made 30-50 cm) must be greater than the length of the side of the area intended for the roof, are laid on the edge. For example, if the planned area of the shed is 3 m by 3 m, then the length of the rafter board should be 3.840 m.

The boards are nailed diagonally - two nails on both sides, so that the roof can more reliably withstand loads under snow pressure and strong winds; it can be reinforced with metal corners.

It is necessary to install a sheathing on the roof (100*25 mm is suitable). If the roof is planned to be covered with ondulin, then the optimal lathing pitch recommended by the manufacturer of this roofing material should be 40 cm.

The final step is to cover the roof with the selected material - ondulin, slate or others.

Note!

Completing the construction of the shed
After the walls and roof are erected, windows and doors are installed in the prepared openings.

You can make a small porch at the door or just one or several small steps - depending on the height of the threshold of the barn.

The lining of the shed can be painted to match the roof, or, if it is wooden, leave it a natural color, which will look organic in the dacha by oiling it.

And to make the building look aesthetically pleasing and neat, the foundation should be covered with an asbestos sheet.

Such a barn, if the site on which it is being built has already been prepared, can be erected in just a couple of days. Built with your own hands and taking into account individual needs, it will turn out to be very comfortable and beautiful.

Photo of a do-it-yourself shed


