Electrical wiring in the apartment. Do-it-yourself electrical wiring in an apartment: wiring repair and installation from scratch
Whether you purchased a new apartment in a new building or decided to overhaul an old one in a brick or panel house, all this does not matter, because doing electrical wiring with your own hands is not very difficult. Of course, you will definitely need an understanding of the processes taking place and skills in working with simple tools. Therefore, we suggest that you familiarize yourself with such a process as do-it-yourself electrical wiring in an apartment (step-by-step instructions).
Before we begin to understand the topic of the article, it is necessary to outline some positions, or rather, the differences in the process performed relative to the type of house. Firstly, this concerns the material from which the house is built. This can be brick or ready-made reinforced concrete panels. What's the difference?
The thing is that in the panels of an apartment building at the factory, grooves are placed in which the electrical wires are laid. Even at the construction stage, the wiring diagram is already determined, which is determined by the arrangement of the grooves. That is, manufacturers themselves decide where and how many sockets and switches there should be. Nobody asks the consumer about this.
As for a brick building, a certain wiring diagram for electrical cables is also used here, but hidden wiring is carried out along the brickwork using different fasteners. And all this remains under the plaster layer.
Stages of electrical wiring
Like any installation process associated with construction, electrical wiring is divided into several main stages. The main requirement is to follow the exact sequence of their implementation, taking into account all the nuances regarding the correct calculation of the circuit and cables, plus to do the installation correctly. That is, it is necessary to comply with all the requirements of the step-by-step instructions.

Wiring diagram
Is the wiring diagram in an apartment different from the wiring diagram at home? No, it's no different. All requirements and standards are also taken into account here. What exactly are the requirements:
- All cables are laid only horizontally and vertically. No slanted contours.
- The distance to the ceiling or floor is maximum 10 cm.
- Away from water pipes and heating systems.
- The wiring can be done hidden, open or a combination.
If all this is clear, then move on to the diagram itself. What needs to be done and taken into account first.
- The number of switches and sockets in the rooms, their exact location.
- Number and location of light sources.

Attention! The first soldered (distribution) box will be located in the hallway above the front door. Therefore, you will have to make a niche for it. In order not to make a mistake with the installation location, accurately determine the location where the input cable coming from the distribution panel enters the apartment.
Selecting materials
Now the main task is to select the wires according to their cross-section. The input cable must have a cross-section of 6 mm². It must be copper. Wires with different cross-sections are scattered throughout the rooms, it all depends on the load from electrical appliances and lighting in each room. For example, only one light bulb is installed in the toilet. In the bedroom there is one ceiling lamp or two wall lamps and several household appliances such as a hair dryer, massager (sometimes a vacuum cleaner) and so on, which consume a minimum of electricity.
But the kitchen is the most frequently used room in the apartment. There is the largest number of household appliances here. By the way, it is recommended to connect some of them to a separate cable from the distribution panel. For example, a 2.5 mm² cable is supplied to the dishwasher. Wires with a cross section of 4 mm² are supplied to the kitchen itself. How to calculate the required cable cross-section for each room can be found in another article on our website.

Installation work
So, the circuit is ready, the cables have been selected according to power consumption, and installation can be carried out. Before wiring, it is necessary to draw contours along the walls in each room along which the electrical wires will be laid.
The most difficult wiring is hidden. What is its difficulty? If this concerns a panel house, then you will have to ditch the walls using a grinder. New round niches must be drilled for new sockets and switches. For this, a hammer drill and a working tool – a crown – are used. All dusty work must be done simultaneously. Then you can proceed to laying the wires.
When the installation of an electrical network is carried out in a new brick house, it is usually carried out before plastering work. If in a brick house where repairs are being carried out, that is, without removing the plaster layer, then the technology is exactly the same as in a panel house with gating of the walls. But you shouldn’t go deep into the walls; you just need to make grooves in the plaster up to the brickwork.

As for ceiling wiring, this is the easiest. After all, the ceiling in most cases is a six-hollow slab. So running a cable through it will not be difficult. The main thing is to accurately hit the empty channel with a hammer drill and pull the cable to the installation location of the lamp. If the ceiling will be sheathed with a suspended or tension structure, then the cable can be routed directly along the base ceiling surface in the form of an open route, securing the wires with clamps or other fasteners.
There is an option to conduct the electrical circuit on the floor to the sockets. For this, it is best to use special skirting boards with cable channels. The option is actually very convenient. And not only in terms of installation work, but also in terms of repairs. You can always dismantle the baseboards (this is not difficult), check the wiring for faults and replace the faulty cable with a new one.
Connection of loops
It would seem that it could be simpler than connecting electrical wires together. No one will argue; there is little complicated here. But you will have to take into account some rules that guarantee long-term operation of the entire electrical circuit.
- If twisting is done, the joints must be well insulated. The best option is to close the joint with a plastic cap.
- The ideal connection is using terminals. We won't talk about soldering; it's not the easiest way. Although the most reliable and effective.
- Copper and aluminum conductors must not be connected to each other. If there is no other option, then the ends of the aluminum wire are copper-plated.
- All connections are made only inside junction boxes.
The final stage after connecting all the circuits into a single network is sealing the grooves with a fastening solution (plaster or putty). Installation of sockets and switches is carried out after finishing work.

- As for the wiring diagram, the best option is to break it down into rooms. That is, each room is a separate section with its own load, and, therefore, with its own cable cross-section. This refers to the cable from the first distribution box above the entrance door to the apartment, to the distribution box above the door to the room. Inside the room, wires with a smaller cross-section are scattered among the lamps and sockets, suitable for certain loads that you have planned in advance, based on the number and total power of consumer devices.
- The wiring diagram, as well as installation work, must begin from the farthest room. The last room is the hallway.
- It is necessary to bypass the diagram of concrete structures such as floors above windows and doors. Firstly, this is a monolithic product, which is very difficult to groove. Secondly, God forbid, when installing curtain rods, you stumble upon a cable with a drill. All the work will go down the drain.
- Correctly counting the number of distribution boxes will make it possible to save the length of the cable used.
- The best option is to lay the cable in a corrugated hose, and then put it in grooves.
Distinctive features of the introductory group
I would like to dwell on this in more detail, because the input group (distribution board) can be located both inside the apartment and outside it. So, if in an apartment building there are no more than four apartments on one staircase, then the distribution board is located right here. That is, only the input cable is routed into the apartment itself.
If there are more than four apartments, then usually a shield is installed on the staircase, but each apartment also has its own shield inside. There are types of apartment buildings where the wiring group (power cables) are located inside the apartments, and, therefore, the distribution panel is located right there.

Conclusion on the topic
Do-it-yourself electrical wiring in an apartment without inviting a professional electrician is a real process. Of course, it is not the simplest, but if you understand the stages of its implementation, you can be sure that all the nuances described above will be observed. And this is a guarantee of high network reliability and long-term operation. Nevertheless, it is recommended to place the main emphasis on calculating the power of consumers and choosing the cable cross-section.
Electrical wiring in an apartment is one of the main stages of repair and construction work, which allows for reliable and uninterrupted power supply to the entire room in accordance with the current requirements of PUE, PTB and PTEEP.
Since not only your personal safety, but also the safety of your property depends on the quality of doing the wiring in your apartment yourself, it is better to entrust this service to a highly specialized electrical installation organization with many years of experience. If you think that you can handle this matter on your own, we recommend that you read this article in full, which will describe in detail:
- Type of cable and wire products for each task.
- Recommended distance to sockets and switches from the floor.
- Number of circuit breakers or residual current devices to protect consumers.
- Nuances when chipping walls.
- Method of laying cable and wire products.
- Recommended number of outlets in each room.
- The best manufacturers of electrical products and much, much more.
Where is the best place to start electrical installation work in an apartment?

As a rule, electrical installation in an apartment begins with the planning stage. What does it mean? In order to correctly replace electrical wiring, installing new wires is not enough. It is primarily necessary to determine the installation locations of sockets, switches, household appliances, and so on.
If you do not properly arrange communications, it will be very unpleasant when, after completion of construction or repair and finishing work, some sockets are located behind cabinets or a bed, and switches are located either too high or too low.
Of course in such situations there is a way out! This is connecting extension cords, but a natural question arises - why then was it necessary to replace the electrical wiring if you constantly trip over them?
The first thing you need to do before starting a renovation is to develop a plan or order a design project. In this plan, you need to outline where you plan to place cabinets, sofas, armchairs, beds, cabinets, household appliances, and so on.
Basic Rules for a Good Plan

- All sockets should be located at a height of 30 cm from the finished floor.
- Switches must be located no lower than 90 cm from the floor.
- Sockets above the work surface in the kitchen are located at a height of 80–100 cm from the floor.
- A minimum of 4–5 sockets are required on the work surface to connect household appliances (processors, mixers, blenders, etc.).
- In the kitchen, it is necessary to additionally provide sockets for an extractor hood, refrigerator, washing machine, gas or electric stove, extractor hood, and heated floors (if available).
- In the bathroom, near the mirror, it is recommended to install 2-3 sealed sockets for connecting a hair dryer, electric razor, epilator, and so on.
- Also in the bathroom it is necessary to provide sockets for connecting a boiler, heated floor, washing machine, and water purification filters.
- In places where the TV will be installed (living room, bedroom, children's room, etc.), it is recommended to install 4-5 sockets, 2-3 of which will supply equipment (TV, tuner, game consoles, etc.) 1 will serve to connect the Internet cable "and 1 more for connecting the antenna cable.
- Sockets in the bedroom should be placed 2 on each side of the bed for easy connection of charging a mobile TV or a lamp on the bedside table.
- Also in bedrooms, it is recommended to install sconces with a switch near the outlet on each side of the bed to create convenience when reading books.
- It is better to place the switches on the right side of the door if you are right-handed and on the left if you are left-handed.
And so the plan for arranging sockets and switches was ruined. What to do next? Next we need to select the type of protection.
Selecting the type of protection
According to modern electrical safety requirements, each installation of electrical wiring in an apartment must be done in such a way that each wire in the electrical panel is protected by a separate circuit breaker or RCD (we’ll talk about this a little later). What does it mean? Let's look at a specific example.
An example of calculating protection for a one-room apartment

Let's say you have a wiring diagram for a one-room apartment. According to this diagram:
- In the room: 5 sockets for TV, 4 sockets (2 pieces each) near the bed, 1 switch and 1 air conditioner.
- In the kitchen: 1 electric stove, 1 air conditioner, 4 sockets on the work surface, 1 socket for the hood, 4 sockets for the TV (2 electrical and 2 for the Internet and antenna) and 1 socket for the refrigerator and 1 switch (double-key or single-key).
- In the bathroom: 2 sockets near the washbasin, 1 socket for the washing machine, 1 socket for the boiler, 1 socket (or rather just phase and zero) for the heated floor and 1 switch.
- In the corridor: one socket and 2 pass-through switches.
According to the requirements of DBN and PTEEP, each cable must have its own protection using RCDs (sometimes they are replaced by circuit breakers). Based on these standards, the following number of RCDs (AV) must be installed in the electrical panel:
- In the room: 2 16 A RCDs, one of which will protect the air conditioner, the second a socket group and one 10 A circuit breaker to protect the lighting circuits.
- In the kitchen: one 16–32 A RCD (depending on the consumer’s power) to protect the electric stove and oven, one 16 A RCD for the socket group, one 10 A circuit breaker for the lighting circuits.
- In the bathroom: one RCD for a washing machine, one RCD for a boiler, one RCD for a socket group, one RCD for a heated floor, one AV for lighting circuits.
- In the corridor: one RCD for a socket group and 1 AV for lighting circuits.
Based on the above calculations, we will need an electrical panel for 24 modules, 20 of which will be occupied by an RCD and 4 AV lighting (if the input circuit breaker will be installed in a switchboard on a flight of stairs and overvoltage protection will not be installed in the electrical panel (Barrier, ZUBR, etc. If the input AV and surge protection are installed in this panel, then it should have 36 modules (7 modules will be backup).
What is the difference between RCD (residual current device) and AV (circuit breaker)

The main difference between these devices is the method of operation. What does it mean? In order not to consider in detail the operating principle and characteristics of each device, I would like to say one thing: circuit breakers are triggered only in the event of a short circuit in the controlled section of the electrical wiring, and RCDs are triggered when the insulation of the wires is broken or a leakage current occurs on the metal body of various household equipment.
To make it more clear, a residual current device serves to protect a person from electric shock, and AVs simply protect household equipment.
Why is it worth connecting your washing machine and boiler to a separate RCD?
Since the main consumer of electricity in both the boiler and the washing machine is the electric heating element, which is in contact with water, sooner or later it will break through to the housing, and if it is not powered from a separate RCD, then the light will go out in the entire apartment.
Selection of cable and wire products

According to the requirements of regulatory documentation DBN, PTEEP, PUE and PTB:
- To power power outlet groups, a boiler, a washing machine, an air conditioner, and hoods, it is necessary to install a VVGng 3x2.5 mm cable or a PVSng 3x2.5 mm cable.
- To connect an electric stove and oven, you need a VVGng 3x4 mm cable or a PVSng 3x4 mm cable.
- For lighting circuits, VVGng 3x1.5 mm or PVSng 3x1.5 mm will be sufficient.
- If you are replacing the wiring in a Khrushchev building, the input cable from the power electrical panel on the flight of stairs to the electrical distribution panel of the apartment should be made with a VVGng (PVSng) 3x4 cable, provided that you do not have an electric stove, or with a VVGng (PVSng) 3x6 cable if it is installed in the kitchen oven or electric stove.
What is the difference between PVSng and VVGng

The only difference between these brands is the method of execution. The VVGng cable (for example, 3x2.5 mm) consists of 3 monolithic cores with a cross-section of 2.5 mm, and the PVS cable consists of 3 cores that are woven from many small copper wires.
What does the “ng” marking in the cable name mean?
The addition “ng” means that the cable does not support combustion. Thus, if a short circuit occurs in the electrical wiring, it will go out on its own, thereby protecting your apartment from fire.
How to install cable and wire products (electrical cables)

- If a short circuit occurs in the electrical wiring, you can replace the damaged cable without dismantling the finish, since it will be easy to remove the cable from the corrugation and replace it with a new one.
- If the electrical wiring in the apartment is made in corrugation, then the cable has additional protection, and even if your neighbors flood you, the electrical wiring will remain undamaged since the corrugation is sealed.
- When pulling the cable through the metal profiles on which the drywall is attached, only the corrugation may be damaged, and the protective sheath of the cable will remain undamaged.
How to unplug electrical wiring in separate rooms

Let's look at an example of doing electrical wiring in an apartment with your own hands. Let's say you have already assembled an electrical panel and ran cables from it to the rooms. However, what to do next if 2 or 3 cables come into the room (lighting, sockets and air conditioning), and 3-6 cables come out of the sockets (depending on the number of sockets)?
To do this, it is necessary to install a distribution box. In this electrical product, all cables are connected to each other using welding, soldering or special clamps (for example, WAGO).

Important! If you connect a socket group, then according to the marking and correct switching in the electrical cabinet, the brown wire is the phase, the blue wire is the common zero and the green and yellow wire is the ground.
What is prohibited to do when replacing electrical wiring in an apartment
- Connect wires outside the distribution wiring.
- Connect the wires using twists (since over time the contact in the twists will deteriorate and a fire may occur).
- Break the seals off the electricity meter (if it is installed inside the apartment).
- Chaining walls in panel houses. It is allowed to make only vertical grooves in the plaster layer or to lay electrical wiring in a corrugation behind a false plasterboard wall.
- Carry out electrical wiring repairs in the apartment using a truncated cable (TU marking). For example, if on a cable with the TU brand it is written that the cable cross-section is 3x2.5 mm, then in reality it can be in the range of 1.5–1.8 mm.
- Install cable and wire products closer than 10–15 cm to window and door openings.
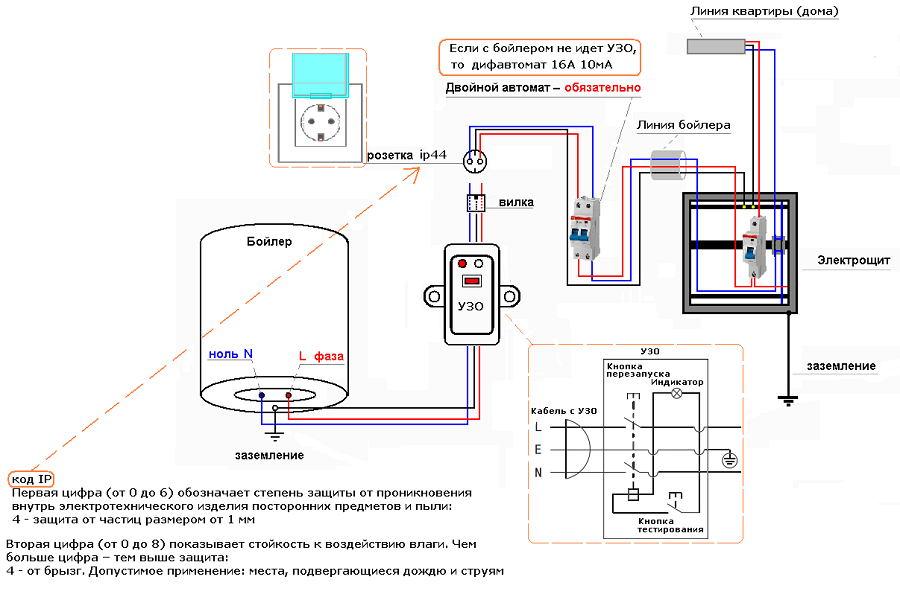
- Use non-waterproof equipment in bathrooms. For installation in bathrooms, the degree of protection of sockets must be at least IP54.
- Install electrical wiring near gas or water supply pipes.
- Connect to AB 16 A a cable with a cross-section of less than 2.5 mm², since the cable will heat up and lose insulation, and the circuit breaker will not work.
- Make horizontal grooves.
- Connect equipment directly without any protection (AV, RCD, etc.).
- Violate the integrity of the load-bearing wall structure.
conclusions
Replacing electrical wiring in a Khrushchev house is a responsible process that requires certain skills and knowledge, since the safety of not only you and your family, but also all household equipment and fixtures depends on the quality of its implementation. And if you want the electrical wiring in a one-room apartment to last at least 20–25 years, then it is better to entrust this matter to proven electrical installation organizations.
Video on the topic
A modern apartment contains a large number of various electronics and household appliances. At the same time, the power consumption of individual electrical equipment varies significantly. The condition of the electrical network is unsatisfactory not only in houses of old construction, but also in more modern ones, since it does not have time to fully cope with the influx of new electrical appliances. You should always have a power supply diagram at hand in each room of the apartment, and with the new purchase of household appliances, you should evaluate the change in load. Electrical wiring is combined with repairs, since construction work is required here.
Laying electrical wiring in an apartment during renovation
Rules for installing electrical wiring
High-quality electrical wiring can be done if you adhere to the following rules:
- It is necessary to create a new power supply project for a house or apartment. There should be a wiring diagram and a list of necessary materials. The locations for the input of the supply wire from the network, the installation of the panel, distribution boxes, sockets, switches, lamps, and electrical appliances are determined. After this, it will be possible to make load calculations and select conductor cross-sections.
- Wiring is predominantly carried out with a cable with copper cores. The cheapest is VVG, with a non-flammable shell VVNng, with reduced gas and smoke emissions - VVGng-LS. The following are used indoors: VVGng(LS)-3x6 (3 cores with a cross-section of 6 mm2) - for wiring in cable ducts; VVGng-3x2.5 – hidden wiring through distribution boxes and sockets; VVGng-3x1.5 – wiring to switches and lamps; PVS-3x2.5 – flexible wire for connecting electrical appliances. Each product has its own standards that reflect technical characteristics.

Types of cables for electrical wiring in an apartment
- Automatic switches: 25 A – for powerful electrical appliances, 20 A – for sockets, 16 A – lighting switching.
- Separate lines should be laid to the following equipment: stationary powerful consumers (stove, washing machine and dishwasher, titanium), lines for sockets, lines for lighting.
- The main electrical panel is installed near the network cable input, in an accessible and convenient place for maintenance.
- Switches are located at a height of 0.8 to 1.5 m near the doors, which should not overlap or touch them. Sockets are installed at a height of 0.3 to 1 m, for reasons of ease of connection, in accordance with the interior and safety requirements. The norm is one socket per 6 m2. Their number in a room depends on its type (the maximum number in the kitchen is 5 or more). Electrical fittings are placed taking into account the future location of furniture and electrical appliances.
- Sockets are located at a distance of at least 50 cm from metal products: pipes, radiators, sinks.
- Installing an outlet in a bathroom is permitted, but under certain conditions. Connection is possible only through a separate RCD with a response current of no more than 30 mA or an isolation transformer (possible together). It is recommended to make it hidden, with a connection through a grounding contact and without a distribution box. In addition, all conductive elements of the bathroom are grounded, and the socket is installed at a distance of at least 60 cm from them and at a height of at least 130 cm.
- Wiring is laid strictly in vertical or horizontal boxes or closed channels. In the screed along the attic and interfloor ceilings, cables can be laid over the shortest distances.
- The wiring should fit snugly against the base of the groove to make it easier to plaster. A single wire is attached after 0.9 m, and a bundle of wires - after 0.5 m. The distance of horizontal cable routes from the ceiling and floor is 15-20 cm. The distance from openings and corners should be at least 10 cm.
- Crossing wires should be avoided. If this cannot be done, a distance of at least 3 mm is maintained between them.
- It is recommended to lay hidden wiring in pipes or corrugations so that they can be replaced if necessary.
- Branching is done through distribution boxes. The ends of the wires are connected using the following methods: soldering, crimping, through lugs or terminals. The reliability of the insulation of connections should be no worse than that of entire cable cores.
The connection of copper and aluminum wires is made through a special terminal block.
- During wiring work, the electricity in the room is turned off.
Preparation of materials
The required number of cables, wires, pipes and cable ducts, switches, sockets, distribution and mounting boxes, and fastening elements are selected. The main tools you will need are a hammer drill and bits for cutting sockets for fittings, a screwdriver and a set of tools for installation.
Electrical wiring methods
There are only two ways to install electrical wiring in a room: open and closed. When choosing them, you need to know the features of each, as well as the advantages and disadvantages.
When the installation of hidden wiring is completed, there is no access to it. It can be under a layer of plaster or any other wall and ceiling finishing materials, most often under plasterboard sheets. Its main advantage is that it is invisible and does not spoil the interior. The disadvantage is the inability to access, as well as the complexity of preparation and installation.
Open wiring can be laid on the surface of the wall and ceiling. There is always access to it. Usually it is in plastic boxes that do not support combustion. The advantages here are the following: the ability to carry out repairs and replacements; there is no need to chisel the walls and then seal them. The picture below shows exposed electrical wiring in a wooden house, where the cables are laid in pipes coming out of the distribution panel.

Open electrical wiring in a wooden house
The inconvenience of repairing hidden wiring can be neglected if it is correctly selected and installed, after which it can serve for decades. In addition, there are niches in the concrete walls for its installation, through which it can be replaced if they are not clogged with debris.
Hidden
The installation method is dirty and labor-intensive due to the need to cut grooves in the walls and ceiling, as well as dismantle the floor covering. Therefore, it is combined with a major overhaul. If you have to use old channels, they also need to be freed from plaster.
For any installation method, a wiring diagram is drawn up.
Open
Open wiring is done when there is no other option. Its laying is done in boxes, cable ducts or attached to the walls or ceiling with clips. In most cases, the wiring looks unaesthetic.
Skirting boards with a built-in cable channel are popular. The wires can be hidden without harming the interior, but their number is limited due to the small size of the baseboard. Now baseboards have begun to appear that allow you to accommodate more wires and cables.

When manufactured well, retro wiring looks impressive in the form of twisted bundles attached to insulators. The method can be used in any room, including wood.
Installation instructions
The sequence of cable routing throughout the apartment is as follows:
- drawing up a diagram, calculating the sections of cores depending on the power of the loads and the amount of materials, choosing protective devices;
- marking walls and cutting channels and recesses for distribution boxes, sockets and switches;
- installation of an electrical panel, laying cables from the panel to the loads;
- installation of electrical fittings, installation of electrical devices in the panel.
Drawing up a diagram
The diagram is drawn on the apartment plan, where the placement of wiring and electrical equipment is noted.

Electrical wiring diagram in a two-room apartment
The diagram is required for the following reasons:
- wiring changes or improves during any repair if it is done efficiently;
- if you don’t do everything according to the plan, it’s difficult to change anything in the future;
- effective renovation involves changing the interior, where electricity plays an important role.
The main indicator of correct electrical wiring is the absence of carriers and power adapters on the floor.
The correct placement of sockets and switches in the room depends on the arrangement of furniture. Access to them must be ensured and efforts should be made to place them at different ends of the room. The exception is the kitchen, where up to four sockets are located near the desktop, and the office, where connecting electronic equipment in one place is required. A double socket is needed near the TV so that you can connect various set-top boxes.
The diagram shown in the kitchen shows only 2 sockets. Here you need at least five of them. The figure below shows a block of sockets with switches for a kitchen workbench.

Socket block in the kitchen
The more carefully the work is done to improve the wiring diagram, the fewer problems there will be in the future.
The choice of cables has already been mentioned earlier. The examples given refer to a typical apartment. Therefore, a more accurate calculation of the cross-section of cores and wires for the actual conditions of their operation would not hurt. You just need to leave a power reserve in case you purchase new electrical appliances in the future.
Preparing the site
The depth and width of the channel for the cables must be sufficient so that the wiring is placed under them and is also covered with a layer of plaster at least 10 mm thick.
For sockets, switches and distribution boxes, you need to make recesses up to 50 mm in selected places using a hammer drill and a crown.
It is prohibited to make horizontal grooves in load-bearing walls, as this reduces their strength.
It is advisable to use the following spaces in house structures for cables:
- Longitudinal voids in interfloor slabs. It is especially convenient to use free space for lighting.
- Laying wiring in the floor screed or under the floor covering. Here you need a corrugated sleeve for each cable or wire.
- On walls made of flammable material, the wiring can be laid in corrugations, but it is better to do this in plastic or steel grounded pipes under sheathing made of sheets of plasterboard (gypsum plasterboard), plywood, SML or gypsum fiber board.
- For complex cable routing under ceilings, the possibilities of a suspended ceiling (stretch, gypsum plasterboard or combined) are often used. It reliably hides all highways.
- The free space between the boards of a wooden ceiling or floor. There is usually insulation there, but there is enough space for wiring in the pipe.
- Free spaces of hollow partitions and structures. They are sheets of sheathing attached to a metal or wooden frame. The wiring in the corrugated pipe is fixed to the sheathing.
Cable routing
The wiring is secured in hollowed-out grooves with plastic clips. The fittings are inserted into the recesses and secured with alabaster mortar. If there is an external laying, cable channels are installed for it. The ends of the wires are connected according to the diagram.
The distribution panel must provide power distribution throughout the apartment, protect it from short circuits and overloads, and protect people from electric shock. The figure below shows an apartment panel with a meter on top and circuit breakers on the bottom.

Switchboard in the apartment
It is better to choose a built-in shield design and place it in a convenient niche with a suitable size. Its dimensions must first be estimated based on the amount of equipment it can accommodate, leaving a reserve for the next connections.
The external cable is connected by electrical service specialists, and the electricity meter is connected by representatives of the energy supply company.
Socket boxes and distribution boxes are installed on the solution in prepared recesses and holes. Then the ends of the cable cores are taken out of them and connected to sockets, which are then installed in place and secured using spacer tabs or threaded connections.

Installation of sockets in a socket box
Lighting in each room is distributed evenly. It is especially important to do this when using spotlights. They are used for suspended ceilings, behind which you can hide all the wiring.
The chandelier in the room is hung in the middle. Now it requires a ground wire.
Wiring installation. Video
This video talks about the specifics of an electrician’s work when it comes to laying apartment wiring.
Any repair will be of poor quality if it does not include work to improve the electrical wiring. You can do the work yourself if you follow all the rules for installing electrical wiring - from drawing up a diagram to the final connection.
connecting AV and RCD in the apartment
The distribution board itself is connected to the electricity meter. The supply of current to a one-room apartment is carried out from an electrical panel, which is located on the landing. An apartment AV and an apartment RCD are also installed in front of the meter. Their technical characteristics should depend on the total power of electrical appliances that will be used in the apartment.
However, there is one caveat. It may be that you have placed in a one-room apartment so many devices, the power of which can be 6-8 kilowatts. It is logical that apartment AVs and RCDs should be designed for at least 37 amperes (8000 watts / 220 volts = 36.36 amperes).
However, the installation of such AVs and RCDs is impractical. The reason for this is that most homes have old electrical wiring. This means that 20-30 years ago, 1.3-2 kilowatts were allocated per apartment, not 8. It is clear that if you turn on devices with higher power in the apartment, you will be turned off by the electrical panel, which is located in the entrance.
As professional electricians note, in most cases, the maximum load on home wiring with appliances from one apartment can be 4.3 kilowatts. House wiring can still withstand such power.
Accordingly, this figure is the main one when making all calculations and selecting an apartment circuit breaker, an RCD, as well as an input wire.
In cases where the power of the switched on devices is more than 4.3 kilowatts, you will have to turn off some of them yourself. Otherwise, the main circuit breaker will turn off the entire apartment.
As a result, the apartment AB should be designed for 25-32 amperes. The number of amperes depends on the area of the one-room apartment. For small apartments, you can take a 25 amp AB. In this case, the current reserve should be taken into account, which should range from 1.3 to 1.5. The apartment RCD must be rated at 50A 30μA.

Table 1. Dependence of cable cross-section on the power of electrical appliances
As for the input cable that will connect the floor and apartment distribution boards, it should also be selected depending on the total power of electrical appliances. When you know this figure, then by looking at the table below, you can determine the cross-section of the input cable.
Helpful advice: this plate should also be used to determine the cross-section of all cables that will be used to create a separate branch of electrical wiring in a one-room apartment. Of course, for this you need to calculate the power of devices that will be powered from one circuit.
In most cases, the input cable for a one-room apartment should have a cross-section of 4 to 6 square meters. millimeters. Of course, it must be copper and three-core.
Laying wires in the living room
In Fig. 2 it is noted that the lighting of the corridor and living room is created using two different contours. In practice, you can make sure that the corridor and living room are illuminated from the same circuit. A general chandelier or spotlights, as well as lamps in the corridor, are unlikely to have a power greater than two kilowatts.
Of course, to follow this advice, the junction box should be installed on the wall at the entrance to the living room. Further from the box, you can route the cables to the lamps in the hallway and in the living room.
In this case, the wires to the chandelier and the switch in the living room will need to be laid through a hole in the wall. The cross-section of the cable that will be used for the circuit for lamps can be 1.5 square meters. millimeter. The circuit breaker current rating for this circuit should be ten amps.
The contours for lamps in the bathroom and kitchen should be the same. In principle, one circuit can be laid for the lamps of these two rooms.
In Fig. 2 you can see that there are branches to which the sockets are connected to the living room, kitchen and bathroom.
Each such branch must be equipped with a 25 ampere circuit breaker and a 30 A 30 µA RCD. Our scheme involves installing two double sockets in the living room.
Helpful tip: you can determine the location of the sockets yourself. However, they must be located behind electrical appliances. Therefore, before designing the placement of sockets, it is worth designing the location of electrical appliances, as well as furniture. The sockets themselves should be located at a height of 30 centimeters from the floor and 15 centimeters from the corner of the wall.
The number of sockets directly depends on the number of electrical appliances. At the same time, there is also a rule that states that there should be one outlet for every six square meters. In the case of a bath and kitchen, there should be two sockets in this area.
The branch of the socket group must be created using a copper cable, the cross-section of which is not less than 2.5 square meters. millimeters. Of course, the cross section can also be determined using the table. 1. In this case, you need to know the maximum power of electrical devices.
The wiring diagram presented above for a one-room apartment (Fig. 2) does not take into account the use of an air conditioner in the living room. The air conditioner needs a separate circuit. To create it you need to use:
- cable with a cross section of 2.5 sq. millimeter;
- AB 16 ampere;
- RCD rated at 20A 30μA.
The socket of this branch should be located near the air conditioner.
To summarize, we can say that three circuits must be laid in the living space of a one-room apartment.
Wiring in the kitchen
In the kitchen there are usually several separate circuits. One for lighting, one for sockets (this circuit is carried out with a 2x2.5mm cable) and one for each of the devices:
- electric hob;
- electric stove;
- instantaneous water heater;
Each of these circuits is connected separately with a 4 mm cable to a 16A circuit breaker.
A group of three or four sockets of this circuit must be mounted behind the lower cabinet, which is located under the countertop. All kitchen appliances will still be connected to these outlets. At the same time, the remaining sockets must be placed in other places, or rather, where the refrigerator and other large devices will be located.
If you use an electric stove in a one-room apartment, you should install another wiring branch. Its features depend on the specific characteristics of the slab itself.
We mentioned the kitchen lighting circuit above.
Wiring in the bathroom
It remains to consider the wiring diagram in the bathroom of a one-room apartment. This room is special and the most dangerous. Therefore, the wiring here is laid in compliance with strict requirements. Two circuits can be output to this room: for a lamp and for electrical appliances.
As for the branch for the lamp, it is the same as in other rooms. The exception is the location of the switch. It should be placed outside the bathroom.

The switch should be outside the bathroom
An outlet circuit can only be installed if it has an RCD or distribution transformer. Of course, each outlet must have a housing that is protected from moisture. Although the picture shows only one outlet, three are usually required. The requirements for the cable and parameters of the RCD, AV are the same as for the components of the circuit of the socket group in the kitchen.
Where should I mount each branch?
It is worth noting that the wiring diagram of a one-room apartment determines not only the number and location of sockets, lamps, switches, but also determines the cable routes. There are some nuances here. They depend on what kind of house the one-room apartment is located in, and what kind of decoration each room will have.
If the owners install a suspended ceiling and finish the walls with plasterboard, then the routes can be arbitrary. The main thing is that the cables are placed only horizontally and vertically, and do not cross. In this case, the electrical wires will be hidden behind the drywall.
If the house is panel, then the electrical wiring will have to be installed either in the floor, or in special channels, or in the space that is located at the junction of the ceiling and wall. As you know, in the horizontal direction.
Therefore, horizontal wiring will be placed in the places mentioned above. Vertical can be carried out in grooves (such grooves can be made).
In a brick house, you can lay the cable in the shortest possible way, since the wiring can be hidden either under the plaster or in grooves. Depending on these features, the routes of each branch are designated. Next, take a meter and measure the required number of electrical wires.
Wiring Tools
So, we know how to select each element of electrical wiring, as well as how and where to place them. Now let's look at what tools you need to have to install these elements.
Tools must be presented:
- A hammer drill with a set of drills and chisels for concrete and brick (depending on the house).
- Drill.
- A grinder or wall cutters with a diamond disc (for creating grooves in a brick house).
- Multimeter tester.
- Phase indicator indicator.
- A set of screwdrivers and wrenches.
- With pliers.
- Side cutters.
- With a mounting knife.
- Construction level.
- With a spatula.
Knowing the basic principles of electrical work, you can do the electrical wiring in your home yourself and save a fair amount of money. The basis for all subsequent types of construction work, after the construction of walls and roofs, or before major repairs, is the correct installation of electrical wiring. I will try to talk about the most basic principles of electrical installation.
Moreover, it is not difficult to do it yourself, but for this you need to have the necessary knowledge and equipment. The equipment can be bought, but we will try to tell you about the necessary knowledge in a popular way.
How to make electrical wiring?
1. Wiring diagram.
In most cases, the electrical wiring diagram is drawn up arbitrarily by the owner of the construction, in other words, out of the blue. And, as a rule, when the craftsmen who came to do this work are standing over his head.
The diagram looks like this: Using chalk or a piece of brick, draw the locations of sockets and switches on the walls. Switches are near the doors, and sockets are in the corners of the rooms. Are you familiar with this situation?

After the completion of construction work, the sockets end up behind the furniture, and the switches behind the open door, which, you see, is not very convenient.
The quality of the electrical wiring diagram can be judged by the number of electrical extension cords and tees used in housing after completion of construction work.
Therefore, the electrical wiring diagram, indicating the location of sockets, switches and junction boxes, must be prepared in advance. You also need to calculate the required load, wire cross-section, and divide consumers into groups.

There must be at least two groups of consumers, that is, two circuits. One is lighting and the other is sockets. It is better if each room in the house has such two circuits separately. In addition, each powerful electrical appliance - oven, electric stove or boiler must have a separate connection with its own automatic machine.
It is imperative to coordinate this scheme with the location of heating, water supply and gas pipes in the premises, the future arrangement of furniture and the location of stationary household electrical appliances. It is forbidden to place the socket closer than 50 cm from various pipes, radiators and sinks.
The socket can be located at the height from the floor that suits you best. In most cases, this is 30-40 cm from the floor. But be sure to take into account the thickness of the screed and the future floor covering.
If you are in doubt about whether to install an outlet here or not, do so. It’s better to have an extra outlet than not have one in the right place. After all, the arrangement of furniture in the apartment can change at any time.
And now about the requirements for switches. The switch should be located at a distance of 90-95 cm from the floor and 15 cm from the doorway, near the door to the room, and always on the side of the door handle.
The location of the switches should be such that it is clear which switch is responsible for which lighting circuit.
In the off position, the upper part of the switch should protrude, and in the on position, the lower part.
Two single-key switches will always be better than one two-key switch. But this requirement does not apply to chandelier switches.
The distribution board should be located in an accessible, dry place, preferably near the front door, at a height of no more than 70 meters from the floor. Under no circumstances should it be in the bathroom or pantry, especially not in the wardrobe. There should be no sanitary connections near it. All live parts in it must be covered.
2. Wire selection.
The wire must have cores with different insulation colors. Therefore, you need to take all the wire from one manufacturer with the same color range of cores.
For wiring, it is best to use solid copper wire, grade VVG - flat, double insulated. It is better with the letters NG, which means non-flammable. Be sure to buy wire marked by trusted and well-known manufacturers. When purchasing, ask for a quality certificate from the seller. Do not take an unmarked wire of unknown origin, even if it is much cheaper. Wiring in a house is done for more than one year and you can’t save money here.
Do not use aluminum wire. With the same cross-section, copper wire can withstand 1.5 times more power than aluminum wire. And with the current filling of the home with various household appliances, this is very important. In addition, copper wire is more durable, stronger, and less susceptible to corrosion than aluminum.
Now attention. For capital wiring, you cannot use stranded soft wire of the PVS brands (like this one - it’s double insulated, round) and ShVVP (like this one) - they are used mainly only for extension cords. Such a wire has a higher resistance and lower electrical conductivity than a single-core wire, so it heats up more when loaded. Although it is soft and easy to install when making wiring.
Do not use wires of different brands and from different metals to install electrical wiring in an apartment or house.
Now attention. Remember one of the basic rules for selecting wire cross-section. To prevent the wire from heating up, one square or 1 mm2 of the wire cross-section must carry a total current of no more than 9 amperes, that is, such a cable can connect devices with a power of no more than 2 kilowatts.
Based on this, the following cable with a cross-section of one core should be used in combination with the appropriate circuit breakers:

One more thing. If you plan to install sockets with grounding, and you have a properly equipped grounding circuit, then you need to use a three-core copper cable for the sockets. Modern rules for organizing electrical wiring require the installation of sockets only with grounding.
But do not install sockets with grounding if the wiring is two-wire, without a grounding wire! This can be confusing for the consumer. He may think that the outlet is protected by grounding and will pay bitterly for this.
3. Selection of equipment.
When purchasing sockets and switches, pay attention to their quality and the presence of markings on the withstand power. Don't buy very cheap or very expensive ones. Take the average price category. In my opinion, the difference in price does not cover the difference in quality.

Buy installation boxes (socket boxes) for them of the appropriate size and quality. All imported sockets and switches are designed for European standard installation boxes with a diameter of 68 mm.

If you plan to make a panel strip of sockets and switches, then the socket boxes should have special protrusions on the sides to connect them together, at a certain distance.

Buy circuit breakers and other switchboard equipment only from well-known and trusted brands. There is no point in saving money here.
4. Installation of electrical wiring. Wire routing.
In houses with wooden walls, the wiring is done externally. If you need to do it internally, then only in a metal pipe. Sockets, switches and distribution boxes in a wooden house can only be installed externally. If it is necessary to install internal ones, then only in special installation boxes for wooden structures. All wire connections must be located outside the walls only.
In a brick house, wiring can be both internal and external. Near flammable structures made of plastic or wood, a metal cable channel is used to protect the wire. To protect the wire inside the walls, a plastic corrugation is used, and on the finished walls, a plastic box is used outside.

For internal wiring, two methods are used. The first, under the plaster - on top of the walls, and the second, with cutting out grooves - grooves in the wall where the wiring is placed. To avoid damage to the wire during further work, the wire must be completely recessed into the recess of the groove, without protrusions. To cut grooves, various equipment is used - from a grinder with a diamond blade to a hammer drill and a special wall cutter.

It is especially important that according to existing standards, the wire should be laid only vertically and horizontally, and only at right angles. It cannot be laid haphazardly throughout the room. Vertical sections of wires should not pass closer than 10 cm to the corners of the room, as well as window and door openings.

The wires are not laid in a bundle (they cannot be tied together), but each separately, with a distance of at least 3 mm between them. Because in a bundle of wires there is less ability to transfer heat and can overheat. There should also be no crossing of wires with each other.
The wire from each outlet or switch should run vertically up to the ceiling. Then, at a distance of 10 to 25 cm from the ceiling, depending on the thickness of the ceiling (plaster, tension, plasterboard), a distribution box is placed and a horizontal wire channel is formed.
If necessary, a horizontal section can be laid - on the ceiling, under the floor, or horizontally to the floor, but not lower than 10-25 cm from it.

Such standards exist so that after covering the wires with cladding materials, you know at any time where they pass. Violation of this norm can lead to damage to the wiring and tragic consequences. If you decide to hang, for example, a picture on a wall or a cornice on a window, then you will know for sure that you cannot drill a hole above the socket or switch to the ceiling, or at a distance of about 10-25 cm from the ceiling. And in all other places it can be done safely.

At connection points (socket, box), be sure to leave a wire at least 25 cm long.
The choice of elements for fastening the wire to the wall today is quite varied. A single wire is best secured using this herringbone fastener. It has various shapes and sizes. You need to drill a hole in the wall, preferably not in mortar, but in brick, put this “herringbone” on the wire, and insert it into the hole. The wire is secured. For mounting a metal or plastic hose with a wire, there are also various fasteners.

When connecting wires to the distribution board, they must be marked, and masking tape must be attached indicating where exactly this wire goes.
5. Connection of wires.
Now attention! Important point.
Wires intended for lighting and sockets with a cross-section from 1.5 to 2.5 mm2 can be cut, connected and branched from them.
The wire intended for powering electric stoves, flow-through heaters, that is, for powering powerful electrical appliances, with a cross-section of 4 mm2 and above, cannot be cut, connected or branched. It must be solid and go directly from the shield to the device. In addition, for each such device you need to install a separate machine in the switchboard.

This rule must never be broken!
The order of connecting the wires is different in each case, depending on which consumers are suitable for each specific box.
But there is one iron rule that should never be broken.

Attention! A wire with a phase, and not a zero, must be connected to a circuit breaker or switch.
The connection of the wires must be reliable, safe and durable.
Simple twisting is prohibited by electrical installation rules. No matter how well it is made, over time the wires oxidize, the contact weakens, heats up and can lead to a fire. Twisting copper with aluminum is also prohibited, because this guarantees huge problems in the future.
And now about ways to connect the wires.

The first method is to weld wires with a welding inverter. First, twisting is done, and then its ends are connected by welding. But not everyone has such a welding machine at home.
The second method is crimping. Special sleeves of a certain size are placed on the wires to be connected and, using special press pliers, are pressed into the sleeve. But, again, not everyone has such pliers, and the simplest ones cost about $20.
The third method is soldering. The twisted wires can be soldered using a soldering iron with a minimum power of 100 watts, tin and solder. The main thing is not to overheat the wires at the soldering point so that the insulation does not melt. This method is more accessible at home, with, of course, certain skills.
After all these methods, the connection of the wires must be insulated with heat shrink or electrical tape.

All of the listed types of connections are reliable, but they are non-separable, labor-intensive, and are already outdated. Among other things, their implementation requires special equipment, and installers charge more for such connections.
Therefore, here I want to say a very important note.
Namely, why is there no need to use these wire connections in a house or apartment: welding, crimping and soldering?
Because any of the modern self-clamping terminal blocks manufactured by WAGO, and not Chinese fakes, can easily withstand the current that is used in a residential area. In addition, such a connection does not require any additional tools or insulation. Anyone can connect wires using a terminal block with their own hands. And if necessary, you can easily change the circuit, because the connection using terminal blocks is removable.
Again I ask for your attention. It is very important. In modern electrical wiring, cables with a cross-section of up to 2.5 mm2 must be connected only using terminal clamps, and machines with a maximum capacity of 16 amperes must be used for them.

And the cable from 4.0 mm2 and above, as you remember, I hope, cannot be connected at all, it must be led intact from the switchboard to the device.
6.Checking the completed electrical wiring.
It is imperative that after the electrical installation is completed, you need to once again check the correctness of the connection and connection of all wires visually. You can also check them using the device. For such a test, there are special devices on sale (and this is not a tester), but they are not cheap. Therefore, there is no point in buying such a device for your home; it is easier to check it yourself, spending an extra hour or two. If errors are identified, and this happens, it is necessary, of course, to correct them.
7. Assembly and installation of the distribution board.
The main thing that should be in the switchboard is a meter and circuit breakers - one general and several for consumer groups. It is advisable to install all other equipment, RCD, automatic circuit breaker, voltage relay, etc., in order to protect the lives of household members and the integrity of connected electrical appliances.
The main machine is needed to turn off the power to the entire apartment with one movement of the hand. And a difavtomat is needed to do the same action automatically.
The residual current device of the RCD is triggered if a differential leakage current appears in the network to which it is connected, when the insulation is damaged and a heating element or other element breaks through to the housing. If a person touches damaged wires or uninsulated parts of equipment, the RCD will instantly turn off the power to the network.

Remember that the RCD does not protect the network from overload and short circuit. That is why the RCD is always connected in series with the machine. These two devices work in pairs, so to speak: one protects against current leaks, the other against overloads and short circuits. If you turn on the RCD without a circuit breaker and connect phase and neutral, resulting in a short circuit, then the RCD will not work. And the wiring, if there are no other protection devices, will burn out along with the RCD.
A differential circuit breaker is a unique device that combines a circuit breaker and an RCD. That is, a differential circuit breaker can protect your wiring from short circuits and overloads, as well as from current leaks.
A voltage relay or UZM (multifunctional protection device) turns off the power supply when it leaves the range you set. This relay is installed to protect electrical appliances connected to the network from power surges in this network.
The circuit breaker must be accurately rated for the load. Here you need to apply the rule that it is better to install a machine with a lower power than a larger one. So that the machine would work earlier and turn off the power, so that the wire would overheat, a short circuit would occur and the wiring would catch fire.
Remember that the machine does not protect the electrical appliance connected to it, but only the wire that powers it, from overheating.
I have already spoken above about which machine needs to protect the cable with which cross-section.
The main mistake here is that people try to install machines with more power, which is why the wiring burns out and apartments burn out.
The wire does not heat up if a device of appropriate power is connected to it. Therefore, there is no need to set the machine’s power higher than the calculated one.
There are different categories of slot machines. I won't explain the differences to you.
All you need to remember is the following. For all sockets in the apartment, you need to use only machines with the English letter “B”.
For lighting, you can use category B and category C machines.
And for all other power devices, you can use category C machines.
Attention! Under no circumstances should category D automatic machines be installed in an apartment; they are intended for powerful machines and electric motors with high starting currents.
8.Installation of socket boxes.
A place for an installation box in a brick or concrete wall can be drilled using a hammer drill with a special attachment - a crown with a diameter of 70-75 mm. The required cable is inserted into the socket box.
The socket boxes are installed after all the necessary finishing work has been carried out on the walls. That is, we drill a hole for the socket box on a bare, untreated wall, and install the socket box on the wall with a complete and finished finish.
The process is simple. The hole for the socket box, in a brick or concrete wall, is filled with a quick-hardening solution, it can be a solution of building gypsum.
Then the socket box or junction box must be inserted into the hole, aligned with the wall surface and horizontally using a level so that the socket does not protrude from the wall and is not skewed to one side.
In plasterboard, a hole for a socket box is cut out with a special cutter with a diameter of 68 mm and secured using side clamps.
9. Installation of sockets and switches.
There are no special tricks here. You need to remove the top cover of the socket or switch key. Connect the wires to the terminals, having previously cut them to a length of no more than 10 cm. Lay the wires on the bottom of the socket box. Insert the device into the socket until it stops. Secure the device to the socket box with screws and tighten the bolts in the niches on the sides that press the special fastening tabs to the socket box until they stop. Then reinstall the socket cover or switch key.
After installing the sockets, switches and panel, we apply voltage to the electrical wiring and check the correct operation of all sockets, switches and machines.
10. And lastly.
You can do electrical wiring in your house yourself, especially for a person who knows what zero is and what phase is. But there are many different nuances here that even the so-called experts in this matter do incorrectly. For example, when building a summer house, it was only on the fourth attempt that I found a proper electrician. Electrical installation is a very important section of work that should not be trusted to non-professionals.
If you decide to hire an electrician, ask him how he plans to carry out the work and what tools he has for this. Real electricians have a whole set of special tools to carry out all types of work on electrical wiring. And if electricians come to you and they have one hammer between them and it was borrowed from a neighbor, then drive them to the neck.
Ask the technician where he has already installed the wiring and ask the owners about the results. By the way he places an order for consumables, you can understand his qualifications and draw conclusions. After the installation begins, carefully monitor its operation, based on the recommendations that I told you about in this video.
And if you want to do your own electrical wiring, also follow these rules.
What is not clear, ask in the comments and you will succeed. Remember that successful electrical installations depend on being careful, attentive, and following instructions.
Select the right wires, the power of the machines, and try to do high-quality electrical installation with your own hands.
Video. How to do electrical wiring in a house?