DIY garland of plastic lids. Original crafts from wine and plastic corks - photo ideas, instructions, tips
Recently, handmade things and crafts, the so-called handmade, which can be made from anything, have become increasingly popular. Plastic plugs did not stand aside and received their second use in original design ideas.
Plastic bottles are available to everyone without exception and are certainly found in every kitchen.

Many people try to immediately throw them away, but there are also creative individuals who, using various life hacks, use them for decoration or useful devices for the home or garden, as in the photo of crafts made from corks.

Today we will talk about crafts made from plastic corks.

Using plastic caps in children's creativity
Children are great dreamers by nature. Give them any object and they can easily transform it into another image. After all, from a very young age, both at home and in the children's group, children are instilled with an interest in handmade crafts.
Plastic bottle caps are an excellent material for children's creativity. Corks can be easily glued, thanks to which various panels, figures and decorative things can be created.

The kids love to tinker with traffic jams and fantasize about various topics: appliqués, toys and figures.

Types of applications
The most favorite craft made from plastic corks among children is a caterpillar. Delight your child by making it out of colorful corks and lengths of his own, and he will play with it all day long.

The caterpillar's face can be made funny, which will inspire the subject. The caterpillar is made very simply, a hole is made in the center of the corks, a fishing line is threaded through it, on which the corks are strung, the muzzle can be made from a Kinder Surprise cone.

Using the same principle, you can make a person, a cat, a dog, etc.

To make a “bird” craft from bottle caps you need: two caps, cardboard, light fabric or natural feathers, such as pigeon feathers. The head and body are made from corks, and the wings are made from cardboard, fabric or feathers.

The “rabbit” applique is made in the same way as the “bird”, the body and head are made of caps, one of them should be of a larger diameter, the ears are made of cardboard and the tail is made of a piece of fur. Children are delighted with such toys. The main thing is that you can do this together with your child.

A three-dimensional “turtle” craft made from corks with your own hands will interest a child more than an applique. It's not difficult to do.

The necessary materials for creativity you will need: a large diameter lid, cotton swabs and an ice cream stick. A lid is glued onto an ice cream stick and green-colored cotton swabs placed crosswise on top.

Specks are drawn on the lid and eyes are made. Your masterpiece is ready. In the same way, you can create spiders, ladybugs, bees, etc., using various available materials.

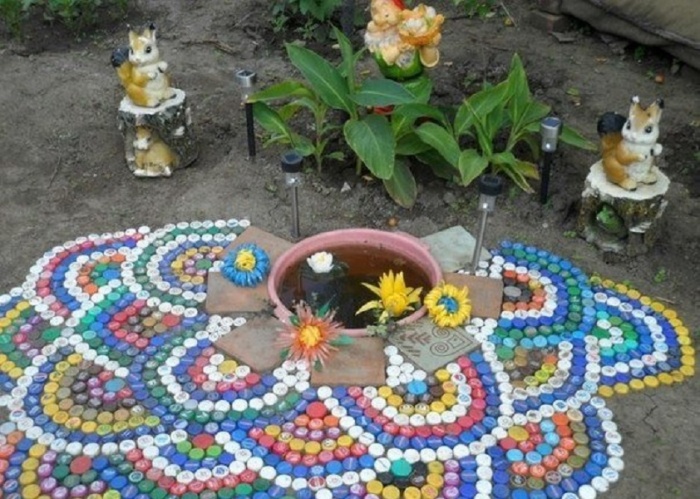
Mosaic of traffic jams
You can build a mosaic panel from a large number of multi-colored corks. To do this, in addition to corks, you will need good glue or a glue gun so that the composition does not fall apart in the future.
Note!


First of all, choose a surface for creativity, decide on the image and get to work. The panel parts are attached by gluing them one by one to the prepared surface. If you want to mount them from the reverse side, then you will need screws to secure them.

An interesting solution for the panel would be the option of folding lids of different sizes one into one according to the matryoshka principle. For example, a yellow sun made from such folded lids looks great.

The “cockerel” craft is also entertaining, but requires some skills and time. To do this, you need to make a plywood base, prime it, apply an outline and use glue to fix the plugs according to the image diagram. The result is an original creation.
Magnets
An ideal option for beginners would be making refrigerator magnets. Nowadays, almost all refrigerators are decorated with all kinds of magnets and not only to hide any defects.

Making them will require very little time and the following materials: corks of different colors, magnets themselves, glue, alcohol solution, paints, multi-colored paper, felt-tip pens.

Note!

First, degrease the cork with alcohol. Glue a magnet inside the cork. We cover them with circles of colored paper, cut out in advance.

You can decorate multi-colored circles with names, drawings, letters or bows ahead of time too. Use letter circles to create a fun alphabet. You can also make a picture using certain Internet resources as assistants.

Foot massage mat
One of the most popular craft options is a foot massage mat. Making a rug is an easy and simple process using multi-colored corks. And subsequently the rug looks bright, unusual, and its use is good for health.

Walk on it for about 15 minutes a day to achieve relaxation and general strengthening of the body, due to the impact of walking through traffic jams on the nerve endings of the feet.

Prepare multi-colored corks, an awl, and thick fishing line. For a hexagon-shaped rug, you will need 10-15 pieces of corks on one side. The total number of stoppers per product can be calculated as follows: multiply the number of stoppers on one side by the number of sides of the rug and subtract the number of repeating stoppers.

Note!

Then make 6 holes in all the plugs with an awl. Next, using the weaving method, starting with the outer plugs, you should braid all the parts to form a hexagon. A rug made of multi-colored corks in the shape of flowers will have a beautiful appearance.
Hallway rug
A hand-made hallway rug would be practical for everyday use. Using a glue gun, bottle caps are glued together in any shape and form; colored caps are used to add brightness. It is easy and simple to clean from dirt.

But it also has its drawbacks: it can scratch the linoleum surface, so it is better to use it for tiles.

For example, in the bathroom. If the mat will slide on the surface, it should be secured with rubber circles on the back side of the mat.

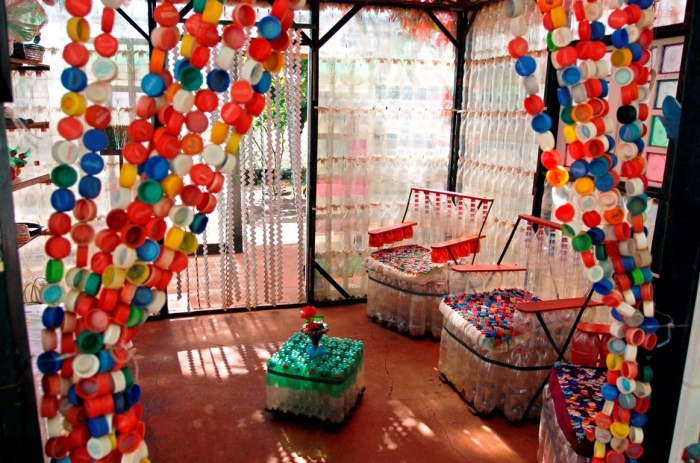
Country curtains for doorways
At the dacha you can find many options for using both bottles and the corks themselves. Here fantasy has no limits. But the most popular idea is to decorate doorways with curtains made of plastic corks; this is financially economical and easy to manufacture.

And as a result - beautiful unusual curtains. To do this, you need a large number of multi-colored caps, fishing line, an awl, a hammer, a nail and a needle.

The step-by-step scheme for making curtains looks like this:
- Holes are made in the lids on both sides.
- If the curtains are made according to a pattern, it is necessary to lay out the covers in accordance with it.
- The corks are strung on a fishing line of a certain length, you should start from the bottom of the 1st row up, and then immediately move to the 2nd row.
- Secure with knots, singeing the edges of the fishing line.
- String row 3-4, row 5-6, etc., as in step 2.
- Be sure to mark the transition from one row to another to make the work easier.
- Markings are made on the doors for attaching curtains with equal intervals between them.
- The curtains will be secured to the wooden door with stoppers for fastening, according to the markings.
- The first thread (row 1-2) and fix it on the door with a hammer and nails.

Crafts from corks for the garden
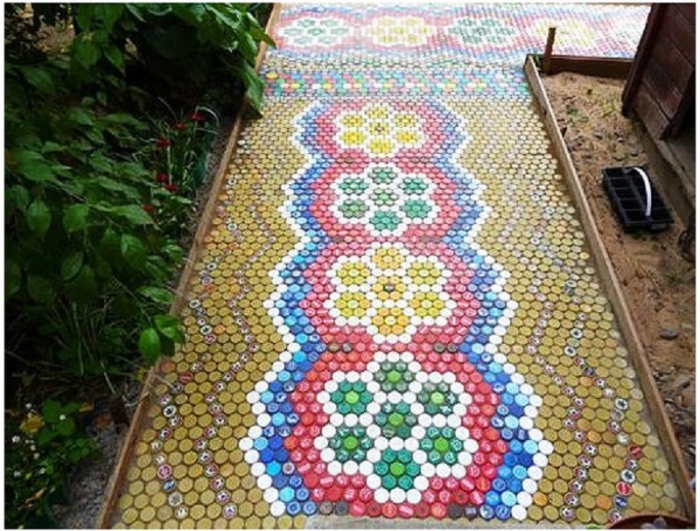
You can decorate your summer cottage with paths made of plastic corks. But do not forget that such paths have a decorative function of paths, and not a fundamental one. In winter they are very slippery.


For this you will need: large quantities of corks and different colors, sand, construction glue, boards, cement.

The procedure for creating garden paths is as follows:
- The first step is to make markings for laying the plugs according to certain sizes and in the designated place.
- The top layer of soil is removed and a trench is dug 10 cm deep. Formwork made of wooden boards is installed in the trench, into which about 5 cm of sand is poured.
- A cement mortar is made from sand and cement (1:4) with the addition of glue.
- The solution is poured into the trench, and plugs are pressed into it according to your sketch image. This is done carefully and evenly, at the same level, leaving only the top of the plugs without cement.
- After the cement mortar has been adhered, its remains are cleaned from the surface of the path with a stiff brush.
- At the end of the work, the formwork is removed.
- Curbs are being installed.

Using the same principles, using your multifaceted imagination, you can make other crafts using wine corks, but that’s another story.

Photos of crafts made from corks


Want to know what you can make from plastic bottle caps? Then let's look together at the most popular and interesting areas that home craftsmen have already mastered. And many photographs and diagrams will help us verify their availability and ease of manufacture.
From paintings to garden furniture
Plastic cork has several amazing properties that make it an excellent finishing or even building material.
- Strength. A round patch with a side elastic wall around the perimeter is not so easy to deform;
- Cheapness. What is the price of a cork? In fact, none, since it is received along with the bottle and its contents;
- Easy DIY processing. Plastic is easy to cut and make holes in;
- A wide range of colors and shapes.

- Durability. Without intentional recycling, plastic will easily outlive more than one generation of people.
Of course, not everything is so smooth, because although this material in itself is not worth anything, you will have to try to get it in large quantities. You won’t buy several cases of soda just to make a craft, will you? But, gradually putting aside from each empty container, over time it will not be difficult to collect the corks.
To speed up the process of accumulating the necessary bottle caps, connect your relatives and friends to it. It will be easy for them, and you will ultimately be able to start working much earlier.
And now, when you already have a sufficient amount of material on hand, you can take the following directions for creative activity:
Direction No. 1: decorating fences, walls and furniture items
These can be either real paintings or less complex ornaments. The principle of their manufacture is simple:
- Post it on a flat area there is an image of multi-colored caps. The abundance of shades allows you to create quite expressive patterns using this method;

- Transfer the resulting ornament on cardboard or immediately on a wall or fence. Most often, glue is used for this, but you can also use nails, screws, or other methods of attaching the lids.
And here are the resulting pictures from plastic bottle caps:
| Photo | Description |
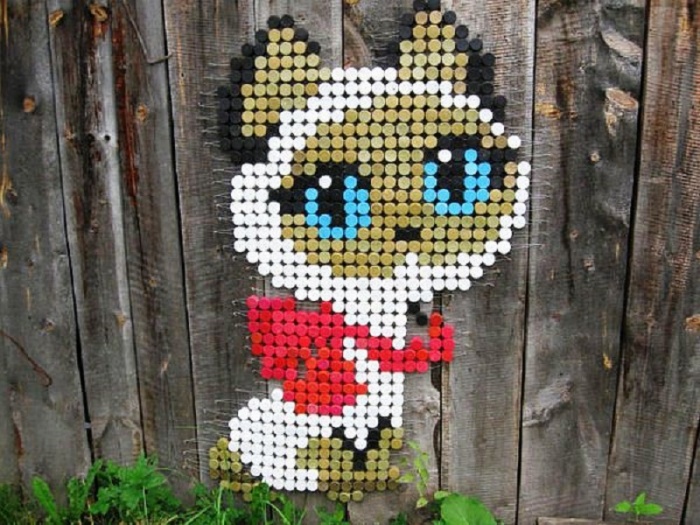
 |
Adorable cartoon animals They will enliven a plank fence and will surely appeal to children. |
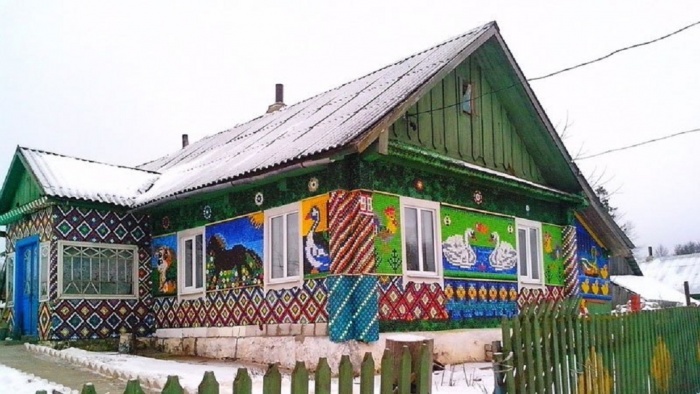
 |
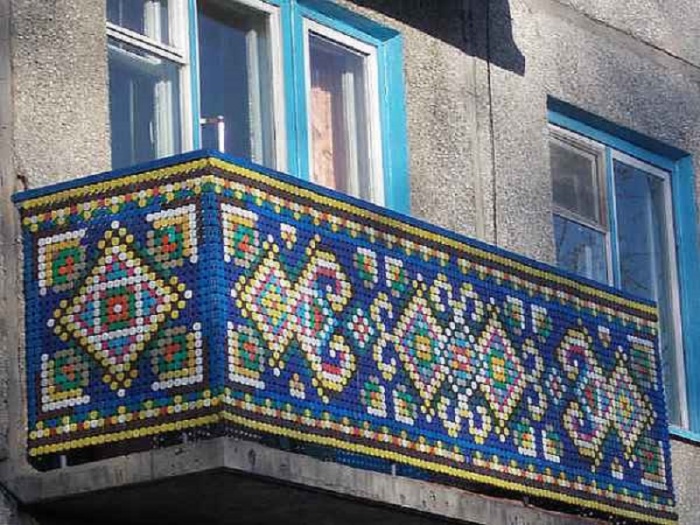
Mosaic of complex geometric patterns, reminiscent of embroidery, can decorate the facade of a village house. |
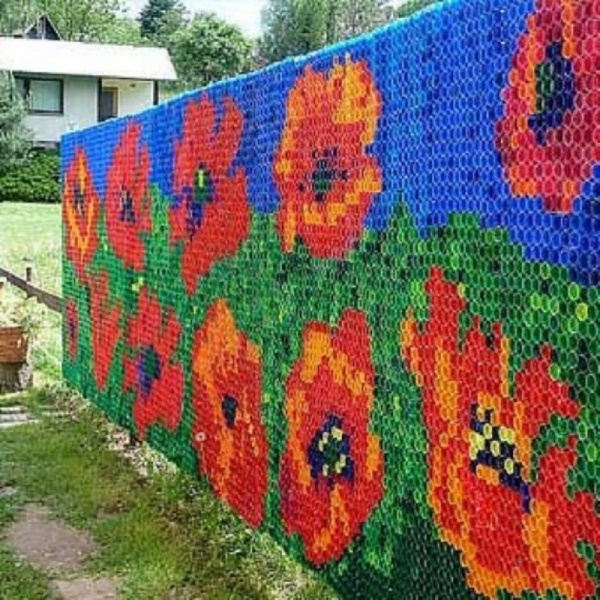
 |
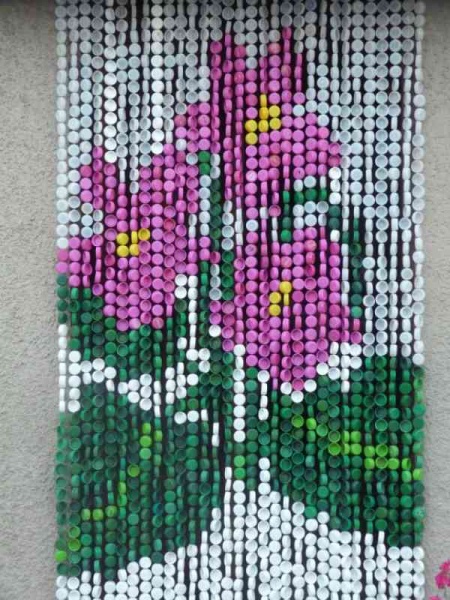
Panel of poppies will turn the fence into a real work of art. |
 |
Creating a Portrait will require artistic talent and a large number of different caps from plastic bottles, but it is also possible. |
 |
Lighting fixture lampshade You can also decorate with a composition of multi-colored lids. |
Direction No. 2: rug
Rugs can be made using two technologies:
- Glue the cork ornament onto a cardboard sheet. The progress of work is similar to that carried out when decorating vertical surfaces. But the finished product in this case will have a significant drawback - fear of water;
- Connection with fishing line. In this case, you will have to work harder, but in the end you will get a moisture-resistant, easy-to-roll mat.

When using the second method, do this:
- Burn through the corks have six holes around the perimeter;
- Tied up them with pieces of fishing line according to the following pattern:

If you turn over a mat made from corks, it will immediately become a massage mat, since in this case you will have to come into contact with the sharp edges of the lids.

In the same way you can make coasters for hot dishes in the kitchen:

Direction No. 3: toys, souvenirs and decorations
Crafts made from plastic bottle caps can also be used as souvenirs, garden decorations and even children's toys. To create such products, you usually do not need as many caps as in the cases described above, but additional materials may be required. Here are some illustrative examples:
- Dragonfly. Hangs on a tree branch, thereby enlivening the interior of your garden. It is made in three steps:
| Photo | Description |
 |
|
 |
Cut it out wings from a plastic bottle. |
 |
|
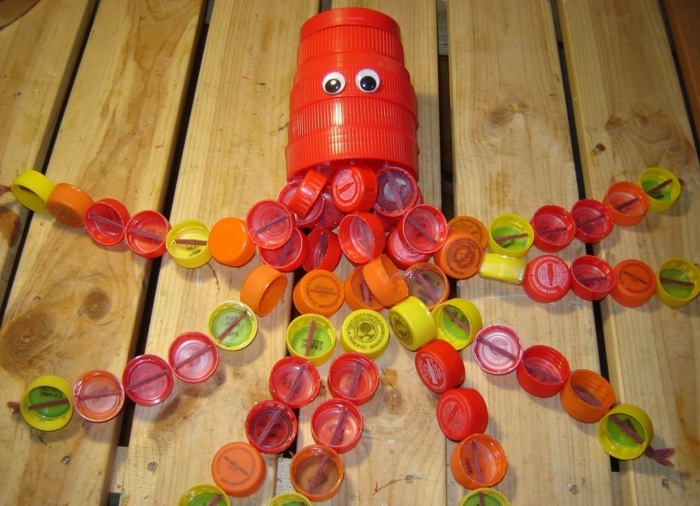
- Octopus. You can even play with this friend in the bathroom. It is also easy to do: just secure eight pieces of fishing line or rope in a small cylinder or cone and put caps on them that will form the legs;

- Snake. If you use an egg from KINDER SURPRISE as a head and attach a garland of corks to it, you will get an excellent snake;

- Watch. Of course, you will also need the clock mechanism itself, but in the end you will become the owner of an original-looking device.

Crafts made from plastic corks have recently gained recognition among lovers of original things due to their ease of implementation. After all, there are plastic bottles in every home. Therefore, do not rush to part with them, but turn on your imagination and start decorating your home or garden plot.
As you know, children have a very well developed imagination. They can create anything from whatever materials they have at hand. The thing is that from early childhood, parents and kindergarten teachers develop their interest in crafts.
A material such as plastic corks is perfect for children's creativity. They are good because they stick to any surface, which means you can create all kinds of pictures and shapes. Children really like crafts made from plastic corks, and they are happy to make voluminous and interesting products.
Usually from d Using this material, they make 3 types of crafts: appliques, toys and figures.

The easiest applique to make is a caterpillar. It can be any size and color. You can complement it with a beautiful background and various small details. For example, make a sun and a flower as a background by gluing corks together according to the design.
Another interesting applique is birds. To do this you will need 2 covers for the head and body, as well as cardboard, fabric or real feathers for the wings.
You can make a wide variety of crafts from plastic bottle caps, trusting your imagination or displaying them step by step in pictures.
So, you can make an applique, for example, in the shape of a rabbit. It is made in the same way as the bird, with two lids of different diameters, cardboard for the ears and a small pompom for the tail. In this way, you can create any animals that your child likes.
Three-dimensional crafts are also easy to make and look more interesting than appliqués. Try making a turtle.

To do this you will need a large lid for the shell, cotton swabs for the limbs and an ice cream stick for the body. They need to be painted green or any other color, glue the lid onto an ice cream stick and crossed cotton swabs, draw spots on top, attach eyes - and the funny turtle is ready.
The same principle is used in making spiders, but instead of cotton swabs, you can use pieces of chenille wire.
A child can easily make crafts in the form of ladybugs or bees, which are done by painting the lids with appropriate colors. The antennae can be made from black fishing line, and the wings from cardboard.
Using fishing line and wire, you can get a snake by stringing plugs on them.

Mosaic panels made of plastic corks
Mosaic compositions made from bottle caps are also especially popular. To create such paintings you need many lids of different colors. The work is absolutely easy to do - by gluing the plugs together.
Important! The glue must have increased tenacity; alternatively, you can use a glue gun.
The parts are attached to the base. If you fasten them with the reverse side, then it is advisable to screw them to the base with screws.
If you have a lot of plastic corks of the same color, say, yellow, then you can make a sun-shaped craft out of them. It will look interesting if you take lids of different diameters and put them together.
You can make a cockerel craft from a large number of multi-colored plastic bottle caps. True, some skills will be needed here, and such work will take much more time, but the result will be an original picture that will delight you for a long time.

A piece of plywood is suitable as a base, which must first be opened with a primer, then an outline is applied and the plugs themselves are glued according to the drawing diagram.
Magnets made from plastic bottle caps
If you have just decided to try your hand at this exciting activity, then the simplest crafts made from plastic bottle caps look like ordinary magnets, which can be found on the refrigerator of every housewife. After all, we need them not only for beauty or for attaching lists, but also to disguise possible defects formed on the surface of the equipment. You won't need too much time to make them.
Materials needed to make magnets:
- multi-colored corks;
- magnets (can be purchased at a craft store);
- glue;
- alcohol;
- paints and colored paper;
- colored markers or pencils.

First of all, you need to completely degrease the cork with alcohol. Then place a magnet on the glue inside. From colored paper, cut out circles of exactly the same diameter as the cork itself. Write letters on the resulting blanks and secure them to the bottom of the cork. You can additionally decorate the magnet with a small bow. The result is a bright and fun alphabet. Using this method, you can also assemble a picture by cutting out circles of the required diameter and different shades. The description of this craft made from plastic corks can be found out in more detail from the master class on specialized websites on the Internet.
Cork mat as a foot massage
One of the most popular DIY crafts made from plastic corks is a massage mat. You don’t need to put in much effort to make it, and it looks very unusual and attractive, especially from multi-colored corks. This product has certain benefits. Even doctors recommend walking on such mats every day for 15 minutes to improve health. Because massage has a relaxing effect. The principle of its operation is that when walking on it, the nerve endings located on the feet, which are responsible for certain organs, are activated. This massage is a kind of exercise for the whole body.
To make it you will need:
- plastic stoppers;
- awl;
- strong fishing line.
Each side of the hexagonal mat requires 10-15 plugs. In order to make the correct calculation, you need to multiply the number of plugs on one side by the number of sides of the product and subtract the number of repeating plugs. Once you have the required amount ready, you should make 6 holes in each part using an awl. The outer plugs need to be assembled onto one line. Next, you should firmly braid the lids with fishing line, forming a hexagon. And to make the rug pleasing to the eye, you can use covers of different shades, which will create a whole picture. You can select a pattern for a craft made from plastic bottle caps from a photo on the Internet, focusing on the selected image, you can post it in advance, and then proceed directly to the assembly itself.

Corridor mat made of plastic corks
Among the original and at the same time practical handicrafts made from the caps of plastic bottles is a rug for the corridor. It is made by gluing the lids together with silicone glue in a glue gun. You can make any pattern; to do this, you only need to take corks of different shades to make the product colorful.
Attention! The main advantage of the material used for the rug is its ability to easily and quickly clean off various types of dirt.
However, in a room where linoleum is located, it can cause harm, since the edges of the covers are quite sharp and can scratch the coating. It is recommended to lay such a rug on tiles, which means it is suitable for the bathroom.
Plastic is characterized by such properties as wear resistance, so it will withstand any temperature and humidity. The only thing that might suffer is the color. However, if desired, you can restore it by painting it with special paints, or make another one from new covers, because, as mentioned above, this material is very cheap. Therefore, crafts from plastic corks can be made very often and always different, experimenting with colors and shapes.

Thread curtains - decoration of a country house
Crafts made from plastic corks can be very diverse. It all depends on the richness of your imagination. However, one of the most interesting and original ideas that can be found on the Internet are thread curtains made from lids, which is especially important for those who have a summer house. Such a product will save your budget, since it does not require any special costs, and they are easy to manufacture. The result is unusual thread curtains.
All you need to make them are caps in large quantities; you can use one color or different shades if you are planning some kind of pattern. It is important to note that its design should be selected in an elongated shape. You also need: fishing line, a hammer, nails, an awl, and if the need arises, also a needle.

Cork curtains are made in the following sequence:
- Use an awl to make holes in the lids on both sides.
- Lay out the parts according to the drawing; you can keep it near you when stringing the corks.
- String 2 vertical rows onto a long fishing line, starting from the bottom of the 1st, moving to the 2nd.
- If you tie the result on both sides with knots, you can singe the ends of the fishing line.
- String the third-fourth row, the fifth-sixth and the seventh-eighth according to the same principle.
- To make it easier to assemble the curtains, it is advisable to make some kind of mark when you move to the next row.
- If the door frame is wooden, then the product can be attached to it by nailing separate fastening plugs.
- Before attaching the plugs, you need to make markings, determining the same distance between them.
- Take the first thread with the first and second rows of caps. Find the middle mark, which marks the transition from row to row.
- Nail an additional cover to the door frame, while the head of the nail should protrude from the wood, and the first thread should be hung on it in the middle. Then hammer it in completely.
This design will also look good in a summer shower at the dacha, due to its density.
The imagination of folk craftsmen knows no bounds; the results of handicraft amaze the imagination with the variety of forms and methods. Recently, there has been a tendency to make crafts from plastic lids; fortunately, there is always enough material at hand. Let's look at the most popular methods of using and designs for plastic bottle caps.
Children's crafts
Even children can create interesting crafts from plastic bottle caps. The simplest option is original magnets.
To work, you must ensure that you have the following materials:
- multi-colored corks;
- small magnets, which can be found in craft departments;
- double-sided tape or glue;
- colored paper;
- alcohol;
- felt-tip pens, pencils and paints.
Alphabet
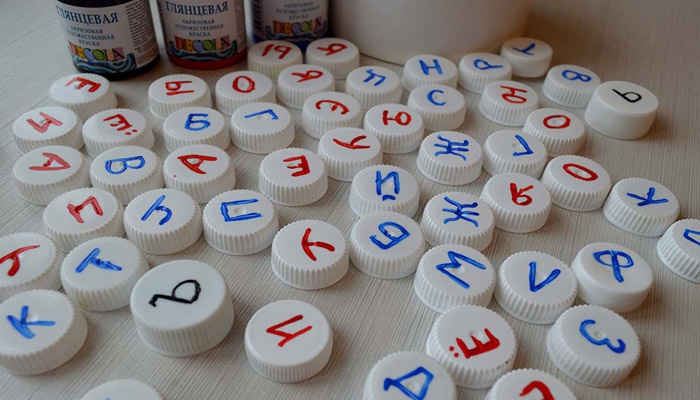
A craft in the form of an alphabet set made from plastic caps will be a useful tool in teaching children the alphabet. Basic manufacturing steps:
- The bottle cap is degreased with alcohol.
- The magnet is fixed to the plastic plug with tape or glue.
- Circles with a diameter corresponding to the size of the lid are cut out of colored paper.
- Letters are written on the blanks.
- The parts are glued inside the lid.
Advice! The craft is very convenient to use on a magnetic board.
In a similar way, create a craft in the form of an arithmetic set.

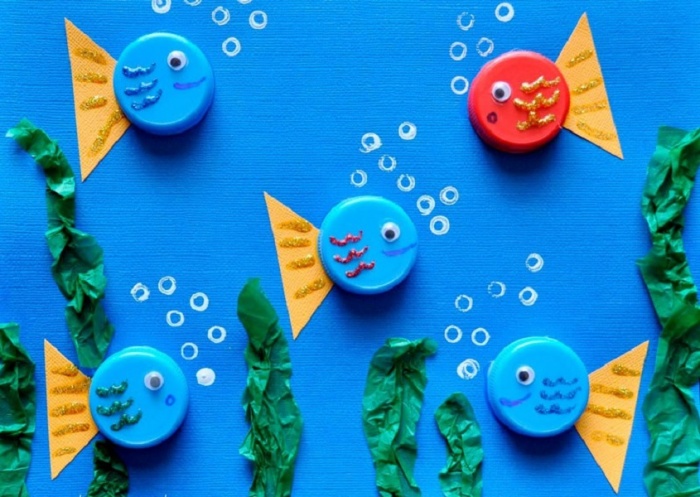
Aquarium
An aquarium made of fish based on plastic lids looks original. Depending on the age of the child, parental assistance may also be required. The process of creating an attractive craft includes the following steps:
- Small triangles made of colored paper will serve as tails.
- They are glued in random order onto a sheet of blue cardboard.
- The tails are complemented by plastic plugs, which are fixed with glue or double-sided tape.
- Fish eyes are decorated in various ways: plastic blanks are glued, drawn with a marker, or parts are cut out and pasted on from colored paper.
- The basis for various algae is green paper.
- Bubbles applied with a stroke will add more realism to the craft in the shape of an aquarium with fish.
At the final stage, the craft can be supplemented with an applique in the form of a fairytale castle or sea stones.
Mosaic
A mosaic made from plastic bottle caps is another version of the original craft. The need for a large number of traffic jams can become an obstacle, so friends and neighbors are often enlisted to help with collection. There are several options for making mosaic-shaped crafts; the main difference is the surface on which it will be located.
Independent unit
This type of craft made from bottle caps is rare. The design principle is quite simple. Initially, a sketch of the future craft is created on a sheet of cardboard, drawing all the multi-colored elements. Based on the sketch, the plugs are fastened with plastic glue.
Comment! Mosaic designs are chosen to be simple, without a lot of ornate details.
Paintings on houses and fences
Much more often, mosaics decorated with lids are found on wooden fences. There are several creation options. As in the previous case, you should make sure in advance that you have a sketch with drawn color markings. Cross stitch blanks can be an excellent assistant in this matter.
The first method is to glue plastic bottle caps onto plywood in accordance with the selected image. After which the entire part is fixed to a fence or wall of a wooden house.
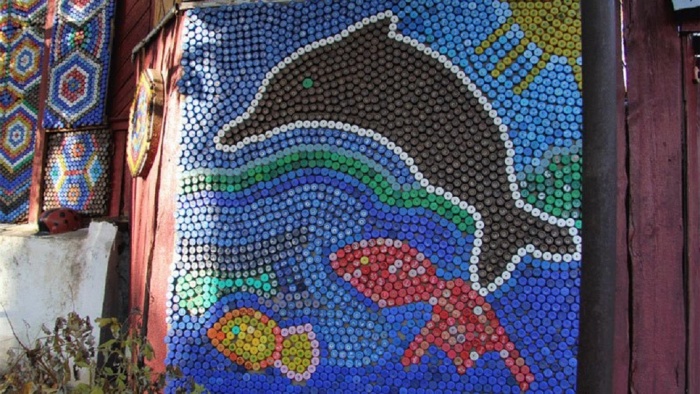
The second method is to initially prepare holes on all plastic lids. This work is quite labor-intensive; it is better to do it with a hot awl. The corks are then strung in rows on wire. When all the elements are assembled, each row is fixed to the wall or fence with nails. Vivid examples of paintings made from bottle caps are presented in the photo:

Another popular way to make mosaic-shaped crafts is to attach plastic lids to a wooden surface with nails. Naturally, having a pre-drawn image is necessary. Nails are selected with a small head of length corresponding to the thickness of the wooden base. Bottle caps can be nailed on the inside or outside.
Comment! The second option is preferable, since fastening from the inside causes a lot of inconvenience at the fixation stage. In the future, the lids quickly become clogged, and the craft loses its original attractive appearance.
A concrete or brick wall requires a different approach when creating a craft in the form of a picture based on plastic bottle caps. Here you will need a special solution designed for laying ceramic tiles. To save money, you can prepare your own cement mixture. Bottle caps are attached gradually, treating a small area of the wall with the solution. It is important to choose the right consistency of the adhesive, otherwise the plastic lids will move down and the craft will turn out sloppy.
Subsequently, the gaps between the plugs can be sealed with a solution, this will extend the life of the craft and give it greater aesthetics. Masterfully crafted do-it-yourself bottle caps are shown in the photo below:
A few more original ideas
Corks are a universal material. They even learned to make massage mats and decorative paths for the garden from them.
Massage mats
A mat made from plastic bottle caps perfectly relieves muscle tension after a hard day. The craft is useful both for the back and for massaging the feet. Here you need to be patient. The principle of creation is similar to the design of an independent mosaic:
- A geometric pattern is often chosen for a rug, although this is not at all necessary.
- The image is drawn on paper with all the colorful lines reflected.
- Each bottle cap is pierced with an awl at four points arranged crosswise.
- Next, the selected pattern is formed from plastic plugs.
- The parts are alternately strung on a fishing line in rows.
- A rug of lids can be assembled all at once using the snake principle, or you can string individual rows and then fix them together.
- The ends of the fishing line are bitten off or carefully set on fire.
This method is suitable for creating various crafts from bottle caps: coasters for cold dishes, rugs for the hallway or shower.
Garden paths
Another area of application for free material is tracks made from plastic bottle caps.
Attention! Experienced users warn about the slipping of the surface from the covers during the frosty period, so the paths are located in that part of the garden that is not used for walking in winter.
To work you need to prepare:
- A large number of plastic bottle caps.
- Sand with cement for mortar.
- Construction adhesive.
- Wooden elements for formwork.
Registration process:
- In the back, the outlines of the future path are marked.
- If there is grass, the top layer of turf is removed and a trench 10 cm deep is dug.
- Formwork is formed from wooden elements, fastened with nails.
- When preparing the solution, glue is added to the mixture of cement and sand.
- The composition is spread over the surface in a small area, after which the bottle caps are carefully pressed into the uncured mixture. The plugs go deep to the base.
The main rule of a labor-intensive craft is to achieve the same level of plastic lids. When the solution dries, the remaining cement is removed with a stiff brush. At the end of the work, the formwork is dismantled.
The following photo will help you enjoy the beauty of paths made of plastic bottles:
In addition to the proposed craft options, curtains for a country house are often made from lids.
The main thing is to show your imagination, and the fascinating process will lead to the creation of individual masterpieces from bottle caps.
Not only in dachas, but also on city streets you can see panels made of plastic lids - often made also as a call to save the environment.

Many owners of suburban areas like a variety of crafts made from plastic bottle caps. If you look at their creativity from the outside, it may seem that there is an unspoken competition for the most original idea. Craftsmen from the people create amazing things, but they complain that the material, although cheap, takes a long time to assemble. But when there are enough traffic jams, real masterpieces emerge from the hands of craftsmen.
Vernissage made of plastic corks
Let's take a walk around the dachas and see what our neighbors have done there.
A board fence is boring. Shouldn't we decorate it with a mosaic of corks? Planned, done. A dacha decoration made from the caps of plastic bottles in the form of a multi-colored panel along the fence clearly requires a lot of patience in both collecting and applying the corks to the wooden base. Particularly stubborn owners decorate the walls of houses with plastic bottle caps, turning them into fairy-tale towers.
Another popular product is summer curtains made from cork. They can be plain or colored, with floral or geometric patterns.
From white corks you can assemble a lampshade for a lamp on the veranda, and colored ones are suitable for decorating a garden table.
The theme also includes crafts in the shapes of animals and flowers. Butterflies, dragonflies, and caterpillars inhabit benches and trees; daisies and seven-flowered flowers complement compositions of fresh flowers and serve as decoration for children's playgrounds.
Cork mosaics are used to decorate the garden and the interior of the house. They also make garden paths.
As you can see, in most cases, corks are used as a finishing material, but their capabilities do not end there. Armed with fishing line and an awl, people sew door and massage mats from them. Let's try to make such a rug.
Mastery Lessons
Understanding that right now you don’t have 2-3 bags of corks stored at home, we will only tell you how and what garden crafts you can make from bottle caps with your own hands. All you have to do is choose the idea you like and start collecting material.
Massage Mat
At the dacha we not only relax, but also work hard. By the end of the day, your legs get tired and require rest. To help them get back to normal faster, we’ll make a massage mat from plastic bottle caps for the dacha, and consider two options.
First way
We will need:
- sheet of cardboard (any size)
- glue "Moment"
- corks (the quantity is determined by the size of the cardboard in order to completely fill it with corks)
On the prepared cardboard, row by row, glue the corks with the inside facing up. We are waiting for the glue to dry and the rug is ready. Its only drawback is that it is afraid of moisture.
Scheme for making a small massage mat.
Take 19 caps (colors of your choice), burn 6 holes in each and fasten with fishing line in four steps (shown by lines of 4 colors)
To create a more reliable design you need to take:
- traffic jams
- fishing line
- awl (you can use a nail or a knitting needle)
Let's start weaving:
- In each lid we make 6 holes with a heated awl or nail, placing them evenly around the entire circumference.
- The shape of the rug is hexagon. The length of one side is equal to 10 covers. This means that the outer side of our rug will consist of 54 covers.
- We assemble from the edge to the center of the rug, passing the fishing line, as shown in the figure.
- The weaving pattern is shown in a small fragment, but it is not difficult to transfer it to the full size of the product. For clarity, each stage of weaving is shown with colored parts of the fishing line; it is clear that there is only one fishing line in the work.
- Having finished weaving, we secure the end of the fishing line by melting it.
Advice!The mat can be used both as a massage mat and as a door mat, just turn it over.
The same weaving method can be used to make a bag and a mug stand.
Fun crafts
Various cork figures are suitable for decorating a summer cottage. We don't need robots, but flowers and insects will fit organically into the countryside landscape. We will do them.
Dragonfly
Let's take for work:
- 4 blue caps and 2 green caps
- one clear plastic bottle
Garden decoration made from plastic dragonfly lids - step-by-step instructions.
Glue the dragonfly's body from four covers, glue two eyes of a different color. We cut out dragonfly wings from a plastic bottle and paint them with acrylic paint.
We glue the corks together, giving them the shape of a dragonfly's body. Cut out wings from a plastic bottle. They can be left transparent or streaked with acrylic paint. We make two holes in the central part of the wings, thread a fishing line through them and attach the dragonfly to a branch of a tree or bush.
Flower
For the flower we need:
- 7 corks (choose the color to your liking)
- branch, 20-30 cm long (to guess its diameter, try the lid on the cut of the branch, it should fit tightly)
- waterproof glue
Plastic bright flowers for the garden can be made using the technique quilling(by cutting the petal base strips from the bottles) or as indicated in the step by step guide below
Let's start assembling the flower. Glue the corks together to form a chamomile-shaped inflorescence. We wait until the lids set well and turn them over with the inside facing up. Apply glue to the central plug and press the cut of the branch against it. Let the glue dry and “plant” our flower in a flowerbed, under a tree or along a path.
Panel or mosaic
When thinking about how to decorate your dacha with caps from plastic bottles, you can take on a large-scale project and line the fence with caps. It is difficult to give step-by-step instructions in this matter, but general recommendations will be useful.
First of all, we need to resolve the issue with the future drawing. Make a rough diagram on paper. You can build panels by repeating the same fragments, or you can “paint” a whole picture with corks.
The main problem in such a project is collecting the required number of traffic jams.
Advice!Involve your loved ones and friends in collecting caps. You can even divide the colors of the corks between them. Some will collect green, others yellow, and others red.
If everything goes well and you become the owner of a large supply of caps, draw the contours and details of the picture on the fence with colored paint.
You can lay out the covers in two ways: with glue or with screws. Please note that if you choose screws, you will need as many of them as plugs. Accordingly, we glue the plugs to the fence with the bottom side and screw them through the top side.
A working clock mechanism can be put into action by making a dial for it from covers, of different sizes - this will give a greater decorative effect
Options for decorating your dacha with bottle caps can be found here: